Anatomy of a Game Engine by Richard Baldwin - HTML preview
Download the book in PDF, ePub, Kindle for a complete version.
Figure 6.14. Listing 9. Source code for the program named Slick0150a.
Listing 9. Source code for the program named Slick0150a.
.
/*Slick0150b.java
Copyright 2012, R.G.Baldwin
Cause a ladybug sprite to bounce around inside the game
window.
A random time delay is inserted in the render method to
simulate a situation where the rendering process is very
complex and the time to render varies from one frame to
the next.
The program attempts to maintain a constant physical
speed as the bug moves across the game window despite
the fact that the delta varies quite a bit from one
frame to the next. The step size varies in proportion
to delta or inversely with frame rate.
Tested using JDK 1.7 under WinXP
*********************************************************/
import org.newdawn.slick.AppGameContainer;
import org.newdawn.slick.BasicGame;
import org.newdawn.slick.GameContainer;
import org.newdawn.slick.Graphics;
import org.newdawn.slick.Image;
import org.newdawn.slick.SlickException;
import java.util.Random;
public class Slick0150b extends BasicGame{
Random random = new Random();
Image bug = null;
Image background = null;
float backgroundWidth;
float backgroundHeight;
float bugX = 100;//initial position of ladybug
float bugY = 100;
float bugWidth;
float bugHeight;
float bugXDirection = 1.0f;//initial direction to right
float bugYDirection = 1.0f;//initial direction is down
float xStep = 4.0f;//horizontal step size
float yStep = 3.0f;//vertical step size
float bugScale = 0.75f;//drawing scale factor
//Used to compute and display the time required for the
// bug to make each round trip across the game window
// and back.
long oldTime = 0;
long traversalTime = 0;
//Frame rate we will simulate in terms of the speed of
// the sprite and maximum frame rate we will allow.
// We will use this value to achieve a constant overall
// speed of motion for the sprite regardless of the
// actual frame rate.
int targetFPS = 60;
//----------------------------------------------------//
public Slick0150b(){//constructor
//Set the title
super("Slick0150b, baldwin");
}//end constructor
//----------------------------------------------------//
public static void main(String[] args)
throws SlickException{
AppGameContainer app = new AppGameContainer(
new Slick0150b(),414,307,false);
app.start();
}//end main
//----------------------------------------------------//
@Override
public void init(GameContainer gc)
throws SlickException {
oldTime = gc.getTime();
bug = new Image("ladybug.png");
background = new Image("background.jpg");
backgroundWidth = background.getWidth();
backgroundHeight = background.getHeight();
bugWidth = bug.getWidth()*bugScale;
bugHeight = bug.getHeight()*bugScale;
System.out.println(
"backgroundWidth: " + backgroundWidth);
System.out.println(
"backgroundHeight: " + backgroundHeight);
System.out.println("bugWidth: " + bugWidth);
System.out.println("bugHeight: " + bugHeight);
gc.setTargetFrameRate(targetFPS);//set frame rate
}//end init
//----------------------------------------------------//
@Override
public void update(GameContainer gc, int delta)
throws SlickException{
//Compute new location for the sprite.
//The following code attempts to maintain a constant
// overall speed as the bug moves across the game
// window despite the fact that the delta varies
// quite a bit from one frame to the next. The step
// size varies in proportion to delta or inversely
// with the frame rate.
bugX += bugXDirection*xStep*delta*targetFPS/1000.0;
bugY += bugYDirection*yStep*delta*targetFPS/1000.0;
//The following code does not correct for variations
// in delta. The step size is always the same
// regardless of delta. Enable this code and disable
// the two statements above to see the effect.
// bugX += bugXDirection*xStep;
// bugY += bugYDirection*yStep;
//Test for collisions with the sides of the game
// window and reverse direction when a collision
// occurs.
if(bugX+bugWidth >= backgroundWidth){
//A collision has occurred.
bugXDirection = -1.0f;//reverse direction
//Set the position to the right edge less the width
// of the sprite.
bugX = backgroundWidth - bugWidth;
//Compute traversal time for the bug to make one
// round trip across the game window and back.
long currentTime = gc.getTime();
traversalTime = currentTime - oldTime;
oldTime = currentTime;
}//end if
//Continue testing for collisions with the edges.
if(bugX <= 0){
bugXDirection = 1.0f;
bugX = 0;
}//end if
if(bugY+bugHeight >= backgroundHeight){
bugYDirection = -1.0f;
bugY = backgroundHeight - bugHeight;
}//end if
if(bugY <= 0){
bugYDirection = 1.0f;
bugY = 0;
}//end if
}//end update
//----------------------------------------------------//
public void render(GameContainer gc, Graphics g)
throws SlickException{
//set the drawing mode to honor transparent pixels
g.setDrawMode(g.MODE_NORMAL);//honors transparency
//Draw the background to erase the previous picture.
background.draw(0,0);
//Draw the bug in its new location.
bug.draw(bugX,bugY,bugScale);
//Display the traversal time computed in the update
// method.
g.drawString(
"traversalTime: "+traversalTime,100f,10f);
//Insert an additional random time delay ranging from
// 0 to 43 msec to simulate a situation where the
// rendering process is very complex and the time
// to render varies quite a lot from one frame to
// the next. The average delay time should be about
// 21.5 msec, which should result in an average FPS of
// about 46 or 47 FPS reduced by the additional time
// that would be required to complete a frame in the
// absence of this time delay.
int sleepTime = (((byte)random.nextInt()) + 128)/6;
gc.sleep(sleepTime);
}//end render
}//end class Slick0150b
Figure 6.15. Listing 10. Source code for the program named Slick0150b.
Listing 10. Source code for the program named Slick0150b.
-end-
Solutions
Chapter 7. Slick0160: Using the draw and drawFlash
methods.*
It is licensed under the Creative Commons Attribution License:
http://creativecommons.org/licenses/by/3.0/
2013/02/05 17:59:18 -0600
Summary
Learn about using the draw, drawCentered, and drawFlash methods of the Image class.
7.1. Table of Contents
General background information
Beginning of the Slick0160a class
Beginning of the class named Slick0160b
7.2. Preface
This module is one in a collection of modules designed to teach you about the anatomy of a game
engine.
Although the modules in this collection will concentrate on the Java game library named Slick2D,
the concepts involved and the knowledge that you will gain is applicable to different game engines
written in different programming languages as well.
An earlier module titled A first look at Slick2D bitmap graphics introduced you to the use of bitmap graphics in Slick2D. The purpose of this module is dig a little deeper into the use of
bitmap graphics
Viewing tip
I recommend that you open another copy of this module in a separate browser window and use the
following links to easily find and view the images and listings while you are reading about them.
Images
Image 1 . Output from the program named Slick0160a.
Image 2 . One output from the program named Slick0160b.
Image 3 . Another output from the program named Slick0160b.
Listings
Listing 1 . Beginning of the Slick0160a class.
Listing 2 . The main method.
Listing 3 . The init method.
Listing 4 . The render method.
Listing 5 . Draw the top four images.
Listing 6 . Draw three more images.
Listing 7 . Draw image based on its center.
Listing 8 . Draw a flipped copy.
Listing 9 . Beginning of the Slick0160b class.
Listing 10 . The update method.
Listing 11 . Beginning of the render method.
Listing 12 . The large flashing spider.
Listing 13 . Source code for Slick0160a.java.
Listing 14 . Source code for Slick0160b.java.
7.3. Preview
Bitmap graphics are used in a variety of ways in game and simulation programming. Therefore, I
will present and explain two programs that dig more deeply into the use of bitmap graphics in
Slick2D.
The program named Slick0160a
The first program named Slick0160a calls the draw method of the Image class several times in
succession to illustrate some of the options available with the draw method. This program also
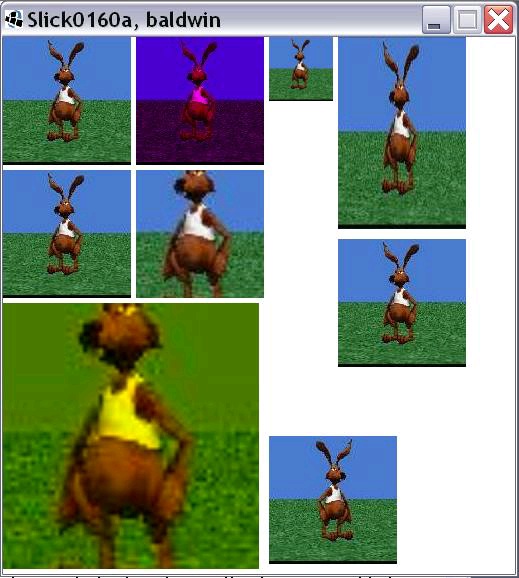
illustrates flipping an image. The output from this program is shown in Image 1 .
Figure 7.1. Image 1. Output from the program named Slick0160a.
Image 1. Output from the program named Slick0160a.
The program named Slick0160b
The second program named Slick0160b illustrates the use of the drawFlash method to draw an
image in silhouette and to cause the silhouette to switch back and forth between two or more
colors. The program draws several spiders in silhouette. It causes a large spider to flash back and
forth between a white silhouette and a blue silhouette. A screen shot of the output from the
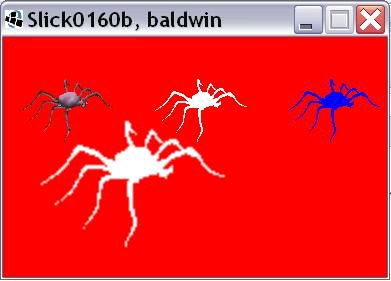

program while the large spider is in its white state is shown in Image 2 .
Figure 7.2. Image 2. One output from the program named Slick0160b.
Image 2. One output from the program named Slick0160b.
A screen shot of the output from the program while the large spider is in its blue state is shown in
Image 3.
Figure 7.3. Image 3. Another output from the program named Slick0160b.
Image 3. Another output from the program named Slick0160b.
What you have learned
In the previous module, you learned how to make sprites move at a constant speed in front of an
image in the face of widely varying frame rates. You also learned about a rudimentary form of
collision detection.
What you will learn
In this module, you will learn about using the draw , drawCentered , and drawFlash methods of
the Image class.
7.4. General background information
The Slick2D org.newdawn.slick.Image class defines about ten overloaded versions of the draw method. We will investigate several of them in this module.
The class also defines three overloaded versions of the drawFlash method along with a method
named drawCentered . We will also investigate some of them.
7.5. Discussion and sample code
Beginning of the Slick0160a class
Beginning of the class named Slick0160b
The program named Slick0160a
Beginning of the Slick0160a class
Will discuss in fragments
A complete listing of this program is provided in Listing 13 . As is my custom, I will break this program down and discuss it in fragments.
Listing 1 shows the beginning of the class down through the constructor.
import org.newdawn.slick.AppGameContainer;
import org.newdawn.slick.BasicGame;
import org.newdawn.slick.GameContainer;
import org.newdawn.slick.Graphics;
import org.newdawn.slick.Image;
import org.newdawn.slick.SlickException;
import org.newdawn.slick.Color;
public class Slick0160a extends BasicGame{
Image rabbit = null;
float rabbitWidth;
float rabbitHeight;
//Frame rate we would like to see and maximum frame
// rate we will allow.
int targetFPS = 60;
//----------------------------------------------------//
public Slick0160a(){//constructor
//Set the title
super("Slick0160a, baldwin");
}//end constructor
//----------------------------------------------------//
Figure 7.4. Listing 1. Beginning of the Slick0160a class.
Listing 1. Beginning of the Slick0160a class.
As usual, it is necessary to declare several import directives that point to classes in the Slick2D
library. Also, as in several previous modules, the new class extends the Slick2D class named
BasicGame .
Listing 1 declares several instance variables, initializing some of them.
The constructor simply sets the title on the game window.
The main method
The main method is shown in Listing 2 . There is nothing in Listing 2 that you haven't seen in several previous modules.
public static void main(String[] args)
throws SlickException{
AppGameContainer app = new AppGameContainer(
new Slick0160a(),512,537,false);
app.start();
}//end main
Figure 7.5. Listing 2. The main method.
Listing 2. The main method.
The init method
The init method is shown in Listing 3 .
There is nothing in Listing 3 that you haven't seen in previous modules.
@Override
public void init(GameContainer gc)
throws SlickException {
rabbit = new Image("rabbit.png");
rabbitWidth = rabbit.getWidth();
rabbitHeight = rabbit.getHeight();
System.out.println(
"rabbitWidth: " + rabbitWidth);
System.out.println(
"rabbitHeight: " + rabbitHeight);
gc.setShowFPS(false) ;
gc.setTargetFrameRate(targetFPS);//set frame rate
}//end init
Figure 7.6. Listing 3. The init method.
Listing 3. The init method.
The update method
The body of the update method is empty so it isn't shown here. You can view it in Listing 13 .
The render method
The interesting code in this program is in the render method, which begins in Listing 4 . There is nothing in Listing 4 that you haven't seen before.
public void render(GameContainer gc, Graphics g)
throws SlickException{
//set the drawing mode to honor transparent pixels
g.setDrawMode(g.MODE_NORMAL);
g.setBackground(Color.white);
Figure 7.7. Listing 4. The render method.
Listing 4. The render method.
Draw top four images
The code in Listing 5 calls four different overloaded versions of the draw method on the rabbit image to draw the top four images in Image 1 .
rabbit.draw(0f,0f);
rabbit.draw(133f,0f,new Color(1.0f,0.0f,1.0f));
rabbit.draw(266f,0f,0.5f);
rabbit.draw(335f,0f,128f,192);
Figure 7.8. Listing 5. Draw the top four images.
Listing 5. Draw the top four images.
Draw unchanged at the origin
The first call to the draw method in Listing 5 simply draws the image unchanged with its upper-left corner at the upper-left corner (the origin) of the game window.
Apply a color filter before drawing
The second call to the draw method in Listing 5 applies a color filter to the rabbit image and draws it with its upper-left corner at 133,0.
I haven't found an explanation as to exactly how the color filter is applied. It appears from
experimentation that the pixel color values in the original image are multiplied by the red, green,
and blue color values (expressed in the range from 0 to 1.0) in the color object that is passed as a
parameter to the method. However, the Image class defines two constants named
FILTER_LINEAR and FILTER_NEAREST that may have something to do with how color
filtering is applied.
Apply a uniform scale factor before drawing
The third call to the draw method in Listing 5 applies a scale factor of 0.5 to both dimensions of the rabbit image and draws it with its upper-left corner at 266,0.
Change the dimensions before drawing
The fourth call to the draw method in Listing 5 resizes the rabbit image to a width of 128 pixels and a height of 192 pixels and draws the modified image with its upper-left corner at 335,0.
Draw three more images
The code in Listing 6 calls three different overloaded versions of the draw method on the rabbit image to draw the two images on the center left and the large image on the bottom left of Image 1
.
rabbit.draw(0f,133f);
rabbit.draw(133f,133f,32f,32f,96f,96f);
rabbit.draw(0f,266f,256f,532f,32f,32f,96f,96f,new Color(1.0f,1.0f,0.0f));
Figure 7.9. Listing 6. Draw three more images.
Listing 6. Draw three more images.
Draw another unchanged version
The first call to the draw method in Listing 6 simply draws another unchanged version of the rabbit image in a new location, 0,133.
Extract and draw a rectangular section
The second call to the draw method in Listing 6 extracts a rectangular section from the original image and draws it the same size as the original image with its upper-left corner at 133,133.
The third and fourth parameters (32,32) specify the coordinates of the upper-left corner of the
rectangle that is extracted. The fifth and sixth parameters (96,96) specify the coordinates of the
lower-right corner of the rectangle that is extracted.
Extract and draw another rectangular section with color filtering
The third call to the draw method in Listing 6 extracts a rectangular section from the original image and draws it with a different size and also applies a color filter. I will leave it as an exercise
for the student to go to the Slick2D documentation for an explanation of the eight parameters of type float .
Draw image based on its center
The