LabVIEW Graphical Programming by Serhat Beyenir - HTML preview
Download the book in PDF, ePub, Kindle for a complete version.
Chapter 4
Customizing VIs
4.1 Configuring the Appearance of Front Panels1
After you build a VI, you can configure the appearance of the front panel so users can more easily operate the VI. For example, you can hide the menu bar and scrollbars to create VIs that look and behave like standard dialog boxes for each platform.
Select ❋✐❧❡
❱■ Pr♦♣❡rt✐❡s to configure the appearance and behavior of a VI. You also can right-click
the VI icon on the front panel or block diagram and select ❱■ Pr♦♣❡rt✐❡s from the shortcut menu. You cannot access the ❱■ Pr♦♣❡rt✐❡s dialog box while a VI is running. Refer to the LabVIEW Basics II: Development Course Manual for more information about configuring the behavior of VIs.
Use the ❈❛t❡❣♦r② pull-down menu at the top of the ❱■ Pr♦♣❡rt✐❡s dialog box to select from several
different option categories, including the following:
General - Displays the current path where a VI is saved, its revision number, revision history, and any changes made since the VI was last saved. You also can use this page to edit the icon or the
size of the alignment grid for the VI.
Documentation - Use this page to add a description of the VI and link to a help file topic. Refer to the original Thermometer VI (Section 2.5) for more information about documenting VIs.
Security - Use this page to lock or password-protect a VI.
Window Appearance - Use this page to configure various window settings.
Window Size - Use this page to set the size of the window.
Execution - Use this page to configure how a VI runs. For example, you can configure a VI to run immediately when it opens or to pause when called as a subVI.
Editor Options - Use this page to set the size of the alignment grid for the current VI and to change the style of control or indicator LabVIEW creates when you right-click a terminal and select
❈r❡❛t❡ ❈♦♥tr♦❧ or ❈r❡❛t❡ ■♥❞✐❝❛t♦r from the shortcut menu.
4.1.1 Window Appearance
In the ❱■ Pr♦♣❡rt✐❡s dialog box, select ❲✐♥❞♦✇ ❆♣♣❡❛r❛♥❝❡ from the ❈❛t❡❣♦r② pull-down menu to cus-
tomize the window appearance for VIs.
These options apply to the VI when it is running. Use these options to change how the user interacts with the application by restricting access to LabVIEW features and by changing the way the window looks and behaves. You can make the VI look and act like a dialog box so the user cannot interact with other windows while the VI window is open. You also can remove the scrollbars and toolbar, and you can set a window to be centered or automatically sized to fit the screen.
1This content is available online at <http://cnx.org/content/m12299/1.2/>.
Available for free at Connexions <http://cnx.org/content/col11408/1.1>
75
76
CHAPTER 4. CUSTOMIZING VIS
By default, the VI window title is the same as the VI name. You can customize the VI window title to make it more descriptive than the VI filename. This is useful for localized VIs so the VI window title can be translated to the local language. Remove the checkmark from the ❙❛♠❡ ❛s ❱■ ◆❛♠❡ checkbox to edit
❲✐♥❞♦✇ t✐t❧❡.
To configure the window appearance, select one of the following window styles. A graphical represen-
tation of each style displays on the right when you select the style.
Top-level Application Window - Shows the title bar and menu bar, hides the scrollbars and toolbar, allows the user to close the window, allows run-time shortcut menus, does not allow resizing,
and shows the front panel when called.
Dialog - The VI functions as a dialog box in the operating system, so the user cannot interact with other LabVIEW windows while this VI window is open. This option does not prevent you from
bringing windows of other applications to the front. (UNIX) You cannot make a window stay in
front of all other windows. Dialog style windows stay on top, have no menu bar, scrollbars, or
toolbar, allow the user to close the window but not resize it, allow run-time shortcut menus, and
show the front panel when called. Also, if a Boolean parameter on the front panel is associated
with the <❊♥t❡r> or <❘❡t✉r♥> key, LabVIEW highlights the parameter with a dark border.
Default - Same window style used in the LabVIEW development environment.
Custom - Custom window style.
Customize - Displays the Customize Window Appearance dialog box.
4.1.2 Window Size
In the ❱■ Pr♦♣❡rt✐❡s dialog box, select ❲✐♥❞♦✇ ❙✐③❡ from the ❈❛t❡❣♦r② pull-down menu to customize the window size for VIs. This page includes the following components:
Minimum Panel Size - Sets the minimum size of the front panel. If you allow the user to resize the window on the ❲✐♥❞♦✇ ❆♣♣❡❛r❛♥❝❡ page, the user cannot resize the front panel smaller than the
width and height you set on this page.
Size the front panel to the width and height of the entire screen - Automatically resizes the front panel window to fit the screen when you run the VI. The VI does not retain a record of its
original size and location, so it stays in the new location if you switch back to edit mode.
Maintain proportions of window for different monitor resolutions - Resizes the VI so it takes up approximately the same amount of screen space when opened on a computer with a different
monitor resolution. For example, if you develop a VI on a computer with a monitor resolution of
1, 024 × 768, you might want to run the VI on a computer with a monitor resolution of 800 × 600.
Use this control in conjunction with scaling one or all the objects on the front panel.
Scale all objects on front panel as the window resizes - Automatically resizes all front panel objects with respect to and in proportion to the size of the front panel window. Text does not
resize because the font sizes are fixed. Use this option when you allow the user to resize the
front panel window.
4.2 Opening SubVI Front Panels when a VI Runs2
A single front panel sometimes is too restrictive to present numerous options or displays. To solve this problem, organize VIs so the top-most VI presents high-level options, and subVIs present related options.
TIP: You also can use tab controls to make the front panel more usable.
2This content is available online at <http://cnx.org/content/m12300/1.1/>.
Available for free at Connexions <http://cnx.org/content/col11408/1.1>
77
When LabVIEW calls a subVI, ordinarily the subVI runs without opening its front panel. If you want a single instance of the subVI to open its front panel when called, use the ❙✉❜❱■ ◆♦❞❡ ❙❡t✉♣ dialog box. If you want every instance of the subVI to open its front panel when called, use the ❱■ Pr♦♣❡rt✐❡s dialog box.
4.2.1 Single Instance
If you want a single instance of the subVI to open its front panel when called, right-click the subVI and select
❙✉❜❱■ ◆♦❞❡ ❙❡t✉♣ from the shortcut menu to display the ❙✉❜❱■ ◆♦❞❡ ❙❡t✉♣ dialog box. Place checkmarks in the ❙❤♦✇ ❋r♦♥t P❛♥❡❧ ✇❤❡♥ ❝❛❧❧❡❞ and ❈❧♦s❡ ❛❢t❡r✇❛r❞s ✐❢ ♦r✐❣✐♥❛❧❧② ❝❧♦s❡❞ checkboxes to
open the subVI front panel when called. This dialog box also includes the following components:
Open Front Panel when loaded - Displays the front panel when the subVI loads or when the VI that calls it loads.
Show Front Panel when called - Displays the front panel when the subVI is called.
Close afterwards if originally closed - If ❙❤♦✇ ❋r♦♥t P❛♥❡❧ ✇❤❡♥ ❝❛❧❧❡❞ also contains a checkmark and if the subVI was previously closed, the front panel closes after the subVI runs.
Suspend when called - Suspends a subVI when called and waits for user interaction. This option is the same as selecting ❖♣❡r❛t❡
❙✉s♣❡♥❞ ✇❤❡♥ ❝❛❧❧❡❞.
4.2.2 Every Instance
If you want every instance of the subVI to open its front panel when called, open the subVI and se-
lect ❋✐❧❡
❱■ Pr♦♣❡rt✐❡s. Select ❲✐♥❞♦✇ ❆♣♣❡❛r❛♥❝❡ from the ❈❛t❡❣♦r② pull-down menu, click the
❈✉st♦♠✐③❡ button, and place checkmarks in the ❙❤♦✇ ❋r♦♥t P❛♥❡❧ ❲❤❡♥ ❈❛❧❧❡❞ and ❈❧♦s❡ ❆❢t❡r✇❛r❞s
✐❢ ❖r✐❣✐♥❛❧❧② ❈❧♦s❡❞ checkboxes.
4.3 Pop-up Graph VI and Use Pop-up Graph VI3
Exercise 4.3.1
Complete the following steps to build a VI that acquires temperature once every 0.5 seconds for
10 seconds, displays a subVI front panel that shows the acquired data in a graph, and keeps the
front panel open until you click a button.
4.3.1 Front Panel
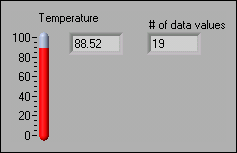
Open a blank VI and build the following front panel.
Figure 4.1
3This content is available online at <http://cnx.org/content/m12301/1.2/>.
Available for free at Connexions <http://cnx.org/content/col11408/1.1>


78
CHAPTER 4. CUSTOMIZING VIS
Use the following guidelines to assist you in building the front panel.
• The indicator to the right of the thermometer is a digital display belonging to the ther-
mometer. Right-click the thermometer and select ❱✐s✐❜❧❡ ■t❡♠s
❉✐❣✐t❛❧ ❉✐s♣❧❛② from
the shortcut menu to display the digital value.
• Change ★ ♦❢ ❞❛t❛ ✈❛❧✉❡s to signed 32-bit integer (I32) representation.
4.3.2 Block Diagram
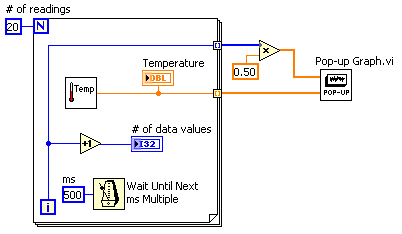
1. Build the following block diagram.
Figure 4.2
a.
Place the ❚❤❡r♠♦♠❡t❡r VI from a previous exercise (Section 2.5) on the block
diagram. This VI acquires the current temperature value.
b.
Place
the
❲❛✐t ❯♥t✐❧ ◆❡①t ♠s ▼✉❧t✐♣❧❡ function,
located
on
the
❋✉♥❝t✐♦♥s ❆❧❧ ❋✉♥❝t✐♦♥s ❚✐♠❡ ✫ ❉✐❛❧♦❣ palette, on the block diagram. Right-
click the input, select ❈r❡❛t❡
❈♦♥st❛♥t, and type ✺✵✵ in the constant to cause the ❋♦r
▲♦♦♣ to execute every 500 ms.
c.
Place the ▼✉❧t✐♣❧② function, located on the ❋✉♥❝t✐♦♥s
❆r✐t❤♠❡t✐❝ ✫
❈♦♠♣❛r✐s♦♥ ❊①♣r❡ss ◆✉♠❡r✐❝ palette, on the block diagram. This function multiplies
each element of the output array by 0.50 to scale the x values to represent the time
interval at which the VI takes the measurements.
d.
Place the P♦♣✲✉♣ ●r❛♣❤ VI, located in the ❈✿\❊①❡r❝✐s❡s\▲❛❜❱■❊❲ ❇❛s✐❝s ■
directory, on the block diagram. This VI plots the temperature data on an XY graph.
e. Complete the block diagram as shown in the previous figure.
2. Save the VI as ❯s❡ P♦♣✲✉♣ ●r❛♣❤✳✈✐ in the ❈✿\❊①❡r❝✐s❡s\▲❛❜❱■❊❲ ❇❛s✐❝s ■ directory.
3. Configure the subVI to display its front panel when called.
a. Double-click the P♦♣✲✉♣ ●r❛♣❤ subVI to open its front panel.
Available for free at Connexions <http://cnx.org/content/col11408/1.1>
79
b. Select ❋✐❧❡
❱■ Pr♦♣❡rt✐❡s.
c. Select ❲✐♥❞♦✇ ❆♣♣❡❛r❛♥❝❡ from the ❈❛t❡❣♦r② pull-down menu.
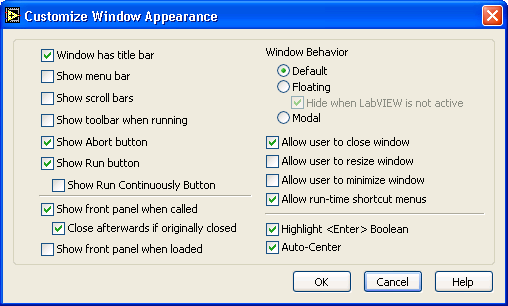
d. Click the ❈✉st♦♠✐③❡ button. Configure the window appearance as shown in the dialog
box (Figure 4.3).
Figure 4.3
e. Click the ❖❑ button twice and save and close the subVI. If the front panel is not closed,
it will not close after the subVI runs.
4. Run the ❯s❡ P♦♣✲✉♣ ●r❛♣❤ VI. After the VI acquires 10 seconds of temperature data, the
front panel of the P♦♣✲✉♣ ●r❛♣❤ VI displays and plots the temperature data. Click the ❉❖◆❊
button to return to the calling VI.
5. Change the window appearance settings for the P♦♣✲✉♣ ●r❛♣❤ subVI to the ❉✐❛❧♦❣ window
style.
6. Save and close the subVI.
7. Run the ❯s❡ P♦♣✲✉♣ ●r❛♣❤ VI again. The P♦♣✲✉♣ ●r❛♣❤ subVI front panel window behaves
as a dialog box. For example, the window stays on top of all other windows and uses the
system colors.
8. Close all open VIs.
4.4 Keyboard Shortcuts for Controls4
While a VI runs, you can press the <❚❛❜> key to change the key focus from one control to the next. The key focus is the same as if you had clicked the control. While a control has the key focus, you can use the keyboard to enter the control value. If the control is a text or numeric control, LabVIEW highlights the text so you can edit it. If the control is Boolean, press the s♣❛❝❡❜❛r or the <❊♥t❡r> key to change its value.
You also can assign keyboard shortcuts to controls so users can navigate the front panel by pressing other keys. Right-click the control and select ❆❞✈❛♥❝❡❞
❑❡② ◆❛✈✐❣❛t✐♦♥ from the shortcut menu to display the
❑❡② ◆❛✈✐❣❛t✐♦♥ dialog box.
4This content is available online at <http://cnx.org/content/m12302/1.1/>.
Available for free at Connexions <http://cnx.org/content/col11408/1.1>
80
CHAPTER 4. CUSTOMIZING VIS
NOTE:
The ❆❞✈❛♥❝❡❞
❑❡② ◆❛✈✐❣❛t✐♦♥ shortcut menu item is dimmed for indicators because
you cannot enter data in an indicator.
Select the shortcut key you want to assign to the control in the ❑❡② ❆ss✐❣♥♠❡♥t section. The front panel control names that appear in the ❈✉rr❡♥t ❆ss✐❣♥♠❡♥ts listbox correspond to the owned labels of those controls.
To prevent users from accessing a control by pressing the <❚❛❜> key while the VI runs, place a checkmark in the ❙❦✐♣ t❤✐s ❝♦♥tr♦❧ ✇❤❡♥ t❛❜❜✐♥❣ ❝❤❡❝❦❜♦①.
4.5 Temperature System VI5
Exercise 4.5.1
4.5.1 Front Panel
1. Open the ❚❡♠♣❡r❛t✉r❡ ❙②st❡♠ VI located in the ❈✿\❊①❡r❝✐s❡s\ ▲❛❜❱■❊❲ ❇❛s✐❝s ■ direc-
tory. The following front panel is already built.
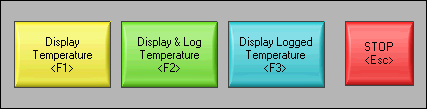
Figure 4.4
The front panel contains four Boolean buttons (Figure 4.4). The mechanical action of the first
three buttons is ▲❛t❝❤ ❲❤❡♥ Pr❡ss❡❞. This setting changes the control value when you click
it and retains the new value until the VI reads it once. At this point the control reverts to
its default value, even if you keep pressing the mouse button. This action is similar to a
circuit breaker and is useful for stopping ❲❤✐❧❡ ▲♦♦♣s or for getting the VI to perform an
action only once each time you set the control. The mechanical action of the ❙t♦♣ button
is ▲❛t❝❤ ❲❤❡♥ ❘❡❧❡❛s❡❞. This setting changes the control value only after you release the
mouse button within the graphical boundary of the control. When the VI reads it once, the
control reverts to the old value. This action guarantees at least one new value. This action is
similar to dialog box buttons and system buttons.
2. Right-click a control and select ❆❞✈❛♥❝❡❞
❑❡② ◆❛✈✐❣❛t✐♦♥ from the shortcut menu to dis-
play the ❑❡② ◆❛✈✐❣❛t✐♦♥ dialog box.
3. In the ❑❡② ❆ss✐❣♥♠❡♥t section, assign the shortcut key shown in the Figure 4.4.
4. Repeat list, item 2, p. 80 and list, item 3, p. 80 for each control.
4.5.2 Block Diagram
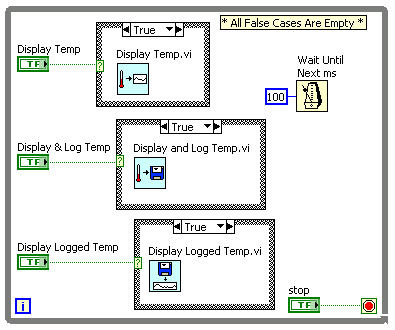
1. Examine the block diagram (Figure 4.5) which is already built.
5This content is available online at <http://cnx.org/content/m12303/1.1/>.
Available for free at Connexions <http://cnx.org/content/col11408/1.1>


81
Figure 4.5
•
The ❉✐s♣❧❛② ❚❡♠♣ VI simulates a temperature measurement every 500 ms and
plots it on a strip chart.
•
The ❉✐s♣❧❛② ❛♥❞ ▲♦❣ ❚❡♠♣ VI simulates a temperature measurement every 500
ms, plots it on a strip chart, and logs it to a file.
•
The ❉✐s♣❧❛② ▲♦❣❣❡❞ ❚❡♠♣ VI opens a file that you select, reads the logged data,
and displays them on a graph.
2. Configure each subVI to display its front panel when called.
a. Right-click the subVI and select ❙✉❜❱■ ◆♦❞❡ ❙❡t✉♣ from the shortcut menu.
b. Place checkmarks in the ❙❤♦✇ ❋r♦♥t P❛♥❡❧ ✇❤❡♥ ❝❛❧❧❡❞ and ❈❧♦s❡ ❛❢t❡r✇❛r❞s ✐❢
♦r✐❣✐♥❛❧❧② ❝❧♦s❡❞ checkboxes.
c. Click ❖❑ to close the ❙✉❜❱■ ◆♦❞❡ ❙❡t✉♣ dialog box.
d. Repeat list, item 1, p. 81 through list, item 3, p. 81 for the remaining two subVIs.
3. Save the VI. Display the front panel and run the VI.
4. Click each button and press the corresponding keyboard shortcuts. The three subVIs return
to the ❚❡♠♣❡r❛t✉r❡ ❙②st❡♠ VI front panel when you press the <❊♥t❡r> key. Try pressing
the <❊♥t❡r> key to do so.
5. Stop the VI.
6. Configure the ❚❡♠♣❡r❛t✉r❡ ❙②st❡♠ VI to run automatically when you open the VI.
a. Select ❋✐❧❡
❱■ Pr♦♣❡rt✐❡s.
b. Select ❊①❡❝✉t✐♦♥ from the ❈❛t❡❣♦r② pull-down menu.
c. Place a checkmark in the ❘✉♥ ❲❤❡♥ ❖♣❡♥❡❞ checkbox.
7. Configure the VI so the menu bar and toolbar are not visible while the VI runs.
a. Select ❲✐♥❞♦✇ ❆♣♣❡❛r❛♥❝❡ from the ❈❛t❡❣♦r② pull-down menu.
b. Click the ❈✉st♦♠✐③❡ button.
Available for free at Connexions <http://cnx.org/content/col11408/1.1>
82
CHAPTER 4. CUSTOMIZING VIS
c. Remove the checkmarks from the ❙❤♦✇ ▼❡♥✉ ❇❛r and ❙❤♦✇ ❚♦♦❧❜❛r ❲❤❡♥ ❘✉♥♥✐♥❣
checkboxes.
d. Click the ❖❑ button twice.
8. Save and close all VIs.
9. Open the ❚❡♠♣❡r❛t✉r❡ ❙②st❡♠ VI again. The VI runs automatically when you open it. Click
the buttons on the front panel or use the keyboard shortcuts.
10. Stop and close all VIs.
4.6 Editing VI Properties6
Sometimes you can select VI properties that make it difficult to edit a VI. For example, you might select the
❘✉♥ ❲❤❡♥ ❖♣❡♥❡❞ option and disable the menu bar and toolbar. If you set the VI to close and exit LabVIEW
after it runs, you cannot stop the VI and edit it without it closing and exiting LabVIEW. This VI would be very difficult to edit.
NOTE: To exit LabVIEW, you can use the Quit LabVIEW function located on the ❋✉♥❝t✐♦♥s
❆❧❧
❋✉♥❝t✐♦♥s ❆♣♣❧✐❝❛t✐♦♥ ❈♦♥tr♦❧ palette. This function aborts all running VIs and ends the
current session of LabVIEW. The function has one input. If it is wired, the end of the LabVIEW
session occurs only if that input is True. If the input is not wired, the end of the session occurs
when the node executes.
Before you change VI properties, save a backup of the VI to a new location by selecting ❋✐❧❡
❙❛✈❡ ✇✐t❤
❖♣t✐♦♥s to avoid situations like the previous examples.
Select the ❉❡✈❡❧♦♣♠❡♥t ❉✐str✐❜✉t✐♦♥ option to save the VI to a new location along with its entire
hierarchy. You also can include the ✈✐✳❧✐❜ files in the save. After you save the backup VI, change the VI properties of the original VI. If you encounter a problem, you can return to the backup VI.
NOTE:
If you select the ❘❡♠♦✈❡ ❞✐❛❣r❛♠s option, you remove the source code of the VI. Select
this option only if you never need to edit the VI again. Before you save a VI without the block
diagrams, save a backup of the VI with the block diagrams.
If you already saved a development VI with properties that make the VI difficult to edit, refer to the Edit Me VI (Section 4.7) exercise for more information about editing the VI.
4.7 Edit Me VI7
Exercise 4.7.1
4.7.1 Front Panel
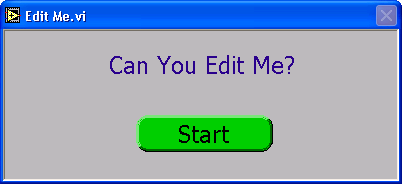
1. Close any open VIs and open the ❊❞✐t ▼❡ VI, located in the ❈✿\❊①❡r❝✐s❡s\▲❛❜❱■❊❲ ❇❛s✐❝s
■ directory. The following front panel is already built.
6This content is available online at <http://cnx.org/content/m12304/1.2/>.
7This content is available online at <http://cnx.org/content/m12305/1.2/>.
Available for free at Connexions <http://cnx.org/content/col11408/1.1>
83
Figure 4.6
The VI is already running when it opens. While the VI runs, you cannot use the menu bar,
toolbar, or keyboard shortcuts to edit or abort the VI.
2. Click the ❙t❛rt button. After 10 seconds, the VI stops running and quits LabVIEW.
3. Relaunch LabVIEW and open a blank VI.
4. If the VI you want to edit either does not have subVIs or you do not know what it contains,
complete list, item 5, p. 83 through list, item 13, p. 83. However, if the VI you want to edit
has subVIs, open one of the subVIs and modify the block diagram to break the subVI. For
example, place an ❆❞❞ function on the block diagram and do not wire the inputs. Open the VI
you want to edit. Because its subVI is nonexecutable, the VI that calls it is also nonexecutable.
It opens in edit mode and the ❘✉♥ button appears broken. Make sure to fix the subVI after
you edit the calling VI.
5. Display the block diagram of the new VI.
6. Place the ❊❞✐t ▼❡ VI, which is already built, on the block diagram. The front panel for the
❊❞✐t ▼❡ VI displays. Although you can display the block diagram of the ❊❞✐t ▼❡ VI, you
cannot edit it.
7. Select ❖♣❡r❛t❡
❈❤❛♥❣❡ t♦ ❊❞✐t ▼♦❞❡. A dialog box informs you that the VI is locked.
8. Click the ❯♥❧♦❝❦ button. You now can edit the VI. You also can unlock a VI by selecting
❋✐❧❡ ❱■ Pr♦♣❡rt✐❡s and selecting ❙❡❝✉r✐t② from the ❈❛t❡❣♦r② pull-down menu.
9. Select and delete the ◗✉✐t ▲❛❜❱■❊❲ function from the block diagram.
10. Save and close the ❊❞✐t ▼❡ VI. Close the new VI and do not save changes.
11. Open the ❊❞✐t ▼❡ VI again.
12. After the VI runs, try to edit it.
13. Close the ❊❞✐t ▼❡ VI.
4.8 Customizing the Controls and Functions Palettes8
You can customize the ❈♦♥tr♦❧s and ❋✉♥❝t✐♦♥s palettes to add VIs and controls to the palettes, hide VIs and functions, or rearrange the built-in palettes to make the VIs and functions you use frequently more accessible.
4.8.1 Adding VIs and Controls to the User Library and the Instrument Library
The simplest method for adding VIs and controls to the ❈♦♥tr♦❧s and ❋✉♥❝t✐♦♥s palettes is to save them in the ❧❛❜✈✐❡✇\✉s❡r✳❧✐❜ directory. When you restart LabVIEW, the ❋✉♥❝t✐♦♥s
❊①♣r❡ss ❯s❡r ▲✐❜r❛r✐❡s
8This content is available online at <http://cnx.org/content/m12306/1.1/>.