Turbo Windows - The Ultimate PC Speed Up Guide (Step-by-step Manual for Computer Users with Windows) by Liz Cornwell - HTML preview
Download the book in PDF, ePub, Kindle for a complete version.
CHAPTER
Opening Files Takes Ages?
Optimize Your Hard Drive for Peak Performance
Most people tend to ignore minor speed losses and only notice that their computer is slowing down when opening files and software starts taking ages. When this happens, less experienced users panic, start doing erratic things like deleting files, and call a computer technician when nothing they do seems to help. But in most cases it’s absolutely unnecessary because it’s not at all difficult to fix the probelm yourself. All you need to do is perform some simple hard drive optimization and maintenance.
Compress files and directories
Modern versions of Windows use NTFS file system, which is a lot more efficient than the previous FAT16 and FAT32. On top of that, NTFS has some very useful built-in features. NTFS file compression is one of them. Unlike .zip and .rar compression, this
114 | auslogics.com TURBO WINDOWS® — The Ultimate PC Speed Up Guide compression feature leaves the files in their native format, but forces them to occupy a smaller space on the hard drive. And today’s powerful processors ensure that decompression happens in less than a blink of an eye, which means that your files will snap open. The average compression factor is 1.6/1, although with some files you’ll get a 10/1 or even 50/1 compression factor. Some files, like .jpg image files, can’t be compressed. In any case, using NTFS compression will save disk space and improve hard drive performance. Keep in mind that if you have an SSD drive, you shouldn’t use NTFS compression, as it will only slow things down and jeopardize stability.
To experience the maximum performance increase, you’ll need to compress the following directories:
• Users (Documents and Settings in Windows XP)
• Program Files
• Program Data (Windows Vista and Windows 7)
• Windows
• All your .exe and .dll files
NTFS file compression is done through the Command Prompt with a simple command: compact /c /s /i. Before you open the Command Prompt, make sure that you are logged in as administrator.
OK, let’s get started!
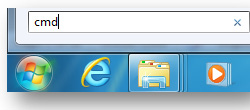
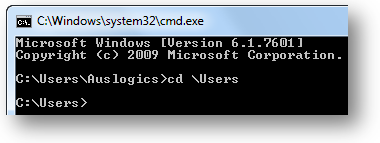
1. Click on Start, type cmd in the Search box (Run box in Windows XP) and press Ctrl+Shift+Enter 2. In Windows Vista and Windows 7, type CD \Users and press Enter to change the directory. If you are on Windows XP, type CD \Documents and Settings and press Enter

115 | auslogics.com TURBO WINDOWS® — The Ultimate PC Speed Up Guide 3. Now type the compression command compact /c /s /i and press Enter
Depending on the amount of files and their size, compression can take something like 10 to 20 minutes.
4. When that’s done, do the same for Program Files by typing CD \Program Files, pressing Enter (CD \Program Files (x86) for 64-bit systems), typing compact /c /s /i and hitting Enter for the second time. Again, this could take a while.
5. And now we’ll do the same for the Windows directory. To do that, type CD \Windows, then press Enter to change the directory and then type the compression command compact /c /s /i and press Enter. Wait for the compression to complete.
6. Then we are going to compress all .exe and .dll files. To do that, type CD\ and press Enter to change the directory to C:\> .
Then type the compact /c /s /i *.exe command, press Enter, and when it’s done, issue the compact /c /s /i *.dll command and press Enter. Wait for it to complete.
When everything is done, you’ll need to make sure that files that were in use and couldn’t be compressed will be compressed.
You will need to reboot your computer into Safe Mode and repeat steps 1-6 in Safe Mode. To enter Safe Mode, restart your PC
and keep tapping F8 until the option to boot in Safe Mode appears. Select the option and proceed. When the compression is finished, reboot your computer once again, keep tapping F8 and enter Normal Mode.
NTFS compression will make the files in the compressed directories occupy 2/3 of the original space and your hard drive will open them faster. This should give you a bit of a performance increase. But the main performance boost comes from defragmenting your hard drive and optimizing system files placement.
Defrag your hard drive
When your Windows PC starts taking longer to open files and launch applications, the first thing you should do is defragment your hard drive. But before we proceed with defragmentation, let me explain why your hard drive becomes fragmented in the first place.
All Windows-based computers suffer from disk fragmentation, a phenomenon that occurs because of how Windows saves new data. When you create a new file, download something from the Web, or simply edit a Word document, Windows doesn’t save the new data as a whole, but rather splits it into little pieces and fills available bits of free space on the hard drive. As a result, the newly
116 | auslogics.com TURBO WINDOWS® — The Ultimate PC Speed Up Guide saved data becomes fragmented. And when you delete files, free space becomes fragmented, which eventually causes data fragmentation. It’s this simple.
When Windows needs to access a fragmented file, the hard drive read/write heads have to move all over the disk to collect all the fragments of the file you want to open. Naturally, this takes a lot longer than simply opening a non-fragmented file in one smooth read movement. Fragmentation also decreases the lifetime of your hard drive, since it has to work more and harder.
The solution is to run disk defragmentation on a regular basis, like once a week. All versions of Windows have a built-in Disk Defragmenter and the Windows 7 one is even scheduled to run once a week right out of the box. Here is how you can launch disk defragmentation:
Windows XP:
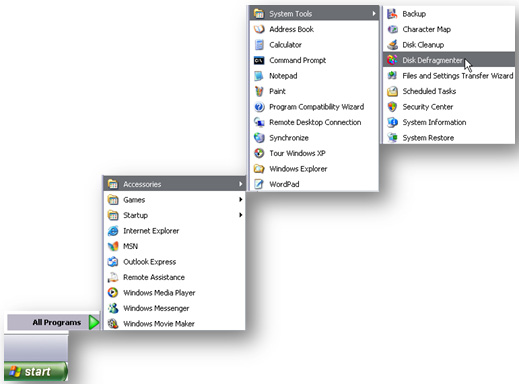
1. Click on the Start button and go to All Programs
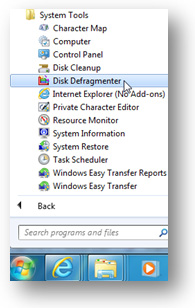
2. Navigate to Accessories and then go to System Tools
3. Launch the Disk Defragmenter
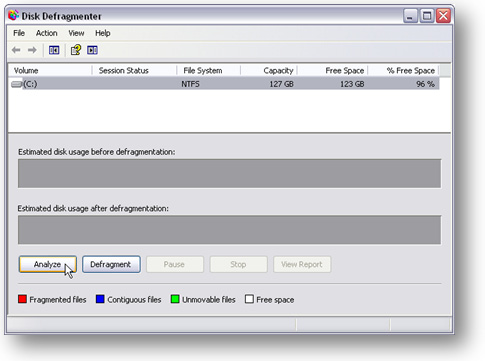
4. Click on the Analyze button and let the tool analyze your
drive. If the fragmentation level is significant, you will be prompt-
ed to defragment your drive
117 | auslogics.com TURBO WINDOWS® — The Ultimate PC Speed Up Guide 5. Click on the Defragment button to defragment your hard disk.
Windows 7:
1. Click on the Start button and click on All Programs
2. Go to Accessories – System Tools
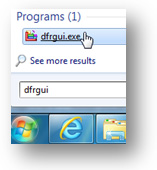
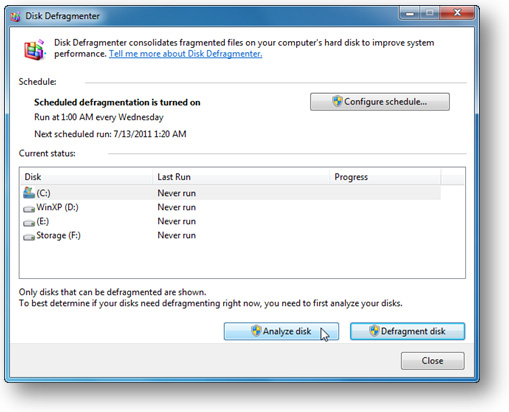
3. Select Disk Defragmenter. Alternatively simply click on Start, type dfrgui in the Search box and press Enter 4. Select a disk and click on the Analyze disk button to find out how much
fragmentation there is. Defrag if it’s above 10%
118 | auslogics.com TURBO WINDOWS® — The Ultimate PC Speed Up Guide 5. To defragment a disk, select it and click on the Defragment disk button. Depending on the fragmentation level, defragmentation may take from something like five minutes to a couple of hours.
This will only defragment your files, but your free space will stay fragmented. So if you want to prevent further fragmentation, it’s good to run the Windows 7 Disk Defragmenter from the command prompt with the free space consolidation option enabled.
Here is how you can do it:
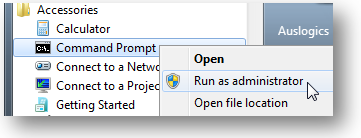
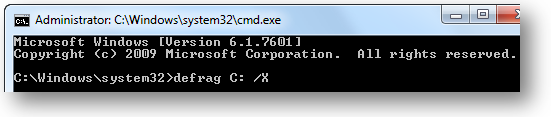
1. Click on Start, go to All Programs and then to Accessories
2. Right-click on the Command Prompt and select Run as administrator
Alternatively you can click on Start, type cmd in the search box and press Ctrl+Shift+Enter 3. Now type the following command: defrag C: /X. C: is the drive letter you want to defrag and X is the switch for the free space consolidation option.
There is no doubt that the Windows 7 Disk Defragmenter is a lot better than the XP or Vista one, but it still doesn’t do much in terms of disk optimization. For example, it doesn’t optimize system files placement. And that’s not good because files placement can affect hard drive performance as much as fragmentation, if not more. You see, the outer tracks of a hard drive are a lot faster than the inner tracks. Therefore, it makes sense to put frequently accessed data, such as system files needed at boot-up, to the faster tracks. This will make your computer launch a lot quicker than if those system files were scattered all over the place.
Windows doesn’t have a tool to optimize file placement, but there are free third-party programs you can use.
Auslogics Disk Defrag is a really good one. It can defragment both files and the free space, as well as optimize your hard drive
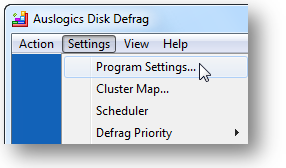

119 | auslogics.com TURBO WINDOWS® — The Ultimate PC Speed Up Guide and move system files to the faster tracks of the disk. Here is how you can optimize your disk with this tool: 1. Open Auslogics Disk Defrag, click on Settings, go to Program Settings and then to the Algorithms tab
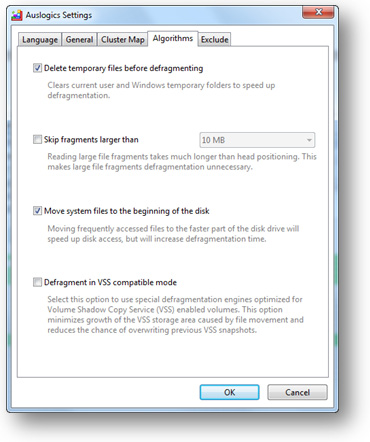
2. Check the Move system files to the beginning of the disk checkbox
3. I also recommend checking the delete temporary files before defragmenting
checkbox, as these files are junk that clutter your hard drive
4. Click OK to close the Settings window
5. Now select the drive you want to defragment and optimize, and select Defrag & Optimize from the drop-down menu

120 | auslogics.com TURBO WINDOWS® — The Ultimate PC Speed Up Guide Selecting Defrag & Optimize will activate a special algorithm that sorts files and folders and then intelligently distributes them across the hard drive. For example, frequently accessed system files are moved to the faster tracks of the hard drive and large user files (like your videos) are moved to the slower tracks. This technology makes hard drive usage more efficient and improves overall system speed.
Schedule Disk Defragmenter to run automatically
If you don’t want to keep remembering to run disk defragmentation, you can schedule it to run automatically – it’s easy enough on all Windows versions.
Windows XP:
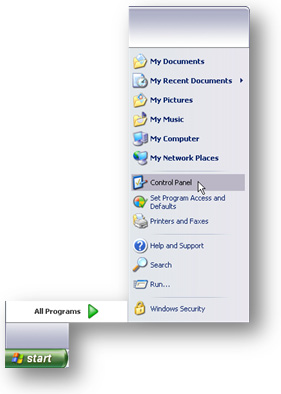
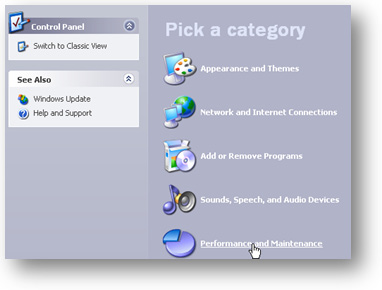
1. Click on Start and go to the Control Panel
2. Click on Performance and Maintenance
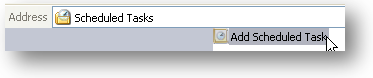
Then go to Scheduled Tasks
and double-click on Add Scheduled Task
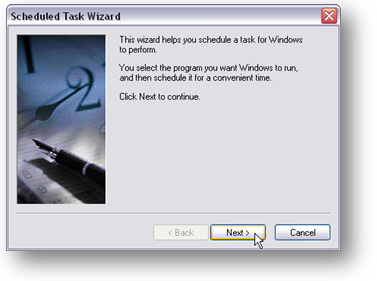
121 | auslogics.com TURBO WINDOWS® — The Ultimate PC Speed Up Guide 3. The Schedule Tasks Wizard will open. Click Next to continue
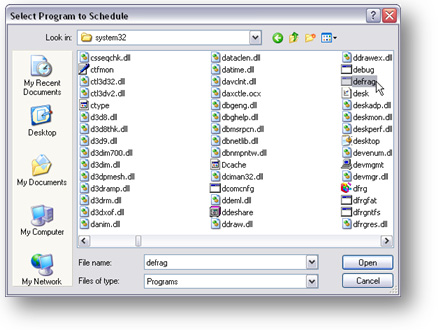
4. Click on Browse and navigate to the Windows - system32 folder 5. Select defrag.exe and click Open
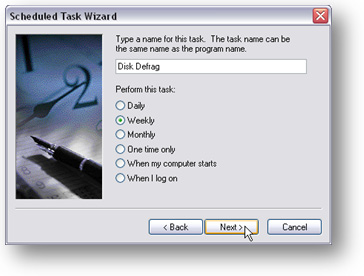
6. Now name the new task, for example Disk Defrag
7. Select how often you want the task to run under Perform this task. Once
a week is enough. Click Next
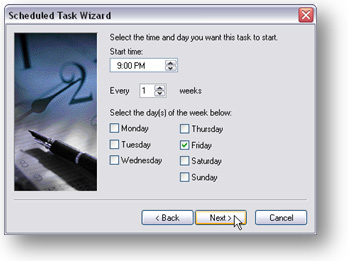
8. Now select the time when you want
disk defragmentation to start. A good
time is when your computer is running,
but you are not using it
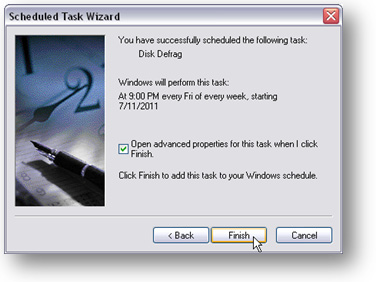
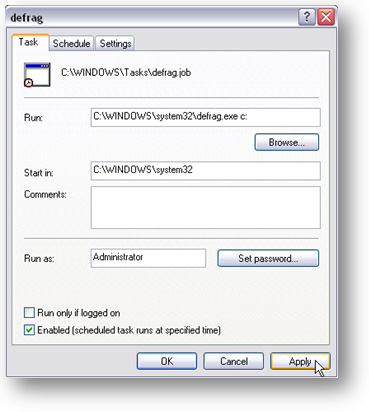
122 | auslogics.com TURBO WINDOWS® — The Ultimate PC Speed Up Guide 9. Verify your settings and check the Open advanced properties for this task when I click Finish checkbox. Click Finish 10. Type c: in the run box after C:\WINDOWS\system32\defrag.exe. Make sure there is a space between .exe and c:
11. Click Apply, then click OK.
Phew, that was quite a process, wasn’t it?!
123 | auslogics.com TURBO WINDOWS® — The Ultimate PC Speed Up Guide
Windows 7:
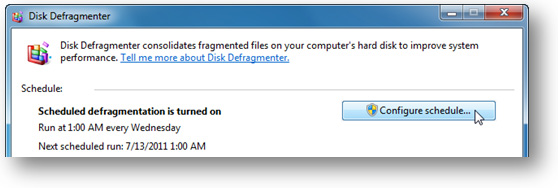
Windows 7 automatically sets Disk Defragmenter to run on schedule every Wednesday at 1 a.m. Not the best time in my opinion.
Don’t know about you, but my computer is usually switched off at that time of night. So, if 1 a.m. on Wednesdays doesn’t suit you either, you can modify the schedule. Here is how:
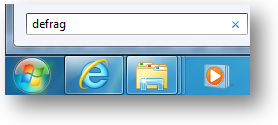
1. Open Disk Defragmenter (type defrag in the Search box and press Enter) 2. Find the Configure schedule button and click on it
3. Now you can either disable the scheduled task by unchecking the relevant box or modify the schedule to your liking 4. When finished, click OK and you’re done
Auslogics Disk Defrag
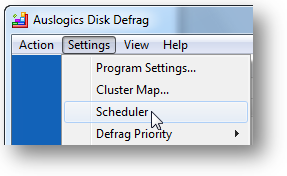
If you prefer using a third-party defragmentation utility, such as Auslogics Disk Defrag, you should disable scheduled defragmen-
tation in Windows 7 and create a scheduled task with Disk Defrag instead. It’s easy enough: 1. Open Auslogics Disk Defrag, click on Settings, and then go to Scheduler

124 | auslogics.com TURBO WINDOWS® — The Ultimate PC Speed Up Guide 2. Check the Defragment automatically checkbox and specify how often you want defragmentation to run 3. Check the drives you wish to schedule defragmentation
for
4. Click OK and you’re done.
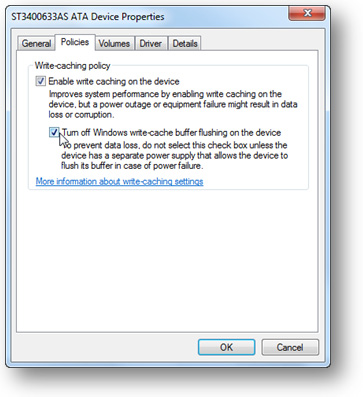
Enable advanced disk performance (Windows 7)
One more way to speed up your SATA hard drive and improve overall Windows 7 performance is to enable write caching. Be careful, though, and only enable this option if you have a UPS and there is absolutely no risk of power cuts. Otherwise you can lose your data. To enable advanced disk performance, do the following:
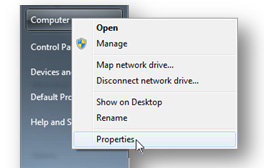
1. Click on Start, right-click on Computer and go to Properties
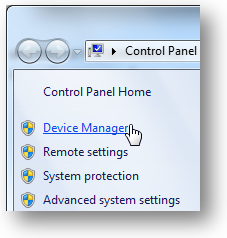
125 | auslogics.com TURBO WINDOWS® — The Ultimate PC Speed Up Guide 2. Click on the Device Manager on the left-hand side
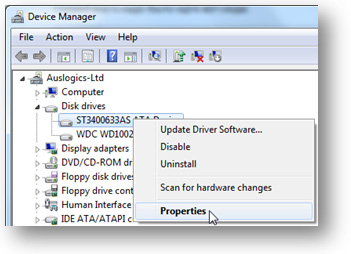
3. Open the Disk drives section, right-click on your hard drive and select Properties 4. Go to the Policies tab
5. Check Enable write caching on the disk
6. Click OK and you’re done.
Now your hard drive should perform a lot better. But how about giving your PC a real boost by installing an SSD drive? We’ll discuss the benefits of SSD in the next chapter.
126 | auslogics.com TURBO WINDOWS® — The Ultimate PC Speed Up Guide 11