Turbo Windows - The Ultimate PC Speed Up Guide (Step-by-step Manual for Computer Users with Windows) by Liz Cornwell - HTML preview
Download the book in PDF, ePub, Kindle for a complete version.
CHAPTER
1
Hope Is Good, Prevention Is Better
The Best Ways to Back Up Your Data
There are a lot of things that can make your computer slow. Some of them are pretty harmless, but some have the potential to ruin your PC. I’m talking about things like hardware faults and virus attacks. And some of the incorrectly applied speed-up techniques, especially registry hacks, can also kill your PC. I bet you’re thinking that it won’t happen to you because you have good hardware, the “right” drivers, and a good anti-virus. And I bet you are careful when it comes to tweaking. It’s good that you are so confident, but I can tell you that the “Nah, it won’t happen to me” attitude is no good. Because one day it will. Are you comfortable about losing all your files, photos, music, videos and all your programs, including the ones you paid for? No? Well, then you should start backing up your computer today.
Backing up is something we know we should do, but never actually get round to. There are always more important and more ex-citing things we want to do. And one day disaster comes.
11 | auslogics.com
TURBO WINDOWS® — The Ultimate PC Speed Up Guide
I was in my last year at college when it happened to me. There I was, writing my thesis on my laptop. It was a pretty old laptop, but it still worked OK. I finished writing for the day and went out. The next day the laptop refused to boot no matter how hard I tried – the hard drive had died and all my work perished with it. Thankfully, I had some chapters saved on a flash drive and some bits and pieces were in my email Sent box. Most importantly, I had plenty of time to restore what I could and write the rest all over again. My thesis was reborn from the ashes, but everything else that was stored on that laptop was gone for good. You see, I never bothered to create a backup. So all my papers and PDF books, all my software, all my photos, and all my financial documents were gone. That’s what I call a disaster and it took me ages to sort everything out. It happened to me, and one day it will happen to you.
So, what are the best ways to back up your data? The answer is it doesn’t really matter as long as you diversify. The more backups you have, the better. Here is a backup plan for you to follow:
1. Configure System Restore
2. Create a disk image
3. Use an external hard drive
4. Create automatic online backups
Let’s have a closer look at these options and create some backups before we proceed with optimizing and tweaking your PC.
Configure System Restore
System Restore is a handy Windows feature that will help you roll back your computer to a previous state. It’s very useful in case of minor faults like incorrect software installations and driver conflicts. However, you must understand that System Restore does not actually back up your computer and doesn’t monitor your personal files. This means that you should never rely on it alone.
Now, some people claim that disabling System Restore will boost computer performance. That’s not true. System Restore only kicks in when your system is idle, which means it can’t slow you down. However, System Restore can and does waste disk space.
Like a lot of things in Windows, the default System Restore configuration is not ideal for most users and takes up too much space.
So, if you have better plans for your gigabytes, you should configure System Restore to eat up less space.
12 | auslogics.com
TURBO WINDOWS® — The Ultimate PC Speed Up Guide
Windows XP users:
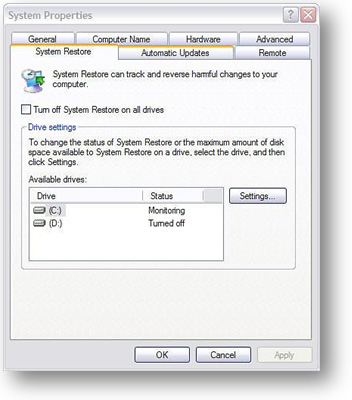
The XP version of System Restore is pretty basic and quite often pretty useless. For a start, it’s slow (big surprise) and it often doesn’t do what you want it to do. It’s still worth having it enabled, though, just in case. To check whether System Restore is enabled, press the Windows key + the Pause/Break key to open the System Properties window and go to the System Restore tab. There you’ll see the list of your disks and partitions, as well as System Restore status.
Now let’s tune it up a bit!
If you use a third-party restore program, you can disable the Windows one altogether.
This will free up heaps of space without putting you at risk. You can disable System Restore by checking the relevant checkbox.
If you have more than one disk or a couple of partitions on your computer, then you
don’t need System Restore to be monitoring all of them; it’s enough to monitor the drive or partition where the OS is installed. Usually it’s drive (C:). To disable System Restore on all other drives, highlight them one by one, click on Settings and check the relevant checkbox.
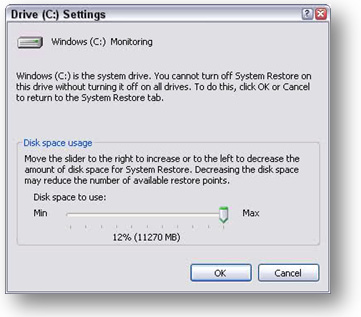
And now let’s free up even more space. Do you really want your system restore points to multiply like rabbits and use up your disk space? I guess not. That’s why it’s a good idea to restrict the amount of space System Restore can use for its purposes.
To do this, simply go to the System Restore tab, click on Settings, and adjust the slider.
Set it to something like 5% and you’ll be fine.

13 | auslogics.com
TURBO WINDOWS® — The Ultimate PC Speed Up Guide
Sometimes you might want to create a restore point manually, especially before tweaking or installing unknown applications. It might prove handy – you never know. Creating a restore point is dead easy:
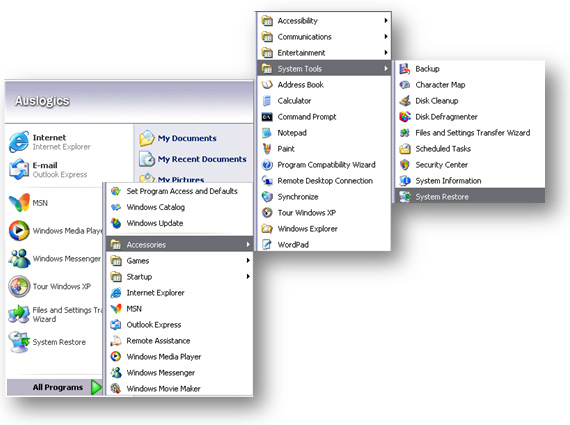
1. Click on Start – All Programs – Accessories – System tools and then click on System Restore 2. Select Create a restore point and click Next
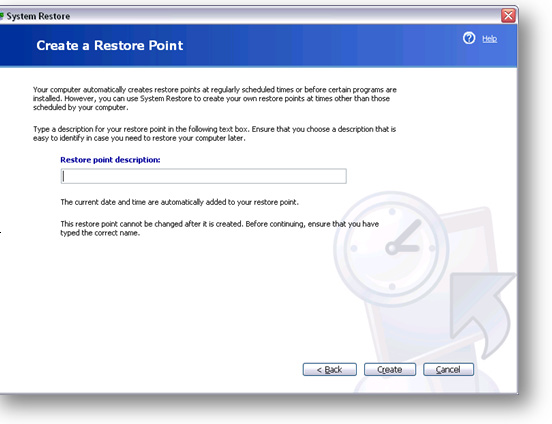
3. Describe your restore point, so that you can easily find it in case you need it
4. Click on Create to create the restore point.
14 | auslogics.com
TURBO WINDOWS® — The Ultimate PC Speed Up Guide
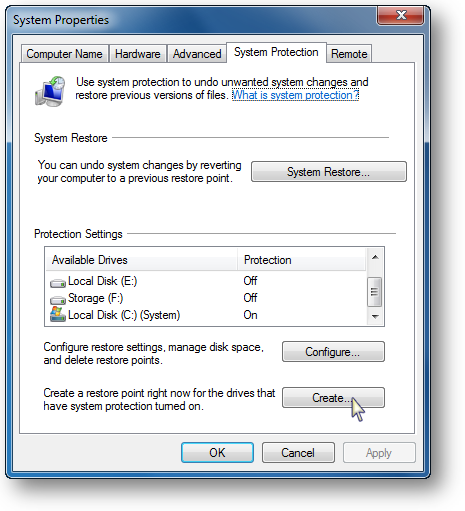
Windows 7 users:
Guys, you’re in luck. The Windows System Restore function got immensely improved since the days of XP. The Windows 7 version of System Restore is filed under System Protection and does a lot more thorough job at protecting you from data loss by using Shadow Copy features. Basically, this means that Windows can create snapshots of your drive and backs up your files even when they are in use. This makes the Windows 7 System Restore a lot more effective and improves your chances of successful recovery.
All the configuration tips that I recommend for XP apply to Windows 7 as well. To configure System Restore in Windows 7 do the following:
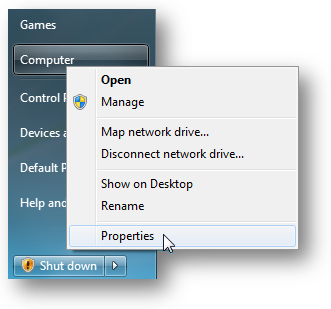
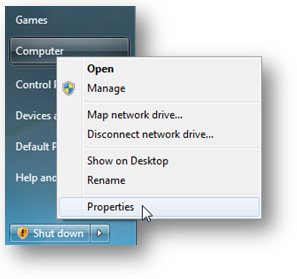
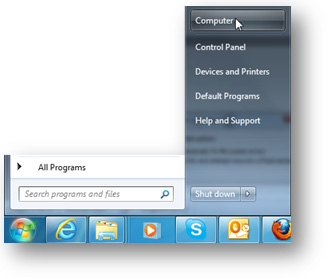
1. Go to Start and right-click on Computer. Go to Properties
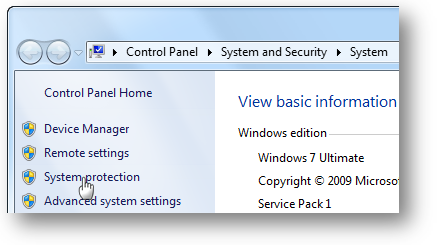
2. Click on the System Protection link on the left-hand side

15 | auslogics.com
TURBO WINDOWS® — The Ultimate PC Speed Up Guide
3.
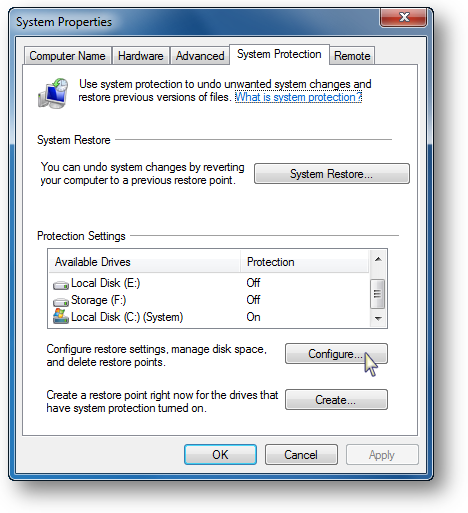
Click on Configure to manage System Restore settings and the amount of disk space it uses Easy-peasy!
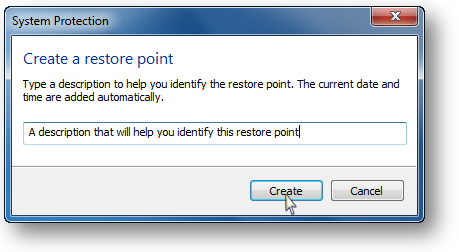
Now let me show you how to manually create restore points in
Windows 7:
1. Click on Start and right-click on Computer. Go to Properties
2. Now click on the System Protection link on the left-hand side
16 | auslogics.com
TURBO WINDOWS® — The Ultimate PC Speed Up Guide
3. Click on the Create button to set a new restore point
4. Type in a description that will help you identify this restore point
5. Click Create and you’re done!
Right, now you know how to use and configure System Restore. So let’s get serious about backup and discuss my favorite backup method – disk imaging.
17 | auslogics.com
TURBO WINDOWS® — The Ultimate PC Speed Up Guide
Creating a disk image
The reason why disk imaging is my favorite backup method is simple – if you have a disk image, you can be sure your data is safe.
With a disk image you can restore literally everything, including your operating system and all your programs, in a quick and easy way.
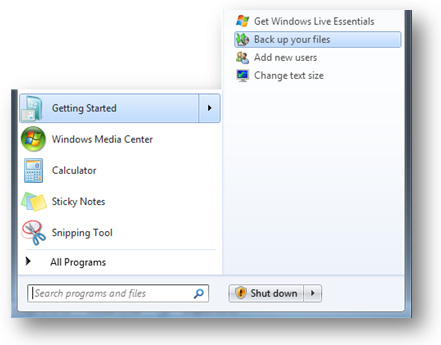
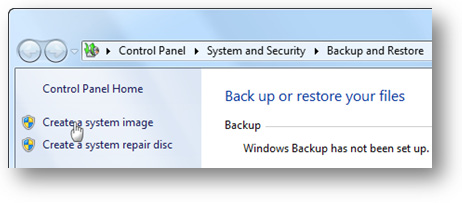
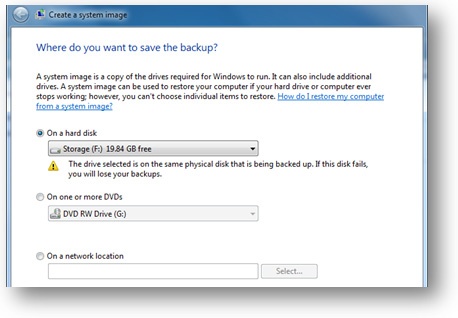
Windows 7 has a built-in feature that allows you to create disk images in just a couple of clicks. Here is how it’s done: 1. Click on Start, go to Getting Started and click on Back up your files 2. Now click on the Create a system image link
3. Select where you want to save the image. I recommend using an external
hard drive to store your backup
18 | auslogics.com
TURBO WINDOWS® — The Ultimate PC Speed Up Guide
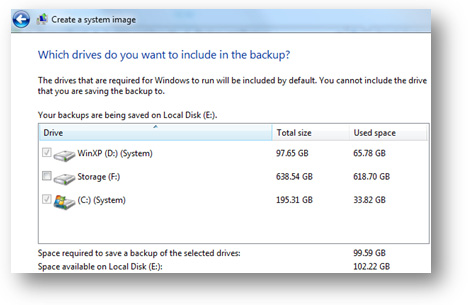
4. Select which drives you want to back up
5. Confirm and let Windows Backup do the job. Aren’t you glad you have Windows 7?
Those of you who are still on XP or worse – Vista Home can create disk images with the help of third-party utilities. There are plenty of great programs to help you create disk images.
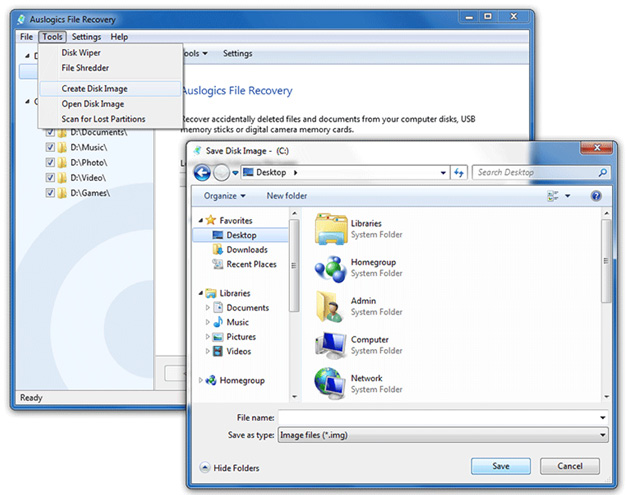
Auslogics File Recovery Pro is a particularly good one because it can also recover accidentally deleted files, which is something Windows can’t do. I’m now going to show you how to create a disk image using this software.
19 | auslogics.com
TURBO WINDOWS® — The Ultimate PC Speed Up Guide
1. Launch Auslogics File Recovery, go to Tools and select Create Disk Image 2. Select where you want to save the disk image. I recommend saving it to an external hard drive or burning it to a DVD. This way it won’t be lost even if everything else on your computer gets wiped out
3. Name the disk image and click on Save
4. Let the program do the work.
Make sure you create disk images on a regular basis. This way your backup will always be up-to-date.
20 | auslogics.com
TURBO WINDOWS® — The Ultimate PC Speed Up Guide
Back up to an external hard drive
Get yourself a pretty large external hard drive and use it to store your important files. If you can, get a water- and shock-resistant one, just in case. The downside of backing up to an external hard drive is that you need to constantly update the backup.
But even if you don’t, you will still be able to recover a lot of your data if your system fails. You could also use software like
Microsoft’s SyncToy or Allway Sync to synchronize your PC and your new USB hard drive to keep your backup up-to-date.
Create automatic online backups
Using automatic online backups is the only way you can make sure your data is safe even if your house burns down (hopefully not, but things like that happen) or your kid decides to use your laptop as a raft for toy soldiers. It’s also a great way to keep your backups constantly updated. There are plenty of automatic backup solutions to choose from, such as Dropbox, Carbonite, NovaBACKUP, IDrive, BackBlaze, SOSOnlineBackup and Mozy. Choose the one you like and start backing up!
Remember that you should have at least two backups on two different sources. This way you will still be able to recover from data loss disaster even if one of your backups gets damaged.
21 | auslogics.com
TURBO WINDOWS® — The Ultimate PC Speed Up Guide
C 2HAPTER
Is Your Hard Drive Playing Up?
Use Check Disk to Detect And Fix Hard Drive Errors
Did you know that your hard drive is one of the very few mechanical computer parts? Unlike CPU and RAM that have electronic components, hard drives have a mechanical arm that moves whenever anything is written to the disk or read from the disk. That’s why it’s not surprising that your hard drive is the slowest part of your computer. But that’s not all – it’s also extremely prone to errors. These errors vary in severity and are caused by a number of things, from hardware faults and power cuts to interrupted data write process. Now, if any serious hardware faults occur, there is very little you can do. In fact, you would be better off backing up all your data, getting a new hard drive, wiping everything off the old one and chucking it into the bin.
The good news is that you have to do nothing of the sort in case of minor hard drive errors. Most of these errors are easily fixed with the help of a tool called Check Disk. Check Disk (CHKDSK) is a built-in Windows utility that can scan your hard drive for
22 | auslogics.com
TURBO WINDOWS® — The Ultimate PC Speed Up Guide
errors and bad sectors, repair logical errors, prevent further deterioration by moving data to the healthier parts of the disk and make sure new data is not saved to the bad sectors. This way Check Disk can improve the stability of your PC. Generally speaking, it’s good to run Check Disk on a regular basis, like once a month.
How to run Check Disk
Running Check Disk is really easy even though the scan can take a long time to complete. So make sure you don’t need to use your computer for something like 30-40 minutes (though sometimes it may take up to 2 hours), as Check Disk needs exclusive access to your system. Basically, the larger your disk, the longer Check Disk will need to complete the scan. That’s why it’s good to schedule Check Disk to run either at night or when you’re out. Or at least get yourself a large mug of coffee, sit back and relax.
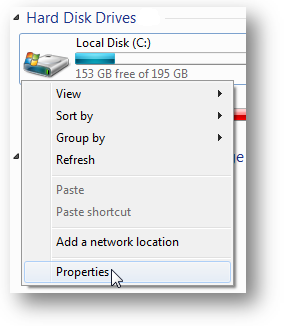
The process of running Check Disk is the same for all Windows versions, which makes things a lot easier. You can launch the tool in two ways – from (My) Computer or from the Command Prompt. Here is how it’s done from (My) Computer: 1. Go to Start and open (My) Computer
2. Right-click on the drive you wish to check and go to Properties
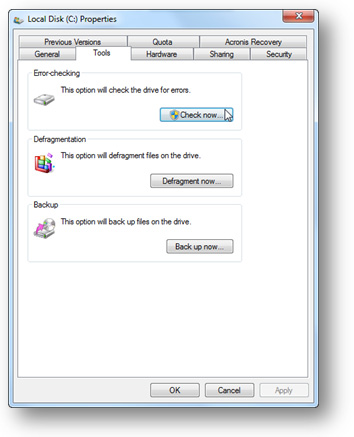
3. Go to the Tools tab and click on the Check Now button

23 | auslogics.com
TURBO WINDOWS® — The Ultimate PC Speed Up Guide
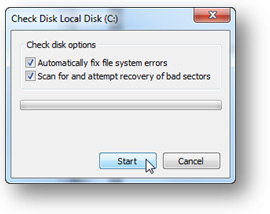
4. A pop-up window will appear and ask you whether you want to Automatically fix file system errors and Scan for and attempt recovery of bad sectors
Make sure you check both checkboxes – otherwise Check Disk will only report errors without fix-ing them.
5. Click Start to launch the tool.
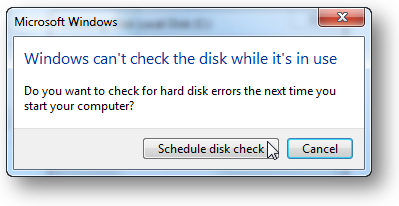
Like I said before, Check Disk needs exclusive access to the drive. This means that no other programs should be running. This includes Windows. So if you are checking your system drive, Check Disk will not be able to perform the scan straight away. Instead, it will offer you to schedule the scan for the next reboot. To do that, just click on Schedule Disk Check and then click OK.
Now it’s time to grab that mug of coffee, reboot your computer and let Check Disk do the work. And if you don’t feel like doing the disk checking after you reboot your PC, don’t worry - you’ll have 10 seconds to cancel.
It’s also possible to run Check Disk (CHKDSK) from the command prompt. I realize that most home users will never use the command prompt option, but I’ll describe how it’s done anyway, just in case you want to give it a go:
XP users
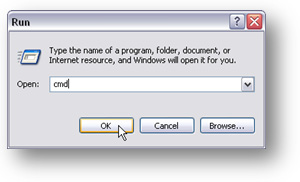
1. Click on Start and then click on Run
2. Type cmd in the box that appears and hit OK
24 | auslogics.com
TURBO WINDOWS® — The Ultimate PC Speed Up Guide
Windows 7 users
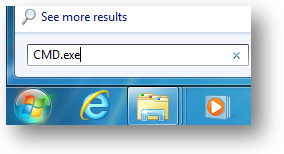
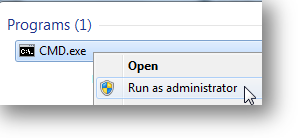
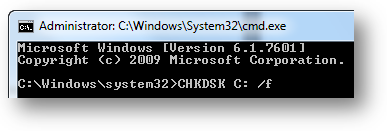
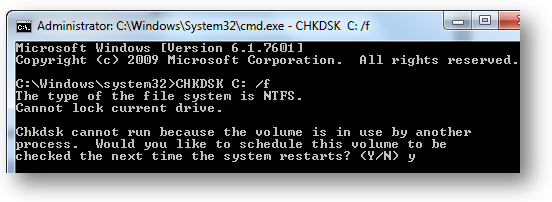
1. You will need to run CMD with administrative privileges. To do it, click on Start and type CMD.exe in the Search box 2. Don’t hit Enter, but right-click on CMD.exe and select Run as Administrator Now type CHKDSK C: /f in the DOS window. C: is the letter of the drive you will be checking and /f will make the tool fix file system errors
Check Disk will try to lock your drive and you will be prompted to schedule the task for the next reboot
25 | auslogics.com
TURBO WINDOWS® — The Ultimate PC Speed Up Guide
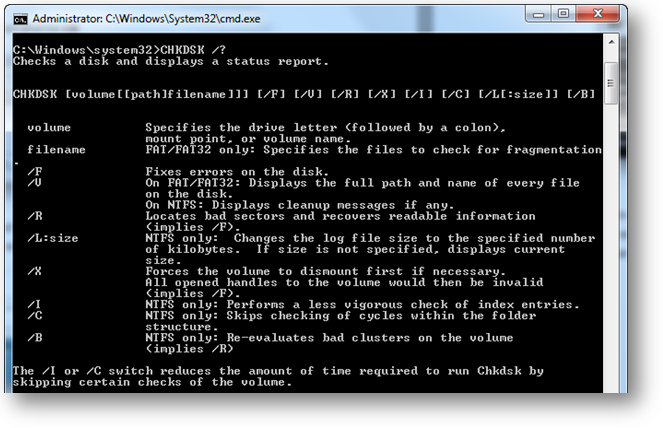
There are more command prompt options for CHKDSK, but you should only run them when you are totally at ease with the CMD interface. The full list of CHKDSK command prompt options can be found via the Command Prompt itself: just type CHKDSK /? to get the details of what each option does.
26 | auslogics.com
TURBO WINDOWS® — The Ultimate PC Speed Up Guide
C 3HAPTER
Computer Is Slow to Wake Up?
Optimize PC Startup
Most likely you can still remember the days when your computer took only several seconds to boot. But these blissful days are long gone and now your PC takes ages to start up. Why? Well, several things could be causing your computer’s sluggish startup, but most likely there are too many programs and background processes loading on Windows boot.
Delete unnecessary startup items
Even if you have a brand new laptop, there is a high chance that it has a lot of pre-installed software that is configured to load every time you switch your computer on. Frankly speaking, these programs can make your PC load longer and you don’t need all of them at startup anyway. And as you install more software, more programs automatically add themselves to your startup list. The more there are, the more RAM gets taken up on Windows boot. That’s how your computer becomes sluggish on startup. The solution is to go through your startup list and disable some of the programs. But before you do that you need to understand what sort of applications load automatically on Windows boot.
27 | auslogics.com
TURBO WINDOWS® — The Ultimate PC Speed Up Guide
When you launch your computer, Windows has to load a whole bunch of system files without which it can’t run. However, a lot of other programs also put themselves in the startup folder. These can be anything, from Google Update to Skype and Windows Live Messenger. Adobe programs are also notorious for launching on startup by default. If you are not sure which programs launch on startup and then run in the background, there is an easy way to find out:
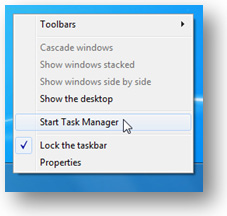
1. Right-click on the taskbar and select Start Task Manager
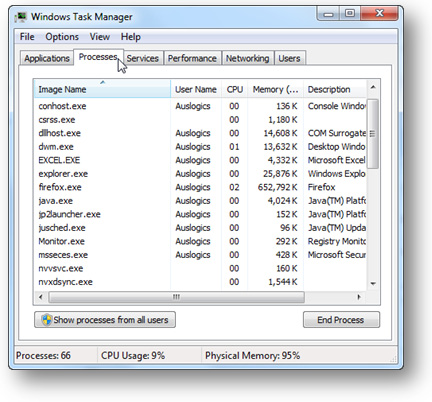
2. When the Task Manager opens, go to the Processes tab
You will now see all the processes running on your system and how much system resources each process takes up. As a rule, you are bound to find several processes belonging to utilities that check for software updates or make certain software launch faster.
The truth is, you don’t really need them running all the time and they can safely be disabled.
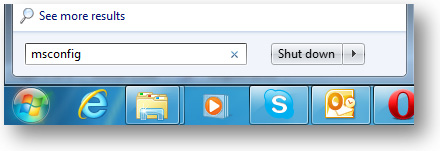
Unnecessary startup items are easy to manage with the help of the System Configuration Utility. Here’s how: 1. Click on the Start button, then click Run (for Windows XP) or Search Programs and files (for Windows 7)
28 | auslogics.com
TURBO WINDOWS® — The Ultimate PC Speed Up Guide
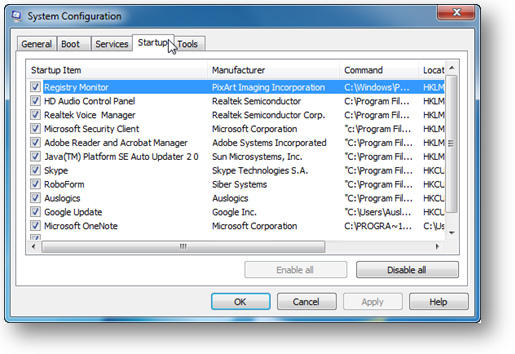
2. Type msconfig in the box and hit Enter. This will launch the System Configuration Utility 3. Go to the Startup tab. You will see a list of all programs launching on Windows startup
4. Now go through the list and simply uncheck the programs you don’t want to start automatically.
Be careful and don’t start disabling recklessly. If you don’t know what something is, it’s best to leave it alone or at least Google it before disabling.
5. Click Apply and then click OK
6. Reboot Windows for the changes to take effect.
I’m sure you’ve noticed that the System Configuration Utility doesn’t provide much information about the programs from the list.
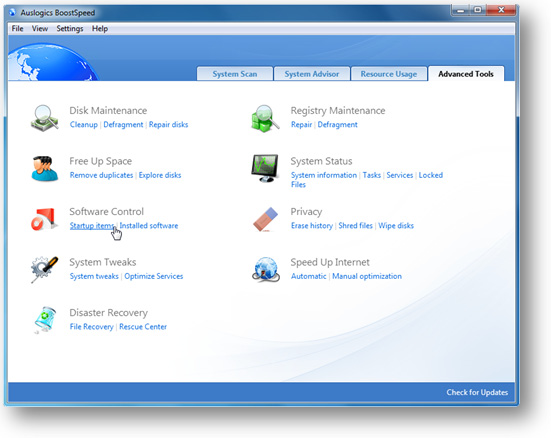
This doesn’t make things easier for you and is potentially dangerous. So if you want to be absolutely certain what you are disabling, it’s best to use a third-party startup management utility. Good quality startup managers, like Auslogics Startup Manager, provide detailed information about each entry, making it easy for you to work out which applications to disable. Here is how you can dis-
29 | auslogics.com
TURBO WINDOWS® — The Ultimate PC Speed Up Guide
able application loading on startup with Auslogics Startup Manager:
1. Open Auslogics BoostSpeed and go to the Advanced Tools tab
2. Under Software Control, click on Startup items
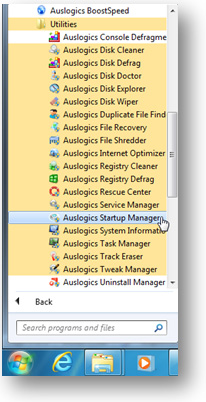
3. Wait for the Startup Manager to load.
You can also launch Auslogics Startup Manager di-
rectly by clicking on Start – All Programs – Auslogics
– BoostSpeed – Utilities – Auslogics Startup Man-
ager