Dreamweaver 8 Basics by Karthick - HTML preview
Download the book in PDF, ePub, Kindle for a complete version.
IV. Adding a Form
On the home page, we will put a simple mailto form so that people can order more information about Elephants by purchasing the fantastic book you have written about your own experiences. There are many methods that forms use to send and/or process information. A mailto form is the simplest. It takes the information inputed into the form fields and mails that information to the email address supplied in the form setup. Other forms may require cgi or perl scripting. We will not be looking at those types of forms in this workshop.
• Some things to think about when putting forms on your page: o what is the purpose of the form?
o what information do you want to gather?
Open your home page in Dreamweaver. Go to the bottom of the page just above the courtesy section and put your cursor in the empty space. Type in the text: "Order Elephants: Yours, Mine and Ours", press the enter key and type in "Latest Book by "your name"". Press the enter key. You are now ready to create your form.
A. Insert a Form Object1. Click on the Insert menu
2. Click on Form in the Form fly-out menu. This will insert the initial form tags to place the form objects in. In Dreamweaver, this is indicated by a red box on your page. Always make sure you are inside of the red box when inserting form objects.
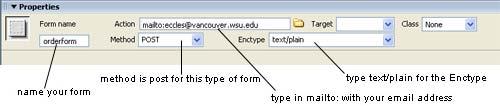
3. Enter a name for your form in the Property Inspector.
4. Enter mailto:youremail@youraddress in the Action box.
5. Leave the method as POST.
6. Type text/plain in the Enctype box.
 B. Form Objects
 When choosing "Form" from the Insert menu, several "form object" choices are available other than the generic "form" choice. They are as follows:
1. Text Field - for entering text
2. Textarea - provides a space of set dimensions in which the user may input data
3. Button - for the submit or reset buttons
4. Checkbox - for when there is more than one selection possible
5. Radio Button - for when there can be only one item selected
6. List/Menu - for when there is a list of items to select from
7. File Field - for allowing a users to browse for file on their computers and upload the file as form data
8. Image Field - for making graphical buttons
9. Hidden Field - stores information entered for use in later visits to the site
10. Radio Group - lets you dynamically pre-select a radio button within a group of buttons when the page is displayed, or when a record is displayed within the HTML form
11. Jump Menu - a popup menu for linking to documents, files, or other pages/sites
12. Fieldset - a container tag for a logical group of form elements
13. Label - provides a way to structurally associate the text label for a field with the field
Click on the Insert menu
1. Click on Form.
2. Click on Text Field. This will place a text field in your form.
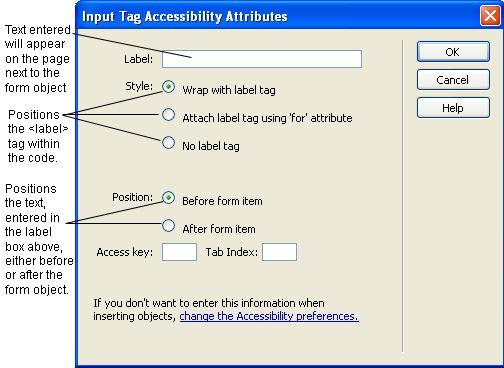
Note The Input Tag Accessibility Window may appear prior to inserting your form object. In this window, accessibilty options can be made. Screen readers will be able to read the label attribute. For our purposes while building this form, we will leave the Input Tag Accessibility Attributes as is and click OK.
3. Click on the Text Field object to select it.
4. Name the Field in the Property Inspector.
5. Enter 30 for the Character Width.
6. Enter 80 for the Max Characters.
7. Select Single Line for the type.
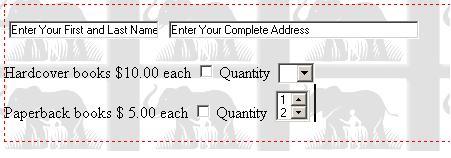
8. Type "Enter Your First and Last Name" in the Initial Value field.
9. Place the cursor at the end of the text box outside of the box.

10. Insert another Text Field.
11. Name the Field: address.
12. Use 50 for Character Width, 100 for Max Characters, single line for type, and "Enter Your Complete Address" for the Initial Value.
13. Click at the end of this Text Field, outside of the text box.
14. Press the Enter key.
15. Your fields should look similar to the following:
 D. Insert Checkboxes
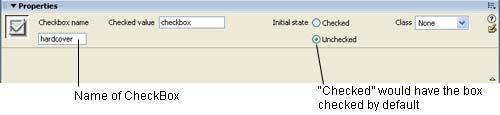
Checkboxes are generally used to allow a person to select various items. Checkboxes allow more than one selection to be made. In this case, the user could select hardcover books and paperback books. Radio buttons are generally used when you want to allow the user only one choice.
1. Type in "Hardcover books $10.00 each".
2. Click on the Insert menu.
3. Click on Form.
4. Click on Checkbox. This will place a checkbox after the typed text.
5. Enter a name for the object.
6. Leave the other values in the Property Inspector as is.
7. Click at the end of the checkbox outside of it.
8. Insert a line break. Using the insert menu go to HTML, then over to Special Characters, then select Line Break (or use the keyboard shortcut sift+enter).
9. Type in "Paperback books $5.00."
10. Click on the Insert menu.
11. Click on Form.
12. Click on Checkbox. This will place a checkbox after the typed text.
13. Enter a name for the object (paperback).
14. Leave the other values in the Property Inspector as is.
1. Click in the space after the first (hardcover) checkbox.
2. Type in "Quantity".
3. Click on the Insert menu.
4. Click on Form.
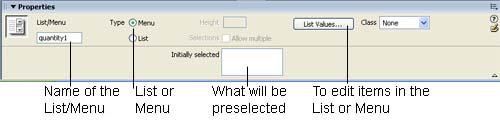
5. Click on List/Menu. This will place a menu list after the typed text.
6. Enter a name for the object (quantity1 since we will have two quantity objects).
7. Select Menu for the type.
8. Leave the Initially Selected area blank.
9. Click on the List Values button.
10. Enter the number 1 in the Item label box.
11. Press the tab key.
12. Enter the number 1 for the value.
13. Press the tab key to go to the next item.
14. Continue entering numbers in the item label and value boxes through the number 4, pressing the tab key after each number until you are in the value box with the number 4.
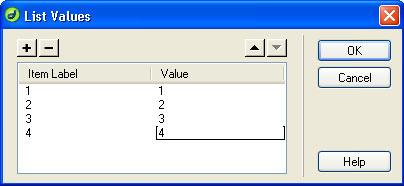
15. Click on the OK button. (NOTE: you won't be able to see these menu values in the editor, but you can by previewing the page in the Web browser (save the page, press F12 and click on the browser refresh button).
16. Click in the space after the checkbox for Paperback books.
17. Type in Quantity.
18. Insert another List/Menu object. This time select List as the type of object.
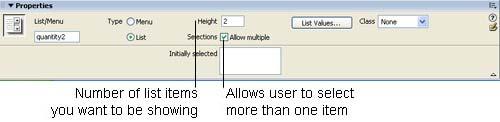
19. Enter quantity2 for the object name.
20. Enter 2 for the Height. This is the number of items that will show in our list.
21. Check the box for Allow Multiple. This allows the user to choose more than one item in the list (While not practical for this particular list, it is useful for other types of lists.).
22. Click on the List Values button and enter the numbers 1 through 4 just as with the first list/menu object.
23. Press the Enter key.
 F. Insert Radio Buttons
1. Insert another line break after the quantity list.
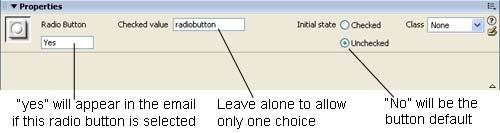
2. Type "Would you like your book(s) gift wrapped? Yes".
3. Insert a radio button (From the "Insert" menu go to the "Form" fly-out window and choose "Radio Button")
4. Click on the radio button to select it. In the property inspector type "yes" in the name field of the Radio Button. Leave the Checked value box text as "radiobutton". Choose "Unchecked" for the initial state of the radio button.
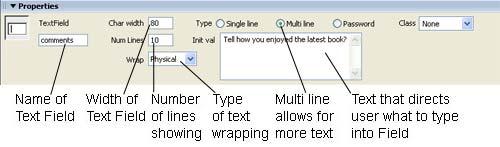
 G. Insert A Multi Line Text Field
1. Insert a line break.
2. Insert a text field (From the "Insert" menu go to the "Form" fly-out window and choose "Text Field")
3. Click on the text field to select it. In the property inspector type "comments" in the TextField name box.
4. Click the Multi line radio button. This will allow the text to scroll if multiple lines of text are entered in the text field of the form.
5. Type 80 for Char width and 10 for Num Lines.
6. Select "Physical" for text wrapping.
7. Enter some text for the Int val which will appear in the text field. For this example we have typed "Tell how you enjoyed the latest book".
 H. Insert Submit and Reset Buttons
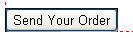
1. Insert another line break after the "text field".
2. Insert a button (From the "Insert" menu go to the "Form" fly-out window and choose "Button")
3. Click on the button to select it. In the property inspector type "Submit" in the Button name box.
4. Change the Value to "Send Your Order". This is the text that will appear on the button.
5. Click the "Submit Form" radio button for the action.
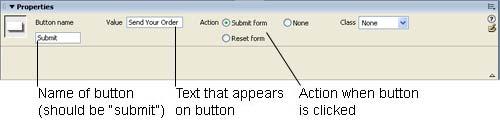
1. Click to the right of the "Send Your Order" button.
2. Insert another button (From the "Insert" menu go to the "Form" fly-out window and choose "Button")
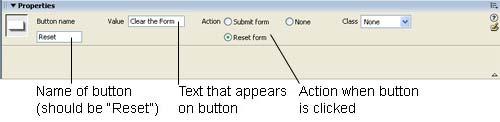
3. Click on the button to select it. In the property inspector type "Reset" in the Button name box.
4. Change the Value to "Clear the Form ". This is the text that will appear on the button.
5. Click the "Reset form" radio button to set the buttons action.
Once you have saved your document you can preview your web page in the default browser
by pushing F12, or from the objects toolbar, click the
 "Preview/Debug in browser" Earth shaped icon and select a browser from the list.
You may also like...
-

Facebook Domination: The Secret Strategy for Unlimited Free Traffic Tutorials by James FunicelloFacebook Domination: The Secret Strategy for Unlimited Free Traffic
Reads:
92Pages:
32Published:
Apr 2024Master Facebook marketing with this e-book, designed to teach you how to drive significant traffic without ads. Learn from actionable strategies and insights ...
Formats: PDF, Epub, Kindle, TXT
-

Autopilot+ - How to passively make $1000 a day with a 5 minutes setup Tutorials by Adribus TedAutopilot+ - How to passively make $1000 a day with a 5 minutes setup
Reads:
543Pages:
30Published:
Nov 2022With this eBook, you will learn how to make thousands of dollars daily with a very easy one-time setup. Enjoy!
Formats: PDF, Epub, Kindle, TXT
-

BILD 9 Tutorials by Kista GrundskolaBILD 9
Reads:
46Pages:
50Published:
Aug 2021Art tutorials grade 9. A step by step guide to drawing, painting, sculpting, analyzing within the curriculum of Art in Swedish public school.
Formats: PDF, Epub
-

BILD 8 Tutorials by Kista GrundskolaBILD 8
Reads:
28Pages:
48Published:
Aug 2021Art tutorials grade 8. A step by step guide to drawing, painting, sculpting, analyzing within the curriculum of Art in Swedish public school.
Formats: PDF, Epub