General Fabric Repair by Department of the Army - HTML preview
Download the book in PDF, ePub, Kindle for a complete version.
inch from the edge. To make a plain seam--
(1) Place piece A faceup on the sewing table.
(2) Place piece B facedown on top of piece A.
(3) Adjust the two layers so that the right edges are even.
(4) Tack the beginning of the seam, and then sew a row of stitches 1/4 inch from and
parallel to the right edge.
(5) Tack the end of the seam.
A
B
A
B
1/4 INCH
Figure 8-2. Plain seam on canvas
8-2
FM 10-16
b. Hemming Seam. Seam type 1 is a hemming seam. It is similar to the hemming seam used on
clothing. The three kinds of hems sewn on canvas are single-edge, grommeted, and four-sided.
(1) Single-Edge Hem. A single-edge hem (Figure 8-3) is used to finish one edge on a
canvas item that does not have grommets. To sew a single-edge hem--
(a) Place the piece of canvas facedown on a worktable.
(b) With a ruler and chalk, mark a line 1 inch from the raw edge.
(c) Fold the raw edge of the canvas up and over to the left until it meets the chalk
line to form a 1/2-inch turn under.
(d) Crease the folded edge in place with the handle of a pair of shears.
(e) Mark a second chalk line 2 inches to the left of the folded edge.
(f) Fold the cloth to the left again until the folded edge meets the second chalk line
to form a 1-inch hem.
(g) Crease the second folded edge in place with the handle of a pair of shears.
(h) Tack the beginning of the seam, and then sew a row of stitches 1/8 inch to the
right of the second folded edge.
(i) Tack the end of the seam.
1 INCH
CHALK LINE
2 INCHES
1/8 INCH
Figure 8-3. Single-edge hem
8-3
FM 10-16
(2) Grommeted Hem. A grommeted hem (Figure 8-4) is used to finish an edge where
grommets will be installed. Extra fabric is required to give the hem added strength. To sew a grommeted hem--
(a) Place the piece of canvas facedown on a worktable.
(b) With a ruler and chalk, mark a line 4 inches from the raw edge.
(c) Fold the raw edge of the canvas up and over to the left until it meets the chalk
line to form a 2-inch turnunder.
(d) Crease the folded edge in place with the handle of a pair of shears.
(e) Mark a second chalk line 4 inches to the left of the folded edge.
(f) Fold the cloth to the left again until the folded edge meets the second chalk line
to form a 2-inch hem.
(g) Crease the second folded edge in place with the handle of a pair of shears.
(h) Tack the beginning of the seam, and then sew a row of stitches 1/8 inch to the
right of the second folded edge.
(i) Tack the end of the seam.
4 INCHES
CHALK LINE
4 INCHES
1/8 INCH
Figure 8-4. Seam type 1--Grommeted hem
8-4
FM 10-16
(3) Four-Sided Hem. A four-sided hem (Figure 8-5) is used to finish a rectangular piece of
canvas completely on all sides. To make a four-sided hem--
(a) Square a 12- by 12-inch piece of material. Using the straight edge (ruler), make
a 1/2-inch mark on all four sides of the material. After this is completed, use the ruler to connect these marks.
NOTE: The 1/2-inch marks will be your fold lines to be folded under.
(b) For the hem width using a ruler, mark 1-inch marks from the 1/2-inch fold line
completely around the piece of material. Using a straight edge, align these marks and connect them around the material.
(c) After competing the above two steps, turn the material over and fold on the
1/2-inch mark (folding right side, bottom, left side, then top). Now take the 1-inch mark and do the same.
NOTE: Always fold material so that the stitch lines are visible to you. By doing this, you can tell if you are going off, or if the stitch line is crooked.
(d) With the folded edge up, place the material under the presser foot and insert the
needle 1/8 inch from the inside hem edge. Sew toward the bottom until the needle catches the bottom hem fold 1/8 inch. Turn the material until you have the corner facing you and sew diagonally toward the corner until the needle reaches within 1/8 inch from the corner. Raise the presser foot while the needle is still intact in the material and turn the material so that the stitch line is toward you. Again, turn the material until the stitched hem is at the top. Sew straight down 1/8 inch away from the edge. Sew the remaining corners in the same manner until the needle reaches the starting point. Sew over the stitches previously made 1 inch for tacking.
1/2 INCH TURN UNDER
A
A
C
A
B
B
FOLD RIGHT
1 INCH
FOLD BOTTOM
FOLD LEFT SIDE
SIDE
FOLD
1/2 INCH TURN UNDER
1 INCH
STARTING
TACK
POINT
FOLD TOP
STITCH 1/8 INCH FROM FOLD
Figure 8-5. Four-sided hem
8-5
FM 10-16
c. Flat Seam (Figure 8-6). A flat seam is used to join two pieces of canvas that have selvage edges.
A selvage edge is a woven edge that will not unravel. A flat seam is used when a seam has to be finished on the outside and the inside, such as the seams of tents, tarpaulins, and truck covers. To make a flat seam--
(1) Place piece A faceup on a worktable with the selvage edge to the left.
(2) With a ruler and chalk, measure and mark a chalk line 1 inch from and parallel to the
selvage edge.
(3) Place piece B faceup on top of piece A so that the selvage edge of B is on the chalk line.
(4) Tack the beginning of the seam, and sew the two pieces together with a row of stitches
1/8 inch to the left of the selvage edge of B. Tack the end of the seam.
(5) Turn both pieces of canvas facedown.
(6) Tack the beginning of the seam, and sew a second row of stitches 1/8 inch to the right
of the selvage edge of A. Tack the end of the seam.
CHALK
LINE
B SELVAGES EGES A B A 1 INCH
Figure 8-6. Flat seam
8-6
FM 10-16
d. Single-Felled Seam. The single-felled seam (Figure 8-7) is similar to the welt seam used on clothing, but the single-felled seam is sewn with two rows of stitches. This seam is used to join two pieces of canvas when the outside has to be finished and the inside does not. It is also used to sew on patches. To make a single-felled seam--
(1) Sew piece A and piece B together with a simple seam but stitch the seam 1 inch from
the right edge.
(2) Lift piece A up and over to the right so that both pieces are faceup and both seam
allowances are to the right underneath.
(3) Tack the beginning of the seam, and sew a row of stitches 1/8 inch to the right of the
fold through all three layers (piece A and seam allowances). Tack the end of the seam.
(4) Turn the pieces facedown.
(5) Tack the beginning of the seam, and sew a row of stitches 1/8 inch to the right of the
raw edges through all three layers. Tack the end of the seam.
1 inch Tack
Stitch
A B A B
Mark and sew
1 inch from
Right Edge
1 inch Tack
Stitch
Mark Materials “A” and “B” Place Material “A” Over Material “B”
1 inch
Tack Stitch 1 inch Tack Stitch
A
B
B
A
Stitch 1/8 inch
from Fold
1 inch
Tack
1 inch Tack
Stitch
Stitch
Fold “A” to Right and Stitch 1/8 inch From Felled Edge Turn Materials Over
Figure 8-7. Single-felled seam
8-7
FM 10-16
e. Double-Felled Seam. The double-felled seam (Figure 8-8) is similar in appearance to the double-lapped seam used on clothing. This seam is used to join two pieces of canvas when the outside and the inside of the seam have to be finished with no exposed raw edges. To make a double-felled seam--
(1) Place piece A faceup on a worktable.
(2) With a ruler and chalk, mark a chalk line 1 inch from and parallel to the left edge.
(3) Place piece B facedown on a worktable.
(4) With a ruler and chalk, mark a chalk line 1 inch from and parallel to the left edge.
(5) Place piece B facedown on piece A. Align the left edge of piece B with the chalk line
of piece A.
(6) Tack the beginning of the seam, and sew the two pieces of canvas together by stitching
a seam on the chalk line of piece B. Tack the end of the seam.
(7) Fold the left edge of piece A up and over to the left on the stitch row of B.
(8) Fold the right side of piece B up and over to the left on the seam line so that both pieces are faceup.
(9) Tack the beginning of the seam, and sew a row of stitches 1/8 inch to the left of the
folded edge. Tack the end of the seam.
(10) Turn both pieces of canvas over so that they are facedown.
(11) Tack the beginning of the seam, and sew another row of stitches 1/8 inch to the left of
the folded edge. Tack the end of the seam.
8-8

FM 10-16
1 inch
Tack Stitch
B A A B
Stitch 1
inch from
edge of
material
“A”
1 inch Tack
Stitch
Measure and mark Measure and mark Place material “A” over
1 inch from right 1 inch from right material “B”.
edge. edge.
1 inch
1 inch
Tack Stitch
Tack Stitch
B B A A B
1 inch
1 inch Tack
Stitch
Fold material “B” Stitches must be 1/8 inch Stitches must be 1/8 inch even with edge. from edge. from both edges.
Figure 8-8. Double-felled seam
8-9
FM 10-16
CHAPTER 9
SEWING REPAIRS TO CANVAS
9-1. REPAIRING CANVAS
Canvas items are made of duck. Duck is a heavy, closely woven, cotton fabric. It is a sturdy fabric, but like all cotton cloth, it is subject to wear. It weakens with age, washings, and use. Tents and canvas items are mended by fabric repair specialists. Some repairs, such as replacing a rivet, do not require sewing. Repairs which require sewing include darning, patching, remaking buttonholes, and replacing zippers and stovepipe openings.
9-2. DARNING
Darns are used to repair small holes and worn areas in all canvas items except tents. Darns are made by machine or by hand. Machine darning is preferred to hand darning. See the appropriate technical manuals for instructions on how to darn on canvas using a darning machine or a heavy-duty sewing machine. The four kinds of darns used on canvas are circular, zigzag, reinforced, and overedge.
a. Circular Darn. The circular darn is used to repair small holes and worn areas in canvas that measure less than 1/2 inch across. A circular darn is also used on clothing. The procedures used to make a circular darn are on page 4-1 .
b. Zigzag Darn. The zigzag darn is used to repair splits and straight tears in canvas where no fabric is missing. It is used to mend holes in clothing, but not in canvas. The directions for zigzag darn are on page 4-3.
c. Reinforced Darn. The reinforced darn is used to repair holes in canvas that measure 1/4 to 3/4
inch across. The instructions on page 4-5 describe how to make a reinforced darn.
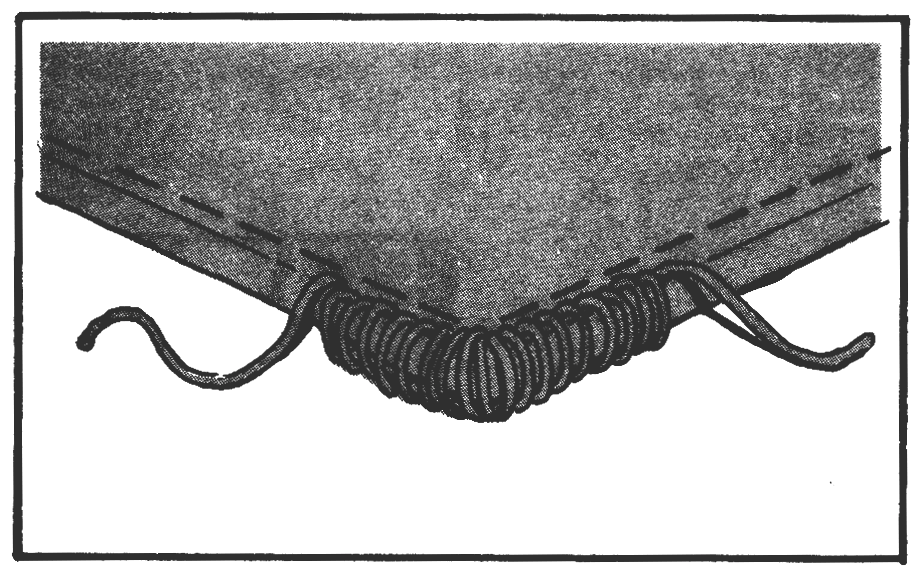
d. Overedge Darn. The overedge darn (Figure 9-1) is used to repair worn corded seams and
bindings. It is not used on clothing. To make an overedge darn--
(1) Turn the canvas item faceup.
(2) Anchor the thread on the underside by sticking the needle up through the canvas near
the cording.
(3) Stick the needle back down into the canvas on the other side of the cording.
(4) Continue to stitch around the cording in a circular or overhand fashion until the
damaged area is covered.
(5) Knot the thread on the underside near the cording, and cut the thread close to the knot.
9-1
FM 10-16
Figure 9-1. Overedge darn
9-3. PATCHING
Patches are used to repair holes and tears in tents. They are used to repair holes and tears that measure more than 3/4 inch across in other canvas items. Patches are used also to repair large worn areas of canvas. Patches are cut from scrapped canvas which is the same color and texture as the canvas to be mended. Items made of waterproof, fire-resistant, and mildew-resistant canvas are patched with canvas that has received the same protective treatment. Several kinds of patches are used to repair canvas. They are described below.
a. Simple Canvas Patch. The simple canvas patch is sewn over or under the damaged area of
canvas. The two kinds of simple canvas patches are the top patch and the inverted patch.
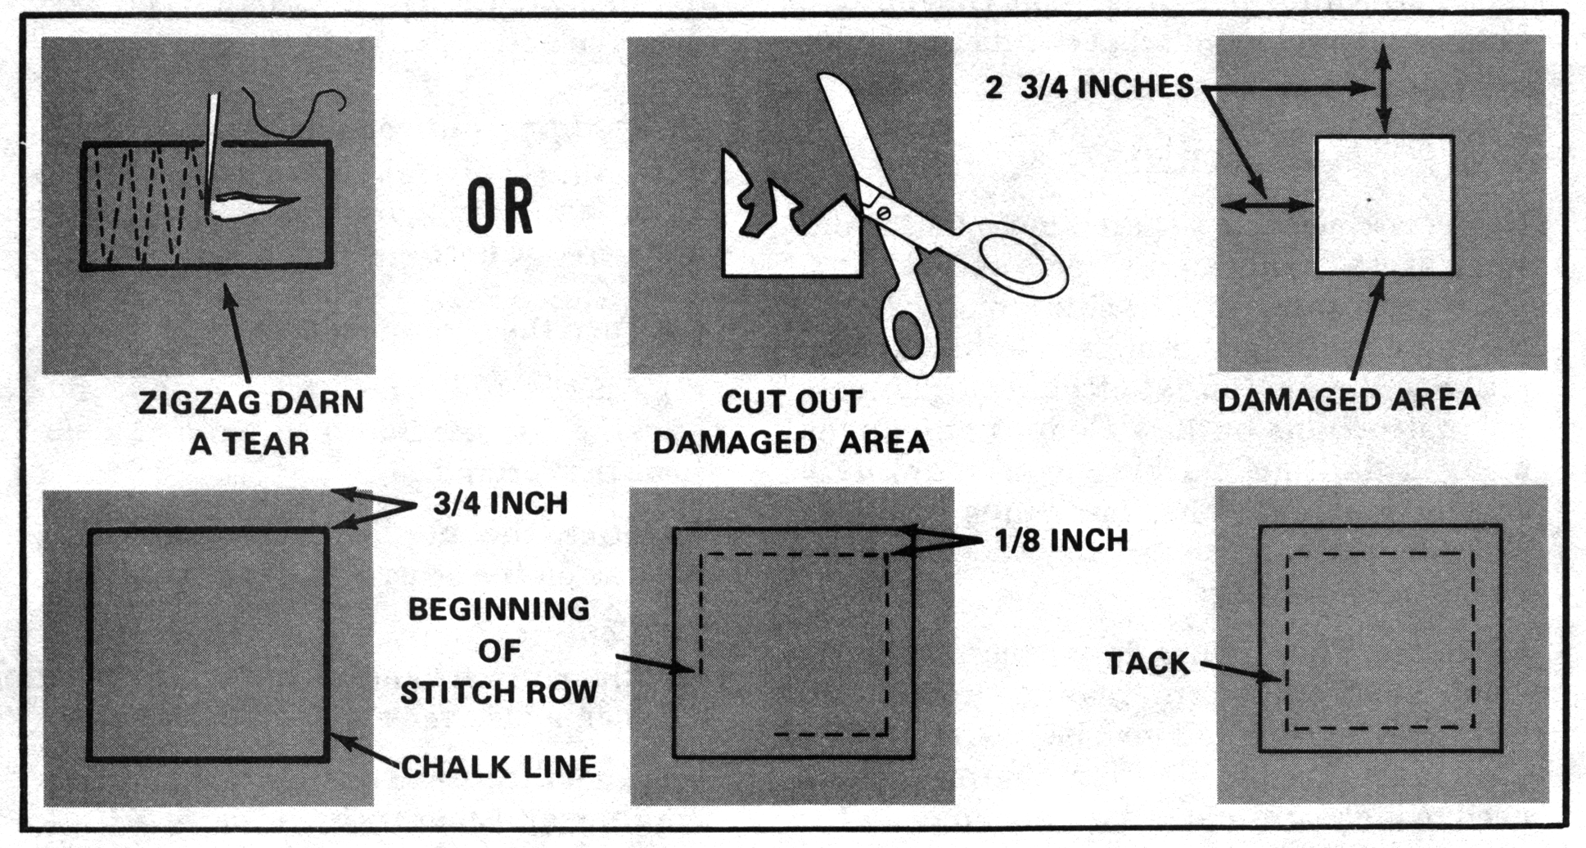
(1). Simple Canvas Top Patch. A simple canvas top patch (Figure 9-2) is sewn to the top
side of canvas. It is the easiest patch to make and to attach to damaged canvas. To make the simple canvas top patch--
(a) Zigzag darn the edges of a rip or tear together to prevent further damage, if no
canvas is missing. If canvas is missing, cut out the damaged area in the shape of a rectangle.
(b) Place the damaged area faceup on a worktable.
(c) Measure the damaged area.
9-2
FM 10-16
(d) Cut a rectangular patch from matching canvas. Make the patch large enough to
extend 2 3/4 inches beyond the damaged area on all four sides.
(e) Place the patch faceup on a worktable.
(f) Draw chalk lines 3/4 inch from all four raw edges.
(g) Fold under the raw edges on the chalk lines, and crease the folded edges in
place with the handle of a pair of shears.
(h) Center the patch faceup on top of the damaged area.
(i) Sew on the patch by stitching a seam 1/8 inch from the folded edges on all four
sides of the patch. Pivot the canvas and patch on the needle at the corners. Sew over the first stitches for at least 1 inch to tack the seam.
Figure 9-2. Simple canvas top patch
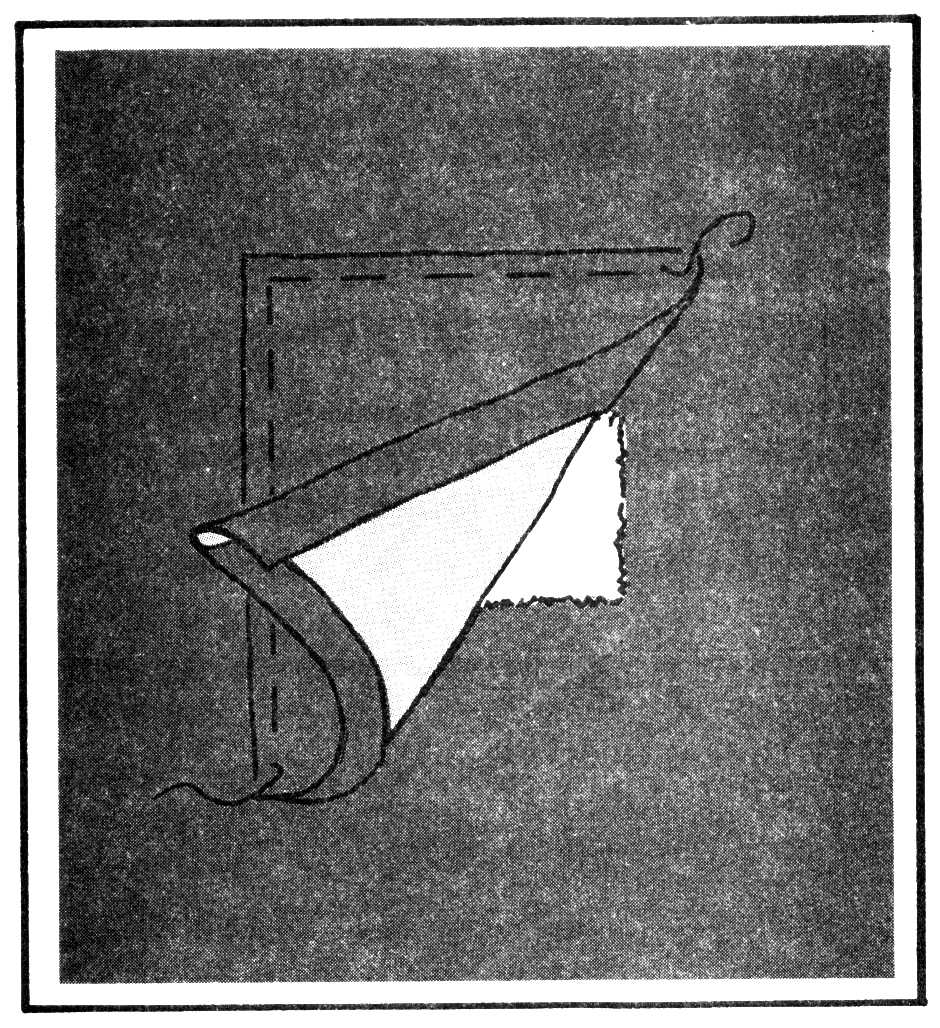
(2) Simple Canvas Inverted Patch. A simple canvas inverted patch (Figure 9-3) is sewn to
the inside or the underside of the canvas. To make this patch, follow the directions in the previous paragraph, but center the patch on the underside of the canvas and secure it in place.
9-3
FM 10-16
Figure 9-3. Simple canvas inverted patch
b. Felled Canvas Patch. The felled canvas patch, like the simple canvas patch, is sewn over or under a damaged area of canvas. Unlike the simple canvas patch, the raw edges of the damaged area are trimmed and neatly finished. The two kinds of felled canvas patches are the top patch and the inverted patch.
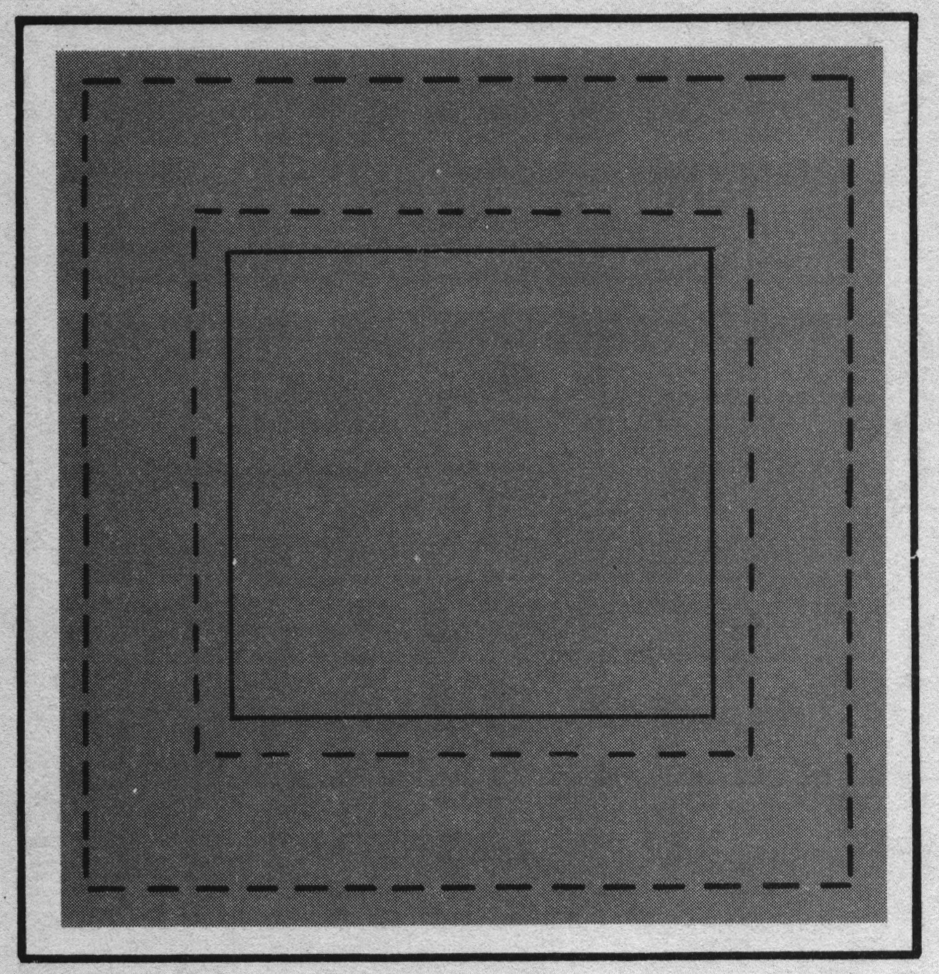
(1) Felled Canvas Top Patch. The felled canvas top patch (Figure 9-4) is sewn to the top
side of canvas. To make a felled canvas top patch--
(a) Cut out the damaged area in the shape of a rectangle.
(b) Place the damaged area faceup on a worktable.
(c) Measure the damaged area.
(d) Cut a rectangular patch from matching canvas. Make the patch large enough to
extend 2 3/4 inches beyond the damaged area on all four sides.
(e) Place the patch faceup on a worktable.
(f) Draw chalk lines 3/4 inch from all four raw edges.
(g) Fold under the raw edges on the chalk lines, and crease the folded edges in
place.
(h) Center the patch faceup on top of the damaged area.
9-4

FM 10-16
(i) Sew on the patch by stitching a seam 1/8 inch from the folded edges on all four
sides of the patch. Pivot the canvas and patch on the needle at each corner. Sew over the first stitches for at least 1 inch to tack the seam.
(j) On the underside, measure 1/2 inch from each side of the cutout area, and draw a
rectangle with chalk.
(k) Clip each corner of the cutout area diagonally.
(l) Fold under the raw edges 1/2 inch, and crease the folded edges in place with the
handle of a pair of shears.
(m) Stitch a seam around the hole 1/8 inch from the folded edges. Sew over the
first stitches for at least 1 inch to tack the seam.
Figure 9-4. Felled canvas top patch
(2) Felled Canvas Inverted Patch. A felled canvas inverted patch (Figure 9-5) is sewn to
the inside or the underside of canvas. To make this patch, follow the directions given in the pervious paragraph, but center the patch faceup on the damaged area on the underside of the canvas, and secure it in place. Clip the corners on the topside of the canvas, fold the tabs under, and stitch them in place.
9-5
FM 10-16
Figure 9-5. Felled canvas inverted patch
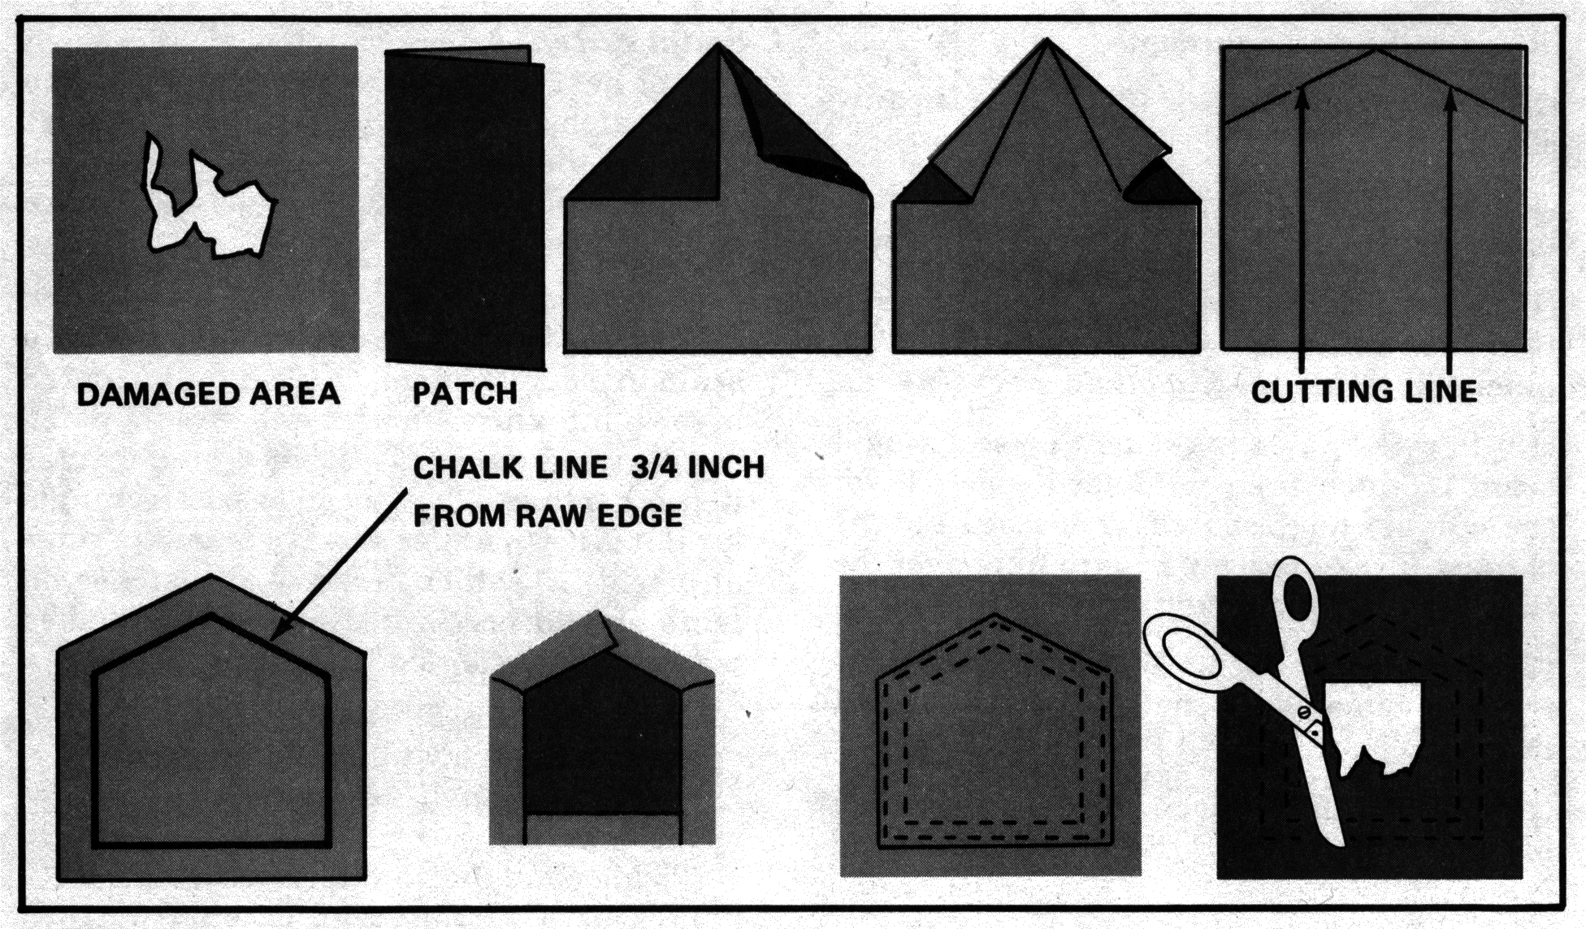
c. Watershed Patch. The watershed patch (Figure 9-6) is a five-sided patch used on the outside of tents. The slant of the two top edges allows water to run off so that it does not collect in the top edge seaming. For this reason, the watershed patch lasts longer than a rectangular patch. Using a watershed patch to repair a tent is preferable to using a rectangular patch. However, a rectangular patch can be used under an eave where the top edge is protected. It can also be used to straddle a ridge on a tent where the top and bottom of the patch are slanted toward the ground. To make a watershed patch--
(1) Measure the damaged area.
(2) Cut a patch from matching canvas. Make the patch large enough to extend 2 3/4 inches
beyond the damaged area on all four sides.
(3) Fold the patch in half lengthwise. Crease the folded edge with the handle of a pair of
shears.
(4) Unfold the patch.
(5) Fold the top right-hand corner to the crease in the center.
(6) Fold the top left hand corner even with the right-hand corner, and crease these folds in
place.
(7) Fold the inside corner of each triangle to the edge of the outside fold. Crease these
folds in place.
(8) Unfold the patch. Cut off the top corners, using the creases closest to the corners as
cutting lines.
(9) Turn the patch faceup.
(10) Draw chalk lines 3/4 inch from the raw edges.
9-6
FM 10-16
(11) Fold under the raw edges on the chalk lines, and crease the folded edges in place.
(12) Center the patch on the damaged area so that the two slanted edges at the top of the
patch will point upward on an erect tent.
(13) Sew the patch to the tent by stitching a seam 1/8 inch from the folded edges. Pivot the
canvas and the patch on the needle at the corners. Tack the seam by stitching over the first stitches for at least 1 inch.
(14) Sew a second seam 3/8 to 1/2 inch inside the first seam. Tack the seam for at least 1
inch.
(15) Cut out the damaged area on the inside of the tent to within 1/8 inch of the second
seam.
Figure 9-6. Watershed patch
d. Seam Patch. A seam patch is a patch sewn over or next to a seam in a canvas item. The seam patch can be rectangular or slanted at the top so that it sheds water better. There are several kinds of seam patches. They are described below.
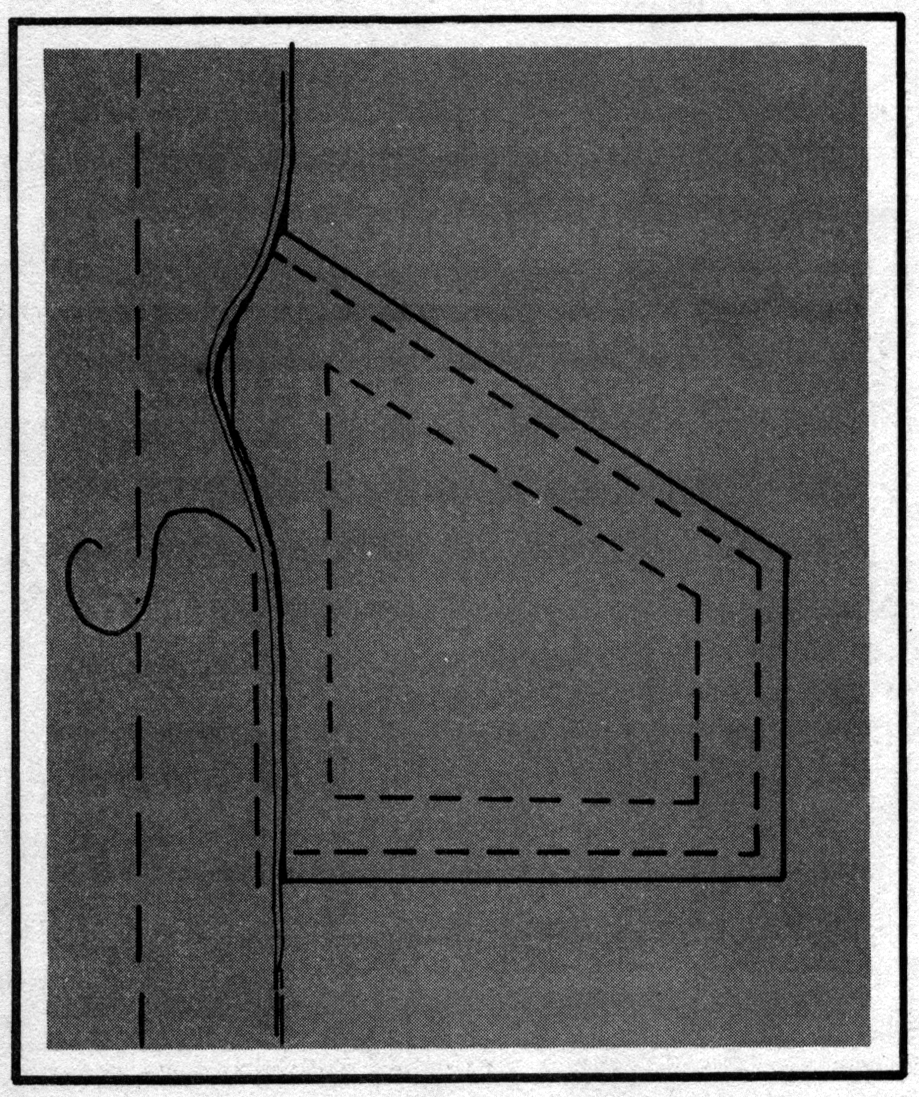
(1) Under-Seam Patch. An under-seam patch (Figure 9-7) is used to repair damage near a
seam in a canvas item. An under-seam patch can be rectangular if it is used on a canvas item other than a tent. It can also be rectangular if it is sewn under an eave or on the ridge of a tent. All other under-seam patches on tents should be slanted at the top to shed water. To make an under-seam patch--
9-7
FM 10-16
(a) Open the seam next to the damaged area by cutting through one row of stitches
6 inches above and below the damaged area.
(b) Measure the damaged area.
(c) Cut a rectangular patch large enough to extend inside the open seam on one side
and 2 3/4 inches beyond the damage on the other three sides.
(d) Determine which top corner will not be tucked into the seam if the patch should
be slanted to shed water. Fold that corner down until it aligns with the side that will be tucked in the seam.
Crease the folded edge in place. Fold the corner back to the crease. Crease the second folded edge in place.
Unfold the patch. Cut off the top corner, using the top crease as a cutting line.
(e) Place the patch faceup on a worktable.
(f) Draw chalk lines 3/4 inch from the raw edges on three sides. Do not mark on
the side that will be tucked into the seam.
(g) Turn under the three edges on the chalk lines, and crease the folded edges in
place.
(h) Center the patch faceup over the damage. Position a watershed patch so that
the slanted side will be at the top on an erect tent.
(i) Tuck the flat raw edge of the patch into the open seam.
(j) Sew the patch to the tent or canvas item by stitching 1/8 inch from the folded
edges on three sides. Tack the seam for at least 1 inch.
(k) Sew the fourth side in place. Close the open seam by stitching a seam 1 inch
above the opening to 1 inch below the opening. Tack the seam at each end for at least 1 inch. Use the previous seam line as a stitching guide.
(l) Sew a second seam 3/8 to 1/2 inch inside the first seam. Tack the seam at each
end for at leas 1 inch.
(m) Cut out the damaged area on the underside to within 1/8 inch of the second
seam.
9-8
FM 10-16
Figure 9-7. Under-seam patch
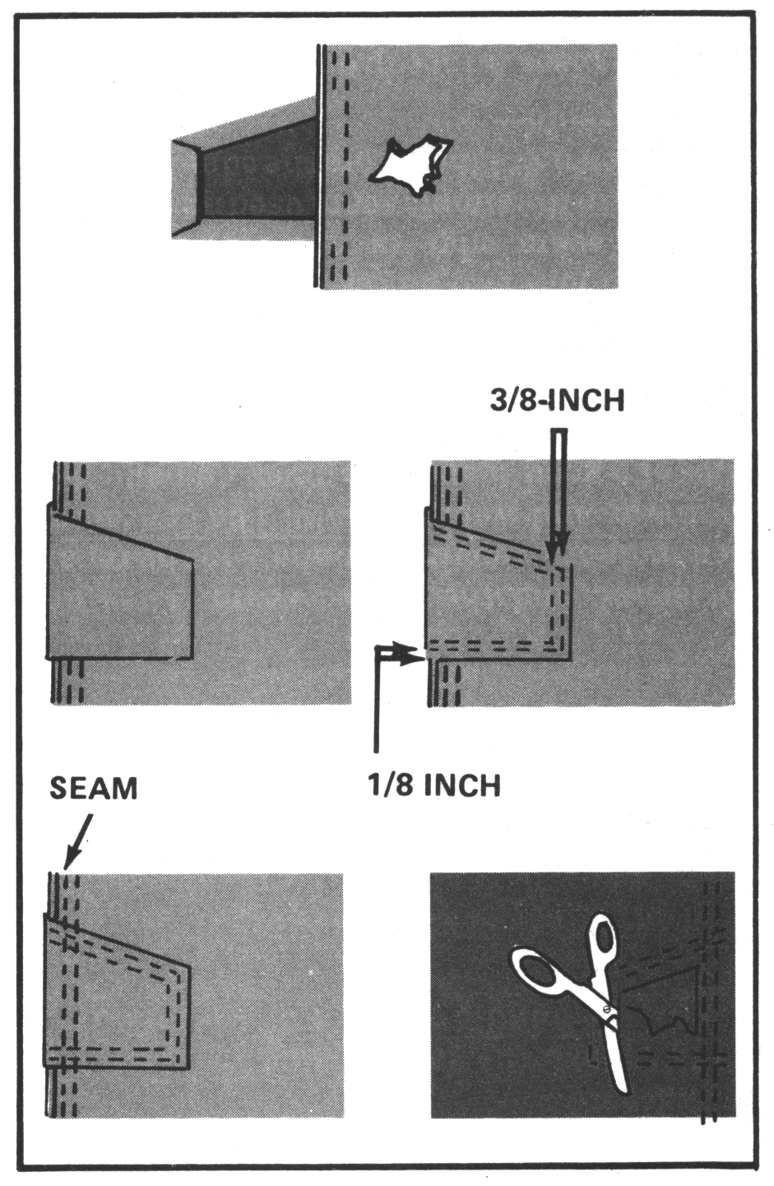
(2) On-Seam Patch. An on-seam patch (Figure 9-8) is like an under-seam patch in that it is
used to repair damage near a seam in a canvas item. It differs from the under-seam patch in that it overlaps the seam. To make an on-seam patch--
(a) Open the seam next to the damaged area by cutting through on row of stitches 6
inches above and below the damage.
(b) Measure the damaged area.
(c) Cut a rectangular patch from matching canvas. Make the patch large enough to
overlap the seam on one side and extend 2 3/4 inches beyond the damage on the other three sides.
(d) Determine which corner will not overlap the seam if the patch should be slanted
to shed water. Turn that corner down until it aligns with the side that will overlap the seam. Crease the folded edge in place. Fold the corner back to the crease. Crease the second folded edge in place. Unfold the patch. Cut off the top corner, using the top crease as a cutting line.
(e) Place the patch faceup on a worktable.
(f) Draw chalk lines 3/4 inch from the raw edges on three sides. Do not mark on
the side that will overlap the seam.
(g) Turn under the edges on the chalk line, and crease the folded edges in place.
(h) Turn the patch facedown.
(i) Tuck the flat raw edge of the patch into the open seam.
9-9
FM 10-16
(j) Hold the flat raw edge in place so that the patch does not slip out of the open
seam. Fold the patch up and over to the opposite side so that the patch is now faceup and centered over the damage.
(k) Sew a seam 1/8 inch from the folded edge on the three sides that are not
overlapping the seam. Tack the seam at each end for at least 1 inch.
(l) Sew a second seam 3/8 to 1/2 inch inside the first seam. Tack the seam at each
end for at least 1 inch.
(m) Sew the fourth side in place. Close the open seam by stitching a seam 1 inch
above the opening to 1 inch below the opening. Use the previous seam line as a stitching guide.
(n) Sew a second seam inside the seam just sewn. Use the