General Fabric Repair by Department of the Army - HTML preview
Download the book in PDF, ePub, Kindle for a complete version.
of the fold, and continue to the horizontal tear ending stitches 1/4 inch from the edge of the vertical tear.
Tack seam at the beginning and the end.
(4) Rotate the item to the left 1/4-turn so that the horizontal tear is now vertical. Fold
the right edge of material to the left along the horizontal tear.
(5) Sew a row of stitches, beginning 1 inch above the end of the horizontal tear at the
edge of the fold, and continue to the juncture of the vertical tear, so that the seam at this point is 1/4 inch from the edge of the horizontal tear. Continue sewing until the row of stitches ends 1 inch below the bottom end of tear at the edge of the fold. Tack the seam at beginning and end.
(6) Turn the item over so that the face side is down. Spread the edges of the tears away
from seams, and press flat using an iron.
(7) Turn the item over so that the face side is up. Sew a row of stitches 1/16 inch from
and around seams. Tack the row of stitches at the beginning and the end.
Figure 4-7. T-patch
d. Iron-On Patch. The iron-on patch (Figure 4-8) may be used to repair sleeping bags. It can be used instead of a pinch patch to repair small holes and tears. To apply an iron-on patch--
4-9

FM 10-16
(1) Replace any missing insulation.
(2) Trim unraveled ends, and measure the damaged area.
(3) Cut a patch from iron-on patching material. Make the patch large enough to extend
1/2 inch beyond the damaged area on all four sides. Round off the corners of the patch.
(4) Unzip the sleeping bag. Place the damaged area on a flat, hard surface that heat will
not affect.
(5) Shake or move the underlying insulation away from the damaged area.
(6) Smooth out and warm the damaged area by pressing with a dry iron set on cotton.
Do not scorch the fabric.
(7) Quickly cover the damaged area with the iron-on patch.
(8) Hold the iron on the patch. Apply constant pressure for 8 seconds, moving the iron
back and forth slightly. If the patch is larger than the iron, press the patch section by section, starting in the center.
(9) Allow the patch to cool for at least 5 seconds before moving the sleeping bag.
(10) After the patch has cooled for 5 minutes, test the patch by trying to lift one of the
corners with a fingernail. If a 1/4- to 1/2-inch section of the corner comes loose, try to peel off the patch.
A well-bonded patch will be hard to remove. A poorly bonded patch will peel off easily. Re-press a poorly bonded patch using a hotter iron, but do not scorch the patch or the fabric. Increase the pressing and cooling times. Test and re-press the patch until it is hard to remove. Re-press the tested corner.
Note: If a patch fails to stick after several pressings, use a new patch.
Figure 4-8. Iron-on patch
4-10
FM 10-16
e. Iron-On Patches of Garments. Rips and tears other than stress points (e.g., crotch seams,
pockets seams, pocket flap seams, etc) may be repaired by iron-on patches. Any rip of tears closer than 3/4 (1.91 cm) to any seam will be repaired by sewing. Iron-on patches are suitable for use on the utility shirt and trousers when garment appearance is not first priority. To apply an iron-on path--
(1) Cut the patch to the size and shape that it will extend approximately 3/4 inch (1.91
cm) in all directions beyond the tear of other damage. Patches will have rounded corners.
(2) When patching by hand iron, place patch center and to the inside of the garment.
(3) Trim heavily raveled ends with scissors.
(4) Smooth out the area to be patched to prevent wrinkles, folds, seams, or other
protrusions under the iron when it is applied.
(5) Pre-warm the area to be patched by pressing with a dry iron set at cotton or as high as
possible without scorching the fabric; apply the iron for 5 seconds or more.
(6) Immediately position the patch. Hold the iron on the patch for about 12 seconds.
(7) Use no more than a slight rotation motion on the iron and apply constant pressure.
(8) Remove the iron and allow the patched area to cool in place about 5 seconds, or long
enough so that the patch will not drift off when the garment is removed from the iron board. If the adhesive strikes through the patch cloth, too much heat has been applied. Reduce time of pressing or temperature of the iron. A small amount of strike-though is not objectionable provided the patch meets the check test described in 4-3d(10).
(9) A bonded patch, which has a lifted edge, will be re-ironed. A bonded patch that has
been subjected to the check test will be replaced.
NOTE: When patching by special automatic press, the platen temperature, dwell time, dwell pressure, and other details shall be in accordance with the press manufacturer's instructions.
4-11
FM 10-16
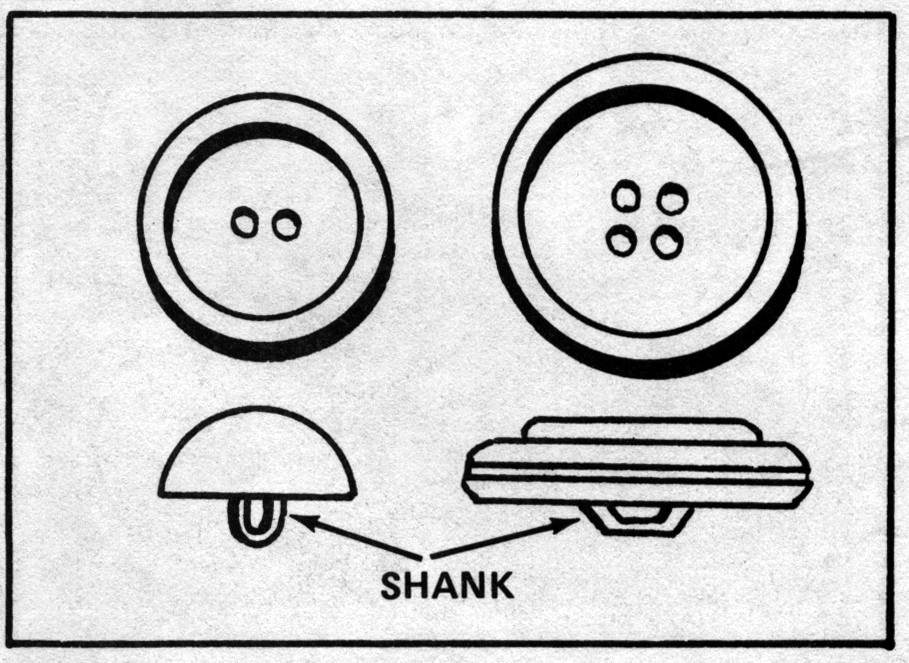
4-4. REPLACING BUTTONS
Buttons have two uses. Their functional purpose is to close openings on clothing and textile items. Their decorative purpose is to provide a finishing touch to enhance the appearance of military uniforms. There are two kinds of buttons. Flat or sew-through buttons have two or four holes (Figure 4-9). They are used as fasteners on lightweight garments. Shank buttons (Figure 4-9) have shanks or stems which lift the buttons off the surface of the cloth to which they are attached. Shank buttons are used on heavyweight garments because the shank permits a thicker layer of cloth to fit between the button and the underlying cloth. If more space is needed between the button and the garment, a thread shank can be used with either button. Buttons are attached to garments with a button-sewing machine or by hand sewing.
Directions for operating a button-sewing machine are included in the technical manual for the machine.
Directions for attaching buttons by hand are given below.
a. General Directions. When making button repairs--
(1) Restitch all loose buttons.
(2) Replace broken buttons with identical, undamaged ones.
(3) Replace missing buttons with buttons that are the same type, color, and size as the
missing ones.
(4) Sew a replacement button in the same spot the previous button was sewn. If this
spot is not obvious, overlap the edges of the garment and stick a straight pin through the buttonhole of the missing button and into the underlying cloth. For horizontal buttonholes, stick the pin in 1/8 inch from the end closest to the edge of the garment. For a vertical buttonhole, stick the pin 1/8-inch down from the top
(5) If the underlying cloth has been torn, repair the cloth with a reinforced darn before
attaching a button in the same spot.
(6) Use the same kind of thread that was used to attach the other buttons to the garment
or textile items. In most cases, the thread will be buttonhole twist thread. Thread the needle with a 1-yard length of thread. Draw the thread through the eye of the needle until the two ends are even, and knot the ends together.
(7) Insert the needle up through the underside of the cloth to hide the knot. Make
several stitches on top of each other to anchor the thread before attaching the button.
4-12
FM 10-16
Figure 4-9. Sew-through and shank buttons
b. Directions for Attaching Sew-Through Buttons. Sew-through buttons are attached by hand
using one of two methods. One method sews the button directly on the cloth. The other method uses a thread shank between the button and the cloth.
(1) Without a Thread Shank. To sew a sew-through button flat to a garment or textile
item --
(a) Anchor the thread, and then stick the needle up through one of the holes in
the button. Slide the button down the length of the thread.
(b) For a two-hole button, stick the needle down through the other hole and
through the underlying cloth. Pull the needle and thread through to the other side.
(c) Stick the needle up through the first hole again and go down through the
second hole. Repeat this step four times.
(d) Knot the thread close to the cloth on the reverse side, and cut off the
remaining thread close to the knot.
4-13
FM 10-16
(e) For a four-hole button, stitch through one pair of holes and then through the
other pair so that the stitches are parallel.
(2) With a Thread Shank. To sew on a sew-through button with a thread shank, use one
of the following methods.
(a) Fold the cloth over the index finger. Hold the button against the cloth with
the thumb. Sew on the buttons following the steps above. On the last stitch, go down through the button, but do not penetrate the cloth. Flatten out the cloth and grasp the button. Wind the thread around the stitches several times to make a shank. Take one stitch through the bottom of the shank to secure the thread. Stick the needle through the cloth to the reverse side. Knot the thread close to the cloth, and cut off the remaining thread close to the knot.
(b) Stick the needle up through one of the holes, and slide the button down the
length of the thread. Lay one or two straight pins across the top of the button, and hold them in place with the thumb. Sew on the button, stitching across the straight pins. On the last stitch, go down through the button, but do not penetrate the cloth. Remove the pins and lift the button away from the cloth.
Wind the thread around the stitches to make a shank. Take one stitch through the button of the shank to secure the thread. Stick the needle through the cloth to the reverse side. Knot the thread close to the cloth, and cut the remaining thread close to the knot.
c. Directions for Attaching Shank Buttons. Shank buttons are attached by hand using one of two methods. One method sews the shank flat to the cloth. The other method adds an additional shank made from thread.
(1) Without a Thread Shank. To attach a shank button without an additional thread
shank--
(a) Position the button so that the shank aligns with the buttonhole and so the
stitches will be parallel to the edge of the opening in the garment.
(b) Anchor the thread, and then stick the needle through the hole in the shank.
(c) Stick the needle down through the cloth, and pull the thread through to the
inside.
(d) Stick the needle up through the cloth, through the hole in the shank, and
down through the cloth again. Repeat this step six times.
(e) Knot the thread close to the cloth, and cut the remaining thread close to the
knot.
(2) With a Thread Shank. To attach a shank button with a thread shank--
(a) Follow the steps above to attach button. During stitching, hold the tip of the
forefinger between the button and cloth to keep the two apart.
(b) On the last stitch, pass the thread through the hole in the shank, but do not
penetrate the cloth.
4-14
FM 10-16
(c) Grasp the button, and wrap the thread around the stitches to form a shank.
Take one stitch through the bottom of the shank.
(d) Stick the needle and thread through the cloth to the inside. Knot the thread
close to the cloth, and cut the remaining thread close to the knot.
4-5. REMAKING BUTTONHOLES
Buttonholes are small horizontal or vertical openings through which buttons are passed. The length of the buttonholes depends on the size of their buttons. Properly sized buttonholes are long enough for their buttons to slip through easily and short enough to prevent the buttons from coming undone accidentally.
Generally, buttonholes are 1/4-inch longer than the width of the buttons. The buttonholes used on military garments are keyhole buttonholes. They have eyes to keep the buttonholes from becoming distorted by button shanks. Even though the edges of all buttonholes are reinforced to prevent damage, repeated use and washing wear them out. The threads unravel, the edges fray, and the surrounding cloth tears. Damaged buttonholes look ragged and are usually too large to hold buttons properly in place.
Buttonholes can be repaired by using a sewing machine or by hand sewing. Instructions for making machine-worked buttonholes can be found in appropriate technical manuals. To remake a buttonhole by hand--
a Remove the old stitches around the buttonhole.
b Close the buttonhole with a reinforced darn.
c Use a buttonhole cutter to cut a slit 1/4-inch longer than the width of the button. Cut the slit in the same place as the previous buttonhole.
d Cut an eye in one end of the buttonhole. If the buttonhole is vertical, cut the eye in the top of the slit. If the buttonhole is horizontal, cut the eye in the end closer to the finished edge of the garment.
e Use a buttonhole stitch to finish the cut edges of the buttonhole.
f Start stitching at the end that does not have the eye. Stitch along one edge, fan the stitches out around the eye, and stitch back along the other edge.
g Secure the buttonhole stitches by taking three or four long stitches straight across the width of the two rows of the buttonhole stitches.
h Stick the needle and thread through the cloth to the inside. Cut the remaining thread close to the knot.
4-6. REPLACING ZIPPERS
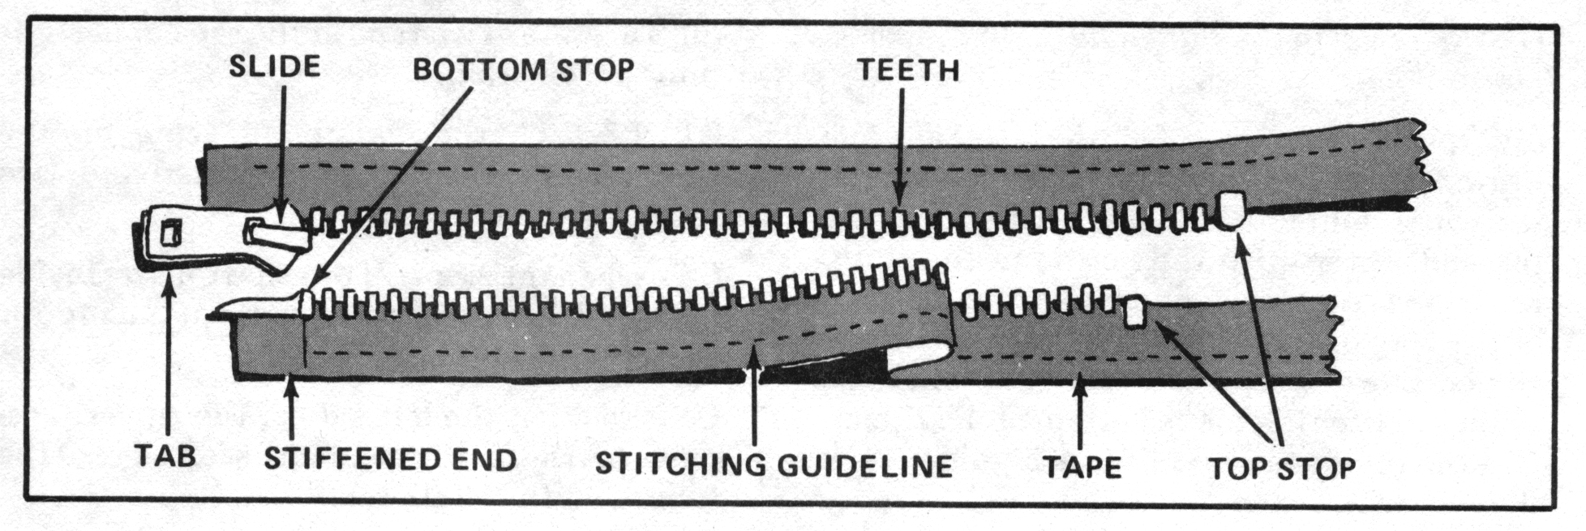
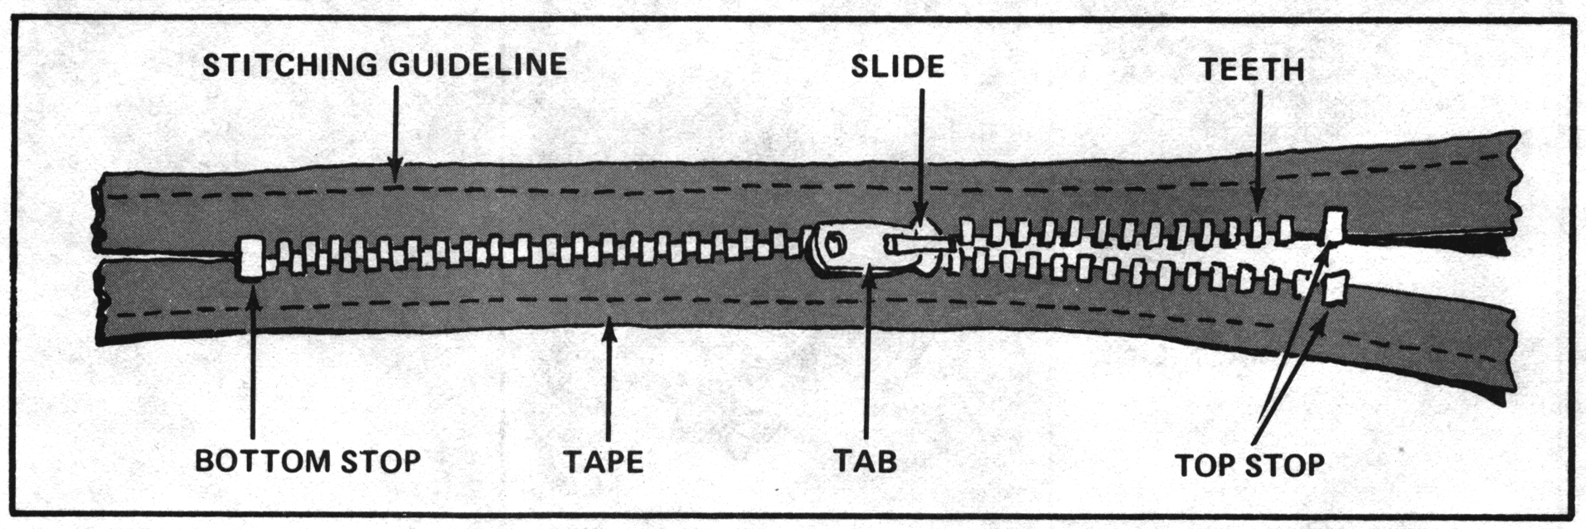
A zipper is called a slide fastener in supply catalogs. The military uses two kinds of zippers, separating and nonseparating. A separating zipper (Figure 4-10) opens completely. The left side splits away from the right side when the end of the left side is lifted out of the slide. The nonseparating zipper (Figure 4-11) does not come apart completely. The left side is permanently attached to the right side at the bottom of the zipper. Repeated use and washing damage zippers.
4-15
FM 10-16
The cloth tears, the metal teeth rust or come loose. The slide jams and will not move up or down. The slide is lost. The fabric repair specialist replaces these broken zippers with new or salvaged ones.
Replacement zippers should be the same type, size, and color as the broken zippers. Directions are given here for replacing the nonseparating zipper in a trouser and the separating zipper in a jacket. Replacing others may differ slightly from these two examples. The key point to remember is that a replacement zipper is sewn in place in the same way the previous zipper was sewn in place. A fabric repair specialist examines a garment or textile item and notes how the zipper was sewn in before attempting to replace it.
Figure 4-10. Separating zipper
a. Replacing a Nonseparating Zipper in Trousers.
(1) To remove zipper from trousers (Figure 4-12)--
(a) Start at the left side of the fly and rip stitches. (Start at top, work down as far as the tacking stitch bottom of the fly.)
(b) Where the zipper is tucked under at the waistband, rip just enough stitches to remove
the end of the zipper.
(c) In cutting the stitches, take necessary precautions not to damage the trouser material.
(d) Cut stitches and remove the zipper from the fly on right side of trouser.
(e) Cut and remove the stitches from the fly facing.
(f) Cut the stitches from bar tack at the bottom of the fly and remove the zipper.
(g) Do not cut below or beyond the tacking stitches.
(2) To prepare trouser and zipper for replacement--
(a) Remove all old loose stitches from the trouser fly.
4-16
FM 10-16
Figure 4-11. Nonseparating zipper
(b) Select a zipper of the proper size and length. Make sure the color and shade of the
zipper match.
(3) To replace the zipper to the trouser--
(a) Pin the zipper to the fly facing and sew the zipper to the facing.
(b) Follow the same procedure on the left side of the fly. Make certain the zipper is
aligned.
(c) Sew the facing to trousers, make certain to follow the old stitch line.
(d) Stitch the waist band to the trouser fly, securing the zipper.
(e) Replace the tacking stitch at the bottom of the fly.
4-17
FM 10-16
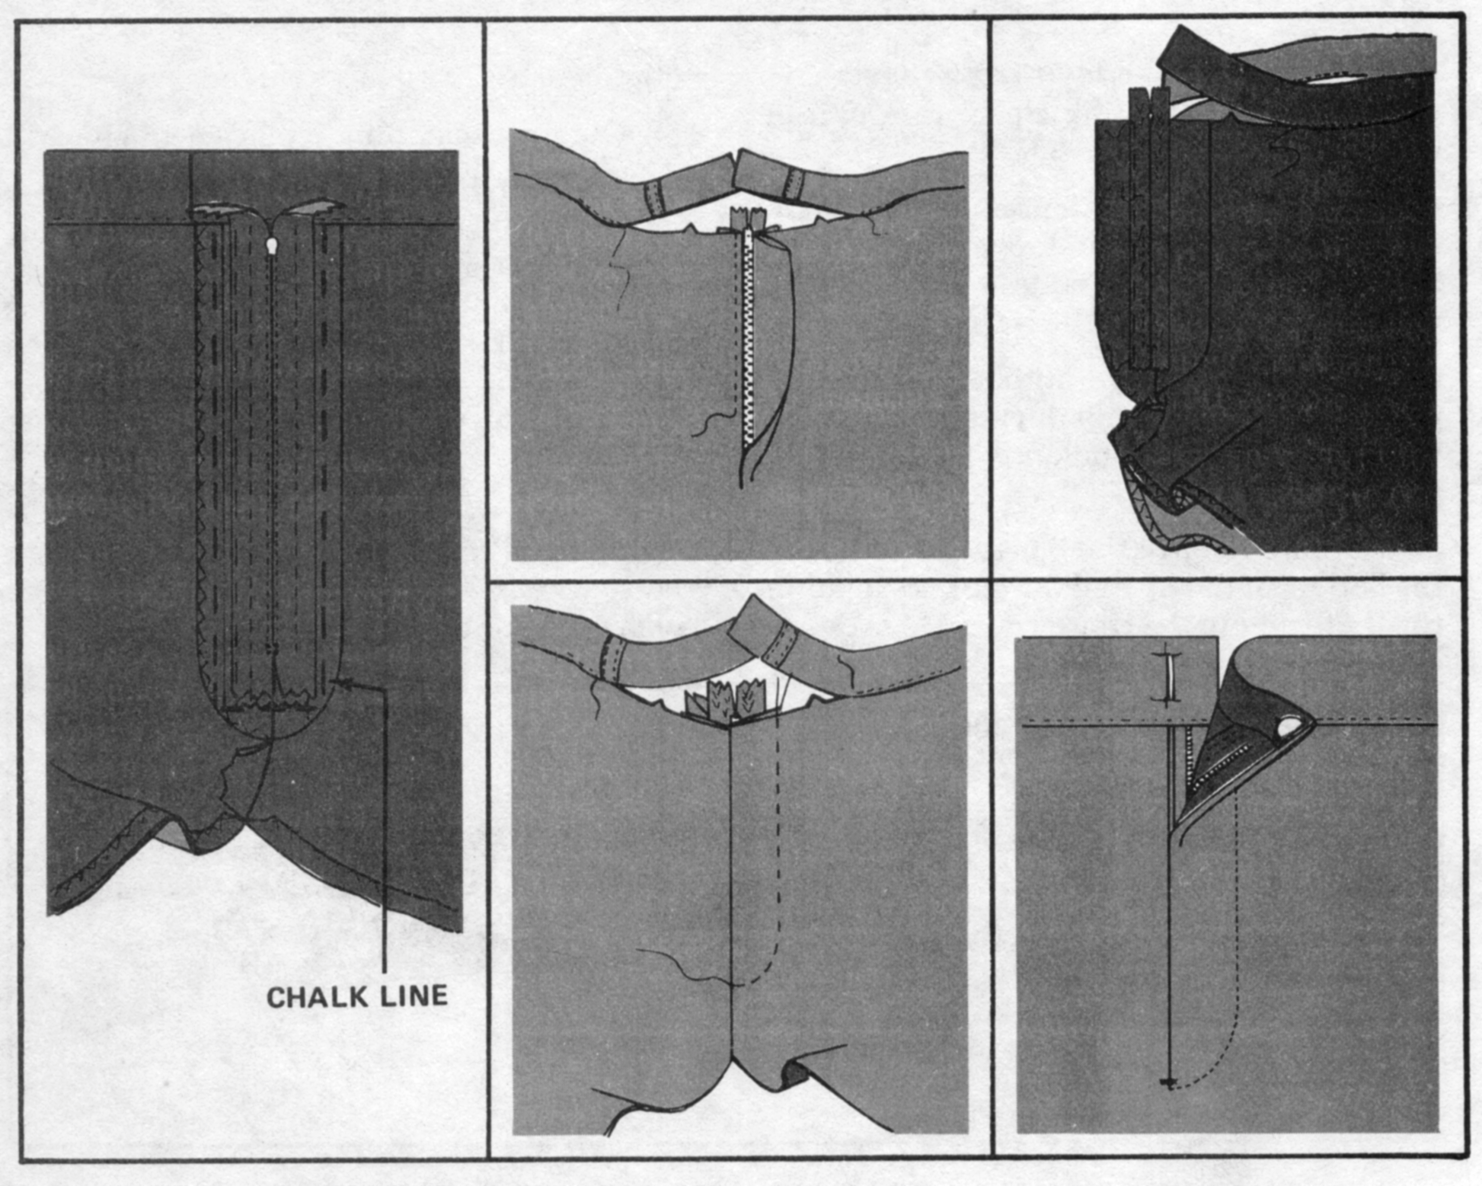
Figure 4-12. Replacing zipper on trousers
b. Replacing a Separating Zipper in Jacket. To replace a separating zipper in a jacket--
(1) Place the jacket faceup on the table, and close the zipper. If the zipper will not close,
line up the edges exactly and pin the zipper in place.
(2) Obtain a matching replacement zipper.
(3) Turn the jacket inside out.
(4) Place the replacement zipper facedown directly on the old zipper. Match the
position exactly.
(5) Draw several horizontal lines with tailor’s clay chalk on each side of the new zipper.
Draw the lines across the zipper tape and the cloth in the garment. Use these index marks as guides to position the new zipper.
(6) Unzip the garment.
(7) Cut and remove the stitches holding the hem, facing, and lining in place over the
zipper.
(8) Cut and remove the stitches holding the zipper in place.
(9) Clean away all loose threads.
(10) Separate the two pieces of the new zipper.
4-18
FM 10-16
(11) Position the left side of the zipper facedown on the left edge of the garment. Push
the hem, facing, and lining of the garment out of the way.
(12) Align the index marks, and pin or baste the left side of the zipper in place. Turn the
end of the tape under at the top of the zipper, and pin or baste it in place.
(13) Position the right side of the zipper facedown on the right edge of the garment.
Push the hem, facing, and lining of the garment out of the way.
(14) Align the index marks, and pin or baste the right side of the zipper in place. Turn
the end of the tape under at the top of the zipper, and pin or baste it in place.
(15) Turn the jacket right side out.
(16) Stitch the left side of the zipper in place. Tack the seam at the beginning and at the
end. Use the old seam line as a guide.
(17) Stitch the right side of the zipper in place. Tack the seam at the beginning and at the
end. Use the old seam line as a guide.
(18) Restitch the hem, facing, and lining in place. Make sure they will not catch in the
teeth of the zipper when it is opened and closed.
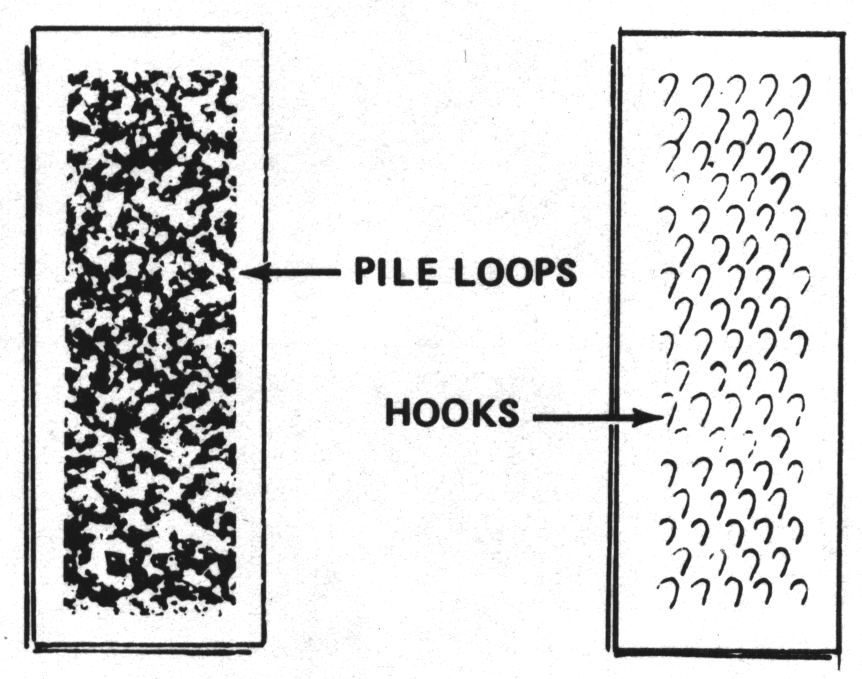
4-7. REPLACING HOOK AND PILE FASTENER
Hook and pile fasteners (Figure 4-13) are used to close openings and to make adjustments in cuffs and waistbands. Each fastener consists of two pieces of tape. One piece is covered with a thick pile of small nylon loops. The other piece is covered with rows of small nylon hooks. When the two pieces are overlapped and pressed together, the hooks grip the loops. The two pieces will cling together until they are pulled apart. Repeated use can pull out the stitches which were used to attach the fastener to the garment or textile item. The fastener may also lose its clinging ability if lint and debris get caught in the hooks and loops.
Figure 4-13. Hook and pile fastener
4-19
FM 10-16
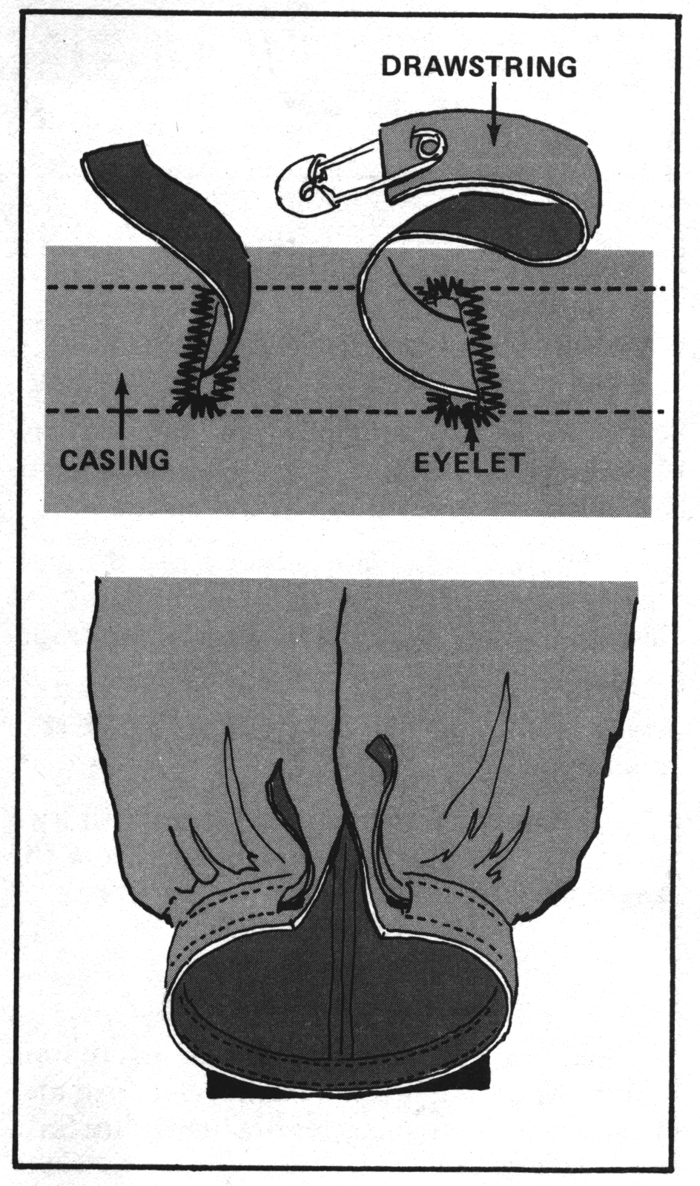
4-8. REPLACING DRAWSTRINGS
Drawstrings are cotton or nylon cords enclosed in casings. Drawstrings are used to make formfitting adjustments in cuffs, waistbands, hoods, and hems. Drawstrings are also used to close openings in textile items such as barracks bags. Drawstrings fray and break with repeated use and washing. They also come out of their casings if they have not been properly secured. To replace a drawstring (Figure 4-14)--
a. Remove the stitching that secures the drawstring midway in the casing.
b. Untie or cut off the knots in the ends of the drawstring.
c. Remove the defective drawstring by pulling it out of one end of the casing.
d. Restitch both eyelets or replace the metal rings in the casing, if necessary. See page 4-21 for directions on replacing eyelets.
e. Cut a new drawstring the length of the casing plus enough for an extension on each end. (See the specifications on each garment for the exact length of the drawstring.)
f. Dip the ends of the drawstring in a synthetic resin or a mixture of 50 percent beeswax and 50
percent paraffin to prevent them from fraying.
g. Attach a safety pin to on end of the drawstring to guide the drawstring through the casing.
Remove the safety pin.
h. Even up the ends of the drawstring. Stitch through the casing and the drawstring midway in
the casing to anchor the drawstring in place.
i. Knot the ends of the drawstring to prevent them from being pulled back through the eyelet into the casing.
Figure 4-14. Replacing a drawstring
4-20
FM 10-16
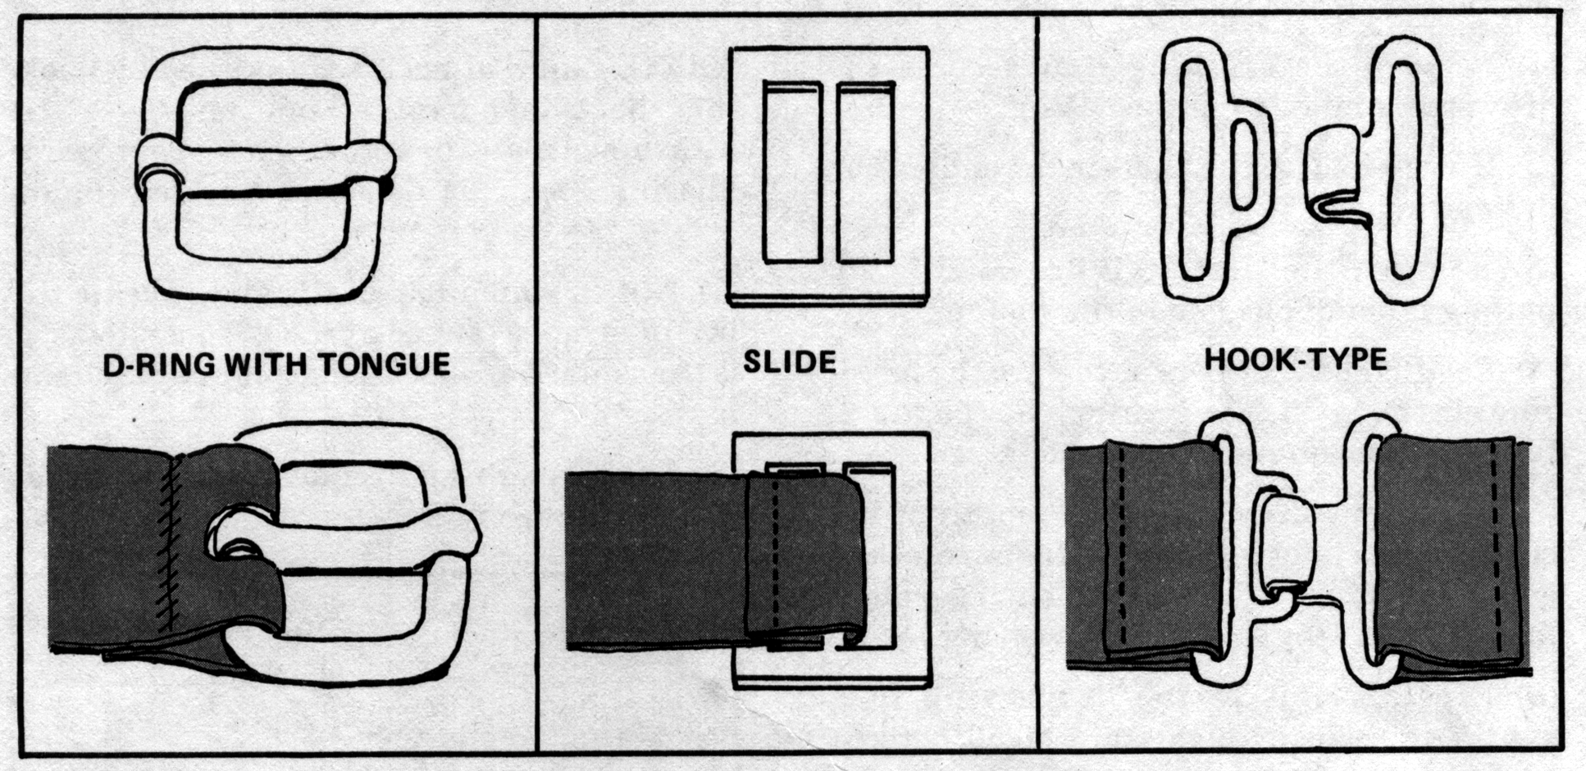
4-9. REPLACING BUCKLES
The military uses three kinds of buckles on clothing and textile items. One kind consists of a D-ring with a tongue. A belt or strap with a tongued buckle attached to one end is fastened by passing the loose end through the buckle and inserting the tongue into an eyelet. The second kind is a slide buckle with three parallel bars. A belt or strap with this kind of buckle attached to one end is fastened by passing the loose end over and under the bars and pulling the end up taut. The third kind is a hook-type fastener. A belt or strap with this kind of buckle is fastened by hooking the attachment at one end over the attachment at the other end. To replace missing, bent, or defective buckles (Figure 4-15)--
a. Notice which bar of the slide buckle the belt or strap is lapped over. On some items, it is the center bar. On others, it is one of the end bars.
b. Cut through and remove the stitches at the end of the overlap.
c. Unfold the underlap and remove the defective buckle.
d. Obtain a new or salvaged buckle the same type and size as the defective buckle. If the buckle is missing, check the item specifications for a description of the buckle.
e. Pass the end of the belt or strap through the buckle. Insert the tongue of a tongued buckle through the hole in the belt or strap.
f. Turn under the raw edge of the belt or strap. Fold the belt or strap under at the buckle.
g. Stitch the underlap in place with two rows of stitching 1/16 to 1/8 inch from the edge. Tack all seams.
Figure 4-15. Replacing a buckle
4-21
FM 10-16
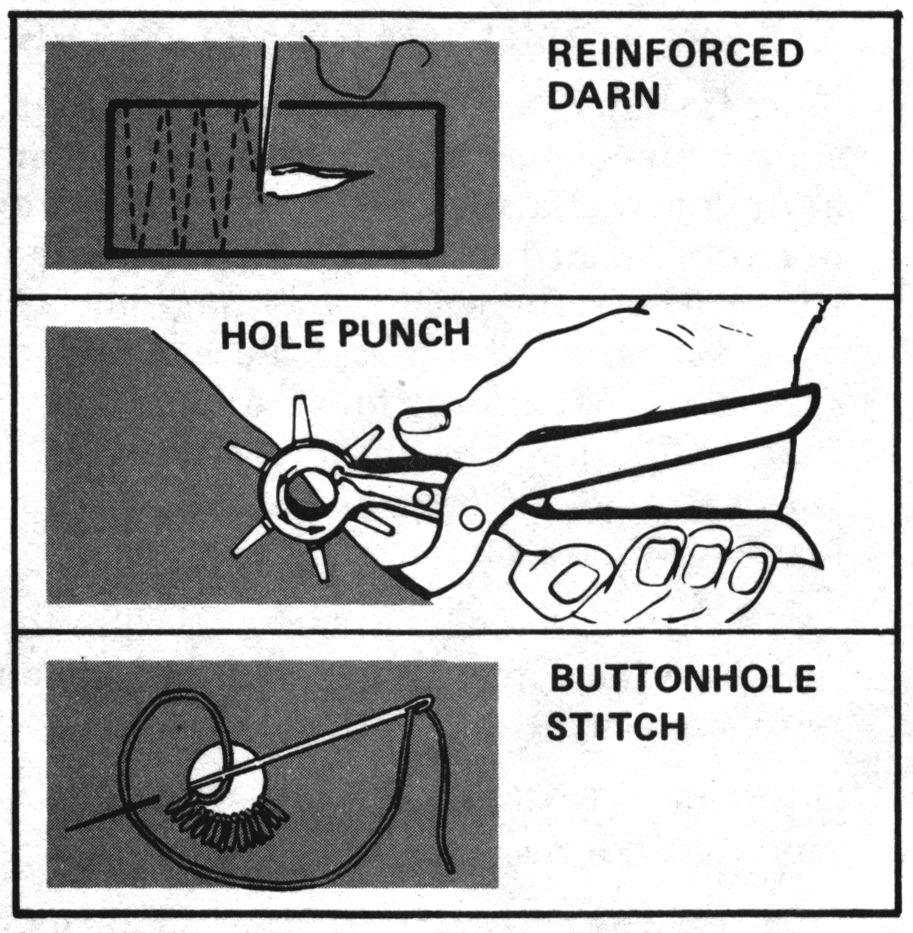
4-10. REPAIRING OR REPLACING EYELETS
Eyelets are used on belts and straps to hold the buckle tongue in place. Eyelets are also used on garments and textile items that have lacing and drawstrings. The edge of an eyelet is reinforced with buttonhole stitches or a metal ring. Most metal eyelets are made of brass. Some are also covered with an enamel finish to match a garment. The stitches sewn around eyelets fray and unravel with repeated use and washing. The metal rings bend, split, and pull away from the surrounding cloth.
a. Repairing Stitched Eyelets. To repair stitched eyelets (Figure 4-16)--
(1) Cut and remove all the buttonhole stitches around the eyelet. Clean away all pieces
of thread.
(2) Close the hole with a reinforced darn.
(3) Use the appropriate punch on a hole punch to make a new hole for the eyelet.
(4) Sew buttonhole stitches around the raw edges of the hole.
Figure 4-16. Repairing a stitched eyelet
4-22
FM 10-16
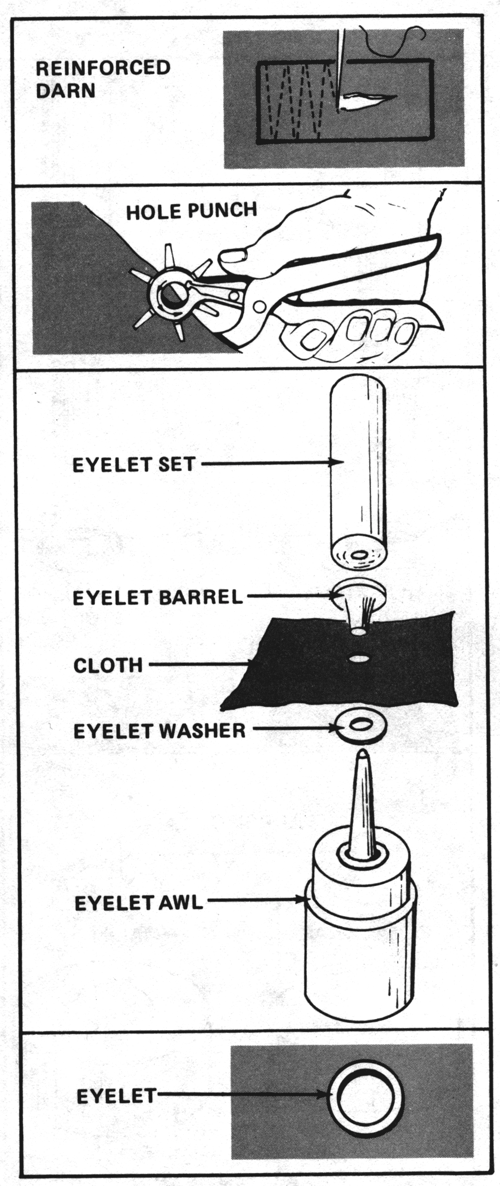
b. Replacing Metal Eyelets. To replace metal eyelets (Figure 4-17)--
(1) Remove the defective eyelet by cutting it out with a pair or wire cutters. Do not cut
the surrounding cloth.
(2) Close the hole with a reinforced darn.
(3) Obtain an eyelet the same type and color as the one removed.
(4) Use a hole punch to make a new hole for the eyelet. Make the hole smaller than the
eyelet barrel so that the eyelet will fit tightly.
(5) Turn the cloth facedown. Insert the barrel of the eyelet down into the hole.
(6) Place the washer on the awl.
(7) Place the cloth facedown on the awl so that the barrel of the eyelet rests on the awl.
(8) Position the eyelet set on the eyelet, and hold it in place.
(9) Hit the top of the eyelet set with a mallet to set the eyelet in the cloth.
Figure 4-17. Replacing a metal eyelet
4-23
FM 10-16
4-11. REPLACING SNAP FASTENERS
Snap fasteners are used in place of buttons. A snap fastener has a male half and a female half. The two halves close under pressure and remain clinched until they are pulled apart. Repeated use and washing damage parts of a snap fastener. The metal pieces bend and split. The surrounding fabric often gives way first, and half of the snap fastener is pulled out of the cloth. To replace a defective snap fastener (Figure 4-18)--
a. Place the defective garment or item on a hard surface.
b. Remove the two halves. Use wire cutters and a drill, if necessary.
c. Close the holes with reinforced darns.
d. Use a hole punch to make holes in the darned area. Make the holes smaller than the barrel for the two halves so that the barrels will fit snugly into the holes.
e. The female half consists of a cap and a socket. Turn the overlapping cloth faceup, and insert the barrel of the cap into the hole.
f. Position the cloth facedown on the female anvil. Adjust the cloth so that the cap is in the cavity at the center of the anvil.
g. Place the socket over the barrel with the wide part facing up.
h. Insert the set into the barrel, and hold it in place.
i. Hit the top of the set with a mallet to set the female half of the snap fastener in the overlapping cloth.
<