The Ultimate Guide to the Perfect Bass Setup by Jerzy Drozd - HTML preview
Download the book in PDF, ePub, Kindle for a complete version.
Chapter 2
Adjusting the Instrument
© 2009 All rights reserved. Free distribution of the unaltered content is permitted. This document is free.
Its sale is prohibited. Visit: www.jerzydrozdbasses.com y http://www.electricbasssecrets.com
16
The Ultimate Guide to The Perfect Bass Setup version 1.0
Changing the Strings
Before adjusting the instrument, you should change the strings. This is very important
because, as the strings age, their properties change and the adjustment won't be correct.
Also, if you decide to change the strings later on, all of the adjustments you have done
previously will no longer work and you will have to adjust the instrument again. If you don't
have any new strings, I would advise you to hold off on making the adjustments until you
do.
You should only make adjustments to the instrument if the strings have been on it for less
than a week and if they have been on for less than 4-5 days, it's even better.
With new strings, you assure good intonation and each time you change them, the
instrument will already be correctly adjusted.
Remember that it isn't necessary to take the strings off all at once. It is preferable to
change them one at a time and it doesn't matter if you start with the highest one or the
lowest one.
1. Once you have removed the old string, place the new one across the bridge.
2. Stretch it using the hand furthest away from the tuning head where it will be connected.
3. Cut the string with wire cutters 3-4 inches above the tuning head.
4. Normally, all current tuning heads, whether "Gotoh" or "Schaller," have a hole running
through the center. Thread the string through the hole about ½" to 1" and then begin to
wind the string clockwise with your fingers.
5. You can use the tuning head to help you wind up all of the remaining string until it
begins to tighten.
6. Then, tighten it to the correct tension for that string with the aid of a tuner.
7. Repeat this process with the remaining strings.
8. The number of times you will have to turn the string around the axis of the tuning head
will vary depending on the gauge of the string. The lower strings, such as the B and E
© 2009 All rights reserved. Free distribution of the unaltered content is permitted. This document is free.
Its sale is prohibited. Visit: www.jerzydrozdbasses.com y http://www.electricbasssecrets.com
17
The Ultimate Guide to The Perfect Bass Setup version 1.0
strings, should require 2 or no more than 3 turns. The A and D strings should require 3
or no more than 4 turns and the remaining high strings should require 4 or no more
than 5 turns, except for the very thin, unbraided strings, which will need approximately
6 to 8 turns.
9. Once you have put on all of the strings, retune each one of them to the correct pitch
(see the tuning table here).
Pre-Adjustment of the Bridge - Height
Before adjusting the neck, we have to adjust the approximate height of the strings over the
bridge. If we don't do it at this point, the neck adjustment won't be correct because if the
strings are too close to the bridge or too far away, this will lead to an incorrect estimate of
the true position of the neck.
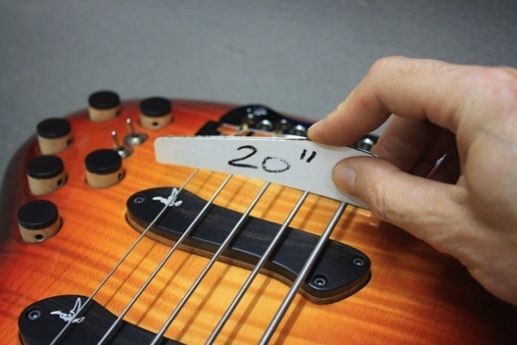
Bridge Curvature Templates
To adjust the height of the strings, you should use a curvature template. If you don't have
one, you can use the ones included in this Guide. These templates will help you adjust the
bridge to the curvature of the fingerboard. In this way, the strings will be at the correct
distance from it. A bass rarely has a flat fingerboard, although a few more modern
instruments do, such as Barcelona™ or the new Oracle™. The curvature is measured in
inches and can vary considerably, from 7 ½" to 20" or more. The ERB-type multi-string
basses can reach a curvature of 90" and may have a flat fingerboard. The greater the
number of inches, the flatter the fingerboard will be.
Fig. 1 Example of a Type A template for a 12" curvature
© 2009 All rights reserved. Free distribution of the unaltered content is permitted. This document is free.
Its sale is prohibited. Visit: www.jerzydrozdbasses.com y http://www.electricbasssecrets.com
18
The Ultimate Guide to The Perfect Bass Setup version 1.0
10"
Fig. 2 Example of a Type B template for a 10" curvature
Measuring the Curvature of the Fingerboard
First, before adjusting the height of the strings, you have to determine the true curvature of
the fingerboard. If you already know it, you can skip this step.
You will need to remove all of the strings to be able to measure it using the templates
provided in this Guide. Once you know the curvature, you will only need to use the
template that corresponds to your instrument's fingerboard.
Adjusting the Height of the Strings
It is very important that the strings be at a consistent distance from the surface of the
fingerboard (the frets). First, you will need to adjust the height of the two outer strings, that
is, the thinnest and the thickest.
12"
Fig. 3 Curvature template used to adjust the distance of the
strings relative to the curvature of the fingerboard.
© 2009 All rights reserved. Free distribution of the unaltered content is permitted. This document is free.
Its sale is prohibited. Visit: www.jerzydrozdbasses.com y http://www.electricbasssecrets.com
19


The Ultimate Guide to The Perfect Bass Setup version 1.0
Fig. 4
Approximate Reference Heights:
StSándard Basses
Bass
approximate thin string height
approximate thick string height
4 strings
G (Sol) 1,8 - 2,0 mm
E (Mi) 2,0 - 2,5 mm
5 strings with Low B
G (Sol) 1,8 - 2,0 mm
B (Si) 2,2 - 2,7 mm
5 strings with High C
C (Do) 1,7 - 1,9 mm
E (Mi) 2,0 - 2,5 mm
6 strings
C (Do) 1,7 - 1,9 mm
B (Si) 2,2 - 2,7 mm
Extended Range Basses
Extended R
Bajo
approximate thin string height
approximate thick string height
7 strings
F (Fa) 1,6 - 1,8 mm
B (Si) 2,2 - 2,7 mm
8 strings
1,5 - 1,7 mm *)
2,2 - 2,7 mm *)
9 strings
1,5 - 1,7 mm *)
2,6 - 3,0 mm *)
10 strings
1,1 - 1,5 mm *)
2,6 - 3,0 mm *)
11 strings
1,1 - 1,5 mm *)
2,5 - 3,0 mm *)
*) The values of the strings are not specified because ERB-type instruments can easily accommodate
alternative tunings.
© 2009 All rights reserved. Free distribution of the unaltered content is permitted. This document is free.
Its sale is prohibited. Visit: www.jerzydrozdbasses.com y http://www.electricbasssecrets.com
20
The Ultimate Guide to The Perfect Bass Setup version 1.0
Once you have adjusted the height of the outer strings, adjust the height of the remaining
strings using the template with the same curvature as the fingerboard (Fig. 4). You will
need to cut out all of the templates to determine the true curvature of your instrument's
fingerboard.
Two Types of Templates
There are two types of templates: Type A ( Fig. 1) and Type B ( Fig. 2). The Type A
templates are slightly more precise because they measure from the underside of the
strings, which prevents any errors resulting from the varying thickness of the strings.
In Fig. 5 you can see that the measuring surfaces are different. In the case of the Type A
template, the measuring surface is from the underside of the strings, but in the case of the
Type B template, the measuring surface is from the exposed side.
Strings
Measuring surfaces
12"
Strings
Fig. 5
© 2009 All rights reserved. Free distribution of the unaltered content is permitted. This document is free.
Its sale is prohibited. Visit: www.jerzydrozdbasses.com y http://www.electricbasssecrets.com
21
The Ultimate Guide to The Perfect Bass Setup version 1.0
Neck Adjustment
The neck adjustment is the most delicate part of the whole process and requires the
highest level of expertise. As I have already mentioned, if you don't have any experience
adjusting your own instrument, practice first on another one that isn't being used. If you
follow all of the instructions that are laid out here, the neck of your instrument will not be at
risk.
Why Does the Neck Have a Truss-Rod and What Does It Do?
If adjusting and tuning your own instrument is all new to you, then you have probably
asked yourself this question more than once.
In general, all basses have a truss-rod, except for those that have a neck made of carbonfiber (we will discuss those necks later on) or those that are very inexpensive.
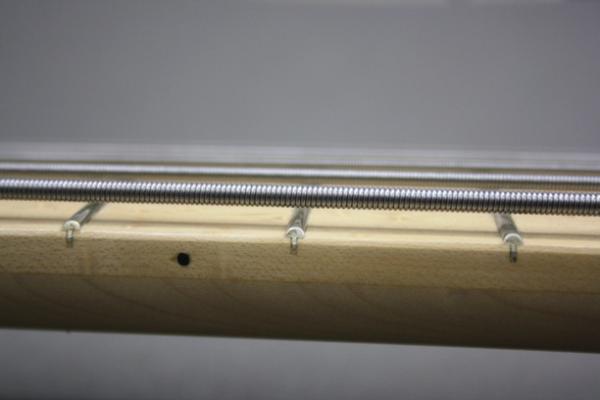
The truss-rod runs along the inside of the neck across its length from the head stock to the
point where it connects to the body. The truss-rod, itself, may vary, but its function is
always the same: to counterbalance the tension of the strings and hold the neck in the
correct position and shape when it comes to making an optimal adjustment. There are
both fixed and adjustable truss-rods.
Fixed Truss-Rods
The only purpose of fixed truss-rods is to reinforce the neck and these are usually round or
flat steel, titanium, aluminum or carbon-fiber rods. We won't spend a lot of time discussing
this type of truss-rod, since it doesn't allow for making precision adjustments to the neck.
Adjustable Truss-Rods
This type of truss-rod comes in several different formats and can function in several
different ways.
© 2009 All rights reserved. Free distribution of the unaltered content is permitted. This document is free.
Its sale is prohibited. Visit: www.jerzydrozdbasses.com y http://www.electricbasssecrets.com
22
The Ultimate Guide to The Perfect Bass Setup version 1.0
The simplest format is the one used in the basses made by Fender®, for example the Jazz
Bass®, Precision Bass® or the MusicMan® and is basically a round rod approximately
3/16" in diameter.
It is connected to the neck on one side and is threaded with a head on the other side. This
long, threaded screw can be tightened at the head of the truss-rod and is usually slightly
bent inside the channel ( Fig. 6).
Neck in a neutral or straight position
Fig. 6
When we loosen the truss-rod, the tension of the strings (red arrow) increases as the
tension of the truss-rod (green arrow) gives way, causing the neck to begin bending
forward ( Fig. 7), resulting in a depression in the middle.
The neck begins to bow backwards
By loosening the truss-rod,
Tension of the strings
we increase its length
Tension of the truss-rod
Fig. 7
When we tighten the truss-rod, the tension of the strings (red arrow) is no longer sufficient
to compensate for the tension of the truss-rod (green arrow), causing the neck to bend
backwards ( Fig. 8) and rise in the middle.
© 2009 All rights reserved. Free distribution of the unaltered content is permitted. This document is free.
Its sale is prohibited. Visit: www.jerzydrozdbasses.com y http://www.electricbasssecrets.com
23
The Ultimate Guide to The Perfect Bass Setup version 1.0
The neck begins to bow
forward
tension de las cuerdas
By tightening the trussTension of the trussFig. 8
Now, you will probably ask, "What good does this do? Isn't it good enough to have a
completely straight neck that is strong enough to resist bending no matter which gauge of
strings I'm using?"
Well, here's the point. An optimally adjusted neck shouldn't be straight.
You will discover that the truss-rod doesn't just compensate for the tension of the strings,
but rather it does so in a very precise way, depending on their gauge.
Logic would tell us that once the neck is balanced, it should be completely straight, but in
reality, it doesn't work that way. In Fig. 9, you can see what happens: when a string
vibrates, that vibration reaches its maximum width right in the middle of the string at 1
and a straight neck doesn't leave it enough room, so it begins to hit the neck more or less
at 2
1
2
Fig. 9
This unwanted effect is commonly called "buzzing" and in order to avoid it, we have to
raise the strings at the bridge, 3 in Fig. 10.
© 2009 All rights reserved. Free distribution of the unaltered content is permitted. This document is free.
Its sale is prohibited. Visit: www.jerzydrozdbasses.com y http://www.electricbasssecrets.com
24
The Ultimate Guide to The Perfect Bass Setup version 1.0
After raising the strings, the instrument won't buzz 1, but you will find that it isn't very
comfortable to play, especially in the higher positions 2. To prevent this problem, you
must slightly arch ( Fig. 11) the neck 4 in such a way so that it accommodates the natural
shape of the strings as they vibrate. By doing this, we make sure that the bass doesn't
buzz, so we can then lower the strings at the bridge 3, achieving a more consistent string
height over the neck 12, which will give us much more playing comfort all along its
length as opposed to the awkwardness we feel when the neck is completely straight.
1
2
3
Fig. 10
1
2
3
4
Fig. 11
Now, you are probably wondering, "How much should the neck arch and how do I
measure it?"
And here we come to the big secret in this unique The Ultimate Guide to The Perfect
Bass Setup ! :-)))))
© 2009 All rights reserved. Free distribution of the unaltered content is permitted. This document is free.
Its sale is prohibited. Visit: www.jerzydrozdbasses.com y http://www.electricbasssecrets.com
25


The Ultimate Guide to The Perfect Bass Setup version 1.0
How to Measure the Arc
You should always correctly tune the instrument before proceeding. To measure the
current arc of your instrument, you should sit in a comfortable position and support it on
your knee just as if you were going to play it.
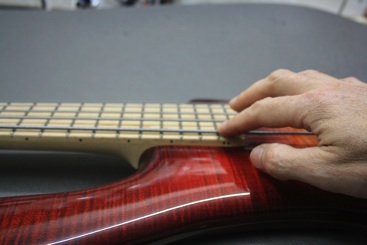
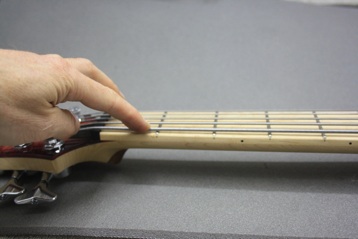
Depress the string at the first fret with the index finger of your left hand until it makes
contact ( Fig. 11a) and then do the same thing with your right index finger at the last fret on
the neck ( Fig. 11b).
Now, observe the string over the 7th through the 9th frets or thereabouts. If the string is
touching all of them, this means that the neck is straight or may even be bent backwards,
as in Fig. 8.
Fig. 11a
Fig. 11b
0,3 - 1,0 mm
Fig. 11c
If the string doesn't touch the 7th through the 9th frets and there is some distance between
the two, this means that there is an arc. Now, all we have to do is measure this distance to
find out if it is correct.
© 2009 All rights reserved. Free distribution of the unaltered content is permitted. This document is free.
Its sale is prohibited. Visit: www.jerzydrozdbasses.com y http://www.electricbasssecrets.com
26


The Ultimate Guide to The Perfect Bass Setup version 1.0
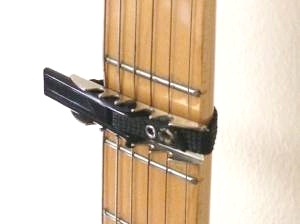
Fig. 12
To measure the arc, you will need another person to help you or else you will need a capo
( Fig. 12) so that you can hold the strings down at the first fret. You will also need a set of
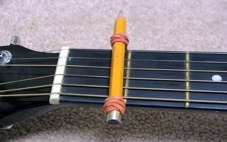
gauges, as I mentioned in the Tools section of Chapter 1. If you don't have a capo, you
Fig. 13
can improvise using a pencil and a rubber band ( Fig. 13).
Place the capo at the first fret so that the strings are touching it. While you are sitting and
holding your instrument as if you were going to play it, hold the string down at the last fret
with your right index finger and use a gauge to measure the distance between the string
and the 7th through the 9th frets. This distance should normally be between .3mm and
1mm, depending on your instrument and playing style. This is not an exact science, but
rather an Art and you will have to experiment a little in order to find the optimal distance
that works for you.
If you don't care so much about having high strings, then this distance can be very slight,
approximately .3mm. If you prefer rather low strings, this distance should be a little
greater. However, it isn't recommended to have a distance greater than 1mm because in
spite of the fact that the bass won't buzz on the first frets, it will start to buzz on the last
ones. On the other hand, if the neck buzzes on the first frets, then we should increase the
© 2009 All rights reserved. Free distribution of the unaltered content is permitted. This document is free.
Its sale is prohibited. Visit: www.jerzydrozdbasses.com y http://www.electricbasssecrets.com
27
The Ultimate Guide to The Perfect Bass Setup version 1.0
distance between the fret and the underside of the string. As a matter of fact, this is the
indicator we will use to carry out the whole adjustment process.
1
2
3
A
A
Fig. 14
In Fig. 14 you can see that the bass buzzes at the first frets 1 and stops buzzing more or
less at the middle of the neck 2 and doesn't buzz at all at the last frets 3, which is a
sign that you need to loosen the truss-rod because the neck isn't arched or it is bowed
back, as you can see in relation to the straight line A-A.
1
2
3
A
A
Fig. 15
In Fig. 15 the instrument is arched in the correct direction but too much so. The
instrument doesn't buzz at the first frets or in the middle, but it will buzz at the last frets,
which is a sign that the neck should be straightened by tightening the truss-rod. In the
case of most common truss-rods, you will need to tighten the head a quarter-turn
clockwise.
So, now you know the basic mechanics of how the truss-rod works and the
procedures for adjusting it. Next we are going to adjust the neck step by step.
© 2009 All rights reserved. Free distribution of the unaltered content is permitted. This document is free.
Its sale is prohibited. Visit: www.jerzydrozdbasses.com y http://www.electricbasssecrets.com
28
The Ultimate Guide to The Perfect Bass Setup version 1.0
The Neck Adjustment Process
1. As a general rule, the bass should be tuned using standard tuning or whatever tuning
you normally use. Tune it now if you haven't already.
2. Determine the arc of the neck, as described in the previous section.
3. The neck should have a slight arc and the distance between the 7th through the 9th frets
and the underside of the strings should be