Media Processing in Processing by Davide Rocchesso - HTML preview
Download the book in PDF, ePub, Kindle for a complete version.
}
a.blend(b, 0, 0, b.width, b.height,
80, 10, 450, 250, BLEND);
image(a, 0, 0, 400, 300);


In Processing, it is possible to assign a color to a variable of type color by means of the function
color(), and the model can be previously set with colorMode(). The functions red(),
green(), blue(), hue(), saturation(), and brightness() allow to move from one
model to the other.
colorMode(RGB);
color c1 = color(102, 30,29);
colorMode(HSB);
color c2 = color(hue(c1), saturation(c1), brightness(c1));
colorMode(RGB);
color c3 = color(red(c2), green(c2), blue(c2));
// the variables c1, c2, and c3 contain the coding of the same color
Tinging an image
An image can be tinged with a color and its transparency can be set by assigning a given value to
the alpha channel. For this purpose, the function tint() can be used. For example, a blue tone
can be assigned to the inlaid image of Example 2.1 by just preceding the second image() command with tint(0, 153, 204, 126) .
Translations, Rotations, and Scale Transformations
Representing Points and Vectors
In computer graphics, points and vectors are represented with the
Definition: homogeneous coordinates
quadruples of numbers, where the first triple is to be read in the X-Y-Z space, while the fourth
number indicates a vector if it takes value 0, or a point if it takes value 1.
A translation is obtained by adding, in homogeneous coordinates, a vector to a point, and the
result is a point. Alternatively we ca see a translation as a matrix-vector product (see Matrix
Arithmetic), where the matrix is
, and the vector is the one representing the point
. An
anti-clockwise rotation by the angle θ around the axis z (roll), is obtained by the rotation matrix

. Rotations around the axes x (pitch) and y (yaw) are realized by means of rotation matrices of the same kind, and a rotation around an arbitrary axis can be obtained by composition
(left multiply) of elementary rotations around each of the main axes.
Translations
The function translate() moves an object in the image window. It takes two or three
parameters, being the displacements along the directions x , y (and z ), respectively.
Rotations
In two dimensions, the function rotate() is used to rotate objects in the image window. This is
obtained by (left) multiplying the coordinates of each pixel of the object by a rotation matrix.
Rotations are always specified around the top left corner of the window ( [0, 0] coordinate).
Translations can be used to move the rotation axis to other points. Rotation angles are specified in
radians. Recall that 2 π rad = 360 ˚ . For example, insert the rotation rotate(PI/3) before the
second image() command in Example 2.1. In three dimensions, we can use elementary rotations around the coordinate axes rotateX(), rotateY(), e rotateZ().
Scale Transformations
The function scale() allows to expand or contract an object by multiplication of its point
coordinates by a constant. When it is invoked with two or three parameters, different scalings can
be applied to the three axes.
Typographic Elements
Every tool or language for media manipulation gives the opportunity to work with written words
and with their fundamental visual elements: typographic characters.
The aspect of a has two main components: font and size.
Processing has the class PFont and the methods loadFont() (to load a font and assign it to an
object of the PFont class) and textFont() (to activate a font with a specific size). In order to
load a font, this has to be pre-loaded into the directory data of the current sketch. The tool
Create Font, accessible from the Tools menu in Processing, creates the bitmaps of the
characters that the programmer intends to use. The file with the bitmaps is put in the data
directory. After these preliminary operations, the font can be used to write some text, using the
function text(). With this function, a string of characters can be put in the 2D or 3D space,
possibly inserting it within a rectangular box. The alignment of characters in the box is governed
by the function textAlign(). In the default configuration, the written text can be spatially
transformed like any other object. The color of characters can be set with the usual fill(), like
for any other graphic object.
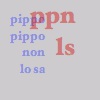
Example 2.3. Overlapped text
Table 2.2.
PFont fonte;
/*The font have been previously created
in the data folder*/
fonte = loadFont("HoeflerText-Black-48.vlw");
textFont(fonte, 12);
fill(10, 20, 250, 80);
textAlign(RIGHT);
text("pippo pippo non lo sa", 10, 14, 35, 70);
textFont(fonte, 24);
fill(200, 0, 0, 100);
text("ppnls", 25, 5, 50, 90);
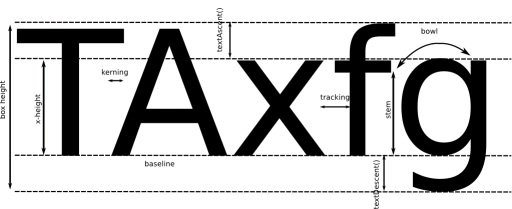
Processing allows a tight control of the spatial occupation of characters and of the distance
between contiguous characters (see Figure 2.3). The function textWidth() computes the horizontal extension of a character or a string. It can be used, together with the exact coordinates
passed to text(), to control the and the between characters. The textSize() allows to
redefine the size of characters. The textLeading() re-defines the distance in pixels between
adjacent text lines. This distance is measured between the baselines of the strings of characters.
Letters such as "p" or "q" extend below the baseline for a number of pixels that can be obtained with the textDescent(). Instead, the textAscent() gives back the maximum extension
above the baseline (typically, the height of the letter "d").
Figure 2.3. Typeface metrics
Typeface metrics
Auditory Elements
Sounds
Untill version beta 112, Processing gave the possibility to program several audio functionalities
by means of some core primitives. In those older versions only two basic primitives are available
to playback and load .wav files. In more recent versions, Processing delegate sound management
and processing functionalities to external libraries. The most used libraries are Ess, Sonia, and
Minim. Only the latter is included in the base installation of Processing. Ess and Sonia need an explicit installation process. Recently, a well-structured and documented Java library called Beads
has also been introduced. It is well suited to the construction of audio-processing algorithms based
on chains of base objects. As in the case of images, in order to process and playback sounds the
source files have to be stored in the data folder of the current sketch. The library Sonia is the most complex one. With its functions, one can do sample playback, realtime Fourier-based
spectral analysis, .wav file saving. In order to use the Sonia library, the programmer has to
download the .zip file from Sonia. Once decompressed, the directory Sonia_?_? has to be copied into the directory Processing/libraries. Finally, the command import has to be
inserted into the code by selecting it from the menu item Sketch / Import Library /
Sonia_?_?.
In order to run the applets produced with Sonia from a web browser, the Phil Burk's JSyn
plugin has to be downloaded and installed from the site
http://www.softsynth.com/jsyn/plugins/.
The library Minim, based on Java Sound, is more user-friendly, well-documented and recommended, if one wants to work with sounds employing high-level primitives, without dealing
with low-level numerical details and buffer management.
Timbre
In this section, we first use then analyze an application for the exploration of timbres, similar in
conception to the Color Chooser of Figure 2.2, and here called Sound Chooser. For the moment, let us think about a sound timbre in analogy with color in images. For example, the various
instruments of the orchestra have different and characterizing timbres (colors). Later on, we will
define the physical and perceptual aspects of timbre more accurately. In the Sound Chooser
applet, four sounds with different timbres can be played by clicking onto one of the marked radii.
Each radius corresponds to a musical instrument (timbre/color). By changing position along the
radius it is possible to hear how the brightness is changed. More precisely, as long as we proceed
toward the centre, the sounds gets poorer.
Let us analyze the Processing code that implements the Sound Chooser in its salient aspects. The
Sonia.start(this) command is necessary to activate the Sonia audio engine. The line
Sample mySample1 declares a variable aimed at containing audio samples. Several methods
can be applied to such variable. Among these, the play methods plays the sound sample back. In
the draw() code section the graphic aspect of the applet is defined. Finally, by the function
mouseReleased(), we detect when the mouse is released after being pressed, and where it has
been released. At this point a sequenceo of if conditions finds what instrument/timbre has been
selected according to the clicking point. Moreover, within the function mouseReleased() the
function filtra(float[] DATAF, float[] DATA, float RO, float WC) is
invoked. This function, which is implemented in the last segment of the code listing, performs a
sound filtering. More precisely, it is a low-pass filter, thus a filter that leaves the low frequencies
unaltered and reduces the intensity of the high frequencies. According to the radial position of the
mouse click, the filtering effect changes, being more dramatic (that is the sound becomes darker)
as the mouse is released closer and closer to the centre. A lighter realization of the Sound Chooser
by means of the library Minim is proposed in problem Exercise 4.. The problem Exercise 5.
explores the recent library Beads.
Table 2.3.
import pitaru.sonia_v2_9.*;
Sample mySample1, mySample2, mySample3, mySample4;
Sample mySample1F, mySample2F, mySample3F, mySample4F;
float[] data1, data2, data3, data4;
float[] data1F, data2F, data3F, data4F;
int sr = 11025; // sampling rate
void setup()
{
size(200, 200);
colorMode(HSB, 360, height, height);
Sonia.start(this);
mySample1 = new Sample("flauto.aif");
mySample2 = new Sample("oboe.wav");
mySample3 = new Sample("tromba.wav");
mySample4 = new Sample("violino.wav");
mySample1F = new Sample("flauto.aif");
// ... OMISSIS ...
data1 = new float[mySample1.getNumFrames()];
// creates new arrays the length of the sample
// for the original sound
// ... OMISSIS ...
data1F = new float[mySample1.getNumFrames()];
// creates new arrays the length of the sample
// for the filtered sound
// ... OMISSIS ...
mySample1.read(data1);
// ... OMISSIS ...
}
void draw()
{
// ... OMISSIS ...
}
choosing a void mouseReleased()
{
controlling float ro;
float roLin;
float wc;
// FLAUTO
if ((mouseX > 95) && (mouseX < 105)&& (mouseY > 50)&& (mouseY < 90)) {
roLin = (mouseY-49.99)/41;
ro = pow(roLin,.33);
wc = 298*(TWO_PI/sr);
filtra(data1F, data1, wc, ro);
mySample1F.write(data1F);
mySample1F.play();
}
// ... OMISSIS ...
}
//filtra = new function
void filtra(float[] DATAF, float[] DATA, float WC, float RO) {
float G;
float RO2;
RO2 = pow(RO, 2);
G = (1-RO)*sqrt(1-2*RO*cos(2*WC)+RO2)*4; // (*4) is for having it louder
for(int i = 3; i < DATA.length; i++){
DATAF[i] = G*DATA[i]+2*RO*cos(WC)*DATAF[i-1]-RO2*DATAF[i-2];
//recursive filtering
}
}
// safely stop the Sonia engine upon shutdown.
public void stop(){
Sonia.stop();
super.stop();
}
The content of a PImage object is accessible through its pixels[] field. The pixels,
corresponding to a row-by-row reading of the image, are contained in this array of size
width*height. Modify the code in Example 2.2 to use the field pixels[] instead of the method get(). The final outcome should remain the same.
The invocation b.set() should be replaced by
b.set(i,j,b.pixels[j*b.width+i]+ color(0,0,0, 255 - (int)((1-ramp)*255)) );
Complete the code reported in Table 2.3 to obtain the complete Sound Chooser applet.
Complete the code reported in Table 2.3 to obtain the complete Sound Chooser applet.
Add some color to the radii of the Sound Chooser, by replacing the line instructions with rect
instructions and coloring the bars with a brightness that increases goint from the centre to the
periphery.
Applet with Processing source code.
Produce a new version of the Sound Chooser of problem Exercise 2. employing the library Minim.
Note the gained compact form and simplicity of the code.
import ddf.minim.*;
import ddf.minim.effects.*;
Minim minim;
AudioPlayer mySample1, mySample2, mySample3, mySample4;
LowPassSP lpf1, lpf2, lpf3, lpf4;
float cutoff1, cutoff2, cutoff3, cutoff4;
void setup()
{
size(200, 200);
colorMode(HSB, 360, height, height);
minim = new Minim(this);
mySample1 = minim.loadFile("flauto.aif");
mySample2 = minim.loadFile("oboe.wav");
mySample3 = minim.loadFile("tromba.wav");
mySample4 = minim.loadFile("violino.wav");
lpf1 = new LowPassSP(4000, mySample1.sampleRate());
lpf2 = new LowPassSP(4000, mySample2.sampleRate());
lpf3 = new LowPassSP(4000, mySample3.sampleRate());
lpf4 = new LowPassSP(4000, mySample4.sampleRate());
mySample1.addEffect(lpf1);
mySample2.addEffect(lpf2);
mySample3.addEffect(lpf3);
mySample4.addEffect(lpf4);
}
void draw()
{
stroke(255);
strokeWeight(1);
fill(0, 88, 88);
ellipseMode(CORNER);
ellipse(50,50,100,100);
beginShape(LINES);
vertex(50, 100);
vertex(90, 100);
vertex(110, 100);
vertex(150, 100);
vertex(100, 50);
vertex(100, 90);
vertex(100, 110);
vertex(100, 150);
endShape();
}
void mouseReleased()
{
// FLUTE
if ((mouseX > 95) && (mouseX < 105)&& (mouseY > 50)&& (mouseY < 90)) {
cutoff1 = map(mouseY, 50, 90, 1000, 30);
lpf1.setFreq(cutoff1);
println(mouseY + " + " +cutoff1);
mySample1.rewind();
mySample1.play();
}
// OBOE
if ((mouseX > 110) && (mouseX < 149)&& (mouseY > 95)&& (mouseY < 105)) {
cutoff2 = map(mouseX, 110, 149, 30, 1000);
lpf2.setFreq(cutoff2);
println(mouseX + " + " +cutoff2);
mySample2.rewind();
mySample2.play();
}
// TRUMPET
if ((mouseX > 95) && (mouseX < 105)&& (mouseY > 110)&& (mouseY < 149)) {
cutoff3 = map(mouseY, 110, 149, 30, 1000);
lpf3.setFreq(cutoff3);
println(mouseY + " + " +cutoff3);
mySample3.rewind();
mySample3.play();
}
// VIOLIN
if ((mouseX > 50) && (mouseX < 90)&& (mouseY > 95)&& (mouseY < 105)) {
cutoff4 = map(mouseX, 50, 90, 1000, 30);
lpf4.setFreq(cutoff4);
println(mouseX + " + " +cutoff4);
mySample4.rewind();
mySample4.play();
}
}
// safely stop the Minim engine upon shutdown.
public void stop(){
mySample1.close();
mySample2.close();
mySample3.close();
mySample4.close();
minim.stop();
super.stop();
}
Produce a new version of the Sound Chooser of problem Exercise 2. using the Beads library. The signal-processing flow is particularly readable from the resulting code.
import beads.*;
AudioContext ac;
String sourceFile; //path to audio file
SamplePlayer mySample1, mySample2, mySample3, mySample4;
Gain g;
Glide cutoff1, cutoff2, cutoff3, cutoff4;
OnePoleFilter lpf1, lpf2, lpf3, lpf4;
void setup() {
size(200, 200);
colorMode(HSB, 360, height, height);
ac = new AudioContext();
sourceFile = sketchPath("") + "data/flauto.aif";
try {
mySample1 = new SamplePlayer(ac, new Sample(sourceFile));
}
catch (Exception e) {
println("Exception while attempting to load sample.");
e.printStackTrace(); // description of error
exit();
}
mySample1.setKillOnEnd(false);
sourceFile = sketchPath("") + "data/oboe.wav";
try {
mySample2 = new SamplePlayer(ac, new Sample(sourceFile));
}
catch (Exception e) {
println("Exception while attempting to load sample.");
e.printStackTrace(); // description of error
exit();
}
mySample2.setKillOnEnd(false); sourceFile = sketchPath("") + "data/flauto.aif";
sourceFile = sketchPath("") + "data/tromba.wav";
try {
mySample3 = new SamplePlayer(ac, new Sample(sourceFile));
}
catch (Exception e) {
println("Exception while attempting to load sample.");
e.printStackTrace(); // description of error
exit();
}
mySample3.setKillOnEnd(false); sourceFile = sketchPath("") + "data/flauto.aif";
sourceFile = sketchPath("") + "data/violino.wav";
try {
mySample4 = new SamplePlayer(ac, new Sample(sourceFile));
}
catch (Exception e) {
println("Exception while attempting to load sample.");
e.printStackTrace(); // description of error
exit();
}
mySample4.setKillOnEnd(false);
cutoff1 = new Glide(ac, 1000, 20);
lpf1 = new OnePoleFilter(ac, cutoff1);
lpf1.addInput(mySample1);
cutoff2 = new Glide(ac, 1000, 20);
lpf2 = new OnePoleFilter(ac, cutoff2);
lpf2.addInput(mySample2);
cutoff3 = new Glide(ac, 1000, 20);
lpf3 = new OnePoleFilter(ac, cutoff3);
lpf3.addInput(mySample3);
cutoff4 = new Glide(ac, 1000, 20);
lpf4 = new OnePoleFilter(ac, cutoff4);
lpf4.addInput(mySample4);
g = new Gain(ac, 1, 1);
g.addInput(lpf1);
g.addInput(lpf2);
g.addInput(lpf3);
g.addInput(lpf4);
ac.out.addInput(g);
ac.start();
background(0);
}
void draw()
{
stroke(255);
strokeWeight(1);
fill(0, 88, 88);
ellipseMode(CORNER);
ellipse(50,50,100,100);
beginShape(LINES);
vertex(50, 100);
vertex(90, 100);
vertex(110, 100);
vertex(150, 100);
vertex(100, 50);
vertex(100, 90);
vertex(100, 110);
vertex(100, 150);
endShape();
}
void mouseReleased(){
// FLAUTO
if ((mouseX > 95) && (mouseX < 105)&& (mouseY > 50)&& (mouseY < 90)) {
cutoff1.setValue(map(mouseY, 50, 90, 1000, 30));
mySample1.setToLoopStart();
mySample1.start();
}
// OBOE
if ((mouseX > 110) && (mouseX < 149)&& (mouseY > 95)&& (mouseY < 105)) {
cutoff2.setValue(map(mouseX, 110, 149, 30, 1000));
mySample2.setToLoopStart();
mySample2.start();
}
// TROMBA
if ((mouseX > 95) && (mouseX < 105)&& (mouseY > 110)&& (mouseY < 149)) {
cutoff3.setValue(map(mouseY, 110, 149, 30, 1000));
mySample3.setToLoopStart();
mySample3.start();
}
// VIOLINO
if ((mouseX > 50) && (mouseX < 90)&& (mouseY > 95)&& (mouseY &