Food Sanitation for the Supervisor by Department of the Army - HTML preview
Download the book in PDF, ePub, Kindle for a complete version.
NOTE
Refer to machine data plate for specific temperatures.
• Air drying dishes after cycle is completed. Towels are never used to dry dishes. Towel drying can contaminate dishes.
• Removing and storing dishes in a clean area.
4-9. During Operation Checks
During the operation, the supervisor should insure that dishes are washed and sanitized correctly. Items to check during the operation are:
• Amount of detergent. If more detergent is needed, instruct the operator.
• Wash water temperature. Keep it between 150o - 165oF. Lower temperatures will not remove greasy foods. Higher temperatures can bake foods on dishes.
• Clear water rinse temperature. It should be at least 170oF.
4-3
• Sanitizing rinse temperature. The final rinse should be between 180o - 190oF.
Temperatures below this will not adequately kill germs.
• Method of drying. Dishes must always be air dried.
4-10. Closing Down the Dishwasher
Once the dishes are washed, removed from the machine, and stored in a clean area, the operator must use correct close-down procedures. By performing the following steps, the dishwashing machine will be ready for the next work shift.
• Turn off the wash-tank heater.
• Open the drain valve.
• Remove and empty scrap trays. Wash trays in soap and water and allow them to air dry. Do not bang the trays.
• Clean and flush out the inside of the machine. Remove the curtains and wash them in soapy water. If necessary, use a lime remover.
• Check the rinse and wash arms. Remove the arms for cleaning. If lime deposits are present, use a lime remover and follow the directions printed on the label.
• For gas heated machines, close the drain valve and allow 3-4 inches of water to run into the wash-tank. This will protect the washtank from the pilot light heat.
Section II. HAND DISHWASHING
4-11. Process for Washing Dishes by Hand
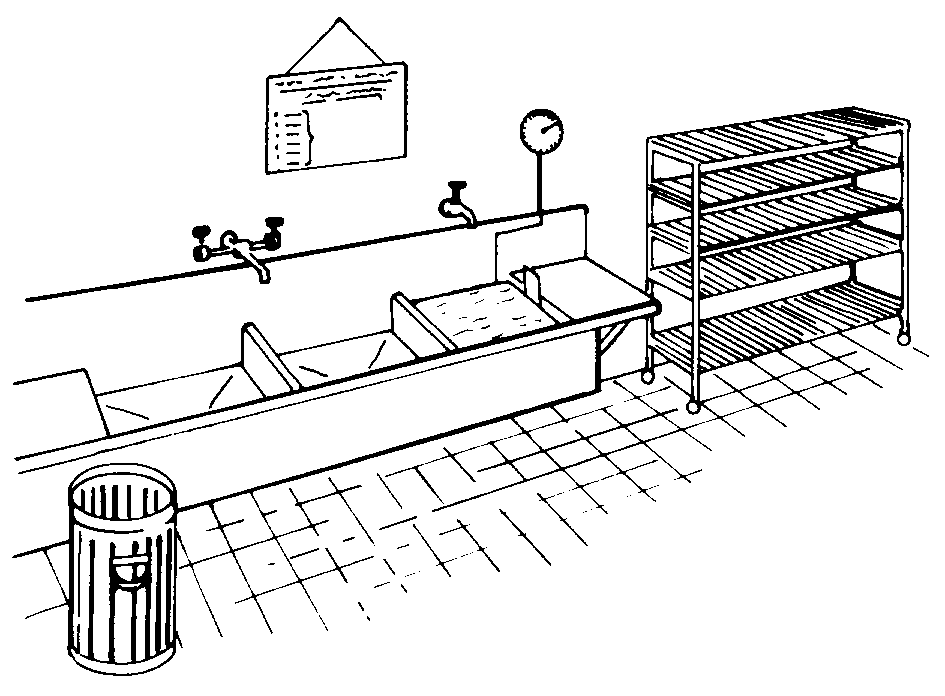
Washing dishes by hand is necessary when a machine is not available. Hand dishwashing is also necessary for large pots and pans (See Figure 4-3). Hand dishwashing requires at least a three-compartment sink. The steps employed are similar to those discussed under machine dishwashing.
a. Scrape food residues from all utensils.
b. Check the wash water temperature. It should be between 110o and 120oF. Higher temperatures will result in burns and scalding. The scrubbing action in handwashing will remove the grease. Thus, the lower temperature is permissible, as opposed to machine dishwashing.
c.
Wash utensils in a detergent solution, in the first compartment of a three-compartment sink, until all visible food particles and grease have been removed. Never use machine dishwashing compounds for hand dishwashing.
4-4
d. Rinse off the soapy water that clings to the utensils and tableware from the washing process in clear, warm rinse water in the second compartment.
e.
Sanitize the utensils and tableware in clear, hot water in the third compartment.
f.
Air dry on clean racks.
Figure 4-3. Hand dishwashing laundry.
4-12. Methods for Sanitizing Utensils, Tableware, and Equipment a. The Hot Water Method
(1) Completely immerse utensils for at least 30 seconds in hot water maintained at a temperature of 170oF. Use a thermometer to insure that the water temperature is maintained at 170oF. Since the water will be too hot for a person to put his hands in, he must use a dishbasket, a dishrack, a flatware container, or some other container with a handle to contain the dishes while immersing them in the sanitizing water. This permits easy removal of the utensils from the sanitizing compartment of the dishwashing sink for drying.
(2) Maintaining water in the sanitizing compartment at a temperature of 180oF
poses a number of problems for the supervisor. First, the water in hot water heating systems is usually 140oF or below. This means that it must be booster-heated to raise it to the desired 180oF. A number of other methods can be used for this purpose, but they all have their limitations. A properly installed electric immersion heater in the third compartment of the dishwashing sink is one of the better methods. Gas burners under the third compartment have been used but are a fire and safety hazard. In any case, it is not a simple problem. The method used should be discussed with and approved by the preventive medicine activity and fire marshal before the auxiliary heating equipment is installed.
4-5
b. The Chemical Method. The active ingredient, or the material in the compound that actually does the sanitizing, is our primary concern. Only a limited number of chemicals are acceptable as active ingredients. Two of the more acceptable chemicals used for sanitizing agents are chlorine and iodine. Immersion time, solution water temperature, and concentration of active ingredients require rigid control during the use of the chemical method.
(1) Concentration of active ingredients.
(a) When using chlorine, the minimum concentration or least amount of available chlorine permitted is 50 parts per million.
(b) When using iodine, the minimum amount is 12.5 parts per million. In addition, the water must be controlled at a level not higher than 5.0 pH as a measure of the acidity for the solution being used. Before using chemicals for sanitizing solutions, the preventive medicine personnel should be contacted to insure the chemicals will be effective.
(2) Solution water temperature. Chemicals react differently at different temperatures. To assure that they will react the same each time, the solution temperature must be maintained between 75oF and 110oF. This insures an effective kill of organisms remaining on the utensils.
(3) Immersion time. The period for effective sanitizing is a minimum of 1 minute.
This requirement does not permit the person washing utensils or tableware to dip them into the sanitizing solution and to rack them immediately for drying. The practice of just dipping tableware, especially glasses, frequently occurs in hand dishwashing operations. This practice is incorrect and must not be permitted.
4-13. Methods for Preparing and Testing Chemical Sanitizing Solutions When preparing fresh solutions of chemical sanitizers, it is recommended that the concentration or strength be double the minimum requirement. Therefore, chlorine solutions will have a strength of 100 parts per million while iodine solutions will have a strength of 25 parts per million.
4-14. Storage of Cleaned and Sanitized Utensils, Tableware, and Equipment a. No matter what procedure is used for washing utensils, tableware, and equipment, they should always be air dried. Towels of any kind must never be used. Towels can quickly become contaminated or may be contaminated before use. This contamination is quickly spread to those utensils or tableware that are dried by the towel later. Utensils that are immersed in water of 170oF or more will air dry very quickly. There are a number of rinse additives available that will aid in preventing water spotting. There is not a necessity for drying with a towel.
4-6
b. Food-contact surfaces of all cleaned and sanitized equipment and utensils must be handled in a manner that will protect them from contamination. Cleaned spoons, knives, and forks should be stored with their handles up. Clean cups, glasses, bowls, and plates should be stored with the food-contact surface down.
c.
Portable equipment and utensils must be stored above the floor in a clean, dry location. Suitable space and facilities, such as shelves, cabinets, or movable carts, should be protected from splash, dust, and other contamination.
d. Food-contact surfaces of fixed equipment such as slicers, mixers, or grinders should be protected from splash, dust, and other contamination. Utensils also should be air dried before being stored or should be stored in a self-draining position on hooks or racks. Stored containers and utensils should be covered or inverted.
4-7
CHAPTER 5
Food Service Sanitation
in the Field
Section I. WATER SUPPLY AND WASTE DISPOSAL
5-1.
Water Supply
In previous chapters, sanitation in garrison food service facilities was discussed.
However, the Army food service supervisor is also required to prepare and serve food in the field. When operating in the field, the same basic sanitation rules are followed as in a garrison operation. Even though new advances are being made in the development of improved field rations and new types of field kitchen facilities, problem situations will still be faced. This chapter provides information on how to handle special problems that may be encountered in the field.
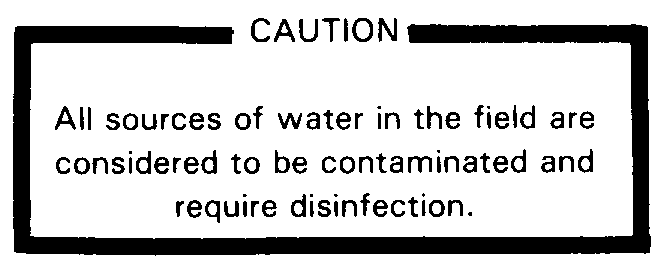
a. A safe water supply for preparing food is a must. Normally, treated water is provided to the unit in the field. Yet, there may be times when the combat situation does not allow this. When this happens, the food service supervisor must insure that all water used for food preparation has been correctly disinfected.
b. There are six sources of water in the field. These sources are surface (streams and lakes), ground, rain, ice, snow, and sea water. Select the clearest source available, then disinfect before use.
c. Water disinfection can be accomplished in the individual canteen, the 36-gallon (163.76 1) water purification (Lyster) bag, or other clean containers used in food preparation. Disinfection is accomplished by using iodine tablets, chlorine ampules, household liquid bleach, or boiling. For larger amounts of water (2-5 gallons+) (9.09-22.73+ l), chlorine ampules or liquid bleach are normally used.
d. Disinfecting water in the Lyster bag is a simple task. The preferred method using chlorine ampules includes the following steps:
1. Insure that the Lyster bag is clean before filling with water.
2. Fill bag to the 36-gallon mark which is 4 inches (10.16 cm) from the top. BE
CAREFUL--when full, the Lyster bag weighs approximately 300 pounds (136.08 kg).
3. Mix a stock solution of chlorine by adding 3 ampules to 1/2 canteen cup (120
ml) of water. Stir with a clean device.
4. Add the solution to the Lyster bag of water. Stir with a clean device.
5. Cover the Lyster bag.
5-0
6. Flush all faucets.
7. Wait 10 minutes, then using the chlorine color test kit, check for chlorine residual.
8. If residual is less than 5 parts per million (ppm), add one more ampule.
Repeat steps 7 and 8 until a 5 ppm residual is achieved.
9. Wait an additional 30 minutes before drinking or using for food preparation.
e. If chlorine ampules are not available, use household liquid bleach. Initially use 1
tablespoonful (15 ml) per Lyster bag. The unit field sanitation team has been trained to check the chlorine residual and will provide assistance when asked. When other sized containers are used, follow guidelines in Table 5-1 to determine how much chlorine to use.
Table 5-1. Amount of Chlorine for Disinfecting Water in Common-Sized Containers to 5 PPM.
CONTAINER SIZE
CHLORINE
AMOUNT OF 5%
(GAL)
AMPULES
CHLORINE
5 (18.93 l)
1/2
0.06 oz (1/16 tbs) (15/16 ml)
10 (37.85 l)
1
0.13 oz (1/8 tbs) (1 7/8 ml)
20 (75.70 l)
2
0.26 oz (1/4 tbs ) (3 3/4 ml)
32 (121.10 l)
3
0.41 oz (1/2 tbs) (7 1/5 ml)
100 (378.50 l)
8
1.23 oz (1 1/2 tbs) (22 1/2 ml)
200 (757.00 l)
16
2.56 oz (5 tbs) (75 ml)
300 (1135.50 l)
24
3.84 oz (8 tbs) (120 ml)
f.
When the water supply is disrupted or the safety of the water supply is questionable, disinfect. Insure that the container is clean, follow directions provided on labels or guidelines in this manual, allow 30 minutes total contact time before drinking or using in food preparation, and insure a 5 ppm chlorine residual or follow command guidelines.
g. Water from water supply points may require additional treatment before use.
5-2.
Waste Disposal
a. In a garrison facility, disposal of kitchen waste is easy. Waste is flushed down a sanitary drain or is stored in a covered container and someone is assigned to pick it up.
In field operations, kitchen waste disposal can become a major health problem. Unless correct procedures are followed, kitchen waste can attract large numbers of disease-carrying flies and rodents.
5-1
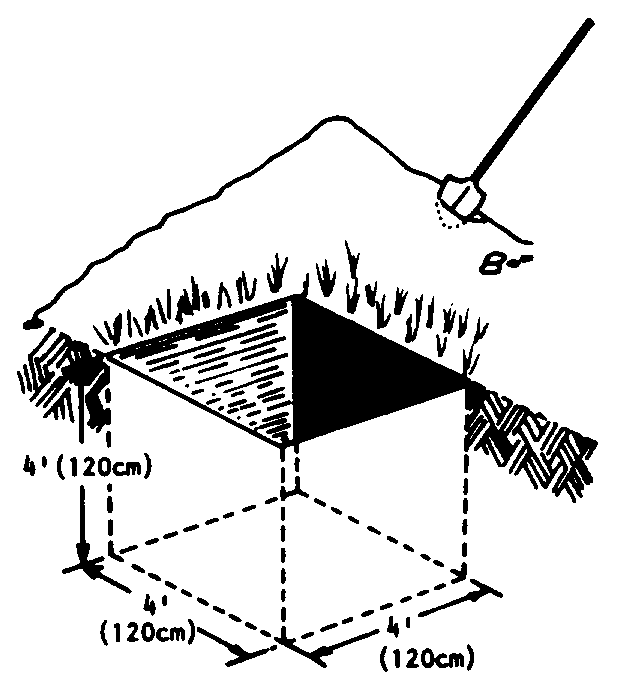
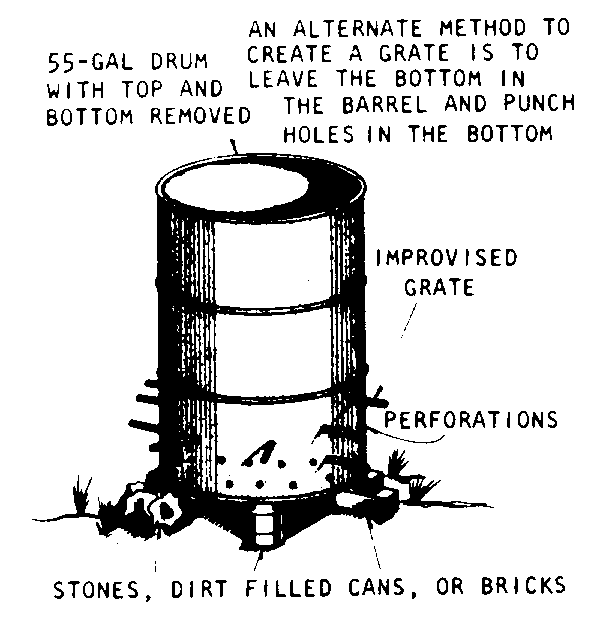
b. The two basic methods for the disposal of solid waste in the field are to burn it or bury it. If this is not done, insects and rodents will soon take over the area of operation.
A method of constructing a garbage burial pit is shown in Figure 5-1. A simple means of burning waste, the grate incinerator, is shown in Figure 5-2.
Figure 5-1. Garbage burial pit.
Figure 5-2. Grate incinerator.
5-2

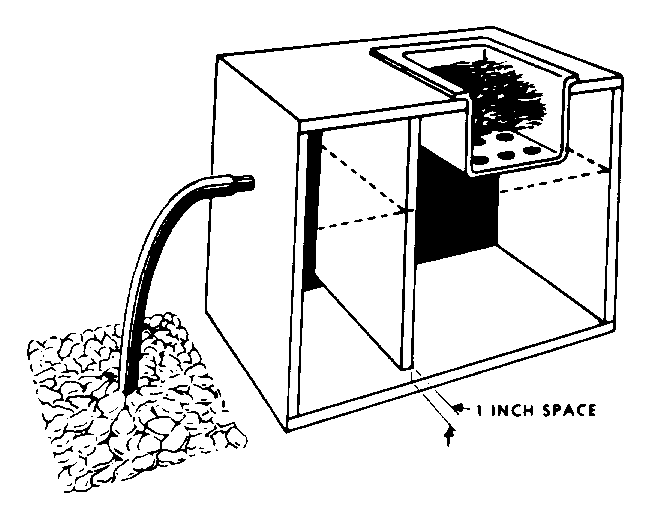
c. For disposal of kitchen liquid waste, a soakage pit must be constructed. Liquid waste that has a high grease content may clog the soakage pit. A "grease trap" is needed in conjunction with the soakage pit for this type of waste. Figures 5-3 and 5-4 are examples of a soakage pit and a grease trap.
Figure 5-3. Soakage pit for liquid waste.
Figure 5-4. Grease trap.
d. As a food service supervisor, it is not only important to know how to construct these disposal devices but also who constructs and maintains them. In some units, food service personnel may be responsible. This is not a desirable practice since the same personnel will be handling food products. In other units, detail personnel will be assigned to construct and maintain disposal devices. This responsibility should be outlined in a field standing operating procedure (SOP). Field sanitation team personnel have also been trained in construction requirements. They should be asked for assistance in determining the number of disposal devices required and where to locate them.
5-3
Section II. SAFE PRODUCT TEMPERATURES
IN THE FIELD
5-3.
Safe Product Temperatures
a. Decisions for type of rations issued are beyond the control of the supervisor. It is of utmost importance that all product temperatures be monitored. Perishables must be stored immediately in the best refrigeration unit available to maintain a safe product temperature. The refrigeration unit may be an ice box or a mechanical refrigerator.
b. When serving hot or cold meals in the field, maintaining safe product temperatures (45oF and below or 140oF and above) can seem like an impossible job. By correctly using equipment that is available and using good supervisory techniques, the job can be done.
NOTE
Review Chapter 2, Section III, for the importance
of maintaining safe product temperatures.
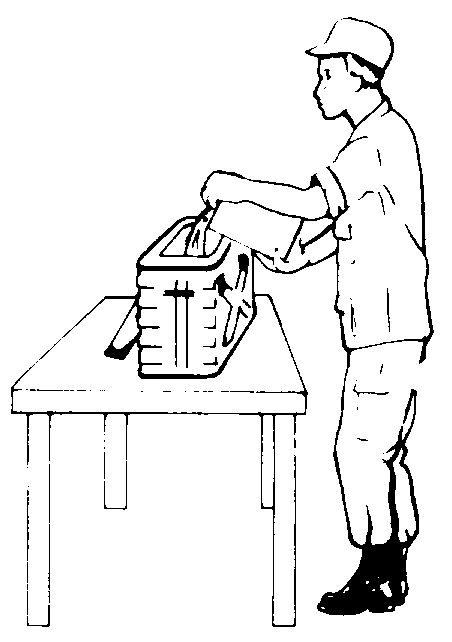
c. Transporting potentially hazardous foods from a base camp to troops at other locations will require the use of insulated food containers. Correct use of the insulated food container will help maintain safe product temperatures (see Figure 5-5).
Figure 5-5. Insulated food containers.
d. For hot foods, preheat the insulated container by using boiling water. Let the boiling water remain in the container for at least 30 minutes. This will preheat the container and help maintain safe temperatures of potentially hazardous foods. When correctly preheated, foods should remain at safe temperatures for 3 to 4 hours. See Figure 5-6 for specific directions. Take the following steps: 1. Remove the inserts.
2. Pour 2 quarts/liters of boiling water into the container.
3. Close and let stand for at least 30 minutes.
4. Pour out enough water to provide room for the inserts.
5-4
5. Place the hot food (at least 140oF) into inserts and then place the insert in the container.
6. Close and fasten the container lid.
Figure 5-6. Preheating the insulated food container.
e. For potentially hazardous foods that must remain cold, put 2 quarts/liters of crushed ice into the container to prechill it. Let the ice remain in the container for at least 30 minutes. When correctly prechilled, cold foods should remain at safe temperatures for 3 to 4 hours. See Figure 5-7 for further directions for prechilling.
Take the following steps:
1. Remove the inserts.
2. Put crushed ice or 2 quarts/liters of ice water in the container.
3. Close and let stand for 30 minutes.
4. Dump out enough ice to provide room for the inserts.
5. Place the cold food (should be below 45oF) into the inserts and then place the inserts in the container.
6. Close and fasten the container lid.
5-5
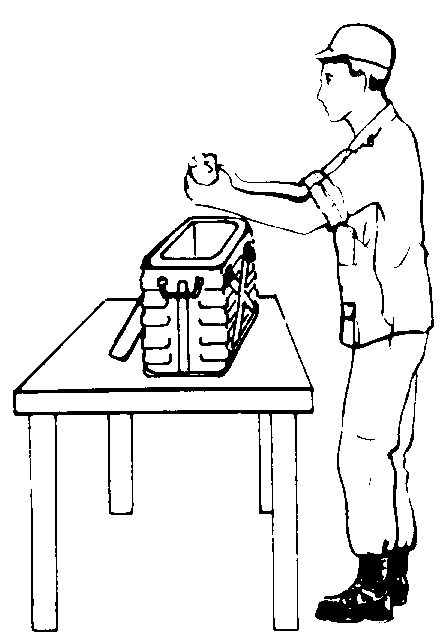
Figure 5-7 Prechilling the insulated food container.
5-4.
Supervisory Techniques
Good supervisory techniques include labeling each insulated container with the product, the temperature of food when placed in the container, and the time that the food was placed in the container. When the container is opened for serving, the temperature should be checked again. Insulated containers must be checked for defects such as gaskets that do not fit right or that are missing, lids that do not close tightly, or any other discrepancy. Maintaining potentially hazardous food at safe temperatures prevents disease outbreak and contributes to the good health of the entire unit.
Section III. EQUIPMENT CLEANING
AND SANITATION
5-5.
Messkit Laundry
The food service supervisor plays an important role in the proper operation of a messkit laundry. The messkit laundry is used to wash and sanitize individual messkits and kitchen utensils and equipment. Newly developed portable facilities to replace the messkit laundry are being tested. Until these facilities have been thoroughly tested, approved, and supplied throughout the Army, the messkit laundry will be used. The messkit laundry can present many problems. The problems are obtaining water, maintaining "clean" water, preventing "giant mudholes" from forming, and preventing burns from the hot water/immersion heaters.
5-6
a. It is not always an easy task to obtain enough water for field operations. A normal messkit laundry requires about 60 gallons (227.10 l) of water. This amount can increase when the water becomes heavily soiled with food waste. Good supervisory actions will keep the water clean longer.
b. To keep the water clean until all personnel have washed their messkits, always provide a can for scraping out food waste from the messkit. A senior person must supervise soldiers as they use the messkit laundry, making sure that food waste has been scraped out. This simple action will help keep the water in the containers clean for a longer period of time. If the water does becomes heavily soiled, it should be replaced with clean water. To conserve water, the soiled wash water is discarded. The rinse water is used as the wash water by adding detergent to it. The sanitizing water is used as the rinse water. A clean container is added as the sanitizing water. This way only one container of water is replaced.
c. Soldiers should not have to wade through mudholes to use the messkit laundry.
But experience shows that most messkit laundries become giant mudholes after one or two uses. This can be avoided by improving the area around the messkit laundry.
Providing a rock walkway in front of the cans will help eliminate this problem. Enough rocks should be used to allow splash water to soak through to the soil.
d. Before a field training exercise or military operation, TRAIN personnel in the use of immersion heaters. Burns resulting from the use of immersion heaters range from minor to third degree that require hospitalization. New personnel should not be allowed to light immersion heaters until they have demonstrated that they can use them safely. The first person to blame for injuries from an immersion heater is the negligent supervisor.
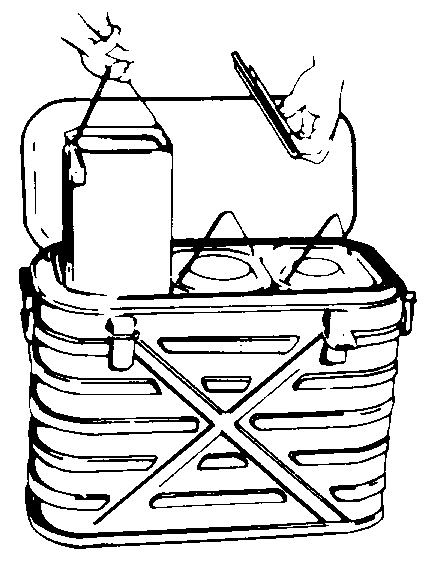
e. Figure 5-8 describes how the messkit laundry should be set up and maintained.
More detailed instructions for operating the field messkit laundry can be found in FM
10-23, Army Food Service Operations.
Messkit laundry: Enough water is placed in each can to allow 1 quart (0.95 l) for each person. One laundry can accommodate 80 persons. If an immersion heater is not available, a chemical disinfectant must be used in the last can. When the chemical disinfectant preparation is used, the following steps should be followed: (1) If possible, use the Disinfectant, Food Service, as specified on the label.
(2) In an emergency, use three level messkit spoonsful of calcium hypochlorite powder/granule in a 32-gallon container.
OR
(3) Use 1 canteen cup of 5 percent liquid chlorine bleach in a 32-gallon container.
5-7
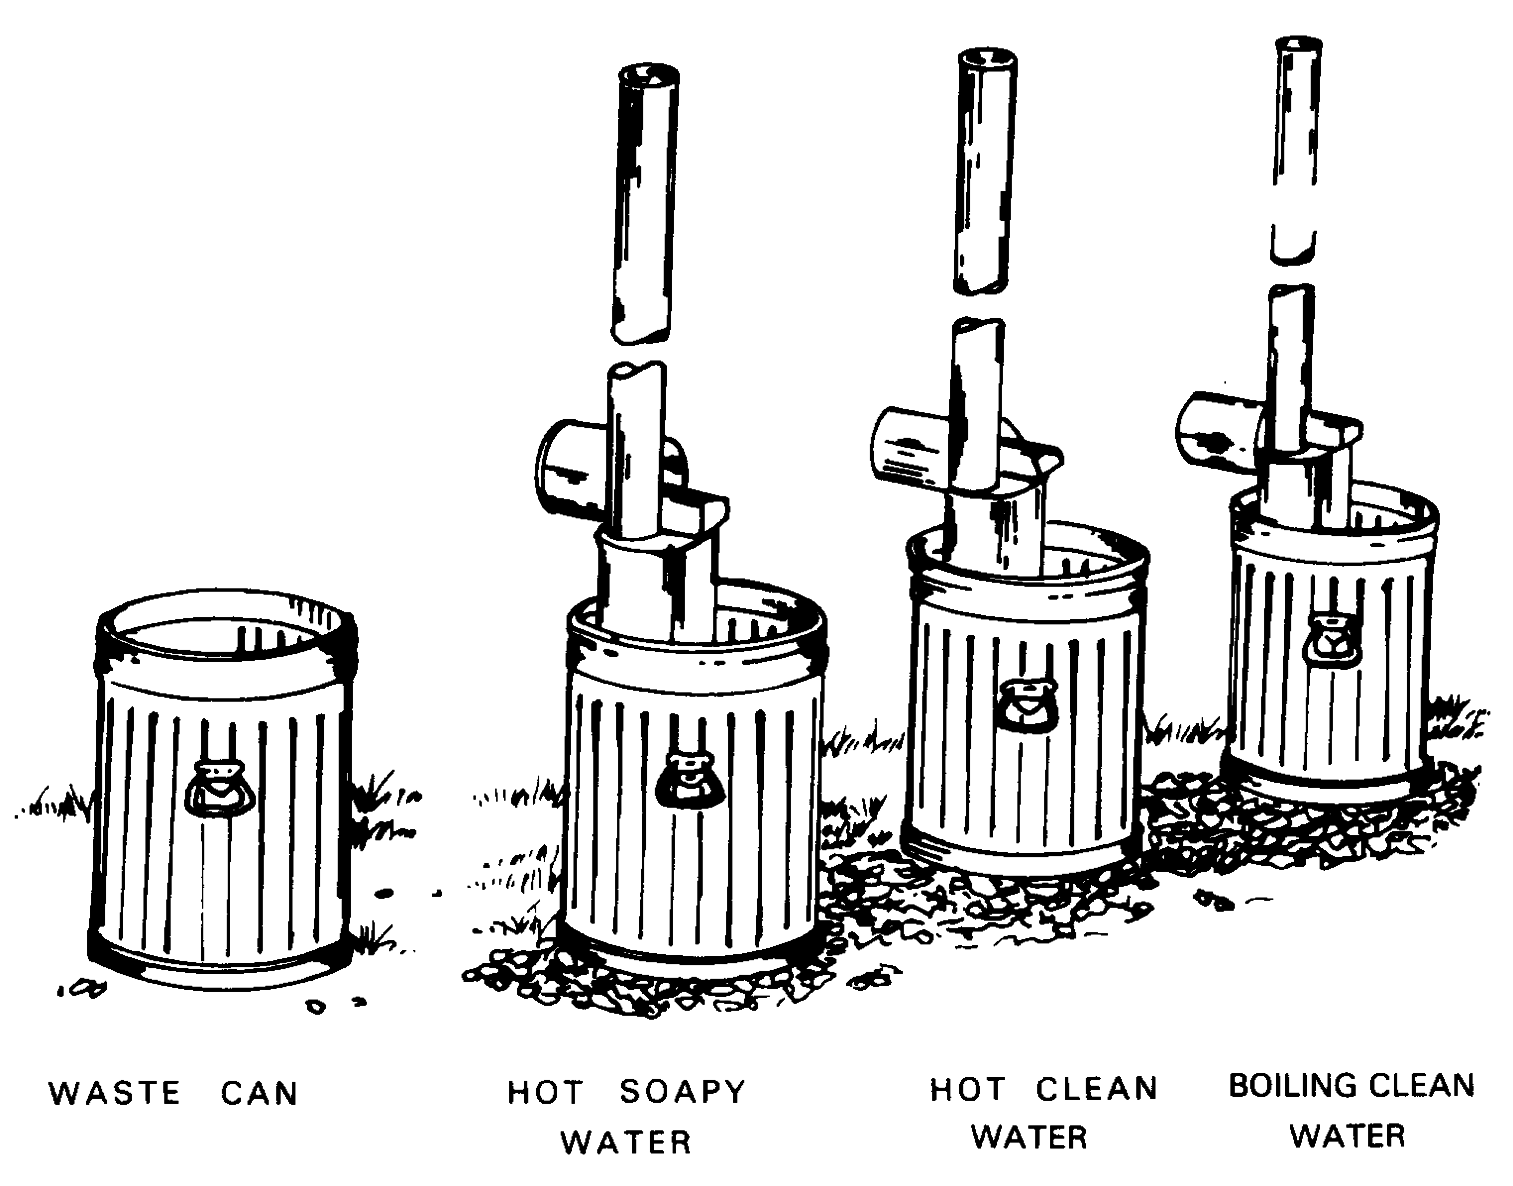
Figure 5-8. Messkit Laundry.
5-6.
Field Conditions
Field conditions are no excuse for lowering standards of personal hygiene. Maintaining high levels of health and hygiene of food service personnel is critical. There are many ways to construct improvised handwashing facilities in the field. Two of these are shown in Figures 5-9 and 5-10.
5-8
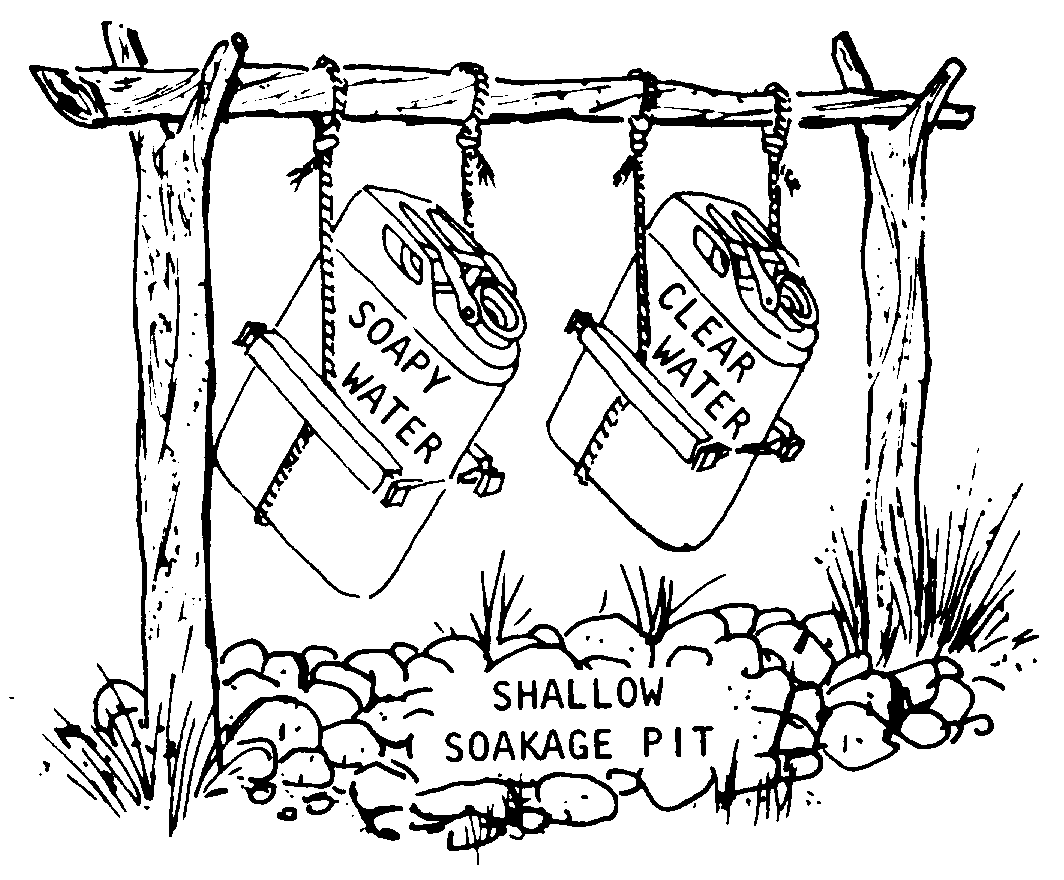
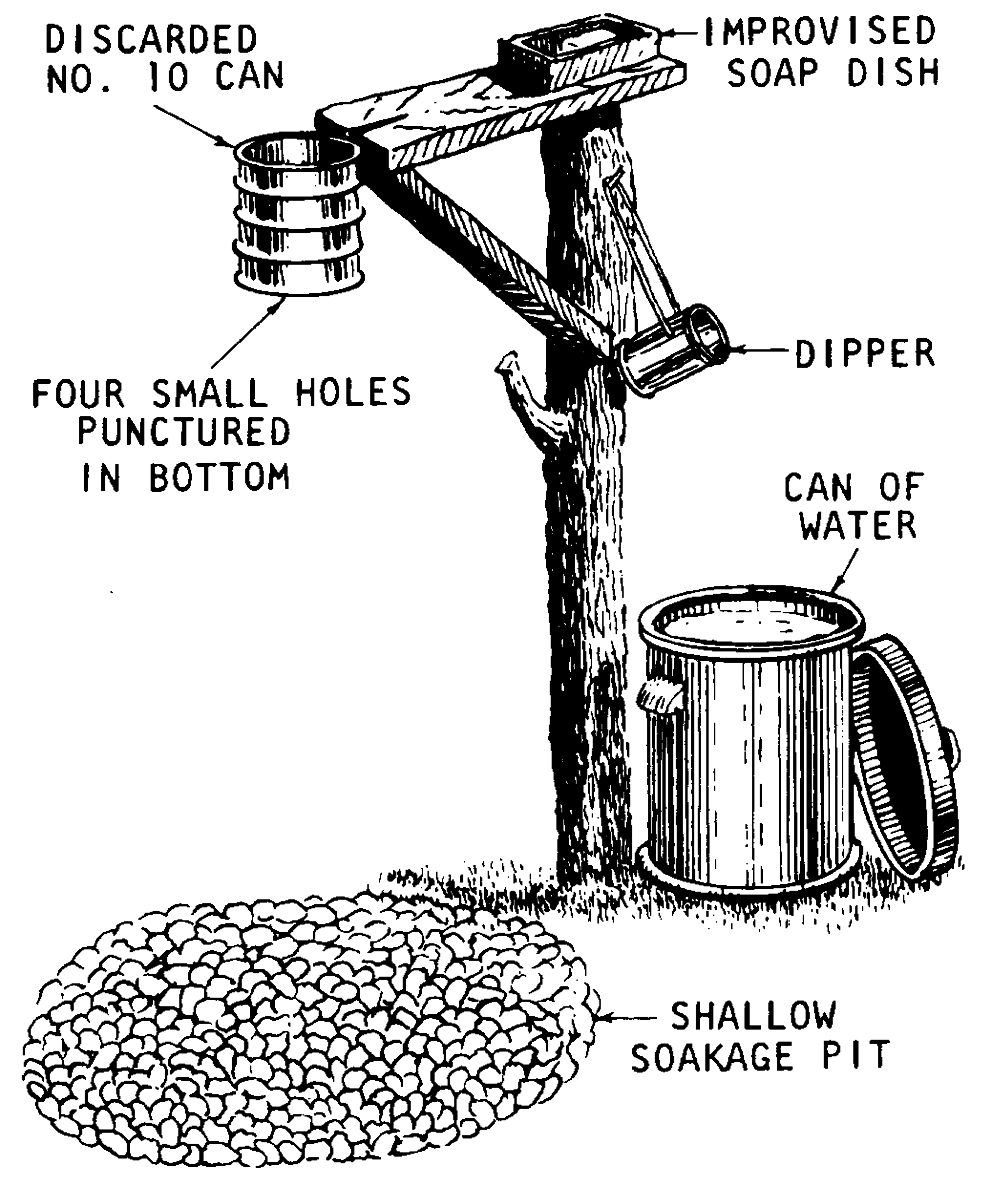
Figure 5-9. Handwashing device--tipping 5-gallon can.
Figure 5-10. Handwashing device.
5-9
CHAPTER 6
EFFECTIVE SANITATION PROGRAM
6-1. Supervision That Works
Information in this chapter can help the supervisor maintain a clean facility; keep food service equipment clean, sanitized, and in good working condition; train personnel in critical sanitation procedures; and perform quality control inspections.
6-2. Supervising Housekeeping
a. The importance of good housekeeping and general cleaning practices cannot be overemphasized. Food items prepared in a "dirty" kitchen will more than likely become contaminated. "Dirty" equipment also makes it easier for bacteria to grow. Equipment must be washed before it can be sanitized or disinfected.
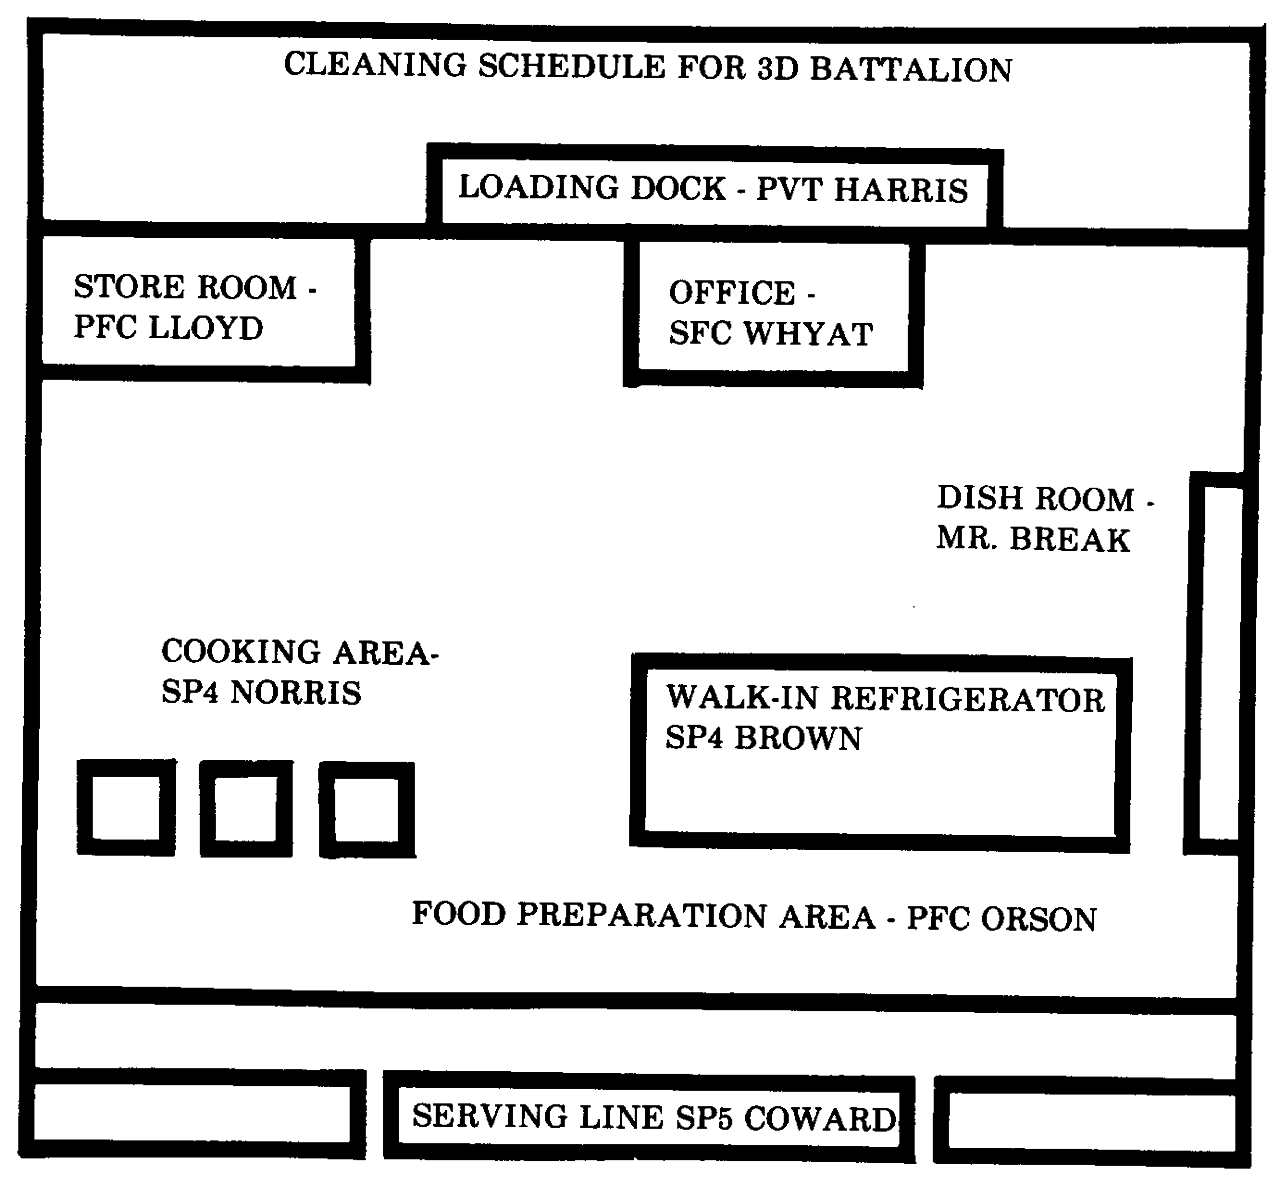
b. A clean food service operation does not just happen. It must be planned and supervised. The supervisor plans what is to be done, specifies how it is to be done, provides the right supplies and equipment for the job, and then makes sure that the job is done. An excellent way to plan housekeeping work is to draw a floor plan of the kitchen (Figure 6-1). The names of individuals assigned to clean each area are placed on the floor plan. When using this method everyone knows what his housekeeping duties are.
Figure 6-1. Example of cleaning responsibilities using floor plan.
6-0

c. A cleaning schedule is maintained for each work shift. Each person has a specific area of responsibility for cleaning and housekeeping duties.
d. The right cleaning supplies and equipment must be used. Too much of a cleaning product may damage equipment, result in injury to workers, or leave a toxic residue in foods. Label directions must be followed on all cleaning products.
e. One way to make sure that personnel use correct methods is to establish written cleaning procedures for each area and for each major item of equipment. An example of a written cleaning procedure appears below:
CLEANING PROCEDURES FOR MEAT AND FOOD SLICERS
As a safety precaution, always disconnect the electric cord before starting to clean the slicer. Set blade control at 0 to reduce the possibility of accidental cuts. Leave the blade guard in place until ready to clean the blade. Always replace the guard as soon as the blade is cleaned. Clean the shafts and all parts under the frame.
1.
Dismantle and remove parts to pot sink. Soak parts for 5 minutes in a detergent cleaning solution. Brush all parts. Rinse with 125oF water.
2.
Dip parts in sink containing a sanitizing solution.
3.
Clean the stationary parts in place. Be careful of the blade. Use same solution as in number 1, above. Scrub with a good nylon-bristled brush. Check inside and outside, especially corners, handle connections, underneath rolled rims, receiving trays, and the area between the chute and frame of the unit.
4.
Swab with a saturated clean brush or disposable cloth squ