LabVIEW Graphical Programming by Serhat Beyenir - HTML preview
Download the book in PDF, ePub, Kindle for a complete version.
LabVIEW Graphical Programming
Collection Editor:
Serhat Beyenir
LabVIEW Graphical Programming
Collection Editor:
Serhat Beyenir
Authors:
National Instruments
Malan Shiralkar
Online:
< http://cnx.org/content/col11408/1.1/ >
C O N N E X I O N S
Rice University, Houston, Texas
This selection and arrangement of content as a collection is copyrighted by Serhat Beyenir. It is licensed under the Creative Commons Attribution 3.0 license (http://creativecommons.org/licenses/by/3.0/).
Collection structure revised: February 6, 2012
PDF generated: October 29, 2012
For copyright and attribution information for the modules contained in this collection, see p. 114.
❚❛❜❧❡ ♦❢ ❈♦♥t❡♥ts
1 Introduction
1.1 LabVIEW . . . . . . . . . . . . . . . . . . . . . . . . . . . . . . . . . . . . . . . . . . . . . . . . . . . . . . . . . . . . . . . . . . . . . . . . . . . . . . . . . . . . 2
1.2 LabVIEW Environment . . . . . . . . . . . . . . . . . . . . . . . . . . . . . . . . . . . . . . . . . . . . . . . . . . . . . . . . . . . . . . . . . . . . . . 3
1.3 Front Panel . . . . . . . . . . . . . . . . . . . . . . . . . . . . . . . . . . . . . . . . . . . . . . . . . . . . . . . . . . . . . . . . . . . . . . . . . . . . . . . . . 14
1.4 Block Diagram . . . . . . . . . . . . . . . . . . . . . . . . . . . . . . . . . . . . . . . . . . . . . . . . . . . . . . . . . . . . . . . . . . . . . . . . . . . . . . 16
1.5 Acquiring a Signal VI . . . . . . . . . . . . . . . . . . . . . . . . . . . . . . . . . . . . . . . . . . . . . . . . . . . . . . . . . . . . . . . . . . . . . . . 21
1.6 LabVIEW Documentation Resources . . . . . . . . . . . . . . . . . . . . . . . . . . . . . . . . . . . . . . . . . . . . . . . . . . . . . . . . 33
1.7 Reduce Samples VI . . . . . . . . . . . . . . . . . . . . . . . . . . . . . . . . . . . . . . . . . . . . . . . . . . . . . . . . . . . . . . . . . . . . . . . . . . 36
1.8 Debugging Techniques . . . . . . . . . . . . . . . . . . . . . . . . . . . . . . . . . . . . . . . . . . . . . . . . . . . . . . . . . . . . . . . . . . . . . . 42
1.9 Debug Exercise (Main) VI . . . . . . . . . . . . . . . . . . . . . . . . . . . . . . . . . . . . . . . . . . . . . . . . . . . . . . . . . . . . . . . . . . . 43
1.10 Summary, Tips, and Tricks on Introduction to LabVIEW . . . . . . . . . . . . . . . . . . . . . . . . . . . . . . . . . . . . 47
2 Modular Programming
2.1 Modular Programming . . . . . . . . . . . . . . . . . . . . . . . . . . . . . . . . . . . . . . . . . . . . . . . . . . . . . . . . . . . . . . . . . . . . . . 51
2.2 Icons and Connector Panes . . . . . . . . . . . . . . . . . . . . . . . . . . . . . . . . . . . . . . . . . . . . . . . . . . . . . . . . . . . . . . . . . . 53
2.3 Convert C to F VI . . . . . . . . . . . . . . . . . . . . . . . . . . . . . . . . . . . . . . . . . . . . . . . . . . . . . . . . . . . . . . . . . . . . . . . . . . . 56
2.4 Using SubVIs . . . . . . . . . . . . . . . . . . . . . . . . . . . . . . . . . . . . . . . . . . . . . . . . . . . . . . . . . . . . . . . . . . . . . . . . . . . . . . . 60
2.5 Thermometer VI . . . . . . . . . . . . . . . . . . . . . . . . . . . . . . . . . . . . . . . . . . . . . . . . . . . . . . . . . . . . . . . . . . . . . . . . . . . . 61
2.6 Creating a SubVI from Sections of a VI . . . . . . . . . . . . . . . . . . . . . . . . . . . . . . . . . . . . . . . . . . . . . . . . . . . . . . 65
2.7 Summary, Tips, and Tricks on Modular Programming . . . . . . . . . . . . . . . . . . . . . . . . . . . . . . . . . . . . . . . 66
3 Repetition and Loops
3.1 While Loops . . . . . . . . . . . . . . . . . . . . . . . . . . . . . . . . . . . . . . . . . . . . . . . . . . . . . . . . . . . . . . . . . . . . . . . . . . . . . . . . 67
3.2 For Loops . . . . . . . . . . . . . . . . . . . . . . . . . . . . . . . . . . . . . . . . . . . . . . . . . . . . . . . . . . . . . . . . . . . . . . . . . . . . . . . . . . . 69
3.3 Timed Temperature VI . . . . . . . . . . . . . . . . . . . . . . . . . . . . . . . . . . . . . . . . . . . . . . . . . . . . . . . . . . . . . . . . . . . . . . 71
3.4 Summary, Tips, and Tricks on Repetition and Loops . . . . . . . . . . . . . . . . . . . . . . . . . . . . . . . . . . . . . . . . . 74
4 Customizing VIs
4.1 Configuring the Appearance of Front Panels . . . . . . . . . . . . . . . . . . . . . . . . . . . . . . . . . . . . . . . . . . . . . . . . . 75
4.2 Opening SubVI Front Panels when a VI Runs . . . . . . . . . . . . . . . . . . . . . . . . . . . . . . . . . . . . . . . . . . . . . . . . 76
4.3 Pop-up Graph VI and Use Pop-up Graph VI . . . . . . . . . . . . . . . . . . . . . . . . . . . . . . . . . . . . . . . . . . . . . . . . . 77
4.4 Keyboard Shortcuts for Controls . . . . . . . . . . . . . . . . . . . . . . . . . . . . . . . . . . . . . . . . . . . . . . . . . . . . . . . . . . . . 79
4.5 Temperature System VI . . . . . . . . . . . . . . . . . . . . . . . . . . . . . . . . . . . . . . . . . . . . . . . . . . . . . . . . . . . . . . . . . . . . . 80
4.6 Editing VI Properties . . . . . . . . . . . . . . . . . . . . . . . . . . . . . . . . . . . . . . . . . . . . . . . . . . . . . . . . . . . . . . . . . . . . . . . . 82
4.7 Edit Me VI . . . . . . . . . . . . . . . . . . . . . . . . . . . . . . . . . . . . . . . . . . . . . . . . . . . . . . . . . . . . . . . . . . . . . . . . . . . . . . . . . . 82
4.8 Customizing the Controls and Functions Palettes . . . . . . . . . . . . . . . . . . . . . . . . . . . . . . . . . . . . . . . . . . . . 83
4.9 Summary, Tips, and Tricks on Customizing VIs . . . . . . . . . . . . . . . . . . . . . . . . . . . . . . . . . . . . . . . . . . . . . . 85
5 Plotting Data
5.1 Waveform Charts . . . . . . . . . . . . . . . . . . . . . . . . . . . . . . . . . . . . . . . . . . . . . . . . . . . . . . . . . . . . . . . . . . . . . . . . . . . 87
5.2 Temperature Monitor VI . . . . . . . . . . . . . . . . . . . . . . . . . . . . . . . . . . . . . . . . . . . . . . . . . . . . . . . . . . . . . . . . . . . . 89
5.3 Temperature Running Average VI . . . . . . . . . . . . . . . . . . . . . . . . . . . . . . . . . . . . . . . . . . . . . . . . . . . . . . . . . . . 94
5.4 Waveform and XY Graphs . . . . . . . . . . . . . . . . . . . . . . . . . . . . . . . . . . . . . . . . . . . . . . . . . . . . . . . . . . . . . . . . . . . 98
5.5 Graph Waveform Array VI . . . . . . . . . . . . . . . . . . . . . . . . . . . . . . . . . . . . . . . . . . . . . . . . . . . . . . . . . . . . . . . . . . 99
5.6 Temperature Analysis VI . . . . . . . . . . . . . . . . . . . . . . . . . . . . . . . . . . . . . . . . . . . . . . . . . . . . . . . . . . . . . . . . . . . 104
5.7 Graph Circle VI . . . . . . . . . . . . . . . . . . . . . . . . . . . . . . . . . . . . . . . . . . . . . . . . . . . . . . . . . . . . . . . . . . . . . . . . . . . . 106
5.8 Intensity Plots . . . . . . . . . . . . . . . . . . . . . . . . . . . . . . . . . . . . . . . . . . . . . . . . . . . . . . . . . . . . . . . . . .. . . . . . . . . . . . 108
5.9 Intensity Graph Example VI . . . . . . . . . . . . . . . . . . . . . . . . . . . . . . . . . . . . . . . . . . . . . . . . . . . . . . . . . . . . . . . . 109
5.10 Summary, Tips, and Tricks on Plotting Data . . . . . . . . . . . . . . . . . . . . . . . . . . . . . . . . . . . . . . . . . . . . . . . 111
5.11 Additional Exercises for Plotting Data . . . . . . . . . . . . . . . . . . . . . . . . . . . . . . . . . . . . . . . . . . . . . . . . . . . . . 111
iv
Index . . . . . . . . . . . . . . . . . . . . . . . . . . . . . . . . . . . . . . . . . . . . . . . . . . . . . . . . . . . . . . . . . . . . . . . . . . . . . . . . . . . . . . . . . . . . . . . . 113
Attributions . . . . . . . . . . . . . . . . . . . . . . . . . . . . . . . . . . . . . . . . . . . . . . . . . . . . . . . . . . . . . . . . . . . . . . . . . . . . . . . . . . . . . . . . . 114
Available for free at Connexions <http://cnx.org/content/col11408/1.1>
Chapter 1
Introduction
Available for free at Connexions <http://cnx.org/content/col11408/1.1>
1
2
CHAPTER 1. INTRODUCTION
1.1 LabVIEW1
LabVIEW programs are called virtual instruments, or VIs, because their appearance and operation imitate physical instruments, such as oscilloscopes and multimeters. LabVIEW contains a comprehensive set of tools for acquiring analyzing, displaying, and storing data, as well as tools to help you troubleshoot your code.
LabVIEW VIs contain three components-the front panel, the block diagram, and the icon and connector pane. This lesson describes the front panel and the block diagram; refer to Modular Programming (Section 2.1) for more information about the icon and the connector pane.
In LabVIEW, you build a user interface, or front panel, with controls and indicators. Controls are knobs, push buttons, dials, and other input devices. Indicators are graphs, LEDs, and other displays. After you build the user interface, you add code using VIs and structures to control the front panel objects. The block diagram contains this code. In some ways, the block diagram resembles a flowchart.
Use LabVIEW to communicate with hardware such as data acquisition, vision, and motion control de-
vices, and GPIB, PXI, VXI, RS-232, and RS-484 devices. LabVIEW also has built-in features for connecting your application to the Web using the LabVIEW Web Server and software standards such as TCP/IP networking and ActiveX.
Using LabVIEW, you can create test and measurement, data acquisitions, instrument control, datalog-
ging, measurement analysis, and report generation applications. You also can create stand-alone executables and shared libraries, like DLLs, because LabVIEW is a true 32-bit compiler.
1This content is available online at <http://cnx.org/content/m12192/1.2/>.
Available for free at Connexions <http://cnx.org/content/col11408/1.1>
3
1.2 LabVIEW Environment2
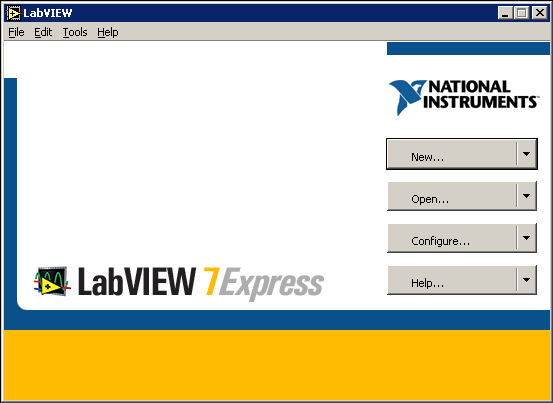
When you launch LabVIEW, the navigation dialog box (Figure 1.1) appears that includes introductory material and common commands.
Figure 1.1: LabVIEW Dialog Box
The LabVIEW dialog box includes the following components:
• A menu with standard items such as ❋✐❧❡ ❊①✐t.
• A set of buttons for creating and opening VIs, configuring data acquisition devices, and finding help-ful information.
- Click the ◆❡✇ button to create a new VI. Click the arrow on the ◆❡✇ button to choose to open a blank VI or to open the ◆❡✇ dialog box.
- Click the ❖♣❡♥ button to open an existing VI. Click the arrow on the ❖♣❡♥ button to open
recent files.
- Click the ❈♦♥❢✐❣✉r❡ button to configure your data acquisition devices. Click the arrow on
the ❈♦♥❢✐❣✉r❡ button to configure LabVIEW.
- Click the ❍❡❧♣ button to launch the LabVIEW Help. Click the arrow on the ❍❡❧♣ button for
other Help options, including the ◆■ ❊①❛♠♣❧❡ ❋✐♥❞❡r.
1.2.1 Creating and Saving a VI
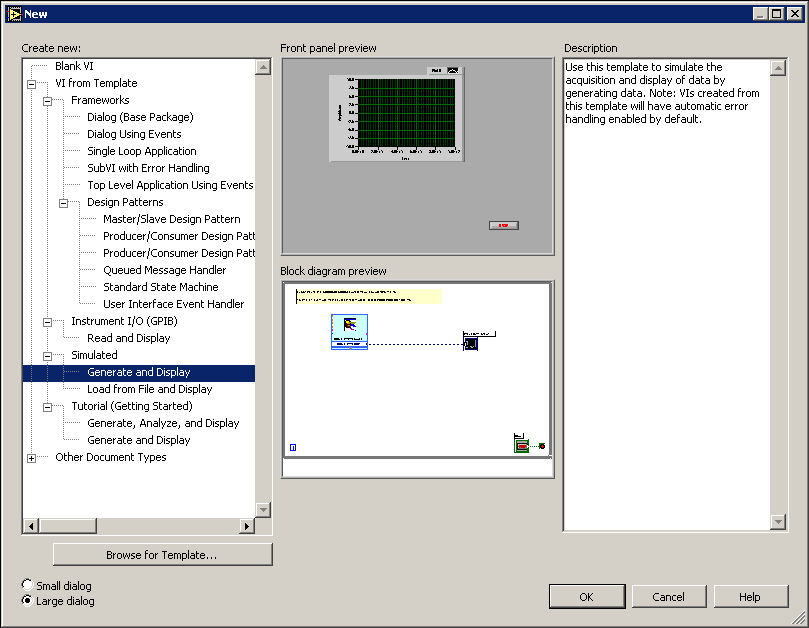
When you click the ◆❡✇ button in the ▲❛❜❱■❊❲ dialog box, the ◆❡✇ dialog box appears. You also can select
❋✐❧❡ ◆❡✇ to display this dialog box. When you select a template in the ❈r❡❛t❡ ♥❡✇ list, previews of the 2This content is available online at <http://cnx.org/content/m12193/1.3/>.
Available for free at Connexions <http://cnx.org/content/col11408/1.1>
4
CHAPTER 1. INTRODUCTION
VI appear in the ❋r♦♥t ♣❛♥❡❧ ♣r❡✈✐❡✇ and the ❇❧♦❝❦ ❞✐❛❣r❛♠ ♣r❡✈✐❡✇ sections, and a description of the template appears in the ❉❡s❝r✐♣t✐♦♥ section. Figure 1.2 shows the ◆❡✇ dialog box and the ❙✉❜❱■ ✇✐t❤
❊rr♦r ❍❛♥❞❧✐♥❣ ❱■ template.
Figure 1.2: New Dialog Box
Click the ❖❑ button to open the template. You also can double-click the name of the template VI in the
❈r❡❛t❡ ♥❡✇ list to open the template. If no template is available for the task you want to create, you can start with a blank VI and create a VI to accomplish the specific task. In the ▲❛❜❱■❊❲ dialog box, click the arrow on the ◆❡✇ button and select ❇❧❛♥❦ ❱■ from the shortcut menu or press the ❈tr❧✲◆ keys to open a blank VI.
NOTE:
You also can open a blank VI by selecting ❇❧❛♥❦ ❱■ from the ❈r❡❛t❡ ♥❡✇ list in the ◆❡✇
dialog box or by selecting ❋✐❧❡
◆❡✇ ❱■.
1.2.1.1 Open/Templates
Use the ◆❡✇ dialog box to create different components in LabVIEW to help you build an application. You can start with a blank VI to write a VI from scratch, or start with a template to simplify the programming.
Available for free at Connexions <http://cnx.org/content/col11408/1.1>
5
The ◆❡✇ dialog box includes the following components:
Create new - Displays templates you can use to start building VIs and other LabVIEW documents.
Select from the following templates and click the ❖❑ button to start building a VI or other Lab-
VIEW document.
Blank VI - Opens a blank front panel and blank block diagram.
VI from Template - Opens a front panel and block diagram with components you need to build
different types of VIs.
Other Document Types - Opens the tools you use to build other LabVIEW objects.
Browse for Template - Displays the ❇r♦✇s❡ dialog box so you can navigate to a VI, control, or template. If you previously have browsed for and selected a template from this dialog box, use the
pull-down menu of the ❇r♦✇s❡ button to select a template to reopen it.
Front panel preview - Displays the front panel for the VI template you selected in the ❈r❡❛t❡ ♥❡✇
list.
Block diagram preview - Displays the block diagram for the VI template you selected in the ❈r❡❛t❡
♥❡✇ list.
Description - Displays a description of the template you selected in the ❈r❡❛t❡ ♥❡✇ list if the template includes a description.
1.2.1.2 Opening an Existing VI
You load a VI into memory by selecting ❋✐❧❡
❖♣❡♥. In the ❈❤♦♦s❡ t❤❡ ❱■ t♦ ♦♣❡♥ dialog box that ap-
pears, navigate to the VI you want to open.
The VIs you edit in this course are located in the ❈✿\❊①❡r❝✐s❡s\▲❛❜❱■❊❲ ❇❛s✐❝s ■ directory.
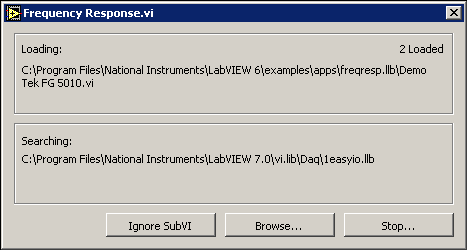
As the VI loads, a status dialog box similar to Figure 1.3 might appear.
Figure 1.3
The ▲♦❛❞✐♥❣ section lists the subVIs of the VI as they are loaded into memory. ◆✉♠❜❡r ▲♦❛❞❡❞ is the
number of subVIs loaded into memory so far. You can cancel the load at any time by clicking the ❙t♦♣
button.
If LabVIEW cannot immediately locate a subVI, it begins searching through all directories specified by the ❱■ ❙❡❛r❝❤ P❛t❤. You can edit the ❱■ ❙❡❛r❝❤ P❛t❤ by selecting ❚♦♦❧s
❖♣t✐♦♥s and selecting P❛t❤s
from the top pull-down menu. The ❙❡❛r❝❤✐♥❣ section lists directories or VIs as LabVIEW searches through Available for free at Connexions <http://cnx.org/content/col11408/1.1>
6
CHAPTER 1. INTRODUCTION
them. You can have LabVIEW ignore a subVI by clicking the ■❣♥♦r❡ ❙✉❜❱■ button, or you can click the
❇r♦✇s❡ button to search for the missing subVI.
1.2.1.3 Saving VIs
Select ❙❛✈❡, ❙❛✈❡ ❆s, ❙❛✈❡ ❆❧❧, or ❙❛✈❡ ✇✐t❤ ❖♣t✐♦♥s from the ❋✐❧❡ menu to save VIs as individual files or group several VIs together and save them in a VI library. VI library files end with the extension ✳❧❧❜.
National Instruments recommends that you save VIs as individual files, organized in directories, especially if multiple developers are working on the same project.
LabVIEW uses the native file dialog boxes so they act similar to other applications on the computer. You can disable this feature by selecting ❚♦♦❧s
❖♣t✐♦♥s and selecting ▼✐s❝❡❧❧❛♥❡♦✉s from the top pull-down
menu. If you disable native file dialogs, LabVIEW uses its own platform-independent file dialog boxes with some convenient features, such as providing a list of recent paths and reducing the steps necessary to save VIs in VI libraries.
1.2.1.4 Moving VIs Across Platforms
You can transfer VIs from one platform to another, such as from Mac OS to Windows. LabVIEW automati-
cally translates and recompiles the VIs on the new platform.
Because VIs are files, you can use any file transfer method or utility to move VIs between platforms. You can port VIs over networks using FTP, Z or XModem protocols, or similar utilities. Such network transfers eliminate the need for additional file translation software. If you port VIs using magnetic media, such as floppy disks or a moveable external hard drive, you need a generic file transfer utility program, such as the following:
• (Windows) MacDisk and TransferPro transfer Mac OS files to the PC format and vice versa.
• (Mac OS) DOS Mounter, MacLink, and Apple File Exchange convert PC files to the Mac OS format and vice versa.
• (Sun) PC File System (PCFS) converts PC files to the Sun format and vice versa.
NOTE:
Certain operating system-specific VIs are not portable between platforms, such as DDE
(Dynamic Data Exchange) VIs, ActiveX VIs, and AppleEvents.
Refer to the Porting and Localizing LabVIEW VIs Application Note, available by selecting ❍❡❧♣
❙❡❛r❝❤
t❤❡ ▲❛❜❱■❊❲ ❇♦♦❦s❤❡❧❢, for more information about porting VIs.
1.2.2 Menus
The menus at the top of a VI window contain items common to other applications, such as ❖♣❡♥, ❙❛✈❡, ❈♦♣②, and P❛st❡, and other items specific to LabVIEW. Some menu items also list shortcut key combinations.
(Mac OS) The menus appear at the top of the screen.
(Windows and UNIX) The menus display only the most recently used items by default. Click the arrows at the bottom of a menu to display all items. You can display all menu items by default by selecting
❚♦♦❧s ❖♣t✐♦♥s and selecting ▼✐s❝❡❧❧❛♥❡♦✉s from the top pull-down menu.
NOTE: Some menu items are unavailable while a VI is in run mode.
• The ❋✐❧❡ menu contains items used for basic file operations, such as opening, closing, saving, and printing files.
• The ❊❞✐t menu contains items that allow you to search for and modify LabVIEW files and their
components.
• The ❖♣❡r❛t❡ menu contains items you use to control the operation of VIs.
Available for free at Connexions <http://cnx.org/content/col11408/1.1>


7
• The ❚♦♦❧s menu contains items for configuring LabVIEW, your projects, and your VIs.
• The ❇r♦✇s❡ menu contains items that allow you to view aspects of the current VI and its hierarchy.
• The ❲✐♥❞♦✇ menu contains items that allow you to configure the appearance of the current windows
and palettes. You also can access the ❊rr♦r ▲✐st window and view the contents of the clipboard.
• The ❍❡❧♣ menu contains items to explain and define LabVIEW features and other components, pro-
vide full LabVIEW documentation, and access National Instruments technical support.
1.2.3 Front Panel and Block Diagram Windows
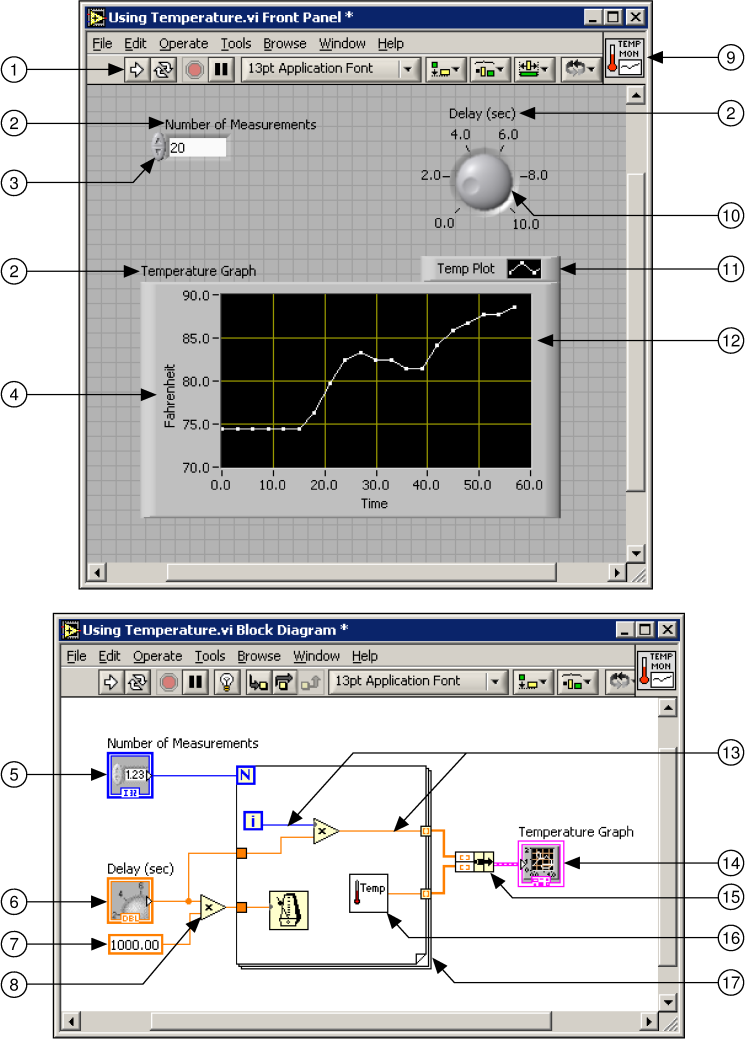
When you open a blank VI, an untitled front panel window appears. This window displays the front panel and is one of the two LabVIEW windows you use to build a VI. The other window contains the block
diagram. The illustration in Figure 1.4 shows a front panel and its corresponding block diagram with front panel and block diagram components.
Figure 1.4: 1. Toolbar, 2. Owned Label, 3. Numeric Control, 4. Free Label, 5. Numeric Control Terminal, 6. Knob Terminal, 7. Numeric Constant, 8. Multiply Function, 9. Icon, 10. Knob Control, 11. Plot Legend, 12. XY Graph, 13. Wire Data Path, 14. XY Graph Terminal, 15. Bundle Function, 16. SubVI, 17. For Loop Structure
1.2.4 Front Panel Toolbar
Use the toolbar buttons to run and edit a VI. The toolbar in Figure 1.5 appears on the front panel.
Figure 1.5
Click the ❘✉♥ button to run a VI. LabVIEW compiles the VI, if necessary. You can run a VI if the
Run button appears as a solid white arrow. The solid white arrow, shown above, also indicates you can use the VI as a subVI if you create a connector pane for the VI.
Available for free at Connexions <http://cnx.org/content/col11408/1.1>


8
CHAPTER 1. INTRODUCTION
While the VI runs, the ❘✉♥ button appears as shown at left if the VI is a top-level VI, meaning it
has no callers and therefore is not a subVI.
If the VI that is running is a subVI, the ❘✉♥ button appears as shown at left.
The ❘✉♥ button appears broken, shown at left, when the VI you are creating or editing contains
errors. If the ❘✉♥ button still appears broken after you finish wiring the block diagram, the VI is broken and cannot run. Click this button to display the ❊rr♦r ❧✐st window, which lists all errors and warnings.
Click the ❘✉♥ ❈♦♥t✐♥✉♦✉s❧② button, shown at left, to run the VI until you abort or pause execution.
You also can click the button again to disable continuous running.
While the VI runs, the ❆❜♦rt ❊①❡❝✉t✐♦♥ button, shown at left, appears. Click this button to stop
the VI immediately if there is no other way to stop the VI. If more than one running top-level VI uses the VI, the button is dimmed.
NOTE: Avoid using the ❆❜♦rt ❊①❡❝✉t✐♦♥ button to stop a VI. Either let the VI complete its data
flow or design a method to stop the VI programmatically. By doing so, the VI is at a known state.
For example, place a button on the front panel that stops the VI when you click it.
Click the P❛✉s❡ button, shown at left, to pause a running VI. When you click the P❛✉s❡ button, Lab-
VIEW highlights on the block diagram the location where you paused execution, and the P❛✉s❡ button
appears red. Click the button again to continue running the VI.
Select the ❚❡①t ❙❡tt✐♥❣s pull-down menu, shown at left, to change the font
settings for the selected portions of the VI, including size, style, and color.
Select the ❆❧✐❣♥ ❖❜❥❡❝ts pull-down menu, shown at left, to align objects along axes, including
vertical, top edge, left, and so on.
Select the ❉✐str✐❜✉t❡ ❖❜❥❡❝ts pull-down menu, shown at left, to space objects evenly, includ-
ing gaps, compression, and so on.
Select the ❘❡s✐③❡ ❖❜❥❡❝ts pull-down menu, shown at left, to resize multiple front panel objects
to the same size.
Select the ❘❡♦r❞❡r pull-down menu, shown at left, when you have objects that overlap each
other and you want to define which one is in front or back of another. Select one of the obj