The 'Get It Done In An Hour' Guide To Cryptocurrencies: Step-by-step guides to understanding, buying and storing popular by Nick King - HTML preview
Download the book in PDF, ePub for a complete version.
Authy will present you with some information about your new account. Have a read, and once you’re done, press ‘Scan QR code’.
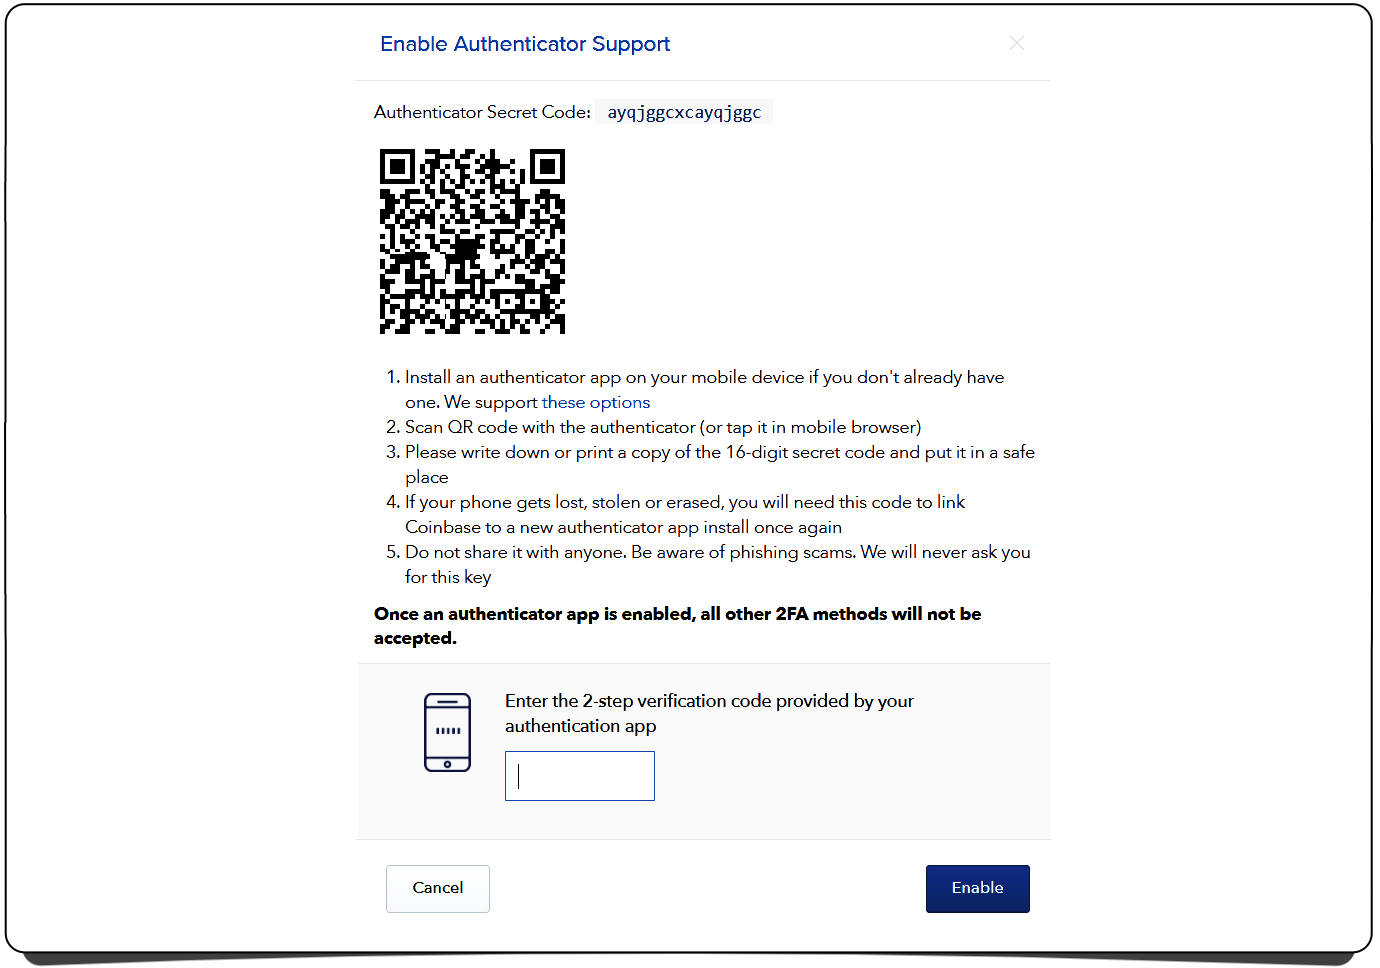
Your phone’s camera will be enabled. Point it at the QR code Coinbase has given you, similar to the image above. Authy will use the code to create a Coinbase account on your phone.
You’ll be asked to give the account a name. Call it ‘Coinbase’.
On your phone, you will now be taken to a screen that gives you a unique code, which is refreshed every thirty seconds.
In Coinbase, enter the current code shown in Authy and press ‘enable’.
Your Coinbase account is now protected by two-factor authentication.
From now on, when you log into coinbase or send coins, you’ll need a code from your Authy app to verify the activity.
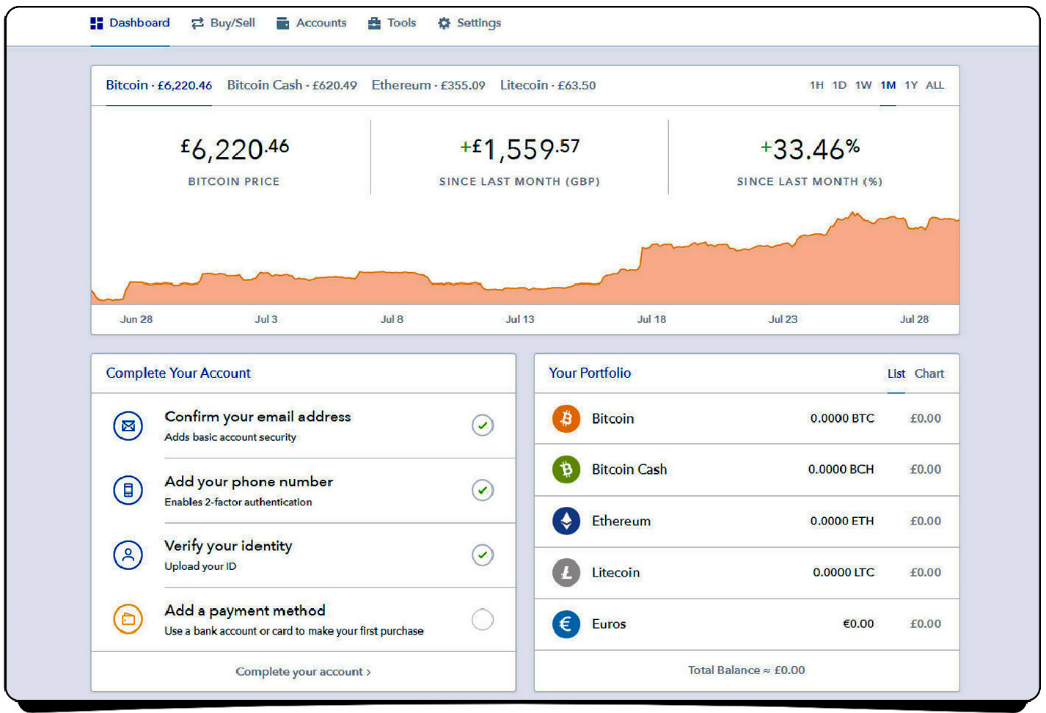
Now that you’ve secured your account, lets add a payment method to it so you can buy some coins.
Click the ‘Dashboard’ button.
Click ‘Complete your account’.
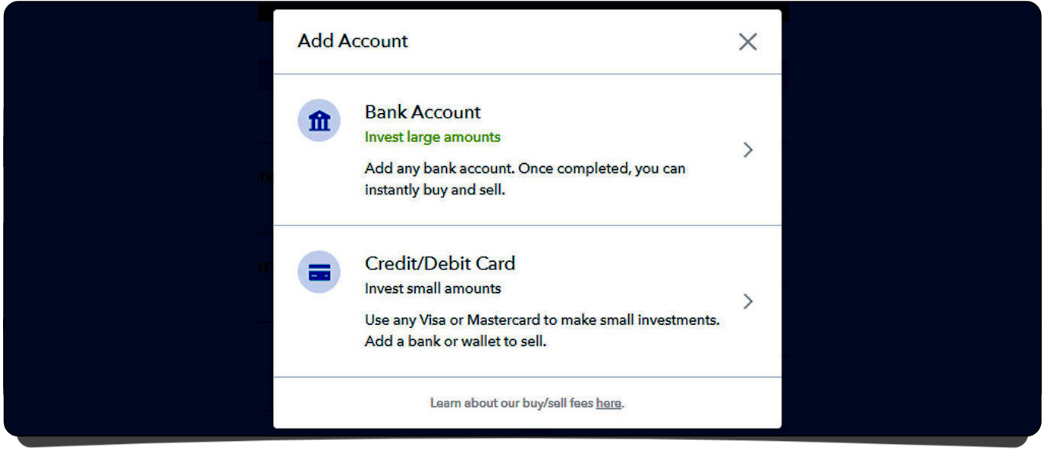
The options available to you may differ depending on the country you’re in, but generally you’ll be offered the option to add:
A bank account
The slower option, but with higher buy limits and generally fewer fees when buying coins.
A credit or debit card
The fastest option for buying, but with lower buy limits and higher fees than using a bank account.
Once you’ve decided which option you’d like to use, click the desired button and follow the instructions to add your payment details.
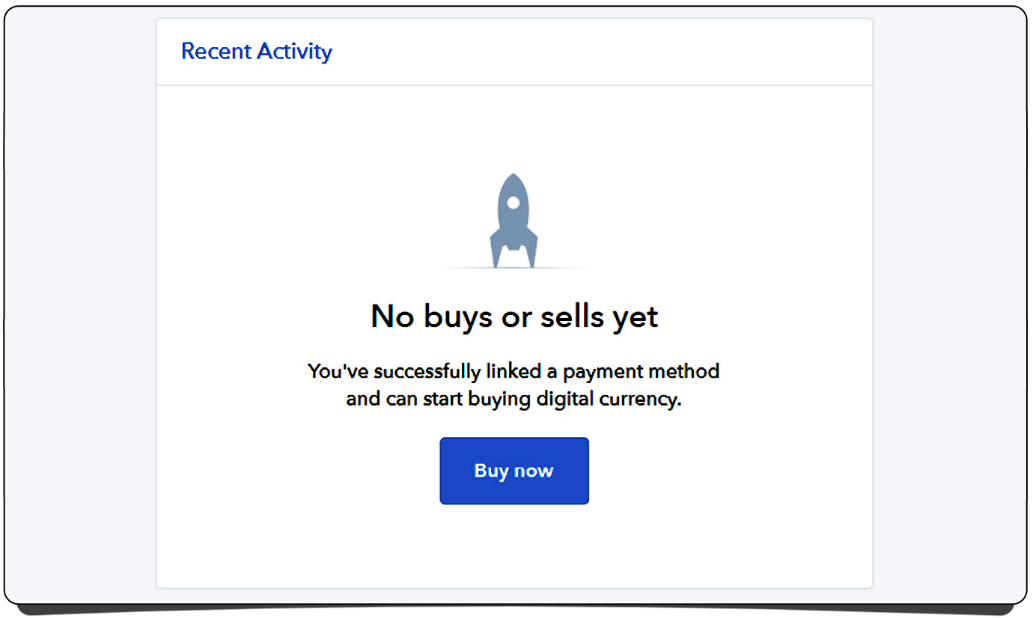
When you’ve successfully added your payment method, your recent activity will let you know you’re ready to buy.
Either press the ‘Buy now’ button or the ‘Buy/Sell’ button along the top menu.
Note: The buying processes for Bitcoin and Ethereum are essentially identical, so though the following screenshots show Bitcoin, the same process applies if you’re buying Ethereum.
Select either Bitcoin or Ethereum from the menu of coins available to buy.
Unless you’ve added more than one payment method, there’s no need to choose which you’d like to use, Coinbase will automatically default to the one you added earlier.
Note: Because your account is new, you’ll have a relatively low initial purchase limit. This grows with each purchase you make.
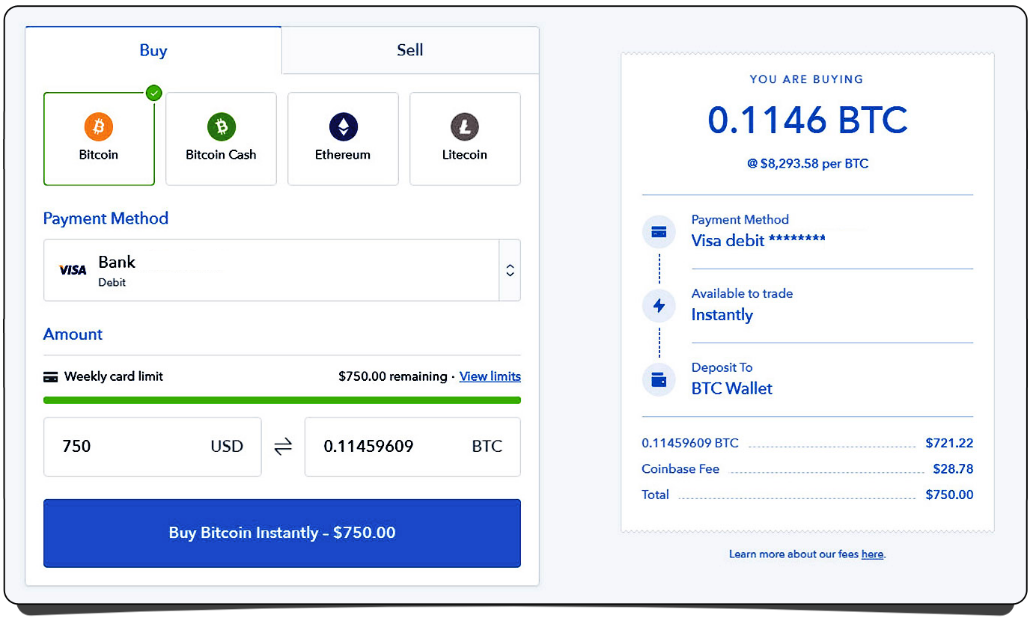
As you can see from the screenshot, you don’t have to purchase a whole Bitcoin or Ether. Coins can be purchased down to many decimal places so that, as in the image above, when a $750 purchase is made for example, the amount of Bitcoin received is 0.11459609.
If you want a perfectly round number of Bitcoin or Ether, you can enter the amount of coin you want to buy instead of the amount of currency you want to spend.
The info panel on the right of the page will summarize the entire purchase , letting you know your payment method and whether the coins will be available in your account immediately or in a few days (this can differ depending on your payment method and country) and which of your Coinbase wallets the coins will be deposited in.
You’ll also see the total that your bank account or debit/credit card will be billed, and how much of that is the Coinbase exchange fee.
Once you’re happy with what you see, press ‘Buy Bitcoin/Ethereum instantly’.
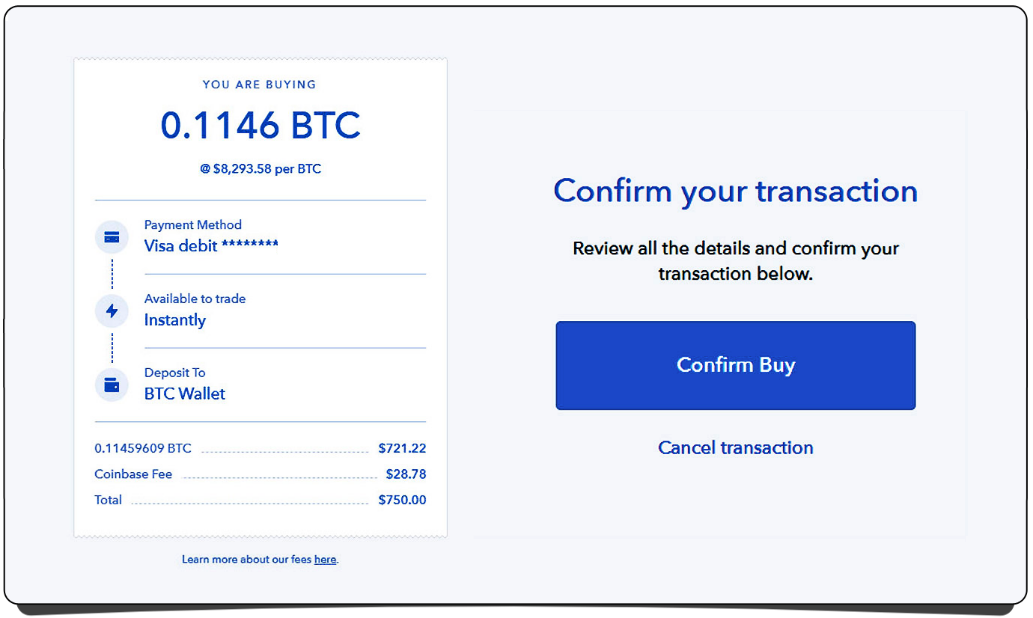
You’ll be asked to confirm the transaction.
Check the details again and be sure it is correct.
When you’re happy, press ‘Confirm Buy’.
Unfortunately, because many banks are suspicious of the cryptocurrency revolution, your bank may block your first Coinbase transaction.
So you might get a message or call from your bank asking you to review ‘suspicious’ activity on your account, or you may even have to call your bank yourself to get it to white-list Coinbase purchases on your account.
Once it has, you can go through with the purchase again, and it should be approved.
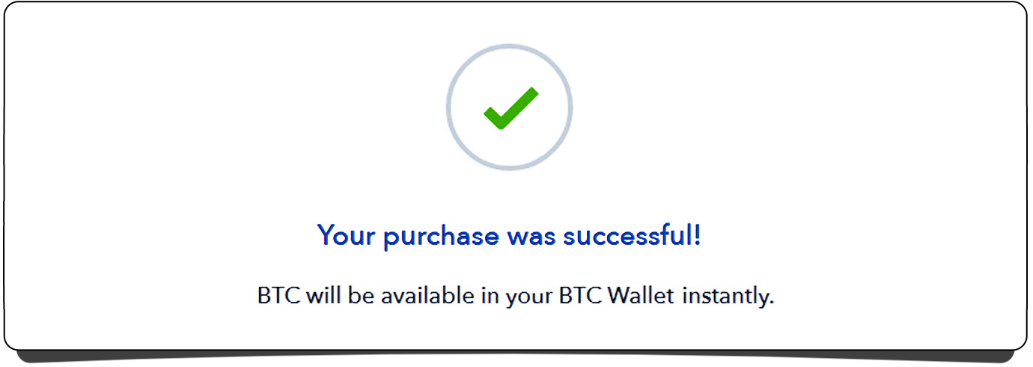
Once your purchase is successful, you’ll get this message, and your coins will be in your wallet, usually immediately.
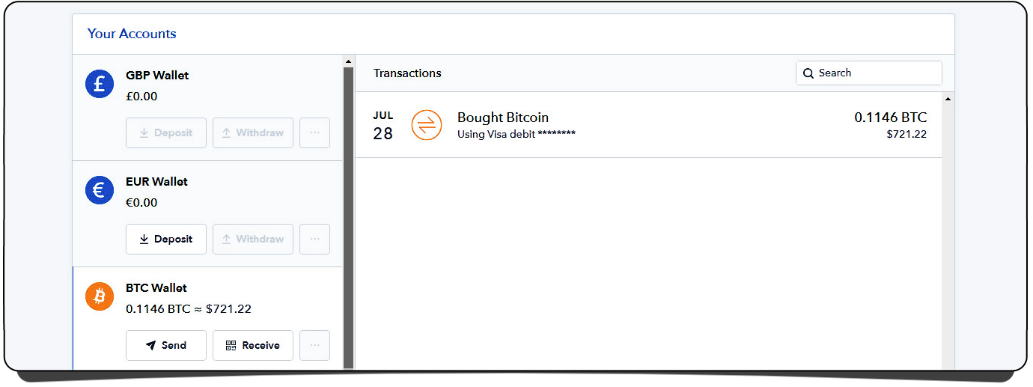
Press ‘Accounts’ in the top menu.
Depending on whether you bought Bitcoin or Ethereum, click the corresponding wallet. As you can see , your coins are now showing.
Congratulations , you now own some cryptocurrency!
Alternatives to Coinbase
If in the future you decide you want to check out some other exchanges for your Bitcoin or Ethereum purchases, there are plenty out there. But you have to be very careful and be sure that you choose a trusted company.
Consider:
How long has the company existed?
Where is it based?
Who are running it, and are their identities public?
Are they insured against theft and company failure?
Have there been any prior incidents of insider hacking or losses due to lax security practices or bad coding?
Some popular exchanges that have good reputation’s include:
Coinfloor.co.uk (UK only)
Coinmama.com
Coinsquare.com (Canada only)
Gemini.com
Kraken.com
Uphold.com
This is far from an exhaustive list. And, as always, do your own research before using any of these sites: seek reviews, do your homework and be a smart investor.
5
Storing your crypto.
Keeping your coins safe and secure.
At the moment your coins are safely stored on Coinbase.
According to Coinbase, the company holds less than 2% of customer funds online, and those are insured against theft. The rest is stored in ‘cold storage’ —which is a fancy way of saying the wallets storing the coins are not connected to the internet.
Despite countless attempts, Coinbase has never been hacked.
But never say never. Other exchanges have been hacked in the past . Take a moment to do a web search for the ‘Mt. Gox hack’ to see for yourself.
Also, bear in mind that a key principle of Bitcoin is that you don’t trust a third party with your coins . Rather, you hold them yourself. Because if you don’t hold something yourself, do you truly own it?
If you want an easy life, then feel free to leave your coins on Coinbase. They’ll probably be safe. But if you want to take control of your coins —to be your own bank —you’re going to want to move them from Coinbase to a personal wallet that’s under your exclusive control.
Note: If you’re considering exchanging your Bitcoin or
Ethereum for other altcoins, leave your coins on Coinbase for the moment.
What is a wallet?
You store physical money, such as coins and notes, in a physical wallet.
You store digital money, such as Bitcoin and Ethereum, in a digital wallet.
A digital wallet is software installed on your computer, phone or secure server that allows you to interact with your coins and store them at a unique wallet address on a blockchain.
What’s a wallet address?
Just as a bank account has a unique number to identify it, so does a cryptocurrency wallet.
Each wallet address, sometimes referred to as a public key, is identified by a unique sequence of letters and/or numbers, and looks something like this: 1MvSr21cJZhnLxbLc4o8fVsE6viFWfsqW
Every coin that exists on a blockchain is assigned to a wallet address —it’s how we know who owns what.
How do I access a wallet?
Just like you use a PIN or password to access your online bank or ATM, you can use a ‘private key’ to access a digital wallet. A private key is essentially a code that allows a wallet to be opened and coins sent from it.
Keeping a private key safe and secure is very important , since if
you lose it, your cryptocurrency can be lost. If anyone accesses your private key, he can use it to steal your cryptocurrency.
It’s important to understand that cryptocurrencies such as Bitcoin don’t get hacked , but the devices that store the private keys do.
What are my wallet options?
Mobile wallet
Providing access on the go via your mobile phone, but at the cost of security.
 Practical and easy to use.
Easy to accept and send payments quickly.
Additional features, such as QR code scanning, which makes sending payments quick and easy.
 Phones are insecure. You could lose your coins if your phone is compromised by malware, keyloggers, viruses or malicious apps — or simply if someone gains physical access to it.
Web wallet
Web wallets are typically cryptocurrency wallets that you access via your web browser.
Fast way to complete transactions.
Ideal for holding small amounts of cryptocurrency.
Some are able to manage multiple cryptocurrencies.
Web wallets are susceptible to phishing scams, malware, insider hacking, DDOS attacks and outdated security measures.
Your wallet is sometimes ‘out of your hands’ and the information is stored on a third party’s server.
Your wallet’s security is in the hands of the company you sign up with . If it goes down, you could too.
Desktop wallet
A wallet program downloaded and installed on your desktop computer or laptop.
Generally easy to use.
Private keys are under your control , not a third party’s.
If your computer is connected to the internet, there can be security concerns , such as malware, keyloggers, viruses, etc. on your computer.
You must make sure you keep safe and secure backups of your wallet. If your computer dies and you have no backup, you lose access to your coins.
Hardware wallet
Physical devices that plug into your computer like a USB stick. They encrypt the private key to your wallet so that no one can know it.
That way, only someone with physical access to the hardware wallet and who knows its password can access the coins on it.
The gold standard of crypto wallet security.
Remove any anxiety about having your wallet hacked.
Not as simple or quick to use as other wallet types.
Must be purchased.
Recommendations
Using a web wallet is strongly discouraged. Sure, they’re easy to use and quick to set up, but they require trust in a third party to maintain their security, and there’s no recourse if something goes wrong.
A mobile wallet is useful for storing small amounts of crypto you intend to use day to day, such as using Bitcoin for online shopping.
If you don’t want to pay for a hardware wallet, a desktop wallet on your computer is the best choice. But be aware you’ll need a USB stick or an external hard drive to back up your private key in case of computer failure. How to set up a Bitcoin desktop wallet is covered in the next chapter.
Otherwise, if you want to take security seriously —and you should —a hardware wallet is a must buy.
But what if I lose my hardware wallet?
If you lose your hardware wallet, anyone who finds it (if they even know what it is) can try to guess your password a very limited number of times, and then the device wipes itself.
To regain access to your coins, you simply buy another hardware wallet and restore your information using a secret recovery phrase that you’re prompted to save the first time you set up your hardware wallet.
Choosing a hardware wallet
The two largest companies in the hardware wallet market are Ledger and Trezor.
Ledger Nano S
Ledger Nano S
The Ledger Nano S is a compact and discreet hardware wallet, and wallet management is achieved through a small LCD screen and two buttons.
For more information and purchase links, go to: https://getcrypto.info/ledger
Comprehensive instructions on setting up and using the Ledger Nano S are included with the item when you receive it.
Trezor
Trezor
The Trezor is small and easy to use. It features two buttons and displays a lot of information on its small LCD screen.
For more information and purchase links, go to: https://getcrypto.info/trezor
Comprehensive instructions on setting up and using the Trezor are included with the item when you receive it.
6
Setting up a Bitcoin wallet.
Install and use a personal Bitcoin wallet.
Using this guide, you can set up a Bitcoin desktop wallet, and then send your Bitcoin to it from Coinbase.
Note: Remember, security first. Do you have an anti-virus and anti-malware program installed?
And one more note: For the purposes of this guide, I’m going to assume you’re using a Windows PC. If you’re not, your installation experience will be slightly different, but the rest of the set up is essentially the same.
Downloading a Bitcoin wallet
An up-to-date list and links to download Bitcoin wallets can be found here:
https://bitcoin.org/en/choose-your-wallet
Note: As always, when clicking any links involving
cryptocurrencies, be sure that the URL looks correct and secure in your browser.
From the list on Bitcoin.org, you’re going to download the Electrum Bitcoin wallet, as it:
Remember: It’s a good habit not to blindly follow advice when it comes to cryptocurrencies. Do your own research and be sure in your own judgment before taking action that could result in financial losses. |
Doesn’t require you to download the whole Bitcoin blockchain (currently 145 gigabytes) to use it.
It’s been around for years.
Over that time it’s proven to be reliable and secure.
Either click the link on bitcoin.org to go to the Electrum official site, or go there yourself: https://electrum.org
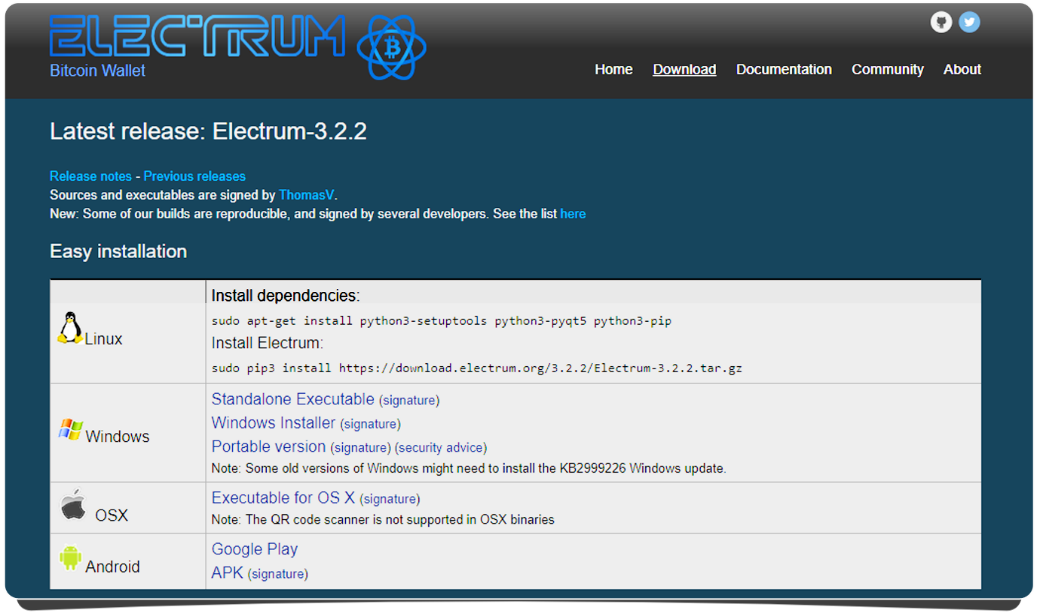
Press ‘Download’ along the top menu.
Choose the file under ‘Easy installation’ that matches your computer system and download it. For example, Windows users would pick ‘Windows installer’.
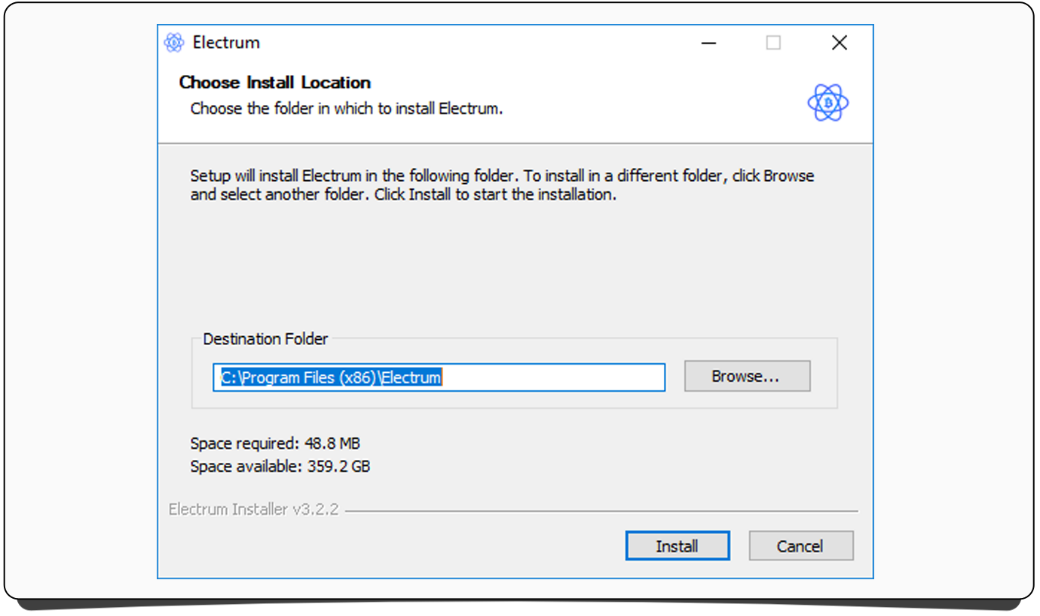
Once the file has finished downloading, you should run it, and then follow the installation instructions.
Once setup has completed, open the wallet, which will have been installed under the name ‘Electrum’ on your computer.
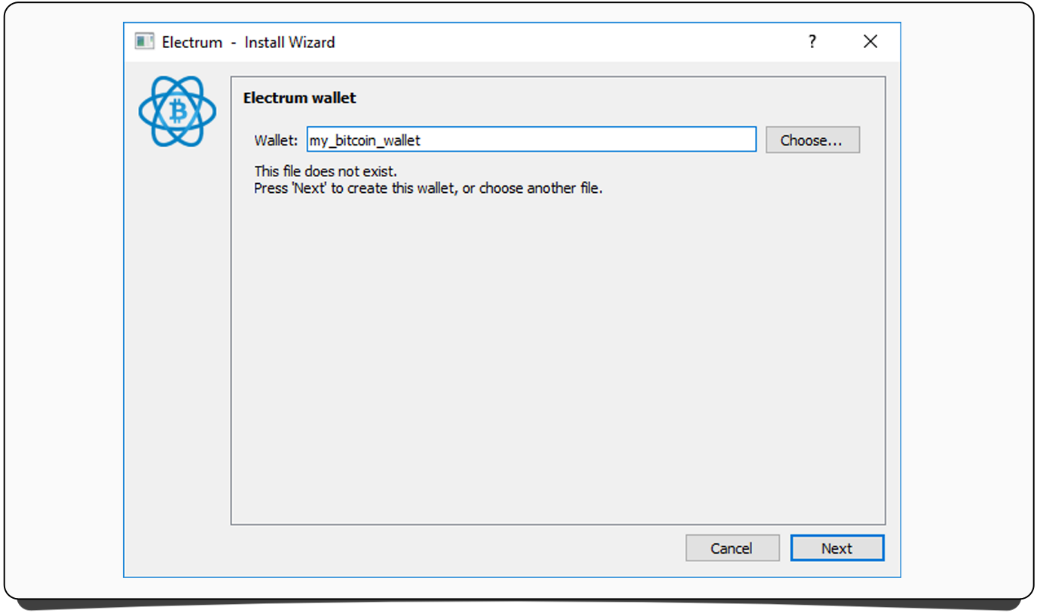
You will be asked to give your new wallet a name. Choose something obvious, such as ‘my_bitcoin_wallet’.
Click ‘Next’.
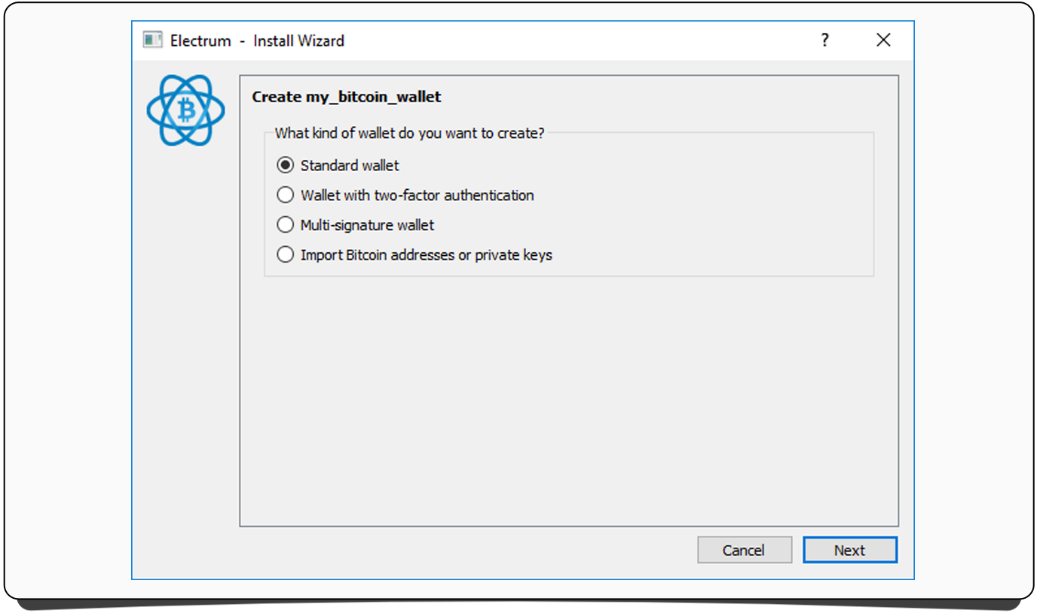
On this screen keep ‘Standard wallet’ selected.
Press ‘Next’.
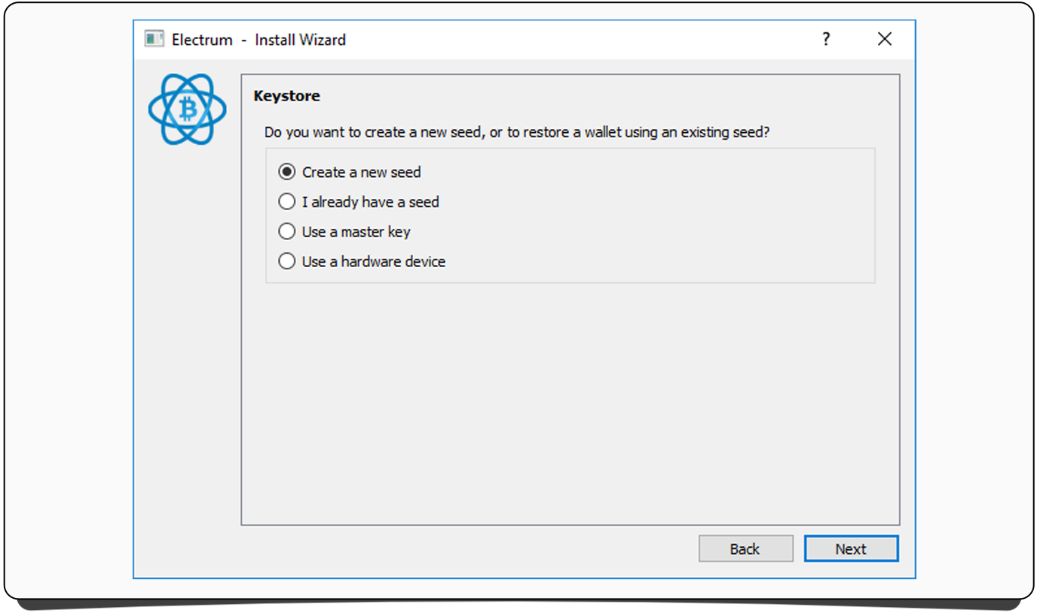
On this screen keep ‘Create a new seed’ selected. Press ‘Next’.

When asked to choose a seed type, stick with ‘Standard’.
Press ‘Next’.
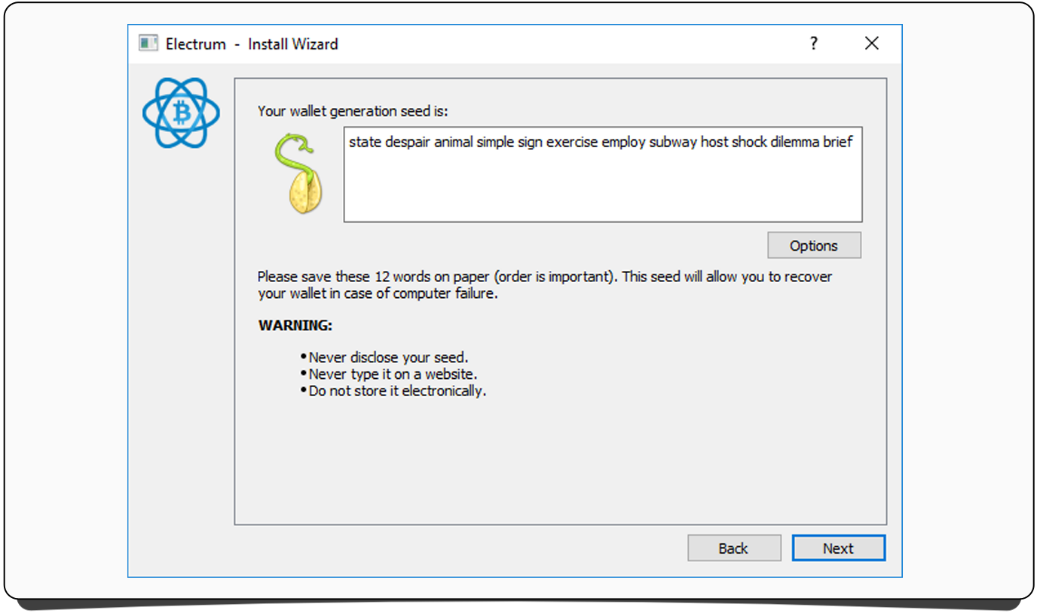
You will be presented with your personal wallet seed.
This seed acts as a backup of your wallet and can be used to open your wallet from any computer without knowing your password.
It’s vitally important that you back-up this information somewhere safe.
Note: If someone gets hold of this seed, he can open your wallet and take your coins. Keep it safe!
Press ‘Next’.
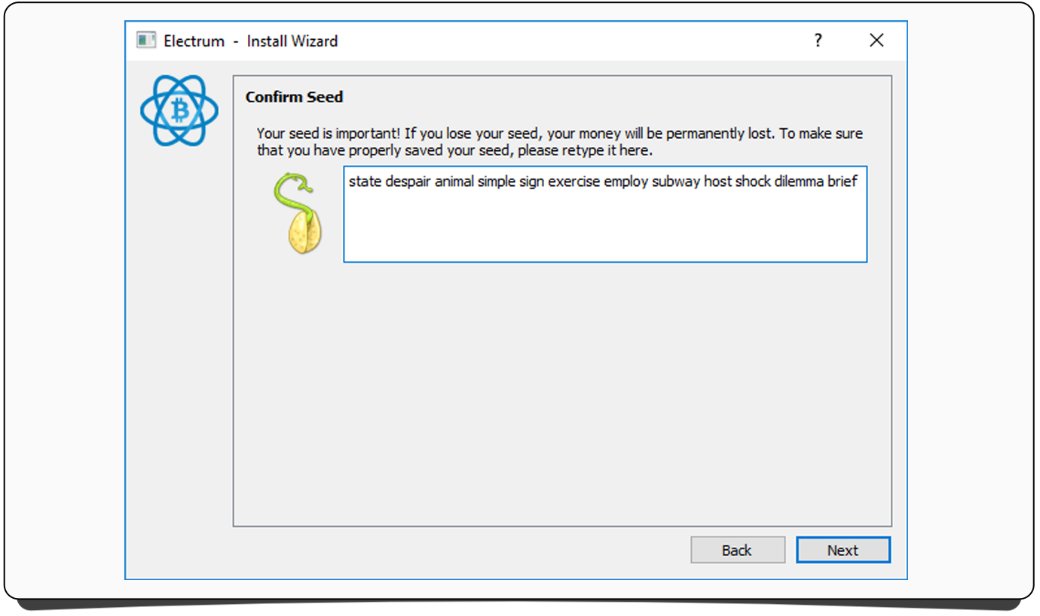
You now have to write your seed into the box to confirm you copied it correctly.
Once done click ‘Next’.
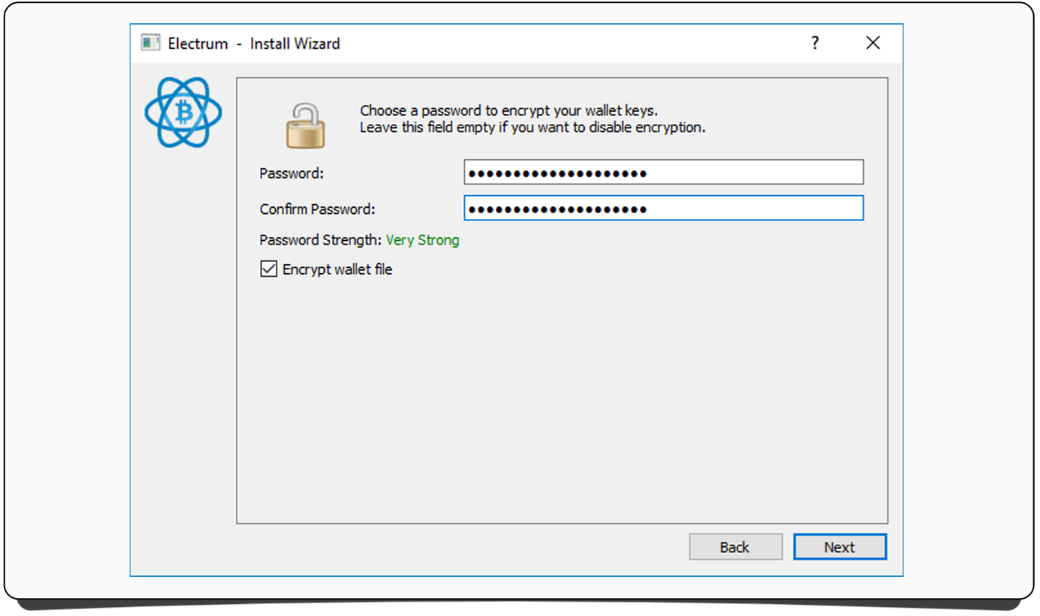
You’ll now be asked to enter a password.
Make it something that would be hard to guess (but which you won’t forget!). It’s a good idea to make it complicated enough that ‘Password Strength’ says ‘Very Strong’.
Note: Don’t tell anyone your password! If someone with access to your computer knows or guesses it they could steal your coins.
Keep ‘Encrypt wallet file’ checked. Press ‘Next’ twice.
Note: If you forget your password, the only way to gain access to your coins will be using the seed you saved earlier.

Your wallet is now open.