

Qigong For PTS by Jeffrey Smoley - HTML preview
Download the book in PDF, ePub, Kindle for a complete version.
Qigong
For
PTS
By Jeffrey Smoley
Introduction
My name is Jeff Smoley and I am a US Army Viet Nam era veteran, retired engineer and I have practiced martial arts for 55 years and Qigong for 42 years, as of March 2015. I am writing this pamphlet because I had PTS and back then, there was no one around to help.
This is PTS and not PTSD. Post Traumatic Stress, not stress disorder or disease. This reaction to extreme levels of stress is not a disorder, in my opinion, it is a normal reaction by a civilized human being. The people who can experience the horrors of combat and show no adverse reaction are the ones who need to be watched.
Qigong
Qigong is part of Chinese traditional medicine, its roots go back about 7000 years. One of the Qigong forms I will present has sections that appear in the ancient drawings that are evidence of the age of Qigong.
Qigong is the coordinated use of breathing methods, breath control, stances, movements, acupressure, self-massage, visualizations and guided meditations to achieve specific goals: increasing the quantity and quality of Qi in one’s body, facilitating the easy and smooth flow of Qi in one’s body, for the purpose of increasing health, strength, longevity, boosting one’s immune system and making oneself a better person.
I learned some Qigong as part of my study of martial arts, but I got into the deepest learning when I married my wonderful wife and her father was a Qigong master. He was also a western MD and OMD, Oriental Medical doctor and an acupuncturist. Dr. Zhou awarded me the title of master of Zhou family Qigong on my 60th birthday after 11 years under his tutelage. Two of the forms that will be presented here are from his family tradition and are many generations old.
Qigong is one of the best ways to be able to handle or manage stress. Stress reduction is only possible when you have control of what is causing the stress. If driving on a crowded highway is stressful, you may be able to make the same trip on surface streets. If your boss is causing the stress, you don't normally have control over your boss, so you have to learn how to manage the stress, if you can't change jobs. The US National Institute of Health (NIH) has written that Qigong is one of the best ways to manage stress.
The first lesson of Qigong is about changing the way you breathe. You may be thinking, I have been breathing my whole life, how could I be doing it wrong? Well, somehow most people changed the way they breathe as they grew up. We started by doing it correctly.
Abdominal Breathing, Buddha’s Breath, Baby’s Breath are different names for the same specific type of breathing used for most Qigong. Most people are what are called chest breathers, the chest and upper chest expand when inhaling. Abdominal breathing is where the abdomen and lower belly expand and there is almost no movement of the chest during inhalation. This is the way babies and most mammals breathe. Statistics have shown that chest breathers have shorter and/or less healthy lives than abdominal breathers, with everything else being equal or similar.
When we inhale, the diaphragm contracts down. If the stomach muscles are tensed, there is a restriction on the amount of air that can be inhaled. By allowing the abdominal muscles to be relaxed or even lightly pushed out when inhaling, more air is taken in. Since the amount of air is increased, then the number of breaths needed to get the same amount of air is reduced. Most people breathe 12 to 18 times per minute, a Qigong adept will breathe as few as 2 times per minute, even when doing mildly strenuous exercise.
When people are angry or upset, they are often told, "Take a deep breath." There is real science behind this. Slow rhythmic breathing combined with slow rhythmic movements has been shown to slow the heart rate, lower blood pressure and reduce stress. Cats and dogs show these same effects when licking and cleaning themselves. We don't have to lick ourselves to get this result.
One of the goals of Qigong training is to become an abdominal breather, all the time. In the beginning, we have to work at it, but like any habit, if you practice enough, it will become your normal way of breathing. You can practice abdominal breathing standing, sitting or laying down. Stand, sit or lay down and try to relax. There will be specific relaxation training later. Place the tip of your tongue, lightly, just behind your upper front teeth. Most people will feel a little dip there. In Chinese medicine, this connects the two main vertical energy channels of your body. Don't worry if you are not familiar with Chinese medical theory, this works even if you don't believe it will. Inhale deeply and slowly. When you exhale, slightly contract your abdomen, then slowly pull it in about 1/2 way as you exhale more completely. Inhale slowly & deeply, letting your abdomen expand and about 1/2 way lightly push your abdomen outwards and down.
Continue for about 20 breaths, but stop if you begin to feel light headed. It is possible that if you are laying down, you might fall asleep. This is OK. Repeat this exercise twice more for a total of three times. You can do this three times a day. Don't do this if you are driving or doing anything that requires active concentration. You will notice that you will eventually find yourself breathing this way without thinking about it. When you are doing the following Qigong exercises or forms, use abdominal breathing.
The next practice is called or Progressive Relaxation: Mindfulness
Do not do this while driving or operating machinery!
This can be done standing, sitting or lying down. It is a good form to help you sleep, relax you in stressful situations and can, in conjunction with the microcosmic orbit and flowing water visualizations, reduce blood pressure. It is a Qigong of Buddhist origin.
Standing:
Start in the normal stance.
Sitting:
Sit in an armless chair which is not too soft. You should be able to have your feet flat on the floor and your thighs roughly parallel to the floor. If you are missing a limb or limbs, get as close to this position as you can.
Lying Down:
Note: If you fall asleep before finishing this form, it has worked. You don’t need to finish. Lie down; face up, in your bed or other location where you can fall asleep, without incurring any back pain.
Stand normally, relaxed. Normally ( or naturally) means, place your feet shoulder/hip width apart and parallel. This is actually narrower than most people think of when standing shoulder width apart, as they look at the outmost part of their shoulder. In most people the ball of the upper arm in the shoulder socket and the ball of the upper leg in the hip socket are about the same distance apart. Your heels should be directly below the center of the ball of your hip or shoulder. This will allow the bones of your legs to carry the maximum amount of your body's weight with the least amount of muscular strength. You muscles will be used for balance, not holding up your body. If you are missing limbs or are not able to control them, if you are able to stand, try to get as close to this position as you can.
Parallel means that the line from the center of your heel to your middle toe is directly forward in both feet. Most people stand with the inner sides of their feet parallel or even spread to the sides. This compromises your balance slightly.
The balance of your weight should be about 55% / 45% between the balls of your foot to your heel, just enough so you feel a slight forward sense.
To start the practice, think about and pay attention to your left foot, and how it feels. Now curl you toes in (under), then lift them up, and relax. Pay attention to that relaxation. Think about your left calf. Now, press down lightly with your toes as if you are going to stand on your toes, contracting your calf muscle. Keeping your left heal on the ground, lift the toes of your left foot and contract the muscles on the front of your leg. Relax your foot and leg. Pay attention to the feeling.
Do the same with your right foot. Now pay attention to your upper legs. Push your left foot down and forwards while pushing your right foot down and to the rear, then reverse the contractions. Relax and think about how your legs feel. Keep your attention on your legs and push down and out, as if to slide your feet apart. Then tense your muscles as if to pull them together. Relax and be aware of how your legs feel.
Pay attention to your waist, put your hands on your waist and turn your upper body to the right, keeping your head and shoulders in line. Turn slowly to the left, and then return to facing forwards. Be aware of how your middle feels. Bend your body to the right, at the waist, maintaining the awareness of your waist, then bend to the left, then return to the upright position and relax. Think about how your waist and body feel. Bend forwards about 45 degrees, make most of the bend from your waist, not your hips (you may want to tuck your hips under to help), paying attention to your back. Lean back to a comfortable degree and think about how your back and stomach feel. Return to upright and pay attention to the feelings in your middle.
Place your palms together in front of your chest and be aware of the feeling. Make a fist with your left hand, then extend all your fingers, then relax, paying attention to the feelings in your lower arm. Do the same with your right hand.
Clasp your fingers together. Be aware of your upper arm. Push down on your left hand while pulling up with the right. Relax and push down with the right and pull up with the left. Relax both arms. Be aware of the feeling.
Keeping your hands clasped together try to turn your right hand to the left, resisting with the left hand, then try to turn your right hand to the right, resisting with the left. Do the same with your left hand. Relax and sense how your arms feel.
Pay attention to your chest and push both hands together. Relax. Be aware of the feeling in your chest. Paying attention to your back, keeping your fingers clasped, pull your hands apart and feel your shoulders and back. Put your hands behind your back and clasp them again. Pay attention to your back and shoulders, and lift your hands. Relax and push them against your back. Relax and feel your upper body. Let your arms return to your sides.
Shrug your shoulders, paying attention to them and your neck. Drop your shoulders and relax. Raise your arms to the side & up until they meet over your head, press them together and them bring your arms down and press your palms against your legs. Relax. Pay attention to your neck and turn your head to the right, then left and relax facing forwards. Be aware of your neck. Bend your neck forwards, then back, and then return to normal. Think about how your neck and body feel.
Pay attention to your face. Close your eyes tight, scrunch up your face and press your lips together. Relax. Open your eyes wide, your mouth wide and stick out your tongue. Relax. Think about how relaxed you feel. Be aware of your whole body. You have tensed & relaxed most of the muscles you use in everyday life.
During this practice, keep your tongue lightly touching behind your front teeth and breathe slowly and deeply.
The Microcosmic Orbit.
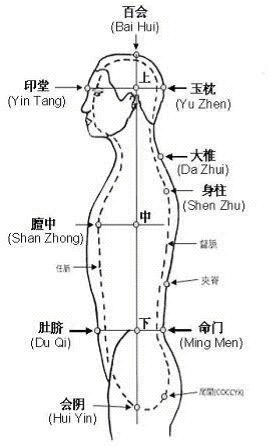
The first steps are to still the body, calm the mind, and regulate the breath. You can use the Progressive Relaxation meditation and abdominal breathing. Sit, stand in the normal stance or lay on your back, in a quiet place, eyes closed lightly. If you are sitting, you should be upright, with your feet flat on the floor, sitting forward enough so your genitals are off the chair. Advanced practitioners can use many of the different Zhan Zhuang postures that will be presented later.
Focus your attention on your Dantien (just below your navel and behind the Du Qi point), and visualize or imagine a small ball of energy, a ball of golden or white light, bright and pure. Maintain the attention on the Dantien until you feel the energy of the ball. This could be heat, vibration, warmth or just a sensation of its presence.
Begin abdominal breathing if you are not doing this already. Exhale through your slightly opened mouth, keeping your tongue lightly touching your palate just behind your upper front teeth. When you exhale your abdominal muscles contract lightly to help expel air.
Inhale and visualize or imagine this small ball of Qi passing down from the Dantien, past the Hui Yin (between genitals and anus), up through the coccyx. Then visualize or imagine the Qi ball rising up to the Ming Men and then to where the ribs meet the spine, then going through this area and right on up to the back of the head, where it joins the neck.
Then visualize or imagine this Qi ball in the center of your brain, taking in healing energy through the Bai Hui point on the top of your head.
Next, focus your attention on the Yin Tang point between and just above the eyebrows and draw energy into the ball of Qi from this point as the ball passes and goes to the roof of your mouth. This may cause a tingling or throbbing sensation there. This ends your inhalation. Beginners may need to take two breaths to move the Qi ball this far.
You may wish to stay and work with this Qi by focusing on a heaviness behind your nose for a few minutes, before letting Qi sink down through the palate and tongue (which you still have lightly pressed onto your palate), into the throat to the heart (Shan Zhong point). Taking a breath or two while the Qi is in your mouth can help you focus on the ball. This is OK for beginners.
Exhale and send the Qi down to your heart (Shan Zhong Point). From the heart, draw it down through the middle Dantien at your solar plexus, past your navel, and down into the lower Dantien, where energy gathers, mixes, and is reserved for internal circulation. Then begin another cycle.
Once the Qi is circulating, your breath will naturally become fine. This means it is smooth, not ragged or irregular. You can do this meditation from one to dozens of times.
According to Chinese medicine, Qi circulation harmonizes and reforms, so that the vital fluids produced by daily life can produce true vitality.
If you have any physical problems or discomforts in a particular section of your body, while doing the Microcosmic orbit, stop the circulation and focus your mind and Qi at the discomforting point and let it pulse there for a while. This will help heal and rejuvenate and improve the Qi flow. If you tend to get stuck at any point in the orbit, don't try to force any movement of the ball. Concentrate on your breathing and let the Qi seep past the blockage.
This meditation may also cause the head to rock or the body to tremble, which, some believe, are signs of progress.
If you have high blood pressure and want to use this meditation as part of your treatment, reverse the flow of the orbit, so that your Qi goes up your front during the inhale and back and down on the exhale.
The Microcosmic Orbit is a good practice for all Qigong students, and can be used before other meditations. You can use a few orbits in both directions during the day, to reduce stress. You can also do this lying down before sleep. Don’t do this while driving or operating machinery!
If you have trouble visualizing or imagining the flow, you can think of a marble, a golf ball or ping-pong ball. You can even use one hand to trace the flow when you are sitting or standing.
Standing Post Qigong.
Standing Gong - Zhan Zhuang 站樁 Standing Post, Standing Like a Post, Tree Hugging, Post Standing are all various names for Qigong forms where you maintain one position for a length of time, that can vary from a few minutes to several hours; once you reach a very advanced level.
This is one of the most important practices of Qigong and several teachers and masters have told me they still spend about 30% of their practice on this one exercise.
I start my martial practice with the standing forms because these are the forms that are done to rebalance practitioners if they get out of balance due to over-doing Qigong practice or improper Qigong practice. This results in what is called “Qi Derivation” and can result in symptoms of both physical and mental illness. This form also develops strong legs and a good root. The exercise of
doing standing post is Zhan Zhuang gong: 站樁功.
Performing these gongs or exercises promotes or creates the "Three Treasures" or San Bao: 三寳. The Three Treasures are known as Jing 精, Qi 氣
and Shen 神 and can be loosely translated as Essence, Vitality and Spirit.
In addition, these basic stances are used in many other Qigong forms, or used as a starting point for moving forms. They are also used in many martial arts.
Basic Stances:
Natural Stance, also known as the normal stance. The feet are centered under the armpits, toes pointed forwards, feet parallel, knees are relaxed and arms are at the sides, thumbs towards the front.
Horse Stance (Ma bu), should be known as horse riding stance, since the legs are more than shoulder width apart, knees bent, feet forwards. Horses don’t stand like this. Hands can be kept palms up on thighs, or in fists, at the hip, waist or at the lowest rib. Thumbs can be up or outwards.
Bow Stance (Gong bu), forward leg bent, rear leg straight, rear foot is usually kept at a 45 degree angle. Hips are pointing forwards or at about a 15 degree angle from forwards.
Cat Stance (Xu bu or Mao bu), forward leg bent, toes down and heel up, back leg less bent, foot flat on the ground. Toes are pointing 45 degrees from front.
Crane Stance (Guan bu), Various one legged stances. The raised foot can be just off the ground like a higher cat stance, or the foot can be placed on the calf or shin, knee straight ahead, 45 degrees or 90 degrees to the sides. In addition there are variations where the raised foot is at the height of the knee, either knee forwards or the leg twisted so the sole of the raised foot is on the other knee.
Back Stance (San qi bu), The reverse of the bow stance, however, both knees are bent.
Bear Stance (Hung bu), Feet are more than shoulder width apart, toes are pointed inwards or heels are out, 15 to 30 degrees from forwards. Knees are bent, and the hand are either held at sternum level, out from the body in a bear claw (palms flat and fingers bent) palms facing, or one hand is at this level and the other on the back, palm out over the Ming Men.
Low Stance (Pu bu), body rests on rear bent leg, forward leg out straight. A very low back stance.
Note: “Bu” can also be translated as step. I would prefer to use the term zhitai, which means stance or form, since there are so many variations.
From stillness comes movement. All of the basic still stances lead to various moving forms. If the forms are done using Silk Reeling skill: Chan Si
Gong, 纏絲功, one then creates "Winding Silk Power" (or Silk Reeling Power): Chan Si Jing, 纏絲勁. It is this silk reeling power (Jing) that creates Peng Jing 掤 勁 (ward off power). It is the combination of both that is the power behind the internal martial arts and Qigong. “Without these two primary Jings, Taijiquan is just slow dancing and Qigong is just slow breathing”, Master Chen Quanzhong.
Peng Jing is the goal of many Qigong forms and that of the forms of the Chinese internal martial arts. The idea of "ward off" is much greater than the basic martial concept of preventing oneself from being hit. You can ward off illness (your immune system), stress and even psychic attack. You may have met someone who, just by their presence in the room seems to suck the life out of a conversation or change how people behave. Many people in the more hands on healing arts (physical therapists, massage therapists, chiropractors, osteopaths and nurses, etc.) will tell of meeting people like this. The ancients who developed Qigong felt this and developed a way to protect themselves. Later the Wuji form that will be presented has a part that directly addresses this.
A Basic Standing Qigong that can also be done laying down:
Stand normally, relaxed. Place your feet shoulder width apart and parallel (outside heels are shoulder width; you can measure your shoulders (use the widest point at the middle deltoid muscle) and keep a small stick of the correct length on the floor). This “parallel” is with the outside edges of your feet parallel, not the inside; your toes should be pointing forwards. You can also use the line between your middle toe and the center of your heel. The balance of your weight should be about 55% / 45% between the balls of your foot to your heel, just enough so you feel a slight forward sense. Slightly “grip the ground” with your toes. This is called the normal stance.
The kua is the area from the thickest part of one thigh (inside of the thigh), up through the genitals, to the same point on the other thigh. Very slightly bend your knees, and tuck your lower pelvis forward just a bit, as if you are thinking about sitting down. This allows you to relax the “kua” and keep it rounded. Remember to maintain the curl of your toes; you are being song (relaxed, this is pronounced sung). Drop your shoulders and relax the arms. Keep your head straight with the chin just in enough so that the crown of your head, the hole of your ear, the midpoint of the shoulders, hips and ankles are in line. This is as if you are being suspended from a string attached to the crown of your head. The crown of the head is the Baihui or DU20 point. Put your tongue tip lightly on your palate, just behind your teeth, you should feel a little dip or ridge. Your middle finger should be touching your leg on the Gallbladder 31 point. This is on the outside of your leg in the indentation between muscles. Breathe abdominally.
One of your goals is to make abdominal breathing your normal breath. Now, imagine or visualize you are in a warm shower, or, for you outdoor types, in a warm spring rain. The water runs over your body, washing away tension and stress. As you continue to breathe, imaging this water is able to run through your body as well as over, washing away even more stress and tension. It is also washing away stale Qi, and washing past any places Qi is blocked to open up the flow. The stale Qi washes down though your body and out the Yong Quan, K1, bubbling well points (between the balls of your feet.) Repeat the breaths 9 times, up to 38 times until you are relaxed (song); your breathing should be slowing down and deepening as you relax. You can do this same exercise seated, but with the hands palm up on the top of your thighs. It is a great way to reduce stress, relax and lower your blood pressure.
If you are laying down, think of being in a warm stream or a whirlpool bath set on low.
The normal or natural stance should be the most relaxed way of standing upright. The center of the heels of both legs should be under the ball of the hip joint. This is also aligned with the ball of the shoulder joint. This allows the bones of the legs to bear most of the weight and to use as little leg muscle as possible. Any wider or narrower and more energy is required to maintain the stance.