• To put a floating toolbar back into the taskbar, drag it back into the taskbar.
• To rearrange items in the toolbar, drag the dots nearest the Start button to the right, past any item that you want to put to the left of the current item.
• To resize an item within the toolbar, drag its dots to the left, right, up, or down.
You can further personalize the taskbar in a variety of ways to suit your own work style and
environment. Chapter 13 describes some of those more advanced techniques. If you want to take a quick look at the Properties dialog box that offers those additional options, just right-click the neutral area of the taskbar and choose and choose Properties.
For the moment, I think our time is better spent on more basic skills. In particular, it's time to talk about those dialog boxes that come up from time to time, and how you operate the various controls they offer.
Using Dialog Boxes
A dialog box is sort of like a window. Instead of representing an entire program, however, a dialog box generally contains some simple settings from which you can choose. The term dialog box comes from the fact that you carry on a kind of "dialogue" with the box by making selections from the options it presents. Controls within a dialog box are similar to the controls on any other kind of machine, be it a car, dishwasher, or stereo. Controls enable you to control how a program behaves and looks.
As you may recall, many objects on your screen have properties, characteristics such as size, color, and so forth that you can change. If an object does offer properties that you can change, right-clicking the object and choosing Properties from the shortcut menu will take you directly to the Properties dialog box for that particular object. For example, the desktop itself has properties that you can alter. If you right-click the desktop "proper" (not the taskbar, not an icon, not an open window) and choose Properties, you'll come to the Display Properties dialog box shown in Figure 2-8.
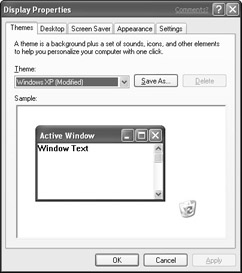
Figure 2·8: The Display Properties dialog box
Tip The Properties dialog boxes for many objects also are available in the Control Panel, which you can get to by choosing the Control Panel option from the Start menu.
Within the dialog box, you see examples of some common controls. The following sections explain how to work all the different kinds of controls you may come across in your daily use of Windows. The sample Display Properties dialog box doesn't offer all the controls discussed here. But trust me, you will eventually come across all the controls described in the next few sections.
Tabs
Some dialog boxes contain more controls than can actually fit into the box. In this case, options are split into two or more tabs. For example, the Display Properties dialog box contains the tabs shown in Figure
2-9. To view the options offered by a tab, click the tab you want. Alternatively, you can hold down the
Ctrl key while pressing the Tab key to move from one tab to the next. Pressing Ctrl+Shift+Tab moves through the tabs in the opposite order, from right to left.
![]()
Figure 2·9: An example of tabs
Buttons
Buttons are simple. You click them with your mouse. If a button has an underlined letter in its label, you can optionally hold down the Alt key and press the key that represents the underlined letter. For example, as an alternative to clicking a button labeled Pattern, you can press Alt+P.
You might notice one button in a group has a slightly darker appearance than the others, such as the OK button shown in Figure 2-10. That button is called the default button and, as an alternative to clicking directly on that button, you can press the Enter key. Many dialog boxes also have a Cancel button, which enables you to escape gracefully from the dialog box without saving any changes. As an alternative to clicking the Cancel button, you can press the Esc key or click the Close (X) button in the upper-right corner of the dialog box.

Figure 2·10: An example of buttons
If your hands happen to be on the keyboard rather than the mouse and you want to choose a button, you can press the Tab key to move forward from one control to the next, or you can press Shift+Tab to move backward through the controls until the button you want to press is highlighted with a dotted line. Then press Enter to push that highlighted button.
The buttons play an important role in dialog boxes. Keeping them straight is important. Remember these important points:
• The Apply button (if available and enabled) applies your selection right now, without closing the dialog box.
• The OK button applies your selection(s) and then closes the dialog box.
• The Cancel button (or pressing the Esc key) closes the dialog box without applying or saving any options you selected. However, it does not undo any selections you have already applied!
• Any button that appears to be dim is currently disabled, and clicking it will do you no good.
The button will become enabled again once it can serve some purpose. For example, the Apply button will be enabled only after you make some selection that you can apply.
Don't forget the handy Help (?) button displayed near the top of many dialog boxes. You can click this button and then click any option within the dialog box to learn more about that option.
Dimmed (disabled) controls
Buttons aren't the only controls that might be dimmed and disabled. At any given time, any control in a dialog box, as well as any option on a menu, might be dimmed. This doesn't mean something is broken.
It means that the control is not relevant or meaningful at the moment. Therefore, there's no point in selecting it. When you first open a dialog box, for example, the Apply button will be disabled, because you haven't yet made any selections to apply. As soon as the situation changes (for instance, you make a selection that can be applied) and the control becomes meaningful, it will automatically be enabled (undimmed).
Tip I've actually seen people click away repeatedly at a disabled control, as though doing so will some how "wake up" that control. Trust me on this. It won't.
Option buttons
Option buttons (also called radio buttons) are a set of two or more mutually exclusive options. The name radio button comes from the buttons on old-fashioned car radios, where pushing a button to select a station automatically unpushed whatever button was previously pressed. Figure 2-11 shows a couple option buttons available on the Start Menu tab of the Taskbar and Start Menu Properties dialog box (which opens when you right-click the Start button and choose Properties).
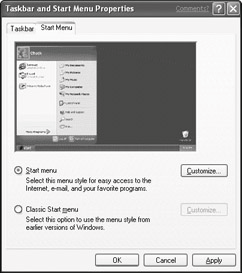
Figure 2·11: The Start menu and Classic Start menu options here are mutually exclusive, as indicated by the option buttons. You can select one or the other, but not both.
Choosing an option button is simple, just click it. Often you can click the text next to the radio button, which provides a larger target. Choosing radio buttons with the keyboard is a little trickier. Within the dialog box, you need to press the Tab or Shift+Tab keys until one of the radio button options is selected (has a little gray border around it or its label). Then you can use the arrow keys to move that gray border to the option you want. To move out of the radio button group, press the Tab or Shift+Tab keys.
Preview area
Some dialog boxes offer a preview area, which is an area of the dialog box that gives you a preview of how the applied selection will affect the object. For example, the Taskbar and Start Menu Properties dialog box shown in Figure 2-11 contains a preview of the Start menu. Choosing one of the option buttons below the preview area shows you how your selection will change the appearance of the Start menu. Therefore, if you don't like what you see in the preview area, you can switch back to the other option before you actually apply the change to the real Start menu.
Check boxes
Check boxes, like the examples shown in the in Figure 2-12, enable you to turn some option on or off. (That figure is showing the Taskbar tab of the Taskbar and Start Menu Properties dialog box.) Unlike option buttons, check boxes are not mutually exclusive. You can select any combination of check boxes you want. When a check box is selected (contains an X or a check mark), the option is turned on. When the check box is empty (clear)