How to Write an E-book in 2 Weeks by Dennis Yu & Warren Whitlock - HTML preview
Download the book in PDF, ePub, Kindle for a complete version.
Once you have your transcript, and you made sure there are no mistakes or errors in it… you need to make the overall content flow.
This is usually done by a content writer, but you won’t have to pay someone $1000 to look over your ebook.
Instead, you can use AI to get this done. More specifically -->Jarvis.ai
We’ve gotten to a point in time where AI can easily assist you with creating content and copy or blogs, sales pages, and even books.
It can help you start from scratch, or it can take content that you already have and improve it.
It’s an amazing tool.
Here’s how to use it:
Go to Templates, and search for ‘Content Improver’.
Here’s how to use it:
Go to Templates, and search for ‘Content Improver’.

The content improver is a great place to start with your transcribed content. This tool will take the written content that you have and generate unique outputs to improve and expand upon your current content.
i. Insert a paragraph of up to 600 words
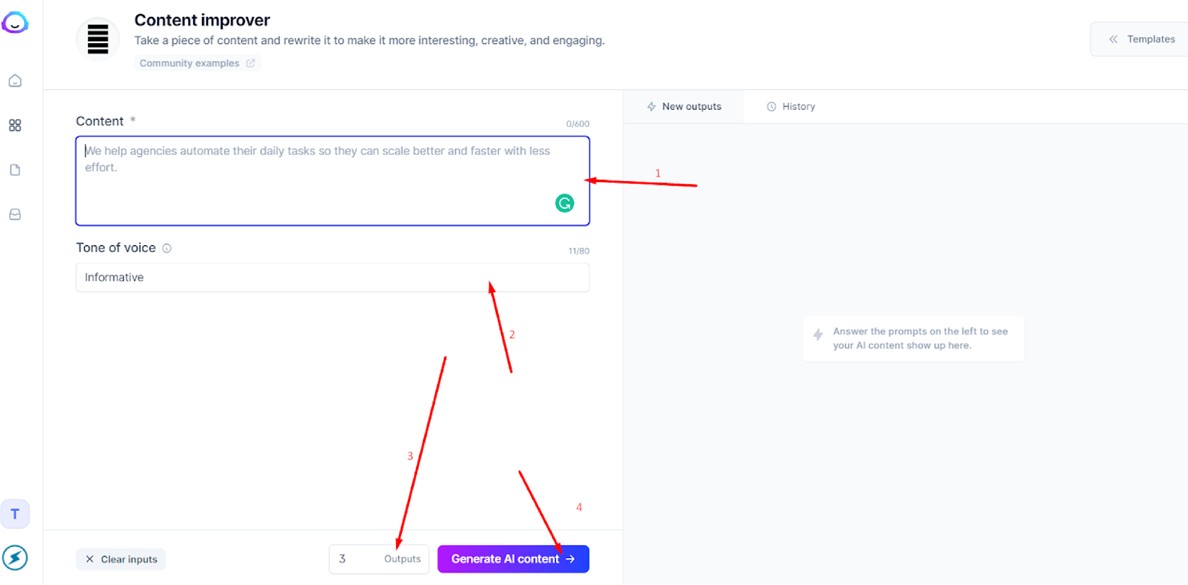
ii. Choose the tone of voice you want to use
iii. Choose the number of outputs you want to receive
iv. Click on ‘Generate AI content’
Depending on the amount of context Jarvis has, not all of the outputs will be a good fit.
The glory of Jarvis is that you can keep generating out- puts until you have a piece of content that works well with your topic.
Continue this process with the entire transcript. If you’re going through 600 words at once, it shouldn’t take you very long to get everything done.
Split your book into sections and improve everything with Jarvis.
And that’s it!
Your book is ready to move to the next step--> Design.
If you still want an expert to take a final look over your ‘manuscript’, you can do that. However, by the time you’re done with Jarvis, everything should be in place.
b. Outsourcing book design work


The design of your book will play a major part in the overall process. Good content is absolutely necessary, but the design is what catches the eye first.
The cover stands a good chance of being the first impres- sion your readers have of you and your book. If you want prospects to read, make sure you are deliberate in creat- ing a compelling cover.
Have a clear bold title, a short description, or a subtitle that gives a bit more insight. You might also consider including a few lines of reviews (with permission, of course).
Once you have a design plan in place, you’re going to look for a freelance designer.
That can be done on Upwork or Fiverr.
Outsourcing work is efficient and cost-effective. In fact, you can generally get all the book design work done for $80-125.
However, make sure to check the freelancer’s reviews and star-rating before making a payment. Like anywhere else, you will find good and bad professionals, so it’s better to be safe than sorry.
And if the first design draft is not to your liking, most freelancers offer multiple rounds of revisions.
Once you find someone good enough, follow these steps:
i. Provide the freelancer with the book content and any supporting images you want to use
- Specify within the content exactly where you want your supporting images to be used.
ii. Provide the title of the book
iii. Share ideas for a book cover design
- Check out your favorite book covers and talk to your designer about why you think they work well.
This will help establish a shared vision for the cover design and make it easier to collaborate on future projects. In addition, it will give the freelancer something concrete to go on when they begin designing your book cover. They’ll know what is expected.
iv. Provide any formatting details
- Like a buffer between the cover page and the rest of the content. You might also want to add page numbers or write some special instructions about the font.
Here is a simple example of formatting instructions:
“The pages need to be 0.75” (2 cm) top and bot- tom margins, with square corners – no indents. All text should be 12pt Arial. Please color code head- ings (blue for chapters, orange for subchapters). I’d also like a space between paragraphs and the first line of each paragraph should be capitalized.
Similar to this, each chapter heading should be italicized. Lastly, please ensure that full-page images are on even-numbered pages, and then start the text on the next page.”
v. Set a deadline for the project
- This way, you’ll be able to plan the project more effectively.
In case the designer doesn’t finish it on time and will need additional days to get it done, agree on a date when he has to tell exactly why this is so. You don’t want any delays with your book, so write down everything that needs to be done to get this out to the public.
vi. Revise rough draft
Revision is the last stage of the book designing process. It’s your last chance to ask for changes from your designer, so remember to go through every single page and note down anything that doesn’t look or feel right.
vii. Ask for a PDF version as well as a raw file in the case of any future edits.
That’s it.
Your book is now ready to be printed, published, used as a lead magnet, etc.