Word Press for Beginners: Easy as 1-2-3 by Nico Julius - HTML preview
Download the book in PDF, ePub, Kindle for a complete version.
Introduction
What is WordPress?
With WordPress you can easily create and maintain a blog or a website.
WordPress.com vs WordPress.org
There are 2 versions of WordPress, WordPress.com and WordPress.org.
WordPress.com is very easy to start with. Just go to WordPress.com, sign up and start blogging. The basic version is free, but it will show adds to your visitors. You have to pay to remove the adds and to use your own domain name.
WordPress.org is the selfhosted version. This means you have to download the software and install it on your own web hosting / server. This might be a little bit more work but you’ll also have much more possibilities: there are a lot more plugins available and you can choose or create your own themes.
In this tutorial, you’ll learn how to use the selfhosted version of WordPress (= WordPress.org).
Why choose WordPress?
• open source software
• easy to use
• flexible
• used worldwide
• constantly in development
Open source software
WordPress is open source software. This means that you don’t have to pay for a license or you don’t have to pay to use it.
Easy to use
WordPress is easy to use. Not only it’s simple to install and to configure, you also don’t need any technical knowledge to create and maintain the content.
Flexible
Because WordPress is a flexible platform, it’s easy to suit your needs. The standard configuration contains the basics, but you also can extend WordPress with a lot of interesting and powerful plugins.
Used worldwide
WordPress is used worldwide; thousands of blogs and websites run on the WordPress platform. Depending on the source, it’s reported that 8 to 12% of the websites worldwide are running on WordPress!!
Constantly in development
A lot of developers work together to constantly make WordPress better.
WordPress for Beginners, Easy as 1-2-3 by WPBrix.com & WordPressNinja.com (FREE beta edition) 5
Installation
Preparation
Before starting to install WordPress, you need a couple of things:
• A domain name and web hosting
• WordPress software
A domain name and web hosting
The first step is choosing a domain name (for example www.mydomain.com) and web hosting. There are a lot of sorts of web hosting. In most cases the registration of the domain name is included with the web hosting. If you’re just starting with WordPress, then I advise you to go for cheap shared web hosting. At any time, you’ll be able to move your blog to another web host if you need more power. Examples of companies offering shared hosting are: Bluehost, Dreamhost and Hostgator.
Of course, there are MUCH more web hosting companies, so feel free to choose your own.
If you’re building a professional blog or website for a lot of visitors that has to be fast, then I advise you to take a look at managed WordPress hosting like WPEngine, Page.Ly or ZippyKid.
For more information, reviews and speed tests of web hosting, please check my blog wpbrix.com/hosting/
WordPress software
You can download WordPress for free at www.wordpress.org.
Step by step installation
WordPress is famous for its “5 minutes installation” (sounds great, isn’t it?) Step 1: Upload the WordPress software
After you downloaded WordPress and unpacked the zip file, you have to upload WordPress through FTP to your web hosting. Normally you don’t have to create an extra folder, unless you want WordPress to be installed in a subfolder.
Step 2: Start the installation
In your web browser, visit the url where you installed WordPress. In most cases this will be something like http://
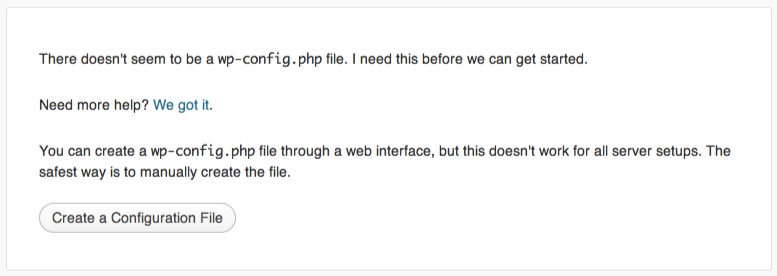
Step 3: Create a configuration file
In this screen you’ll see next message:
Click the “Create a Configuration File” button.
WordPress for Beginners, Easy as 1-2-3 by WPBrix.com & WordPressNinja.com (FREE beta edition) 6
It’s possible that WordPress can’t create the configuration file. When you experience this problem, search for wp-config-sample.php on your web space. Just make a copy of wp-config-sample.php and rename it to wp-config.php. Now try again.
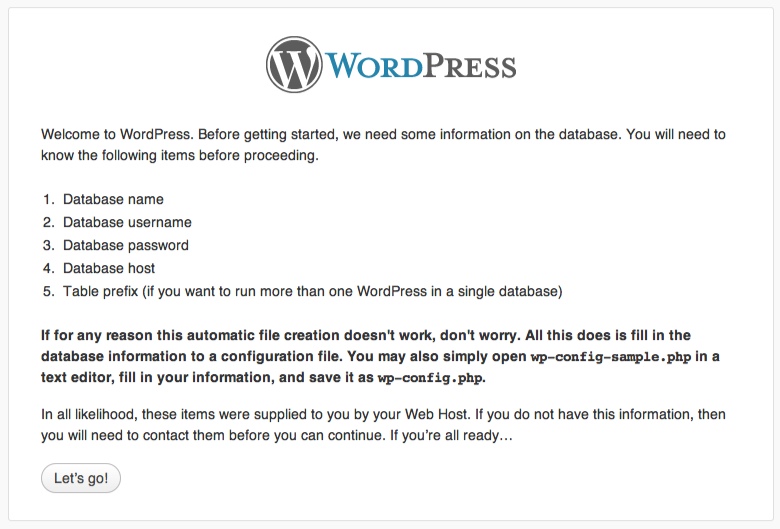
Step 4: Welcome message
The next screen is a welcome message. It also reminds you to the fact that you need all the information you got from your web host.
WordPress for Beginners, Easy as 1-2-3 by WPBrix.com & WordPressNinja.com (FREE beta edition) 7
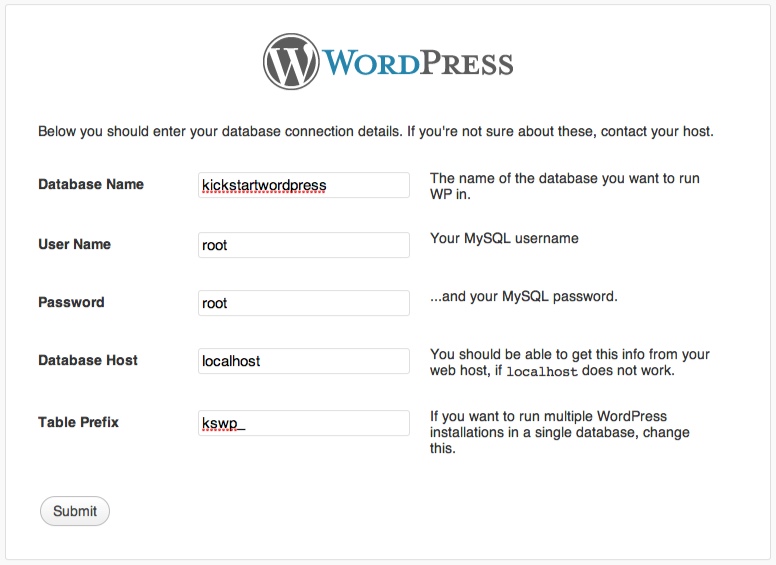
Step 5: Fill In The Database Connection Details
In the following screen you need to fill in the database connection details: The following fields have to be filled in:
• Database Name: the name of your database
• User name: the MySQL username
• Password: the MySQL password
• Database Host: by default this is localhost (only change this if you have anoter database server from your web host)
• Table Prefix: by default this is “wp_” but for security reasons it’s better to fill in another table prefix.
Click the “Submit”-button to proceed.
WordPress for Beginners, Easy as 1-2-3 by WPBrix.com & WordPressNinja.com (FREE beta edition) 8
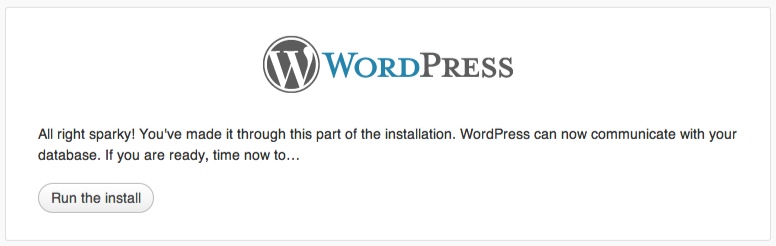
If you see this screen, your database connection details are ok: Click the “Run the install” button to start the installation of WordPress Step 6: fill in the basic information
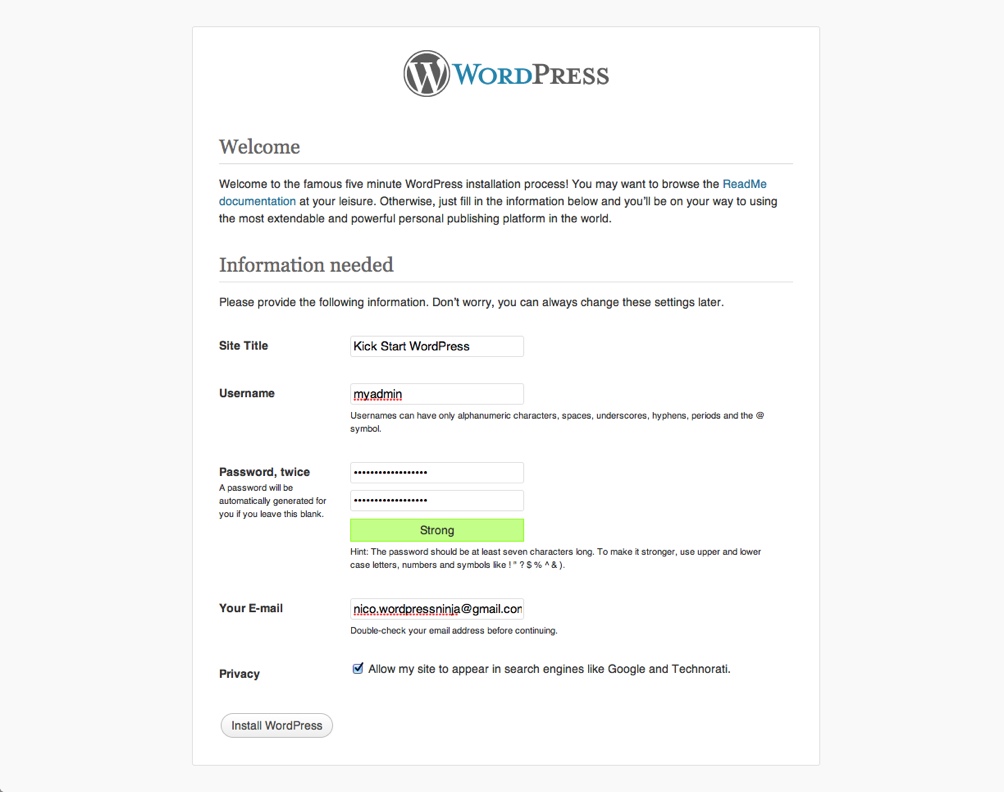
In the following screen you have to fill in some basic information WordPress for Beginners, Easy as 1-2-3 by WPBrix.com & WordPressNinja.com (FREE beta edition) 9
• Site title: fill in the title of your blog or website.
• Username: choose a username. By default “admin” is filled in but for security reasons I advise you to choose another username. This makes it harder for hackers to guess your administrator username.
• Password, twice: fill in a password. For security reasons, pick a strong password that’s not easy to guess!!
• Your E-mail: fill in a valid e-mail.
• Allow my site to appear in search engines like Google and Technorati: select this so your website can be found and indexed by search engines.
Click the “Install WordPress” button after you filled in the needed information.
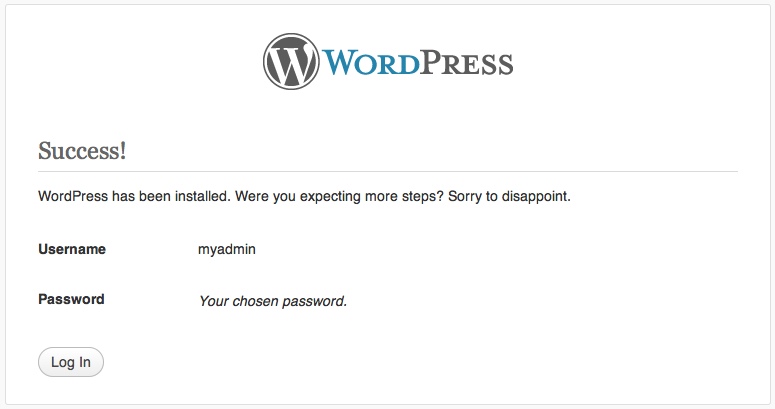
Step 7: installation completed
That’s it!
Click the “Log In” button to get access to the back office where you can manage WordPress.
Web host with a pre-installed version of WordPress
As you can see, installing WordPress is very easy. But there are some companies offering web hosting with a WordPress 1-click-installation. This makes it even easier to install WordPress!
Another option is managed WordPress hosting. In this case, WordPress will already be installed, together with a selection of plugins. Examples of companies offering managed WordPress hosting are WPEngine, Page.Ly and ZippyKid.
More information
Check out the WordPress Codex for more information about the installation of WordPress:
If you have a question or if you need help, check out the Offictial WordPress forum:
WordPress for Beginners, Easy as 1-2-3 by WPBrix.com & WordPressNinja.com (FREE beta edition) 10
Getting to know the dasbhoard
Front end / back end
Front end
The front end is the part of your blog or website your visitors can see.
Back end
The Back end is the part where you can log in and manage your blog. This is the CMS (Content Management System) part.
Here you can add, edit and delete content. It’s also the place to fully configure your blog.
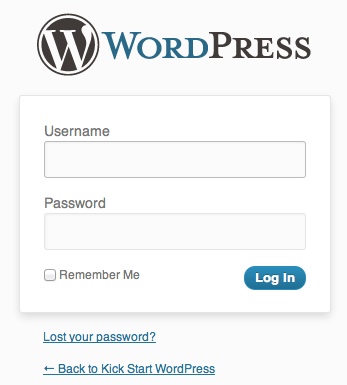
Log in (to get access to the back end)
You have to log in to get access to the back end (the part where you can manage your blog).
You can log in through http://www.yourdomain.com/wp-login.php. Now you’ll see the following screen: Here you have to fill in your username and your password. Click the “Log in” button. After you logged in, you’ll see the back end of your blog:
WordPress for Beginners, Easy as 1-2-3 by WPBrix.com & WordPressNinja.com (FREE beta edition) 11
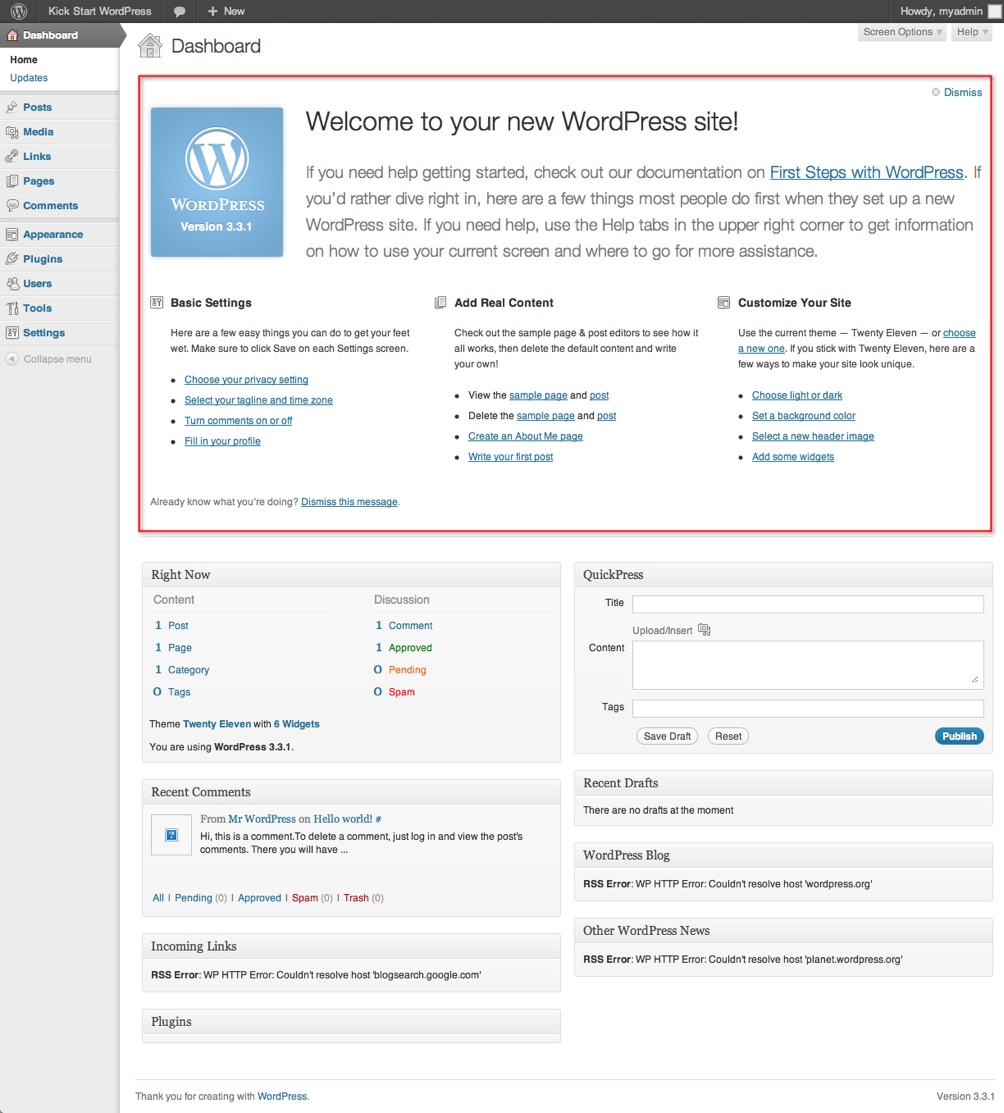
The upper part is a welcome message helping you to start with WordPress. To remove this message from the dashboard, click the “Dismiss” link right above or the “Dismiss this message” link on the bottom.
WordPress for Beginners, Easy as 1-2-3 by WPBrix.com & WordPressNinja.com (FREE beta edition) 12
Configuring WordPress (Settings)
General Settings
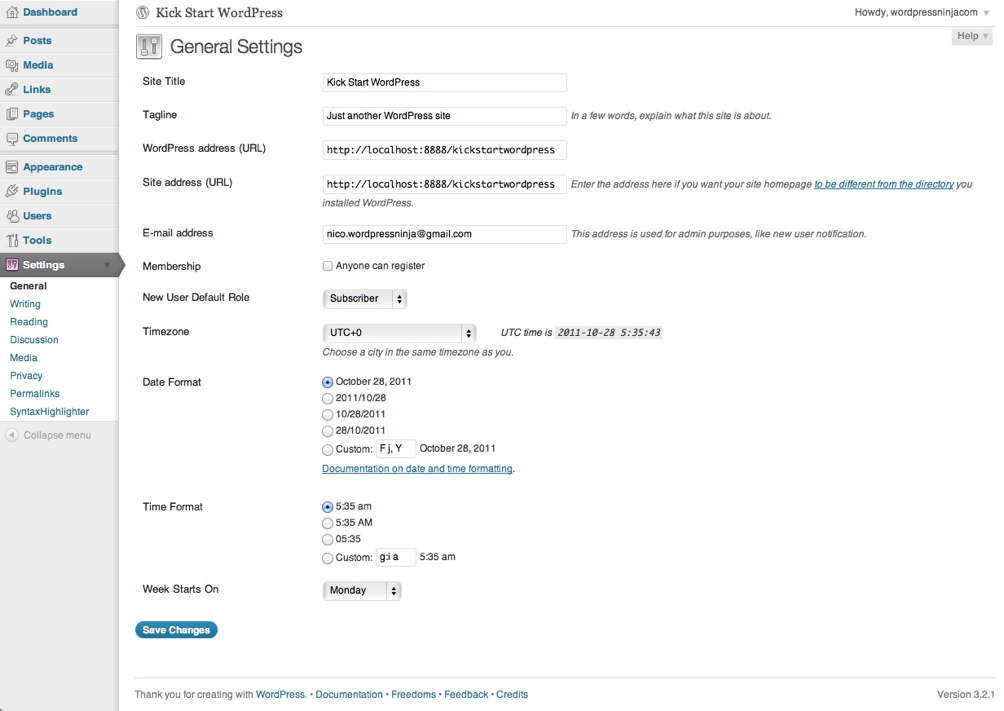
You can find the general settings through “Settings” > “General” in the left menu. In this screen you can configure the basics of your site setup.
• Site Title: here you can fill in the title of your site / blog.
• Tagline: in a few words, explain what your site / blog is about.
• WordPress address (url): here you find the url of your site / blog. Be careful when you change this!
• Site address: for regular installations, you can leave this field blank.
• E-mail address: this address is used for admin purposes, like new user notification.
• Membership: can everyone register to your site / blog?
• New User Default Role: what’s the role of new users (IF they can register)? Select “Subscriber” here. Users with more experience can also select another default role here.
• Timezone: select your timezone.
• Date Format: select a date format.
• Time Format: select a time format.
• Week starts on: select the first day of the week.
WordPress for Beginners, Easy as 1-2-3 by WPBrix.com & WordPressNinja.com (FREE beta edition) 13
Writing Settings
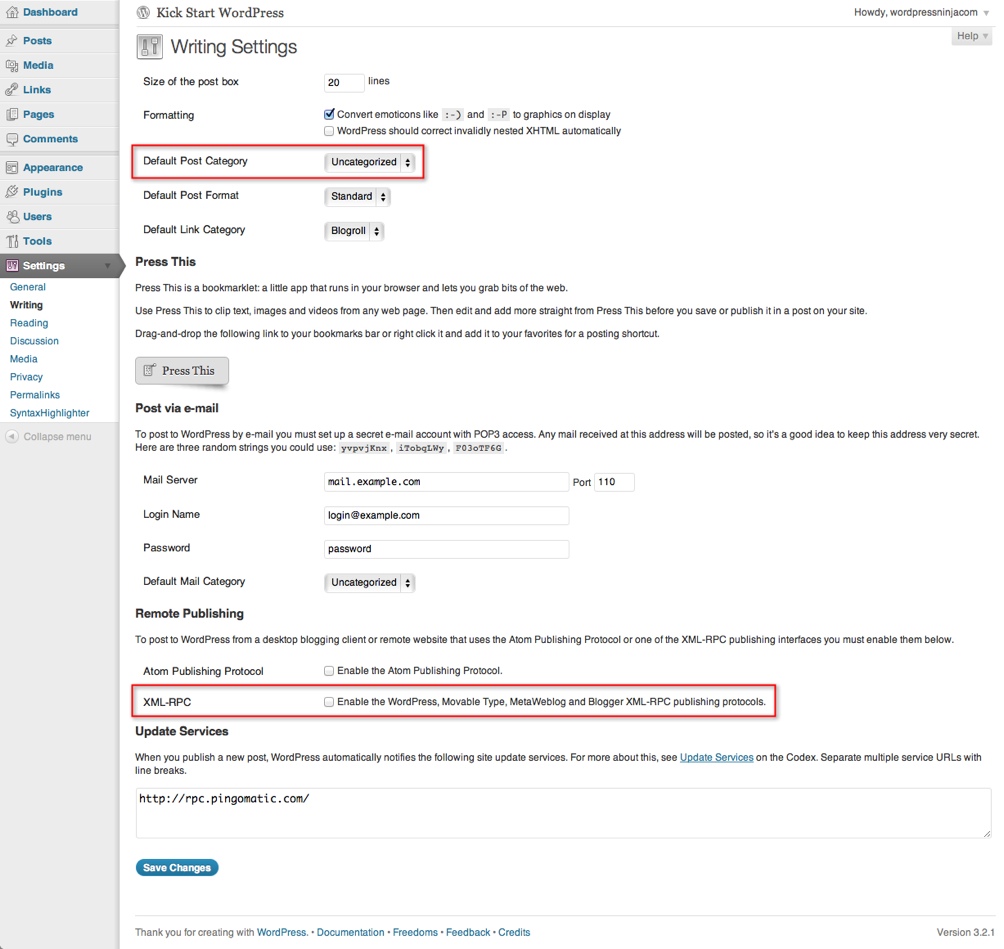
You’ll find the “Writing Settings” page through “Settings” > “Writing” in the left menu For now, only 2 settings are important:
• Default Post Category: here you can choose the default post category. But you’ll first need to create other categories (you’ll learn this later in this tutorial).
• XML-RPC: check this option to update your blog / site from mobile devices (smartphone, tablet,...).
WordPress for Beginners, Easy as 1-2-3 by WPBrix.com & WordPressNinja.com (FREE beta edition) 14

Reading Settings
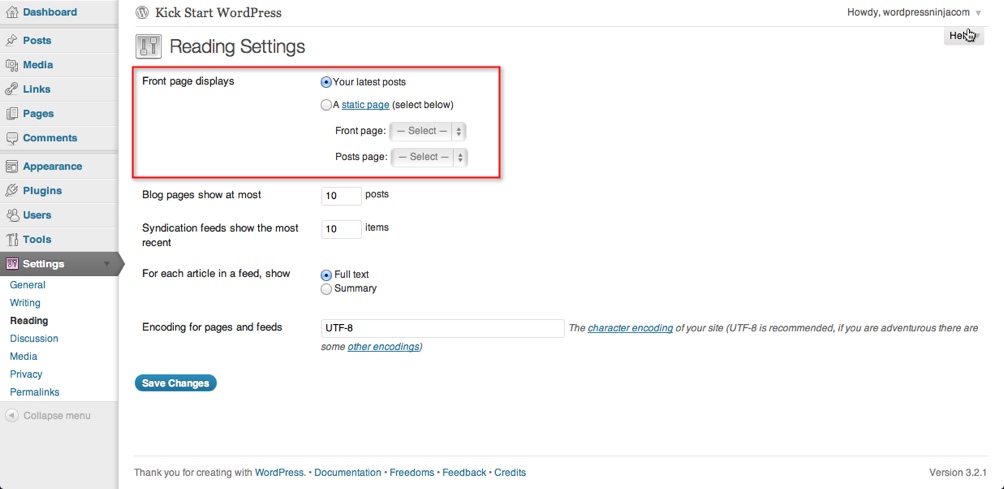
Select “Settings” > “Reading” in the left menu:
An interesting option here is “Front page displays”. Here you can choose what will be shown on your front page. If you want to use WordPress as a website, select “a static page” and pick a page to act as your frontpage. And just like the front page, you can also select another posts page.
Don’t forget, these pages have to be existing pages, so you have to create them before you can select them.
Discussion Settings
You’ll find the Discussions Settings page through “Settings” > “Discussion” in the left menu. On this page you’ll retrieve the settings for several options. Let’s take a look!
This part is important for bloggers. If you’re planning to use WordPress as a CMS, this part is less important.
Default Article Settings
• Attempt to notify any blogs linked to from the article: if you publish an article with links to other blogs in it, your blog will try to notify those other blogs to “tell” them you linked to them (and you published an article). This will result in a automatic comment on that blog (only when you checked this option).
• Allow link notifications from other blogs: when other blogs link to you and they notify you, they’ll place an automatic comment. Uncheck this setting to not publish these comments (I always uncheck these setting).
• Allow people to post comments on new articles: give your visitors the possibility to write a comment under your article.
WordPress for Beginners, Easy as 1-2-3 by WPBrix.com & WordPressNinja.com (FREE beta edition) 15


Other Comment Settings
• Comment author must fill in name and e-mail: when someone leaves a comment, he or she must fill in a name and email address.
• Users must be registered and logged in to comment: if you check this option, readers first have to log in before they can place a comment. For most blogs, it’s better not to check this option.
• Automatically close comments on articles older then XX days: when you check this option, your visitors will not be able to place comments after XX days. If you check this option, be sure to leave enough time for your readers to place a comment. 14 days is way to short. On my blog, I have topics of over 6 months old, and still a lot of readers are placing comments!
• Enable threaded (nested) comments X levels deep: checking this option makes it easier to read comments on other comments. So be sure to check this option, the default of 5 levels should be enough.
• Break comments into pages with XX top level comments per page and the last page displayed by default: this could be interesting if you have a VERY popular blog with a lot of comments. This means that WordPress will split articles with more then XX top level comments in multiple pages.
• Comments should be displayed with the older / newer comments at the top of the page: here you can select older /
newer to choose how to sort your comments. Note that most bloggers choose to display the newer comments on top.
E-mail me whenever
• Anyone posts a comment: when checked, you’ll receive an e-mail when someone places a new comment.
• A comment is held for moderation: if checked, you’ll receive an e-mail when someone places a new comment that’s held for moderation.
I advise you to check these both because if you have a lot of articles. This is the easiest way to follow up the (new) comments.
Before a comment appears
• An administrator must always approve the comment: when someone places a new comment, an administrator always has to approve this comment.
• Comment author must have a previously approved comment: when someone places a first comment, you’ll have to approve this comment. After that, comments of that user will show up without any approvel.
• Comment moderation: Hold a comment in the queue if it contains a certain amount of links (defined by you). You also have a field where you can fill in words. Fill in one word per line. When a comment contains those words, it will be held in the moderation queue.
WordPress for Beginners, Easy as 1-2-3 by WPBrix.com & WordPressNinja.com (FREE beta edition) 16
• Comment blacklist: In this field you can fill in words. Fill in one word or ip per line. When a comment contains those words, it will be marked as spam.
• Avatars: An avatar is an image that follows you from weblog to weblog appearing beside your name when you comment on avatar enabled sites. Here you can enable the display of avatars for people who comment on your site.
Media Settings
You’ll find the Media Settings page through “Settings” > “Media” in the left menu. Here you can configure some default settings for media (especially images) you upload. For most of you, the basic settings are just fine.
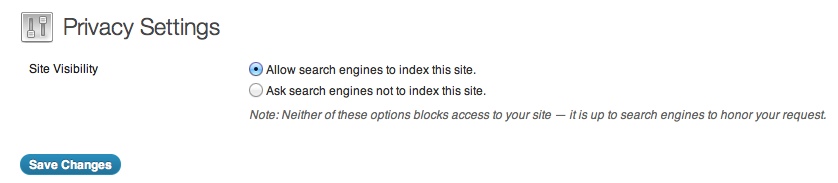
Privacy
You’ll find the Privacy Settings page through “Settings” > “Media” in the left menu. Unless you don’t want your blog to show up in search engine search results, you select the first option: Permalinks
You’ll find the Permalinks Settings page through “Settings” > “Permalinks” in the left menu. Here you can choose how the url of your blog or website will look like.
I advise you to change this because this is important for Search Engine Optimization (SEO).
Out of the box WordPress generates urls like:
If you turn on Permalinks, it’s possible to generate urls like this:
http://www.mysite.com/about-us/
As you can see, in the url of the second example we can read what the page is about. This is also very important for search engines because they also index page urls. Words in the page url are considered as important, which is good for SEO.
WordPress for Beginners, Easy as 1-2-3 by WPBrix.com & WordPressNinja.com (FREE beta edition) 17
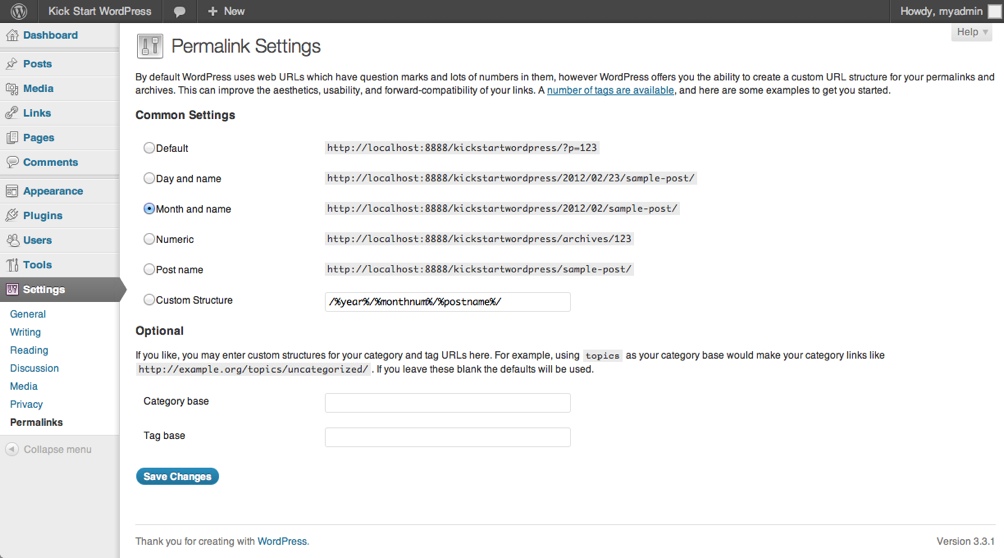
Which one to choose? The general rule is, if you’re writing evergreen content then choose the option “Post name”.
Otherwise it’s better to choose for “Day and name” or “Month and name”. For example for my blog WordPressNinja.Com I chose “Month and name”.
WordPress for Beginners, Easy as 1-2-3 by WPBrix.com & WordPressNinja.com (FREE beta edition) 18


The Basics Of WordPress
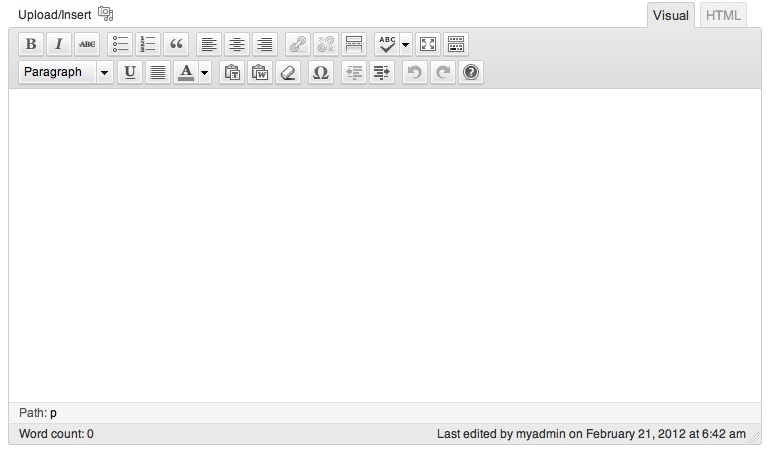
The WYSIWYG editor
The WYSIWYG editor is used to edit the content of pages and posts. It’s based on MS Word to keep things as simple as possible.
Function overview
Button
Function
put selected text in bold
put selected text in italic
strike selected text
create unordered list
create ordered list
put selected text as a quote
align left
align centre
align right
insert hyperlink
WordPress for Beginners, Easy as 1-2-3 by WPBrix.com & WordPressNinja.com (FREE beta edition) 19


Button
Function
remove hyperlink
insert the “more” tag
spell checker
WYSIWYG-editor in full screen
show / hide the kitchen sink (show more / less buttons)
format the selected text / paragraph
undeline selected text
align full
select text color
paste copied text from another application as plain text (text without formatting) paste copied text from Word
remove formatting from the selected text
insert a custom character
outdent selected paragraph
indent selected paragraph
undo
redo
help function
insert media
Hyperlinks
How To Insert a Hyperlink?
• Select the text you want to turn into a hyperlink
• In the menu, click on the
-button (Insert / edit link)
WordPress for Beginners, Easy as 1-2-3 by WPBrix.com & WordPressNinja.com (FREE beta edition) 20
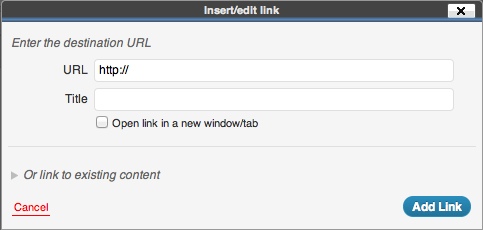


• The following popup appears:
• If you want to link to an external page:
• Fill in the full url (including “http://”) of that page in the field “URL”.
• Enter a short description in the “Title” field.
• Select “Open link in a new window/tab” so the page will open in a new window / tab.
• Click the “Add link” button.
• If you want to link to an internal page (within your site or blog) that already exists:
• Click on “Or link to existing content”.
• In the “Search” field you can enter a part of the title of the post or page you’re looking for.
• Select a post or page in the list.
• Only select “Open link in a new window/tab” if you really want that the page / post opens in a new window or tab, but it’s better not to do that if you link to an internal page.
• Click the “Add link” button.
How to edit a hyperlink?
• Select the text of which you already created a hyperlink (you don’t need to select the whole text, it’s ok to just click on it once).
• Click on the
-button in the menu (Insert / edit link).
• Do the changes you need.
• Click on the “Update” button.
How to remove a hyperlink?
• Select the text of which you already created a hyperlink (yo