How to: Create You Own Website ( Easy!) by Taylor Conrad - HTML preview
Download the book in PDF, ePub, Kindle for a complete version.
This guide is for you if you are….
> Someone who wants to learn how to create your own website from scratch without spending thousands of dollars on fancy software or web designers.
> Looking to have a web presence your own professional industry specific business such as: Yoga instructor, life coach, consultant etc.
> Someone who wants to start a hobby blog in areas such as a fashion, cooking, internet marketing etc.
> A recent graduate applying for jobs and entering the grownup job market.
> A freelance writer, graphic designer, web designer, financial consultant etc. and are looking to establish your name and gain exposure in order to attract clients.
> A photographer setting up your own photography website to showcase your work and establish your online presence
The employment marketplace is a competitive place. So whether you work for somebody else or work for yourself the competition is always there. Gone are the days where your credentials and education solely guaranteed you a job. These days you will need to think creatively in order to get the job. Whether you are a freelance writer, yoga instructor, or someone looking to get your foot through the door of corporate America. Having a website is essential. It enables you to let your personality and your work shine. Your website is important because it is what will help you to differentiate yourself from the crowd.
To most people, the idea of creating their very own blog or website is daunting and intimidating to say the least. Many of us picture the days of having to learn complicated code and HTML in order to setup a simple web page and get online. This could not be further from the truth! If you are looking to start a blog or personal website, it is not as complicated as you might think and no, you absolutely do not need to know how to code or learn HTML to get started! Why should you setup your own blog or personal website? Having an online presence is very important in the job market and can act as the one thing that sets you apart from other job applicants in the competitive job market. Plus starting a blog or setting up your very own personal website is easy!
Picture this, you and 100 other people apply for a job position and out of those 100 people, around 25 are chosen for an interview. Out of the 25 candidates interviewed, only 15 qualify for a second interview, and out of these 15 people, only two have an online presence achieved by owning and running their very own personal website /blog. This is the one thing that differentiates them (aside from their Linkedin profiles) from the herd. Now which person do you think is most likely to peak the interest of the interview: The person who just presents themselves as yet another job applicant or the person who has something more going for them such as an online presence? Hmmm...I will let you answer this for yourself.
6 Reasons You Need to Setup a Personal Website or Start a Blog
1) You get to control what other people can find about you online . If people Google your name usually all they can find are your social media profiles such as your Twitter, or Facebook (if you use your real name that is...) and sometimes your Linkedin profile ( if you have one). But when you have your own personal website/blog, it is likely to be among the top results in any search engine
2) You make yourself instantly interesting. When people find your personal website/blog online, they are inclined to think 'hmmm... Who is this person? What is his/her website about?... Let me click over and see what they have to say/offer'
3) Stand out from the crowd. Having a blog/website allows you to stand out and differentiate yourself. Even though there are mil ions of blogs in the interwebs today, keep in mind that people with blogs do not blog in identical niches/topics. If anyone tells you 'There are way too many personal finance blogs, the web does not need another!'
4) Ignore this hater (they probably suffer from extreme indigestion anyways) and instead start your own personal finance blog and give and add your own unique flare!
5) Pass on something of value to your readers Having your own website/blog, can help you to communicate and offer valuable information and this in turn can help you to showcase your work/talents to potential employers or partners by providing them with a window to see what you are capable of. Oh and did I mention sharing can earn you online karma points for the future!
6) It allows you to network...COMFORTABLY. Whenever I think of networking, I picture a room filled with people suited up in their best business wear armed with business cards and making super awkward small talk then randomly handing out their business cards without making any real connection to one another. With blogging you actually get the chance to build and form a relationship with your readers as well as with other bloggers. You get to know them by commenting on their blogs, participating in podcasts and even collaborating on projects.
7) You get to be the creator of something. There's something satisfying about taking an idea from concept to life. Starting your own blog is no different as it will gives you a sense of purpose and community to be able have something you are working towards in life, even if it’s something you do once a week or frequently.
For the above industries, you can showcase your blog or website to potential clients in many ways: If you are a photographer, having an online portfolio can help you to showcase the quality of your work to potential clients/employers. You can impress clients or a potential employer as an interior decorator/designer by having an online blog full of pictures of past projects. Allow your clients to see your talents as a web designer by pointing them to your online web design portfolio of past work you have done. If you are looking to build your business as a fitness trainer, why not start a blog with a main focus on exercise & nutrition as well as display your past work with client's before and after pictures (just be sure to ask their permission first)... The list goes on.
A blog or personal website can act as the avenue to help you get hired, build a business, get connected, attract opportunities and differentiate yourself from the pack...But only if you finally GET OFF YOUR BUTT AND START!
So you want to setup a personal website or start a blog?....
What you do Not need to know
- Complicated HTML of any other complex code that would otherwise look gibberish
- Photoshop, Dreamweaver or any other
Here is what you will learn with this guide?
- How to register a domain name
- How to get hosting
- Places to get an awesome and attractive theme for your website
- Essential must have plugins to secure, optimize and seamlessly run your blog/website
Full Disclosure: If you decide to use the hosting and domain options I recommend within this guide and you click on any of my links in order to get the product, I will earn a commission (it will not cost you anything and it can even cost you less because I can provide you with coupon code or two). If you choose to get your domain name or hosting through my link, I want to thank you as it is my aim that this tutorial will help you get started online.
Step 1: Name Your Website
The first thing you want to do is come up with a name for your blog or website. When coming up with a name, make sure that it’s easy to remember and complementary to your industry of choice or niche. If you are setting up a personal website then your first and last name will suffice. The main point is, you need to pick a name that you like and feel is suitable for whatever it is that you would like to accomplish. So whether that means registering fitbodiesunite.com or queenofcupcakes.com, or whatever comes to mind.
Step 2: Register your Domain Name
The next thing you will want to do is to pick the right domain for your website. If it’s your goal to have you very own personal website, then you probably want to go with a name like firstandlastname.com. If the name you want is taken, you will have to improvise by placing a middle initial in the middle or come up with a different name. With a blog you can get more creative, ( think short and sweet).
2 Places where I buy my domain names from
There are many places where you can buy your domain name from online, however I only use the following two companies:
Namecheap.com: This is also a good place to buy domain names, their .com's start at $10.69/year.
Godaddy.com: Their domain names are fairly priced and they even have a promotion right now where you can get domains for as little as $8.99 .
I really like Godaddy because you can usual y get coupons with them, whereas as much as I also like Namecheap, as a company they do not offer coupons, however the domain name registration at Namecheap does come with a free 'Who is ' protection option that you can activate in the case that you do not want anybody to lookup your website domain name and be able to see your address and who the owner is.
Word of advice > In case you find a domain that you really want for your blog or website, register it immediately because you just might search for it the next day and somebody else could have snapped it up (believe me, I learned the hard way). Oh and it’s probably not a good idea to register a name such as crazyforcocopuffs98229.com!
It is VERY important to have a good domain name. I do not think this fact can be stressed enough.
If you are setting up a personal website your domain name can be in the structure of Yourfirstlastname.com and there you can include a portfolio of your past work and links to all the social media profiles where you can be found as well as a link to your company website and main blog if you own a company or run a blog.
Avoid this when setting up a domain name:
Using numbers in your domain name
Using dashes, only use them if you absolutely have to.
Making your domain name longer than three words (it's too long)
Using super complicated and hard to spell domain names
Avoid domain names with extensions such as .biz, .info they can be spammy looking.
Make sure if you are using wording found in the dictionary to SPELL the name correctly!
Remember, the main goal here is to make it as easy and as simple as possible for people to find your website. Did you know nowadays you can buy your domain name in the same place you get your hosting from? It will cost you around $4 more but if you want the convenience, this is an option you are free to pursue.
After you have come up with a good domain name, you are now ready to get your hosting.
Step 3: Find Hosting
The second thing you need to consider is whether you want a self hosted or a free website on WordPress or Blogger such as one with the extension Yourwebsite.wordpress.com or Yourwebsite.blogpost.com, the end decision is really up to you. If you are on a very strict budget, there is nothing wrong with starting off with a free website at WordPress.com or Blogger.com
In my own personal opinion I believe that having a self hosted website/blog looks waaaay better and more presentable, especially if you want to develop a strong brand and be taken more seriously in your industry.
Reliable website hosting is not free, however, it is worth considering since it offers many benefits in the long run.
There are thousands upon thousands of web hosts on the Internet and the options you can choose to go with are endless. Since I am happy whenever I pay a reasonable price for stuff that actually works, I am going to make an assumption that this is also the case with most of my readers as well .
So what type of website hosting is the best? It really depends on the type of website you want to run but since this tutorial is about how you can start a blog or personal website from start to finish, I will just keep things as uncomplicated and as focused as possible.
My top choice for web hosting is the Just Host shared hosting package I have been consistently using Just Host since 2008 and have never experienced any serious problems with their product or service.
Justhost hosting plans are very reasonably priced and affordable, plus they do not have any downtime and the best thing about their hosting plan is they provide a WordPress Quick Instal option (if you ever need to start a blog on WordPress, it's a breeze!) In late 2012 one of my websites was affected by a Malware that made every one of my live posts super wonky (I am talking all different types of codes were showing up that I could not decipher and I was frazzled, angry and had tried everything on my own to resolve the issue), when I contacted Justhost the first agent I spoke to was unable to help me to completely resolve the issue, however what I didn't know was that he had submitted a ticket to have a higher level agent look into the issue.
I went to bed kind of frustrated and close to pulling out most of my hair from the scalp! But lo and behold the very next day when I woke up, I saw an email saying that 2 tickets had been opened and also my issue was resolved, my website was FULLY RESTORED to full working order and I have never had another issue since then. So what was the issue? Justhost support told me what had affected my computer was Malware from using an infected computer! ( a warning for everybody, do not use any unknown computers to access and work on your blog!)
You can use the coupon code letsgoweb to get a percentage off your first hosting purchase. . With this coupon you actually save more when you would if you just used the Justhost default signup.
Please note: These instructions can be applied for use with any other hosting provider and are not restricted for use with Justhost.
Justhost has 3 plans: Starter $5.99/month, Plus $9.99/month and Business Pro $19.99/month Once you have decided on the type of plan you want.
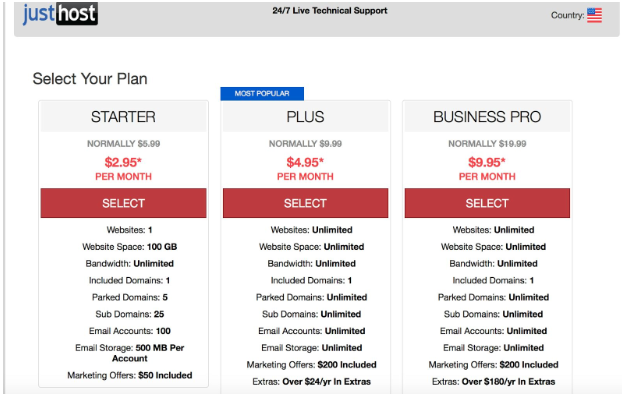
At the time of the screenshot, Justhost was having a summer sale *prices subject to change
After you have made payment, you’ll receive an email with all the information you’ll need to continue.
Step 4: Connect your Domain Name with your Web Host
Now that you have both your domain name and your hosting setup, you will need to get your domain name and your hosting account connected to one another. How do you do this? It's simple really, all you have to do change the domain name servers ( also known as DNS). I do not want to get all technical, but the easiest way to explain a DNS and web host connection is to think of the DNS as the zip code and your domain name as the main address. If the DNS is a 90210, then all mail needs to be routed to Beverly Hills since 90210 is the Beverly Hills zip code. So if you were to mail something to someone in this location, you would need to use the 90210 zip code otherwise if you put down any zip code the mail may not get there since it will not go to the right zip code! Here's how you change your domain name DNS to your web host
You will get an email welcome message from your web host providing you with the DNS details that you will need in order to change your DNS on your domain name to match those of your web host cPanel.
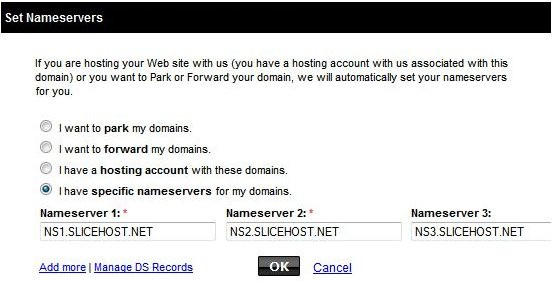
- Log into your hosting account's cPanel and scroll down to the bottom and you will see numbers that look sort of like: NS1.SLICEHOST.NET and NS1.SLICEHOST.NET ( it won't say slicehost.com this is just an imaginary company! )
- Copy the domain nameservers from step 1
- Now Sign in to your Godaddy or Namecheap Account Manager
- Choose 'Manage Domains' option and select the domain you want to modify.
- From the Nameservers menu choose the 'Manage' option
- Under Setup Type select 'Custom'
- Click on ' Edit Nameservers' link and paste the Nameservers you got in step #1 and hit 'Save'
The end result should look similar to:
Step 5: Quick Install WordPress & Set Up Your WebSite
Here is where you actually begin to build your website/blog. In this tutorial, you will be using a selfhosted WordPress to setup your website, not WordPress.com. Keep in mind you have endless choices as to which types of websites you can setup with WordPress so do not feel limited by thinking you can only set up blog sites. If you wanted to, you can setup a company website, personal website, eCommerce site, portfolio site etc.
The best thing about WordPress is it only takes around 5 minutes or less to install! How is this so? You can do this through the WordPress QuickInstall offered by your hosting company.
Steps you will need to take:
1. Login to your Hosting account’s cPanel. You can login by typing in this URL into your Internet browser: yourdomainame.com/cpanel ( of course you want to replace yourdomainame with your actual domain name) If your domain name is taking too long to reach, you can make use of the link JustHost sent you in the first registration email.
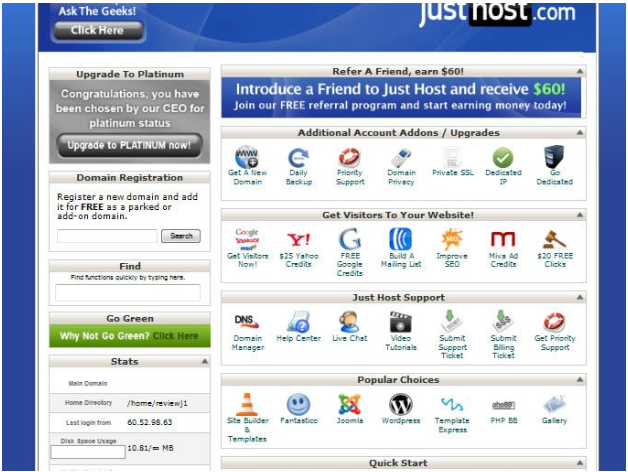
Please note: If you are working with more than one domain name, you will need to click on ' Add on Domains ' also located in the front end of cPanel under the tab with the heading 'Domains' and add your domain name to cPanel before you can instal WordPress with QuickInstall
3. You will now be directed to the front end of your cPanel. In order to instal WordPress, you will want to get near the bottom of the page and there you will see a link for Quick Instal .
4. Click on 'Quick Instal ' link located on the homepage underneath the 'Software and Services' tab
5. Once you get inside the ' QuickInstall' on the left hand side you will see a 'WordPress button, click that
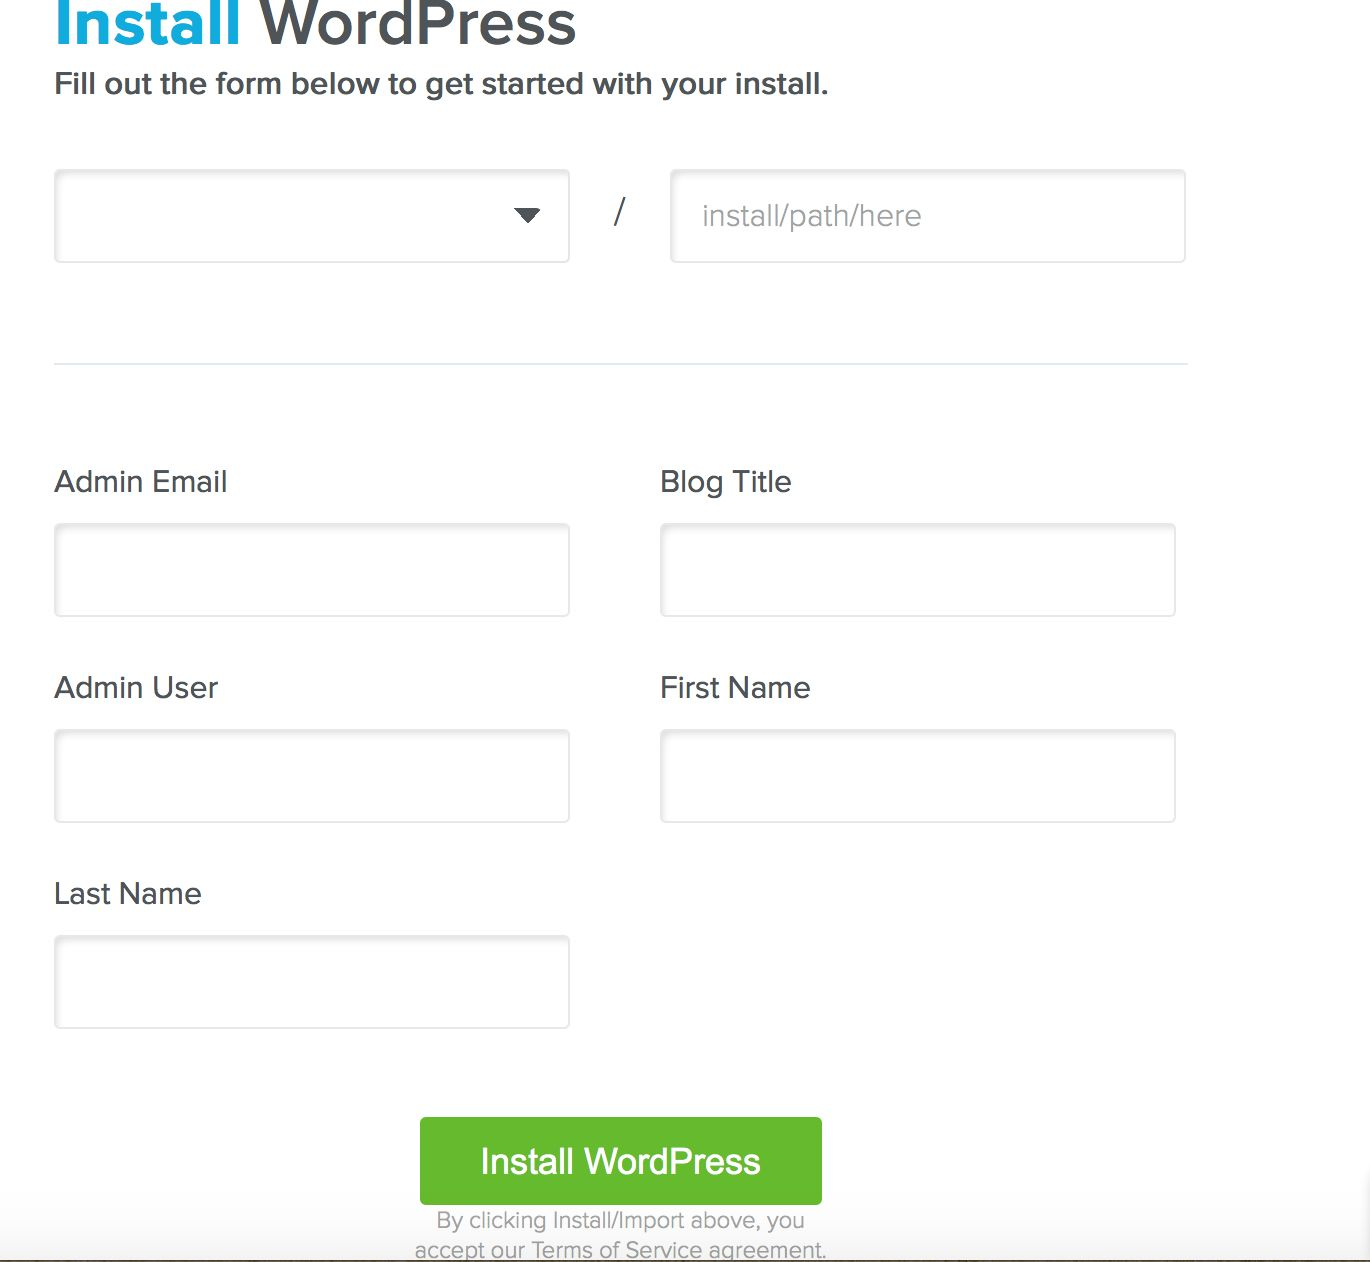
6. Select the domain name you want to develop a WordPress site for and fill in the information required such as the website's username, site tag line, and your email (so you can get the login details emailed to you)
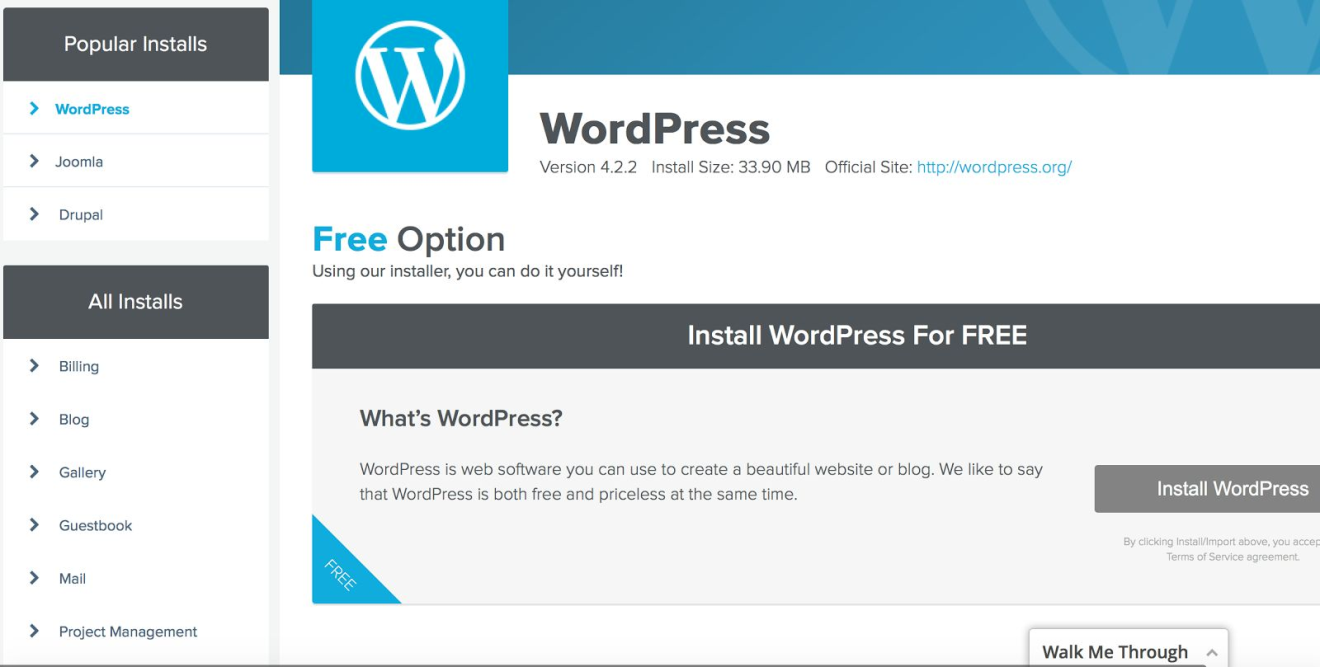
In the Quickinstall area you want to click on the button labeled ‘’Instal WordPress’
Enter all your information and remember to put in the right email so that you can receive your login details!
Please note: it can sometimes take up to 2 hours for your web host to set your account up. You may be able to access your cPanel almost instantly, however your domain name may not be accessible for up to 2 hours.
Pat yourself on the back, you have just installed WordPress in 5 minutes or less and you should now have a fully functioning website!
Before we move on to creating posts, setting up pages, installing plugins etc, let us first take a look at WordPress itself and get a feel for the Dashboard and define what's what.
Familiarize Yourself With WordPress
WordPress is a Content Management System (CMS) that is relatively easy to navigate and use. If you want to know more about it, there's even a tutorial feature as long as you have the latest 3.3+ version of WP installed. Below are a few key terms to remember:
- Dashboard This is the ' hub page' of WordPress. The Dashboard is what you will see once you log in each and every time.
- Posts – Here is where you will go each time you want to write up a blog post or edit any other already published posts.
- Media – Any pictures you upload, videos, or any kind of media can be located and viewed here.
- Pages – Here you can create the pages that will show up in your website's main navigation. With the 'pages' option you can add your about me page, contact page, sitemap etc.
- Comments If anybody (human/computer) comments on your blog, you will be able to see them here (you can also disable the comments).
- Appearance – You can customize your website's look and feel via the appearance menu by using customized menus, widgets and you can also edit your theme code.
- Plugins – Manage your plugins and give your website more functionality by adding the necessary plugins
- Users You can change your website password here.
- Tools Import/Export blog content here. You will rarely need to use this menu options.
- Settings – This particular area has a lot of stuff from your permalinks, reading, writing and so much more.
Now that you have an idea on the functionality in the dashboard, you will have an easier time creating and navigating your website.
Now do not forget to do this important yet very simple thing…
Step 6: Change Your Permalink Structure
Whenever you create a post or a page, WordPress will just create a generic default URL similar to the following: yourdomain.com/?p=123 .This is a very ugly URL and definitely something you do not want.
With a properly structured permalink your url for your 'About Me' page will look like yourdomain.com/aboutme .Now this is what you want.
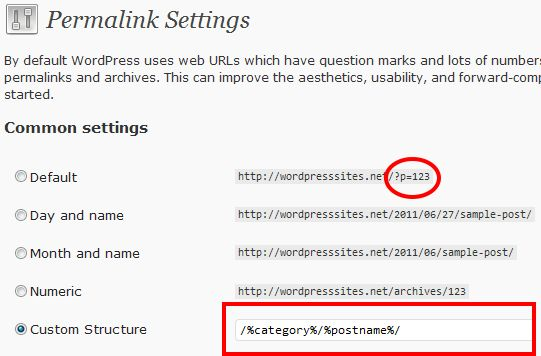
In order to do this, you will need to adjust your permalink structure. This is very straightforward and much cleaner and nicer than the default URL.
1. Go over to the Settings link and click on the Permalinks
2. Select the Post Name option
3. Format your permalinks as: %postname%
4. Save the changes.
Having a well structured permalink gives your post URL a clean and put together look and takes less than a second to do!
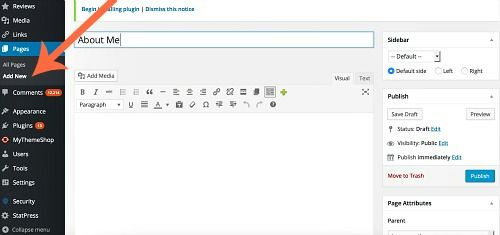
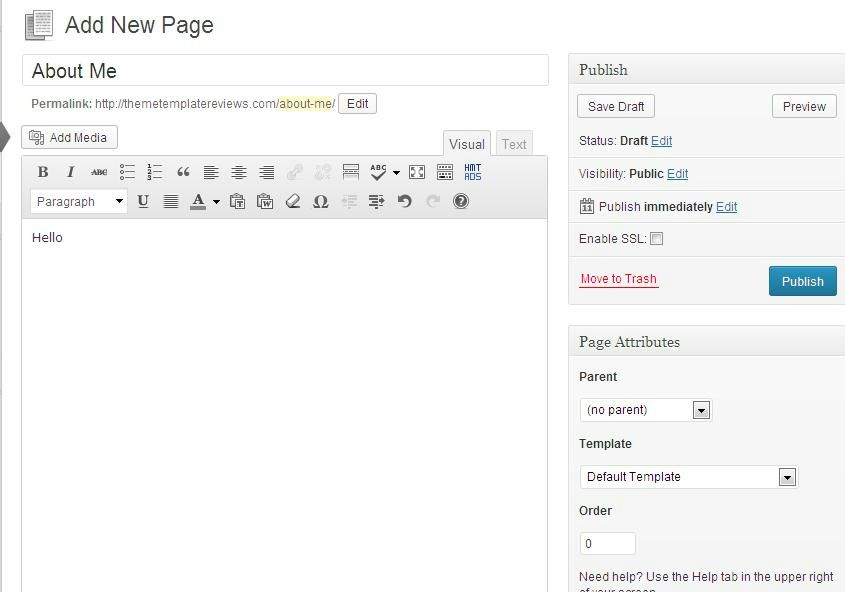
Step 7: Create your About Me Page
Now onto building pages...
Pages are static and will always stay on your website so all that a person has to do is click on the tab to link to a page you've posted. Posts will move down the page with every new blog post published.
Do you really need to create pages? I would have to say yes you do. Why? It makes you more unique and interesting and provides additional information that will always be easily findable via your website's top tabs.
There is a selection of pages you should build especially if you choose to start and maintain a personal website. These include:
- An About Me page is usually the first thing people want to see when they come to your website.
- A further detailed Biography page
- A Past Work page ( if you are building a business/personal website )
- A Contact page that will disclose how people can get in touch with you. You will need to add a contact form for this.
Other pages you probably want to add, (but only if they fit your needs):
- A Portfolio This will allow you to showcase any of the work you have done, this can be anything from content writing, graphic design, web design, interior design etc. You can create this any which way you want, although you may find a theme that is portfolio ready much more suitable.
- A Hire Me page I would strongly suggest to have this as an active page especially if you are a freelance writer, designer or are aspiring to start looking for freelance work. This page itself will tell people what you are looking to do and why you are the best fit for the job.
- A Press page If you have ever been featured or mentioned and you would like to share this with the world, feel free to do so, after all, it helps your credibility!
The decision is yours when it comes to deciding the kinds of pages you would like to have on your website. I am however going to walk you through on how to create an About Me page, and from there you can follow the same steps in order to create the rest.
Make sure that you delete the default WordPress sample page and sample post that are come with your initial website installation. All you have to do is find the post labeled as ' Hello World' ' and ' Sample Page' and send them to the Trash.
When creating your ' About Me' Page...
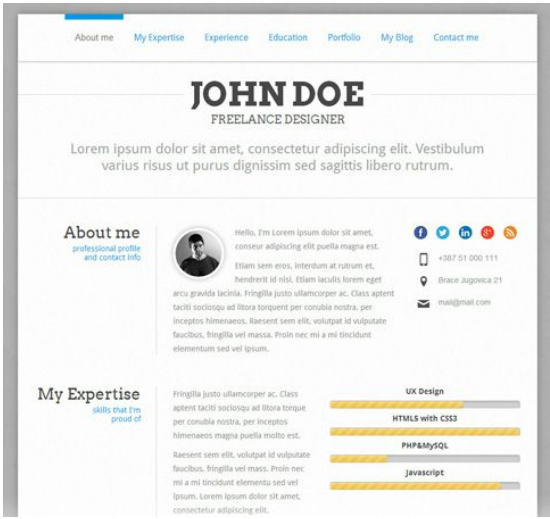
Remember your About Me page is a page that many of your visitors will at one point see. It is also a page that you want to make as interesting as you possibly can. This page will include a short summary of what your website or blog is about, who you are, what you do/study, and where you work or how you make a living. It's also awesome to have a picture or two of yourself and if you are a freelancer, web designer etc. it would be a bonus to have a few words or quotes about your work from past or current clients.
How to setup your ''About Me'' Page on a Personal Website
Since we are creating a personal website as opposed to a blog, the first page you will want your site visitors to see is your About Me page, so it only makes sense to set it up as your main home page!
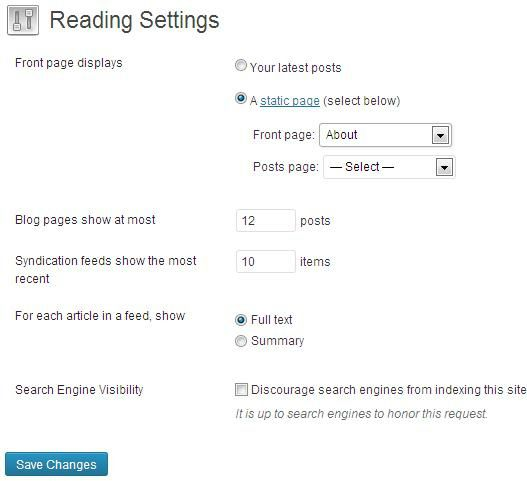
1. On the left dashboard sidebar, scroll down and hover over the Settings option, then click on Reading
2. Where it says Front Page Displays click on the button that reads A Static Page
3. Select your About Me page as the main home page.
4. In the case that you would like a blog on your personal website, all you have to do is to publish a blank page and name it Blog, then set this up as the Posts Page
5. Save all your changes.
You may also like...
-

Digital Marketing for Growth: A Guide for Key Industries Web Design by Vandana ManhasDigital Marketing for Growth: A Guide for Key Industries
Reads:
40Pages:
46Published:
May 2024Are you Looking for the best digital marketing agency in Chandigarh? Social sail is a Chandigarh based leading digital marketing Company in India. We provide ...
Formats: PDF, Epub, Kindle, TXT
-
Nodejs with KOA2 Web Design by Amin B NagpureNodejs with KOA2
Reads:
585Pages:
51Published:
Aug 2016This is the only ebook available on the subject Nodejs with koa2this ebook contains code which worksand how to learn nodejs faster and easy wayafter reading t...
Formats: PDF, Epub, Kindle
-
A Field Guide to Freelancer Finances Web Design by FreeAgentA Field Guide to Freelancer Finances
Reads:
1055Pages:
51Published:
Jun 2016A Field Guide to Freelancer Finances is a free book of practical finance tips by leading designers, developers and FreeAgent.
Formats: PDF, Epub, Kindle
-

17 SEO Myths You Should Leave Behind in 2016 Web Design by Ally Digital Media17 SEO Myths You Should Leave Behind in 2016
Reads:
417Pages:
21Published:
May 2016Started in 2013, Ally Digital Media have helped over 1200+ startup business to grow their business online and is one of the top seo company in Mumbai and Indi...
Formats: PDF, Epub, Kindle