Cubase vst-vst Remote Control Devices by - HTML preview
Download the book in PDF, ePub, Kindle for a complete version.
Remote Control Device Specifics
CM Automation Motor Mix
The CM Motor Mix can control any number of VST channels in groups of 8.
• Fader level, Mute, Solo control the equivalent VST functions.
• Left and right View buttons: selects VST Channels 1-8, 9 -16 etc.
• Top button row (above the rotary knobs) selects channel.
• The two rows of buttons on each side of the faders can be assigned functions in the Device Setup dialog.
All except the Shift button, which acts like [Shift] on your computer keyboard.
• The Rotary knobs are multi-functional, depending on the selected Rotary setting.
The following parameters can be remote controlled with the 8 Rotary knobs:
• Pan
• Effect sends 1-8
• EQ Enable/Freq/Gain/Q
• The first two rows of buttons below the rotary knobs are also multi-functional, depending on the status of the buttons to the left and right of these two rows. Note that the “Group” button is not assigned any parameter.
• EQ Master Bypass
• Insert On
The following parameters can be remote controlled with the 8 buttons on the second row below the rotary knobs:
• Record Enable
• Monitor
• Write Automation
• Read Automation
JL Cooper CS-10
The CS-10 can remote control 32 VST channels (in groups of 8). The following CS-10 controls will remote control the following VST parameter for each channel strip:• Fader: Volume
• Solo and Mute: Solo and Mute
• Sel: Select channel for editing
Dial Parameter
Send 1
Send 2
Pan
Boost/cut Frequency Bandwidth Effect send 1 Effect send 2 Pan
EQ 1 Gain
EQ 1 Frequency EQ 1 Q Factor
• If you hold down the Function key “Shift” and then move a fader, the two indicators beside the fader will indicate whether the fader position is below or above the current fader level in Cubase.
If the upper indicator is lit, the fader position on the panel is above the fader level in Cubase VST and vice versa. When both indicators are dark, the fader positions are matched for that channel.
• The CS-10 Play, Stop, Record, Rewind and Fast Forward transport controls will have the equivalent functionality in Cubase VST.P The CS-10 supports “MIDI Feedback”, allowing the Mute, Solo and selection status of the channels in VST to be indicated on the panel. For this (and the fader position indication described above) to work, you need a two-way MIDI connection between the CS-10 and Cubase VST.
JL Cooper MCS-3000
The MCS-3000 can control 32 VST channels remotely (in groups of 8). The following MCS-3000 controls will remote control the following VST parameter for each channel strip:
• Fader: Volume
• Solo and Mute: Solo and Mute
• Sel: Select channel for editing
The following parameters can be remote controlled for each selected channel using the dials on the MCS-3000 and switching between Pages 1 - 4:
Page 1
Dial Parameter
1 Pan
2 Effect send 1
3 Effect send 2
4 Effect send 3
5 Effect send 4
Page 2
Dial Parameter
1 EQ 1 Gain
2 EQ 1 Freq
3 EQ 1 “Q”
Page 3
Dial Parameter 1 EQ 2 Gain 2 EQ 2 Freq 3 EQ 2 “Q”
Page 4
Dial Parameter 1 EQ 3 Gain 2 EQ 3 Freq 3 EQ 3 “Q”
• You can create Markers by pressing the "Set Locate" key on the MCS-3000, typing in a Marker ID and pressing Return.
• To locate to a Marker, press “Locate”, type in a Marker ID and press Return.
• The MCS-3000 Play, Stop, Record, Rewind and Fast Forward transport controls will have the equivalent functionality in VST.
P The MCS-3000 supports “MIDI Feedback”, allowing fader settings and channel Mute, Solo and selection status to be indicated on the panel. For this to work, you need a twoway MIDI connection between the MCS-3000 and Cubase VST.
Roland MCR-8
P Before you can initiate remote control operation, the MCR-8 “Mode” switch must be set to “4”.The Roland MCR-8 can control 16 VST channels, plus transport control. The “A/B switch” is used to switch between controlling channels 1 - 8 and 9 - 16. The following MCR-8 parameters control the equivalent VST parameters for each channel strip:
• Fader level, Mute, Solo and Pan.The following MCR-8 transport controls control the equivalent VST functions:
• Play, Stop, Record, Rewind, Fast Forward.
P The MCR-8 does not support “MIDI feedback”, that is, the current status of parameters in VST are not indicated on the MCR-8. Therefore, you only need a one-way MIDI connection between the MCR-8 and Cubase VST.
Roland U-8
The U-8 can control up to 8 VST channels and 16 MIDI Track Mixer channels. In addition, it can be used to control the U-8 internal audio processor.P Please refer to the U-8 documentation for detailed descriptions of the U-8 Mixer.
• The U-8 controls the U-8 Mixer when its window is open.
To open the U-8 Mixer window press the Mixer button on the U-8.
When the U-8 Mixer window is closed, the U-8 will remote control the following VST and MIDI Track Mixer parameter for each channel strip:
• Fader: Volume (for VST and MIDI Track Mixer channels)
• Track Status:: Selects VST channel for editing
• Mixer Dial 1: Pan
• Mixer Dial 2: FX-Send 1
• Mixer Dial 3: EQ1 Gain (press the U-8 Shift key to control EQ1 Freq)
• Mixer Dial 3: EQ2 Gain (press the U-8 Shift key to control EQ2 Freq)
• The U-8 Transport keys will have the equivalent functionality in VST.
• To set Markers, hold down "Set" while pressing a Locator key.
• The Time/Value wheel will act as Position-Shuttle.
• Loop will control the Cycle status.
• Auto Punch will control the Punch In status.
• The U-8 supports "MIDI Feedback", allowing for selection and Transport status to be indicated on the panel. For this to work, you need to select the "U-8 Control In" port as input and the "U-8 Control Out" as output.
Tascam US-428
The US-428 can remote control up to 64 VST channels, 64 MIDI Track Mixer channels and 1 or 2 DSP-Factory cards (if installed).• When you select the Tascam US-428 device in the Remote Setup dialog and click OK, the Remote Status window appears.
This indicates which Bank (group of eight channels in Cubase VST) is currently being controlled by the remote device. To select another Bank, use the pop-up menu in the window or use the Bank Left/Right buttons on the remote device.
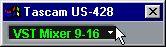
The Remote Status window.
• The US-428 Transport keys will have the equivalent functionality in VST.
• To set Markers, hold down "Set" while pressing a Locator key.
• If you hold down the Function key [Null] and then move a fader, the Select and Rec indicators above the fader will indicate whether the fader position is below or above the current fader level in Cubase.
If the upper indicator is lit, the fader position on the panel is above the fader level in Cubase and vice versa. When both indicators are dark, fader positions are matched for that channel.• The US-428 supports "MIDI Feedback", allowing to Mute/Solo, Channel selection, EQ band, Aux 1 to 4 and Transport status to be indicated on the panel. For this (and the fader position indication described above) to work, you need to select the "US-428 Control" port as input and output.
VST Channel MixerThe following US-428 controls will remote control the following VST parameter for each channel strip:
• Fader: Volume
• Mute/Solo: Mute and Solo (selected via the Solo switch)
• Select: selects channel for editing
• Pan-Dial: Pan
• EQ-Gain
Controls the EQ Gain for each band selected with the Low, LoMid, HiMid and High buttons.. These correspond to the four EQ bands in VST, starting from the leftmost band.
• EQ-Freq
Controls the EQ Freq for each band selected with the Low, LoMid, HiMid and High buttons.. These correspond to the four EQ bands in VST, starting from the leftmost band.
• EQ-"Q"
Controls the EQ “Q” for each band selected with the Low, LoMid, HiMid and High buttons.. These correspond to the four EQ bands in VST, starting from the leftmost band.
The Effect Send levels for Sends 1 to 4.
• The Shuttle wheel will act as Position Shuttle if no Aux send button is selected. Press the activated button to deselect it.
• Holding down the ”Asgn” button and pressing the Low, LoMid, HiMid and High EQ buttons switches the corresponding EQ band “On” button status.
• Holding down the ”Asgn” button and pressing the Aux1 to Aux4 buttons switches the corresponding Effect Send 1-4 “On” button status.
MIDI Track Mixer channels
MIDI Track Mixer channels are named “CTM” Mixer channels in the Remote Status window. The following US-428 controls will remote control the following CTM parameter for each channel strip:
• Fader: Volume
• Mute/Solo: Mute and Solo (selected via the Solo switch)
• Select: selects channel for editing
• Pan-Dial: Pan
The following US-428 controls will remote control the following DSP Factory parameter for each channel strip:
• Fader: Volume
• Mute/Solo: Mute and Solo (selected via the Solo switch)
• Select: selects channel for editing
• Pan-Dial: Pan
• EQ-Gain
Controls the corresponding EQ Gain for each band selected with the Low, LoMid, HiMid and High buttons.
• EQ-Freq
Controls the corresponding EQ Freq for each band selected with the Low, LoMid, HiMid and High buttons.
• EQ-"Q"
Controls the corresponding EQ “Q” for each band selected with the Low, LoMid, HiMid and High buttons.
Controls the Effect Send levels for Sends 1/2 and 5/6.
• Holding down the ”Asgn” button and pressing the Low, LoMid, HiMid and High EQ buttons switches the corresponding EQ band “Bypass” button status.
• Holding down the ”Asgn” button and pressing the Aux1 to Aux4 buttons switches the Effect Sends 1/2 and 5/6 “On” button status.
Yamaha 01V
The Yamaha 01V can remote control either the VST Mixer or the Yamaha DSP Factory if installed (see the separate “Using Cubase with DSP Factory” document for details). Before you can initiate remote control operation, the 01V must be setup in the following way:
• MIDI Parameter Change and Receive must be enabled.
• MIDI Control Change and Receive must be disabled.
• Device ID / MIDI Channel Receive must be set to “1”.
As soon as “Local Control Off” is selected, remote control of the VST Mixer is enabled.
The 01V remote operation of the VST Mixer is very straightforward, with (almost) every VST parameter having the equivalent parameter controller in the 01V mixer. The current status of all controllable parameters are fed back to the 01V and indicated on the panel, using the motorized faders, indicators, etc (for this to work, you need a two-way MIDI connection between the 01V and Cubase VST).
To facilitate 32 channel remote control, two separate control “Layouts” are used, each controlling 16 VST channels. The “Memory” button on the 01V is used to switch between VST Layout 1 and 2 (there are also two Layouts for the DSP Factory - see the “Using Cubase with DSP Factory” document). Page 1 displays VST Layout 1, page 2 VST Layout 2, page 3 DSP Factory Layout 1 and page 4 DSP Factory Layout 2.
P The value ranges for the parameters in the 01V may not match the ranges for the corresponding VST parameters in all cases.The following parameters are remote controllable for Channels 1 - 32 in the VST Mixer:
• Fader level, Mute and Pan.
01V controls for these parameters control the equivalent VST parameters.
• Effect Sends 1 - 6.
01V Aux 1 - 4 controls VST Effect send 1 - 4, 01V Effect 1 and 2 controls VST Effect send 5 and 6.
• EQ Frequency, Gain and Q (4 Bands).
01V controls for this parameters control the equivalent VST parameters.
• Stereo Master Volume.
01V controls for these parameters control the equivalent VST parameters.
• Send Effects Master Volume 1 - 4 are controlled by 01V Aux Master 1 - 4. Send Effects Master 5 and 6 are controlled by 01V Effect Master 1 and 2.
With Layout 1 the 01V controls the following VST channels:
• Channel 1 - 12, 13/14 and 15/16 will control VST channels 1 - 14.
• 01V Return 1 and 2 will control VST channels 15 and 16.
With Layout 2 the 01V controls the following VST channels:
• Channel 1 - 12, 13/14 and 15/16 will control VST channels 17 - 30.
• 01V Return 1 and 2 will control VST channels 31 and 32.
The Generic Remote Device
The Generic Remote device can be used for other remote controllers for which Steinberg has no specific support. These we call generic controllers. If you have a generic MIDI controller, you can use this for remote control of Cubase VST by setting up the Generic Remote device:1. Open the VST Remote Setup dialog on the Options menu.
2. Select “Generic Remote” from the Remote pop-up menu and click OK. The Remote Status window appears (more on this below).

3. Click the Edit button in the Remote Bank Select window.
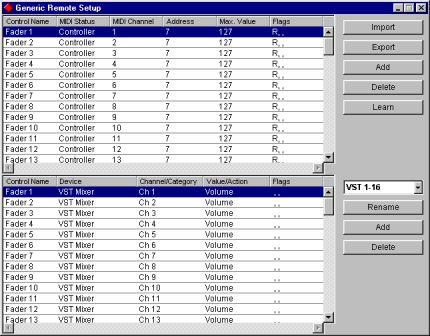
The Generic Remote Setup window appears. This is where you specify which control on your device should control which parameter in Cubase VST.
4. Use the pop-up menu to the right to select a Bank.
The concept of Banks is based on the simple fact that most MIDI devices can control a limited number of channels at a time (often 8 or 16). For example, if your MIDI control device has 16 volume faders, and you are using 32 audio channels in Cubase VST, you would need two Banks of 16 channels each. When the first Bank is selected you control channel 1 to 16; when the second Bank is selected you control channel 17 to 32. Since it is possible to control the MIDI Track Mixer and Transport functions as well, you may need several Banks.
Column
Control Name
MIDI Status
MIDI Channel
Address
Max. Value
Flags
Description
Double clicking this field allows you to enter a descriptive name for the control (typically a name written on the console). This name is automatically reflected in the Control Name column in the lower table.
Clicking in this column pulls down a pop-up menu, allowing you to specify the type of MIDI message sent by the control. The options are Continous Control, Pitchbend, Program Change, Note-On, Aftertouch and Polyphonic Pressure. Also available are Continuous Control NRPN and RPN, a way to extend the available control messages. The “Ctrl JLCooper” option is a special version of a Continuous Controller where the 3rd byte of a MIDI message is used as address instead of the 2nd byte (a method supported by various JL-Cooper remote devices).
Clicking in this column pulls down a pop-up menu, allowing you to select the MIDI channel on which the controller is transmitted.The Continous Controller number, the pitch of a note or the address of a NRPN/ RPN Continous Controller.
The maximum value the control will transmit. This value is used by the program to “scale” the value range of the MIDI controller to the value range of the program parameter.
Clicking in this column pulls down a pop-up menu, allowing you to activate or deactivate three flags:
• Receive - activate this if the MIDI message should be processed on reception.
• Transmit - activate this if a MIDI message should be transmitted when the corresponding value in the program changes.
• If you find that the upper table holds to many or too few controls, you can add or remove controls with the Add and Delete buttons to the right of the upper table.
• If you are uncertain of which MIDI message a certain controller sends, you can use the Learn function:
Select the control in the upper table (by clicking in the Control Name column), move the corresponding control on your MIDI device and click the Learn button to the right of the table. The MIDI Status, MIDI Channel and Address values are automatically set to those of the moved control.
6. Use the lower table to specify which Cubase VST parameters you want to control. Each row in the table is associated to the controller in the corresponding row in the upper table. This is indicated by the Control Name column. The other columns have the following functionality:
ColumnDevice
Channel/Category
Value/Action
Flags
Description
Clicking in this column pulls down a pop-up menu, used for determining which “device” in Cubase VST should be controlled: the Transport, the VST Mixer or the CTM (MIDI Track) Mixer. The special option “Command” allows you to perform certain command actions by remote control. One example of this is the selection of Remote Banks.
If you have a Yamaha DSP Factory card installed, this will also appear as an option on the Device pop-up menu.
Clicking in this column pulls down a pop-up menu, allowing you to select the parameter of the channel to be controlled (typically, if the “VST Mixer” Device option is selected you can choose between volume, pan, send levels, EQ, etc). If the “Command” Device option is selected, this is where you specify the “Action” of the category.
Clicking in this column pulls down a pop-up menu, allowing you to activate or deactivate three flags:
• Push Button - When activated, the parameter is only changed if the received MIDI message shows a value unequal to 0.
• Toggle - When activated, the parameter value is switched between minimum to maximum value each time a MIDI message is received. The combination of Push Button and Toggle is useful for remote controls which do not latch the state of a button. One example is controlling Mute status with a device on which pressing the Mute button turns it on, and releasing the Mute button turns it off. If Push Button and Toggle are activated, the Mute status will change between on and off whenever the button is pressed on the console.
• Not Automated - When activated, the parameter will no be automated.
7. If needed, select another Bank and make settings for this.
Note that you only need to make settings in the lower table for this - the upper table is already set up according to the MIDI remote device.
• If you need, you can add Banks by clicking the Add button below the Bank pop-up. Clicking the Rename button allows you to assign a new name to the currently selected Bank, and you can remove a unneeded Bank by selecting it and clicking the Delete button.
8. When you are finished, close the Generic Remote Setup window.
Now, you can control the specified Cubase parameters from the MIDI remote device. To select another Bank, use the pop-up menu in the Remote Status window (or use a control on the MIDI remote device, if you have assigned one for this).
The Export button in the upper right corner of the Generic Remote Setup window allows you to export the current setup, including the Control configuration (the upper table) and all Banks. The setup is saved as a file with the extension “.xml”. Clicking the Import button allows you to import saved Remote Setup files.
• The last imported or exported Remote Setup will automatically be loaded when the program starts or the Generic Remote control is selected in the Remote Setup dialog.
You may also like...
-

Facebook Domination: The Secret Strategy for Unlimited Free Traffic Tutorials by James FunicelloFacebook Domination: The Secret Strategy for Unlimited Free Traffic
Reads:
92Pages:
32Published:
Apr 2024Master Facebook marketing with this e-book, designed to teach you how to drive significant traffic without ads. Learn from actionable strategies and insights ...
Formats: PDF, Epub, Kindle, TXT
-

Autopilot+ - How to passively make $1000 a day with a 5 minutes setup Tutorials by Adribus TedAutopilot+ - How to passively make $1000 a day with a 5 minutes setup
Reads:
543Pages:
30Published:
Nov 2022With this eBook, you will learn how to make thousands of dollars daily with a very easy one-time setup. Enjoy!
Formats: PDF, Epub, Kindle, TXT
-

BILD 9 Tutorials by Kista GrundskolaBILD 9
Reads:
46Pages:
50Published:
Aug 2021Art tutorials grade 9. A step by step guide to drawing, painting, sculpting, analyzing within the curriculum of Art in Swedish public school.
Formats: PDF, Epub
-

BILD 8 Tutorials by Kista GrundskolaBILD 8
Reads:
28Pages:
48Published:
Aug 2021Art tutorials grade 8. A step by step guide to drawing, painting, sculpting, analyzing within the curriculum of Art in Swedish public school.
Formats: PDF, Epub