Cubase vst-Tape Tracks-Controlling Tape Recorders by - HTML preview
Download the book in PDF, ePub, Kindle for a complete version.
Standard MIDI Machine Control
If you have a tape transport that supports the MIDI Machine Control standard, proceed as follows:1. Connect the MIDI Out on the tape recorder to a MIDI In on your interface.
2. Connect the MIDI In on the tape recorder to a MIDI Out on your interface.
4. Also make sure the tape recorder is set to transmit and receive MIDI Machine Control commands.
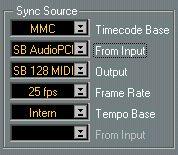
5. Pull down the Options menu and select “Synchronization...”.
6. Pull down the “Timecode Base” Sync Source menu in this dialog box and select MMC. If you can’t find the correct option on the menu, the driver hasn’t been loaded for some reason. 7. Use the “From Input” pop-up menu below “Timecode Base” to select the correct MIDI Input.
8. Use the Output menu to select to which MIDI port Cubase VST should send its MIDI Machine Control messages.
9. Select the correct frame rate from the “Frame Rate” pop-up menu.
 MMC driver activated.
MIDI port selected for sync input.
MIDI port selected for MMC output.
The Frame Rate should be set to match the Timecode on the tape (in this example 25 fps)
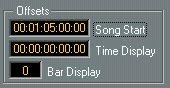
Tempo sync should be deactivated.10.Set the “Song Start” value to the position on the tape where you want Cubase VST to start (the reference to Song Position 1. 1. 0).
 11.Close the dialog box.
The Song Start should be set to match the position on the tape where you want the Song to start.
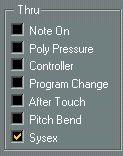
12.Open the MIDI Filtering dialog and make sure the MIDI Machine Control System Exclusive messages are not echoed back to the tape recorder.
 13.Close the MIDI Filtering dialog.
System Exclusive should not be Thru-put.
14.Click on the Sync button on the transport bar (or press [ X]).
Cubase VST is now expecting sync to come from an external source, in this case the tape recorder.
The tape recorder should wind the tape to a position just before the Song Position in Cubase VST and go into Play. After a short while, Cubase VST should start, in sync.
Try to Stop, Fast Forward and Rewind from Cubase VST and activate Play from different positions in the Song. The tape recorder should follow. Record something sequenced from Cubase VST onto an audio track and make sure that what you hear “live” from Cubase VST and taped on the tape recorder is in perfect sync from all positions.
Things to note before proceeding
• Make up a DEF.ALL Song or a DEF.SET setup, with all sync settings as they are now. This will make Cubase VST control the tape recorder right after startup.
• When you record the next song on the tape, advance the “Song Start” value to a position that corresponds to some position on the tape after this first song. By doing so you have shifted forward Cubase VST’s Song Position 1. 1. 0 to that position. When you later save this second Song, this “Song Start” value is saved with it so that the tape recorder always will wind to the correct position for this Song.
• Each time you start up your tape recorder, you may have to activate play from its front panel for a couple of seconds. If you don’t, Cubase VST has no chance of “knowing” where to wind the first time, since it doesn’t know what Timecode is recorded on the tape.