Cubase vst-Modules by - HTML preview
Download the book in PDF, ePub, Kindle for a complete version.
Working with the Auxiliary Bank
P Before starting to work with the Auxiliary Bank, make sure the Main Bank contains a current set of the Patches in your device, so that you can get them back. This is because when you are using the Auxiliary Bank you are actually reprogramming your devices with new settings.
One of the intentions of the Studio Module is to facilitate assembly of new Banks of Patches from Banks you might have on memory cards or on disk. One of the tools for achieving this is the Auxiliary bank.
P You can only use the Auxiliary Bank with devices which support reprogramming of individual Patches, via MIDI. If a certain device doesn’t, the Aux button (see below) will be greyed out.
You can switch between the main Bank and the Auxiliary one by using the Main/ Aux buttons at the top of the window. These will show a ">" sign to the left of the name if Patches are loaded into memory.
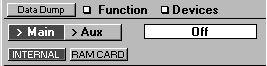 The Main Bank will show an "n" if only names are loaded.
The Auxiliary Bank is actually quite different from the Main Bank:
• If you use the Auxiliary Bank with a multitimbral device, please note that it can only handle "Single Patches", that is single basic sounds, not combinations of sounds. However, for effect units etc. which only handle one type of Patch ("single"), it works like the Main bank in this respect.
• The Auxiliary Bank cannot be loaded with names only. It always contains complete Patches (including names if the device supports it).• When you click on a Patch in the Auxiliary Bank, the complete settings of the Patch is sent out to the device. If the device has a "buffer" – an area of memory where Patches can be put temporarily – it will wind up there. If the device doesn’t have a buffer, the current Patch will be reprogrammed with the settings sent out, so beware! (see below for more details).
Opening and Saving a Bank
To load a Bank of Patches into the Auxiliary Bank, use the pop-up Function menu and select Open. The file selector that appears defaults to show only files which contain settings from the devices you are editing. But if you change the extension to ".MEM" you can extract settings out of a Total Recall file. See page 143 for details on File Handling.
The Aux Bank and the Data Dump window
You can use MIDI to get Patches into and out of the Auxiliary Bank, just as with the Main Bank. Just select the Aux Bank, click the Data Dump button and proceed as normal. Switching over to the Data Dump window also allows you to erase the entire Aux Bank.
Sending Out a Patch
When you click on a Patch in the Aux Bank, all its settings are sent out. This can have two effects, depending on the capabilities of the device:• The Patch is sent to the "edit buffer" of the device where you can try it out directly. This means none of the other Patches will be overwritten, but you if you wish to keep the Patch, you have to manually save it using the front panel of the device.
• The selected Patch in the device gets “reprogrammed” with the settings of the Patch you clicked on. This occurs if the device has no edit buffer.P From the Auxiliary Bank you do not select between existing Patches in the device, as you do from the Main Bank.
The way you would use this feature is when you're hunting for the perfect Patch in a number of disk banks. Just load a Bank, and try out the Patches by clicking on them. As with the Main Bank, there can be a ">" sign or a star in the Aux button to aid you in finding out if the window is "in sync" with the device.
 In Sync Out Of Sync
If you want to go back to the Patch you had originally, switch back to the Main Bank, and hold down [Ctrl] and click on it. This will send out the settings in this Patch to the device, to reprogram it.