Cubase vst-Modules by - HTML preview
Download the book in PDF, ePub, Kindle for a complete version.
"Generic" and "Any Dump"
These two drivers are used when you wish to Receive and Send data, but no specific driver exists for a device.Any Dump
This driver has ANY_DUMP as a file name and is located in the UNIVERSAL directory in the GENERIC directory among the device drivers that come with the Studio Module.Any Dump is a pretty simple driver. It assumes the device only supports System Exclusive dumps by pressing buttons on the front panel. By adding it to the Setup list several times, renaming it each time, you can use it with several devices in your rig.
Any Dump does not have a Patch Manager window since it only handles "bulk" Data Dumps. Therefore, if you try to open the Patch Manager for this device, you instead get the Data Dump Window. This driver is best suited for creating "safety copies" of the settings in a device.
Any Dump has four Data Types, so you can receive up to four System Exclusive Dumps in "one go". When you select Receive (see page 127 for details), a dialog appears asking you to initiate the transfer from the device's front panel.
When you are done, press any key. If you have more than one Data Type activated in the list, you will be prompted for the next, until all are done.
P Please note that this will only work if the device does not require handshaking. However, if the device supports dumping from the front panel, it probably won't require handshaking.
Generic
This driver allows you to (with a little effort) automate a data dump for a device for which there is no specific driver. The following description assumes you have some experience with MIDI System Exclusive messages.
1. In Setup, make all the settings for the driver, as you would with any other.• You can set the number of "Child MIDI Channels" for the device if it is multitimbral. It will then have as many Child Instruments as you define here.
2. Rename the driver to the name of your device. Make up a Short Name and type in a file extension of your choice.
3. Select Extended setup from the pop-up Options menu. The Dump Definition dialog appears.
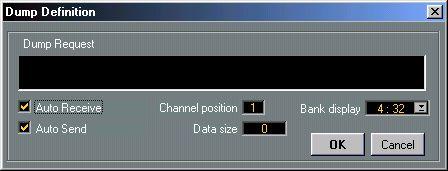
4. If you wish to create an automatic "Receive" operation, activate the Auto Receive option and fill out the Dump Request, as described below. If you leave Auto Receive unticked, this driver will behave like Any Dump, see above.
5. Click in the text field and type in the bytes that make up the message. Separate the bytes with commas.• The message you are trying to create should be a System Exclusive message (beginning with F0 and ending with F7) that makes the device dump some or all of its settings via MIDI. To find out exactly what to input you will have to look in the device's System Exclusive implementation documentation.
• Note that this assumes a dump can be performed without a handshake. If handshaking is required, this will not work!
6. To define where in the Dump Request message the Studio Module should insert the
MIDI Channel specified in the Setup dialog, use the Channel Position value. If you set this to 0, no Channel number will be inserted, the dump will be sent out exactly as typed in. If you set this to any other value, the byte specified will be modified so that the least significant nibble (the right hex character) will be replaced by the MIDI Channel value entered in the Setup dialog.
7. In the Data Size field, enter the size of the dump you will receive. If you don't know this number, you may enter "0", but then you will manually have to "tell" the Studio Module when the entire dump has been received, as with Any Dump, see above.
8. If you want the dump to be sent out automatically during for example a Total Send, activate Auto Send. If you'd rather have the Studio Module prompt you to, for example, manually put the device in a mode where it expects to receive a dump, leave this option unticked.
9. Finally, use the Bank Display pop-up to indicate how your device organises its Patches (this is for selecting Patches from the Patch Manager, see below), in for example one group of hundred Patches (1:100), in four groups of 32 Patches (4:32), etc.
10.Click OK to close the window.If you used all the features of this driver, it will automatically get data from your device when you perform a total Receive or when you use the Data Dump window to "manually" Receive a dump. It will also be able to send out data during a Total Send.
In the Patch Manager, you will get a number of empty cells, which you can name yourself (after performing the dump! Not before!). Clicking on them will send out the corresponding Program Change message (see page 115). This will allow you to select Patches by name. Saving the Bank will save the data and the names.