Cubase vst- Getting into the Details by - HTML preview
Download the book in PDF, ePub, Kindle for a complete version.
Adding and Editing Match Points
What are Match Points?
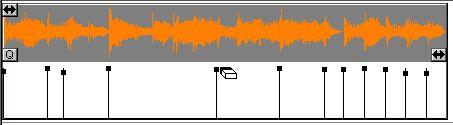
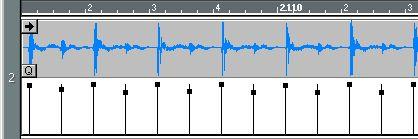
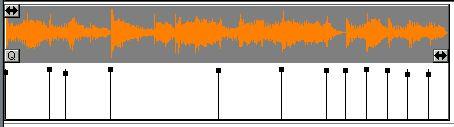
Match points, or M-Points, are “markers” within an Audio Event, used to indicate significant positions in your Audio file. Furthermore, they contain information about the “velocity” of the audio at the positions they indicate. Match Points are used for comparing and combining the timing of recorded audio with the timing of recorded MIDI material in various ways. Therefore, the goal is most often to get M-Points on all “beats” in the recorded audio. The picture below shows a drum pattern, with MPoints displayed. Note that the horizontal positions of the Match Points coincide with the peaks in the audio - the “beats”.
Note that the horizontal positions of the Match Points coincide with the peaks in the audio - the “beats”.
The velocity values of the Match Points (indicated by the vertical position of the black squares) correspond to the level of each audio peak.
 Match points have the following uses:
 • Matching tempo to audio.
• Matching audio to tempo.
• Making groove templates by extracting timing and velocity from recorded audio.
• Match quantizing MIDI Parts to Audio Parts, Audio Parts to MIDI Parts or even Audio Parts to other Audio Parts (after using “Snip at M-points”).
Displaying the M-Points
1. Pull down the View pop-up menu.2. If the Dynamic Events item is not ticked, select it.
This will make the lower halves of the Events show dynamic data (M-Points, Volume or Pan). 3. Pull down the pop-up menu to the right of the Ed Solo button menu and select MPoints.
Adding M-Points automatically
Cubase VST can automatically analyze the Audio Event for you, find the “important” positions and create M-Points:1. Select the Event.
2. Pull down the Do pop-up menu and select Get M-Points.
A dialog box appears, where you can make various settings for how the Match Points should be calculated (described on page 593).
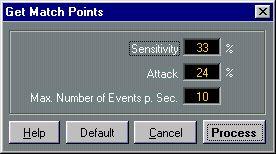 For now, click on the Default button. This will make the program use default settings, which quite often work well.
3. Click Process.
Match Points are calculated and added to the Audio Event.
Adding M-Points manually
You may also add M-Points manually, if for example you find that the automatic MPoint detection doesn’t find all the “important” beats in the audio.In this case, you may want to add M-Points for some of the beats in the audio.
1. Set Snap to a value of your liking.
This affects on which positions you can place M-Points, just like when adding Events in a MIDI editor. On many occasions it may be best to turn Snap off, to be able to freely move created M-Points.
3. Hold down [Alt] on the computer keyboard and click where you want the M-Point(s).
Editing M-Points
Sometimes you may want to move Match Points to make them better coincide with the beats in the audio. It may for example happen that the automatic Match Point detection positions an M-Point too early, due to “double” drum hits, diffuse sounds etc. If that is the case, you can easily move the Match Points:
• If you want to move an existing Match Point or change the vertical position of the black square (i.e. the velocity value), click on it with the Pencil and drag it up/down or sideways.
The Snap value applies for which positions you can move the value to. Since the audio material is probably not perfectly correlated to the playback tempo, it is often best to turn Snap off when moving M-Points.
• If you want to make sure the Match Point isn’t moved left/right, hold down [Shift]. This also makes the value change in smaller steps.Deleting M-Points
If you find that the Match Point detection finds too many M-Points in the audio, you may want to delete some of them:1. Select the Eraser tool.
2. Click on the black square of the Match Point you want to delete.