RH-45 AUTO (Superficial) Modular Rockwell Hardness Tester by G & R Technology - HTML preview
Download the book in PDF, ePub, Kindle for a complete version.
1. Technical Specifications
Main unit specifications
|
|
RH-150AUTO |
RH-45AUTO |
|
Preliminary Load Kg(N) |
10 (98.07) |
3 (29.42) |
|
Total Test Force Kg(N) |
60, 100, 150 (588.4, 980.7, 1471) |
15, 30, 45 (147.1, 294.2, 441.3) |
|
Test Scale |
A, B, C |
15N, 30N, 45N 15T, 30T, 45T |
|
Test Load Control |
Load Cell Based Feedback Loop System |
|
|
Test Cycle Type |
Motorized (Auto Load, Test and Return) |
|
|
Standards Compliant |
ASTM E18, ISO 6508, ASTM E140 |
|
|
Resolution |
0.1 HR |
|
|
Data Output |
Bluetooth (to Printer ), USB (to PC) |
|
|
Data Memory |
1000 Test Results |
|
|
Battery |
Rechargeable Li-ion Battery Work Time 6 hours Charge Time 2 hours |
|
|
Weight |
2 Kg |
|
|
Dimensions |
200mm X 110mm X 46mm |
|
|
Relevant Directives |
EC Machinery Directive (98/37/EC) EC Electromagnetic Compatibility Directive (89/336/EEC) |
|
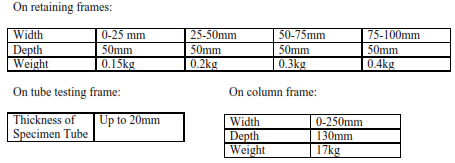
Test Specimen Ranges
2. Check Package
The RH-45AUTO is available in two different packages, each containing different frames and accessories. Upon purchase, please find the correct package list below and check if all listed accessories are included.
Package 1: Column style stand package:
RH-45AUTO measurement component
Diamond indenter
1/16" ball indenter
20-35HRC test block
59-65HRC test block
60-90 HRBW test block
Hex key
11.1V rechargeable battery
12.6V/1.2A battery charger
Column style stand
Fastening fixture
16mm Socket Wrench
60mm plane anvil
60mm V-type anvil
Bluetooth printer and 8.4V/0.8A charger (optional)
Package 2: Retaining frames package:
RH-45AUTO measurement component
Diamond indenter
1/16" ball indenter
20-35HRC test block
59-65HRC test block
60-90 HRBW test block
Hex key
11.1V rechargeable battery
12.6V/1.2A charger
0-25mm retaining frame
25-50mm retaining frame
50-75mm retaining frame
75-100mm retaining frame
Tube-testing frame
self-aligning flat anvil
self-aligning V-type anvil
30mm flat anvil
30mm V-type anvil
Plastic case
Bluetooth printer and 8.4V/0.8A charger (optional)
3. Functional Description
Figures 1 and 2 illustrate the RH-45AUTO hardness tester.
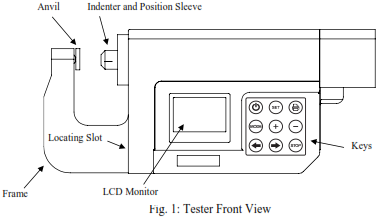
1. LCD Monitor: displays test results, operation descriptions, and prompts.
2. Keys
 key: power on/off. Note: the RH-45AUTO hardness tester has a power save function: it will automatically turn off if inactive for 5 minutes.
- Function keys: SET, MODE,
 ,
,  : these keys are used for various operations as indicated on the LCD monitor.
 -
 key: Bluetooth transmission - press this key to send data to the printer.
 -
 key: begins test and moves indenter forward.
 -
 key: moves indenter backward.
 - STOP key: stops indenter’s movement.
3. Indenter and position sleeve: the indenter penetrates into the test specimen. The position sleeve holds the indenter and measures the penetration depth. The position sleeve and presshead both have marked lines. You need to line them up when inserting the position sleeve with indenter into the presshead hole. Then rotate the sleeve to lock it in the presshead.
4. USB connector: connects tester to an USB cable.
5. Charging port: for charging the battery
6. Anvil: holds the test specimens. Different types are available.
7. Locating slot: attaches frames with socket-head screws
8. Frame: holds the anvil. Different frames are available to accommodate different specimen sizes and shapes.
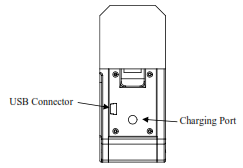
Figure 2: Tester Side View
Available Frames:
1. Retaining frames: the main unit and the retaining frames form a portable hardness tester. The retaining frames have different sizes: 0-25mm, 25-50mm, 50-75mm, and 75-100mm.
2. Tube testing frame: the main unit and the tube testing frame form a portable tube hardness tester.
3. The column frame: the main unit and the column frame form a stand hardness tester. There are a fastening fixture and an anvil on the stand. Attach the tester onto the fastening fixture. To change the height of the tester, unscrew the fastening fixture from the stand, remove it from its slot, and insert it into another slot. Place the test specimen on the anvil. Fine tune the height of the anvil by twisting it. The column stand can be placed in a vertical position or horizontal position.
4. Testing principle and procedure
Press the key to power on the tester. Then, place the test specimen between the anvil and indenter. Then, press the  key once to move the indenter towards the test specimen. As the indenter is moving, you can press the STOP key to stop movement. Press the key again to resume movement.
When the indenter pushes against the test specimen, the position sleeve will clamp the test specimen. Then, the indenter's tip will penetrate into the test specimen, creating an indentation.
The indenter will continue to move and apply a force on the test specimen. When the force reaches the preliminary test force F0, the indenter stops moving, wait for a specified dwell time. The tester then measures the indentation depth on the test specimen.
After waiting, the indenter will move again and further deepening the indentation. When the applied force reaches the total test force F, the indenter stops moving and waits a specified dwell time.
After waiting, the indenter moves away from the test specimen, and decreases the force it applies on the test specimen. When the applied force decreases back to the preliminary test force F0, the indenter stops moving and waits for a specified dwell time. The tester then measures the larger indentation depth on the test specimen.
The tester analyzes both indentation depths to calculate the hardness of the specimen. The LCD displays the hardness reading. Finally, you can print the readings to a Bluetooth printer.
5. Pre-Treatment of the Test Piece
Preparation of the test piece surface prior to testing will help insure accuracy.
a. The test should be carried out on a clean surface that is free from oxide scale, foreign matter, and especially lubricants.
b. Preparation should be carried out in such a way that minimizes alteration of the surface hardness (for example, heat or cold-working).
c. The thickness of the test piece should be no less than 0.08 in (2mm).
d. The test piece should have a smooth even surface. The test surface should be polished so that a metallic luster appears. Measurement errors could result from the roughness of the test surface. The roughness (Ra) of the surface must be limited to  1.6 µm.
6. Basic Operations
Powering on the device
Press the key to power on the tester. The LCD will display the main window, which will show the previous test reading:
Set Up a New Test
1. At the main window, press the SET key to start and set up a new test. You will now select the operating parameters. The LCD monitor will prompt for a number of test results in a test group:
2. Press the or keys repeatedly to change the number of test groups per reading. Then press the SET key to input that number and select a testing scale.
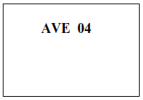
3. The LCD monitor will now prompt for a test scale. Press the key repeatedly to cycle through N45, N30, N15, T45, T30, or T15. Each scale has a unique window shown below:
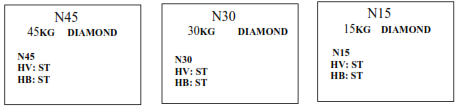
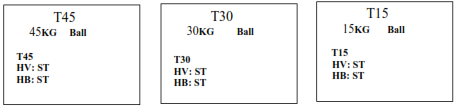
Abbreviation: ST----Steel
4. Each scale’s window prompts for test piece material for converting readings. Press the MODE key repeatedly to cycle through conversion values in Vickers (HV), Brinell (HB). The selected parameter will flash. Note: Only steel (ST) is currently supported for conversion.
5. Press the SET key to return to the main window:
Testing Procedure
1. As an example, we will perform an N45 test. Ensure the diamond indenter is placed in the tester. If not, twist the position sleeve until its notch lines up with the notch on the cylinder:
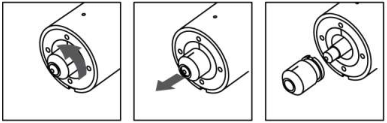
Then pull out the sleeve and replace the indenter with the correct one:
Reinsert the sleeve and twist to lock the sleeve:

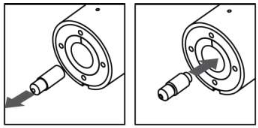
2. Starting in the main window, place the test specimen between the indenter and anvil. Then, press the  key to move the indenter towards the test specimen. (While the indenter is moving, you can press the STOP key to stop the indenter, and then press the key again to resume moving.)
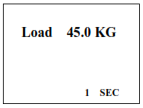
3. The indenter will apply a preliminary test force on the test specimen, then stop moving for a specified dwell time. (The LCD monitor displays a timer for elapsed dwell time). The LCD monitor displays this screen:

4. After the dwell time elapses, the indenter automatically resumes moving and applies more force until the force reaches the load force. Then, the indenter stops moving and pauses for a specified dwell time. The LCD monitor displays this screen:
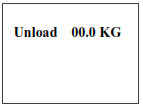
5. After the pause, the indenter automatically moves backwards and decreases the force it applies on the test specimen until the force decreases back to the preliminary test force. Then the indenter stops moving and pauses for a specified dwell time. The LCD monitor displays this screen:

6. After the pause, the indenter continues to move backwards away from the test specimen. You may remove the specimen. The LCD monitor displays this screen:
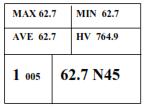
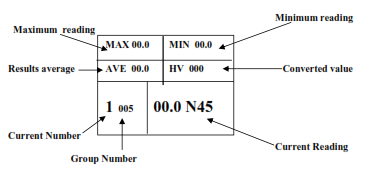
Finally, the LCD monitor will display the test reading:
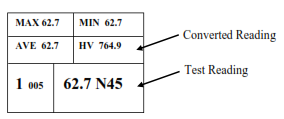
Note: Do not touch test specimen during testing, otherwise the test reading will be affected.
Search & Delete Test Readings
1. Search through readings in current test group
From the main window, press the key to search and cycle through the test readings in the current group. If you want delete the currently displayed reading, press the key. The reading will be deleted from memory and you will return to the main window. The LCD monitor now displays the previous test reading. If you want to return to the main window without deleting anything, press the SET key. The previous test reading will be displayed.
2. Delete current test result
From the main window, press the key to delete current test result.
Transmit Data to Printer
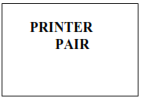
1. First, power on the Bluetooth printer. Press the key to start the transmit procedure. The tester will then attempt to pair with the printer, and the LCD window will flash “PAIR”:
2. When both the tester and printer have been paired, the LCD window will display the current test group number. Press the  or
or  keys to cycle through and select the group number you wish to print.

Press the key again to transfer the selected data to the printer.
If the printer successfully receives the data, it will print the readings and the tester will return to the main window.
If the printer did not receive the data, the tester’s LCD monitor will display:
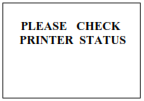
After 30 seconds, RH-45 hardness tester will return to main window. Check if the printer is powered on or operational and try transmitting again.
Transmit Data to Windows PC
Initial PC Setup:
Download the Windows driver from the G & R Technology website.
Download and install the program Putty from http://www.chiark.greenend.org.uk/~sgtatham/putty/download.html
1. Insert USB cable into the tester’s USB port.
2. Repeatedly press the MODE twice until the LCD window will display “USB TRANSFER”
3. A prompt on your Windows 7 Computer will appear, saying drivers are not installed
4. Enter your Windows 7 control panel. Make sure you are viewing by icons, not category. Run device manager.

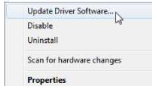
5. Locate and expand “Other devices.” MSP430-USB Example should appear with a yellow exclamation mark.
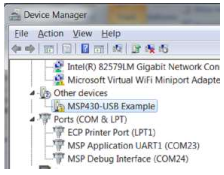
6. Right click on this and select “Update Driver Software.”
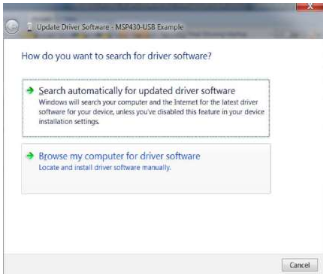
7. Windows will now search for drivers for the RH-45AUTO. Press “Browse my computer for driver software.”
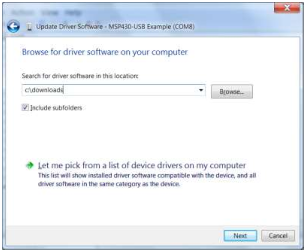
8. Locate the directory which contains the driver downloaded from the G & R Technology website.
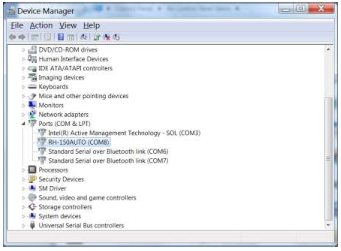
9. The RH-150AUTO is now assigned a COM number. Take note of this number.
10. Unplug the USB cable and install the
You may also like...
-

Engineering Mindset for Early-Career Developers Technology by Moyinoluwalogo O. MayowaEngineering Mindset for Early-Career Developers
Reads:
16Pages:
98Published:
Mar 2026Start thinking like an engineer - not just a coder. Engineering Mindset for Early-Career Developers shows how to approach problems, systems, and collaboration...
Formats: PDF, Epub, Kindle, TXT
-

Mobile App Development with WordPress Backend: A Practical Guide to REST API Integration Technology by SanjayMobile App Development with WordPress Backend: A Practical Guide to REST API Integration
Reads:
25Pages:
40Published:
Aug 2025Build high-performance mobile apps using WordPress as a powerful backend system with this actionable guide. Whether you're working with React Native or Flutte...
Formats: PDF, Epub, Kindle, TXT
-

What’s This Thing Called A Quantum Computer? Technology by Michael McNaughtWhat’s This Thing Called A Quantum Computer?
Reads:
35Pages:
31Published:
Jul 2025"What is this Thing Called a Quantum Computer?" offers a clear and engaging introduction to quantum computing. It explains core quantum mechanics principles, ...
Formats: PDF, Epub, Kindle, TXT
-

AGI Blueprint Visual Thought, Meta-Cognition & Human-Level Architecture - 2025 Technology by Derek Van DervenAGI Blueprint Visual Thought, Meta-Cognition & Human-Level Architecture - 2025
Reads:
15Pages:
46Published:
May 2025This document presents a complete blueprint for an advanced multimodal cognitive architecture designed to enable true Artificial General Intelligence (AGI).Th...
Formats: PDF, Epub, Kindle, TXT