
How to Make a Podcast with 1 Million Subscribers by Taha Atef - HTML preview
Download the book in PDF, ePub, Kindle for a complete version.
Chapter 6: Recording Your Podcast
How to record a high quality podcast?
When it comes to podcasting, recording high-quality audio is essential. No matter how captivating your content is, poor sound quality can turn listeners away faster than you can say "subscribe." But don’t worry recording professional-grade audio isn’t about having the fanciest studio or the most expensive gear. It’s about making smart choices and setting yourself up for success. Let’s dive into the steps and tools that will help you create a podcast that sounds just as good as the ones topping the charts.
The Recording Environment: Creating Your Podcast Studio Anywhere
First things first: you don’t need a professional studio to record high-quality audio.
You can transform almost any space into a decent recording environment with a few smart adjustments. The goal is to reduce echo, minimize background noise, and make your voice sound rich and full.
Here are a few practical tips to get your recording environment right:
1. Pick a Quiet Spot: This sounds obvious, but it’s critical. Find the quietest room in your home, away from traffic noise, appliances, or anything else that can create background noise. Bedrooms are often a good choice because
carpets, beds, and curtains naturally absorb sound.
2. Soundproofing on a Budget: You don’t need expensive foam panels to soundproof your space. Use what you already have! Blankets, pillows, and
thick curtains can absorb sound reflections. You can even record in your closet surrounded by clothes, your voice will sound much clearer.
3. Avoid Hard Surfaces: Sound bounces off hard surfaces like walls, floors, and ceilings, creating an echo. To combat this, cover these surfaces as much as possible. Lay down a rug, hang some blankets on the walls, and close any
doors to keep sound from escaping.
Remember, your recording environment doesn’t have to be perfect—it just needs to reduce as much echo and noise as possible. Sometimes, even small changes can make a big difference.
Choosing the Right Equipment: Tools That Make a Difference
Let’s talk gear. While it’s true that you don’t need a ton of equipment to get started, the right tools can significantly improve the quality of your recordings. Let’s break down the essentials.
Microphones: Your Voice’s Best Friend
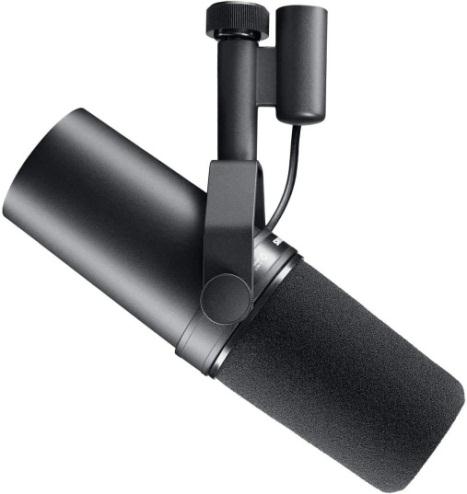
The microphone is the heart of your setup, so investing in a good one is crucial.
Here’s what to look for:
1. Type of Microphone: For podcasting, the two most common microphone types are dynamic and condenser.
o Dynamic Microphones: These are durable and great for blocking out background noise, making them a solid choice if you’re recording in a less-than-ideal environment. The Shure SM7B is a popular dynamic mic that delivers professional sound. Although on the pricier side, it’s worth every penny if you want crisp, clear audio.
o Condenser Microphones: If you’re
recording in a quiet space, a condenser
mic will pick up the nuances of your
voice, giving it a more detailed sound.
The Audio-Technica AT2020 is a highly-rated condenser mic that
balances affordability with excellent
audio quality.
2. USB vs. XLR: For beginners, USB
microphones are an easy, plug-and-play solution. The Blue Yeti USB
Microphone is a favorite for many podcasters because of its versatility and user-friendliness. If you’re more advanced or plan to upgrade your setup,
consider an XLR microphone like the Rode NT1-A, which offers superior sound quality but requires an audio interface (more on that below).
Headphones: Monitoring Your Audio
Good headphones are essential for monitoring your audio while recording. They help you catch any unwanted noise or distortion right away. Here’s what to look for:
Closed-Back Headphones: These are ideal for podcasting because they prevent sound from leaking out and being picked up by your mic. The Audio-Technica
ATH-M50x is a great choice comfortable, durable, and widely used in both podcasting and music production.
Audio Interfaces: For XLR Microphones
If you opt for an XLR microphone, you’ll need an audio interface to connect it to your computer. An audio interface converts the analog signal from your mic into a digital one that your computer can process. The Focusrite Scarlett 2i2 is a top-rated interface that’s easy to use and offers fantastic sound quality.
Recording Software: Your Digital Workspace
Once you’ve got your gear set up, it’s time to choose the software that will capture your voice. Thankfully, there are plenty of user-friendly options that won’t overwhelm you with complicated features.
1. Audacity: A favorite among beginners, Audacity is a powerful open-source audio editor that’s completely free. It’s perfect for recording and editing your podcast, and there are tons of tutorials available online to help you get the hang of it.
2. GarageBand: If you’re a Mac user, GarageBand is an excellent free option.
It’s easy to use, and its built-in tools make editing a breeze.
3. Adobe Audition: For those looking to step up their game, Adobe Audition is a professional-grade audio editing software. It offers advanced features for those who want more control over their sound, but it comes with a steeper
learning curve—and a subscription fee.
Techniques for a High-Quality Recording: Getting It Right Every Time
Now that your gear and software are ready, let’s talk technique. Even the best equipment won’t save you if you’re not using it correctly. Here’s how to make sure your recordings sound great every time.
Mic Placement
Where you place your microphone can make a huge difference in the quality of your recording. Keep these tips in mind:
Distance: Position your microphone about 6-8 inches away from your mouth. Too close, and you’ll get distorted sound; too far, and your voice will sound distant.
Angle: Point the mic slightly off-center to avoid plosive sounds (those harsh “p” and
“b” sounds).
Pop Filter: Use a pop filter or foam cover to reduce plosives and other unwanted noises. The Aokeo Professional Microphone Pop Filter is a great budget-friendly option.
Voice Technique
Your voice is your instrument, so it’s worth learning how to use it effectively. Here are some quick tips:
Speak Clearly and Confidently: Your audience is here for your voice, so make sure they can hear and understand you. Practice speaking clearly, and project your voice without shouting.
Stay Hydrated: Drinking water before and during your recording can help keep your voice clear and reduce mouth noises like clicks and pops.
Warm Up: Just like a singer warms up before a performance, take a few minutes to warm up your voice. Try humming or doing vocal exercises to loosen up your vocal cords.
Minimizing Background Noise
Even with a quiet space and good equipment, background noise can still creep in.
Here’s how to keep it to a minimum:
Turn Off Electronics: Before you start recording, turn off anything that makes noise fans, air conditioners, and even your phone.
Watch for External Noises: Listen for sounds outside your control, like traffic or barking dogs. If you can, pause your recording until the noise stops. If not, consider recording at a different time.
Post-Recording Best Practices: Polishing Your Audio
Recording is just the beginning. To ensure your podcast sounds professional, you’ll need to do some post-production work. But don’t worry this doesn’t have to be overly complicated.
Basic Editing
Editing is where you clean up your recording, removing any mistakes, long pauses, or background noise. Here’s what to focus on:
Cutting Out Mistakes: Go through your recording and cut out any stumbles or awkward pauses. Most editing software makes this process easy with simple cut-and-paste functions.
Noise Reduction: If there’s background noise in your recording, use your editing software’s noise reduction feature to minimize it. Be careful not to overdo it, though too much noise reduction can make your audio sound unnatural.
Volume Levels: Ensure that your audio levels are consistent throughout the episode.
Your voice should be clear and loud enough without peaking (distorting). Most software has tools to help you normalize volume levels across your recording.
Adding Music and Sound Effects
Music and sound effects can add a professional touch to your podcast. Whether it’s an intro jingle or background music, just be sure it doesn’t overpower your voice. If you’re looking for free music, check out sites like Free Music Archive or Incompetech.
Recommended Books: Deepening Your Knowledge
While this chapter covers the basics of recording a high-quality podcast, there’s always more to learn. Here are a couple of excellent books that can help you improve your podcasting skills:
"Podcasting for Dummies" by Tee Morris and Chuck Tomasi: This book covers everything from podcast production to promotion. It’s a great resource for both beginners and intermediate podcasters who want to take their skills to the next level.
Setting Up Your Recording Space
When you're just starting out with podcasting, it’s easy to assume you need a professional studio to get that high-quality sound. The truth is, with a few clever adjustments and budget-friendly choices, you can create an excellent recording space right at home. No need for fancy setups or breaking the bank. Let's dive into the nuts and bolts of transforming your environment into a podcasting haven without the need for a full renovation.
The Space: Choose Wisely
Finding the right spot in your home is the first step. You don’t need a lot of space, but you do need a spot that works with, not against, your recording. The goal here is to minimize noise, echo, and distractions while making the best use of what you have.
1. Location Matters
Start by looking for a room that is naturally quiet. Rooms with thick carpeting, heavy drapes, and plenty of furniture tend to be better at absorbing sound. On the other hand, avoid rooms with hard surfaces, like kitchens or bathrooms, which can cause sound to bounce around, leading to echo and reverb.
Bedroom: Often the best option. Bedrooms typically have soft furnishings (like your bed, curtains, and rugs) that help dampen sound. Plus, they tend to be further away from noisy household activities.
Closet: If you're in a pinch, recording in a closet full of clothes is an excellent hack.
Clothes absorb sound, and the enclosed space helps block out external noise.
2. Soundproofing: Keep the Noise Out
Soundproofing doesn’t have to be expensive. In fact, you can achieve decent soundproofing with items you probably already have at home. The goal here is to prevent unwanted noise from entering your recording space and reduce echo within the room.
Door and Window Seals: Gaps in doors and windows let noise in. You can pick up adhesive weatherstrips for doors and windows for a few dollars. This simple step can make a world of difference by keeping external sounds out.
Draft Stoppers: A rolled-up towel at the bottom of the door can act as a draft stopper, blocking noise from creeping in underneath.
Rugs and Carpets: If you’re recording in a room with hard floors, lay down some thick rugs or carpets to reduce the echo. You’ll be surprised how much of a difference this makes in controlling the sound in your space.
3. DIY Sound Absorption: Make the Most of What You Have
Professional soundproofing panels are great, but they can be pricey. Luckily, there are plenty of budget-friendly alternatives that work almost as well.
Blankets and Curtains: Hang thick blankets or heavy curtains on the walls to absorb sound. These can be especially helpful if your walls are bare or if you’re dealing with a lot of echo in the room.
Furniture: Bookshelves filled with books, sofas, and even pillows strategically placed around the room can all help dampen sound. Essentially, you’re trying to break up large flat surfaces that cause sound to reflect back into the mic.
Acoustic Foam Panels: If you have a bit of budget to spare, acoustic foam panels are a great investment. You don’t need to cover the entire room—
placing them behind your microphone or in key spots where sound is bouncing off walls can significantly reduce reverb. The Auralex Acoustics Studiofoam
is a well-rated and affordable option.
Setting Up Your Gear: Optimize Your Space for Efficiency
Once your space is prepped, it’s time to think about how to organize your equipment for both comfort and quality. The way you set up your gear can influence your sound, so let’s make sure everything is positioned just right.
1. Microphone Placement
Your microphone is the heart of your setup, so placing it properly is key. The general rule of thumb is to position your mic about 6-8 inches from your mouth. You can adjust the distance depending on the sound you want, but this is a good starting point.
Use a Boom Arm or Stand: A boom arm, like the Rode PSA1 Swivel Mount, allows you to adjust the position of your mic easily, keeping it at the right height and distance without cluttering your desk. A stand works too, but make sure it’s sturdy and doesn’t transfer vibrations from your desk to the mic.
Pop Filter: Don’t forget to attach a pop filter to your mic. This little tool helps reduce those pesky plosive sounds (the hard ―p‖ and ―b‖ sounds that can cause distortion). The Aokeo Professional Microphone Pop Filter is a budget-friendly option that does the job well.
2. Keeping Things Organized
A cluttered workspace can lead to distractions and mistakes. Keep your recording area organized to minimize disruptions and make your workflow smoother.
Cable Management: Tidy up your cables using velcro ties or cable organizers. This will not only keep your space neat but also prevent any
accidental mic bumps or interference from tangled wires.
Desk Space: If you’re using a desk, make sure there’s enough room for your mic, notes, and any other essentials you need during recording. Keeping
everything within arm’s reach makes for a more efficient recording session.
Recording Techniques: Getting the Best Sound
Now that your space is optimized, let’s talk about a few key techniques that can elevate your recordings even further. The way you use your space and gear matters as much as the gear itself.
1. Monitor Your Sound in Real-Time
One of the best ways to ensure you’re getting good sound is by monitoring your audio as you record. Using closed-back headphones, like the Audio-Technica ATH-M50x,
allows you to hear exactly what your microphone is picking up, so you can adjust your position or settings on the fly.
2. Speak Naturally but With Intention
The beauty of podcasting is that it’s all about your voice and how you use it. Make sure you’re speaking clearly and confidently, but also try to maintain a conversational tone. You don’t want to sound like you’re reading a script, even if you are.
Pacing and Pauses: Don’t be afraid to slow down and take natural pauses.
This not only makes your podcast easier to follow but also gives you a chance to catch your breath and stay relaxed.
Energy and Enthusiasm: Even if you’re recording in a quiet space, your energy should come through in your voice. Speak with passion and enthusiasm it’ll make your content more engaging and enjoyable to listen to.
The Power of Consistency: Creating a Routine
Once you’ve got your space set up and your gear in place, consistency becomes key.
Having a dedicated recording spot and a regular routine makes the entire podcasting process easier and more enjoyable.
1. Create a Pre-Recording Checklist
Having a checklist to go through before each recording session can save you from headaches later on. This could include things like:
Ensuring your microphone is positioned correctly
Checking that all cables are securely connected
Closing any noisy apps on your computer
Making sure your phone is on silent
This small step can make your sessions more efficient and stress-free.
Keeping your recording space tidy and organized will save you time and energy in the long run. After each session, take a few minutes to put things back in place, tidy up cables, and ensure your gear is in good shape.
Affordable Soundproofing and Optimization Tools
To round things off, let’s summarize some of the most budget-friendly tools and materials you can use to improve your recording space:
Weatherstrips: Inexpensive adhesive strips that seal doors and windows to keep out noise.
Draft Stoppers: Rolled-up towels or foam draft stoppers can block noise under doors.
Rugs and Curtains: Use what you have—thick rugs, carpets, and curtains can dramatically improve sound absorption.
Blankets: Hang thick blankets on walls to reduce echo in a pinch.
Aokeo Professional Pop Filter: A low-cost accessory that improves sound quality by reducing plosives.
Auralex Acoustics Studiofoam: Affordable acoustic panels for strategic sound absorption.
These simple additions can make a significant difference in the quality of your recordings, without forcing you to spend a fortune.
Recommended Books for Further Learning
If you want to dive deeper into optimizing your recording space and overall audio quality, here are a couple of excellent books to add to your collection:
" Podcasting for Dummies" by Tee Morris and Chuck Tomasi: This book offers practical advice for all aspects of podcasting, including setting up your recording environment.
Conclusion: Your Perfect Space Awaits
Setting up a great recording space isn’t about spending loads of money or creating a perfectly soundproofed room. It’s about making smart, budget-friendly choices that help you get the best sound possible with what you have. By following these tips and utilizing the right tools, you can turn any room into a podcast-friendly environment.
Remember, your podcasting journey is a marathon, not a sprint. Your space will evolve over time as you learn what works best for you. The most important thing is to get started and keep improving with each episode. You’ve got this!
When you think about podcasting, the image that often comes to mind is sitting in a cozy recording studio, headphones on, and mic ready to go. But in today’s podcasting world, remote recording has become just as crucial, if not more. Whether you're hosting a show with co-hosts spread across different time zones or interviewing guests from around the globe, mastering remote recording is essential for growing your podcast.
Luckily, remote recording is easier than ever, thanks to an array of tools that make high-quality audio achievable from virtually anywhere. Let’s dive into the best practices, tools, and techniques to help you record podcasts remotely like a pro.
Why Remote Recording?
Remote recording is all about flexibility. It lets you interview that expert living in another country, or co-host a show with someone thousands of miles away, all while maintaining high audio quality. The key to successful remote recording lies in preparation and choosing the right tools for the job. But don't worry, it's not as complicated as it might seem.
Step 1: Choosing the Right Software
When it comes to remote recording, software is your lifeline. The right tool can make a huge difference in your podcast’s audio quality, ease of use, and even the post-production process. Here are some of the most recognized and user-recommended remote recording platforms:
1. Riverside.fm
Riverside.fm has gained immense popularity for a reason—it records locally, which means that even if your internet connection is unstable, your audio remains crystal clear. Both you and your guests’ audio (and video, if needed) are recorded locally on your devices, and the files are automatically uploaded to the cloud. This makes it perfect for interviews and multi-host setups where audio quality is non-negotiable.
Key features:
Local recording of up to 4K video and uncompressed WAV audio.
Automatic backups, ensuring you never lose your recordings.
Easy to use, with a browser-based interface—no downloads required.
Riverside.fm is user-friendly, and with its intuitive interface, you can have your guests up and running in minutes. This tool takes the stress out of remote recording and allows you to focus on your content rather than technical details.
Zencastr is another standout option, known for its simplicity and effectiveness. It offers high-quality, multi-track recording, meaning each participant’s audio is recorded on a separate track. This makes editing a breeze, especially if you need to clean up individual audio tracks later on.
Key features:
Separate track recording for each guest, simplifying post-production.
High-quality audio recording in WAV format.
Live editing soundboard and built-in VoIP, so no external software is needed for communication.
Zencastr is entirely web-based, which means that neither you nor your guests need to install any software. It’s as simple as sharing a link. This tool is perfect for podcasters who want a straightforward solution that doesn’t compromise on quality.
3. SquadCast
SquadCast is designed for podcasters who prioritize remote guest interviews. It records audio locally and uploads it to the cloud, ensuring that any hiccups in internet connection don’t impact the final product. Like Riverside.fm, it’s browser-based, so it’s easy for guests to join without any downloads.
Key features:
Local audio recording for high-quality output.
Automatic file uploads to the cloud.
Video recording options for podcasters interested in repurposing content for YouTube or social media.
SquadCast’s interface is clean and intuitive. Plus, their customer support is often praised for being responsive, which is a bonus if you run into any issues. For interview-heavy podcasts, this is a go-to tool.
Step 2: Optimizing Your Remote Recording Setup
Now that you’ve chosen your software, let’s talk about optimizing your remote recording setup. Whether you’re in a bustling city apartment or a quiet home office, a few tweaks can elevate your sound quality.
1. Microphone Choices
You’ve likely already heard this advice: a good microphone is the backbone of any podcast. But what if your guest doesn’t have one? In that case, encourage them to use their smartphone earbuds or a basic USB mic, which can significantly improve the audio over a laptop’s built-in mic.
For hosts:
Audio-Technica ATR2100x-USB: A popular choice for beginners and intermediates, this microphone delivers professional sound quality at an affordable price.
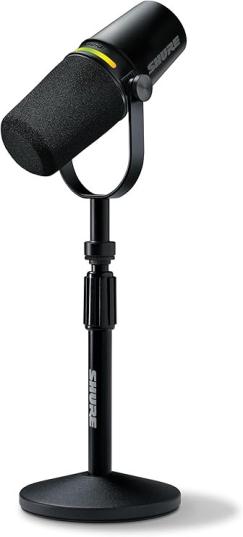
Shure MV7: Inspired by the famous Shure SM7B, this USB/XLR hybrid mic provides excellent sound for remote
recordings, with the flexibility to upgrade your setup later on.
For guests:
Blue Yeti Nano: An easy-to-use USB microphone that offers solid performance and is perfect for guests who don’t have a
dedicated setup.
Smartphone earbuds: If all else fails, a decent pair of
smartphone earbuds with a built-in mic can work in a pinch.
Just make sure your guest is in a quiet environment.
2. Headphones
Headphones are often overlooked, but they’re essential for preventing echo and feedback during recordings. Encourage both you and your guests to wear them during remote sessions.
Recommendations:
Sony MDR-7506: These are classic, industry-standard headphones that offer excellent sound isolation and are comfortable to wear for extended periods.
Audio-Technica ATH-M50X: Another well-loved option for podcasters, these headphones provide clear audio and a durable build.
3. Internet Connection
A stable internet connection is critical for remote recording. While tools like Riverside.fm and SquadCast can mitigate the impact of poor connections, it’s still essential to have a reliable setup.
Tips:
Wired over wireless: Whenever possible, use a wired Ethernet connection instead of Wi-Fi to avoid any potential drops or lags.
Bandwidth check: Before recording, check your internet speed and encourage your guests to do the same. Tools like Speedtest.net can quickly assess your connection quality.
Step 3: Managing Remote Guest Interviews and Collaboration
When you’re recording remotely with guests, it’s not just the tech that matters.
Creating a smooth experience for your guests will make them more comfortable, resulting in better conversations and a more engaging podcast.
1. Pre-Recording Preparation
Preparation is key. Before you hit record, take a few minutes to brief your guest on what to expect. Let them know about any technical requirements, like using headphones or ensuring their environment is quiet. This not only sets expectations but also makes your guest feel more at ease.
Send a checklist: Consider sending a brief checklist to your guest before the interview, outlining essential points like having headphones, choosing a quiet spot, and closing unnecessary programs on their computer.
2. Test Run
A quick test run can save you a lot of headaches. Have your guest join the recording session a few minutes early to do a sound check. This will help identify any potential issues, such as background noise or microphone problems, before the actual recording begins.
Pro tip: During the test run, ask your guest to say a few sentences to ensure their audio is clear and consistent. Adjust settings as needed before diving into the main content.
3. Engaging Your Guest Remotely
Recording remotely can sometimes feel a bit disconnected, but you can keep the energy up by being mindful of your guest’s experience. Simple things like
maintaining eye contact (if you’re using video) and actively listening can make a big difference.
Non-verbal cues: If you’re recording with video, use non-verbal cues like nodding to show your guest you’re engaged, even if you’re not speaking. This helps keep the flow of conversation natural and relaxed.
Encouragement and feedback: Throughout the recording, provide positive feedback to your guest. A simple ―That’s a great point!‖ can go a long way in keeping them motivated and confident during the interview.
Step 4: Post-Production and Backup
Once the recording session is complete, it’s time to focus on post-production. Luckily, many of the tools we’ve discussed (like Riverside.fm and Zencastr) offer cloud storage, ensuring your files are safe. However, you should also have your own backup system in place.
1. Cloud Storage Solutions
While your remote recording software may store files for you, it’s always wise to have an additional backup. Tools like Google Drive and Dropbox are excellent for organizing and storing your podcast episodes.
Tip: Create a dedicated folder for each episode and store all related files—audio tracks, notes, and any other relevant documents—in one place. This will streamline your editing process and help keep you organized.
2. Editing
After recording, you’ll likely need to do some editing to polish the episode. Tools like
Audacity or Adobe Audition can help you clean up audio, remove background noise, and fine-tune your podcast.
Recommendation: For beginners, Audacity is a fantastic free option that offers plenty of features to get you started. Intermediate podcasters might prefer Adobe Audition for its advanced capabilities and professional-grade features.
Wrapping Up
Remote recording might feel daunting at first, but with the right tools and preparation, you’ll be able to create high-quality podcast episodes that sound like they were recorded in a professional studio. Remember, the key is to focus on both the technical aspects and the human elements of your recording sessions.
Here’s a quick recap:
1. Choose the Right Software: Riverside.fm, Zencastr, and SquadCast are top choices for ensuring high-quality remote recordings. They offer features like local recording, separate track recording, and easy-to-use interfaces, which simplify the process and enhance your audio quality.
2. Optimize Your Setup: Invest in a good microphone and headphones, and ensure a stable internet connection. These elements will significantly impact the clarity of your recordings and the overall quality of your podcast.
3. Prepare and Manage: Communicate clearly with your guests, do test runs to troubleshoot any issues, and keep the energy high during your sessions. This preparation will help ensure smooth recordings and engaging conversations.
4. Backup and Edit: Use cloud storage solutions to back up your recordings and utilize editing tools to refine your podcast. Keeping your files organized and using the right software for editing will make the post-production process more efficient.
By following these tips and utilizing the recommended tools, you can effectively manage remote recordings and create content that resonates with your audience.
Embrace the flexibility that remote recording offers, and don’t be afraid to experiment and find what works best for you and your guests.
Happy podcasting, and here’s to reaching that 1 million subscriber milestone!