
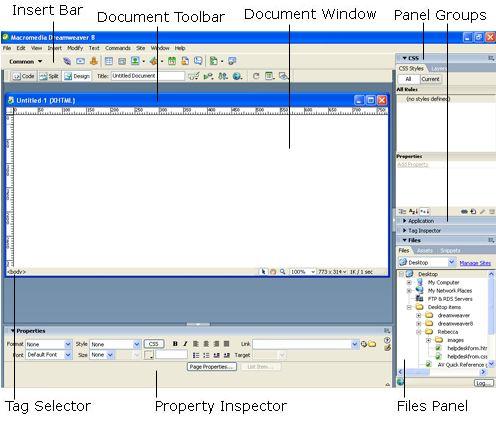
The first thing you will see when you open Dreamweaver 8 is the new Start page. This page provides quick access to most of the commands you need to get started with Dreamweaver. Begin by choosing "HTML". This will bring up a blank page in either Design view, Code view, or Split view--depending upon the preferences that were set. You can easily switch between views by clicking the "Code", "Split", or "Design" buttons in the objects toolbar. The example below shows the Design View.
 B. Save Your File
 Save a new copy of your page in the folder that you created as "home.html" by clicking on the "File" menu and "Save As" option. Save frequently to prevent loss of data.
C. Give Your Page A Title
The title of your web page is the title that shows up in the title bar of the Web browser when someone opens your page. This title is very important as it is used to bookmark the page in Bookmarks (Netscape) or Favorites (Internet Explorer). Some search engines also use it to list your page.
1. Type "Elephant Press" for the title of your page in the top menu bar. You may also go to the "Modify" menu and select "Page Properties". In the Page Properties Window that opens select "Title/Encoding" from the category pane and type "Elephant Press" in the title blank. 2. File names and Titles: These are two very different things. The file name is always given to a page when you save it. You might think of it as a system name, the same way that a Word document is saved as a file. File names have extensions like .doc or .html. File names for web pages have very specific rules that you will need to follow:
• No spaces, extra periods, or special characters (except dashes or underscores)
• No numbers at the beginning of the file name
• Every file name must be unique
Titles are not file names. Titles describe in a very few words what the web page is about: My First Web Page, Washington State University Home Page, Hewlett Packard Printer Drivers, etc. Titles do not have file extensions and do not have to follow the same rules as file names.
• Can be separate words
• Can be any length
• Have no file extensions
• Can be used for more than one web page
Using tables to design web pages is a very common method of layout for web designers. By creating a table to place all of your web page elements inside of, you are able to align various parts of your page much more easily. We will design our web site using tables. Once we create the design and add major elements, we will be able to save that page with a new file name and reuse the design again and again. Never recreate the wheel.
For our Web site, we want a table that has one row across the top and two columns under that row.1. Click on the "Insert" menu.
2. Click on "Table."
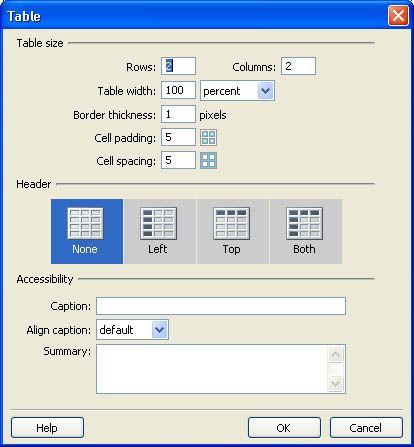
3. Change the table properties to include two (2) rows, two (2) columns, and a width of 100%. We will merge the two cells in the top row after we create the table.
4. Change the border to one (1). Having the table border on helps keep visual track of where text and images are in relation to everything else on your Web page. When we get ready to see what the page will really look like on the web, we can come back to the table properties and change the border to zero if we wish.
5. Set the Cell Padding and Cell Spacing to five (these measurements, by the way, are usually rendered in pixels – a pixel is a square of light/color that goes into making up the screen on your computer. We will talk more about pixels when we talk about images.).
o Cell Padding is the space inside of the table cell surrounding the contents of the cell.
o Cell Spacing is the space between the table cells.
6. Click on the Ok button and your table will be placed on your page. Note the Property inspector now has the table properties showing.
7. Merging table cells:
o Click in the first cell of the top row, hold down the mouse button and drag across both cells in that row.
o In the Property inspector, click on the merge cells button.
o Your table should now have one row on top and two columns under it.
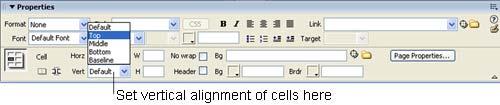
1. Change the vertical alignment. You will need to set the Vertical Alignment of each of the table cells. The default is for content in the table cell to be vertically aligned in the middle of the cell. The problem with the default occurs when one cell has a lengthy content next to a cell with only a few lines.
Line one Line two Line three Line four Lots of content in this area will force scrolling just to be able to see the content in the left-hand cell. This problem is caused by the default vertical alignment in web tables. The default is "middle," which aligns all cell content vertically in the middle of the cell. To fix this problem, we need to reset the vertical alignment in each table cell to "top." This little table demonstrates what happens if the default is left alone.
o oClick in a table cell.
Click on the arrow next to the "Vert:" menu in the Property inspector Select "top."
Repeat for each of the table cells.
Save your page. You are now ready to enter text, images, color, links and anything else you want on your page. You will be working inside of this table structure.