 Instructions for
 These Front Page Express notes are sponsored by Museum-Tracker
Museum-Tracker is an eBook Directory giving you details of significant museums in England and Europe. A travel guide to help you explore Europe’s scientific and cultural heritage.
http://www.museum-tracker.com/Front Page Express is a freeware programme that allows the development of web pages with little or no knowledge of HTML, the scripting language of web pages. You create your web page in much the same manner as you would a word processor document and Front Page Express generates the HTML in the background. When you Save a page to a file it is the HTML script that is saved.
Front Page Express is available when Microsoft Internet Explorer version 5·0 is fully installed (it is one of the full install options). Note that Front Page Express is not included with versions 5·5 or 6 of Internet Explorer. (Microsoft is the registered Trade Mark of Microsoft Corp., U.S.A.)
There are sveral programmes available that allow the creation of web pages in this manner and most of these have more sophisticated features than Front Page Express and are not freeware: they are priced from about $Aust.180 up to $Aust.800. These programmes include:
CoolPage and
Platypus Web Builder
Front Page
Adobe GoLive
Dreamweaver
http://www.coolpage.com/
http://www.coolpagehelp.com/
http://www.rgmt.com.au/webbuilder.html http://www.microsoft.com/
http://www.adobe.com/
http://www.macromedia.com/
 Formatting Limitations of Web Pages
The concept of HTML based Web pages was developed in 1989, when the Internet was mainly used by the academic and research community - before being used commercially. Thus high levels of page design capability were not an issue. All web pages are in the form of plain (ASCII) text as outline above and the HTML tags are also plain text. When a page is being transmitted through the Internet it is sent in 'packets' of text characters - a number of these making up the complete page. The browser is only receiving plain text it has no understanding of how the page is to be formatted, but for the tags - and these are programmed into the browser. Basic HTML only allows for limited formatting in comparison to a word processor or desktop publisher. At any time when you are creating a web page in Front Page Express you can view the relevant HTML code via the View menu and clicking on HTML.
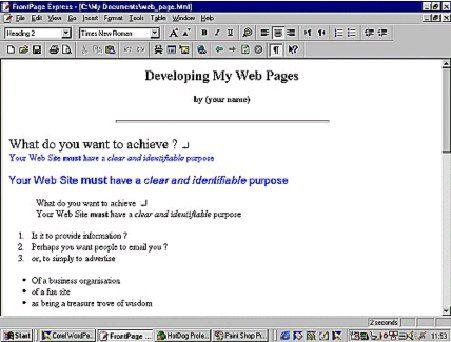
Creating a page Take the heading at the top of the page (see previous page). HTML allows for the use of 7 pre-defined font sizes - sizes 1 to 7. The heading size chosen there is size 2 and this can be selected from the drop down menu at the left of the tool bar that is either blank or showing '(None)'. Notice that the next line has a paragraph spacing between it and the heading above: all the Heading tags automatically place this blank line between the headings and subsequent lines. The Heading font type is set within the browser.
The line 'by (your name)' is in bold font: this is achieved as simply as in a word processor by selecting the text and clicking on the bold button on the tool bar.
The next line 'What do you want to achieve ?' is set in Times New Roman, size 5. The default font that most browsers display text if Times New Roman size 3, which usually prints as 12 point. As the page is transmitted through the Internet only as plain text, the font has to be accessed from the page viewer's computer. Most computers have the Times New Roman font and another very common font, Arial. As a consequence you can only utilise very common fonts. If you specify a font that the viewer's computer does not have, they will see your text in the browser's default font - generally Times New Roman. In a situation where a specific font is required (as in a company name, for example) then you make a small graphic image of the
word(s) and insert this into the page (see notes on images).
You can choose a font for text in exactly the same way as in a word processor (File menu > Font). Limit your choice to common fonts, e.g. Times New Roman
Arial
Helvetica
Courier New
Georgia
Verdana
Comic MS
In addition, text colour can be chosen from the Font dialogue box. As well the background colour of the page can be set from the Format menu: choose 'Background'. Note that there are a limited number of colours that can be displayed by a Browser. As with all the tags, the colour definitions have to be incorporated into the programming of the browser - and there are only 216 'web safe' colours.
Using the Tab key to achieve an indent will have no effect. Browsers only recognise one space-bar spacing. This indenting text must be achieved in a different manner: by the use of the blockquote tag. This tag gives a double indent - and the small text beginning 'What do you want to achieve ?' is indented using the blockquote tag. Note that you can use this tag multiple times, as it's just a 'positioning' tag. The numbered list and the bullet list are achieved by using the toolbar buttons similar in appearance to those on a word processor tool bar.
ImagesImages are incorporated into a web page as separate files and are called by an image tag which specifies them by their filename. Thus a web page will consist of a number of files: the actual page (as an HTML file) and a separate file for each image.
There are two common image file types that browsers display: the .gif file and the .jpg (pronounced jay-peg based on its full extension of .jpeg) file. Both these file types are compressed files, meaning that the size of the file (in bytes) has been reduced to shorten the loading time of web pages. The .gif file often is smaller in size (bytes) but can only support 256 colours, making it unsuitable for colour photographs - though quite suitable for graphics and illustrations. The .jpg file can support 16 million colours and is the file type to use for colour photographs.
It is important the keep the file size (in bytes) of all graphic images to a minimum. The file size has a direct bearing on the time taken for an image to transmit through the Internet and appear on the user's screen - and this is multiplied by each image making up the web page. Research has shown that people expect to see at least part of a page within 10 seconds and start to be come impatient after 15 seconds. The suggested total size of all files (graphic and HTML) making up a web page is under 50 k/bytes and preferably around 35 k/bytes. This is important in countries outside the U.S.A., where the bandwidth is generally lower (smaller).
How can this be accomplished ? What can you do to keep the file size (bytes) of graphics and images as small as practicable ?1. Size of image (in pixels)
You should re-size (resample) all images to the size that you intend the browser to display them on-screen. In many instances an image will be much larger in size with the result that the file size (bytes) will be correspondingly larger. Reducing the image size (pixels) reduces the file size (bytes), as fewer pixels on the screen have to be addressed.
2. Number of colours
Many simple graphic images can have the number of colours contained in the image reduced without effecting the appearance. This, of course, requires some experimentation. However, if you can cut the number of colours you will also reduce the file size (bytes). Note that this is not practical with full tone colour photographs. Reducing the number of colours in photographs will generally ruin them.
You insert an image into your web page via the Insert menu: choose Image. When you get to the Image dialogue box, click on the Browse button and you go to the standard 'Open File' dialogue box. Choose your required image and click on OK. If you click on the image in Front Page Express you get the standard image 'handles' that allow you to resize the image if desired.
Links
Links enable your site visitors to move around your web site and there are two types: the basic text link and the graphic link. When you create a link to another web page, you specify the required page by its filename. You can also link to a web page on another web site by typing the full URL that points to that page.
To create a text link, type the text you wish to become the link and then select it. Then to create a link to an existing page choose Hyperlink in the Insert menu. The 'Create Hyperlink' dialogue box allows you to browse for the file name, or simply type it into the URL text box. If you wish to start a new page, select the 'New Page' tab and again type the proposed filename into the URL text box. Also type the page title into the 'Page Title' text box. When you click OK, you will be taken to the 'New Page' dialogue box to choose the type of new web page you wish to create. In most instances this will be the default 'Normal' page so just click OK again.
You will now have this new page on your screen. If you check in the Window menu you will see your original page listed as being open plus the new page you have just created. Note that this new page has not yet been saved to disk, even though you specified a filename when you created it. To check that the link works correctly, right click on the link and then in the resultant menu left click on 'Follow Hyperlink'.
To make an image into a link, right click on the image and choose 'Image Properties' from the resulting menu. Choose the General tab in the Image Properties dialogue box and go to the Default Hyperlink section. You can type the filename of the desired page in the Location text box or use the Browse button which will take you to the Create Hyperlink dialogue box. Ignore the Warning screen relating to linking to a local file.
As well as creating links to pages within your own site, you can create external links to pages on other web sites. The process is similar, but in this instance click on the 'World Wide Web' tab in the Hyperlink dialogue box.
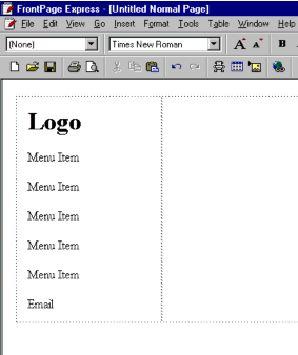
In all cases ignore the Target Frame option, unless you are creating a site structured in Frames.All of the above does not give you much control over page layout. Essentially all text flows from the left screen margin to the right screen margin. To achieve desirable layout you need to utilise 'Tables'. Their origin was to enable data to be tabulated as part of research papers, but there is no limit to the amount of information that can be placed in a table 'cell'. This effectively give you the ability to create ‘columns’ and ‘text boxes’ as in a desktop publisher. These Tables are work similarly to those you may be experienced with in word processors. All web pages are designed with tables.
A very simple page layout could consist of a Table one row deep and two columns wide. This would enable a page with the site Menu on the left of the page, as shown below.
 Tables
To add a Table to your web page choose Insert Table from the Table menu. In the Insert Table dialogue box you can define the different elements of the Table you need.
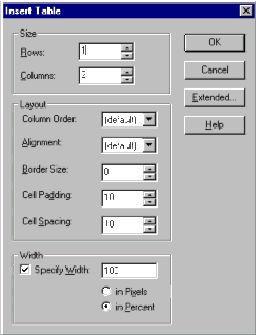
Options for creation of a table are:
Width. Where you are utilising a Table to achieve page layout it is advisable to set the overall width as a percentage of the whole screen width - except perhaps for specific purpose Tables within the page. This is because of the wide range of computer screen resolutions in use. People with older computers are likely to have screens with a resolution of 640 x 480 pixels, whereas newer computers will have screens with resolutions of 800 x 600 pixels and there are increasing numbers of computers with higher screen resolutions. Setting your overall width as a percentage rather that in absolute pixels will accommodate all computers.
Rows/Columns. The rows/columns are the same concept as in a word processor Table. This is determined by the structure of your page. You will benefit here if you have sketched your basic page layout on paper beforehand.
Alignment. The default alignment is left. Options are center (note the spelling) and right - as in a word processor.Border. There is a border placed around the Table and each cell. This can be set by pixels.
Zero pixels makes the border disappear (though technically it still exists). When using Tables with a zero border you see dotted outlines representing the Table and all the cells: these are there as a guide only. You will not see these dotted outlines when viewing the page in a browser.
Cell Spacing/Padding. Cellspacing sets the distance between cells in pixels. In a two column table, eg, this would be the equivalent of the gutter in desktop publishing. Cellpadding sets the distance in pixels of the text from the edge of the cell.
Initially we will create a Table 100% wide one row deep by two columns wide, with a border of 5 and cellspacing of 10. As it's not specified, cellpadding will be the default 1. Notice that both cells (columns) are by default created equal width. In our example below this is not what is required: the left cell (column) should be 30% width.
To adjust this, right click in the left cell and choose Cell Properties from the resultant menu. In the Cell Properties dialogue box go to the Minimum Width panel and change the 50% to 30%. Similarly for the right cell (column), change the cell width to 70%.
You can add any amount of text, images, etc. to either cell and all formatting options can be used. As well background colours different to the basic page can be set for cells in a Table in the Cell Properties dialogue box. An entire page can be constructed in this Table, with, say, the contents of the page in the right cell and a sidebar menu of links to other pages placed in the left cell.
In addition a Table can be inserted into a cell of an existing Table to enable more sophisticated layout.Unless it's a very small site, don't put all your web pages into the one directory (folder) on the server for your web site. Create a series of directory structures to match the information organisation of your web site. This makes your site much easier to manage.
An example could be:
(top level, or site root, directory) | profiles
| bookshop
| products
| service
| graphics
Typically the Home Page (index.html) would be in the site root directory, along with some general pages such as your About Us page. Other category specific pages would be in their relevant directories (folders).
Navigating through a Web SiteCreating a single web page that is isolated from other pages is of very little use. The single feature that had the most influence in the World Wide Web gaining acceptance and popularity is the ability to create 'Links' between pages. As mentioned earlier these Links appear on a page usually as an underlined word or phrase, either within the text on a page or as a 'Menu' at the top, side or bottom of a page. As well, graphics images can be used as links.
Navigation is about more than just putting some attractive buttons on your web pages. There are two perspectives to Navigation within a web site (aside from technical considerations).
There is the logical categories into which your site is divided, based on your business. This is from your perspective.Some people think visually, while others think textually. These differences can often be along the lines of age and educational level. So, know your demographics. The result will greatly influence your Navigation and Menus.
Your Visitor's Goals and NeedsThis is an example of where the difference between Features and Benefits comes into play. You might structure your site and its Navigation from the perspective of the Features of your product/service, whereas your Visitor will be looking at what you have to offer from the perspective of 'What's in it for Me' (Benefits).
This could turn your site's Structure and Navigation on its head !
 These HTML notes are sponsored by Museum-Tracker
Museum-Tracker is an eBook Directory giving you details of significant museums in England and Europe. A travel guide to help you explore Europe’s scientific and cultural heritage.
http://www.museum-tracker.com/• It should be easily comprehended and learned.
e.g. categories and sub-categories should follow intuitive patterns. An example here is the Menu systems on Windows software packages where there are common items in may of the Menus on widely differing programmes. For instance the 'Print' command is always found under the File Menu.
• Your Menu system should remain consistent throughout your site. An abrupt change will create confusion and annoyance for your visitor - and can even alienate them from your site.
• Minimize the number of 'clicks' required to get to the desired page/information. Thus go for a flatter structure rather than a deep structure (limit the depth of sub-categories). It becomes frustrating to have to click through endless sub-menus to get to the desired page - particularly if the pages are slow loading.
• Ensure that the Menu items Names are clear and readily identifiable. Ambiguities and vagaries send your visitors down the wrong track leading to frustrating time wasting for your visitors. Obscure terminology should be avoided for Menus - unless absolutely essential ... and then it should be explained.
• Provide some indication for your visitors to enable them to visualise where they are within your site. If, say they are on a page down 3 levels give them some visual indication of this such as
Home > Products > WidgetMany visitors to your site will 'enter' the site through one of your subsidiary pages, as against the Home Page, having clicked on a title link on a Search Engine's Search Results page. Thus it is vital that they be able to develop a mental image of where they are within your web site.
• Use transverse Links across categories where appropriate. e.g. a link from a product description page in the product category across to the Order form in the Order category.
• Site Maps are a page containing links to every page on the web site (on large sites this may be limited to major pages). These are generally arranged to reflect the structure of the site.
Menu Systems There are three basic Menu layouts that can be used on web pages.(a) The Side Bar menu - either within the page, or as a separate Frame (b) The top Menu Bar - either within the page, or as a separate Frame. (c) Menu links across the bottom of the page
The minimum number of links (i.e. Menu items) on any page (referred to as the current page) should include:(a) Home Page - a link from the current page back to the 'front door' of your web site.
(b) A link up to the main page above the current page - i.e. the page to which the current page is subsidiary.
(c) A link across to any page directly related to the current page
(d) A link to a site map page
(e) A link to a contact and/or email page
(f) Links to the top level of the hierarchy of other major sections of the web site (see point b above)
Use short descriptive names and terms for your link names. This applies to both text links and the text within a graphic image forming a link. Remember information should be no more that 3, at the most 4, levels down from the Home Page.
Title and META Tags Title Tag Note that the Page Title is different from the heading that appears at the top of the page in the document window of the Browser.It is also important as it is what appears in the 'Search Results' when someone does a search in a Search Engine. The blue underlined text that is a Link appearing above the short description covering different pages on the Search Results pages is exactly the same as the text you place between the Title tags. Thus, give consideration to an accurate and definitive title for each
page.
Meta Tags Search Engines pro-actively 'crawl' the Internet using their Robot software logging onto an Internet Service Provider and 'reading' all the web pages on that I.S.P.'s system. Many of the Search Engines index these pages utilising the information contained with META tags.
The Description META tag will allow you (on many Search Engines) to control what the short description of your page reads - as it appears under the page link. You type a concise description of your page within the double inverted commas for the contents field. This should be limited to about 200 characters (approximately 25 words).
<META Name="description" Content=" ... your description of your page ... ">The 'keywords' META tag allows you to define appropriate keywords relevant to your page. Both phrases and individual words can be used and each is separated by a comma. This provides the basis for the Search Engine to index your page. However, don't use any word, either by itself or within a phrase, more than about 5 times. This is regarded by the Search Engine software as 'keyword stuffing' and can result in the rejection of your page.
<META Name="keywords" Content=" ... your keywords ... ">You can add these Tags in Front Page Express to each web page through the File menu > Page Properties.
On the dialogue box select the Custom tab. Go to the 'User Variables' section and click on 'Add".
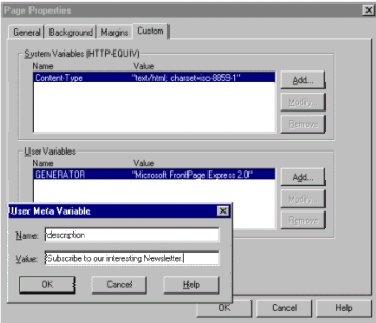 Type your page description and keywords in the 'User Variable' boxes and Front Page Express will create the relevant Meta tags for you.
Do you know how to
• make best use of Search Engines and Directories ?
• use Links to best advantage ?
Find our more at http://www .microbiz.com.au/
Whilst Search Engines utilise Spiders to index pages, this can take up to several weeks for the Spider to come around to your ISP again.
However, you can get your pages indexed immediately (in some cases) by submitting your URL to the Search Engine. All Search Engines and Directories have a Menu item or Button named 'Add URL' or 'Add Your Site'. Go to this page and type your full URL in to the appropriate text box and submit it.
It should be noted that this is not permanent. Your site can be 'displaced' in an index, so it is necessary to re-submit periodically - say, every three months or so. In particular, persevere with gaining a listing in Yahoo.
Museum-Tracker for your PDA and Phone
Your QuickFind guide to the Museums of England and Europe. Make the most of your limited time during your European vacation. Avoid disappointments, such as finding out about interesting exhibits on the last day of your stay …
What is Museum-Tracker ?
It’s an eBook Directory giving you details of significant museums in England and Europe. A travel guide to help you explore Europe’s scientific and cultural heritage.
What they exhibit, where they are and how to get there.
Museum-Tracker is for your PDA and Phone
Museum-Tracker can be used on all Palm and Pocket PC PDA hand-helds, plus 3G (i-Mate, Internet enabled, i-Mode) phones.
http://www.museum-tracker.com/
Gordon Anderson's Links page
(Last item in 'Files' list)
http://www.asisna.com/gordon.anderson/links.html
FPX.exe
and WS FTP light - file transfer programme for uploading pages to your web site on the Internet
ws_ftple.exe
Acknowledgement
Microsoft is the
Registered Trade Mark of Microsoft Corp. of Redmond WA, U.S.A.

Reads:
574
Pages:
51
Published:
Aug 2016
This is the only ebook available on the subject Nodejs with koa2this ebook contains code which worksand how to learn nodejs faster and easy wayafter reading t...
Formats: PDF, Epub, Kindle
Reads:
1036
Pages:
51
Published:
Jun 2016
A Field Guide to Freelancer Finances is a free book of practical finance tips by leading designers, developers and FreeAgent.
Formats: PDF, Epub, Kindle

Reads:
412
Pages:
21
Published:
May 2016
Started in 2013, Ally Digital Media have helped over 1200+ startup business to grow their business online and is one of the top seo company in Mumbai and Indi...
Formats: PDF, Epub, Kindle
Reads:
4064
Pages:
37
Published:
Mar 2016
A step by step guide on how you can create and start your very own personal website. This is ideal especially for anyone who wants to have an online presence ...
Formats: PDF, Epub, Kindle