Cubase VST comes with a number of VST Plug-in effects included. This chapter describes the included effects parameters. For general details about how to assign and set up effects, see the chapter “Installing and using VST plug-ins” in the “Getting into the Details” document.
Version 2.0 of the VST plug-in standard allows plug-ins to receive MIDI from the host application (in this case, Cubase VST). Possible uses for this feature include tempo-based delays, MIDI control of pitch-shifters and harmonizers, etc.
• MIDI Timing information is automatically provided to any VST 2.0 plug-in that “requests it”.Cubase VST 5.0 comes with a completely new set of effect plug-ins. To ensure backwards compability with Songs created using previous versions of Cubase, the previous standard set of VST plug-ins is included as well. These are located in the subfolder “Earlier VST PlugIns” on your effect menus. The parameters for these effects are described in a separate document.
• Dynamics - see page 4.
• Chorus - see page 5.
• DoubleDelay - see page 6.
• ModDelay - see page 7.
• Flanger - see page 8.
• Symphonic - see page 9.
• Phaser - see page 10.
• Distortion - see page 11.
• Overdrive - see page 12.
• Chopper2 - see page 13.
• Reverb - see page 14.
• Reverb 32 - see page 15.
• Metalizer2 - see page 16.
• Tranceformer2 - see page 17.
• Karlette - see page 18.
Dynamics is a plug-in version of the VST Dynamics Panel that is available in the Channel Settings window. The reason for having a separate plug-in version is to make dynamic processing available to Group, ReWire and VST Instrument channels (which cannot use the VST Dynamics panel in the Channel Settings). In addition, it is also possible to use the Dynamic plug-in as a Master effect. Dynamics features three separate processors: AutoGate, Compress and Limit, covering the most common dynamic processing functions.
P See the chapter “Mixing Audio and using Effects” in the Getting into the Details documentation for a description of the available parameters.• Two additional dynamic processors are available in the VST Dynamics panel: AutoLevel and SoftClip.
For technical reasons, these are not available in the Dynamics plug-in.

In the Routing section you can set the signal flow order for the three processors. Changing the order of the processors can produce different results, and the available options allow you to quickly compare what works best for a given situation. Beside each processor label, there is a number. These numbers are used to represent the signal flow options shown in the Routing section. There are three routing options:
• 1-2-3 (Compress-Gate-Limit)
• 2-1-3 (Gate-Compress-Limit)
• 1-3-2 (Compress-Limit-Gate)
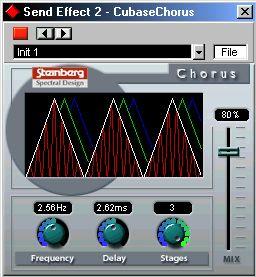 The Chorus plug-in adds a short delay to the signal, and pitch modulates the delayed signal to produce a “doubling” effect. The parameters are as follows:
Parameter Values Description
The Chorus plug-in adds a short delay to the signal, and pitch modulates the delayed signal to produce a “doubling” effect. The parameters are as follows:
Parameter Values Description
Mix 0-100% Sets the level balance between the dry signal and the effect. If Chorus is used as a send effect, this should be set to maximum as you can instead control the dry/effect balance with the send.
Freq 0-5Hz This sets the modulation rate.
Delay 0-5ms This controls the depth of the Chorus effect.
 Clicking on the “no sync” label in the graphic display opens the delay value pop-up for the respective delay!
P Note that a “No Sync” setting will not produce any delay.
Values 0-100%
Feedback
Tempo Sync pop-up 1
Tempo Sync pop-up 2
TmpSync1 0-100%
No sync, 1/1 to 1/32,
1/1 to 1/32 Triplet,
1/1 to 1/32 Dotted
x1 to x10
TmpSync2 x1 to x10
Pan1
Pan2
-100 to 100%
-100 to 100%
Sets the level balance between the dry signal and the effect. If DoubleDelay is used as a send effect, this should be set to maximum as you can instead control the dry/effect balance with the send.
This sets the number of repeats for both the delays.Click on the upper “no sync” label to open the delay value popup to set the value for the first delay. The fixed delay values correspond to note values, and will be “synced” to the tempo.
Click on the lower “no sync” label to open the delay value popup to set the value for the second delay, as above.This multiplies the delay time (note value) for the first delay by a factor selectable between x1 and x10.
This multiplies the delay time (note value) for the second delay by a factor selectable between x1 and x10.
This sets the stereo position for the first delay.
This sets the stereo position for the second delay.
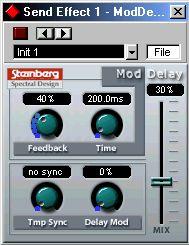
This is a delay effect that can either be tempo-based or use freely specified delay time settings. The delay repeats can also be modulated. The parameters are as follows:
Parameter MixValues 0-100%
Feedback
Tempo Sync pop-up
Tmp Sync knob
Time
DelayMod 0-100%
No sync, 1/1 to 1/32,
1/1 to 1/32 Triplet,
1/1 to 1/32 Dotted
0-5000ms 0-100%
Description
Sets the level balance between the dry signal and the effect. If ModDelay is used as a send effect, this should be set to maximum as you can instead control the dry/effect balance with the send.
This sets the number of repeats for the delay.Clicking the “no sync” field opens the Tempo Sync pop-up. The fixed delay values correspond to note values, and will be “synced” to the tempo.
This multiplies the delay time (note value) for the tempo sync delay by a factor selectable between x1 and x10.This sets the delay time when tempo sync is off.
This controls the pitch modulation rate for the delay effect.

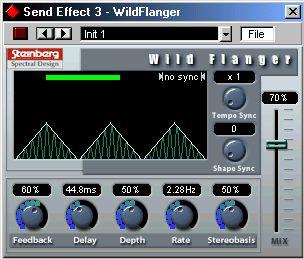 Wild Flanger is a classic flanger effect with stereo enhancement. Parameters are as follows:
Parameter Mix
Wild Flanger is a classic flanger effect with stereo enhancement. Parameters are as follows:
Parameter MixValues 0-100%
Description
Sets the level balance between the dry signal and the effect. If WildFlanger is used as a send effect, this should be set to maximum as you can instead control the dry/effect balance with the send.
Tempo Sync pop-upTempo Sync knob
Shape Sync knob
Feedback
Rate
Depth Delay
Stereobasis No sync, 1/1 to 1/32, Clicking the “no sync” field opens the Tempo Sync pop-up. The 1/1 to 1/32 Triplet,
1/1 to 1/32 Dotted
x1 to x10
fixed delay values correspond to note values, and will be “synced” to the tempo.
0-100% This determines the character of the flange effect. Higher settings produce a more “metallic” sounding sweep.
0-5Hz
0-100%
0-100ms
This sets the rate of the modulation sweep.
This sets the depth of the modulation sweep.
0-100% This sets the depth for the Stereobasis effect. 0% is mono, 50%
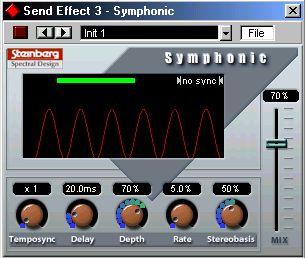
The Symphonic plug-in combines a stereo enhancer, an auto-panner and a chorus/ flanger-type effect. The auto-panner can use Tempo Sync. For best results, apply the Symphonic effect to stereo signals.
Parameter MixValues 0-100%
Delay
Depth
Rate
Tempo Sync pop-up
Stereobasis
0-100 ms
0-100%
0-100% x1 to x10
No sync, 1/1 to 1/32,
1/1 to 1/32 Triplet,
1/1 to 1/32 Dotted
Description
Sets the level balance between the dry signal and the effect. If Symphonic is used as a send effect, this should be set to maximum as you can instead control the dry/effect balance with the send.
This sets the delay time of the Symphonic effect.
This controls the depth of the Symphonic effect.
This sets the modulation rate for the Symphonic effect.
Clicking the “no sync” field opens the Tempo Sync pop-up. The fixed values correspond to note values, and will be “synced” to the tempo.
This sets the depth for the Stereobasis effect. 0% is mono, 50%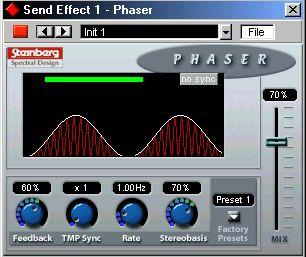
The Phaser plug-in produces the classic “swooshing” sound that characterizes phasing. It works by shifting the phase of the signal and adding it back to the original signal, causing partial cancellation of the frequency spectrum.
Parameter MixValues 0-100%
Feedback 0-100%
Tempo Sync knob
Rate
x1 to x10
0-6Hz
Description
Sets the level balance between the dry signal and the effect. If the Phaser is used as a send effect, this should be set to maximum as you can instead control the dry/effect balance with the send.
This sets the amount of Feedback. A higher value produces a “sharper” sounding effect.This multiplies the delay time (note value) for the tempo sync phasing by a factor selectable between x1 and x10.
This sets the modulation rate for the Phaser effect, when “no sync” is selected.
Tempo Sync pop-up
Stereobasis No sync, 1/1 to 1/32, Clicking the “no sync” field opens the Tempo Sync pop-up. The 1/1 to 1/32 Triplet,
1/1 to 1/32 Dotted
0-100%
fixed values correspond to note values, and the phasing will be “synced” to the tempo.
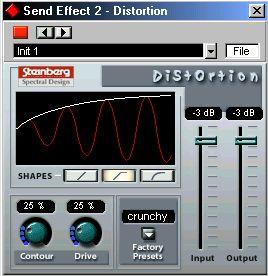
The Distortion effect plug-in is capable of producing anything from a soft “crunch” to all-out distortion. There is a selection of factory presets available. Note that these presets are not only stored parameter settings, but actually use different basic algorithms to produce distortion. The basic character of the distortion preset “models” is indicated by their names. The parameters are as follows:
Parameter InputValues
-24dB to 0dB
Output
-24dB to 0dB
Shapes
Contour Linear,
Non-linear 1, Non-linear 2
Drive
Factory Presets
0-100%
Soft, Crunchy, Dirty, Wracky, Evil
DescriptionSets the Input level. This parameter can also be controlled by the Master input slider in the VST Send Effects panel. If you are using Distortion as an Insert effect, you can use this to boost or cut the input level.
Sets the Output level. As distortion generates harmonics, it increases the level of the processed signal . You can use the Output fader to compensate for the level increase.
The Shape parameter determines how much the input signal is affected by the distortion effect. Non-linear 2 will produce the strongest distortion.
This is a selective low pass filter , altering the tonal quality of the distortion.Governs the amount of distortion.
Select one of five presets, which can be used as they are, or as a basis for further “tweaking”.
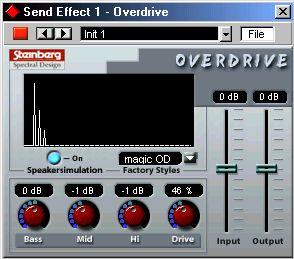 Overdrive is a distortion-type effect, emulating the sound of a guitar amplifier.
Parameter Values
Overdrive is a distortion-type effect, emulating the sound of a guitar amplifier.
Parameter ValuesInput -15 to +15dB
Output -15 to +15dB
Bass -15 to +15dB Mid -15 to +15dB Hi -15 to +15dB Drive 0-100%
Speaker On/Offsimulation
Description
Sets the Input level. This parameter can also be controlled by the Master input slider in the VST Send Effects panel. If you are using Overdrive as an Insert effect, you can use this to boost or cut the input level.
Sets the Output level. As overdrive generates harmonics, it increases the level of the processed signal . You can use the Output fader to compensate for the level increase.
Tone control for the low frequencies, allowing a 15 dB boost or cut. Tone control for the mid frequencies, allowing a 15 dB boost or cut. Tone control for the high frequencies, allowing a 15 dB boost or cut. Governs the amount of overdrive.
Simulates the sound of a speaker cabinet.
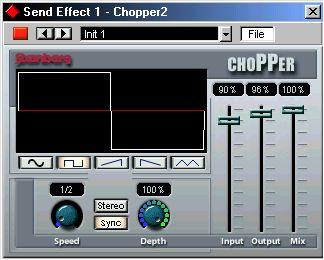
Chopper2 is a combined tremolo and autopan effect. It can use different waveforms to modulate the level (tremolo) and left-right stereo position (pan), either using Tempo Sync or manual modulation speed settings. Parameters are as follows:
Parameter MixValues 0-100%
Input 0-100%
Output Speed 0-100% 0-50Hz
Tempo Sync pop-upNo sync, 1/1 to
Description
Sets the level balance between the dry signal and the effect. If Chopper is used as a send effect, this should be set to maximum as you can instead control the dry/effect balance with the send.
Sets the Input level. This parameter can also be controlled by the Master input slider in the VST Send Effects panel. If you are using Chopper as an Insert effect, you can use this to boost or cut the input level.
Sets the Output level.This knob sets the modulation rate for the Chopper effect. If Tempo Sync is off, a frequency value can be set. If Sync is On, the knob scrolls through the available Tempo Sync note values (see below).
Clicking the “Sync” button so that it lights up activates Tempo Sync.Sync button Stereo/Mono button
Waveform
buttons
1/32, 1/1 to 1/32 To open the Tempo Sync pop-up, click the field above the Speed Triplet, 1/1 to
1/32 Dotted
Stereo/Mono
button. The fixed delay values correspond to note values, and will be “synced” to the tempo.
If this is set to Stereo, the signal will pan left and right , in sync with the level modulation.
Sets the modulation waveform.
Depth Sine, Square, Saw, reverse Saw, Triangle
0-100%Sets the depth of the Chopper modulation.
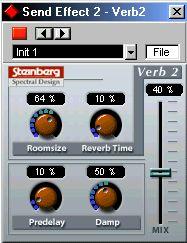 Reverb is used to add ambience and “space” to recordings. Reverb features the following parameters:
Parameter Values Mix 0-100%
Reverb is used to add ambience and “space” to recordings. Reverb features the following parameters:
Parameter Values Mix 0-100%Roomsize 0-100% Predelay 0-100%
Reverb Time 0-100% Damp 0-100%
Description
Sets the level balance between the dry signal and the effect. If Reverb is used as a send effect, this should be set to maximum as you can instead control the dry/effect balance with the send.
Governs the “size” of the simulated room environment.This parameter sets a delay between the direct sound and the reverb effect output. A short predelay before the reverb reduces reverb “clutter” which blurs the sound, and makes the reverb effect more natural-sounding.
This parameter sets the length of the reverb effect.This parameter “dampens” the higher frequencies, producing a rounder and smoother sounding reverb.

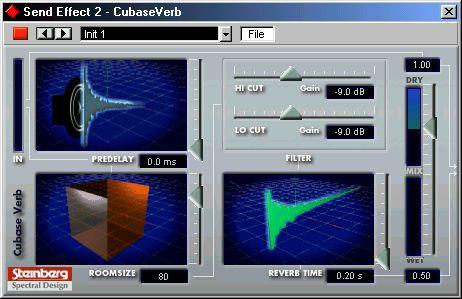 Reverb 32 is a reverb plug-in which provides smooth, dense reverb effects. Reverb 32 has the following parameters:
Parameter Room Size Predelay
Reverb TimeFilter Hi Cut
Filter Lo Cut
Mix
Values Description
20-100 This setting determines the “size” of the simulated room environment.
0-100ms This parameter sets a delay between the direct sound and the reverb effect output. A short predelay before the reverb reduces reverb “clutter” which blurs the sound, and makes the reverb effect more natural-sounding.
0,2sThis parameter sets the length of the reverb time.Forever
-15 to 0dB This filters out high frequencies for the reverb, which can make the reverb sound softer.
-15 to 0dB This filters out the lower frequencies for the reverb. It can be used to reduce low frequency “rumble”.
Dry/Wet Sets the level balance between the dry signal and the effect (wet). If Reverb 32 is used as a send effect, this should be set to maximum wet, as you can instead control the dry/wet balance with the send.
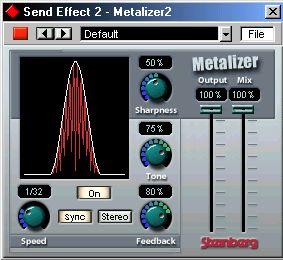 The Metalizer feeds the audio signal through a variable frequency filter, with Tempo sync or time modulation and feedback control. The parameters are as follows:
Parameter Mix
The Metalizer feeds the audio signal through a variable frequency filter, with Tempo sync or time modulation and feedback control. The parameters are as follows:
Parameter MixValues 0-100%
Sharpness 0-100%
Tone
Feedback 0-100% 0-100%
Tempo Sync pop-up
No sync, 1/1 to 1/32, 1/1 to 1/32 Triplet, 1/1 to 1/32 Dotted
Sets the level balance between the dry signal and the effect. If Metalizer is used as a send effect, this should be set to maximum as you can instead control the dry/effect balance with the send.
Governs the character of the filter effect. The higher the value, the narrower the affected frequency area, procucing sharper sound.
Governs the tonal quality of the effect.Sets the amount of feedback. Higher values produces a more “metallic” sound.
This knob sets the modulation rate for the Chopper effect. If Tempo Sync is off, a frequency value can be set. If Sync is On, this knob scrolls through the available Tempo Sync note values (see below).
Clicking the “Sync” button so that it lights up activates Tempo Sync. To open the Tempo Sync pop-up, click the field above the Speed button. The fixed delay values correspond to note values, and will be “synced” to the tempo.
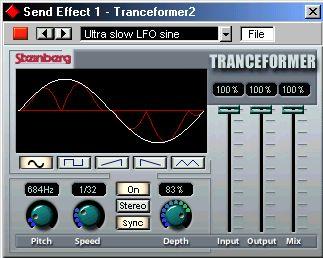
Tranceformer2 is a ring modulator effect. A ring modulator allows a signal to apply amplitude modulation to another signal, resulting in complex distortion of the harmonic spectrum. A variable frequency oscillator is used to amplitude modulate the input signal. A second oscillator can be used to modulate the frequency of the first oscillator.
Parameter MixValues 0-100%
Pitch Speed 1 - 5000Hz 0-10Hz
On buttonWaveform
buttons
Stereo/Mono button
Tempo Sync pop-up
On/Off
Sine, Square, Saw, reverse Saw, Triangle Stereo/Mono
Description
Sets the level balance between the dry signal and the effect. If Tranceformer is used as a send effect, this should be set to maximum as you can instead control the dry/effect balance with the send.
Governs the frequency (pitch) of the modulating oscillator.This knob sets the modulation rate for Tranceformer. If Tempo Sync is off, a frequency value can be set. If Sync is On, this knob scrolls through the available Tempo Sync note values (see below).
Turns modulation of the Pitch parameter on or off. Sets the pitch modulation waveform.Governs whether the effect output will be stereo or mono.
No sync, 1/1 to 1/32, 1/1 to 1/32 Triplet, 1/1 to 1/32 Dotted
Clicking the “Sync” button so that it lights up activates Tempo Sync. To open the Tempo Sync pop-up, click the field above the Speed button. The fixed delay values correspond to note values, and will be “synced” to the tempo.
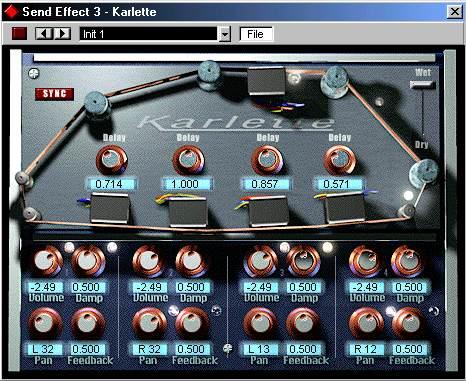
The Karlette is a four-channel delay, that emulates a “tape-loop” echo. The four "tape-heads" can be set to a certain note value, or a certain time, depending on whether Tempo Sync is activated or not. For each of the four “tape-heads”, you can set the following parameters:
Parameter DelayVolume
Values
1/32, 1/16, 1/16*, 1/8,
1/4T, 1/8*, 1/4, 1/2T,
1/4*, 1/2, 3/4, 1/1
Sync Off: 0 - 2 sec.
Damp 0.000 to 1.000
Pan
Feedback L64/< C >/R64 0.000 to 1.000
With the sync button activated, the delay can be set to a note value synced to the Cubase tempo. If the sync button is deactivated, the delay can be freely set to a time value.
The amplitude
Reads:
6
Pages:
32
Published:
Apr 2024
Master Facebook marketing with this e-book, designed to teach you how to drive significant traffic without ads. Learn from actionable strategies and insights ...
Formats: PDF, Epub, Kindle, TXT

Reads:
498
Pages:
30
Published:
Nov 2022
With this eBook, you will learn how to make thousands of dollars daily with a very easy one-time setup. Enjoy!
Formats: PDF, Epub, Kindle, TXT

Reads:
36
Pages:
50
Published:
Aug 2021
Art tutorials grade 9. A step by step guide to drawing, painting, sculpting, analyzing within the curriculum of Art in Swedish public school.
Formats: PDF, Epub

Reads:
23
Pages:
48
Published:
Aug 2021
Art tutorials grade 8. A step by step guide to drawing, painting, sculpting, analyzing within the curriculum of Art in Swedish public school.
Formats: PDF, Epub