The Tiny Book of Rules by Johan Falk - HTML preview
Download the book in PDF, ePub, Kindle for a complete version.
Rules in site building
Using actions
Rules actions are reactions that Rules may perform. Some actions return new data that Rules can work with – such as loading the most recent comment written by a user – but most actions only deal with the data already available to Rules.
Some common actions are:
- Add a variable: This adds a new variable into your configuration, which then can be manipulated and used.
- Calculate a value: This allows you to perform basic arithmetics with numbers.
- Create a new entity: This asks for required data for an entity, and then creates it.
- Fetch entity by id: This allows for fetching nodes and other entities by id.
- Fetch entity by property: This allows for fetching all entities matching selected criteria, for example a selected field value.
- Show a message on the site: This displays an on-site message.
- Publish/unpublish content.
- Create or delete any URL alias.
- Send an e-mail.
- Set a data value (described below).
Actions can be combined in chains, which allows for rules loading new objects and then acting on them. Contributed modules may provide more actions to Rules.
Data in Rules
Actions, and other plugins in Rules, act on specified data types. These data can be simple, such as text, integers and dates; or complex like nodes – which in turn have properties represented by data, such as node id (integer), title (text), or creation date (date). Complex data types may have properties which are complex, too – each node has, for example, an author represented by a user account (which in turn has a number of properties).
Some properties are writable, which means that you can alter these with Rules actions. The action Set a data value is particularly useful, and can be used to set any writable data.
For most action parameters, it is possible to switch between direct input, meaning manually written input, and data selection, a tool for drilling down into the nested properties of complex data types.
The data object site is always available in Rules, containing global site data such as the account for the acting user, the site name, and some other information.
Finally, it should be noted that field values are read- and writable only if Rules can be certain that the relevant entity has that field. If working with a node, for example, a field will only appear if conditions have been set that limits the rule to selected content types. (See using conditions for more information.) If the entity doesn’t have separate bundles – such as users – Rules can access the fields right away.
Using events
Rules provides a number of events – places in a Drupal page load that can be used to fire off actions. Rules that trigger on events are called reaction rules (in contrast to stand-alone rule components that must be triggered by other means – see the section about components).
Each event may provide some associated variables, which can be used in the rule configuration. For example, the event After saving new content provides the saved content as a node variable while After updating existing content provides both the updated and original content as variables – thereby allowing comparison between the two.
A reaction rule may have more than one triggering event. If they provide different variables, only the variables provided by all events may be used in the configuration, assuring that the rule may be evaluated properly regardless of which of the events is acting as trigger.
Using conditions
When a reaction rule is fired, or in other occasions where rules are used, you have the options to check a number of conditions and abort any actions if the conditions aren’t met. Conditions can be pretty specific, such as Content is promoted to front page, Data value is empty or the comparison between two text strings – but the most used condition is called Data comparison. This one is used to compare two variables available to Rules, or to compare a data variable to a manually entered value – for example to check if a field has a certain value or if the node author is the same as the acting user.
Conditions can be logically grouped to create and and or groups. These groups may in turn contain other logical groups.
There are two conditions that are particularly important when working with fields: Content is of type and Entity has field. These conditions allows Rules to know that an entity has a particular field, and subsequently makes the field data available in configuration. The condition Entity is of type has a similar role to provide entity specific data, but is used much less frequently. (You can also use the Data comparison condition to check the entity bundle.)
Lists and loops
Each data type declared to Rules automatically gets a sibling data type, being a list of this particular data. Thus, Rules cannot only handle nodes, text strings and dates, but also lists of nodes, strings and dates. This is very useful when working with multiple-value fields, but also for a few multiple-value entity properties, such as the roles of a user.
Rules provides a few actions and conditions that are handy when working with lists: List contains item, Add a value to a list and Remove a value from a list. The latter two can for example be used to add/remove a user from a multiple value user reference field.
The most useful thing with lists, though, is the ability to loop through them. By adding a loop to your set of actions, you have each action inside the loop being evaluated once for every item in the list you select. This can for example be used to send an e-mail to all users in a multiple-value user reference field.
It is possible to use loops within loops, though you should be aware that evaluation may become performance heavy if there are many items to loop over
Components
Reaction rules are the simplest and usually most common Rules configurations. But you can also create Rules components – reusable condition sets, action sets, single rules or sets of rules. These components can then be called by reaction rules, saving you the work of repeating the same conditions in three different reaction rules.
Apart from avoiding repetitive work, components may also be invoked by other modules. Views Bulk Operations, for example, can make use of Rules components as actions; Rules Scheduler can schedule the evaluation of any component for a future point in time; and with the help of Rules Bonus Pack, CTools can use condition components as access plugins in modules like Page manager and Panels.
Components are mainly created and edited like reaction rules – but they have no triggers. They also have configurable variables that are either parameters or provided (or both). Parameters are required input data for the component – variables that have to be specified when calling the component. Provided variables are returned to the caller after evaluation. Components are very useful both in site building and coding.
Useful additional modules
There are a number of modules taking advantage of Rules as a framework, or providing new actions, conditions and plugins. The most notable are:
- Rules Scheduler. This module is included in the Rules project, and allows scheduling components to be evaluated at a future point in time. The module can for example be used to schedule content deletion, upgrading of user accounts, or managing recurring e-mails.
- Views Bulk Operations (VBO). This module extends Views and allows users to perform actions on selected rows. Apart from some base-level actions, Rules components may be used as actions by VBO. An equally useful feature of VBO is that it allows calling Views from Rules configuration, to load a list of entities listed by Views.
- Rules Bonus Pack. This module serves as an experimental lab for new Rules functionality, and provides a number of new actions and conditions. It also allows using condition components as CTools access plugins, as well as providing a new component type used for validating and modifying arguments (contextual filter values) in Views.
- Rules Link. This module can be used to attach links to entities, and firing rule sets when these links are clicked. Links can also be rendered using Views, and link visibility can be controlled by condition sets.
Debugging Rules configuration
Rules is to a great tool for automation configured in a point-and-click web interface. Just as when automating things with code, you will be happy for a debugger every once in a while. The Rules debugger is found at the Rules configuration page – you will want to write out the debug messages directly on the web pages to easily follow what rules are executed, what conditions are evaluated TRUE or FALSE, and how long time each step takes.
If variables are not behaving as you expect, you will find the Rules action Debug value useful (provided by the Devel module). It prints out a krumo dump of a variable that you choose, making it available for inspection.
Coding for Rules
Normally, extensions of Rules are put into the file mymodule.rules.inc. This way, the file is only loaded when Rules is actually used on a page load, which is good for performance. In this section of the book, all code examples assume that your module is called mymodule.
The following sections only contain the very basics of extending Rules. More detailed documentation can be found at the online documentation (http://www.drupal.org/ node/878720) and in rules.api.php included in the Rules project.
Writing conditions
Conditions are the least complex Rules extension. To provide new conditions to Rules, you need two things – a function returning TRUE or FALSE, and an implementation of hook_rules_ condition_info() to tell Rules about your condition. The info hook should return an array on the following form:
$conditions = array(
‘mymodule_rules_condition_check_a_node_
value’ => array(
‘group’ => t(‘My module’),
‘label’ => t(‘My condition’),
‘parameter’ => array(
‘var_1’ => array(
‘type’ => ‘node’,
‘label’ => t(‘Condition parameter 1
(node)’),
),
‘var_2’ => array(
‘type’ => ‘text’,
‘label’ => t(‘Condition parameter 2
(text)’),
),
),
),
);
return $conditions;
The outermost key in the array above is by default the name of the callback function for the condition – more than one condition can be declared by adding more keys. As usual, make sure to prefix your functions with your module name. Especially note the property parameter, used for telling Rules which type of data the condition uses as input. There can be any number of parameters – including none – for a condition callback. These are used by the callback function, which returns TRUE or FALSE:
function mymodule_rules_condition_check_a_
node_value($var_1, $var_2) {
// Condition logic goes here...
return $result;
}
Writing actions
Conditions are very similar to conditions in their structure: a function carrying out the action, and an info hook implementation to tell Rules about it – in this case hook_rules_actions_info(). An important difference is that while conditions return TRUE or FALSE, actions may return new data objects to Rules. See example below.
$actions = array(
‘mymodule_rules_action_fetch_user_recent_
content’ => array(
‘group’ => t(‘My module’),
‘label’ => t(‘My action’),
‘parameter’ => array(
‘var_1’ => array(
‘type’ => ‘user’,
‘label’ => t(‘Fetch latest content
from this user’),
‘save’ => TRUE,
),
),
‘provides’ => array(
‘var_2’ => array(
‘type’ => ‘node’,
‘label’ => t(‘Most recent content’),
),
),
),
);
return $actions;
Especially note the provides property, describing the variable(s) returned from the action. When writing the action callback, make sure it returns an array containing the variable(s) that Rules expects. The keys for the return array must match the keys in the info hook. The save property for the var_1 parameter means that Rules saves the passed variable if the action was successfully executed. Rules will normally wait with saving the changed entities and other data until execution is finished, to avoid multiple saves.
function mymodule_rules_action_fetch_user_
recent_content ($var_1) {
// Code to fetch a node object goes here...
return array(
‘var_1’ => $account,
‘var_2’ => $node,
);
}
Declaring and invoking events
Events are declared with an info hook – hook_ rules_event_info() – very similar to the previous ones. An important difference is the key used to declare event variables:
$events = array(
‘mymodule_rules_event_id’ => array(
‘group’ => t(‘My module’),
‘label’ => t(‘My event’),
‘variables’ => array(
‘var_1’ => array(
‘type’ => ‘node’,
‘label’ => t(‘Node provided by the
event’),
),
),
),
);
return $events;
Events are not invoked by their own callbacks.
Rather, they are invoked by adding the rules_invoke_event() function somewhere in the execution cycle. The first parameter used with this function is the name of the event to call, and any subsequent parameters are being passed as variables to the Rules event:
// Placed in your custom module to react in
the execution cycle
rules_invoke_event(‘mymodule_rules_event_id’,
$node);
An alternative to rules_invoke_event is the rules_invoke_event_by _args() function. It takes two parameters only, the first being the name of the event and the second being an array of variables to pass to the event.
Invoking components programmatically
Rules components are handy tools for allowing site builders to customize their own actions and conditions. If you are writing a module that allows site builders to set custom conditions (or actions), you can let them set these up as Rules components and then evaluate selected components programmatically. This works in a way analogous to invoking events, by using rules_invoke_component().
The first argument is the (machine) name of the component, and any subsequent arguments are variables sent to the component.
// Included somewhere in your custom module.
$component_name = $settings[‘rules_component_na
me’];
// Any variables provided from the component
are returned from its evaluation.
$result = rules_invoke_component($component_
name, $var_1, $var_2);
Extending and altering data types
Rules relies on information from the Entity API module to declare data types for each entity on your site. These are complemented by a number of other data types, which are (with machine names in parenthesis): date, decimal number (decimal), duration, formatted text (text_formatted), integer, text (text), text token (token), truth value (boolean), URI (uri) and watchdog log entry (log_entry). As previously mentioned, all data types and known entity types are also represented by lists being arrays of the data values.
The formatted text, watchdog log entry and all entities are complex data types, having a number of properties – each property being one of the declared data types. These properties can be altered and extended by modifying the properties array for the data type with help of hook_entity _property _info_alter() and hook_ rules_data_info_alter().
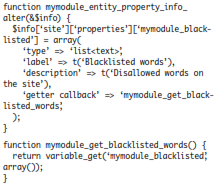
It should be noted that the globally available data is made available under the key site found in hook_entity _property(). The following ex- ample shows how a site-wide list of blacklisted words can be added to the site variable, to be used in Rules configuration.
Providing new entities and data types
Just as existing data types can be altered, new ones can be added. This is done by implementing hook_rules_data_info(). An example of this is displayed below, where views are being introduced as a data type in Rules.
Function mymodule_rules_data_info() {
$data_types = array(
‘mymodule_view’ => array(
‘label’ => t(‘view object’),
‘wrap’ => TRUE,
‘property info’ => array(
‘machine_name’ => array(
‘type’ => ‘text’,
‘label’ => t(‘Machine name’),
),
‘args’ => array(
‘type’ => ‘list<text>’,
‘label’ => t(‘Arguments’),
‘setter callback’ => ‘entity_property_verbatim_set’
),
),
),
);
}
Especially note the wrap property, which makes Rules wrap the passed object and make it available for data selection. It is required for any complex data type. Two properties are declared in the property info array, which will make it possible to read these properties in Rules. Also, the args property has a setter callback – meaning that Rules cannot only read but also write the arguments of the view object.
It so happens that the properties’ machine names correspond directly to properties in the view object. If this wasn’t the case, a getter callback would have been required to tell Rules how to read the property, just as it works for entity properties. Now the default callback entity _property _verbatim_get() is used, which like its setter sibling simply writes to the data object using the declared machine name as property name.
New entity types are declared using hook_entity_info. Its usage is not documented here, but if your entities are declared properly for the Entity API modules, Rules will know about them too.
You may also like...
-

The Magical Guide to Algorithm Analysis and Design Computer Sciences by Rosina S KhanThe Magical Guide to Algorithm Analysis and Design
Reads:
162Pages:
127Published:
Jan 2024The process of writing algorithms or pseudo codes before feeding them into program structures and executing them to get desired outputs is very magical indeed...
Formats: PDF, Epub, Kindle, TXT
-

Basic Keyboard Shortcut Keys - Windows XP, 7, 8, 10, and 11 Computer Sciences by Josh BadhmenBasic Keyboard Shortcut Keys - Windows XP, 7, 8, 10, and 11
Reads:
258Pages:
21Published:
Jun 2023Unlock the Power of Windows with Basic Keyboard Shortcut Keys for XP, 7, 8, 10, and 11. This comprehensive guide provides a curated list of essential keyboard...
Formats: PDF, Epub, Kindle, TXT
-

Virtual Networking Success Computer Sciences by peter heywoodVirtual Networking Success
Reads:
304Pages:
59Published:
Jan 2022Thanks to advances in technology and new ways that employees interact and meet with one another, virtual networking now makes it possible to reach others and ...
Formats: PDF, Epub, Kindle, TXT
-

Continuous Bernoulli distribution---simulator and test statistic Computer Sciences by Kuan-Sian Wang; Mei-Yu LeeContinuous Bernoulli distribution---simulator and test statistic
Reads:
109Pages:
170Published:
Nov 2020This is an advanced and completely descriptive book for the continuous Bernoulli distribution that is very important to deep learning and variational autoenco...
Formats: PDF