Maya How To's by Alias Wavefront - HTML preview
Download the book in PDF, ePub, Kindle for a complete version.


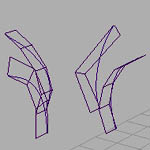
Assistant Online - Maya/How Tos
Alias|Wavefront / Assistant Online / Maya / How Tos How-to's are step-by-step tutorials that are designed to help you
learn more about Maya. While some lessons let you start from
scratch, other lessons may provide a start file for you to begin with.
Note - These files may not perform as expected. Always back up
your work before using any files downloaded from this website.
These how-to's have been updated to work in Maya 2.5. However,
unless otherwise noted, they will also work in Maya 2.0.
Maya how-to's are available in the following categories:
Animation
Maya 2.5 Complete
How to Build and Animate an Iris
Maya 2.5 Complete
Maya 2.5 Complete
How to Animate an Accurate Clock
Maya 2.5 Complete
Maya 2.5 Complete
How to Animate the Aiming of a Spotlight
Maya 2.5 Complete
Maya 2.5 Complete
How to Animate with Flow (Object)
Maya 2.5 Complete
How to Animate with Flow (Curve)
Maya 2.5 Complete
Character
How to Create SoftBodies in Character
Maya 1.5 FX
Maya 2.5 Complete
Compositing
How to Composite Hardware and Software
Maya Fusion Lite
Rendered Images NEW!
How to Composite using zDepth Maps
Composer 5.0
How to change the default event colors
Composer 5.0
Composer 5.0
How to Extract Images from a Movie
Maya Fusion Lite
Composer 5.0
Composer 5.0
How to layer an unpre-multiplied image
Composer 5.0
Composer 5.0
How to set up Maya renders for Compositing
Composer 5.0
Dynamics - Particle
http://www.aw.sgi.com/assistant_online/entertain/maya/how_tos/index.html (1 of 3) [3/7/2000 13:35:40]
Assistant Online - Maya/How Tos
Maya 2.5 Complete
How to use Particles to Drive Rigid Bodies
Maya 2.5 Complete
How to Create an Exploding Fireball
Maya 2.5 Complete
Dynamics - Rigid Body
Maya 2.5 Complete
How to Create a Newton's Pendulum
Maya 2.5 Complete
Dynamics - Soft Body
How to Animate a Melting Object
Maya 2.5 Complete
How to Create an Inflating Balloon
Maya 2.5 Complete
Maya 2.5 Complete
Maya 2.5 Complete
Maya 2.5 Complete
Games - NEW!
Maya 2.5 Builder
Maya Fur
Maya 2.5 Unlimited
MEL
How to use attrCollection.mel Script
Maya 2.5 Unlimited
How to use an "relocateTexturesWin"
Maya 2 Complete
How to use an Assistant Online MEL
Maya 2.5 Complete
Maya 2.5 Complete
Miscellaneous
Learning Maya 2.5 Addendum (PDF 128k)
Maya 2.5 Complete
Modeling
How to Build a Spiral Staircase
Maya 2.5 Complete
Maya 2.5 Complete
How to Use bevelCaps.mel Script
Maya 2.5 Complete
Maya 2.5 Unlimited
Maya 2.5 Unlimited
Paint Effects - NEW!
How to Create a Tree using PaintFX NEW!
Maya 2.5 Complete
Rendering
Maya 2.5 Complete
Maya 2.5 Complete
How to Create a Ball Env Reflection Map
Maya 2.5 Complete
Maya 2.5 Complete
How to Create a Double-sided shader
Maya 2.5 Complete
Maya 2.5 Complete
How to Create a Light GOBO with Barn Doors Maya 2.5 Complete
How to Create a Realistic Sky with EnvSky
Maya 2.5 Complete
How to Create Realistic Shadows with EnvSky Maya 2.5 Complete
Maya 2.5 Complete
How to Create a Soft Spotlight
Maya 2.5 Complete
How to Combine Bump and Displacement
Maya 2.5 Complete
Maya 2.5 Complete
http://www.aw.sgi.com/assistant_online/entertain/maya/how_tos/index.html (2 of 3) [3/7/2000 13:35:40]


Assistant Online - Maya/How Tos
Maya 2.5 Complete
Technical Overview on Aliasing
Maya 1.5 Base
Technical Overview of Maya Software
Maya 1.5 Base
How to Set up Reflections and Refractions
Maya 2.5 Complete
Maya 2.5 Complete
Maya 2.5 Complete
http://www.aw.sgi.com/assistant_online/entertain/maya/how_tos/index.html (3 of 3) [3/7/2000 13:35:40]


Assistant Online - Maya/How Tos/Animation/Flexo
Alias|Wavefront / Assistant Online / Maya / How Tos / Animation / Flexo
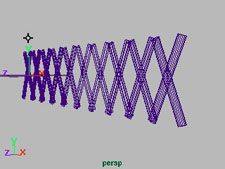
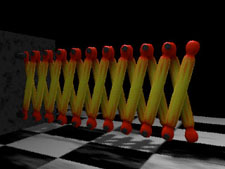
HOW TO MODEL A FLEXO WITH
MAYA
by Lluís Llobera Trias - Quod/IDEP
Spain
Maya Complete
Animation
This is a tutorial to
create and make fully
operative, with Maya,
a flexo-type arm like
those used to hold
lights. You will work
with expressions,
driven keys, pivot
position, and
constraints. You will
also learn to add attributes and work with the Graph Editor.
The point of this exercise is to create a series of arms that
rotate properly together when the main arm of the flexo does.
Note: throughout the tutorial, you are told how to create a 5-arm flexo;
however, all the pictures contained in this document show a 10-arm
flexo. In fact, there's no arm limit as long as you follow the method
correctly.
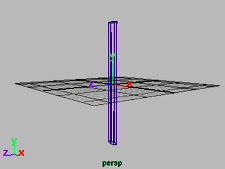
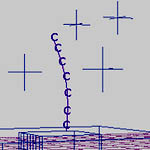
STEP ONE
In "extensible" arms
such as these, you get
the same element
repeated a number of
times. Therefore it is
very important that the
first arm created has
some kind of a solid
structure. You are
going to create a cylinder grouped twice with itself, positioning
the pivot for every node in a proper position.
http://www.aw.sgi.com/assistant_online/entertain/maya/how_tos/animation/flexo/index.html (1 of 6) [3/7/2000 13:35:53]

Assistant Online - Maya/How Tos/Animation/Flexo
Create a
●
NURBS cylinder and name it " c_i", for "inferior constraint". Go to the Channel Box and set its Y scale
to 10, and its Z scale to 0.4.
Enter "
●
Insert" to edit the Pivot Point position, then go to
the Numerical Input Line, which is a white space just
above the Channel Box. Enter the values 0 -10 0.
You should see that the pivot has moved at the bottom of the
cylinder. Enter " Insert" again to go back to object editing mode.
Group the cylinder with itself, and name the new group " c_s", for "superior constraint". Now follow the previous steps to
position its pivot point at the top of the cylinder (that's 0 10 0).
Group the node c_s with itself, and name the new group
" SUP_01". Now you can rotate the node SUP_01 45 degrees in the Z axis. You have successfully created the first arm of
the flexo.
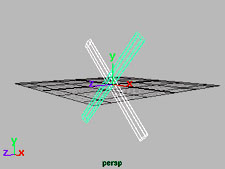
STEP TWO
Enter
Edit->Duplicate->
Options and reset the
values.
Duplicate the node
SUP_01 and name its
copy INF_01. In the
Channel Box, set its Z
translation to 1.
Now you are going to create an expression to make this new
node rotate every time that the superior arm does. Check that
INF_01 is still selected, and go to Window->Expression
Editor. Name the new expression " inf_rotate", and enter in the expressions area
INF_01.rz = 180 - SUP_01.rz ;
Click on " Create". From now on, every time that the SUP_01
rotates in the Z axis, the INF_01 will rotate also. Check it if you want. After you have, set the Z rotation for the SUP_01 to 45 again -- the whole exercise will assume this as its value.
Since the arms of the flexo are alternated, you will now have
to move the pivot points of the c_i and c_s nodes of the
SUP_01 and INF_01 arms in an absolute Z translation of 0.5.
To achieve this, the easiest procedure is to select each of the
sub-nodes, click " Insert" and, in the Numeric Input Line, enter
. . 0.5
http://www.aw.sgi.com/assistant_online/entertain/maya/how_tos/animation/flexo/index.html (2 of 6) [3/7/2000 13:35:53]


Assistant Online - Maya/How Tos/Animation/Flexo
You will have to repeat this operation for each of the
sub-nodes.
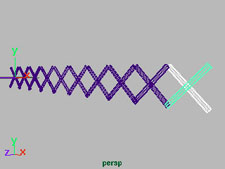
STEP THREE
Select SUP_01 and
INF_01 and then select
Edit-> Duplicate->
Options. Set the
number of copies to 4
and click on the
" Duplicate Input
Connections" box.
When you click on
" Duplicate", Maya will create four new superior cylinders, called SUP_02 to SUP_05, and four inferior cylinders which are named INF_02 to INF_05. Select in the Outliner the nodes SUP_02 and INF_02, and set them to an X translate of 14
units. Pick the next two nodes, move them to 28, and so on.
Now look what happens when you rotate the SUP_01 : only
the inferior arms rotate with it. This is because only INF_01
had the expression applied, and therefore the superior arms
aren't aware of what is going on.
STEP FOUR
Select the nodes
SUP_02 to SUP_05
and (in the
Animation menu)
select
Animate-> Set
Driven
Key-> Set-> Options.
The Set Driven Key
window will pop up (from now on, we will call it SDK). In the
" Driven" frame you'll see the four nodes you have just
selected.
In any orthographic window select the SUP_01 and, returning
to the SDK, click on " Load Driver" to place it in the " Driver"
frame.
Click on the " Rotate Z" next to the Driver frame (it'll get dark), and select the four nodes in the Driver. Click on their " Rotate
Z". Now click on " Key" to set the first connection.
Select the SUP_01 node and set its Z rotation to 60 degrees.
After that, select the SUP_02 to SUP_05 nodes and rotate
them to 60 in Z as well. In the SDK window, set the second
connection by clicking on " Key". Close the SDK.
http://www.aw.sgi.com/assistant_online/entertain/maya/how_tos/animation/flexo/index.html (3 of 6) [3/7/2000 13:35:53]


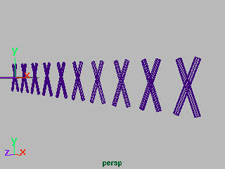
Assistant Online - Maya/How Tos/Animation/Flexo
Look what you have now: the superior arms only seem to
work properly when the Z rotation of SUP_01 is between 45
and 60 degrees. Let us fix this.
Select the nodes SUP_02 to SUP_05 and go to Window-> Animation Editors-> Graph Editor. Press the " f" key to execute a " frame all"; a blue curve will appear in the right window. Select it (all of it, including its beginning and end) and
enter :
Curves -> Pre Infinity -> Cycle with Offset
Curves -> Post Infinity -> Cycle with Offset
Close the Graph Editor. Now all the arms rotate correctly.
STEP FIVE
Using the Outliner or
the Hypergraph, add
constraints from
certain nodes to the
other ones. This is the
formula to do it:
Select the node
●
c_i from
SUP_0x, then
the node c_s
from INF_0(x+1).
Select
●
Constraints->
Point. You also
have to do it the
other way
around, i.e.:
select the node
c_i from INF_0x,
then the node
c_s from
SUP_0(x+1) and
select
Constraints->
Point.
For example, the first step is to select c_i from SUP_01 and c_s from INF_02 and constraint them. Then, pick the c_i from INF_01 and the c_s from SUP_02 and constraint them too.
Continue until you have no arms left.
http://www.aw.sgi.com/assistant_online/entertain/maya/how_tos/animation/flexo/index.html (4 of 6) [3/7/2000 13:35:53]

Assistant Online - Maya/How Tos/Animation/Flexo
STEP SIX
You should now have
the flexo working
correctly. But having to
depend on the Z
rotation for SUP_01 is
time consuming, and
inefficient.
Now we will create a
new node with an attribute to get it to work.
Select
●
all the nodes (Right Click and " select all" is the
easiest way) and group them.
Name the group "
●
FLEXO".
Enter "
●
Insert" to edit its pivot point position.
Go to the Numeric Input Line and enter:
●
. 15 .
Select Display-> Objects Components-> Selection
Handles. From now on, you'll be able to select the whole
object by clicking on this handle.
Now select Modify-> Add Attribute. Name the new attribute
" Length", enter 0 for its minimum value, 100 for the maximum, and 50 as default value.
Select the node SUP_01, and select Animate -> Set Driven
Key -> Set -> Options. Load the node FLEXO as the driver.
Select the attribute " Length" next to the Driver frame, and the Z rotation from the Driven frame. Press Enter.
Set the " Length" Value to 0, and the Z rotation for SUP_01 to 0. Click on " Key". Now set " Length" to 100 and the Z rotation for the SUP_01 to 90. " Key" it again.
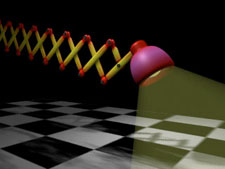
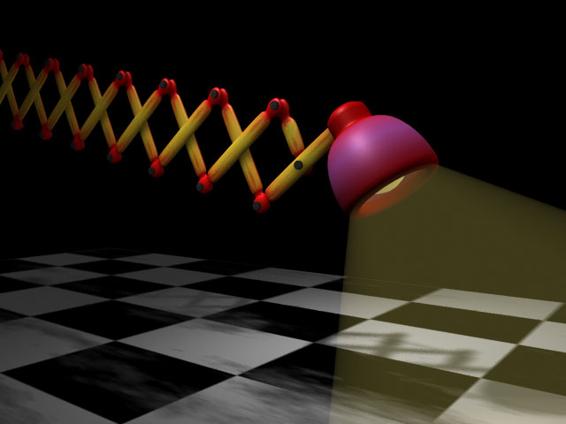
CONCLUSION
Well then you have
just finished building
the flexo!
Now it's up to you to
add details, such as
the joints (which
should be constrained
to the nodes c_i from
the arms), etc.
Here's the final file for
you to download. You can open it with any version of Maya.
http://www.aw.sgi.com/assistant_online/entertain/maya/how_tos/animation/flexo/index.html (5 of 6) [3/7/2000 13:35:53]


Assistant Online - Maya/How Tos/Animation/Flexo
Use of this file confirms your agreement to the Terms and Conditions
set out on the Terms and Conditions page.
http://www.aw.sgi.com/assistant_online/entertain/maya/how_tos/animation/flexo/index.html (6 of 6) [3/7/2000 13:35:53]
http://www.aw.sgi.com/assistant_online/entertain/maya/how_tos/animation/flexo/img/img009b.jpg http://www.aw.sgi.com/assistant_online/entertain/maya/how_tos/animation/flexo/img/img009b.jpg [3/7/2000 13:35:57]


Assistant Online - Maya/How Tos/Animation/Iris
Alias|Wavefront / Assistant Online / Maya / How Tos / Animation / Iris
HOW TO BUILD AN IRIS
By Alan Harris
Maya Complete
Animation
In this lesson, you will learn
how to build an iris and use
Set Driven Key to animate it
opening and closing.
To achieve this, you will
create a locator and add an
attribute called Shutter. This
attribute will range from 0 to
Play Movie [321 k]
10. 10 equals the iris in closed the position.
STEP ONE
Set the Grid Options to
default settings.
Create two Nurbs circles at
the origin -- one 10 units and
the other 5 units. Template
them to use as guides.
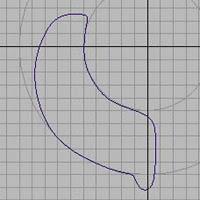
Create a closed
●
CV
Curve as shown.
Duplicate the curve
●
and translate in Y to
-0.2
Select the top curve
●
and select Surfaces >
Planar.
Select the top curve
●
and the bottom curve
and select Surfaces >
Loft.
Delete the curves or
●
delete history on the
surfaces.
http://www.aw.sgi.com/assistant_online/entertain/maya/how_tos/animation/iris/index.html (1 of 4) [3/7/2000 13:37:58]


Assistant Online - Maya/How Tos/Animation/Iris
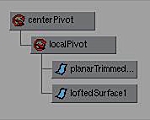
STEP TWO
You will need to group these
surfaces twice to get two different
pivot points. One for creating the
subsequent shutters and the other
for the local rotation.
Select the two surfaces.
●
Select
●
Edit > Group and
rename this node localPivot.
Select the node
●
localPivot,
then select Edit > Group
again and rename this node
centerPivot. This node should
be at the origin.
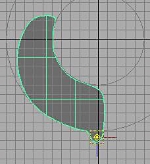
You will now change the location of
the localPivot.
Select the
●
localPivot node.
Press
●
Insert on the keyboard
to modify the pivot point.
In the top view,
●
Move the pivot
to the corner of the shutter
piece as shown.
Press
●
Insert again when
finished.
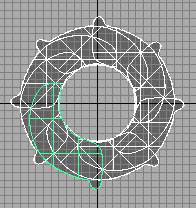
STEP THREE
You will now be duplicating
surfaces to create the other
pieces.
Select the
●
centerPivot
node.
Select
●
Edit >
Duplicate - Options
and set the following:
Rotate Y to 30;
Translate Y to 0.1;
Number of Copies to
11
Press
●
Duplicate.
http://www.aw.sgi.com/assistant_online/entertain/maya/how_tos/animation/iris/index.html (2 of 4) [3/7/2000 13:37:58]


Assistant Online - Maya/How Tos/Animation/Iris
STEP FOUR
You will be creating a Locator with an attribute called shutter to
control the opening and closing of the iris.
Select
●
Create > Locator.
Select
●
Modify > Add Attribute... and set the following:
Attribute name to shutter;
Minimum to 0;
Maximum to 10
Press
●
OK.
STEP FIVE
The Locator now needs a connection to the rotation attribute of
the local pivot. To achieve this connection, you will use Set
Driven Key .
Select
●
all twelve of the localPivot nodes.
Select
●
Animate > Set Driven Key > Set - Options.
With the
●
localPivots selected, press Load Driven.
Highlight all the
●
localPivots in the left column.
In the right column of the Driven section, highlight
●
rotate
Y.
You will now load the Locator as the Driver.
Select
●
the Locator.
Press
●
Load Driver.
Highlight the locator in the left column.
●
In the right column of the Driver section, highlight
●
shutter
In this next step you will be setting the keys.
Press
●
Key.
This will set a key for the shutter value of 0 when the iris is fully open.
In the Channel Box, set the
●
shutter value to 10.
Select
●
all the localPivot nodes.
Highlight the
●
Rotate Y attribute name in the Channel Box.
Use the virtual slider with the
●
MMB in the workspace by
click- dragging to the left until the iris is closed.
Press
●
Key.
Test the Set Driven Key by selecting the Locator and entering
different values or by using the virtual slider.
http://www.aw.sgi.com/assistant_online/entertain/maya/how_tos/animation/iris/index.html (3 of 4) [3/7/2000 13:37:58]


Assistant Online - Maya/How Tos/Animation/Iris
CONCLUSION
You should now have the
shutter attribute controlling
the animation of the iris.
Experiment with different
curve shapes and amount
of shutters. You can also
experiment with different
translate offsets when
duplicating the shutters.
Play Movie [321 k]
Your use of this file confirms your agreement to the
Terms and Conditions set out in the Terms and Conditions page.
http://www.aw.sgi.com/assistant_online/entertain/maya/how_tos/animation/iris/index.html (4 of 4) [3/7/2000 13:37:58]


Assistant Online - Maya/How Tos/Animation/Pick Up Object
Alias|Wavefront / Assistant Online / Maya / How Tos / Animation / Pick Up Object
HOW TO PICK UP AN OBJECT
by Robert Magee
Maya Complete
Animation
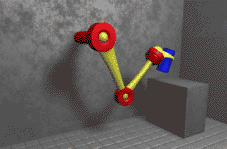
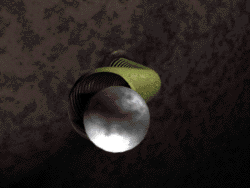
In this lesson, you will
learn how to make an
Inverse Kinematic arm
pick up an object and
place it on a table. This
will involve constraining
the IK handle to two
Locators then animating
Play Movie [224 k]
the constraint weights to
switch the hand between locators.
The key to this lesson is that you will animate the object first
then constrain the arm to match that movement. This ensures
that the object's movement is exactly what you want before you
even have to consider the character picking it up.
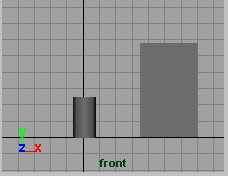
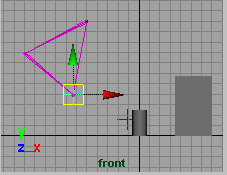
STEP ONE
Create a polygonal
cube. Scale it to create
a tabletop. In the front
view, place it on the
ground along the X axis.
Rename the cube's
transform node to table.
Create a NURBS
cylinder. Scale it so that
it is a little taller. Place it on the ground near the origin. This will
be the object that will get lifted up onto the table. Rename the
cylinder's transform node to glass.
http://www.aw.sgi.com/assistant_online/entertain/maya/how_tos/animation/pickUp/index.html (1 of 6) [3/7/2000 13:38:18]


Assistant Online - Maya/How Tos/Animation/Pick Up Object
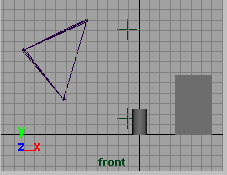
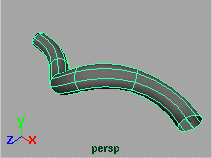
STEP TWO
In the front view, place
three Joints to create a
simple arm that will pick
up the glass and place it
on the table.
Add an IK handle that
runs from the root joint
to the end joint of the
skeleton.
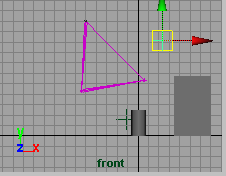
STEP THREE
Create two Locators.
Place one to the left of
the glass and name it
glassLocator. This
locator will drive the arm
when it is picking up the
glass.
Place the second
locator up above the
glass and name it freeLocator. This locator will drive the arm
when it is not picking up anything.
STEP FOUR
In the Hypergraph
window, parent the
glass node to the
glassLocator node. Now
any animation you apply
to the locator will also
affect the cylinder.
STEP FIVE
Select the two locators
and then the IK handle.
Make sure that the IK
handle is selected last.
Select Constrain ->
Point to constrain the
handle to both locators
at once. It will constrain
to a point half way
between the two locators.
http://www.aw.sgi.com/assistant_online/entertain/maya/how_tos/animation/pickUp/index.html (2 of 6) [3/7/2000 13:38:18]


Assistant Online - Maya/How Tos/Animation/Pick Up Object
If you Select and Move the freeLocator, you will see that the IK
handle updates so that it always places itself halfway between
the two locators. Both locators have been constrained using the
same weighting, so the IK handle is trying to point at both
constraints equally, The result is that the IK Handle is
positioned at an equal distance between the two locators.
STEP SIX
Select the IK handle. In
the shapes section of
the Channel box, you
will find the
ikHandle1_pointConstraint1
shape node. It contains
two key attributes:
glassLocatorW0
●
which is the
weighting of the
glass locator; and
● freeLocatorW1
which is the
weighting of the
other locator.
Set the glassLocatorW0 attribute to 0. Now the IK handle will move to the freeLocator since it has the strongest weighting. If
you Select and Move the freeLocator, you will see that the IK
handle now follows this locator entirely, because you have told
it not to point at the glassLocator at all.
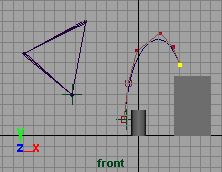
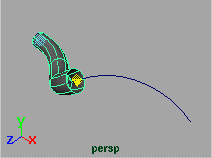
STEP SEVEN
You will now animate the
glass so that it is
positioned exactly where
you need it.
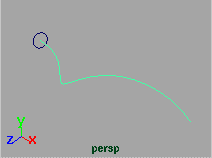
Create a CV curve from
the glassLocator upward
to the top of the table.
This will be used as a
motion path for animating the movement of the glass. You
could also simply set keys on the glass, but using a motion path
offers another way to animate it.
http://www.aw.sgi.com/assistant_online/entertain/maya/how_tos/animation/pickUp/index.html (3 of 6) [3/7/2000 13:38:18]


Assistant Online - Maya/How Tos/Animation/Pick Up Object
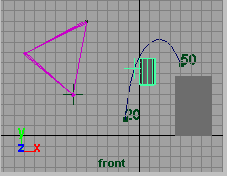
STEP EIGHT
Select the glassLocator
and then the new curve.
Select Animate ->
Paths -> Attach to
Path - options.
Set the Time Range to
Start/End then set the
Start Time to 20 and
the End Time to 50.
Make sure that Follow is turned Off. Click Attach.
Now the glass will animate along the path between frames 20
and 50. If you don't like how the path is working or if the glass is
not sitting on the table properly at frame 50, you can edit the
shape of the curve using its CVs.
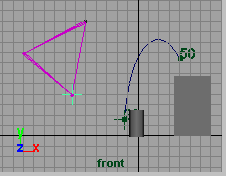
STEP NINE
Now you can animate
the freeLocator. Use the
following positions to
key this node:
Go to frame 1.
Place the freeLocator to
the left of the glass.
Press Shift w to set
keys for the translation attributes.
STEP TEN
Go to frame 20.
Place the freeLocator at
the start point of the
motion path curve.
Again, press Shift w to
set keys for the
translation attributes.
http://www.aw.sgi.com/assistant_online/entertain/maya/how_tos/animation/pickUp/index.html (4 of 6) [3/7/2000 13:38:18]


Assistant Online - Maya/How Tos/Animation/Pick Up Object
STEP ELEVEN
Go to frame 50.
Place the freeLocator at
the end point of the
glass motion path.
Set keys for the
translation attributes.
STEP TWELVE
Go to frame 80.
Place the freeLocator at
the left of the table in
open space.
Set keys for the
translation attributes.
Now if you playback the
animation, you will see
that the hand moves up
Play Movie [254 k]
to the table and back but it does not work properly with the
glass between frames 20 and 50.
STEP THIRTEEN
Go to frame 1.
Open the Animation
Preferences Window.
Change the Default
Out Tangent to
Stepped. This will
ensure that the next few
keys set on these
attributes will jump to a
new value at each
Play Movie [254 k]
keyframe, rather than
make a gradual transition between values from one keyframe to
the next.
Select the IK handle. Highlight the glassLocatorW0 and
freeLocatorW1 attributes on the Constraint shape node. With
your right mouse button select Key Selected.
Go to frame 20. Set glassLocatorW0 to 1 and freeLocatorW1
to 0. Highlight the glassLocatorW0 and freeLocatorW1
attributes on the Constraint shape node. With your right mouse
button select Key Selected. This switches the weighting of the
http://www.aw.sgi.com/assistant_online/entertain/maya/how_tos/animation/pickUp/index.html (5 of 6) [3/7/2000 13:38:18]


Assistant Online - Maya/How Tos/Animation/Pick Up Object
constraints so that the arm is focused on the glassLocator
during this time.
Go to frame 50. Set glassLocatorW0 to 0 and freeLocatorW1
to 1. Again Key Selected for the two attributes. This will ensure that the hand "lets go" of the glass after frame 50.
When you playback the scene this time, you will see that the
arm follows the glass between frames 20 and 50.
CONCLUSION
This animation is the result of constraining the arm to different
Locators, then using the constraint weight to switch between
them. You could add more objects if you wanted, then animate
their weights in a similar manner.
In the completed animation shown at the start of this lesson,
another related technique was used. An extra joint was added
to the skeleton and then the second last joint was
orient-constrained to the two locators, so that if the glass to
rotated then so would the hand. The weighting of the second
constraint was then connected to the weighting of the first
constraint so that the animation of the weights could be shared.
To see the final scene, download the pickup_final.ma file and load it into Maya.
Your use of this file confirms your agreement to the
Terms and Conditions set out in the Terms and Conditions page.
http://www.aw.sgi.com/assistant_online/entertain/maya/how_tos/animation/pickUp/index.html (6 of 6) [3/7/2000 13:38:18]


Assistant Online - Maya/How Tos/Animation/Accurate Clock
Alias|Wavefront / Assistant Online / Maya / How Tos / Animation / Accurate Clock
HOW TO ANIMATE AN
By Robert Magee
ACCURATE CLOCK
Maya Complete
Animation
In this lesson, you will
learn how to animate the
hands of a clock using a
series of expressions
which reference Maya's
internal time variable.
You will also use attributes
that allow you to set the
start time in hours,
minutes and seconds for the animation. This clock can then be
added to any scene and the hands will animate automatically
based on the chosen time units.
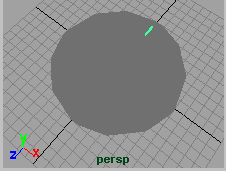
STEP ONE
Select Create > NURBS
Primitives > Circle.
Rotate and Scale the circle
to the size that you need
and place it on the ground
.
Select the circle then
select Surfaces -> Planar
to create a planar trimmed surface for the face of the clock.
Delete History on the surface and the original circle curve.
Rename the surface as face.
http://www.aw.sgi.com/assistant_online/entertain/maya/how_tos/animation/clock/index.html (1 of 6) [3/7/2000 13:39:09]


Assistant Online - Maya/How Tos/Animation/Accurate Clock
STEP TWO
Select Create -> Polygon
Primitives -> Plane.
Scale and Move the plane
to create a marker for the
hours. Place it along the Z
axis near the top. Move it
up a little along the Y axis
to raise it from the face of
the clock.
Delete History on the polygon shape.
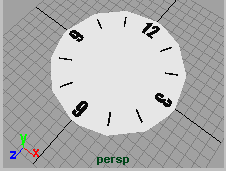
STEP THREE
Select the polygon shape
and choose the Rotate
tool.
Press the Insert key then
use grid snap to snap the
pivot point back to the
origin.
Select Edit -> Duplicate -
options. Set the Y Rotation to 30 and Number of Copies to 11. Press Duplicate.
You now have 12 markers for the hours of the clock. You can
increase the size of the markers at three, six, nine and twelve
o'clock or you can delete the markers at these points and add
numbers.
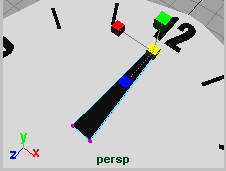
STEP FOUR
Select Create -> Polygon
Primitives -> Cube.
Rename the cube as
hourHand.
Press F8 to go into
component mode then
reshape the vertices to get
the look that you desire.
Make sure that the shape
is pointing up along the Z axis.
Note: By reshaping the hand at the component level, you
ensure that the shape's transform pivot remains at the origin.
Delete History on the polygon shape.
http://www.aw.sgi.com/assistant_online/entertain/maya/how_tos/animation/clock/index.html (2 of 6) [3/7/2000 13:39:09]
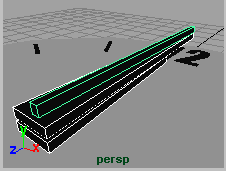


Assistant Online - Maya/How Tos/Animation/Accurate Clock
STEP FIVE
Select Edit -> Duplicate -
options. Press the reset
button then press
Duplicate.
Move the shape up along
the Y axis then reshape it
using component mode to
make this hand longer.
Rename the new cube as minuteHand.
Repeat these steps to create a third, thinner cube and name it
secondHand.
STEP SIX
Select all of the pieces of your clock then select Edit -> Group.
Rename the group node to clock.
With the clock node selected, select Modify -> Add Attribute...
then add the following three attributes to the clock node:
Attribute name: startHour
Data Type: Integer
Minimum: 0
Maximum: 12
Default: 0
Attribute name: startMinute
Data Type: Integer
Minimum: 0
Maximum: 60
Default: 0
Attribute name: startSecond
Data Type: Integer
Minimum: 0
Maximum: 60
Default: 0
These attributes will be used later in the expressions to set up
the time at the start of your animation.
http://www.aw.sgi.com/assistant_online/entertain/maya/how_tos/animation/clock/index.html (3 of 6) [3/7/2000 13:39:09]


Assistant Online - Maya/How Tos/Animation/Accurate Clock
STEP SEVEN
Select the secondHand polyCube. In the Channel box, click on
its rotateY attribute. With your right mouse button select
Expressions. This will bring up the Expression editor.
Enter the following expression:
$direction = -1;
$degreePer = 6;
$start = clock.startSecond;
secondHand.rotateY = $direction * $degreePer * ($start + time);
The $direction variable sets the rotation direction to clockwise.
The $degreePer variable sets how many degrees your want the
hand to rotate per second. (360 degrees / 60 seconds = 6).
The $start variable adds the clock.startSecond attribute to time.
The time portion of the expression represents the actual time,
measured in seconds.
Note: Later you will learn that by measuring time in seconds
instead of frames, you can change time units and the clock will
still work accurately in your animation.
STEP EIGHT
Add the following expression to the minuteHand polyCube:
$direction = -1;
$degreePer = 6;
$start = clock.startMinute;
$adjust = clock.startSecond;
$convert = 60;
minuteHand.rotateY = $direction * $degreePer
* ($start + (time + $adjust)/$convert);
The $direction variable again sets the rotation direction to
clockwise.
The $degreePer variable sets how many degrees your want the
hand to rotate per minute. (360 degrees / 60 minutes = 6).
The $start variable adds the clock.startMinute attribute to time.
The time portion of the expression represents the actual time,
measured in seconds.
In this expression time is advanced using clock.secondStart
since the start position of the second hand has an affect on
where the minute hand will start. Since time and
clock.secondStart are measured in seconds, they must be
converted to minutes using the $convert variable which is set to
60.
http://www.aw.sgi.com/assistant_online/entertain/maya/how_tos/animation/clock/index.html (4 of 6) [3/7/2000 13:39:09]


Assistant Online - Maya/How Tos/Animation/Accurate Clock
STEP NINE
Add the following expression to the hourHand polyCube:
$direction = -1;
$degreePer = 30;
$start = clock.startHour;
$adjust = clock.startMinute;
$convert1 = 60;
$convert2 = 3600;
hourHand.rotateY = $direction * $degreePer
* ($start + $adjust/$convert1 + time/$convert2);
The $degreePer variable sets how many degrees your want the
hand to rotate over a twelve hour period. (360 degrees / 12
hours = 30).
The $start variable adds the clock.hourStart attribute to time.
The time portion of the expression represents the actual time,
measured in seconds.
In this expression time is advanced using clock.startMinute
since the start position of the minute hand has an affect on
where the hour hand will start. Since time is measured in
seconds, it is converted to hours using a value of 60, and since
clock.startMinute is measured in minutes, it is converted to
hours using a value of 3600.
STEP TEN
To view time moving accurately, set your time slider range to a
value of about 480. Since Maya's default time unit is set to Film which is 24 frames per second, 480 frames should make the
second hand on the clock move for 20 seconds. Because this is
such a short time, you will barely see the minute and hour
hands moving.
If you set the frame range much higher than you can scroll to
see the minute and hour hand moving.
Don't forget that you can select the clock node and set the
starting positions for the three hands using the secondStart,
minuteStart and hourStart attributes. This way your clock
animation could start at any time such as 4:15 and 35 seconds
instead of always at midnight.
Note: If you open up the General Preferences, you can click
on the Animation tab then under Animation Controls you can
turn Timecode to On under Options. This will show you time as well as frames.
http://www.aw.sgi.com/assistant_online/entertain/maya/how_tos/animation/clock/index.html (5 of 6) [3/7/2000 13:39:09]


Assistant Online - Maya/How Tos/Animation/Accurate Clock
CONCLUSION
You now have a time
piece that will work
accurately in any
animation. Even if you
change your time units
[In General
Preferences -> Units]
to another value such
as NTSC (30fps), the
use of time in the
expression ensures that
your clock will adjust itself accordingly.
Shift-click to download a completed scene file:
Your use of this file confirms your agreement to the
Terms and Conditions set out in the Terms and Conditions page.
http://www.aw.sgi.com/assistant_online/entertain/maya/how_tos/animation/clock/index.html (6 of 6) [3/7/2000 13:39:09]


Assistant Online - Maya/How Tos/Animation/Extrusion
Alias|Wavefront / Assistant Online / Maya / How Tos / Animation / Extrusion
HOW TO ANIMATE
by Robert Magee
AN EXTRUSION
Maya Complete
Animation
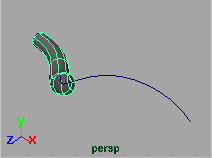
In this lesson, you
will learn how to
animate a profile
extruding along a
curve. This will
involve the Extrude
tool's partial curve
option to generate
extra history nodes
Play Movie [256 k]
called subCurve
nodes. These nodes will allow you to then animate the history
of the extrusion along the path.
STEP ONE
Create a primitive circle at
the origin. Rotate by 90
degrees around the Z
axis. This will act as the
profile of the extrusion.
Create a NURBS curve
that starts at the origin.
This will be used as the
path of the extrusion. Make sure that the first two CVs lie
directly on the X axis. This ensures that this curve is normal to
the circle, making the extrusion easier to control.
Continue the curve as desired. You may also want to edit some
of the CVs to reshape the curve in 3D. Be sure not to edit the
first two CVs.
http://www.aw.sgi.com/assistant_online/entertain/maya/how_tos/animation/extrude/index.html (1 of 3) [3/7/2000 13:40:16]


Assistant Online - Maya/How Tos/Animation/Extrusion
STEP TWO
Select the circle first and
then the path curve. Select
Surfaces -> Extrude -
options. In this window,
set the Curve Range to
Partial. Click Extrude.
This will generate the
surface with two extra
history nodes. You can see the two nodes in the input section
of the channel box.
The two subCurve input nodes allow you to only use part of the
original profile and path curves in the creation of the surface.
One of the subCurves [ subCurve1] controls how much of the
profile curve is extruded along the path. The other subCurve
[ subCurve2] controls the length of the extrusion.
STEP THREE
Click on subCurve2 in the
channel box. You can now
edit the Max Value
attribute in the channel
box or you can use the
Show Manipulator tool.
If you use the Show
Manipulator tool, you get
two markers for the Min and Max value attributes for the node.
By dragging on the Max value manipulator, you can change the
position of the extrusion along the path.
Note: In the case of this extrusion, the Min value attribute creates unpredictable results. It is recommended that you use
the Max value for animating. For other types of surfaces that
use subcurve nodes, the Min Value attribute can give more
predictable results.
STEP FOUR
To animate the extrusion,
you can now set keys on
the Max value attribute.
Set the Max value to 0 at
frame 1 then set it to 1.0
at frame 50.
Playback the scene. You
will watch the extrusion
animate along the path.
Play Movie [176 k]
http://www.aw.sgi.com/assistant_online/entertain/maya/how_tos/animation/extrude/index.html (2 of 3) [3/7/2000 13:40:16]


Assistant Online - Maya/How Tos/Animation/Extrusion
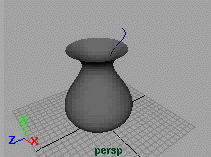
CONCLUSION
The extra history nodes
generated by the Partial
Curve option make it easy
to animate the extrusion of
the circle along the path.
The manipulation of the
subCurve node attributes
lets you edit and animate
the history of the
Play Movie [176 k]
shape.The Partial Curve
option can be used to add subCurve history nodes to several
modeling tools such as loft and revolve.
Shown here is a revolved surface animated along its profile
curve.
Your use of this file confirms your agreement to the
Terms and Conditions set out in the Terms and Conditions page.
http://www.aw.sgi.com/assistant_online/entertain/maya/how_tos/animation/extrude/index.html (3 of 3) [3/7/2000 13:40:16]


Assistant Online - Maya/How Tos/Animation/Aim Spotlight
Alias|Wavefront / Assistant Online / Maya / How Tos / Animation / Aim Spotlight
HOW TO ANIMATE
by Robert Magee
THE AIMING OF A SPOTLIGHT
Maya Complete
Animation
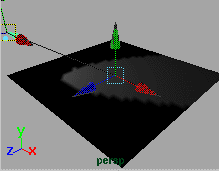
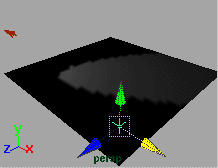
In this lesson, you will
learn how to animate
what a spotlight "looks
at" while it animates.
When you use the
Show Manipulator tool
with a selected spotlight,
it appears as if you
could select and set
Play Movie [~544kb]
keys on the "look at"
point of the light. In fact, this point is not represented by a node
and therefore you cannot key it. Instead you will need to apply
an Aim Constraint to the light so that it always points at
another objects such as a locator.
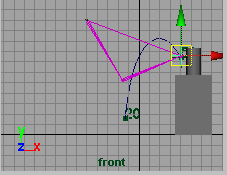
STEP ONE
Create a spotlight. Use
the Show Manipulator
tool to place the eye point
of the manipulator in the
back corner of the
working grid and the look
at point near the origin.
http://www.aw.sgi.com/assistant_online/entertain/maya/how_tos/animation/spotlight_aim/index.html (1 of 3) [3/7/2000 13:40:37]


Assistant Online - Maya/How Tos/Animation/Aim Spotlight
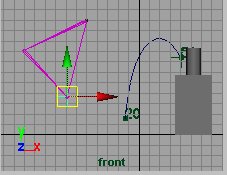
STEP TWO
Create a Locator. Move
the locator to the front of
the working grid.
This locator will be used
as the target for the
spotlight
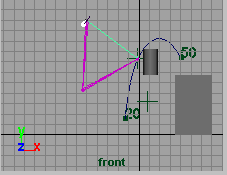
STEP THREE
Select the Locator and
then the Spotlight. Make
sure the light is the last
object selected since it will
be the aiming object.
From the Animation menu
set, select Constrain ->
Aim - options. Set the aim
vector values to 0, 0, -1 then press the Add/Remove button.
Since spotlights are created with their local X axis pointing out
the back of the light, you needed a value of -1 to aim the light
properly.
Now the light is aiming at the Locator. You can now use the
Locator to animate and control the aiming of the light.
STEP FOUR
You can now animate
the Locator in one of
many ways including the
following:
Set keys on the
●
Locator
Assign the Locator
●
to a motion path
Parent or point
●
constrain the
Locator to an
existing character
or object
CONCLUSION
You can now easily control the aiming of your spotlight using
the Locator as a target. You could also leave the target
stationary and animate the light itself.
http://www.aw.sgi.com/assistant_online/entertain/maya/how_tos/animation/spotlight_aim/index.html (2 of 3) [3/7/2000 13:40:37]


Assistant Online - Maya/How Tos/Animation/Aim Spotlight
Your use of this file confirms your agreement to the
Terms and Conditions set out in the Terms and Conditions page.
http://www.aw.sgi.com/assistant_online/entertain/maya/how_tos/animation/spotlight_aim/index.html (3 of 3) [3/7/2000 13:40:37]


Assistant Online - Maya/How Tos/Animation/Rollling Cube
Alias|Wavefront / Assistant Online / Maya / How Tos / Animation / Rolling Cube
HOW TO ANIMATE A
By Alan Harris
ROLLING CUBE
Maya Complete
Animation
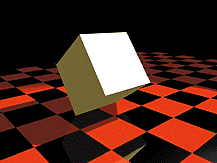
One of the many powerful
features of Maya is the
ability to animate the
location and properties of
an object’s pivot point. In
this lesson, you will use
the animatable properties
of a primitive cube’s pivot
point to animate it rolling
on its edges. This
process will involve the use of the Channel Control window to
make certain attributes keyable. Once they are keyable, they
will be available in the Channel Box for you to set keys and edit
their value. In this lesson, you will also use the Graph Editor to
refine the animation curves to get exactly the kind of motion
that you need.
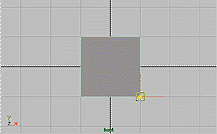
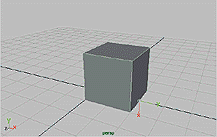
STEP ONE
Place a primitive poly
cube into the scene and
scale it to 2, 2 and 2.
Select the Move tool.
Place the front of the
cube at 0 along the Z
axis. Press the Insert key
to go into edit mode then move the pivot point to the middle of
the cube’s front edge. You may want to use grid snapping to
help you position the pivot.
http://www.aw.sgi.com/assistant_online/entertain/maya/how_tos/animation/cubeRoll/index.html (1 of 4) [3/7/2000 13:41:06]


Assistant Online - Maya/How Tos/Animation/Rollling Cube
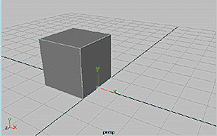
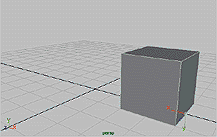
STEP TWO
Now press the Insert key
to return to the Move tool
then move the cube to the
origin. Select Display ->
Object Components ->
Local Rotation Axes and
Rotate Pivots. These
icons will help you visualize these components as you begin
animating the pivot.
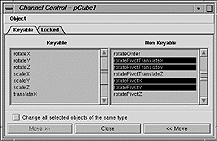
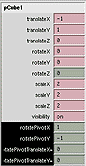
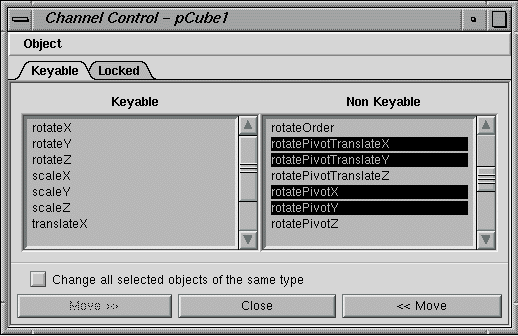
STEP THREE
Select Window ->
General Editors ->
Channel Control and
select the following
non-keyable attributes:
Rotate Pivot Translate X
Rotate Pivot Translate Y
Rotate Pivot X
Rotate Pivot Y
Use the Move button to make them keyable attributes. They will
now appear in the Channel Box.
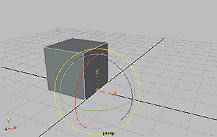
STEP FOUR
With the cube selected,
set a linear key for Z
rotation at frame 1. Go to
frame 10 then Rotate the
cube by
-90 in Z and set another
key.
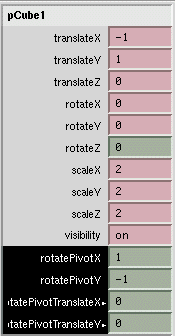
STEP FIVE
Return to frame 1. Select the Rotate Pivot
Translate X, Rotate Pivot Translate Y, Rotate
Pivot X, and Rotate Pivot Y in the Channel Box
then use your RMB to choose Key Selected.
http://www.aw.sgi.com/assistant_online/entertain/maya/how_tos/animation/cubeRoll/index.html (2 of 4) [3/7/2000 13:41:06]


Assistant Online - Maya/How Tos/Animation/Rollling Cube
STEP SIX
Go to frame 10. Open the
Attribute editor and open
up the Pivots -> World
Space section. Set World
Rotate X Pivot to 2. You
should notice that the
pivot moves to the front of
the cube. Now you can continue rotating the cube.
In the Channel Box, set a key for the Rotate Pivot Translate X,
Rotate Pivot Translate Y, Rotate Pivot X, and Rotate Pivot Y
channels.
Editing the World Rotate Pivot in the Attribute Editor affects
these four attributes therefore they must all be keyed.
STEP SEVEN
Go to frame 20. Set
another linear key frame
for a Z rotation of -180.
Set the World Rotate
Pivot to 4 then set keys
for the four pivot channels
in the Attribute editor.
If desired, keep rotating the cube and moving the pivot using
the steps outlined above. If you playback the animation at this
point, the roll of the cube will not seem correct. You need to
change the animation curve tangents for the pivot attributes.
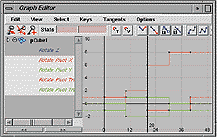
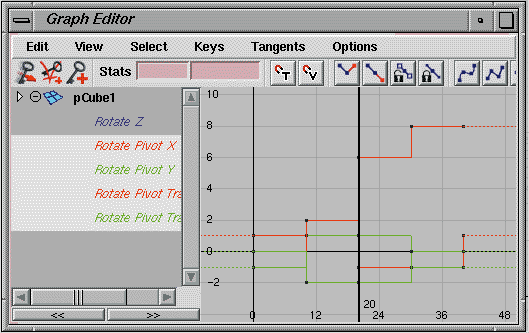
STEP EIGHT
The incorrect motion is
because the pivot point
needs to stay in one
location for 10 frames
then jump to its new
location. Open the Graph
Editor. Select the four
pivot action curves and
then select Tangents ->
Stepped. This will create the desired results.
Playback the scene.
http://www.aw.sgi.com/assistant_online/entertain/maya/how_tos/animation/cubeRoll/index.html (3 of 4) [3/7/2000 13:41:06]


Assistant Online - Maya/How Tos/Animation/Rollling Cube
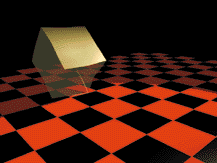
CONCLUSION
Learning how to animate the pivot location on an object
demonstrates how there are hidden attributes on your Maya
objects that can be used to create interesting results. Since
all attributes in Maya can be turned into keyable attributes,
the possibilities can enhance how you animate your scenes.
If you would like to see this cube animate like gelatin, you
may want to complete the How to animate a Gelatin cube
lesson.
Your use of this file confirms your agreement to the
Terms and Conditions set out in the Terms and Conditions page.
http://www.aw.sgi.com/assistant_online/entertain/maya/how_tos/animation/cubeRoll/index.html (4 of 4) [3/7/2000 13:41:06]
http://www.aw.sgi.com/assistant_online/entertain/maya/how_tos/animation/cubeRoll/img/cubeRoll_03_lg.gif http://www.aw.sgi.com/assistant_online/entertain/maya/how_tos/animation/cubeRoll/img/cubeRoll_03_lg.gif [3/7/2000 13:41:12]
http://www.aw.sgi.com/assistant_online/entertain/maya/how_tos/animation/cubeRoll/img/cubeRoll_05_lg.gif http://www.aw.sgi.com/assistant_online/entertain/maya/how_tos/animation/cubeRoll/img/cubeRoll_05_lg.gif [3/7/2000 13:41:17]
http://www.aw.sgi.com/assistant_online/entertain/maya/how_tos/animation/cubeRoll/img/cubeRoll_08_lg.gif http://www.aw.sgi.com/assistant_online/entertain/maya/how_tos/animation/cubeRoll/img/cubeRoll_08_lg.gif [3/7/2000 13:41:29]


Assistant Online - Maya/How Tos/Dynamics/Gelatin Cube
Alias|Wavefront / Assistant Online / Maya / How Tos / Dynamics / Gelatin Cube
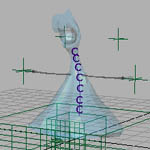
HOW TO ANIMATE A GELATIN CUBE
by Alan Harris
MAYA
Soft Body Dynamics
The Soft Body dynamics in
Maya allow you to give
surfaces a more organic
quality as they animate.
Using the cube from the
Soft Body dynamics to
create the rolling Gelatin
cube.
This process will start with the creation of a Soft Body cube that
uses the original cube as a goal. The soft body will therefore
follow the first cube while colliding with the ground and jiggling
along with a turbulence field that you will add to the scene.
Once all the pieces have been connected, you will have your
animated dessert.
STEP ONE
Select the polycube from
Rolling cube lesson. Click
on the polyCube Input
node in the Channel box
then increase the
Subdivisions along X, Y
and Z to 6.
When you create a soft body object for the cube, every vertex
on the cube will be matched by a particle on the soft body. If
you want more jiggle then you may want to set this value higher
than 6.
http://www.aw.sgi.com/assistant_online/entertain/maya/how_tos/dynamics/gelatinRoll/index.html (1 of 4) [3/7/2000 13:41:56]


Assistant Online - Maya/How Tos/Dynamics/Gelatin Cube
STEP TWO
Go to the Dynamics menu set and select Bodies -> Create
Soft Body - options, and set the following:
● Create Options to Duplicate, Make Copy Soft;
Hide Non-Soft Object to On;
●
Make Non-Soft a Goal Weight
●
to 0.66.
Press Create. Rename copyOfCube1 to Geletan. Rename pCube1 to GeletanGoal.
These settings will create a soft body object that uses the
original cube as a goal. Each particle will try to match the
position of the vertices on the cube with a 0.66 rate of accuracy.
This less than perfect accuracy will help create the follow
through in the gelatin.
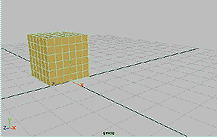
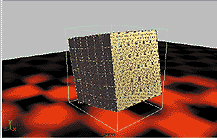
STEP THREE
Click on the Play button to
see the soft body rotate
across the screen.
Because the soft body has
nothing to collide with it
seems to float. Now you
will create a rigid body
floor surface for the soft body to collide with.
STEP FOUR
Create a poly plane and
scale it out. Increase the
Uand V patches. Set its
Translate Y value to -0.1.
This makes sure that the
gelatin and the floor are
not touching initially.
Go to Dynamics -> Bodies -> Create Passive Rigid Body -
options. Set Particle Collision to On. Click Create.
If you playback the scene right now, you won’t see any
collisions. This is because the collision of the particles and the
floor have not yet been connected.
http://www.aw.sgi.com/assistant_online/entertain/maya/how_tos/dynamics/gelatinRoll/index.html (2 of 4) [3/7/2000 13:41:56]


Assistant Online - Maya/How Tos/Dynamics/Gelatin Cube
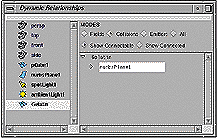
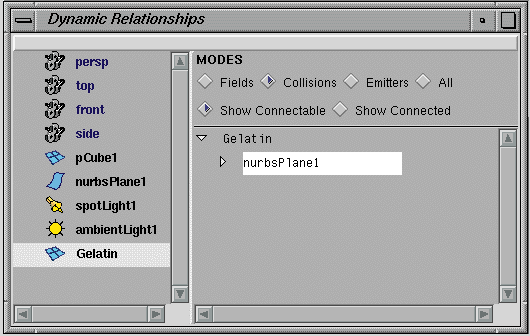
STEP FIVE
Select Window ->
Animation Editors ->
Dynamic
Relationlships... In this
window, click on the
Gelatin surface then set
the Modes to Collisions.
Click on pPlane1 to connect the collisions of the particles to the soft body particles.
When working with particle collisions, you will find that you
often have to manually connect the rigid bodies and the
particles in this manner.
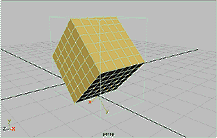
STEP SIX
Playback the scene to view
the collision of the soft body
with the ground. The
particles are being pushed
back as they collide with the
plane. Now you want to add
some more motion to the
Gelatin surface.
STEP SEVEN
Select the Gelatin soft
body object. Select Fields
-> Create Turbulence. In
the Channel box, change
the Magnitude to 60. This
will make the Gelatin jiggle
a little more as it moves.
Again select the Gelatin
soft body. Select Bodies -> Create Springs -> options. Set Creation Methods, to Min/Max, then set the Max Distance to 1.0. Click Create.
The springs will help preserve the volume of the soft body as it
animates. Springs also provide a sort of internal structure to a
soft body as it animates.
http://www.aw.sgi.com/assistant_online/entertain/maya/how_tos/dynamics/gelatinRoll/index.html (3 of 4) [3/7/2000 13:41:56]


Assistant Online - Maya/How Tos/Dynamics/Gelatin Cube
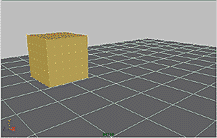
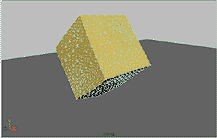
STEP EIGHT
Playback the scene. The
Gelatin surface now
bounces and jiggles in a
recognizable manner. You
may want to create a
Shading group to give the
soft body a
semi-transparent
Gelatin-like surface then
render the scene.
CONCLUSION
To animate all the jiggling of the resulting Soft Body cube
using traditional deformation techniques would have been
very difficult. The advantages of using Soft Body dynamics
become clear as you see the subtle movement in the
surface.
Your use of this file confirms your agreement to the
Terms and Conditions set out in the Terms and Conditions page.
http://www.aw.sgi.com/assistant_online/entertain/maya/how_tos/dynamics/gelatinRoll/index.html (4 of 4) [3/7/2000 13:41:56]
http://www.aw.sgi.com/assistant_online/entertain/maya/how_tos/dynamics/gelatinRoll/img/gelatin_lg_05.gif http://www.aw.sgi.com/assistant_online/entertain/maya/how_tos/dynamics/gelatinRoll/img/gelatin_lg_05.gif [3/7/2000 13:42:06]


Assistant Online - Maya/How Tos/Animation/Flow Object
Alias|Wavefront / Assistant Online / Maya / How Tos / Animation / Flow Object
HOW TO ANIMATE WITH
by Alan Opler
FLOW (OBJECT)
MAYA Complete
Animation
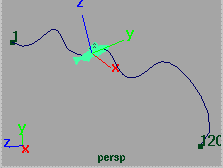
To animate an object
along a path you would
use Attach to path. To
deform the object to the
shape of the path curve,
you would need to use
Flow.
In this lesson, you will
learn how to assign an
object to a path using the Flow's Object option.
The Object option applies a Lattice to your object that animates
along the path with the object. As the Lattice deforms to the
path, so does your object.
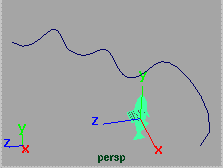
STEP ONE
In a Y-up environment,
create an object (this
lesson uses a fish) so
that it’s profile runs along
the Y-axis. After building
the object, group it to
itself twice and name the
top node of the hierarchy
Fish, and the second
node, rotateFish.
Next, build a curve that will be used as the path curve.
http://www.aw.sgi.com/assistant_online/entertain/maya/how_tos/animation/flow_object/index.html (1 of 4) [3/7/2000 13:42:15]


Assistant Online - Maya/How Tos/Animation/Flow Object
STEP TWO
Select the top node of
the fish. Select Display
-> Object Components
-> Local Rotation Axes.
This will display the local
axes of the fish. This will
help you determine the
follow attributes for the
fish in the next step.
STEP THREE
With the fish's top node
already selected, press
the shift key, then pick
the curve.
Note: The curve must be
chosen last for Attach to
Path to work properly.
Select Animate -> Paths
-> Attach to Path - options. Set Time Range to Start/End. Set the Start and End frames to 1 and 120 (respectively).
Set Follow to On. This reveals axis options for the Front and Up axes for the fish. You now need to determine which of the
object’s local axes you want to use as the front of the object as
it moves down the path.
The fish’s head is what will travel down the path first. Since the
fish is pointing up along its local Y axis, this will be its Front Axis. You will want the fin on the fish’s back to be on the top. It runs along the local Z Axis. Therefore the Z-Axis will be the Up-Axis for the path.
Click on the Attach button.
Playback the animation. The fish moves along the path based
on the location of its pivot point.
http://www.aw.sgi.com/assistant_online/entertain/maya/how_tos/animation/flow_object/index.html (2 of 4) [3/7/2000 13:42:15]


Assistant Online - Maya/How Tos/Animation/Flow Object
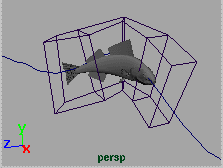
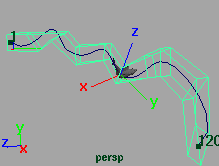
STEP FOUR
Now the Flow option will
be added to allow the
object to deform to the
shape of the curve as it
moves along the path.
Move the Time Slider
back to frame 1.
Select the top node of
the fish. Select Animate -> Paths -> Flow Path Object -> options. Set Lattice Around to Object. Use Divisions of 5, 2, 2. Click on the Flow button.
A Lattice is added to the fish. Play back the animation once
again.
Note - One situation to be aware of, when assigning the Lattice
to the object: the Lattice Base may not be an exact fit. This can
produce some undesirable effects. If this is the case with your
object, simply open the Hypergraph, select the Lattice Base
node and scale it up. This permits every part of the fish to fit
within the Base when it moving along the path, allowing it to
deform properly.
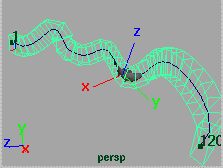
STEP FIVE
You may find that the
deformation is not precise
enough. Since the fish is a
long narrow object, the
number of Divisions can be
increased to create
smoother deformations
along the path curve during
the animation.
Select the Lattice. In the Channel Box, under the
ffd1LatticeShape node, increase the T Divisions value to 10-15.
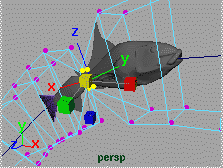
CONCLUSION
You now know how to animate an object along a path using
Flow to create deformations.
Secondary animation can be added to the object even after the
Flow option has been applied. At the beginning of this lesson
you grouped the fish to itself twice and applied the Motion to the
top node. Now, you can select the second node in the
hierarchy. You can have the fish rotate as it moves along the
path by animating the X rotation channel in the Channel Box.
To see how to animate using Flow's Curve option, complete the
http://www.aw.sgi.com/assistant_online/entertain/maya/how_tos/animation/flow_object/index.html (3 of 4) [3/7/2000 13:42:15]


Assistant Online - Maya/How Tos/Animation/Flow Object
How to animate with Flow (Curve) lesson.
Your use of this file confirms your agreement to the
Terms and Conditions set out in the Terms and Conditions page.
http://www.aw.sgi.com/assistant_online/entertain/maya/how_tos/animation/flow_object/index.html (4 of 4) [3/7/2000 13:42:15]


Assistant Online - Maya/How Tos/Animation/Flow Curve
Alias|Wavefront / Assistant Online / Maya / How Tos / Animation / Flow Curve
HOW TO ANIMATE
by Alan Opler
WITH FLOW (CURVE)
MAYA Complete
Animation
To animate an object
along a path you would
use Attach to path. To
deform the object to the
shape of the path curve,
you would need to use
Flow.
In this lesson, you will
learn how to assign an
object to a path using the Flow's Curve option.
The curve option applies a Lattice along the complete length of
the curve that is deforming. At one point along the curve, you
will pinch the lattice points to make the object squeeze through
a tight spot.
STEP ONE
In a Y-up environment,
create an object (a fish)
so that its profile runs
along the Y-axis. After
building the object, group
it to itself twice and
name the top node of the
hierarchy Fish, and the
second node, rotateFish.
Next, build a curve that will be used as the path curve.
http://www.aw.sgi.com/assistant_online/entertain/maya/how_tos/animation/flow_curve/index.html (1 of 4) [3/7/2000 13:42:26]


Assistant Online - Maya/How Tos/Animation/Flow Curve
STEP TWO
Select the top node of
the fish. Select Display
-> Object Components
-> Local Rotation Axes.
This will display the local
axes of the fish. This will
help you determine the
follow attributes for the
fish in the next step.
STEP THREE
With the fish's top node
already selected, press
the shift key, then pick
the curve.
Note: The curve must be
chosen last for Attach to
Path to work properly.
Select Paths -> Attach
to Path - options. Set Time Range to Start/End. Set the Start and End frames to 1 and 120 (respectively).
Set Follow to On. This reveals axis options for the Front and Up axes for the fish. You now need to determine which of the
objects local axes you want to use as the front of the object as
it moves down the path.
The fish’s head is what will travel down the path first. Since the
fish is pointing up along its local Y axis, this will be its Front Axis. You will want the fin on the fish’s back to be on the top. It runs along the local Z Axis. Therefore the Z-Axis will be the Up-Axis for the path.
Click on the Attach button.
Playback the animation. The fish moves along the path based
on the location of its pivot point.
http://www.aw.sgi.com/assistant_online/entertain/maya/how_tos/animation/flow_curve/index.html (2 of 4) [3/7/2000 13:42:26]


Assistant Online - Maya/How Tos/Animation/Flow Curve
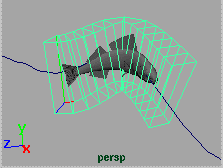
STEP FOUR
Now the Flow option will
be added to allow the
object to deform to the
shape of the curve as it
moves along the path.
Move the Time Slider
back to frame 1.
Select the top node of the
fish. Select Animate -> Paths -> Flow Path Object -> options.
Set Lattice Around to Curve. Use Divisions of 10, 2, 2. Click on the Flow button.
A Lattice is added to the fish that extends for the length of the
curve. Play back the animation once again.
Note - One situation to be aware of, when assigning the Lattice
to the object: the Lattice Base may not be an exact fit. This can
produce some undesirable effects. If this is the case with your
object, simply open the Hypergraph, select the Lattice Base
node and scale it up. This permits every part of the fish to fit
within the Base when it moving along the path, allowing it to
deform properly.
STEP FIVE
You may find that the
deformation is not
precise enough. Since
the fish is a long
narrow object, the
number of Divisions
can be increased to
create smoother
deformations along the
path curve during the animation.
Select the Lattice. In the Channel Box, under the
ffd1LatticeShape node, increase the T Divisions value to 40.
http://www.aw.sgi.com/assistant_online/entertain/maya/how_tos/animation/flow_curve/index.html (3 of 4) [3/7/2000 13:42:26]


Assistant Online - Maya/How Tos/Animation/Flow Curve
STEP SIX
By using the Curve
option, you can create
a keyhole effect by
scaling down the
Lattice points.
Press F8 to go into
component mode.
Select a group of
Lattice Points along the path. Scale them down in all axes.
When the fish passes through these points, it will shrink in size
to fit through the scaled down section of the Lattice.
Note - If you are not getting the proper deformation as your
object passes through the scaled down lattice, you may need
to increase the number of spans on your object.
CONCLUSION
You now know how to animate an object along a path using
Flow to create deformations.
Secondary animation can be added to the object even after
the Flow option has been applied. At the beginning of this
lesson you grouped the fish to itself twice and applied the
Motion to the top node. Now, you can select the second node
in the hierarchy. You can have the fish rotate as it moves
along the path by animating the X rotation channel in the
Channel Box.
To see how to animate using Flow's Object option, complete
the How to animate with Flow (Object) lesson.
Your use of this file confirms your agreement to the
Terms and Conditions set out in the Terms and Conditions page.
http://www.aw.sgi.com/assistant_online/entertain/maya/how_tos/animation/flow_curve/index.html (4 of 4) [3/7/2000 13:42:26]


Assistant Online - Maya/How Tos/Character/Soft Bodies
Alias|Wavefront / Assistant Online / Maya / How Tos / Character / Soft Bodies
CREATING SOFTBODIES IN
by Tom Kluyskens
CHARACTER ANIMATION
MAYA Complete
Character
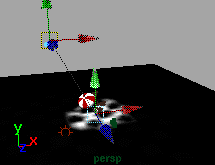
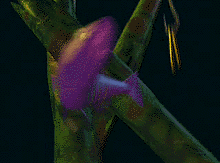
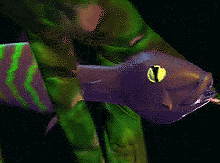
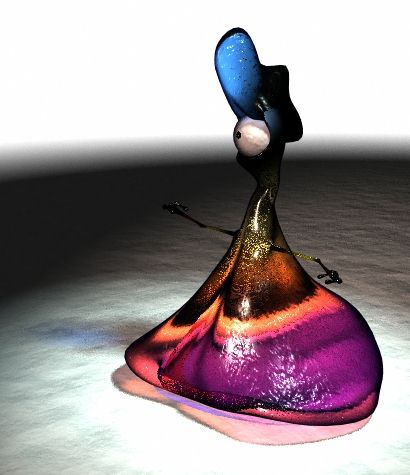
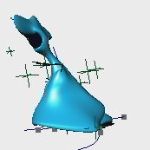
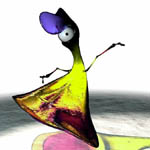
This lesson will demonstrate
how to use softbodies for
character animation purposes.
You will also learn to use a lot of
other tools and Maya features,
too.
The purpose of this project is to
explore Maya's possibilities to
automate subtle secondary skin
and body motion on animated
characters. We'll also see how to
control this motion.
The three parts of the lesson include:
●
SoftBodies and their goal weight
●
Spline IK
●
SoftBody Spline
●
How to control the SoftBody Spline
●
Clusters
●
BlendShapes
●
Collisions and forces
●
●
How to convert
●
The lag problem
●
Use of this file confirms your agreement to the Terms and Conditions
set out on the Terms and Conditions page.
http://www.aw.sgi.com/assistant_online/entertain/maya/how_tos/character/soft_body/index.html (1 of 2) [3/7/2000 13:42:39]


Assistant Online - Maya/How Tos/Character/Soft Bodies
http://www.aw.sgi.com/assistant_online/entertain/maya/how_tos/character/soft_body/index.html (2 of 2) [3/7/2000 13:42:39]
http://www.aw.sgi.com/assistant_online/entertain/maya/how_tos/character/soft_body/img/GLKstill1.jpg http://www.aw.sgi.com/assistant_online/entertain/maya/how_tos/character/soft_body/img/GLKstill1.jpg [3/7/2000 13:42:43]


Assistant Online - Maya/How Tos/Character/Soft Bodies
Alias|Wavefront / Assistant Online / Maya / How Tos / Character / Soft Bodies
PART ONE: SoftBody IK Splines
by Tom Kluyskens
MAYA Complete
Character
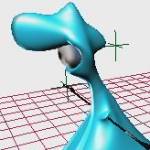
The challenge with SoftBodies, and
Dynamics in general, is to keep a
high level of control over them. Often
the Dynamic elements in the scene
are totally at mercy of the forces that
act on that scene.
Particles have a life of their own,
which is partly what we want, because they create natural
looking motion. The question now is how to keep the SoftBody
Particles under control, while keeping their natural motion
intact.
STEP ONE
Click on
●
or softanimTut.tar (IRIX) to get the scenes for the whole
tutorial.
or
Click on AWIC1.mb to get the scene for this part only
Select GLK's body, and select
Bodies -> Create Soft Body (option box). Press Reset, enable
Goal Weight (0.5), disable Hide Original Geometry and press Create.
This function creates a duplicate geometry, and converts that
duplicate to a SoftBody, which is attracted to the original
geometry.
A SoftBody is a piece of geometry in which the CVs are
replaced by Particles, which are dynamic objects influenced by
forces like gravity, wind and inertia.
The original geometry and its CVs are the Target Geometry of
the SoftBody and its particles. Each particle is attracted to the
http://www.aw.sgi.com/assistant_online/entertain/maya/how_tos/character/soft_body/part_1.html (1 of 4) [3/7/2000 13:43:37]


Assistant Online - Maya/How Tos/Character/Soft Bodies
corresponding CV of the original object. You can easily check
this by transforming (moving, deforming,...) the original
geometry, and hitting play. Try also to animate the original
geometry.
Modify the goal weight and conserve attributes of the SoftBody
to see the effect those parameters have. Conserve is the
degree to which the SoftBody Particles keep their speed (their
inertia). You will notice that a goal weight of 1 makes the
SoftBody follow the original without lag, while a goal weight of 0
makes the particles really lazy...
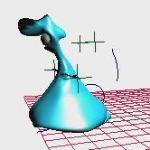
STEP TWO
How to make the head softer than
the rest of the body :
Set the goal weight to 1.
Hide the original geometry.
Select the particles of the head. You
can select particles by pressing F8,
and setting the selection mask to
particles only.
Open the Attribute editor, then do goalPP (with RMB) ->
Component Editor.
Set Component Value on .5, and Set Attribute.
Hit play. Now the head lags behind, while the body sticks to the
original object.
STEP THREE
Download AWIC1end.mb to get the
finalized scene for this part.
Now set the goal weight on .5 and
hit play.
Now the head and the body lag
again, but the head more than the
body.
Note: The softBody goal weight is actually
a multiplication factor to the individual particle goal weights. In the above example, the resulting goal weight of the body is 1 * .5, and that of the
head .5 * .5 = .25 .
http://www.aw.sgi.com/assistant_online/entertain/maya/how_tos/character/soft_body/part_1.html (2 of 4) [3/7/2000 13:43:37]

Assistant Online - Maya/How Tos/Character/Soft Bodies
STEP FOUR
scene for this part
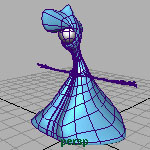
This GLK model is already entirely
skinned, and has handles on the
hands and elbows. The handles are
grouped to a neck bone, so the arms
follow the deformations of the spine.
The eye is parented to a head bone.
Select
●
Shading -> Shade Options -> X-Ray mode.
Select
●
Skeletons -> IK Spline Handle Tool.
Press
●
Reset Tool, disable Auto Simplify Curve and
Auto Parent Curve. Click on the root joint, then on a
neck joint.
The Spline curve is created through all the bones. Simplifying
the curve with the Auto Simplify option reduces the amount of
CVs to the number indicated, but may move your joints at
creation.
Moving the curve, will now move all the joints connected to it.
Because (in this example) the curve also controls the root joint,
moving the curve will move the whole body with it. That's also
the reason why we did not use the Auto Parent Curve.
Deforming the curve will now deform the spine. Try moving
some CVs of the curve. We will see more ways to deform and
control the spine curve later on.
Select the Spline IK Handle, and try out some parameters, like
Offset Roll and Twist. All these parameters can have their use
in an animation, but especially Twist is a 'natural' deformation of
the spine, and very useful in animation. You can set the type of
twist in the Attribute Editor.
Watch how arms and eye rotate with the body. Also watch how
the head follows the motion of the neck joint at the end of the
spine curve.
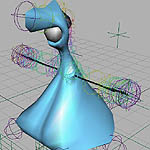
STEP FIVE
scene for this part .
The translation of the spline curve
has been animated in this scene.
This also animates the global body
movement, because the root joint is
controlled by the spline curve.
Now, we want to combine both tools explained above : Spline
IK and SoftBodies:
http://www.aw.sgi.com/assistant_online/entertain/maya/how_tos/character/soft_body/part_1.html (3 of 4) [3/7/2000 13:43:37]


Assistant Online - Maya/How Tos/Character/Soft Bodies
Using the same SoftBody options as above, convert the spline
curve to a SoftBody. The joints are now controlled by the
SoftBody curve ('SoftBody Spline'), which is in turn attracted to
(and thus controlled by) the original, still animated spline curve.
Play and watch how the whole body lags behind the original
spline curve, and 'wobbles' around it.
It is now possible to set the individual particle goal weights to
make some parts of the spine 'looser' than others. Typically,
leave the base particles on weight 1, so they follow the root
joint perfectly, and lower the upper goal weights : the closer to
the head, the lower the goal weight (to a minimum of .4 or so).
Download AWIC3end.mb to get the finalized scene for this part
To learn how to control the SoftBody spline, continue to Part 2
Your use of this file confirms your agreement to the
Terms and Conditions set out in the Terms and Conditions page.
http://www.aw.sgi.com/assistant_online/entertain/maya/how_tos/character/soft_body/part_1.html (4 of 4) [3/7/2000 13:43:37]


Assistant Online - Maya/How Tos/Character/Soft Bodies
Alias|Wavefront / Assistant Online / Maya / How Tos / Character / Soft Bodies
PART TWO: How to Control the
by Tom Kluyskens
SoftBody Spline
MAYA Complete
Character
Goal Weight is a first level control
over these particles, which we
discussed earlier.
Three second-level techniques will
be discussed here
Clusters
●
Blend Shapes
●
Forces and Collisions
●
The latter technique acts directly on the particles, while the two
first methods act on the SoftBody's original target geometry.
STEP ONE
scene for this part
Toggle Show -> Joints and
Surfaces OFF, so that you can
concentrate on the spline. The curve
you see is the original curve, not the
SoftBody curve.
Go into Component Mode (F8), and select a CV of the spline
curve. Then select Deformations ->Cluster. A cluster is
created on the CV of the curve. Do the same on all CVs. You
can take groups of CVs, if you don't want as much control
clusters as there are CVs.
Move one or more clusters, hit play, and watch the body
update as the SoftBody and skeleton take the form of the
deformed spline curve. The clusters can be animated, and offer
a much easier control than through the CVs themselves.
Download AWIC4end.mb to get the finalized scene for this part.
http://www.aw.sgi.com/assistant_online/entertain/maya/how_tos/character/soft_body/part_2.html (1 of 5) [3/7/2000 13:49:12]


Assistant Online - Maya/How Tos/Character/Soft Bodies
STEP TWO
Select the spline curve, then select
Edit -> Duplicate -> Reset and
Duplicate. Move the duplicated
curve away from the body.
Select the duplicated curve and the
spline curve, and select
Deformations -> Blend Shape ->
Reset and Create. This duplicated curve is now a target to the
spline curve (which is in turn a target to the SoftBody Spline).
This technique makes sense only if you deform the duplicated
curve. If you select Window -> Animation Editors -> Blend
Shapes, you will see a slider controlling the degree to which
the spline blends into the duplicated curve. You can also control
this attribute in the Channel Box when the spline curve is
selected. Animate this blend value to convey the deformation to
the actual spine and body of GLK.
STEP THREE
You can 'cascade' these blenders to
have a whole database of spine
positions, like can be seen in this
finalized file.
In this file, select the black cross
behind GLK. This will pop up the custom controls in the
Channel Box
Main Body Blend
●
F, B, L, R Bow
●
Custom Spine.
●
On the far left of GLK you can see the five first-level target
curves for GLK's spine : F, B, L and R, and a fifth custom' curve which you can freely deform to put the spine in positions that
cannot be achieved using a combination of F, B, L or R. These five curves serve as targets for the one curve right to them.
In its turn, this curve is a target to the actual spine of GLK. It's a
visual aid, because the actual spine curve is hidden in GLK's
body. The Main Body Blend controls the blend factor between
these two curves.
http://www.aw.sgi.com/assistant_online/entertain/maya/how_tos/character/soft_body/part_2.html (2 of 5) [3/7/2000 13:49:12]
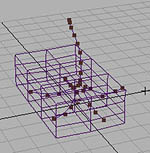

Assistant Online - Maya/How Tos/Character/Soft Bodies
STEP FOUR
scene for this part
This scene contains a further
developed GLK, with SoftBody
Splines in his 'legs', too. It also
contains objects (floor, ball) which
will control GLK's body through
collision with the SoftBody Particles on the splines. Hit play to
get an idea of the motion.
Hide the skeleton, by selecting Show -> Joints, and go into
X-Ray mode. You should now see some blown-up square
particles (of the SoftBody Splines) along the 'legs' and spine.
We want to make those particles collide with objects of GLK's
environment.
First, make the plane a collision object. Select it, and then
select Particles -> Add Collisions, with Resilience on 0 and Friction .5. Resilience is the normal velocity change of a particle bouncing on the surface, Friction is the velocity reduction factor
tangent to the surface.
In the Outliner, select
●
RMB -> Show Shapes, and open
up the sphere geometry. You will find a cube parented to
it.
Select
●
Particles -> Add Collisions, with Resilience on 0
and Friction .5 . We will use that cube (which is slightly
bigger than the sphere) as actual collision object for the
sphere, so that at collision with the neck particles, the ball
doesn't penetrate the neck geometry.
STEP FIVE
Download AWIC5end.mb to get the finalized scene for this part
Now we still have to tell Maya which particles are going to
collide with which objects. That's exactly the functionality of the
Window -> Animation Editors -> Dynamic Relationships
panel.
In the panel's left side, open the all_SoftSplines transform, and
select the body_Spline. Check Collisions on at the right side.
You should see the planet and the cube geometry. Click on the
cube only to enable collision, as we won't collide the spine with
the planet floor. Do the same for the Foot and tail splines, but
this time connect them to the planet, not to the sphere. The
message is to avoid enabling unneeded collisions, because
they will slow down the scene playback and rendering.
Playback, and see how the collisions affect GLK's body
geometry in a natural way.
http://www.aw.sgi.com/assistant_online/entertain/maya/how_tos/character/soft_body/part_2.html (3 of 5) [3/7/2000 13:49:12]


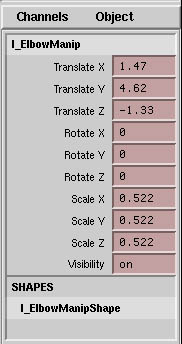
Assistant Online - Maya/How Tos/Character/Soft Bodies
STEP SIX
the finalized scene for this part
Play this file until frame 60 or so,
delete the ball, select
all_HardSplines in the Outliner,
and remove the animation on it.
Select the Rotate channels in the
Channel Box, and then
select
●
RMB -> Break
Connections.
And then
●
Settings -> Initial
State -> Set for all
Dynamic.
This will freeze the particles in
their current position. You can
now rewind.
Select the little black cross behind
GLK. Custom added attributes will appear in the Channel Box.
The
●
Stiffness attributes control the Goal Weights of the
spine and 'feet' of the SoftBody Splines
The
●
Twist controls the spine's twisting motion
The Gravity Pull is connected to the Magnitude of a
●
previously created Gravity Field.
http://www.aw.sgi.com/assistant_online/entertain/maya/how_tos/character/soft_body/part_2.html (4 of 5) [3/7/2000 13:49:12]


Assistant Online - Maya/How Tos/Character/Soft Bodies
This gravity force is connected to the 'feet' of GLK. Set the
Gravity Pull to 200, and play. See how the lifted feet come
down a little, because of the gravity pulling on them. The
resulting position is an equilibrium between two forces: gravity,
and goal weight. Lower the Feet Stiffness (the goal weight of
the feet particles), and the feet will come down even more.
Try connecting the gravity to the spine particles too, to see the
effect.
To learn about the SoftBody Skin, continue to Part 3
Your use of this file confirms your agreement to the
Terms and Conditions set out in the Terms and Conditions page.
http://www.aw.sgi.com/assistant_online/entertain/maya/how_tos/character/soft_body/part_2.html (5 of 5) [3/7/2000 13:49:12]


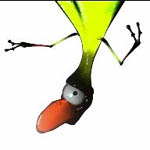

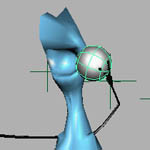
Assistant Online - Maya/How Tos/Character/Soft Bodies
Alias|Wavefront / Assistant Online / Maya / How Tos / Character / Soft Bodies
PART THREE: SoftBody Skin
by Tom Kluyskens
MAYA Complete
Character
The above techniques never
converted actual skin to SoftBody,
but rather were a SoftBody
conversion of underlying curves,
with relatively very few CVs or
vertices. This makes the dynamic
SoftBody simulation and playback
relatively faster. In some situations however, effects can only
be achieved by converting the skin itself, or a part of it, to a
SoftBody.
STEP ONE
scene for this part.
In this scene, the eye is a particle
collision object. Play to see the
animation.
Select
●
GLK's skin, and make it
a SoftBody with goal weight .5,
hiding the original target
geometry.
In the
●
Dynamic Relationship
panel, connect the SoftBody
particles to the eye collision
object. Play it to see the effect
(it may be slow).
Animate the spine curve to see the effect of the whole SoftBody
on GLK's body motion. Again, you can edit the individual
particle goal weights (manually or with Artisan) to stiffen or
loosen parts of the body skin. Adding Springs to the SoftBody
may make the effect even more realistic and interesting (but
slower).
Download AWIC6end.mb to get the finalized scene for this part
.
http://www.aw.sgi.com/assistant_online/entertain/maya/how_tos/character/soft_body/part_3.html (1 of 2) [3/7/2000 13:59:35]


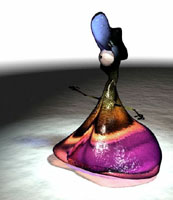


Assistant Online - Maya/How Tos/Character/Soft Bodies
STEP TWO
Download AWIC7.mb to get the scene for this part.
This file contains GLK with a combination of both above
techniques : a SoftBody Spline, and a SoftBody skin.
Look how the skin 'lags' one frame behind, even when both
goal weights are 1. That is because the SoftBody skin is
controlled by a SoftBody spline. The dynamics solver calculates
only one layer of SoftBody animation per frame.
You will notice the same problem in the final file, too, where a
layered SoftBody Spline was used for the head. In some
situations (where the animation is too fast, for example),
layered softbodies will become unusable. A workaround is to
bake the first layer of Softbodies with the bakeSoft.mel script.
This seems to be solved in Maya 2.0
CONCLUSION
Download AWICfinal.mb to get the
finalized scene with animation
and
shading.
Click here for the final animation.
(shift-click to save it on disk)
Your use of this file confirms your agreement to the
Terms and Conditions set out in the Terms and Conditions page.
http://www.aw.sgi.com/assistant_online/entertain/maya/how_tos/character/soft_body/part_3.html (2 of 2) [3/7/2000 13:59:35]
http://www.aw.sgi.com/assistant_online/entertain/maya/how_tos/character/soft_body/img/GLKstill4.jpg http://www.aw.sgi.com/assistant_online/entertain/maya/how_tos/character/soft_body/img/GLKstill4.jpg (1 of 2) [3/7/2000 13:59:44]