A Layman's Guide to PowerShell 2.0 Remoting by Revikanth Chaganti & Jan Egil Ring - HTML preview
Download the book in PDF, ePub, Kindle for a complete version.
Chapter 2: Enable/Disable PowerShell remoting
Remoting in PowerShell 2.0 can be enabled by just running the following cmdlet in an elevated PowerShell prompt
Enable-PSRemoting
Yes. That is it. You will be asked to respond to a couple of questions — based on OS architecture – as you see in the screenshot here.
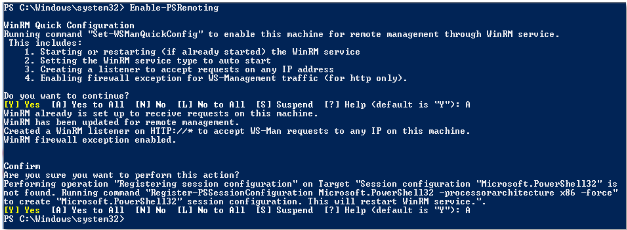
Figure 1 Enable Remoting
The following things happen when you run this cmdlet.
1. WinRM service gets enabled and startup type is set to auto start.
2. WinRM listener gets created to accept remoting requests on any IP addresses assigned to local computer
3. Windows firewall exceptions for WinRM service will be created. This is essentially the reason why network location cannot be set to public if you want to enable PS remoting. Windows firewall exceptions cannot be enabled if the network location is set to public.
4. Enables all registered PS session configurations. We will talk about this in detail later.
By default, WinRM only enables http transport for accepting remoting requests. You can manually enable https transport using either winrm command or New-WSManIntance cmdlet. For now, let us not overwhelm with so much information. We will look at this in part 2 of this guide.
Note
By default, PowerShell remoting uses port number 5985 (for http) and 5986 (for https). This can be changed by modifying wsman:\Localhost\listener\listener*\port to a different value using Set Item cmdlet. However, beware that this will change port number for every WinRM listener on the system.
You should always use the more comprehensive Enable-PSRemoting cmdlet. You can use -force parameter along with this cmdlet to silently enable remoting.
Trivia
![]()
Test PowerShell remoting
You can use the Enter-PSSession cmdlet to test if remoting is enabled on the local machine or not.
Enter-PSSession -ComputerName localhost
If remoting is enabled and functional, you will see the prompt changing to something like this

Figure 2 Enter-PSSession on localhost
Note
A PowerShell session (PS Session) is an environment to run the remote commands and scripts. PowerShell 2.0 provides various cmdlets to manage these sessions. To see a list of all PSSession cmdlets, use Get-Command –noun PSSession.
There is also a New-PSSessionOption cmdlet to change default behavior of a PS session. New-PSSession and Enter-PSSession cmdlets have a parameter, -sessionOption, to specify custom session options. You can use this to specify options such as
IdleTimeOut
Determines how long the PSSession stays open if the remote computer does not receive any communication from the local computer, including the heartbeat signal. When the interval expires, the PSSession closes.
OpenTimeOut
Determines how long the client computer waits for the session connection to be established. When the interval expires, the command to establish the connection fails.
OperationTimeOut
Determines the maximum time that any operation in the PSSession can run. When the interval expires, the operation fails.
SkipCACheck
Specifies that when connecting over HTTPS, the client does not validate that the server certificate is signed by a trusted certification authority (CA).
SkipCNCheck
Specifies that the certificate common name (CN) of the server does not need to match the hostname of the server. This option is used only in remote operations that use the HTTPS protocol.
SkipRevocationCheck
Does not validate the revocation status of the server certificate.
Remoting in workgroup environments
You will not be able to connect to a computer in workgroup just by running Enable-PSRemoting cmdlet. This is essentially because the security levels on a workgroup joined computer are more stringent than on a domain joined computer. So, on workgroup joined computers, you need to enable a few more things before you can create remoting sessions.
On Windows XP
You need to make sure the local security policy to enable classic mode authentication for network logons. This can be done by opening “Local Security Policy” from Control Panel -> Administrative Tools. Over there, navigate to Local Policies -> Security Options and double click on “Network Access: Sharing and Security Model for local accounts” and set it to classic.
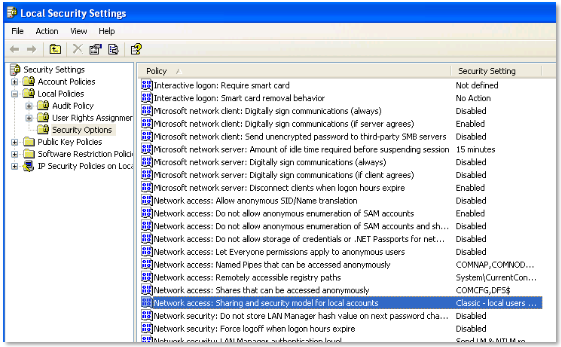
Figure 3 Windows XP security policy change
Modify WSMan trusted hosts setting
On all the workgroup joined computers – including Windows XP, Windows Vista and later – you need to add the IP addresses of all remoting clients to the list of trusted hosts. To do this,
Set-item wsman:localhost\client\trustedhosts -value *
Using * as the value will add all computers as trusted hosts. If you want to add only a specific set of computers,
Set-item wsman:localhost\client\trustedhosts -value Computer1,Computer2
If you want to add all computers in a specific domain,
Set-item wsman:localhost\client\trustedhosts -value *.testdomain.com
If you want to add an IP address of a remote computer to the trusted hosts list,
Set-item wsman:localhost\client\trustedhosts -value 10.10.10.1
Once the above changes are made, you can use Enable-PSRemoting cmdlet to enable remoting on these workgroup joined computers.
Remoting in mixed domain environment
By default, a user from a different domain cannot connect to a computer in another domain even when the user is a part of local administrators group. This is because remote connections from other domains run with only standard user privileges.
To work around this, you can change the LocalAccountTokenFilterPolicy registry entry (set it to 1) to allow members of other domain to remote in to the local computer.
new-itemproperty -name LocalAccountTokenFilterPolicy -path `
HKLM:\SOFTWARE\Microsoft\Windows\CurrentVersion\Policies\System -propertyType DWord -value 1
Disable remoting
You can use Disable-PSRemoting to disable remoting on the local computer. Disable-PSRemoting will only disable the session configurations. This will *not* remove all the changes done by EnablePSRemoting. This includes leaving the WinRM service in enabled state and leaving all the listeners created to enable PS remoting. You will have to manually undo these changes if they are not required by any other component or service on the local computer.
If no other service or components on the local computer need WinRM service, you can disable WinRM service by running
Set-Service winrm -StartupType Manual
Stop-Service winrm
To remove all WinRM listeners listening on default PS remoting port (5985)
Get-ChildItem WSMan:\localhost\Listener –Recurse | Foreach-Object { $_.PSPath } | Where-Object { (Get-Item
"$_\Port").Value -eq 5985 } | Remove-Item
Enable remoting for only a specific network adapter
When you enable remoting on a computer using Enable-PSRemoting cmdlet, an http listener will be created to listen for remoting requests on all IP addresses on the local computer. This may not be a great security practice in an enterprise.
For example, you have an Internet facing server with two network connections. One – obviously – is the Internet connection and a second one connecting to your internal network. You don’t need remoting be enabled on the network adapter connected Internet. But, since you used Enable-PSRemoting cmdlet, remoting will be enabled and there is a WinRM listener on the Internet facing network too. So, how do we disable remoting on the Internet facing adapter?
Enable-PSRemoting is a comprehensive cmdlet that does lot of things for you in one shot. This is also the recommended way to enable remoting. So, if we need to disable remoting on a particular IP address, all you need to do is remove the WinRM listener create by Enable-PSRemoting cmdlet and re-create your own listener for a specified IP address.
We use Remove-WSManInstance and New-WSManInstance cmdlets to do this. You can also use winrm command-line to achieve this. It is just a preference.
To remove the http listener created by Enable-Remoting,
Remove-WSManInstance winrm/config/Listener -SelectorSet @{Address="*";Transport="http"}
This will remove the listener.
Now, to re-create the http listener on a specified IP address
New-WSManInstance winrm/config/Listener -SelectorSet @{Address="IP:192.168.100.2";Transport="http"}
Once this listener is created successfully, you need to restart the WinRM service using Restart-Service cmdlet. From this point onwards, system will listen only on 192.168.100.2 IP address for any remoting requests.
You can follow the same approach for HTTPS transport too. However, you will have to specify the CertificateThumbPrint.
Remoting in an enterprise
To enable remoting on multiple computers in an enterprise or domain environment, you can use group policy 5 . For more information on this, refer to Appendix B: Enable PowerShell remoting using group policy Summary
In this chapter, we looked at how to enable remoting for basic usage. We also looked at how to configure computers in a workgroup and mixed domain environment to participate in PowerShell remoting. Beware that disabling remoting won’t undo changes done by Enable-PSRemoting. If remoting is not required on the local computer, you should manually undo all the changes. This is a good security practice. There are few more things you should be aware of while configuring a computer for remoting. We will look at each of these in detail in part 2.