Merchant by Kane Deng - HTML preview
Download the book in PDF, ePub, Kindle for a complete version.
PayPal Merchant Account Toolkit For Small Online Business
========================================== by : Kane Deng (Geeyo.com)
****************************************** Bring to you valuable & fresh information
on Internet business, and let you keep up
with all the latest major Net business
opportunities.==>
==========================================
1.Introduction
Online merchant account is very important for online business, because you need to accept money payments online, and can't force buyers send checks to you, and then you ship your products. Online buyers want to get your products immediately, don't want to wait for weeks, especially information related products or services. So, immediate online payments accepting is very essential for every online business.
There are many merchant account service companies, most of them charge you high setup fee and monthly fee. This way is not very suitable for startup small business, because they haven't so many sales orders at that time. PayPal doesn't charge both setup fee and monthly fee, only this can save you plenty of money, and cost saving is very essential for startup small business.
Perhaps many people think PayPal only a personal money transfering tool, and don't know the powerful merchant account function. PayPal is becoming more and more popular on the Internet, so taking PayPal as your merchant account is very convenient for your online business. PayPal can handle instant paying between sellers and buyers, you don't need to wait for many days to verify if the payment is valid. In just several dozens of seconds, the money belongs to you forever.
You may wonder what about the people with no PayPal account, it's very easy, PayPal can handle it smoothly. The people can pay you using their credit card directly, and PayPal let you accept both PayPal accounts and credit cards.
2.Open a PayPal premier or business accountIf you don't own a business, and just want to send payments and to receive credit card payments, you can select premier account; if you want to use PayPal to send and receive payments for your business, the business account is the right choice. I suggest you select the business account for receiving payments purpose. Click here [PayPal signup link], there will be such a page:
 Just choose the country where your business is located from the dropdown menu, and click the "Continue" button. There will be this page:
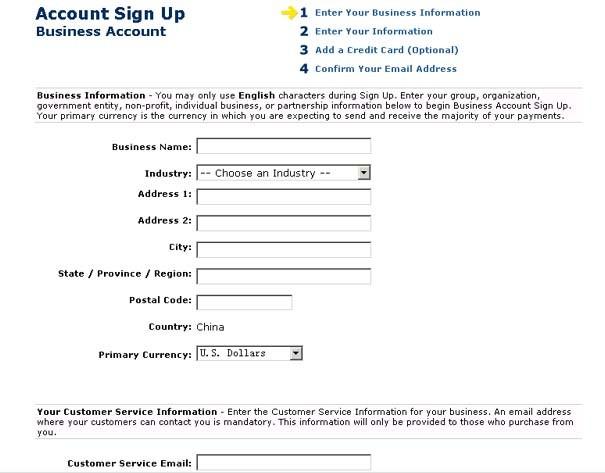 Enter your business's information according to descriptions on the page, then
click the "Continue" button. There will be following page:
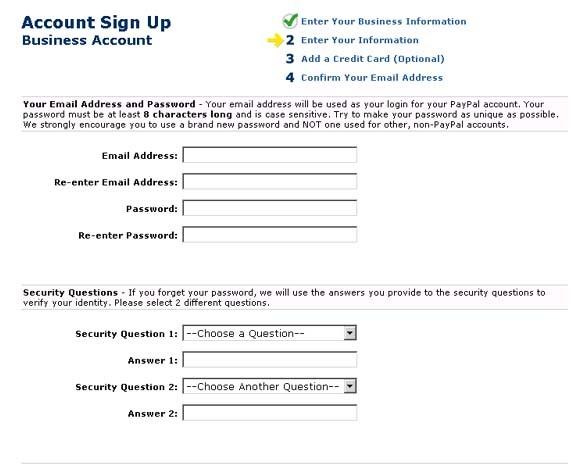 Just enter information about yourself according to descriptions on the page, then click "Sign Up" button.
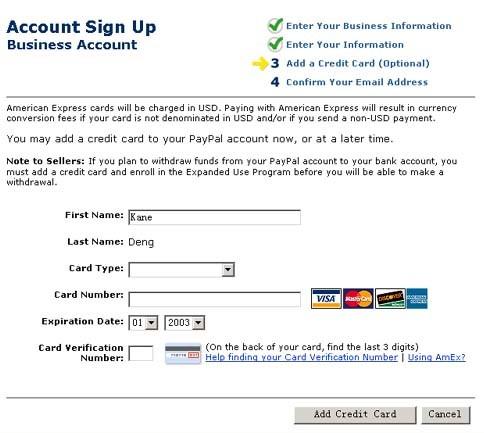 You can enter your credit card info here, or maybe later, it depends on you.
 The last step is to confirm your account email address, the page is like this:
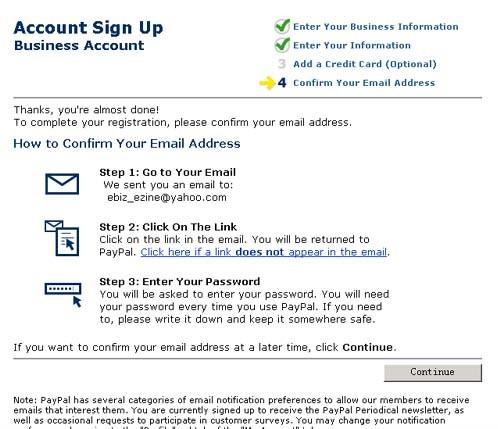
Congratulations! You opened your account now, and you can do as PayPal guides you now, please read every email PayPal sends to you very carefully, and follow what they say.
3.Build a single item order link button using the PayLock toolFirst, you need to get the PayLock Generator tool from here ==>
http://www.geeyo.com/selling/plg/
If you want to sell one single product or service, you can choose this function.
Run the PayLock Generator, click the "Single Item Generator" tab, there will be following interface:
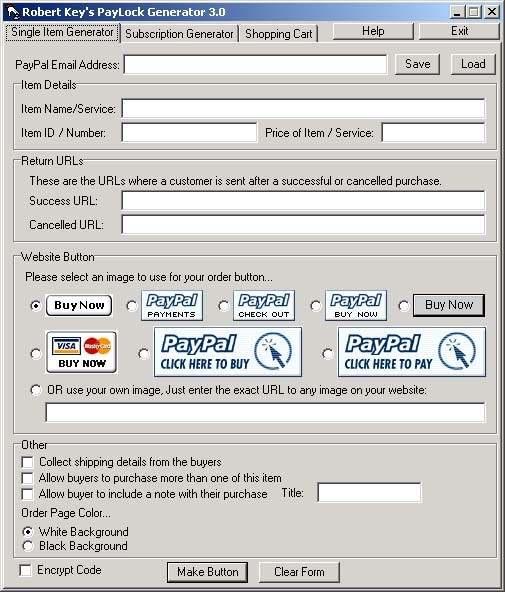 First, enter your PayPal Account Email Address first, this is used by your buyers to pay you, please enter it correctly.
Second, enter the item name of your product or service, such as "EBook Compiler Pro".
Third, enter the item ID/Number of your product or service, this is used to identify your different selling items. Eg, you can enter "ABC0001" as the item number.
Fourth, enter the price of your product or service, just enter the number, don't need the "$" character.
Fifth, enter the return URLs, one is the success URL and another is the cancelled URL. The success URL means the buyer can get your product from it after he/she pays you, and PayPal will automatically redirect to it after PayPal collected the payments. The cancelled URL is almost same, only it is the URL when you cancel paying you through PayPal, PayPal will redirect to it automatically too.
Sixth, select your favorite order button image. There are 9 choices now, and you can choose one according to your needs. You can use your own image if you want, and you must first upload your image to your site or other places can be accessed by an URL, then select the last choice and enter the URL of your own image, the URL must be complet, such as: http://www.your−site.com/images/order.gif.
Seventh, enter other information, such as if collect shipping details from the buyers, if allow buyers to purchase more than one of this item, or if allow buyer to include a note with their purchase. You need to enter the title if you want to check the choice "Allow buyer to include a note with their purchase".
Eithth, select your order page color. There are two choices, one is "White Background", and another is "Black Background", you can select one according to your actual HTML page, if your HTML page is white background, you'd better choose the "White Background", vice versa.
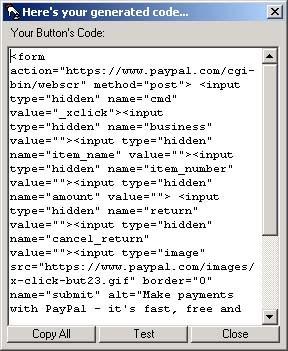
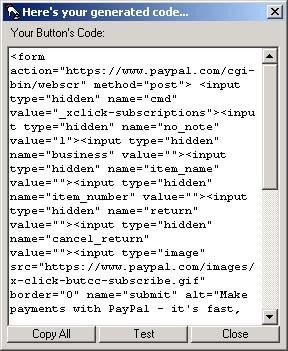
Nighth, click the "Make Button" button, then PayLock Generator will generate the HTML codes for you. PayLock Generator will popup a small window, and display the generated code in it. Now you can click "Copy All" button, and PayLock Generator will copy the generated code to windows clipboard, and you can paste to other places.
 Congratulations! You get the single item order link button now, and you can collect your money right now.
Note: for how to place the code into your order page, please read Chapter 7.
4.Build a shopping cart order link button
If you want to sell multiple products or services, you can choose this function. PayPal will manage your shopping cart automatically, and you don't need to install or run other application to do this task. No matter how many items you want to sell, PayPal can do all tedious tasks for you. You will know how hard the work will be if you want to implement a shopping cart system yourself.
Run the PayLock Generator, click the "Shopping Cart" tab, there will be such an interface:
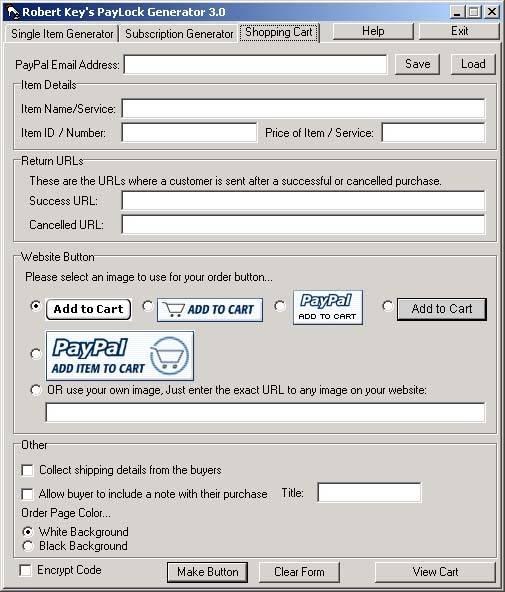 First, enter your PayPal Account Email Address first, this is used by your buyers to pay you, please enter it correctly.
Second, enter the item name of your product or service, such as "Adventure History".
Third, enter the item ID/Number of your product or service, this is used to identify your different selling items.Eg, you can enter "BOOK001" as the item number.
Fourth, enter the price of your product or service, just enter the number, don't need the "$" character.
Fifth, enter the return URLs, one is the success URL and another is the cancelled URL. The success URL means the buyer can get your product from it after he/she pays you, and PayPal will automaticall redirect to it after PayPal collected the payments. The cancelled URL is almost same, only it is the URL when buyers cancel paying you through PayPal, PayPal will redirect to it automatically too.
Sixth, select your favorite order button image. There are 6 choices now, and you can choose one according to your needs. You can use your own image if you want, and you must first upload your image to your site or other places can be accessed by an URL, then select the last choice and enter the URL of your own image, the URL must be complet, such as: http://www.your−site.com/images/order.gif.
Seventh, enter other information, such as if collect shipping details from the buyers, or if allow buyer to include a note with their purchase. You need to enter the title if you want to check the choice "Allow buyer to include a note with their purchase".
Eithth, select your order page color. There are two choices, one is "White Background", and another is "Black Background", you can select one according to your actual HTML page, if your HTML page is white background, you'd better choose the "White Background", vice versa.
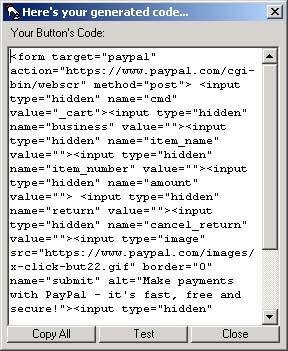
Ninth, click the "Make Button" button, then PayLock Generator will generate the HTML codes for you. PayLock Generator will popup a small window, and display the generated code in it. Now you can click "Copy All" button, and PayLock Generator will copy the generated code to windows clipboard, and you can paste to other places.
 Congratulations! You get the shopping cart order link button now, and you can collect your money right now.
Note: for how to place the code into your order page, please read Chapter 7.
5.Build a recurring subscription order link button
If you want to sell recurring subscription service, such as membership, you need this function. PayPal can collect recurring payments automatically for you, and you don't need to think of anything, just wait to collect your money.
Run the PayLock Generator, click the "Subscription Generator" tab, there will be such an interface:
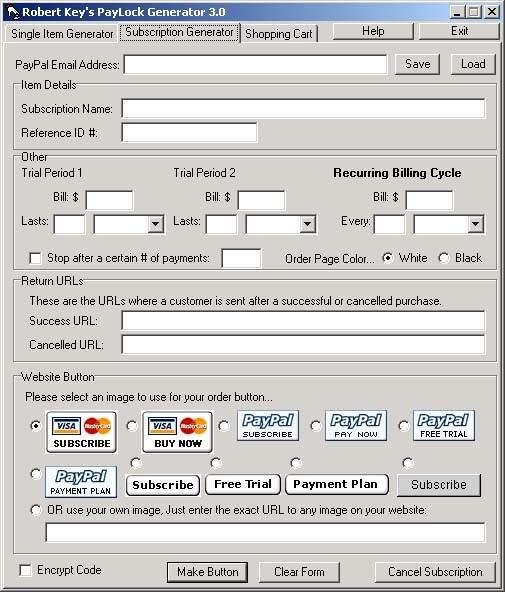 First, enter your PayPal Account Email Address first, this is used by your buyers to pay you, please enter it correctly.
 Second, enter the subscription name of your service and the reference ID you can use to identify different services.
Third, enter the recurring information. There are two "Trial Period" input boxes, these are used to give your buyers one or two trial periods, and this method can let your prospects be happy to try without payments first, and they will continue their subscription after the trial periods if no other problems. It is a way more acceptable than direct selling. Generally, you only need to input one trial period, for example, you decide provide your buyers one month subscription as trial with only $1, you can enter 1 in the first trial input box, and leave another blank. You should select the last information of your trial periods now, if you want to let buyers try 12 days for $1, then you can enter "12" in the "Lasts:" inputbox of the trial period and select "Day(s)" from the "Lasts" dropdown box.
Then enter your normal recurring bill, such as $19.95 per month, you can enter "19.95" in the "Bill: $" inputbox and enter "1" in the "Every:" inputbox and select the "Month(s)" from the "Every:" dropdown box.
If you want to stop the payments after a specified number of cycles, then select "Stop after a certain # of payments:", and enter the number, for example, 12.Forth, select your order page color. There are two choices, one is "White",and another is "Black", you can select one according to your actual HTML page,if your HTML page is white background, you'd better choose the "White Background", vice versa.
Fifth, enter the return URLs, one is the success URL and another is the cancelled URL. The success URL means the buyer can get your product from it after he/she pays you, and PayPal will automaticall redirect to it after PayPal collected the payments. The cancelled URL is almost same, only it is the URL when you cancel paying you through PayPal, PayPal will redirect to it automatically too.
Sixth, select your favorite order button image. There are 11 choices now, and you can choose one according to your needs. You can use your own image if you want, and you must first upload your image to your site or other places can be accessed by an URL, then select the last choice and enter the URL of your own image, the URL must be complet, such as: http://www.your−site.com/images/order.gif.
Eighth, click the "Make Button" button, then PayLock Generator will generate the HTML codes for you. PayLock Generator will popup a small window, and display the generated code in it. Now you can click "Copy All" button, and PayLock Generator will copy the generated code to windows clipboard, and you can paste to other places.
 Congratulations! You get the recurring subscription order link button now, and you can collect your money right now.
Note: for how to place the code into your order page, please read Chapter 7.
6.Secure your order link by encryting the HTML codes
Why should you encrypt PayPal order links?
Because you have to include the Success URL in the order link, so if buyers know something about this problem, they can easily bypassed your collecting payments step, and access the Success URL directly. Now, you can imagine, if anyone does so, how can you earn money?
Another problem of not encrypting is that people can change the amount you charge, such as, you charge them $29.95 normally, but they can change it to $0.95, and get your products immediately with such small cost. It's very certain that you can't stand such theft.
There are other problems with note encrypting the order link.So protecting your confidential order information is very important.
Thanks to the computer technology, we can encrypt data easily and quickly. We can encrypt the order link using PayLock Generator.
In Chapter 4,5,and 6, you can see there is a "Encrypt Code" checkbox in the PayLock Generator interface, this is used to encrypt your order link button's HTML code. You should select this checkbox every time you create your PayPal order link, and this can ensure your confidential information can't be stolen.
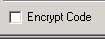
After click the "Encrypt Code", you can click "Make Button" button just as in Chapter 4,5 and 6. PayLock Generator will display the encrypted code in a small popup window. Just click "Copy All" button, and go to next step to use them.
7.Put the order link button codes into your order pageThis step is very easy, but you need know some basic HTML, and you can let one of your friends help you if you know nothing about HTML.
First, open the order HTML page using Microsoft Internet Explorer, and view it for a while. You can think about where you should place the order button. Goto next step after you decide the places.
Second, open your order HTML page using your favorite HTML editor, switch to HTML code mode, and scroll to places you selected, then paste the codes there, and then save this page.Now everything is ok, you can upload the order HTML page to your website host using your favorite FTP client.
Congratulations! You just finished everything to setup your merchant account, and now just wait to see beautiful payments coming in ceaselessly.
8.Confirm it when you receive a PayPal payment
PayPal will notify you after it received a payment for you, and the payment doesn't belongs to you before you confirm it.
And confirm is very easy, just login your PayPal account, and you will see notice messages tell you have payments. You can follow the guides PayPal provides.
9.Conclusion
In my personal opinion, PayPal is the most economic and most convenient way to open a merchant account, only when you have a credit card or debit card. PayPal doesn't charge setup fees and monthly fees, and provides enough tools to meet many kinds of online payment methods. You should make full use of this great opportunity.
Wish your big success! ========================================== by : Kane Deng (Geeyo.com)
****************************************** Bring to you valuable & fresh information
on Internet business, and let you keep up
with all the latest major Net business
opportunities.==>
==========================================
You may also like...
-

Side Hustles that actually work Business by Godfrey OnyangoSide Hustles that actually work
Reads:
0Pages:
82Published:
Apr 2026*Side Hustles That Actually Work* is a practical guide to building real, sustainable income streams outside a full-time job. It cuts through generic advice by...
Formats: PDF
-

Your Next 60 Seconds: Mastering Quick and Effective Decision Making for Positive Results Business by JD KingYour Next 60 Seconds: Mastering Quick and Effective Decision Making for Positive Results
Reads:
91Pages:
147Published:
Oct 2025“Your Next 60 Seconds” provides us with a comprehensive guide to enhancing our decision-making skills in a fast-paced world. The book emphasizes the importanc...
Formats: PDF, Epub, Kindle, TXT
-

Bussiness is Money Business by Kazi Rejwan IslamBussiness is Money
Reads:
104Pages:
46Published:
Sep 2025Money Psychology in Business: Unlocking the Mind Behind Financial Decisions. Do smart people make poor money choices in business? How do emotions like fear, g...
Formats: PDF, Epub, Kindle, TXT
-

Writing, Branding, Content Creation Business by Caleb OlayiwolaWriting, Branding, Content Creation
Reads:
76Pages:
29Published:
Aug 2025"Writing, Branding, Content Creation" is a book written by Caleb Olayiwola. Available in PDF, the ebook talked about what writing is in details and expanded o...
Formats: PDF, Epub, Kindle, TXT