Until I started dabbling with Microsoft Word, I never realised how versatile it is. Like most computer programs, you just end up using a tiny fraction of the functions they offer. In this guide, I’m going to show you what an ideal program Word is for our purposes and explain the few simple commands you need to master to create great looking kitchen plans.
I’ve tried several professional kitchen design packages before, but found most to be overly complicated and time consuming. If I can’t get to grips with something within the first few minutes I lose patience pretty quickly.
View ⇒Toolbars ⇒Drawing
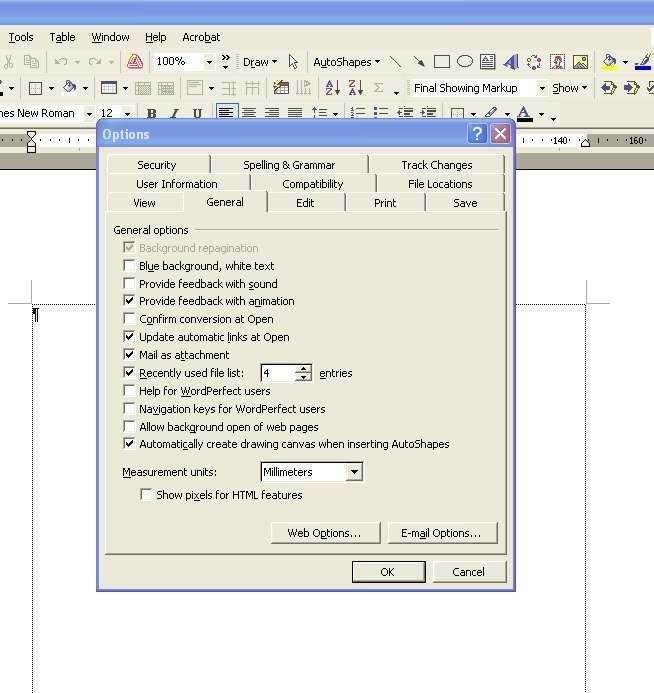
Next, we need to make sure that the unit of measurement is Millimetres (mm):
Tools ⇒Options ⇒General ⇒select Millimetres from the ‘Measurement units’ drop down box
 Now set your page up properly:
 File ⇒Page Setup ⇒Margins ⇒Set Top, Bottom, Left & Right Margins to 20mm – this will allow plenty of space for your drawing while still being within the printable area for your printer. Select the Page Orientation you prefer – Portrait or Landscape.
Once this is done it’s time to start ‘drawing’. Before we do though, let’s cover some basics.1. accurately measure the room (remember the tip about measuring at floor level and again at a height of 900mm, then taking the smaller of the two)
2. note your sizes down on a simple line drawing
3. mark doors, windows , radiators, boilers and other permanent features on your plan
4. mark position of power sockets, light switches
5. mark position of water supply, waste pipes and gas supply if present
5. mark position of any boxed in pipes, sloping ceilings, alcoves or any other feature which may affect your design
For our purposes, the majority of commands we will be using will be available with one click straight off the Drawing Toolbar and will be for simple lines, shapes and text boxes.
Occasionally, we’ll also use some special commands which can normally be accessed by right clicking on the object you’ve just drawn and choosing an option.Your drawings can be as elaborate or as simple as you want to make them. You can add colour, text, special ‘fill’ effects and more. I would suggest you keep them relatively simple though. So long as you or your fitter can understand it and it’s accurate, then that’s all that really matters.
You can see a couple of examples of plans I’ve created using Word at the end of the section. These should give you a good idea of what you can do quickly and easily with the program.
The Grid
The whole ‘key’ to successfully using Word to produce accurate drawings is to set up the ‘Grid’ correctly. To do this:
Draw ⇒Grid ⇒
• tick Snap Objects to Grid
• Grid Settings: Horizontal spacing: select 1mm from the drop down box
• Grid Settings: Vertical spacing: select 1mm from the drop down box
• Leave Grid Origin ticked if it is already
• Tick Display Gridlines on screen
• Tick Vertical every: 5mm
• Set Horizontal every: 5mm
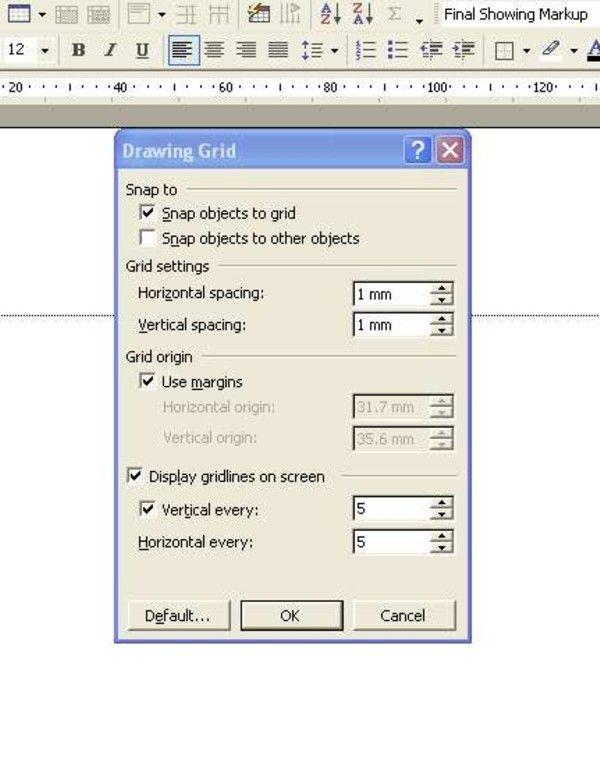
Like most graph paper you can buy in the shops, your Planning Grid will now be made up of 5mm squares.
When designing your kitchen you will find that 100mm is a significant size, because this size will be the building block for your kitchen plan. As you’ve already read, most kitchen units and appliances are sized in multiples of 100mm.
We’ll be creating our plan to a scale of 1:20 so each 5mm square on your plan will represent a length of 100mm on your kitchen floor. This makes it very easy to layout your cabinets and appliances as you will see.
Toolbar Buttons
By default, once you’ve placed the Drawing toolbar on your screen then all of the drawing commands I’m about to refer to should be showing. If any are not, you can easily add them:
Look for the little black down-pointing arrow at the very end of the Drawing toolbar. Click this so that you see, ‘Add or Remove Buttons’. Select the ‘Drawing’ option. Now click this to reveal all available Drawing tools and add the ones you require.
Using the buttons in the picture below will allow you to draw straight lines, arrows, squares/rectangles, circles/ovals and text boxes.
 Here are some examples of what these buttons will draw on-screen:
The Drawing ‘Canvas’
When you click a Drawing button, Word will create a Drawing Canvas for you with the words “Create your drawing here”. Don’t worry if it looks too small just now, you can make it bigger once you’ve placed an ‘object’ inside it (I’ll refer to any line, shape or element you draw as an ‘Object’ for now).
Once you’ve started to draw something the canvas will become ‘highlighted’ and will have black ‘resizing handles’ on its sides and corners. Click any of these to resize the canvas.
 Creating Lines, Rectangles and Circles
(The instructions I give you here are the same for virtually any object you create.)
Start by clicking the ‘Line’ button on the toolbar:

Your drawing canvas will now be highlighted and the cursor will change to crosshairs when it’s inside it. Place the start of the line/object roughly where you want it to be and extend the line by moving your cursor.
Whenever you want to work with this object just click it and a small circle will appear at either end (or on its corners if you’re drawing a box).Different Types of Cursor
Initial ‘positioning’ cross-hairs
When you hover over or inside an object the cursor will change to the arrow crosshairs shown above, meaning you can click and move it wherever you want to on the canvas. If you hover over the little circles at the edge of the object, then the cursor will change to the third, ‘re-sizing’, type and let you change the size or length of the object.

Tip: with circles, rectangles and certain ‘Autoshapes’ you will notice an extra ‘green’ coloured circle in addition to the other little circles that appear when you click inside an object. By clicking on this circle you can rotate the object about its axis.
To draw a simple square, for example, just click the Rectangle drawing button and place your cursor where you want the object on-screen. Use the different cursors mentioned above to move and resize it the way you want, using the 5mm grid we setup as your guide.
So, to draw a typical 600mm base unit on your plan, you would draw a box 6 squares wide by 6 squares deep. (i.e. approximately 600mm wide x 600mm deep). If you wanted to draw a 1000mm base unit you would draw a box 10 squares wide by 6 squares deep. To draw a typical 600mm wall unit (which are normally approximately 300mm deep), your box would be 6 squares by 3 squares. Easy, right?
Other Shapes
At the end of the day, most of the objects you will be drawing on your plan are just straight lines and boxes! The big advantage to using Word though over a pencil and paper is the ease with which you can change your design and moves things around. Remember, 100mm is our magic number when it comes to kitchen planning and using the grid lets you know straight away if something’s going to fit or not.
Look for ‘Autoshapes’ on the Drawing Toolbar and click it. You now have the following choices:
• Lines
• Connectors
• Basic Shapes
• Block Arrows
• Flowchart
• Stars and Banners
• Callouts
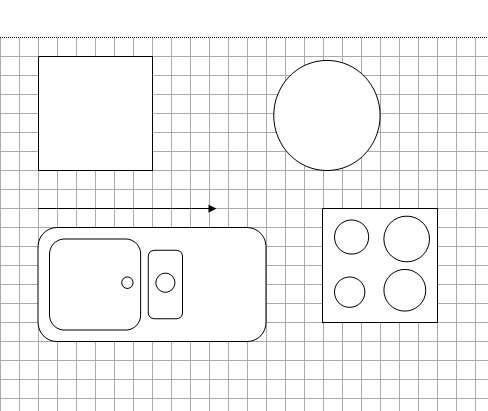
Occasionally you may have use for options in the ‘Lines’ and ‘Connectors’ groups, but the only ‘special shape’ I tend to use is the ‘Rounded Rectangle’ from the Basic Shapes family which is perfect for drawing sinks. I drew the one below in under a minute using only rounded rectangles, circles and straight lines. Open up Word just now and have a go – once you get the hang of it, it’s a piece of cake!
Tip: Once you’ve created an item like the sink above, which consists of several different objects, how do you move it if you need to? Rather than try to move each individual item, then re-align them in their correct position, hold down the Control button on your keyboard then click each item in turn until they’re all highlighted. You can then move them as a complete group of objects. Or, from just outside of the group, left click your mouse and drag a highlighting box over all of them. When you let go of the mouse button all objects will be highlighted. Move your cursor within the group until you have the ‘Positioning’ type of cursor, left click and move the whole group to its new position. You will find these two techniques handy in many situations.
Text Boxes
Often it’s useful to name the different elements on your plan so both you and you’re fitter know what they are. To add text, click the Textbox icon on the toolbar.

A box will appear on the canvas with a prompt ready for you to type. You can format the text by highlighting it and using any of the normal text commands e.g. Font, Font Size, Bold, Italics, Underline etc.
You will notice the textbox automatically appears with a black line around it. It’s personal choice, but I prefer it not to have this. If you’d also like to remove it, right click the edge of the box and click the ‘Format Text Box’ option.
Now click the ‘Colors and Lines’ tab at the top of the dialogue box. In the ‘Line’ section click the Color drop-down box and select ‘No Line’.You can move, enlarge/reduce, copy & paste textboxes in exactly the same way as any other Drawing object.
Object ‘Order’
Sometimes, depending on the order in which you create the different objects in your plan you can end up with one object that is effectively ‘sitting on top’ of another. For example, in an earlier drawing when we were talking about layouts I showed the dotted line of an integrated appliance sitting ‘underneath’ a sink. The drawing you saw was effectively two ‘layers’. I drew the first layer (the appliance) and then I drew the sink. If you ever need to change the order of these ‘layers’ in your drawings, use this technique:
Colour & Fill Effects
If you want to add a touch of colour to your drawing to brighten it up or make an object stand out it’s very easy (I tend to colour my wall and larder units so it’s obvious they’re a different height to the base units).
 Alternatively,
Right click the object ⇒Format Autoshape ⇒Colors and Lines ⇒Color
When you click Color you will see there is also an option called ‘Fill Effects’ which allows you to use shading or hatching effects like this:


Let’s say for example, you have a rectangular shaped room with dimensions of 3540mm x 2810mm. In theory you could count out 35.4 ‘squares’ by 28.1 ‘squares’ on the drawing grid (as each square = 100mm). This is a bit tedious though. Here’s how to get your drawing exact:
If you’re good at mental arithmetic you can do this in your head, otherwise get a calculator out and divide each of your dimensions by 20. In the above example this gives us 177mm by 140.5mm. These are the dimensions you will be using on your drawing.
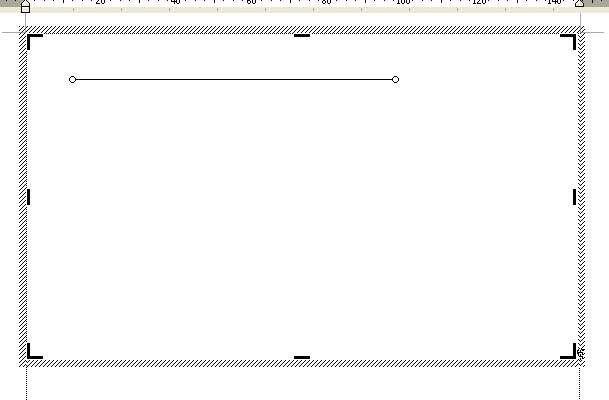
We already know how to draw lines, so go ahead and create a straight line on your canvas. Keep it highlighted (little circles at each end), then right click with your mouse. As well as the usual Cut, Copy & Paste commands, you’ll notice ‘Format Autoshape’. Click this and go to the ‘Size’ tab at the top.
Depending on whether your straight line is a vertical or horizontal line, either the Height or Width parameter will equal 0.00mm – the other size will be whatever length the line happened to be when you drew it. Replace this size with whichever of the two dimensions we just calculated, as appropriate (it makes sense to draw the longest sides of your room on the longest side of your page - depending on whether your page is setup in Landscape or Portrait format).
By now you should have one line on your page which accurately represents one side of your room. Hover your cursor right on top of this line and right click to reveal the Copy command. Click this, then right click again to Paste (these commands are also available from the ‘Edit’ tab on the main Word toolbar).
Hover over the second line you’ve just created until the cursor becomes the Positioning type and move the line to the other side of the page. Now repeat this process for the two lines you’ll need to form the other two walls of the room. When all four lines are accurately drawn and roughly in position, move them as necessary to create the four corners.
Tip: you may not need to draw all four walls of the room depending on your layout – you might only need to draw two or three. Adding Dimensions to Your Drawing
It’s useful, particularly if you are giving your plan to a fitter, if you mark the room dimensions on it. The accepted way is with a double-ended arrow and the length in Millimetres beside it. To do this, follow these steps:
Autoshapes ⇒Lines ⇒(choose the double-ended arrow)
Place the arrow parallel to the line whose dimension you want to indicate, then resize it so it’s exactly the same length. Create a small textbox next to it and enter the dimension in ‘mm’.
Adding Units & Appliances to Your Plan
Creating the outline of your room accurately on the page is perhaps the most important aspect of your kitchen plan. After that, it’s really just a case of arranging the appliances and units to make best use of your space in a logical layout. Let’s quickly re-cap on some common sizes:
(For the purposes of drawing kitchen plans on Word, I tend to show base units as being 600mm deep whereas in reality most are between 570mm – 590mm. This just makes the drawing easier to read as standard worktop is 600mm deep and is attached to the base units anyway.)
Base Units Widths: (I’ll mention as many permutations as I’m aware of)
• 150mm (often wine racks or wire basket pull-out units)
• 300mm
• 400mm
• 450mm
• 500mm
• 600mm
• 800mm
• 900mm (tend to be corner units)
• 950mm (tend to be corner units)
• 1000mm
• 1200mm
Wall Unit Widths:
• 300mm
• 400mm
• 450mm
• 500mm
• 600mm
• 650mm (tend to be corner units)
• 800mm
• 1000mm
Tall Unit Widths
• 300mm
• 500mm
• 600mm
Tip: Check with your supplier first to confirm which units are available before creating your plan.Appliance Widths (Integrated):
• 450mm (Slimline dishwashers)
• 600mm (washing machines, tumble dryers, most integrated fridges & freezers, most integrated ovens
Free-standing appliances tend to be manufactured in similar sizes to those above, but there are variations. Again, check with your supplier before adding them to your plan. Note: a lot of the newer American style fridge freezers are considerably bigger than 600mm.
We’ll draw a few units now, just to hang the hang of it:600 base unit
Integrated Dishwasher 600 3-Drawer Base unit
4 zone hob 150 wine rackwith wok base/wall unitburner
Tip: If you want to represent an integrated appliance draw two squares – one inside the other. Give the smaller a dotted line to show there is a concealed appliance. To do this, follow these steps:
Right click object ⇒Format Autoshape ⇒Colors and Lines (tab) ⇒Line ⇒ Dashed ⇒(select from drop down box)
Tip: To help you, I’ve put together a series of video tutorials to accompany this guide which you can view online by clicking here. Up until now we’ve just created ‘Plan’ views of our kitchen i.e. shown as if you were looking down on them from above. You can also draw individual walls as if you were looking straight at them:
300 500 500 600 Wall Wall Wall Wall Unit Unit Unit Unit
600
Chimney Extractor
50/50 300 500 SingleSingle 600 Fridge/Freezer Base Base BuiltDrawer Base Unit Unit UnderBase Unit Unit Oven
Okay, it’s time to transfer your measurements onto Word and have a go at designing your own dream kitchen. It’s not difficult and, with a little practice, you will find that you can quickly create imaginative layouts that make the most of the space you have available.
Once you’re ready to order your kitchen why not take a look at the wide selection of styles available on our website. We carry a full range of units, worktops, appliances, sinks, taps & accessories all available online ready for dispatch throughout the UK.
If you’re a property developer, contractor or just a first time buyer looking for the latest styles at discount prices you may also want to take a look at our new budget kitchen site.
1000mm base unit with single bowl sink & mixer tap
F/Standing washing machine
400mm base unit500mm base unit with drawer
500mm 500mmbase unitwall unitStainless steel gas oven & hob
Chimney Extractor600mm
larder unit with 50/50
Full height units & wall units F/S Washing Machine
F/S Fridge Freezer
Integrated Dishwasher 400 wall unit
600 base unit with single bowl sink
1000 base unit with Magic
Corner
5-burner
S/steel gas hob
90cm Glass & S/Steel
Chimney
Extractor
Hopefully you should now feel confident enough to have a go with your own design, but if you need any more help why not take a look at the tutorial videos.
Your dream kitchen awaits you! Thanks for reading.

Reads:
16
Pages:
32
Published:
Apr 2024
Master Facebook marketing with this e-book, designed to teach you how to drive significant traffic without ads. Learn from actionable strategies and insights ...
Formats: PDF, Epub, Kindle, TXT

Reads:
502
Pages:
30
Published:
Nov 2022
With this eBook, you will learn how to make thousands of dollars daily with a very easy one-time setup. Enjoy!
Formats: PDF, Epub, Kindle, TXT

Reads:
36
Pages:
50
Published:
Aug 2021
Art tutorials grade 9. A step by step guide to drawing, painting, sculpting, analyzing within the curriculum of Art in Swedish public school.
Formats: PDF, Epub

Reads:
23
Pages:
48
Published:
Aug 2021
Art tutorials grade 8. A step by step guide to drawing, painting, sculpting, analyzing within the curriculum of Art in Swedish public school.
Formats: PDF, Epub