www.ianmiddletonphotography.com
www.ianmiddletonphotography.com
1
First published in Great Britain 2016.
Edition 1
Copyright © 2015 Ian Middleton.
All rights reserved. No part of this publication may be reproduced, stored in a retrieval system, or transmitted in any form or by any means, electronic, mechanical, photocopying, recording or otherwise, without prior permission from the copyright owners.
All photos by Ian Middleton, unless otherwise indicated.
Photography © Ian Middleton
www.ianmiddletonphotography.com
Illustrations by
Rebecca Svetina
David Selwood
Published by Schmetterling Productions
ISBN 10: 0-9540779-5-4
ISBN 13: 978-0-9540779-5-2
Email: sales@schmetterlingproductions.co.uk
Authorised distribution only
While this book is free of charge, distribution of the book is only allowed with permission.
If you would like to make this book available for download on your website, please contact me for permission and details on: ian@ianmiddletonphotography.com
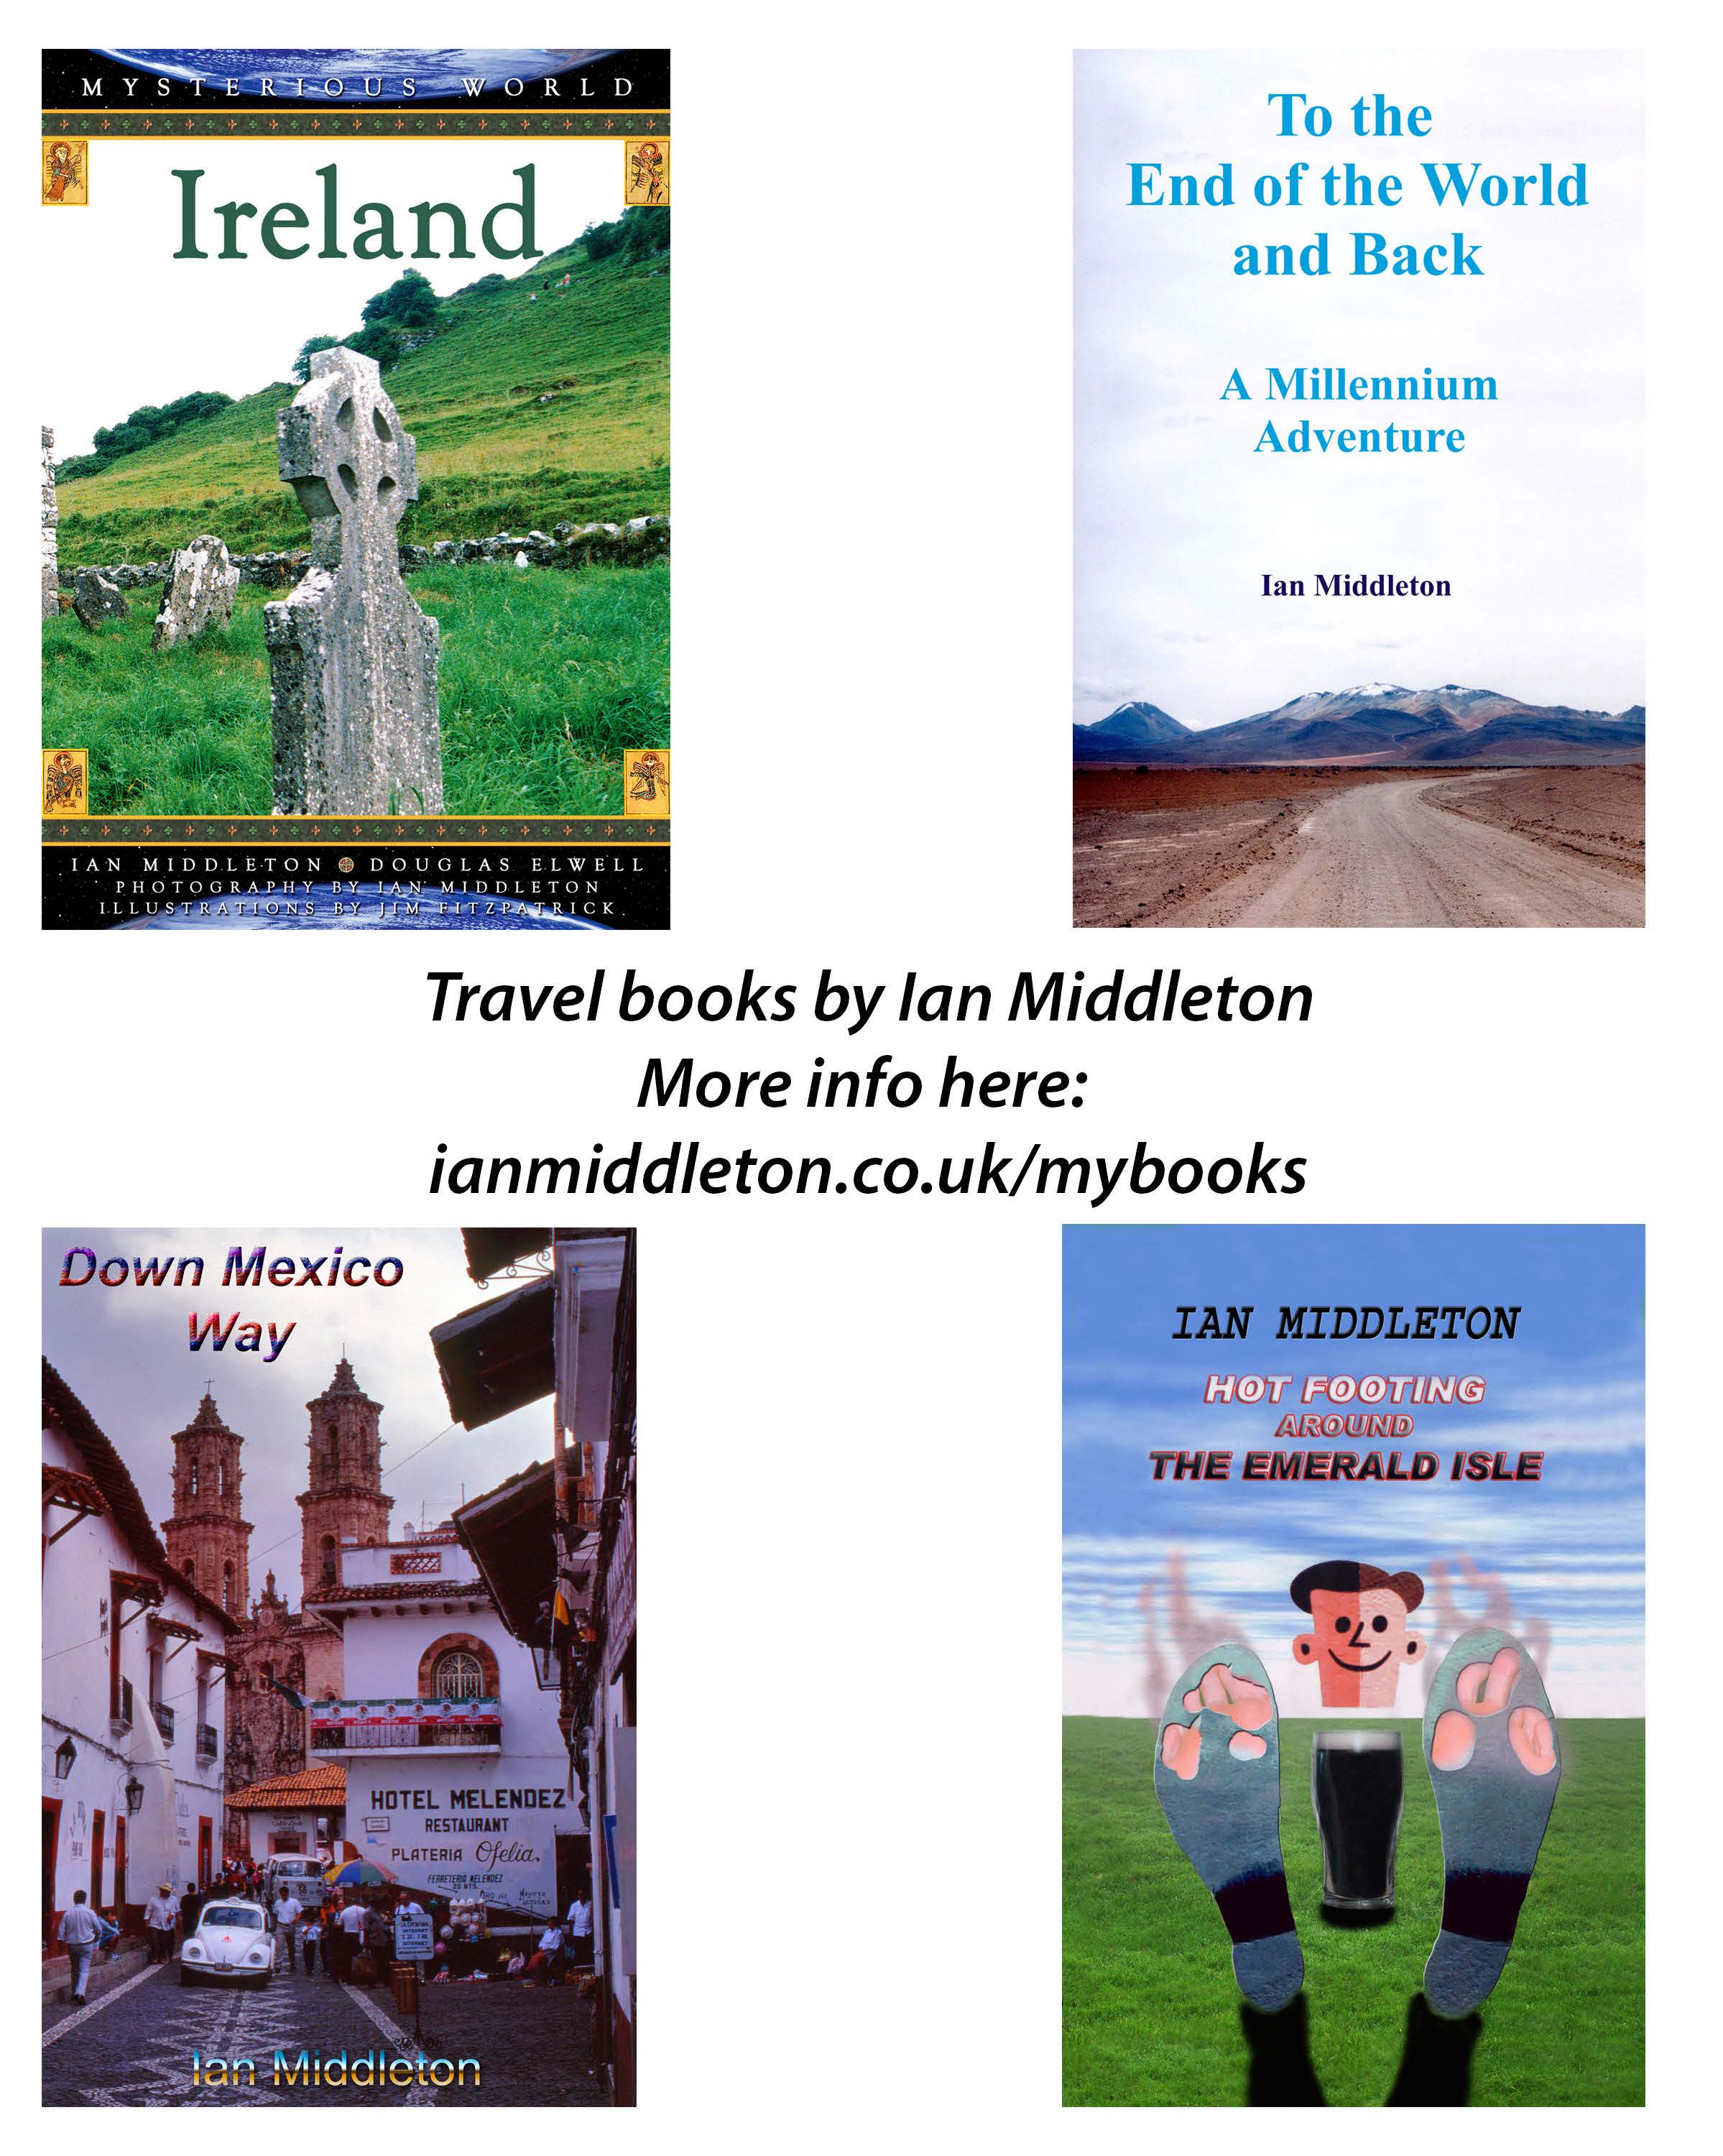
Advertising
OUT NOW IN PAPERBACK
This book contains advertising and affiliate links, which means if you click some links and Available at:
purchase something I will get a small commission at no extra cost to you
If you would like to advertise in this book, then please contact me for rates and details on:
ian@ianmiddletonphotography.com
www.ianmiddletonphotography.com
www.ianmiddletonphotography.com
3


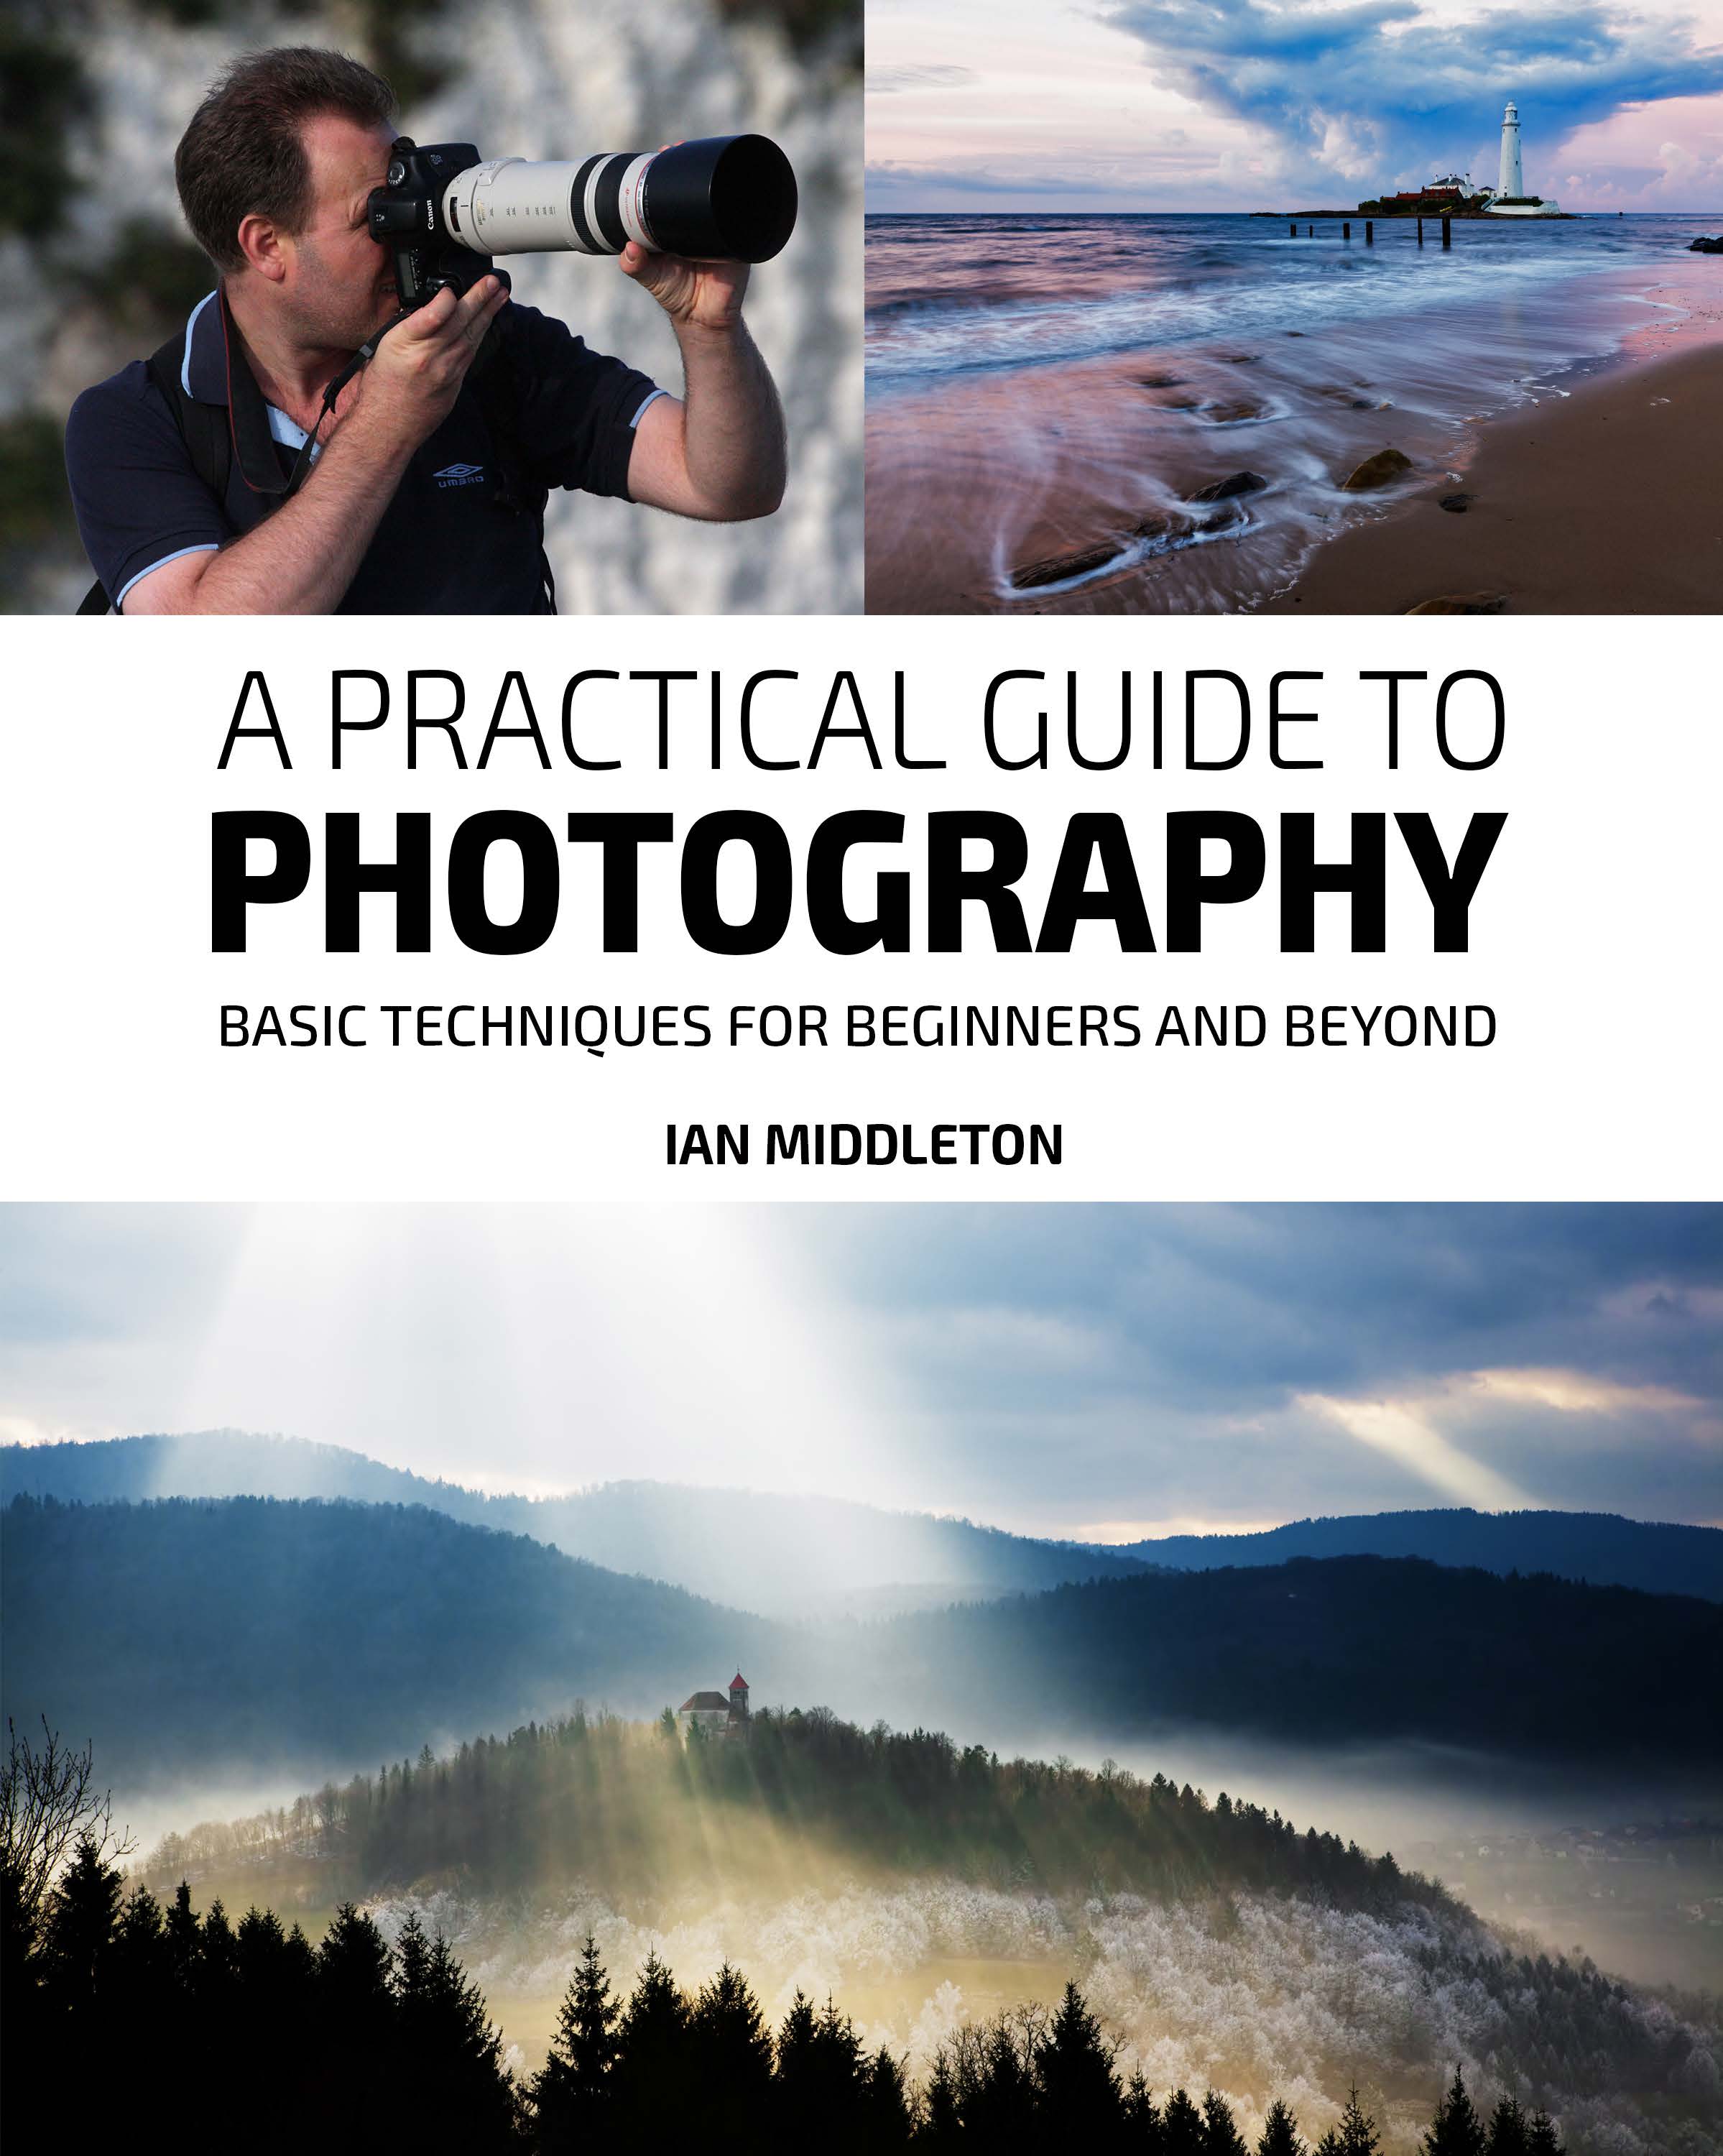
A PRACTICAL GUIDE TO PHOTOGRAPHY
Basic Techniques for Beginners and Beyond
Special thanks to the sponsors of this book.
Contents
1. Introduction to light & direction of light
2. How the camera sees and captures images
5. The exposure triangle (shutter speed, aperture, ISO)
9. Image file formats – RAW, TIFF & JPEG
I often work very late nights to produce these ebooks and all the free articles and tutorials on my websites. They will always be free, but I do need coffee to keep me awake at night. So I’d be grateful to anyone who wishes to buy me a coffee. You can do so via the link above.
Thanks in advance.
More articles on my blog
https://blog.ianmiddletonphotography.com
www.ianmiddletonphotography.com
www.ianmiddletonphotography.com
5
Foreword:
my first SLR and have another go.
Somewhat fortuitously, someone had left an old book on photography for In the chill of the night, way back in the 80s, I was standing in the square outside beginners on the canteen table where I was working at the time. I spent the next my house with my brother’s tripod and
few weeks with my head buried inside this book and it was here that I learned all SLR, and a hastily scribbled set of times,
about the basic principles of photography; including how to load film correctly.
shutter speeds and apertures taken down
I found this essential to understanding how the camera works. It’s these basic from the Sky at Night television program
principles that have been the foundation for my work and have helped me to the evening before. Patrick Moore had been
develop my skil s and work over the years.
interviewing a photographer who gave out
I certainly had lots of practice loading film as I went through reels and these settings for budding photographers
reels learning and practicing my craft. This time I didn’t let my mistakes faze me to capture the lunar eclipse, so in a fit of
and instead learned from them. I transferred to digital in 2005, which certainly spontaneity I had grabbed my brother’s
lowers the cost of making mistakes and allows you the flexibility to experiment camera and tripod and decided to have a
and learn.
go. The lunar eclipse was just beginning. I
Today, with high tech digital cameras, most people may feel more had already loaded my roll of 36-film and
comfortable switching to auto and mistakenly believing that the camera can do as the first shadow was cast across the moon, I began shooting. This was my first it all for them. Well, that’s true if all you want is a basic good shot. The camera attempt at doing some serious photography. Until this point I had always taken cannot read your mind. All it can do is read a scene and give you an average snapshots using a trusty old compact.
shot based on what it captures. So in order to take control and get the shots that As the dawn light crept in I got closer to the end of my film. Or so I thought!
you want, you have to go beyond the auto settings. Also, although technology Once the indicator reached 36, I was surprised to find the camera wind on to has moved on, the basic principles of photography are still the same and apply one more exposure after another until pleasure at the thought of getting a few to all types of camera. Compacts and smartphone cameras all use the same extra pictures turned to suspicion as the reel never seemed to end. Eventual y I principles, and many of these allow some control over the settings. So you might had to pack up and head, bleary-eyed through lack of sleep, to work.
be surprised what you can do with a little more understanding. Alternatively, After work that day I took the film along to the photography shop and with a little extra knowledge you will know what your camera can and can’t do.
told the guy what had happened. He put the film inside a sealed box and looked through a camera. All exposures were blank. It seemed that I had neglected to And so, in this book, I have put together a lot of this information so that you can load the film properly. So my sleepless night was in vain!
learn first-hand the essential knowledge that you will need as a photographer. I After that instance I decided that I wasn’t cut out for photography and a have tried to put make it as simple, and practical as possible. I hope that you find decade passed before I picked up another SLR.
it as useful as I did while learning it.
What inspired me to take photography seriously again was a four-month journey around Mexico in 1997. This voyage of discovery filled my eyes with Once you have read it, you are welcome to join me on one of my photography
enchanting scenes and for the first time I began to see the beauty of nature and
tours or workshops to start putting your new knowledge into practice. More the world into which I was born. Upon my return I couldn’t help feeling that my details at the end of this book.
little compact camera hadn’t truly captured that magic, so I decided to invest in 6
www.ianmiddletonphotography.com
www.ianmiddletonphotography.com
7
Part 1: Introduction to light & direction of light SAVE 15% ON ALL NEW ACCOUNTS AT SMUGMUG.
Photography
NO COUPON NEEDED!
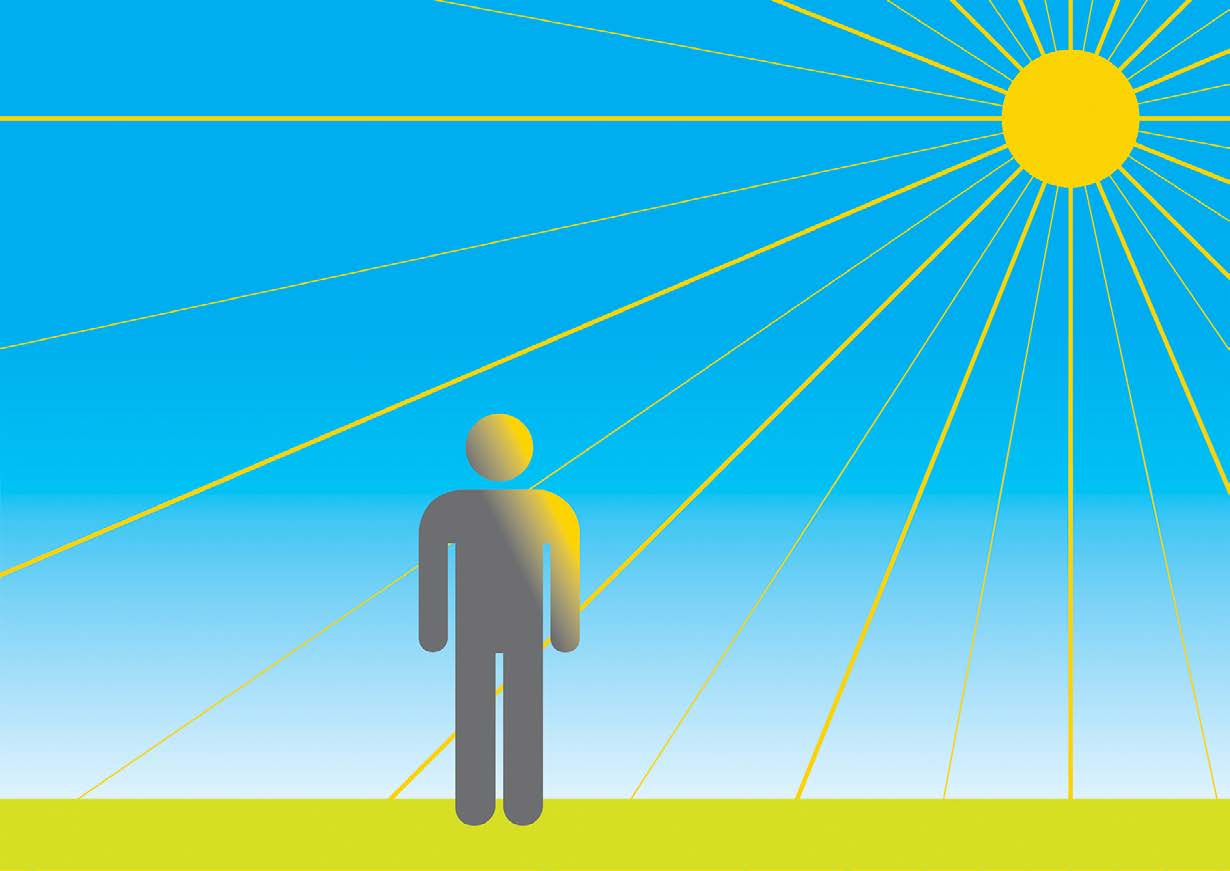
From the Greek word which literal y means:
“Drawing with light”
Light travels in straight lines and without it we cannot see.
Most objects do not give off their own light, so what we see is the light that is reflected off the subject into our eyes, and this in turn determines how the object or scene appears to us.
When light is low we don’t see things so clearly. When there is zero light we
JUST CLICK THE BANNER TO START YOUR
see absolutely nothing, even if objects are right there in front of our eyes. So, in the FREE, NO OBLIGATION 14-DAY TRIAL. NO CREDIT CARD
same way that our eyes need light to see, the camera needs light to capture a picture.
NEEDED. DISCOUNT WILL BE AUTOMATICALLY APPLIED IF
Light is everything when it comes to photography, and it not only determines what we see, but also how we see it. All of us are aware that the world around us YOU PURCHASE A PACKAGE.
appears differently depending on the day, the weather, and time of day or year.
www.ianmiddletonphotography.com
www.ianmiddletonphotography.com
9
So, just as the light determines how we see things, it also dictates, to some degree, Search for the light
how our photo will look. Therefore, not only do we have to consider how much light is available, but also:
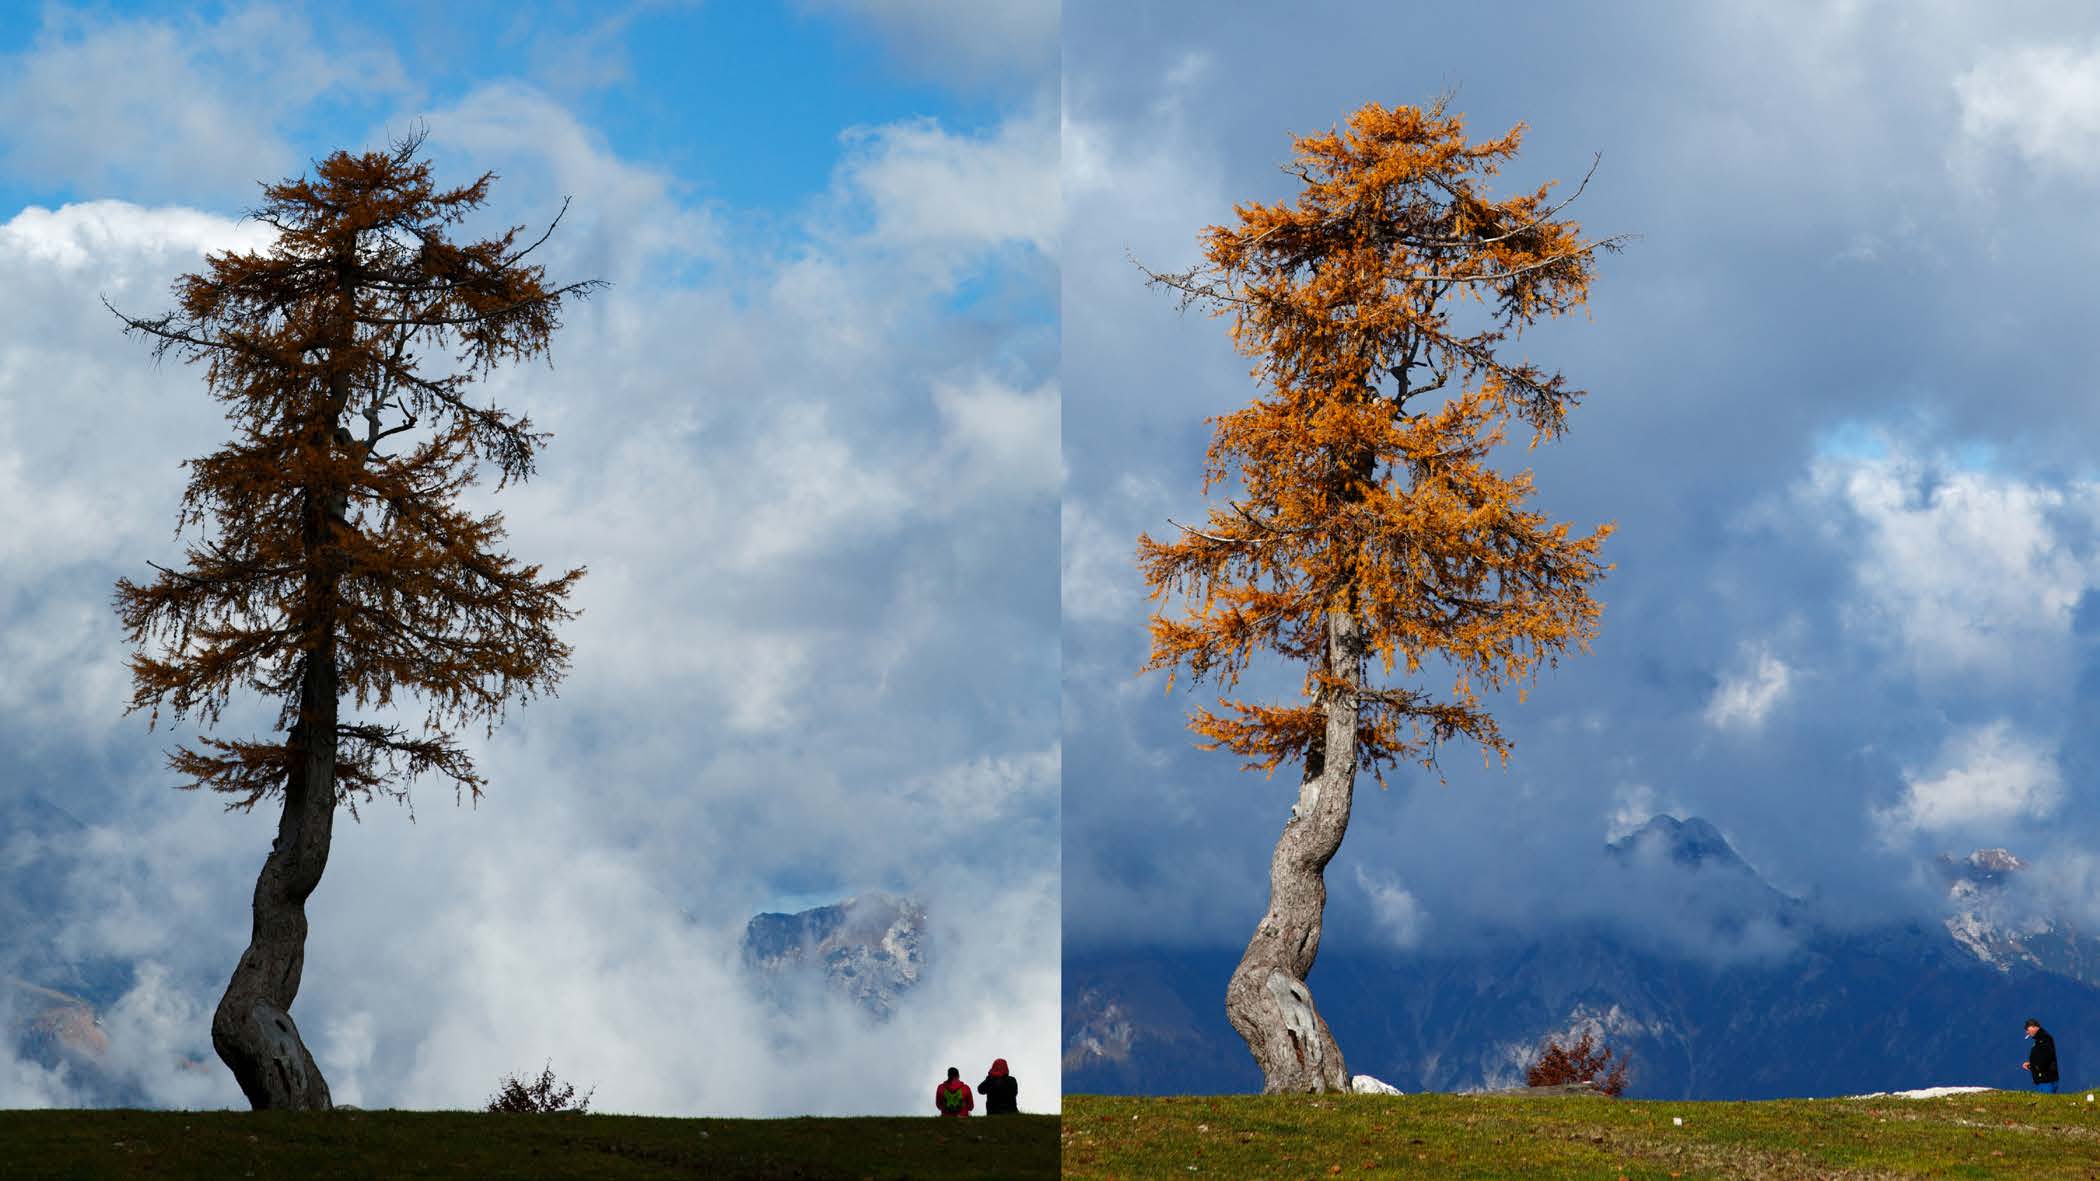
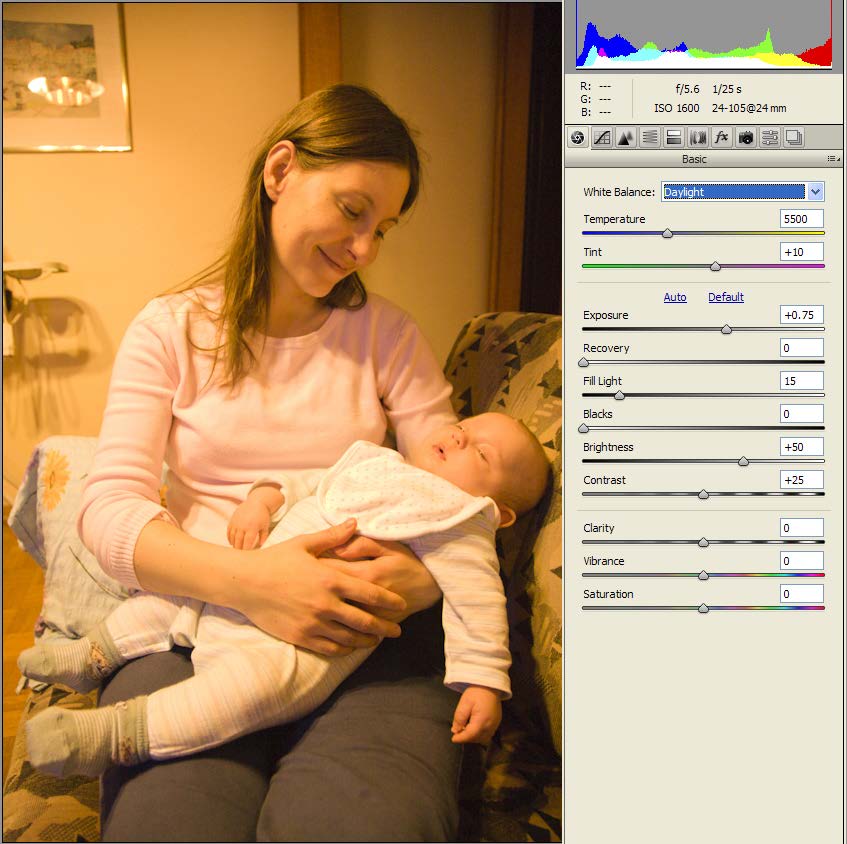
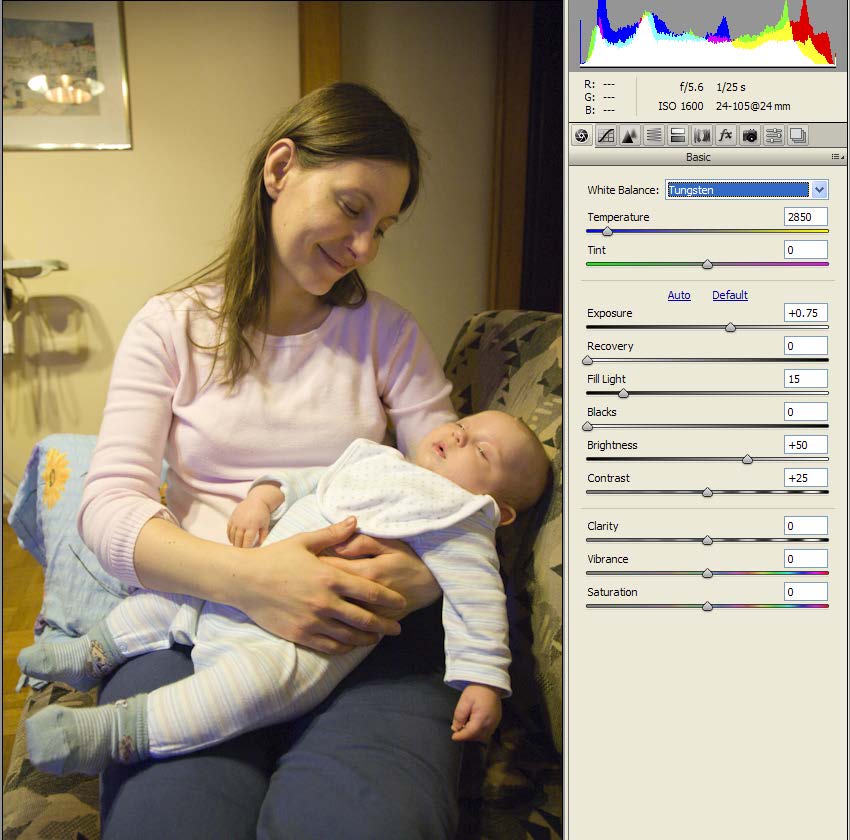
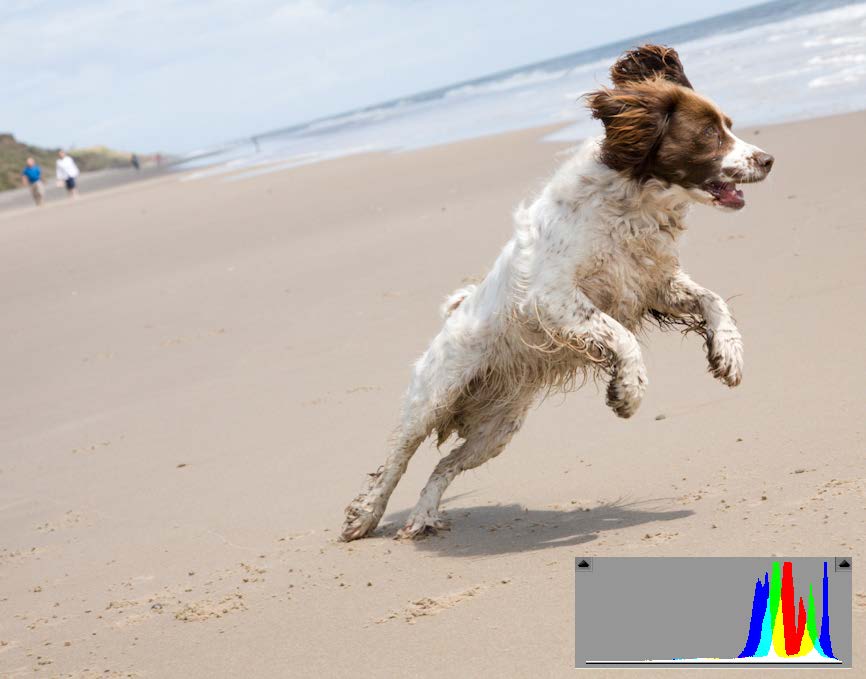
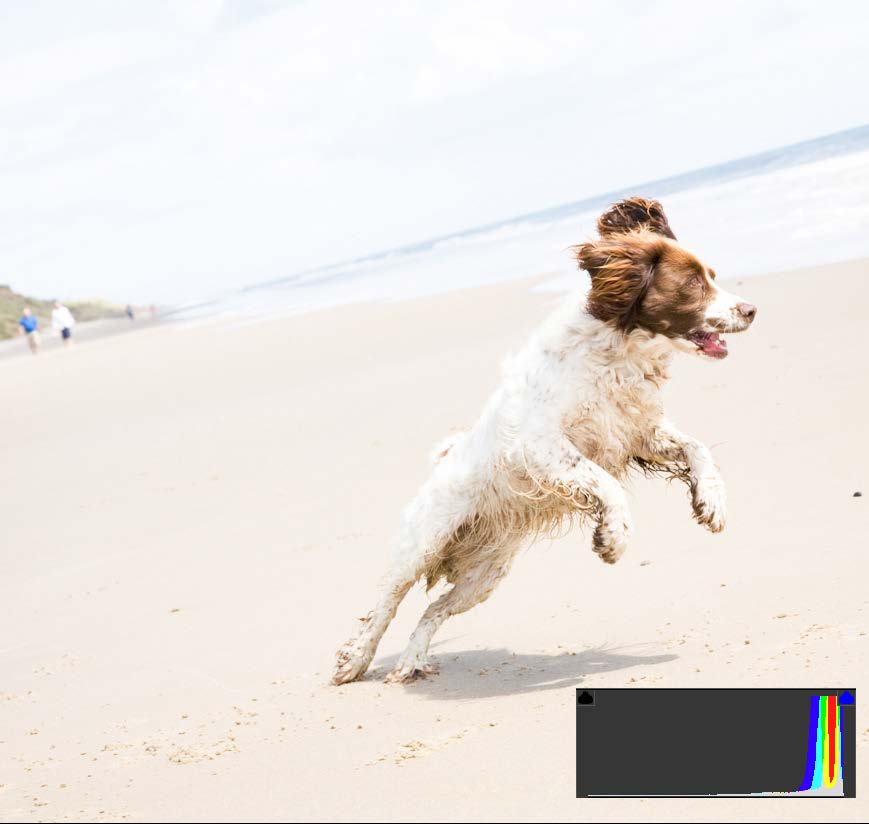
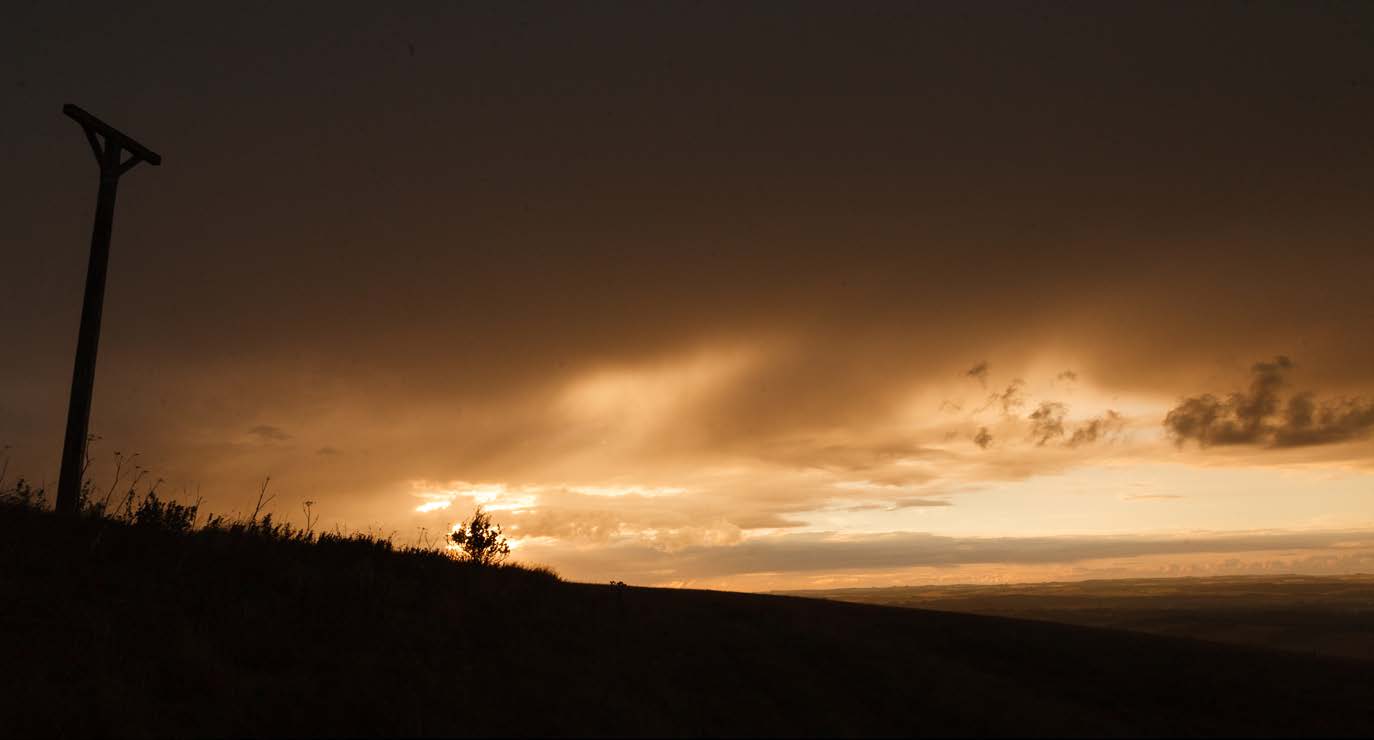
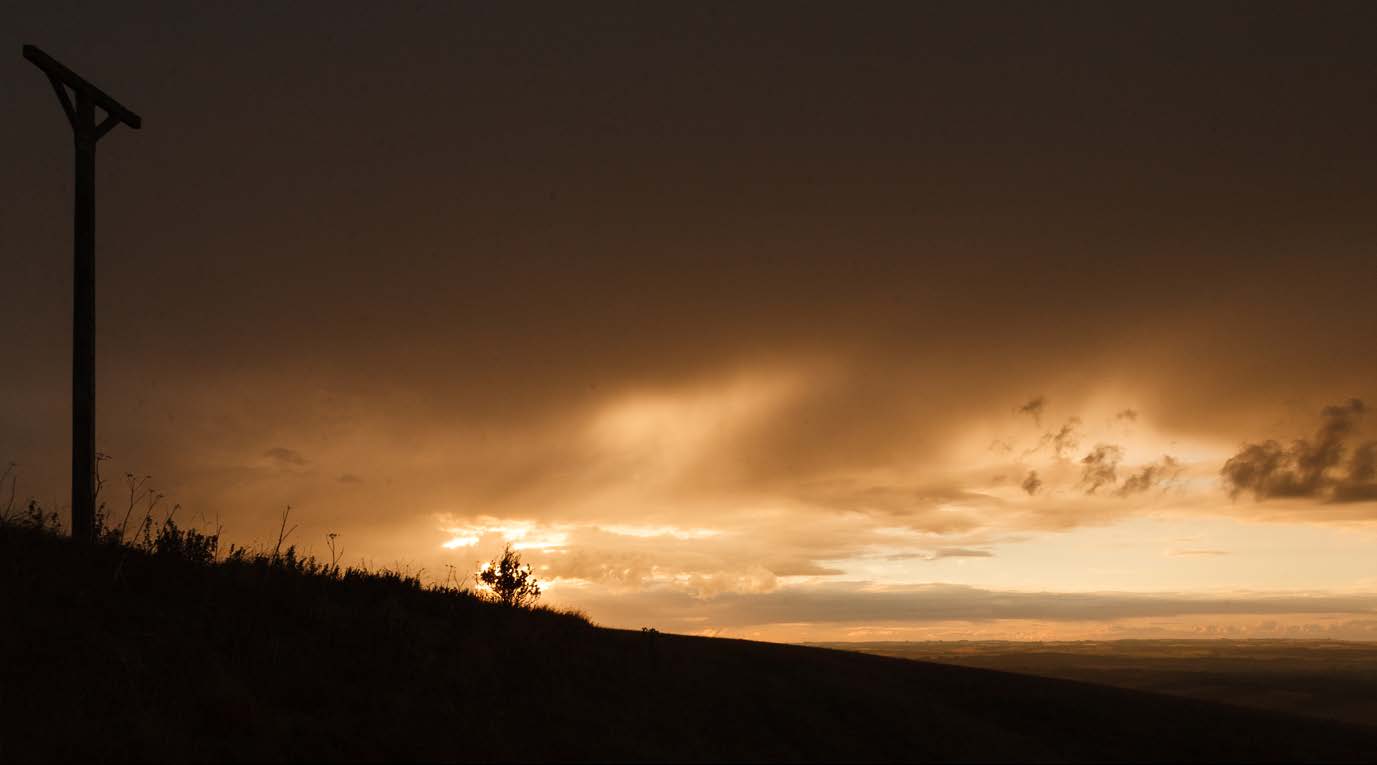
It’s all about the light and not about photoshop... While many believe that
• The quality of the light
photoshop is some kind of magic tool for photographers, it isn’t. The light is our
• The colour of the light
magic tool. It determines from the very start how our image will look. You could
• The direction of the light
never turn the image on the left into the image on the right using software and
• The source of the light
make it look natural.
• How the light is falling upon our subject and what effect it has Light can come from a variety of sources:
• Natural light from the sun (best)
• Artificial light (bulbs etc.)
• Camera flash
• Candles
There are various types of light
1. Direct light (hard light from a small source) (sun, flash, street lights, candles) This produces high contrast images with lots of shadows and definition, along with bright, vivid colours
2. Diffused light (soft light from a large source) (cloudy day, big windows, large studio softboxes) This gives soft, low contrast images with little or no shadow, along with softer more subtle colours
3. Indirect light (Reflected light) (water, bounced flash, large surfaces).
Softens and diffuses light. Can also help to fill in unwanted shadows.
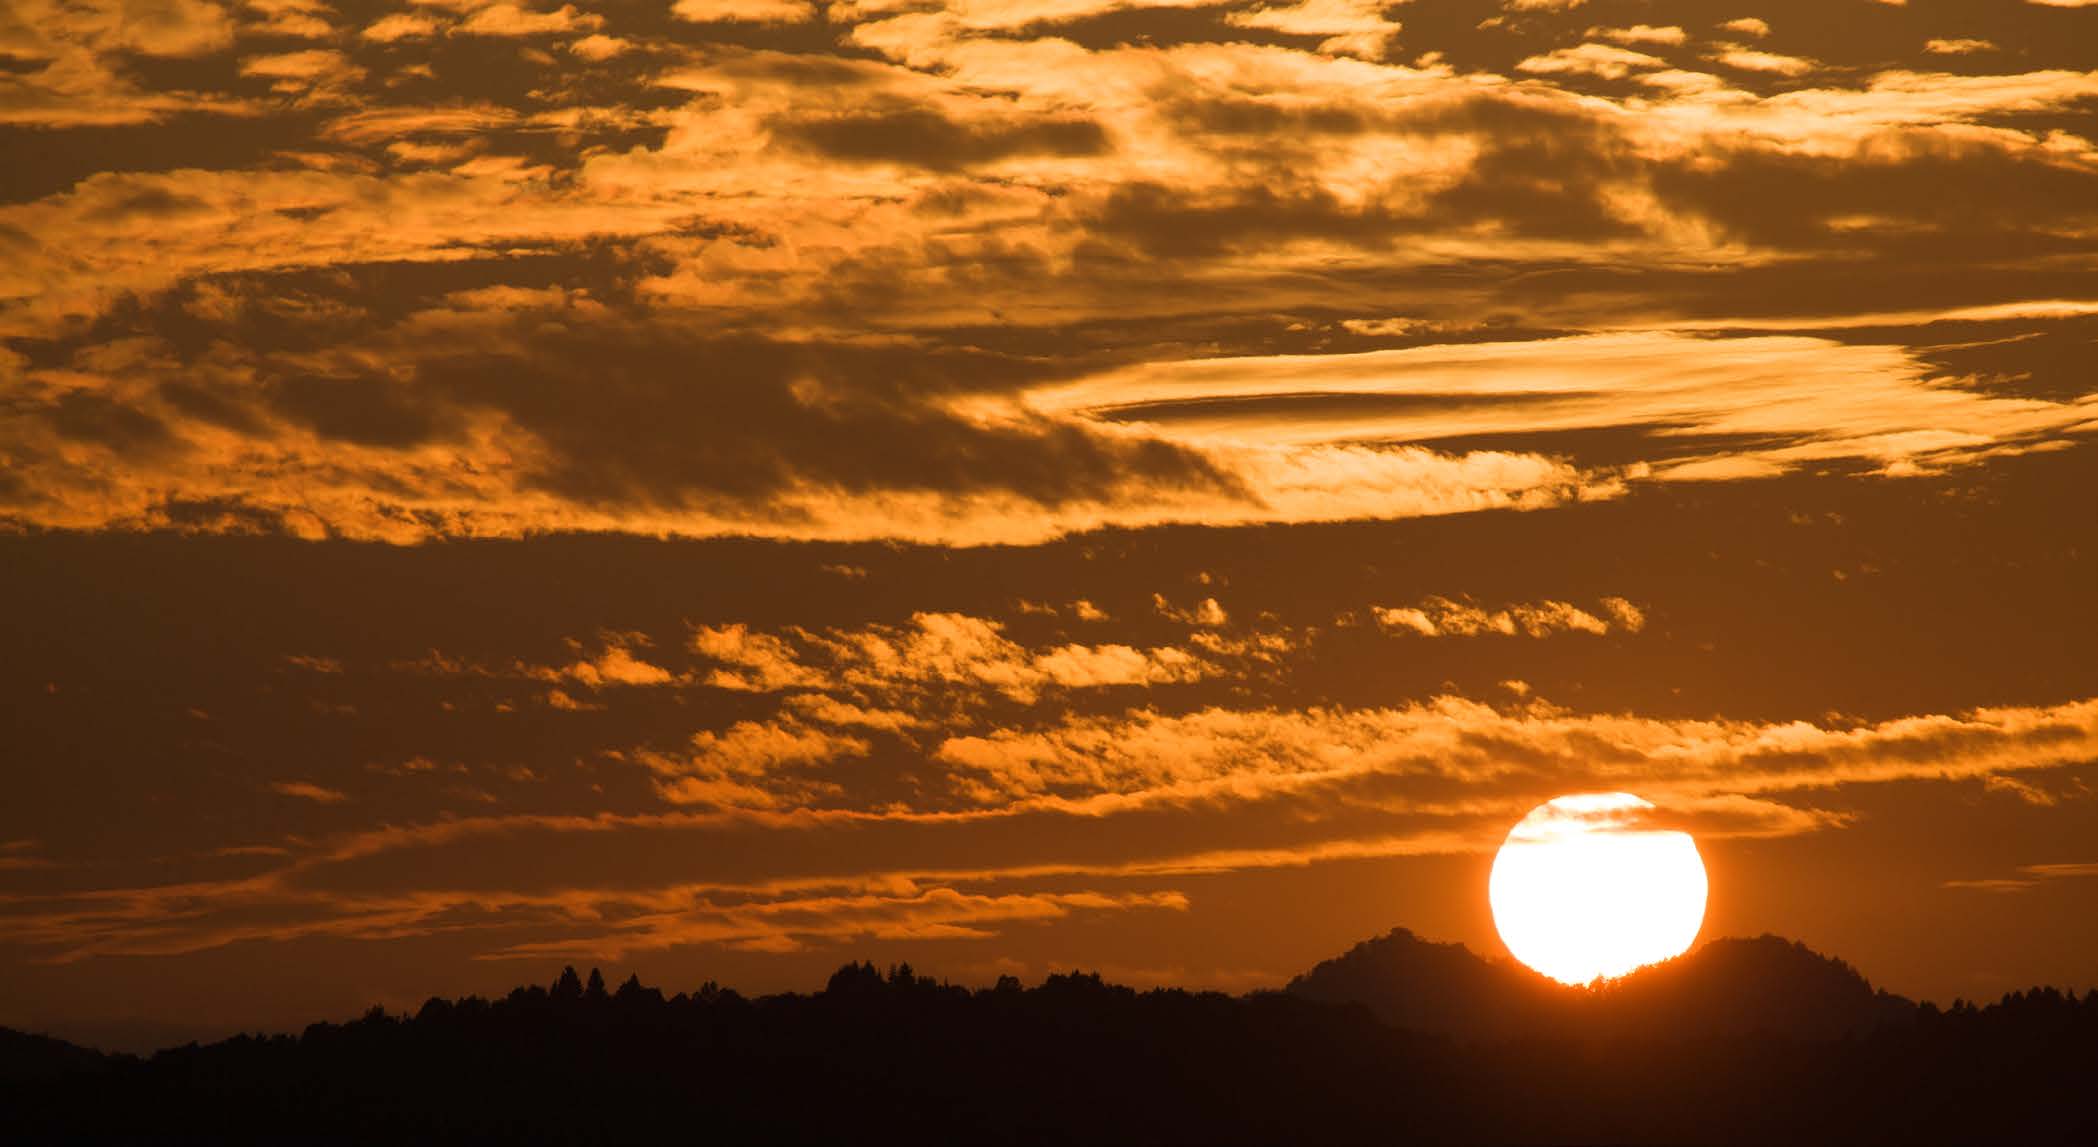
On the left image cloud has thrown the tree and foreground into shade, so both are devoid of colour and texture. However, light is still falling on the mountains and the two people in the lower right corner. The patch of white brightly lit cloud behind has also helped make the people stand out.
On the right photo, the cloud cleared and sunlight fell on the foreground and tree, bringing out the colour and texture of the tree.
The different type of light here has created two entirely different scenes. On the next pages we will see just how the different types of light affect our scene.
10
www.ianmiddletonphotography.com
www.ianmiddletonphotography.com
11

Direct light effects
Unwanted shadow
Direct light comes from
one direction and therefore
When photographing in direct light, shadows can be a major problem. So you produces bright and dark
must look careful y when photographing under these conditions.
sides to the subject it
il uminates. The result, as you
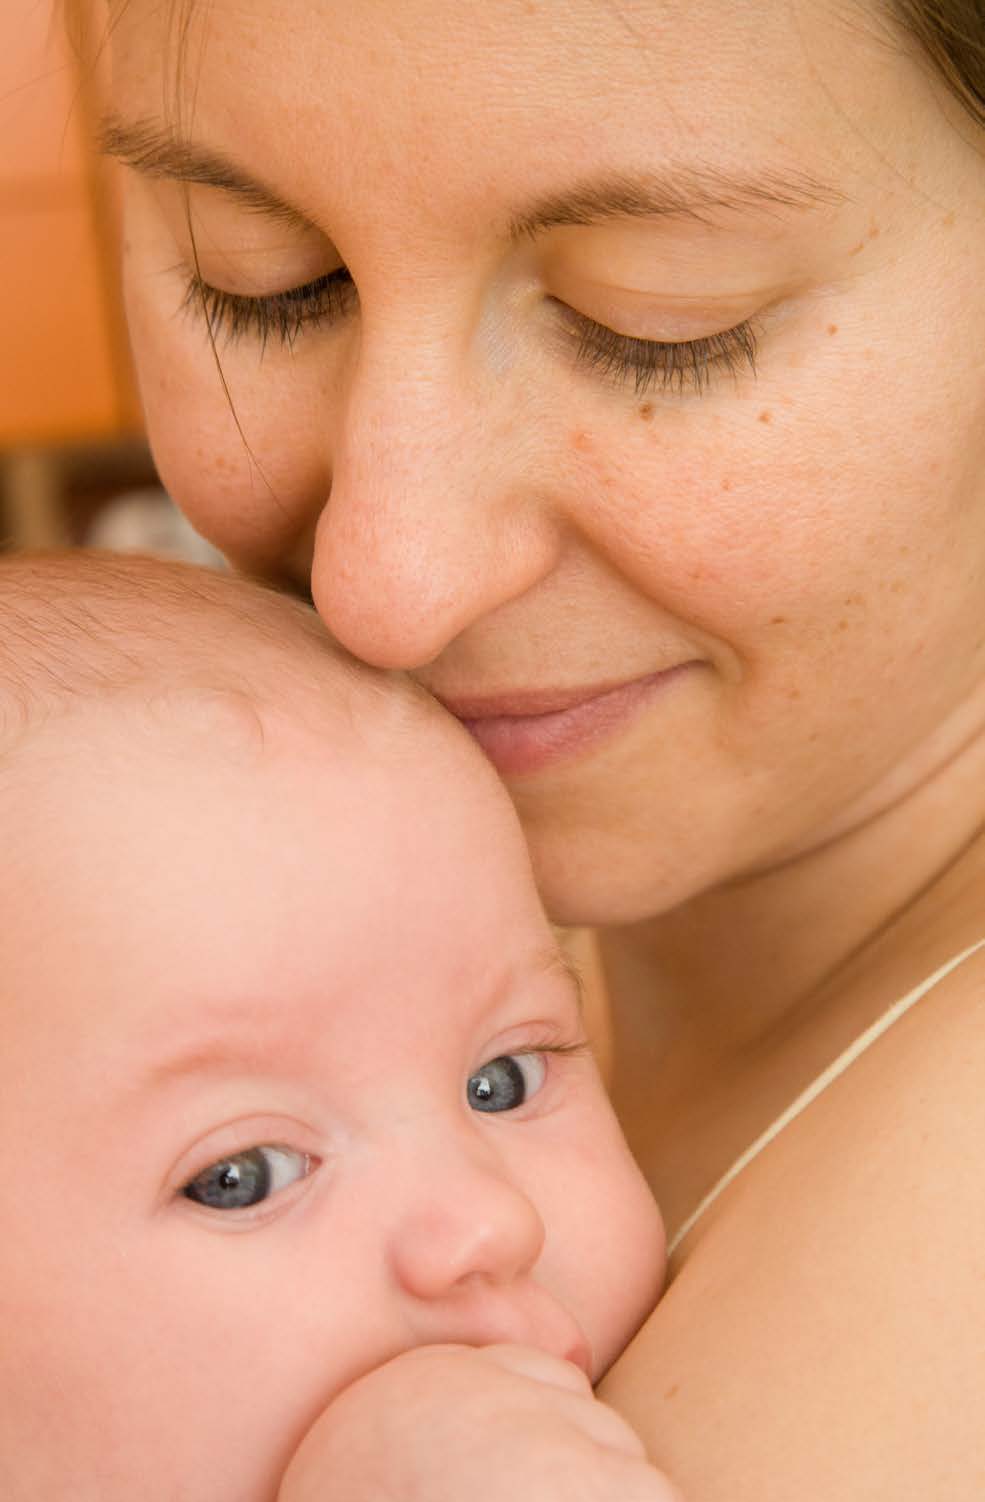
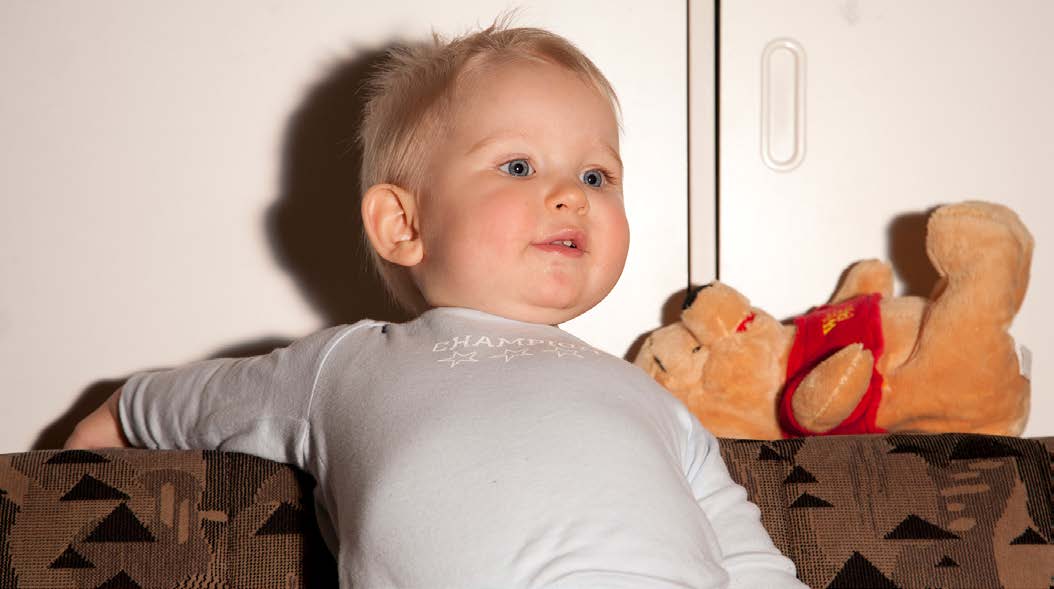
As you can see on the photo to the right
can see by the il ustration to
the woman has cast a shadow over the
the right, is a high contrast
child. You can also use a fill in flash
scene with hard light, hard
to help reduce these shadows, but the
shadows and hard edges
best way is to avoid it completely.
with lots of definition.
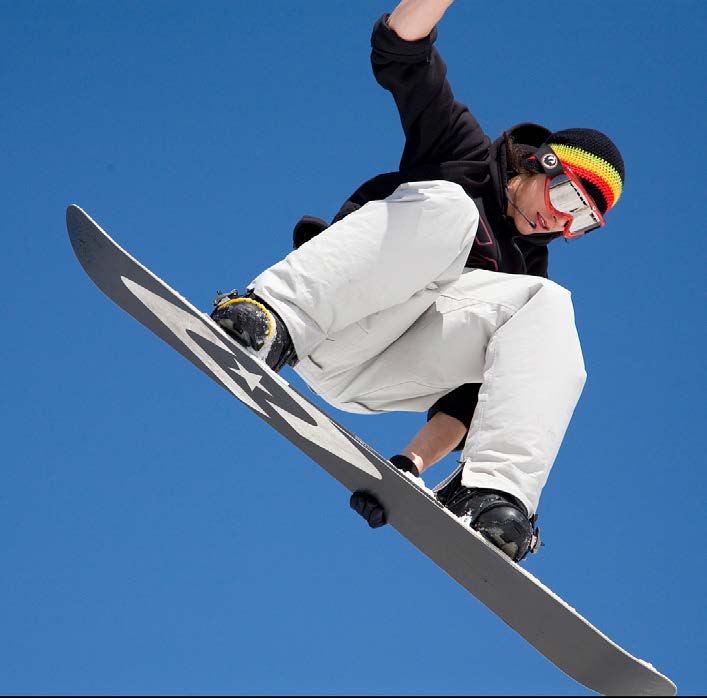
The picture of the snowboarder was taken on a
bright, clear sunny day, so here direct light from
the sun was il uminating the subject. Notice how
On the other photo below you can see that the flash has also cast a shadow bright the colours are, and how much detail,
behind the child and the Winnie the Pooh bear.
definition and sharpness there is on the subject.
As the subject was in the air with nothing but the
The shadow has also been enhanced
sky behind, then shadows were avoided. This was
by the bright white background. So
also taken in winter, when the air was clear and
take care when using flash. Try to
free of moisture. So take note of light quality. It’s
position your subject away from wal s
not enough that it’s sunny. While the sun may be
or other background surfaces.
out, there could still be a lot of haze and moisture in the air, which affects the clarity of a scene. This is especial y true in the summer months when it’s hot.
Time of year and the time of day are also important. When the sun is higher in the sky, around midday or during the summer months, then the light is harsh and hazy. Because this was taken on a mountaintop ski resort in winter, the air Tip: On camera flash produces fewer shadows when shooting your subject was crystal clear which has also resulted in a crystal clear image. During winter straight on with the camera horizontal. To minimise shadows consider using an the sun is lower in the sky so the light is less harsh. And final y, snow is reflective, on flash diffuser.
so the underside of the boarder and snowboard is also lit. So not only does this image have direct light, but also reflected light.
12
www.ianmiddletonphotography.com
www.ianmiddletonphotography.com
13
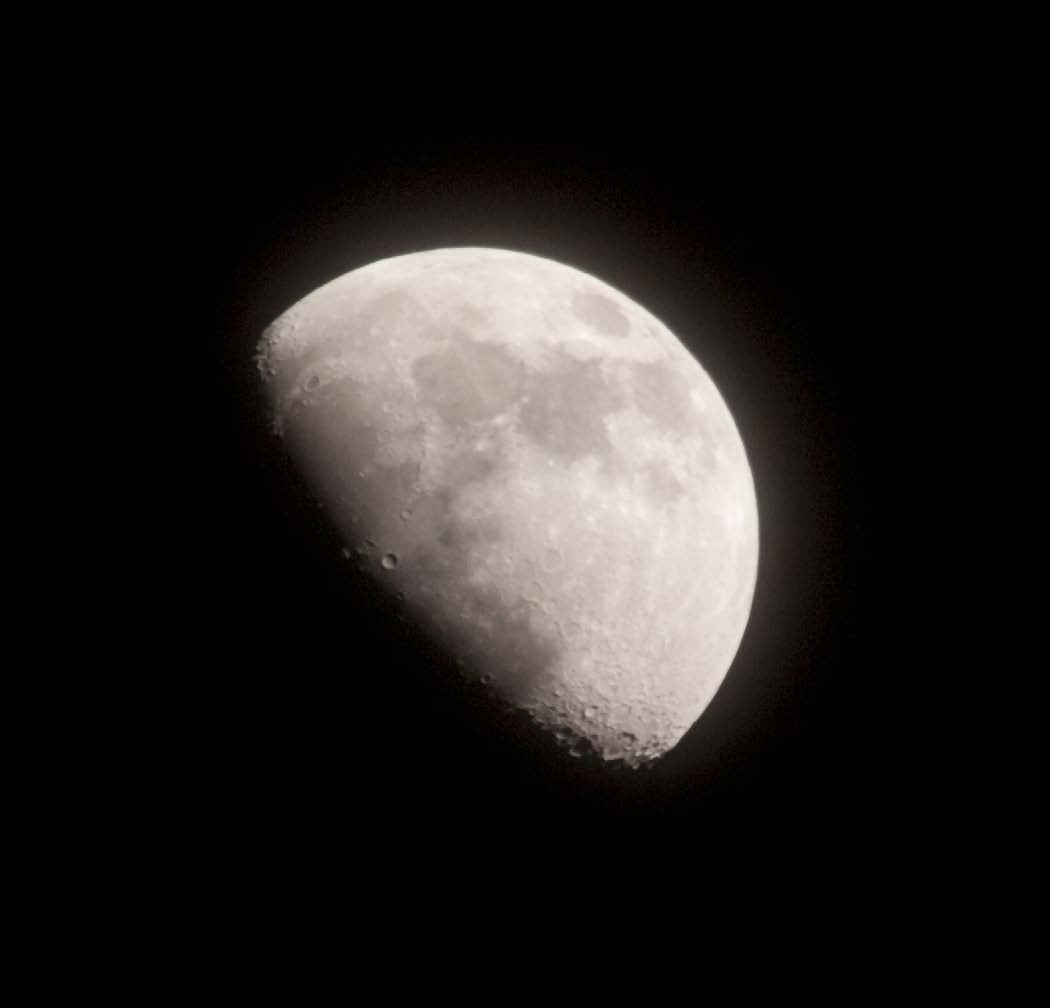
Wanted shadow
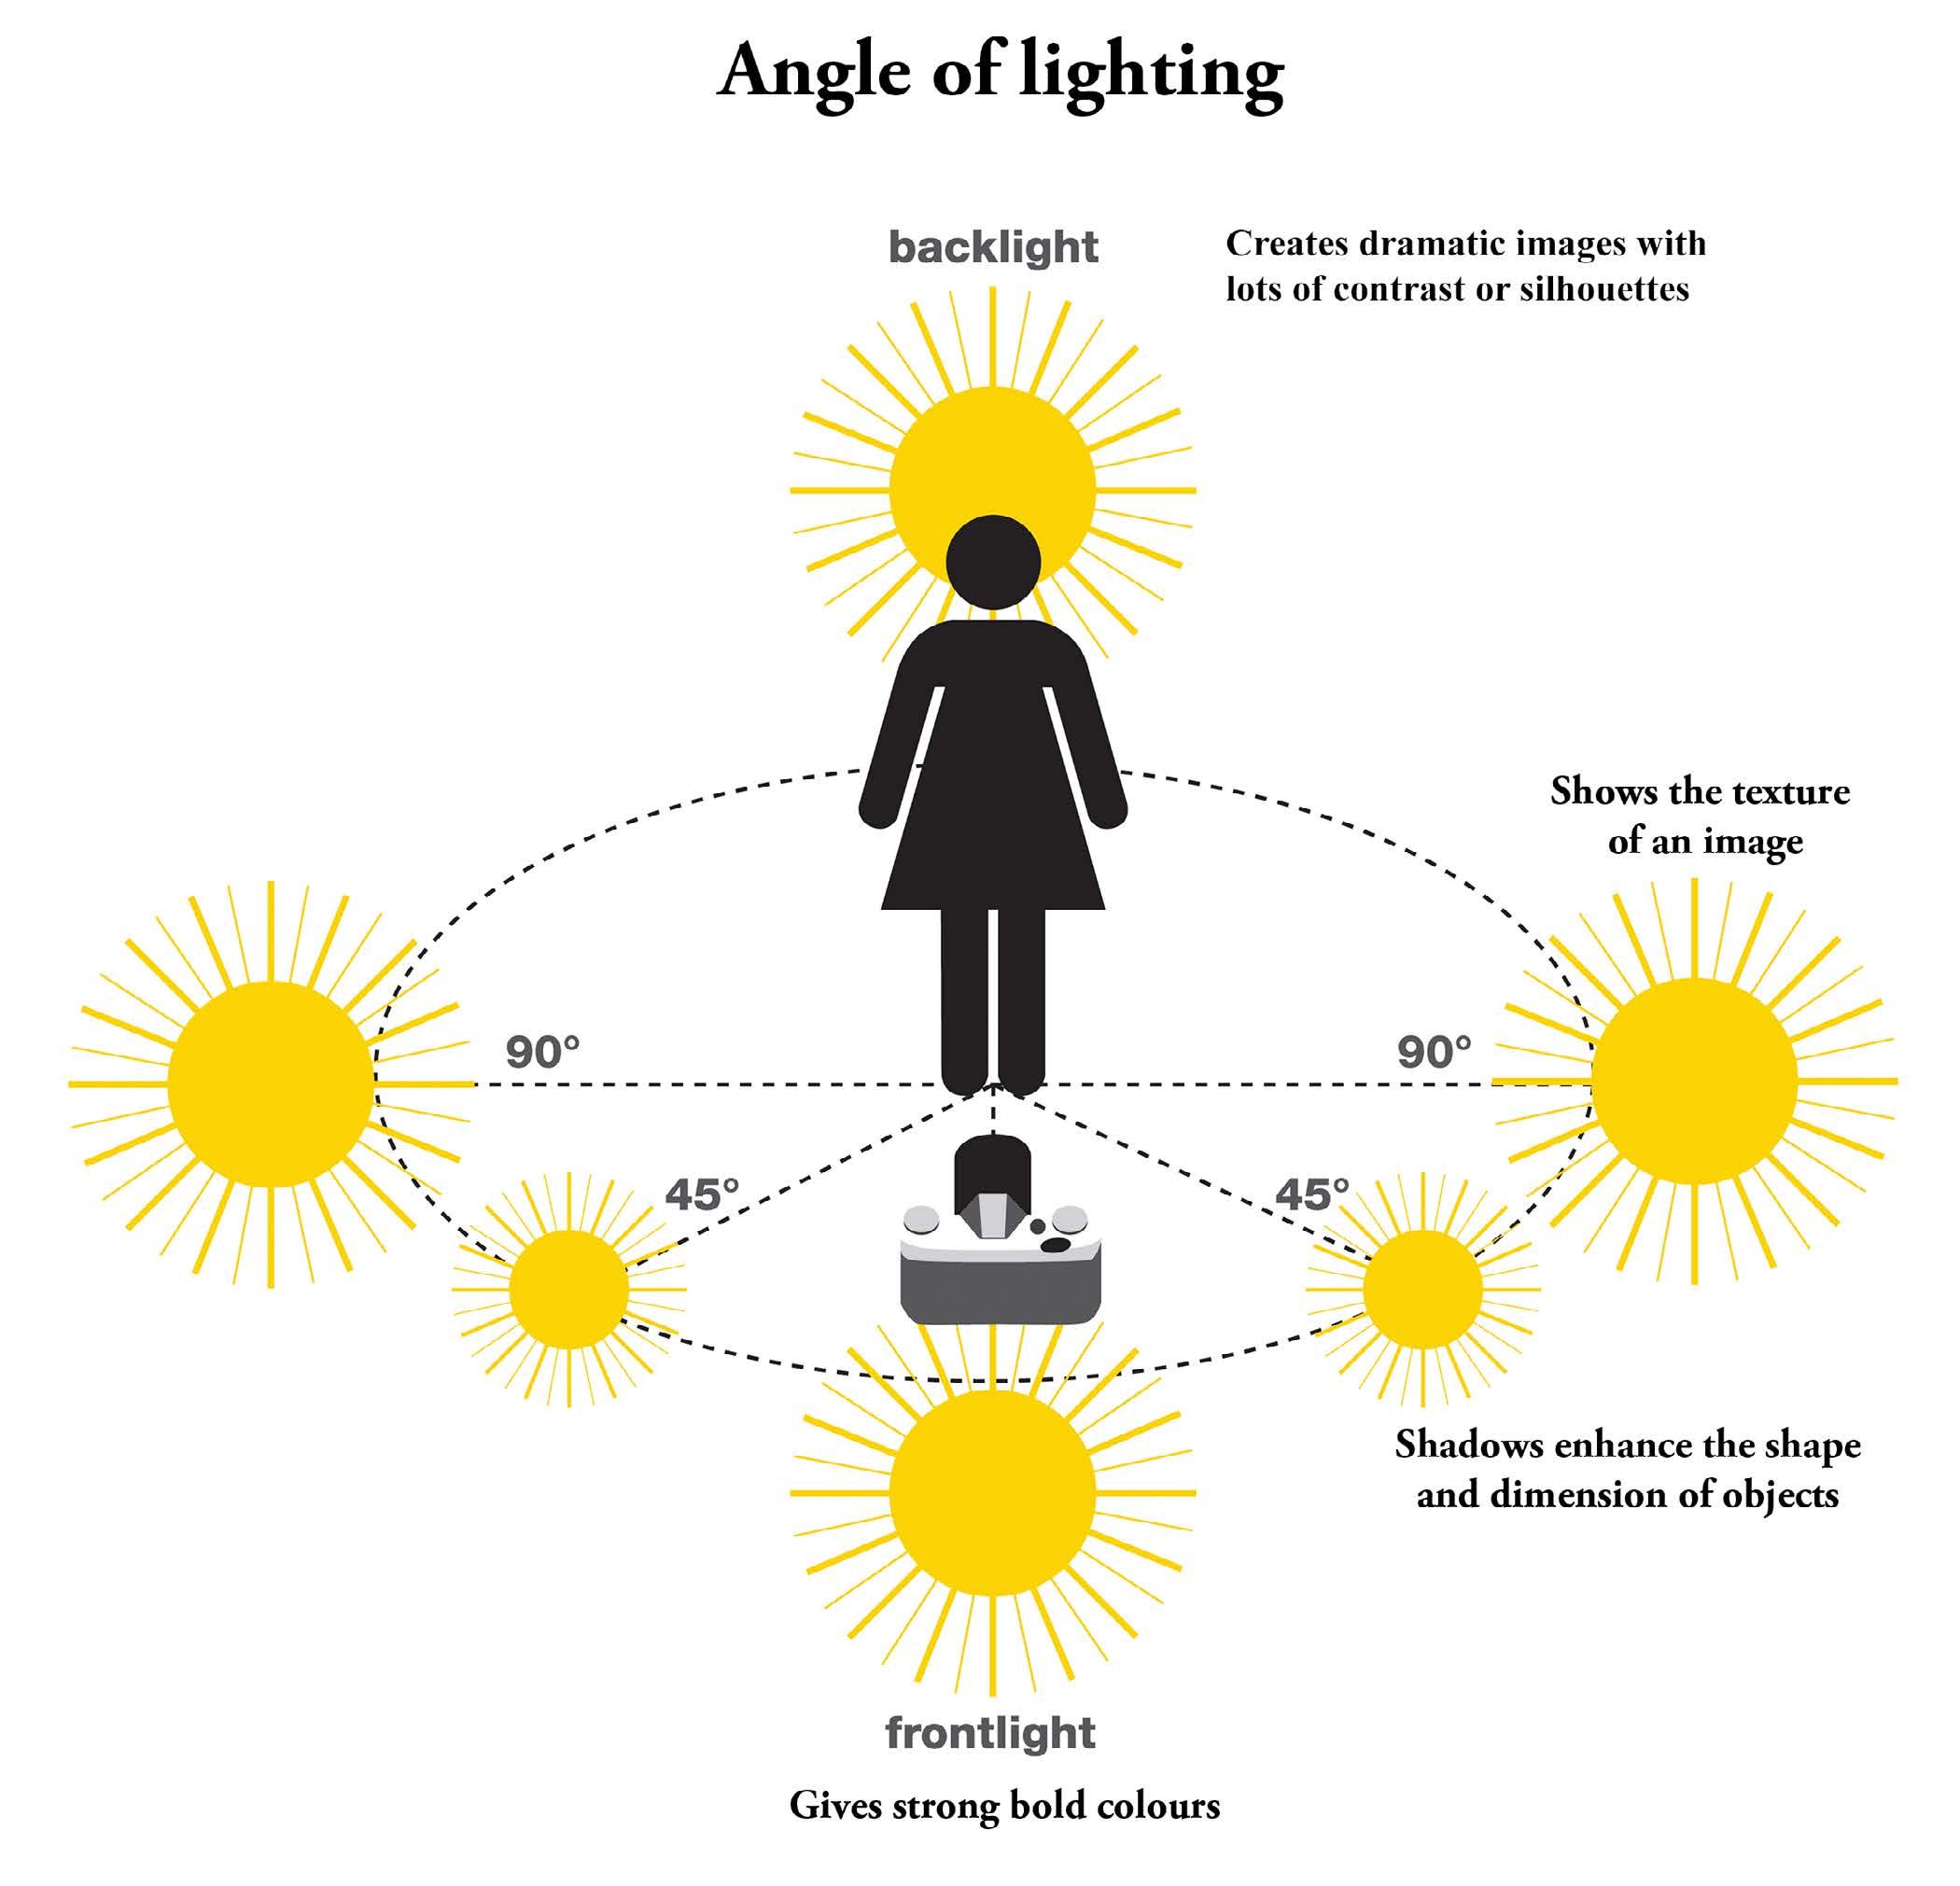
Direction of light
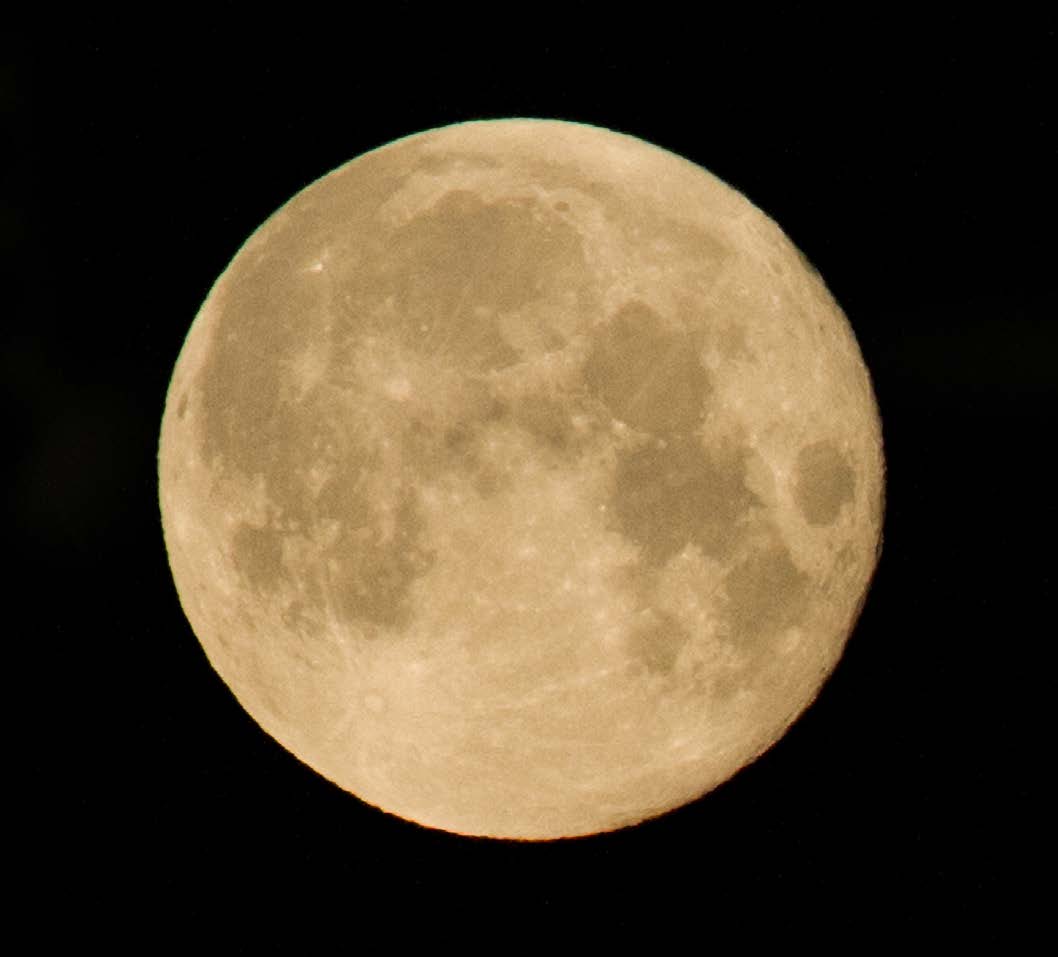
Not all shadows are unwanted. When used correctly they can enhance, give As you have just seen, when the subject is lit from the front it appears flat and 2
shape, texture, depth and contrast to an image. A classic example of this is the dimensional, whereas side lighting has produced shadows which has given the moon. Study the following two photos:
subject a more rounded 3 dimensional look. When working with any form of direct light, the angle that the light is coming from is also very important and This image is of the full moon when
can determine just how your subject appears. The following il ustration helps to the light is shining directly upon it
give you an idea of the effects the different angles create.
from the front. In this state there is
zero shadow, so the moon looks very
flat and two dimensional
This image is of the waning moon
when the light is shining from the
side. Notice how we can now see some
of the craters near to the shadow area
and also the moon looks more three
dimensional
14
www.ianmiddletonphotography.com
www.ianmiddletonphotography.com
15
Direct light for landscapes
Creating shape, texture and colour
Much the same can be said for landscapes. We want some direct light to give shape, texture and colour to our landscape photos.
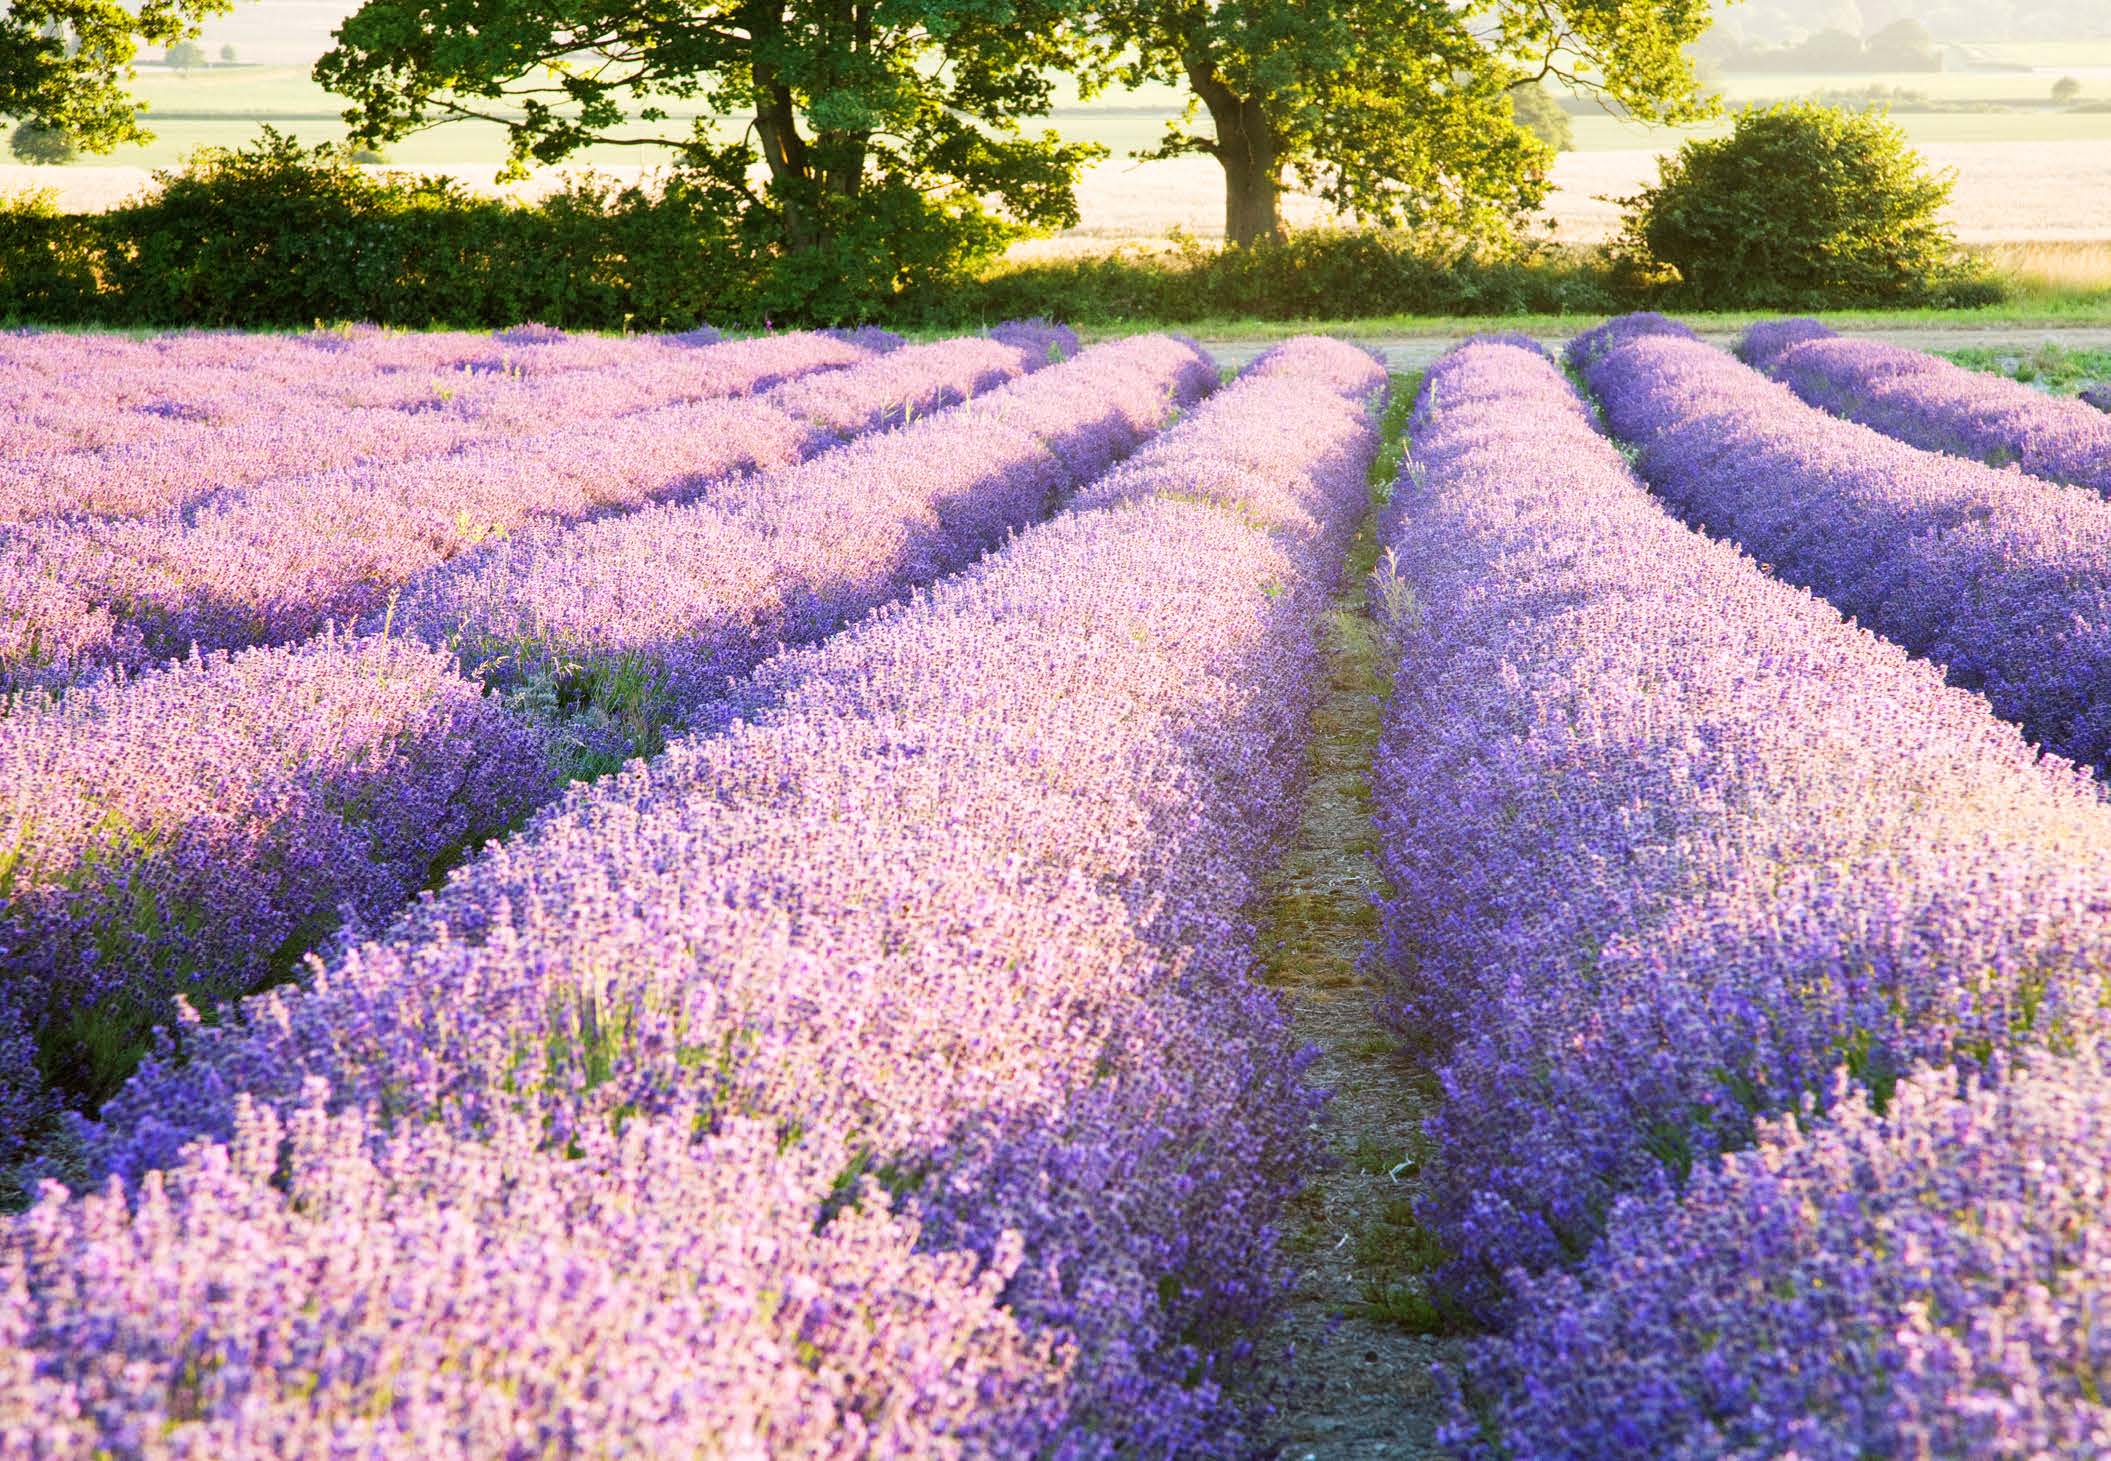
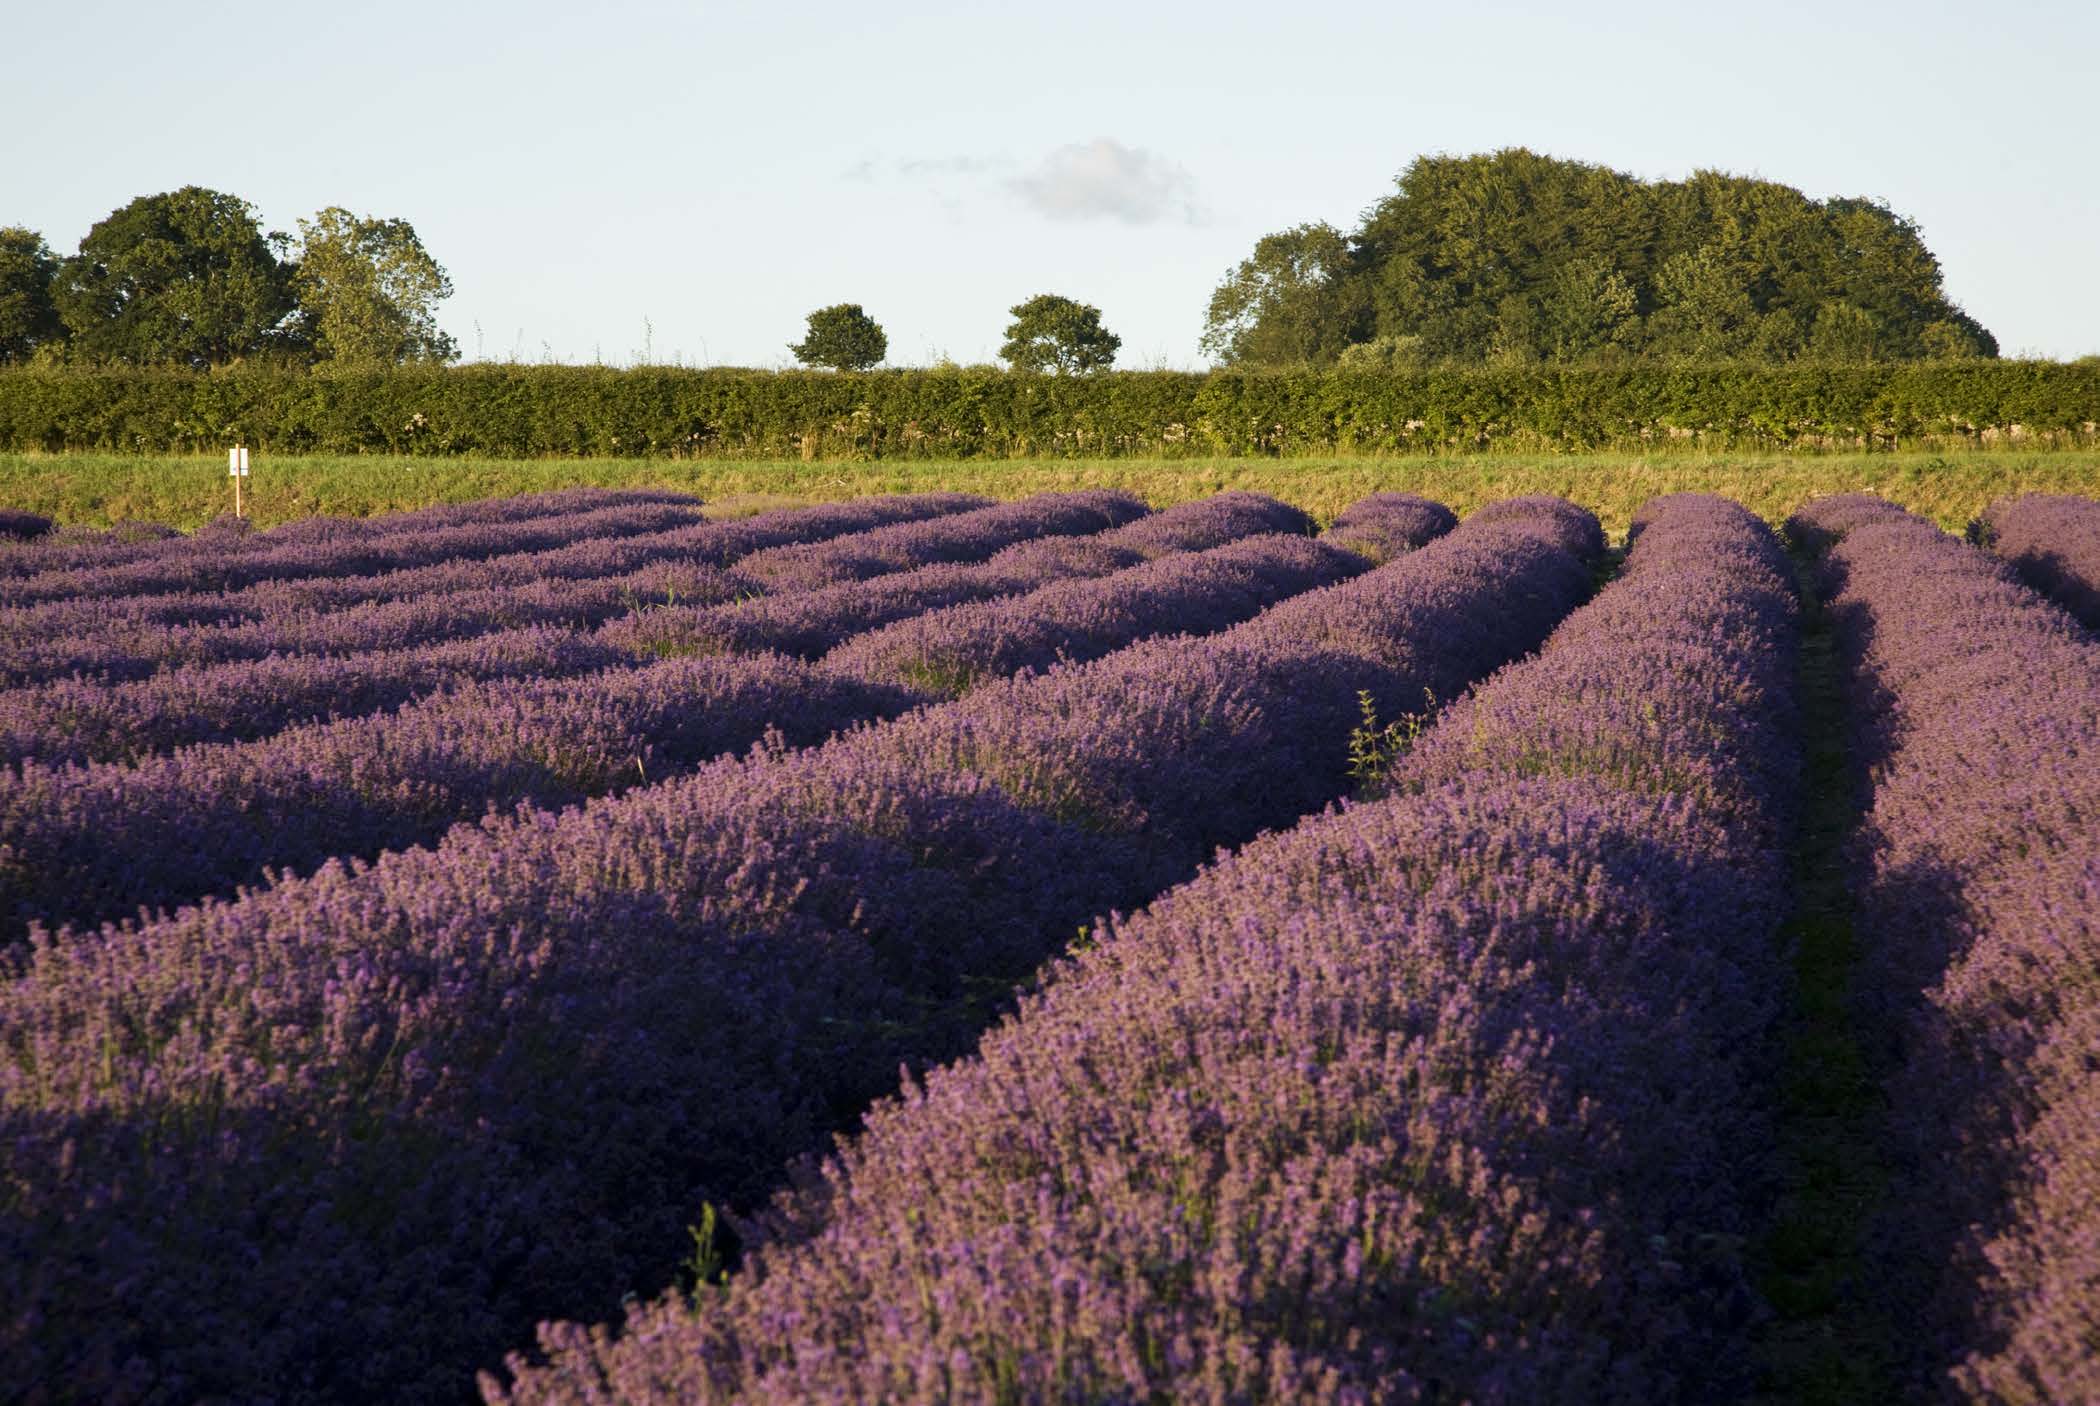
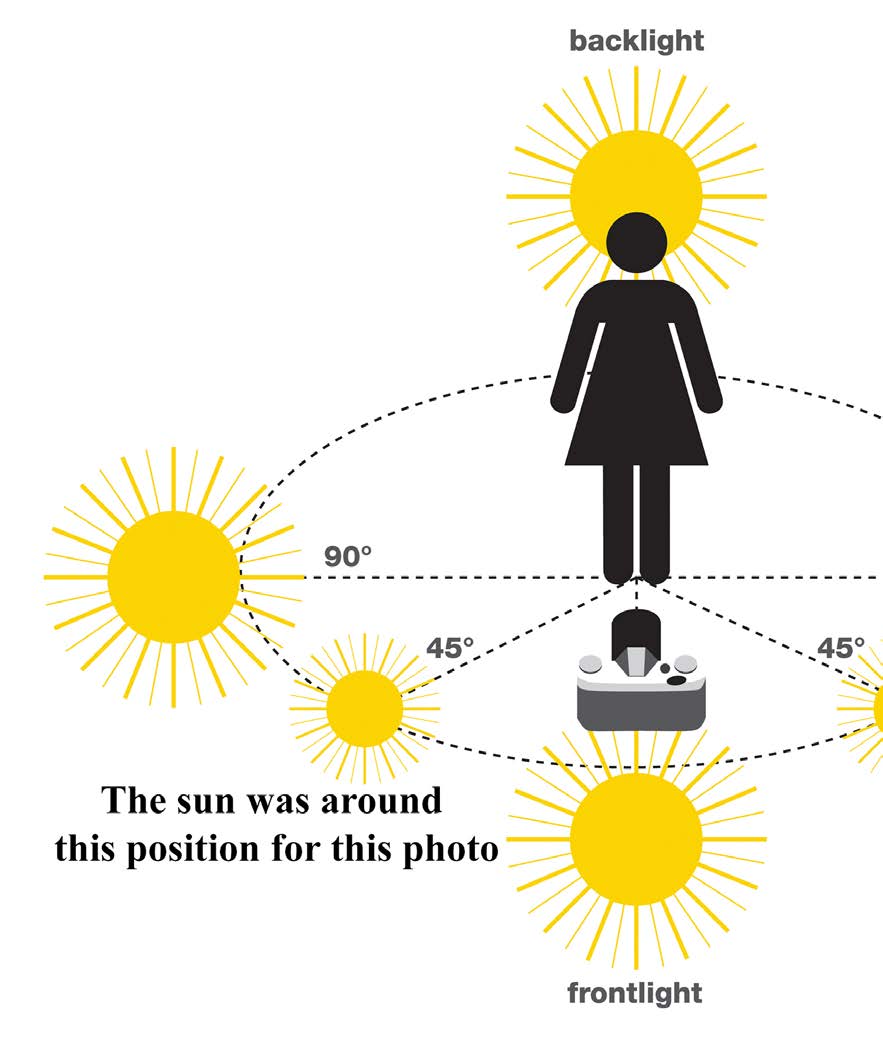
In this photo of a lavender field in
Hampshire, the sun was at a 45 degree angle
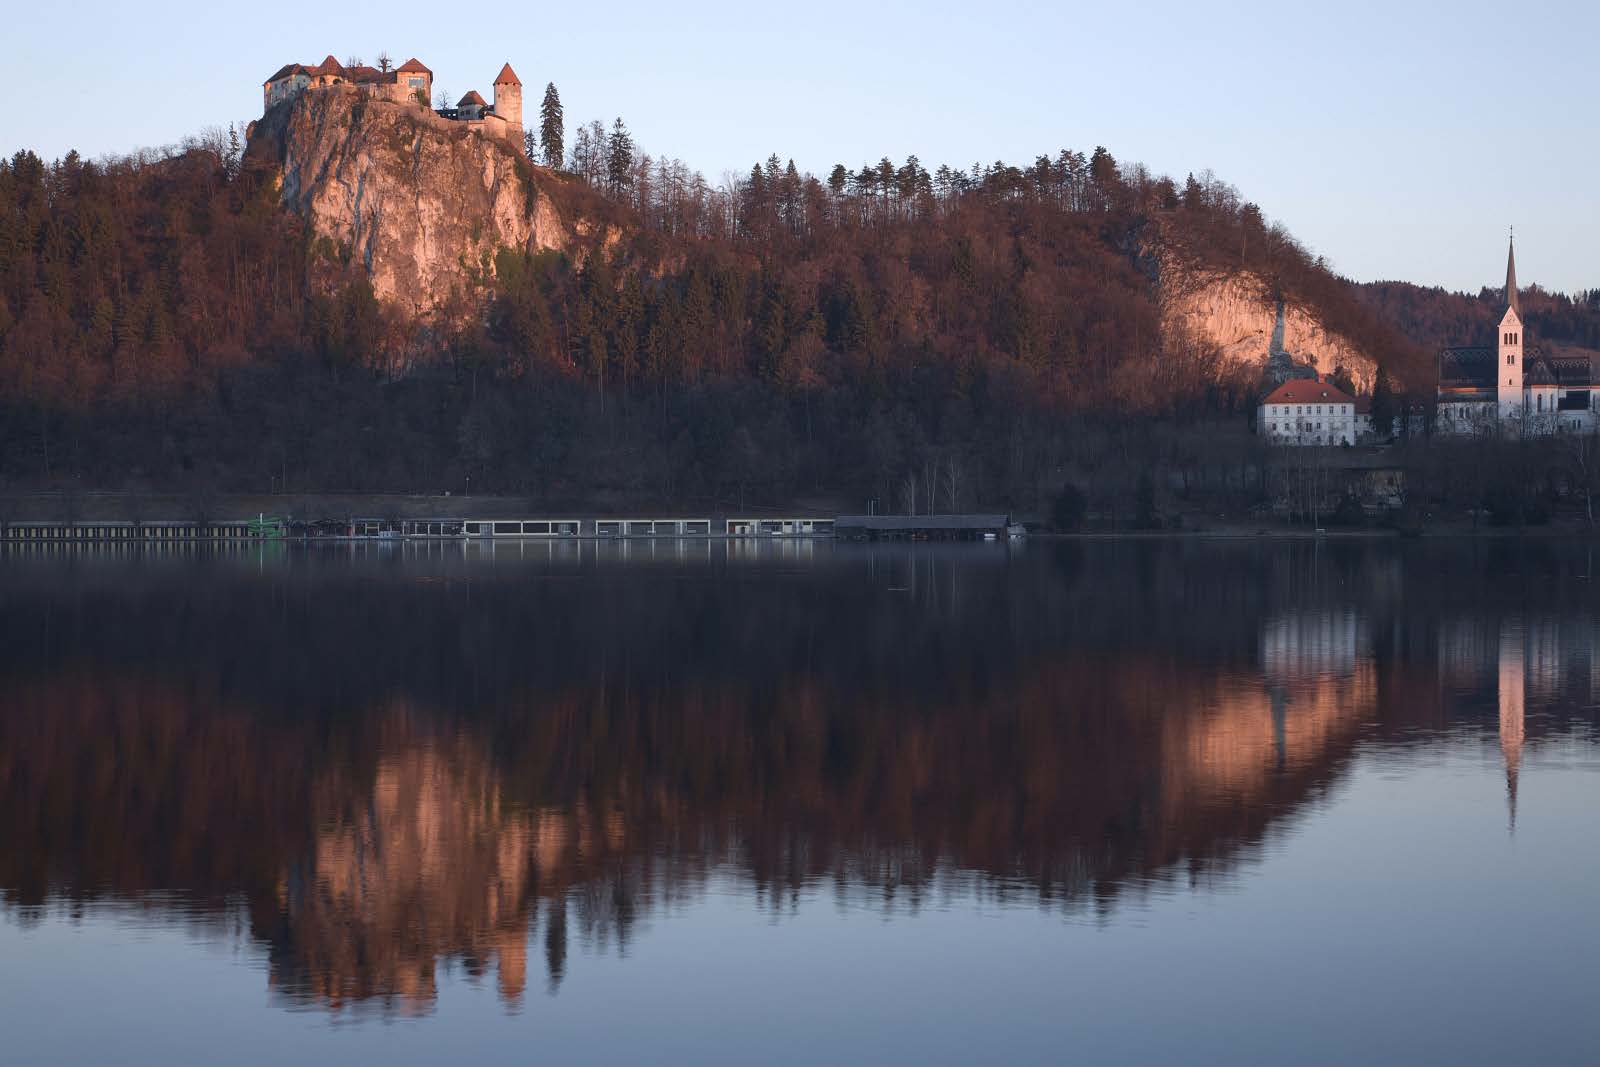
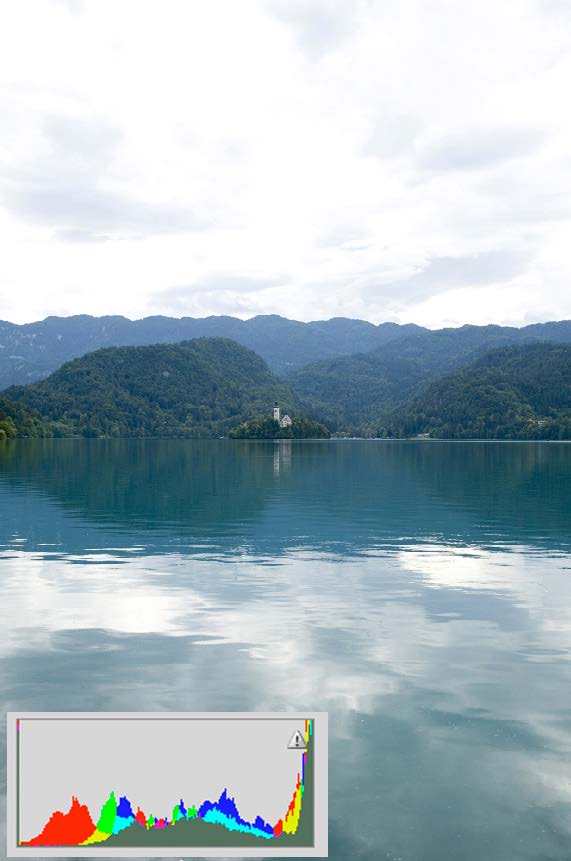
In this photo of Lake Bled in Slovenia, shot at sunrise, the sun coming up from behind me and off to the left. As you can
the side has cast soft, warm light over the scene, but the shadows have also see the side lighting has created shadows
added shape, form and contrast to the land.
between the rows, which helps to give shape
and dimension to them. This was shot in the
evening, so the sun was low in the sky; hence
the colour temperature was lower. Also the
sun was behind me. So this has all helped to
add warmth and depth to the colour.
16
www.ianmiddletonphotography.com
www.ianmiddletonphotography.com
17
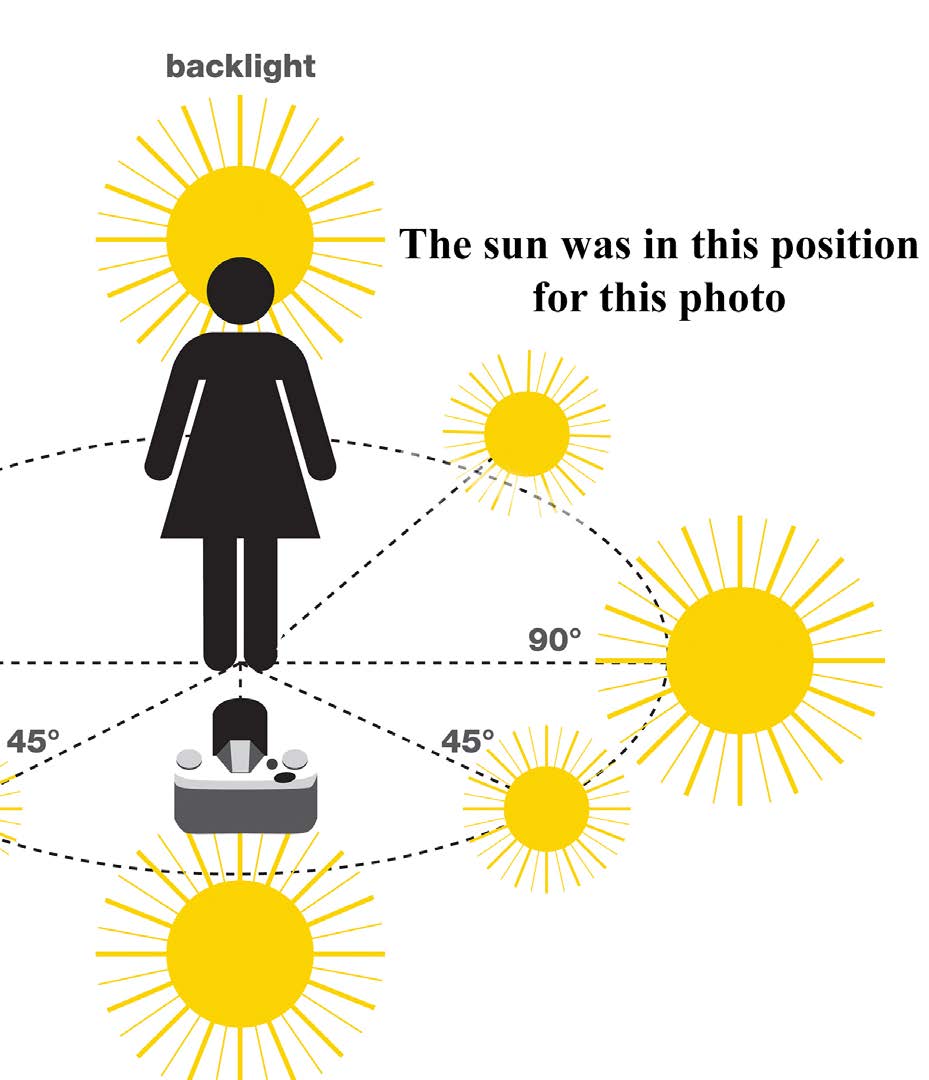
Creating shape, texture and colour
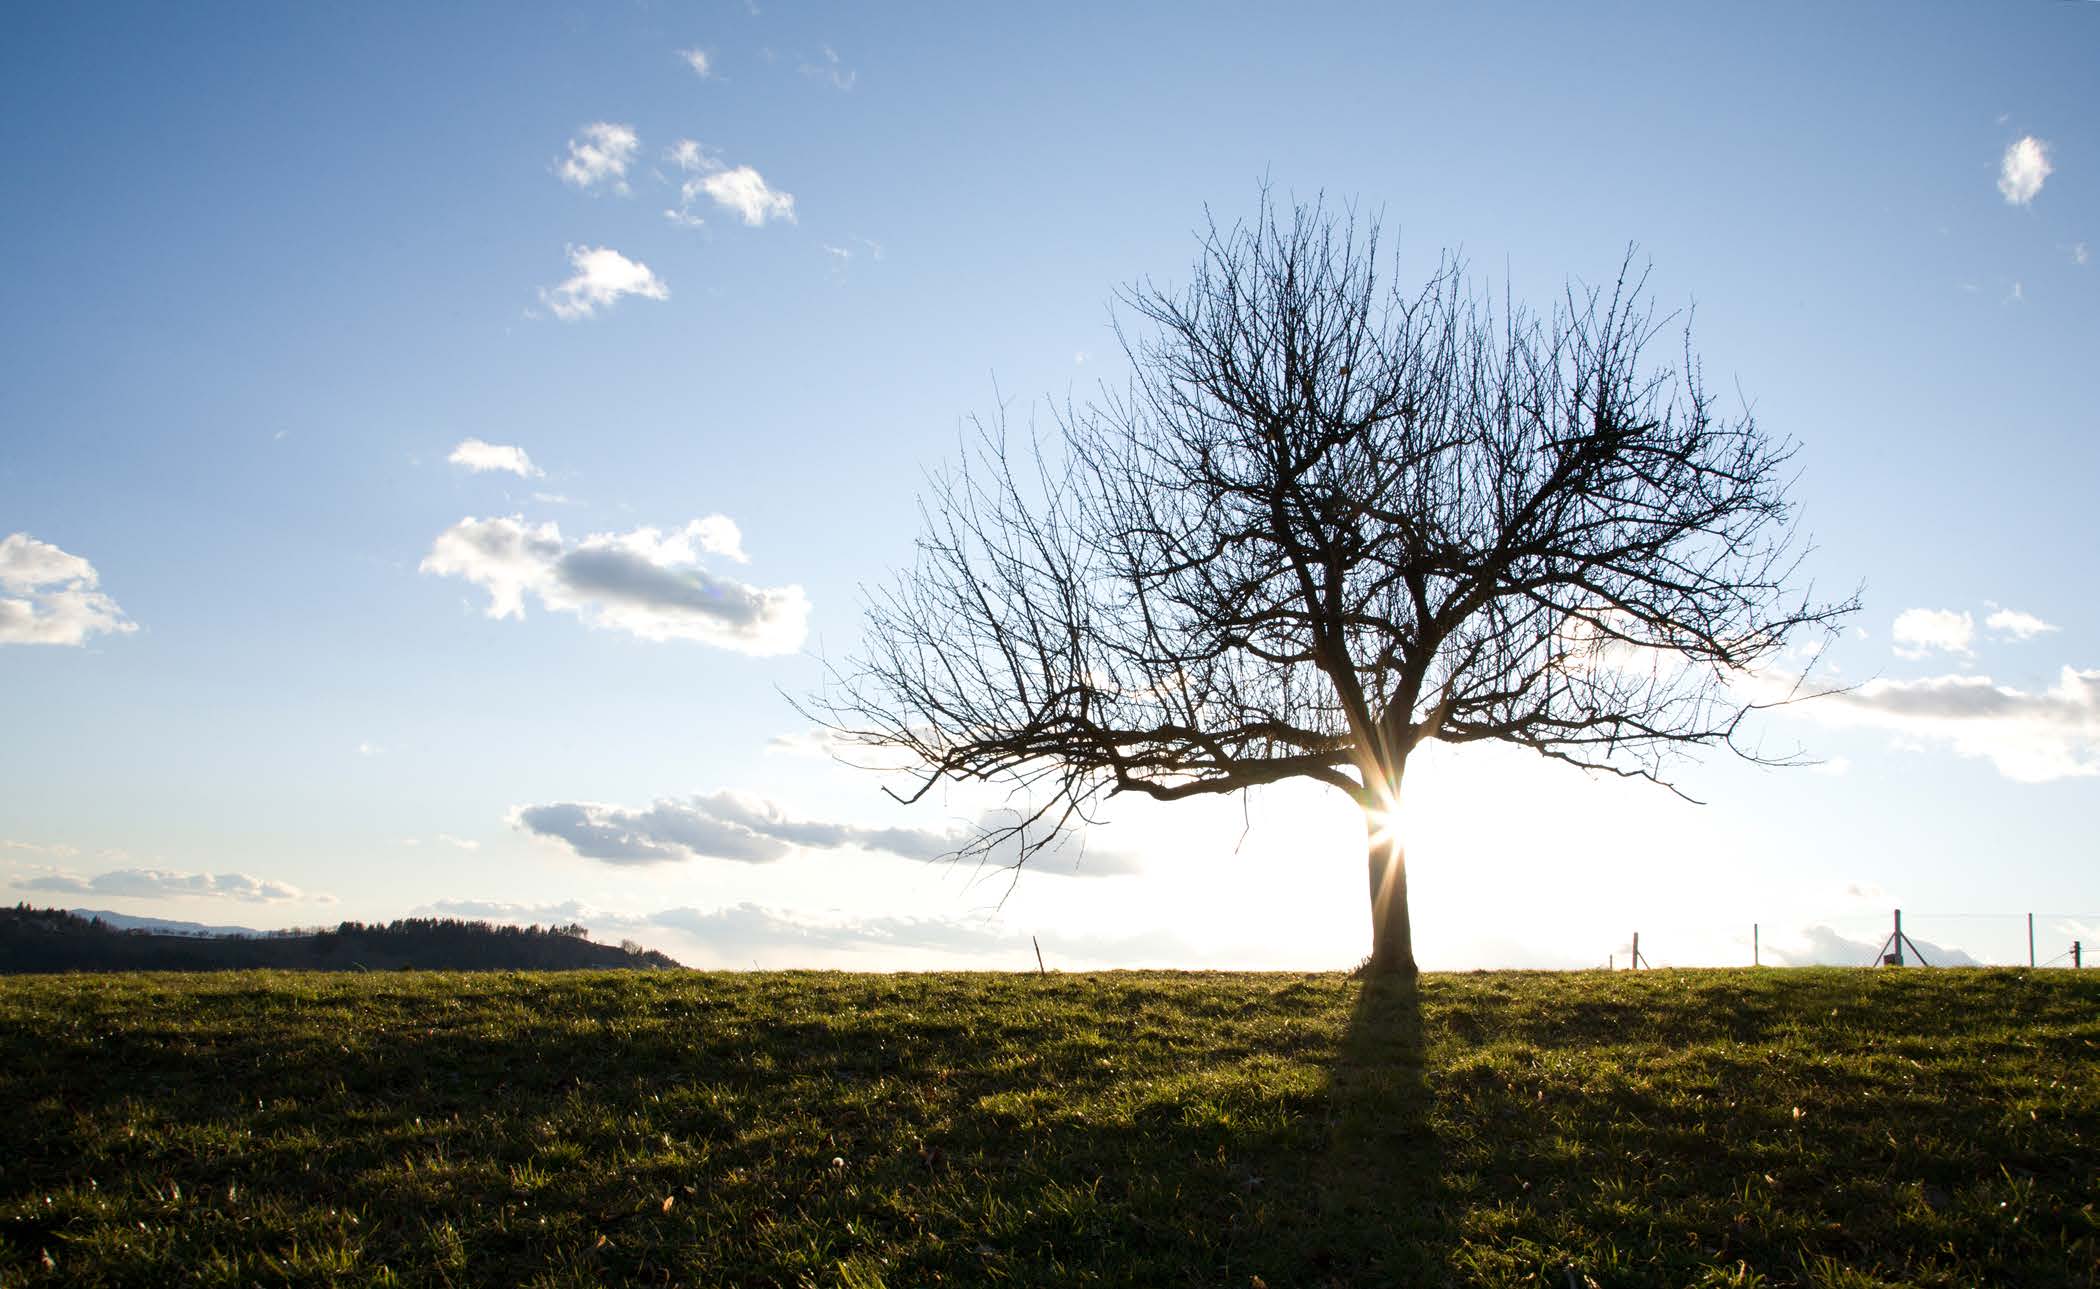
Creative use of direct light and shadow:
Direct light and shadow can be used for creative effect. In the backlit image above the sunlight, careful y positioned behind the tree to reduce its intensity In this photo, taken on the same evening
somewhat, has produced a dramatic image with lots of shadow and contrast.
just a short while after, I moved to the
opposite side of the field and positioned
the sun at a 45 degree in front of me and
off to the right. So I was partial y shooting
into the light. Notice again how the side
lighting has created shape and texture to
the rows. But here the purple colour is
softer and lighter. A classic example of
how the angle of light and how you choose
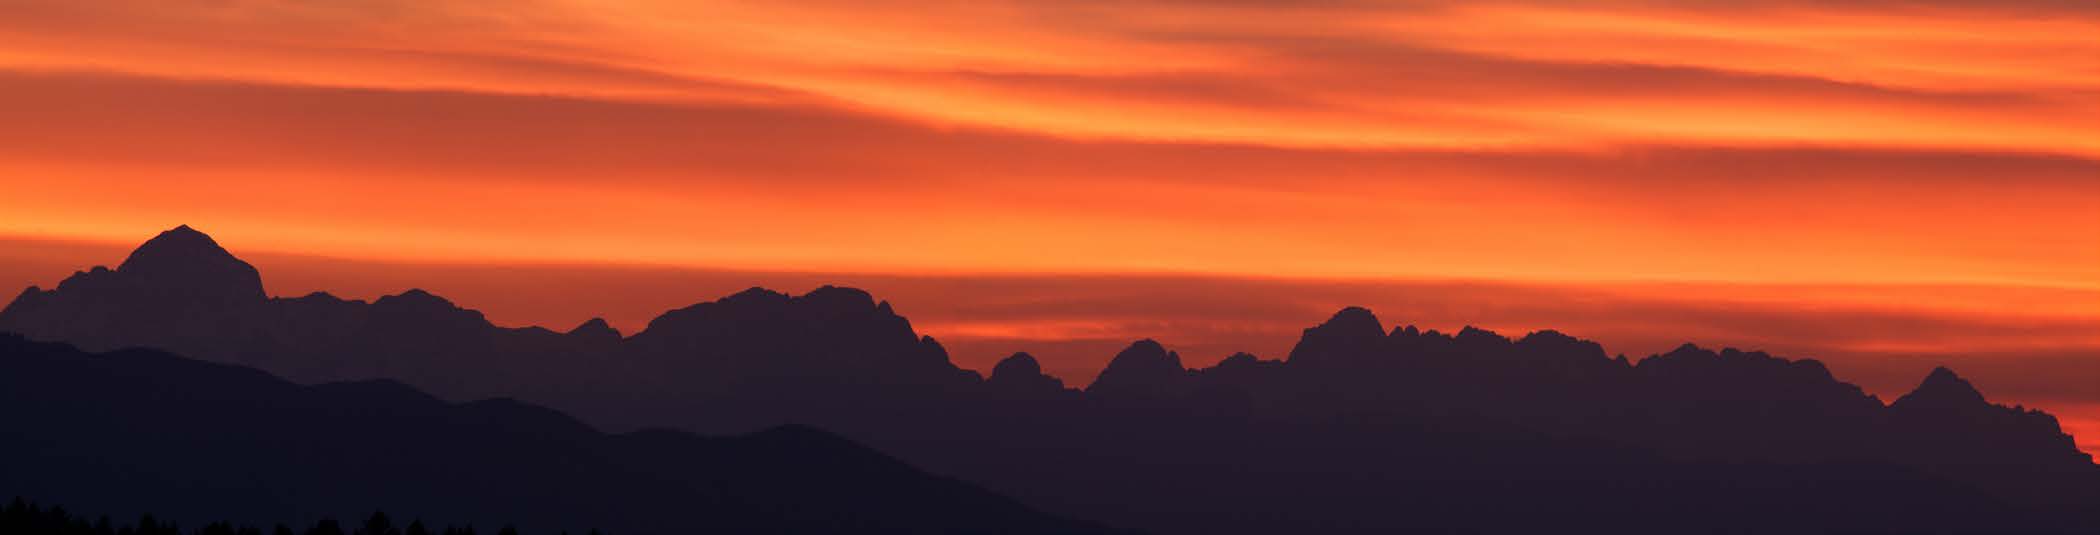
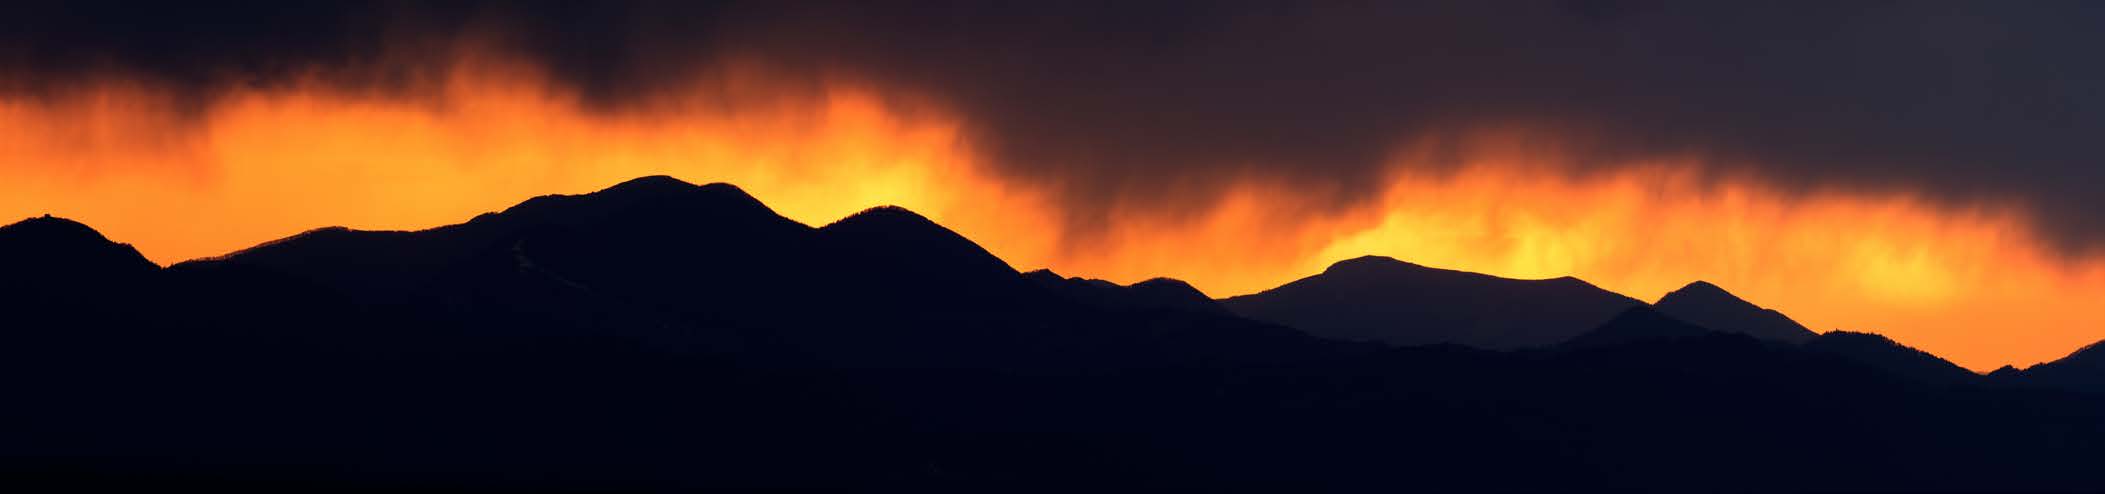
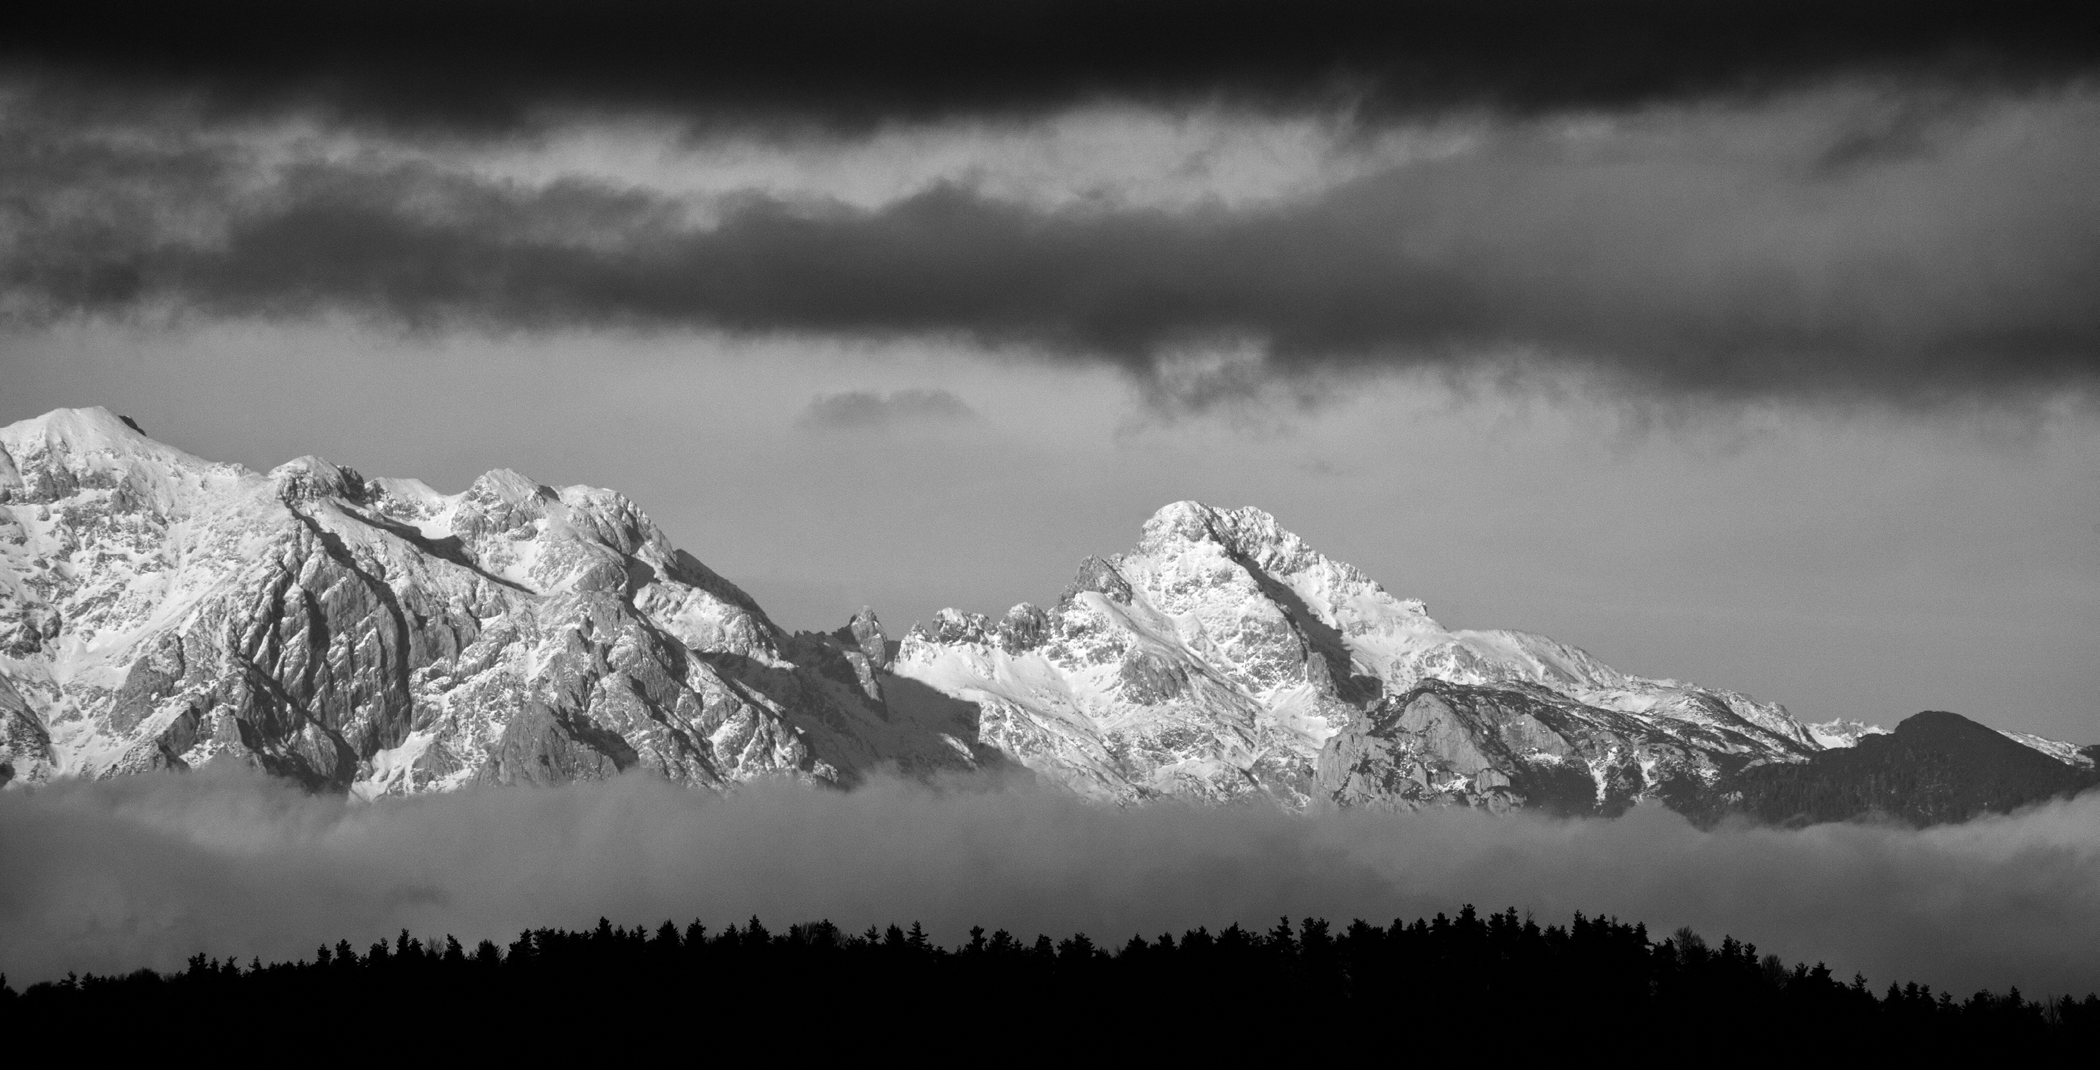
A classic example of direct backlight. Because the mountains are lit from behind to expose your photo can affect how your
and no direct light is falling on the front of them, the difference in brightness colours look. More about exposure later.
is extreme. Because of the high contrast, you need to expose for the highlights (bright parts) and then the mountains become silhouetted.
18
www.ianmiddletonphotography.com
www.ianmiddletonphotography.com
19
Diffused light effects
Diffused light on landscapes
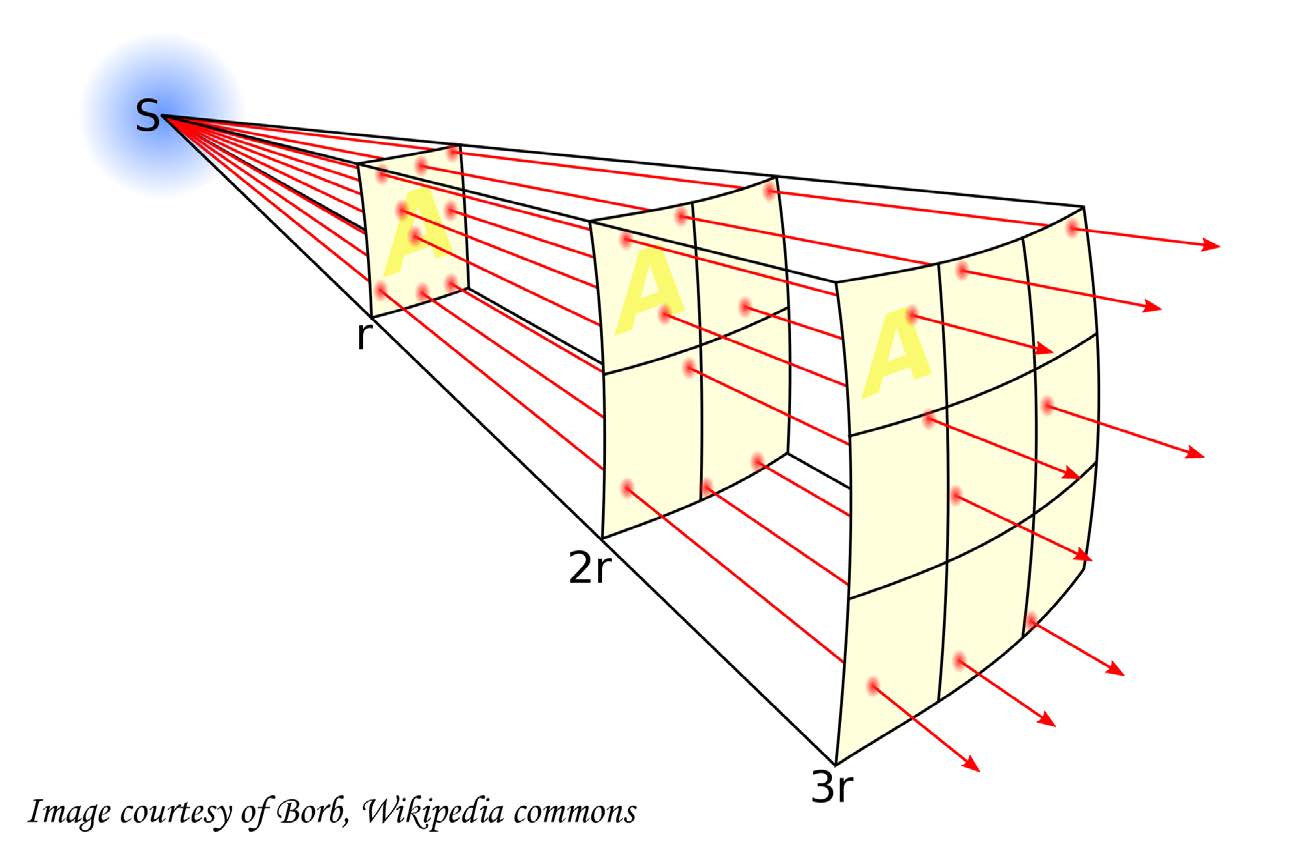
Diffused light comes from a large source rather than a single small source.
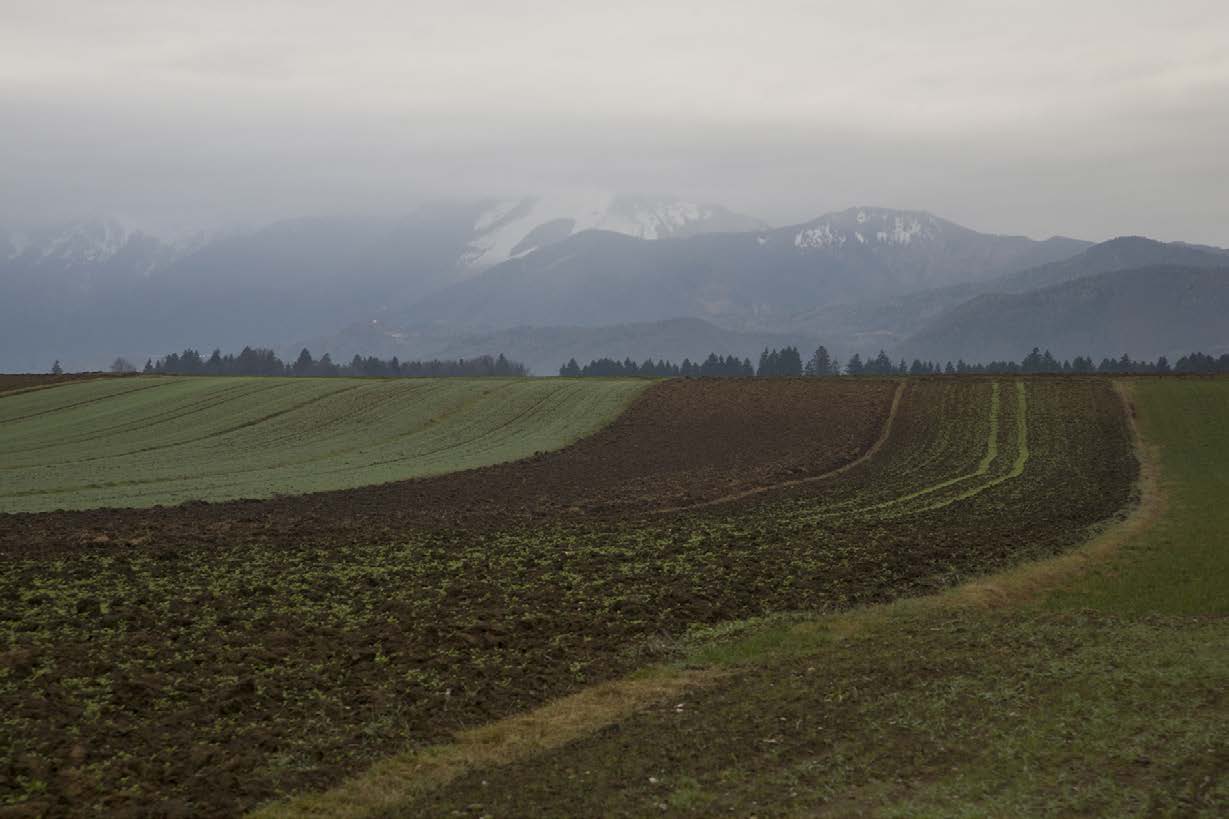
As you can see by the photo to
the right, the light of a thick
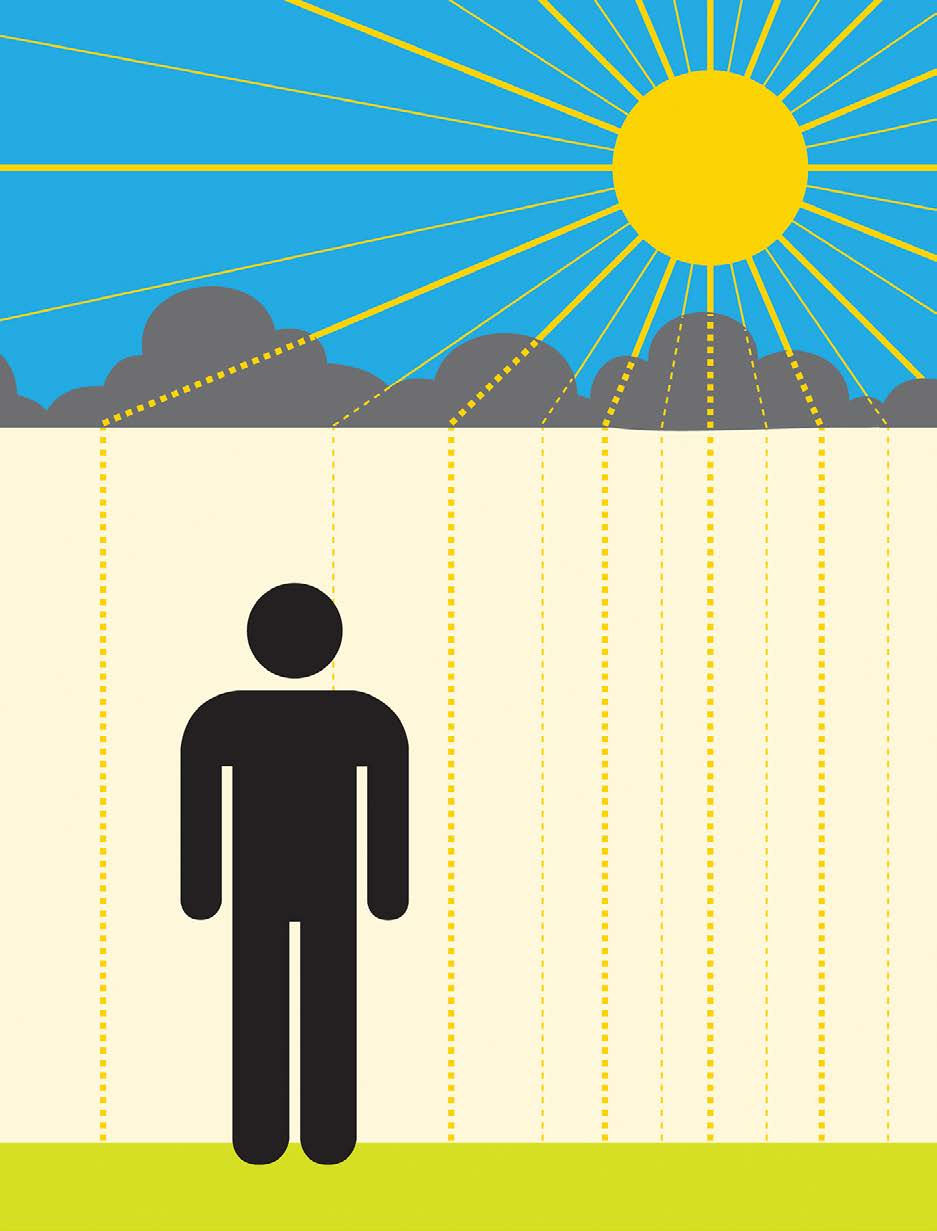
Technical y, light is diffused
overcast day produces a scene
when it passes through a
with low contrast and less
transparent object such
vibrant colours. Notice the
as a large white sheet, or a
almost complete absence of
window. The result is that
shadow here.
the light is scattered and
spread and the diffuser
become the light source
rather than the original
light source.
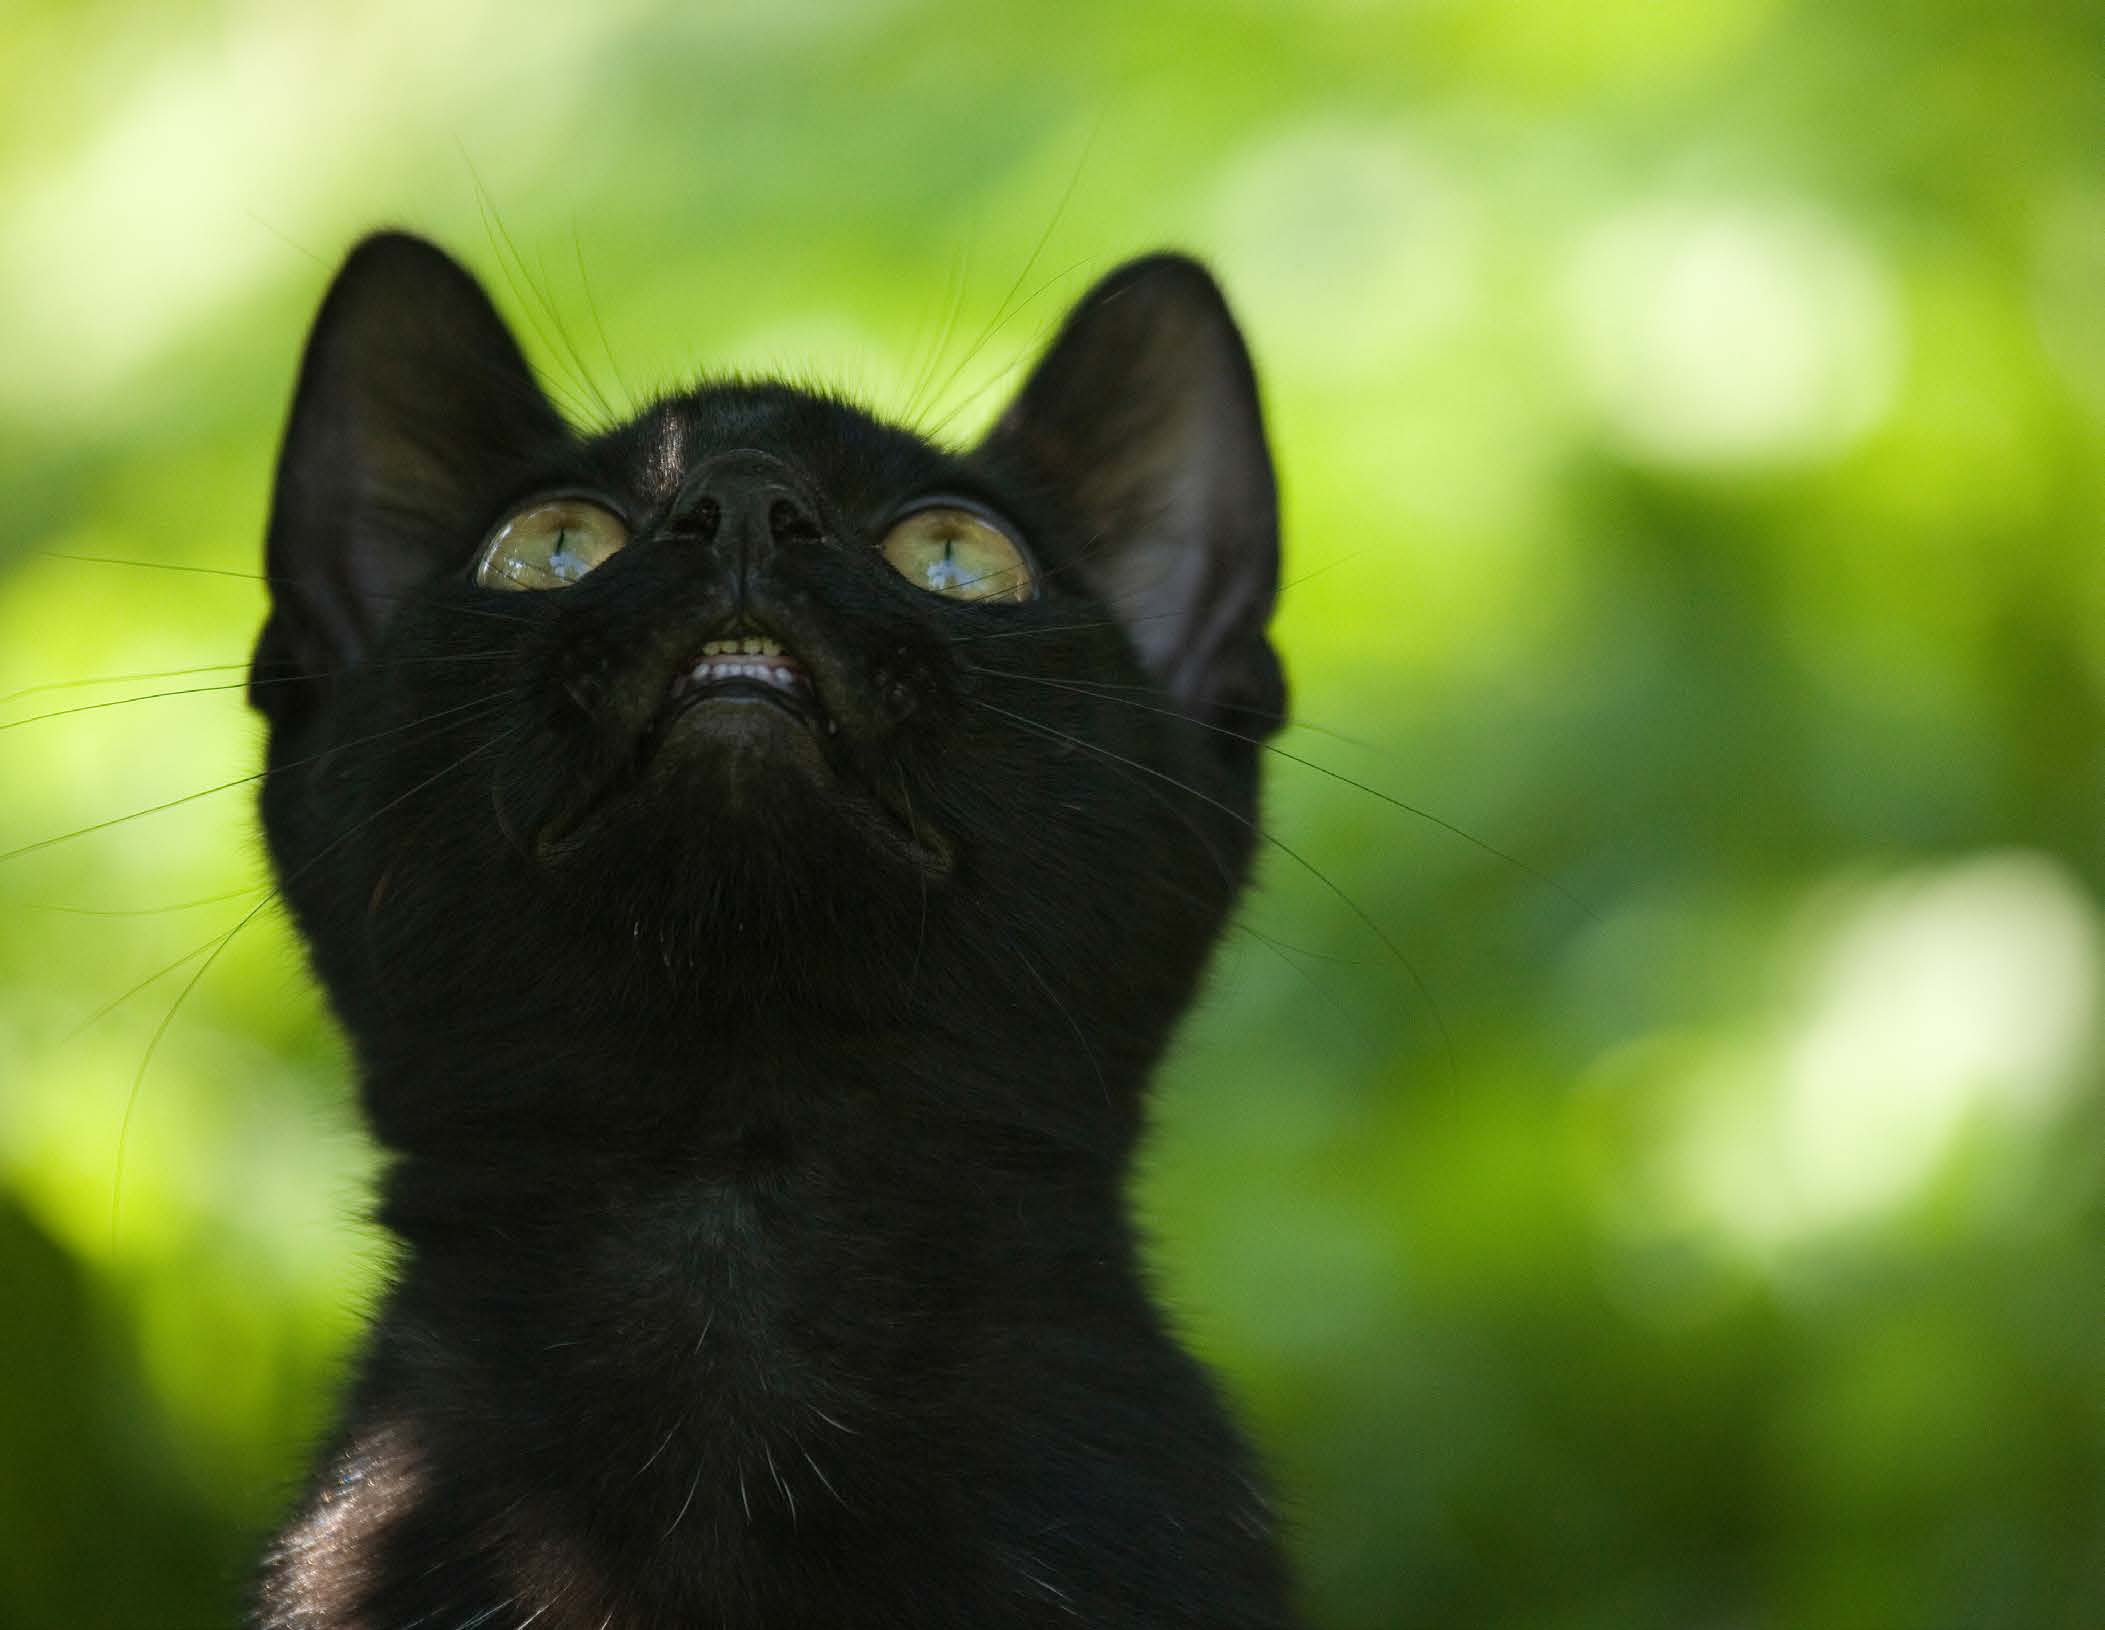
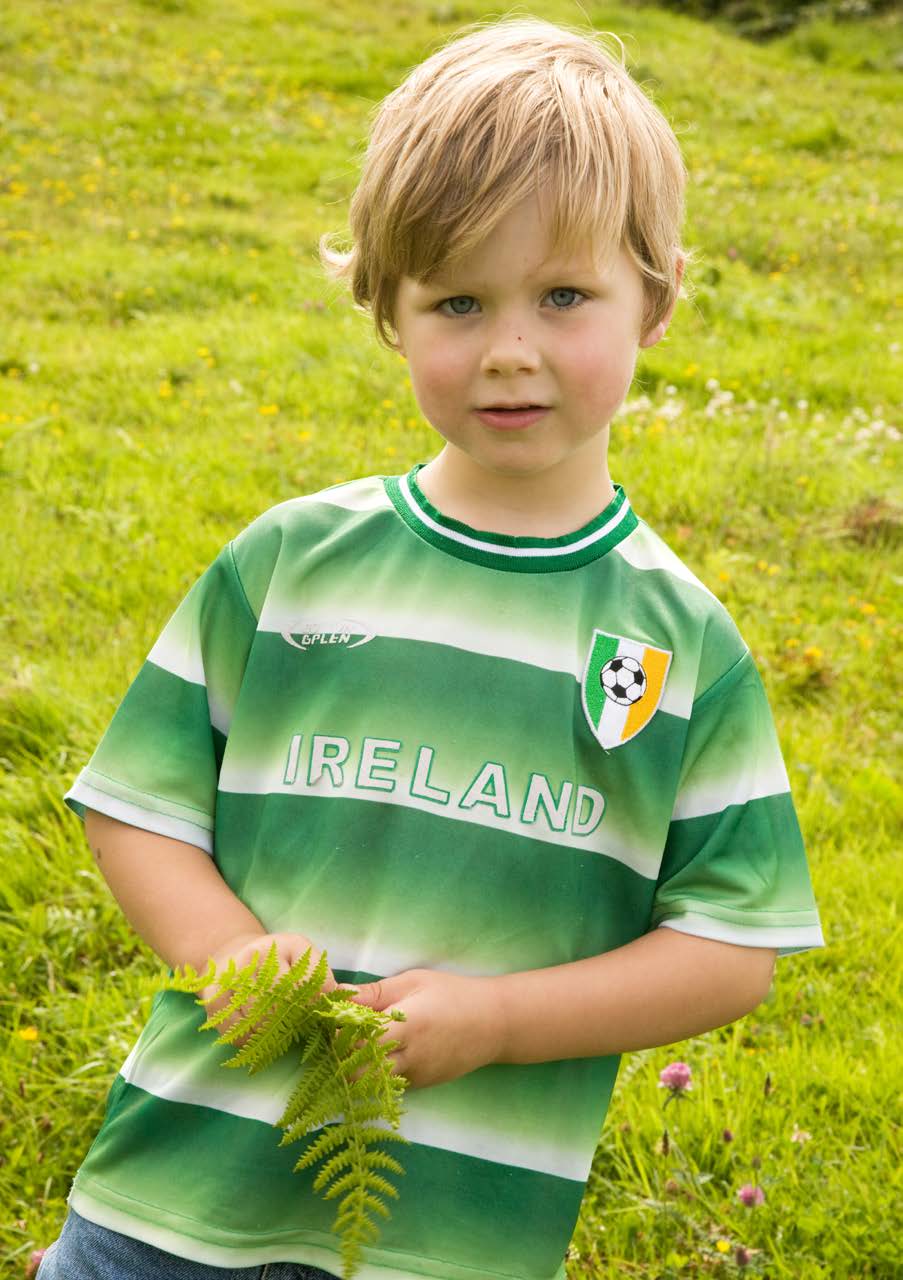
Diffused light is perfect for people
Therefore, the larger the
diffuser, the softer the light. The figure above shows how the light is repeatedly Diffused light is often the best light when
scattered through increasingly larger surfaces.
photographing people portraits. As we
The biggest example of this is the sky on
learned earlier, hard direct light gives lots
an overcast day. Go outside on a sunny day
of definition and therefore also shows up
and look at the sky. You’ll be blinded by a
the flaws and lines in our faces. Diffused
single hard beam of light from the sun. But
light eliminates the problem of shadows,
go out on an overcast day and you’ll see
and also gives softer, smoother and
that there is no single hard beam of light,
more flattering results. Also under these
but the whole sky is evenly lit.
conditions you don’t have to worry about
unwanted shadow.
Now look around and you’ll see there is
little or no shadow. This is because the light
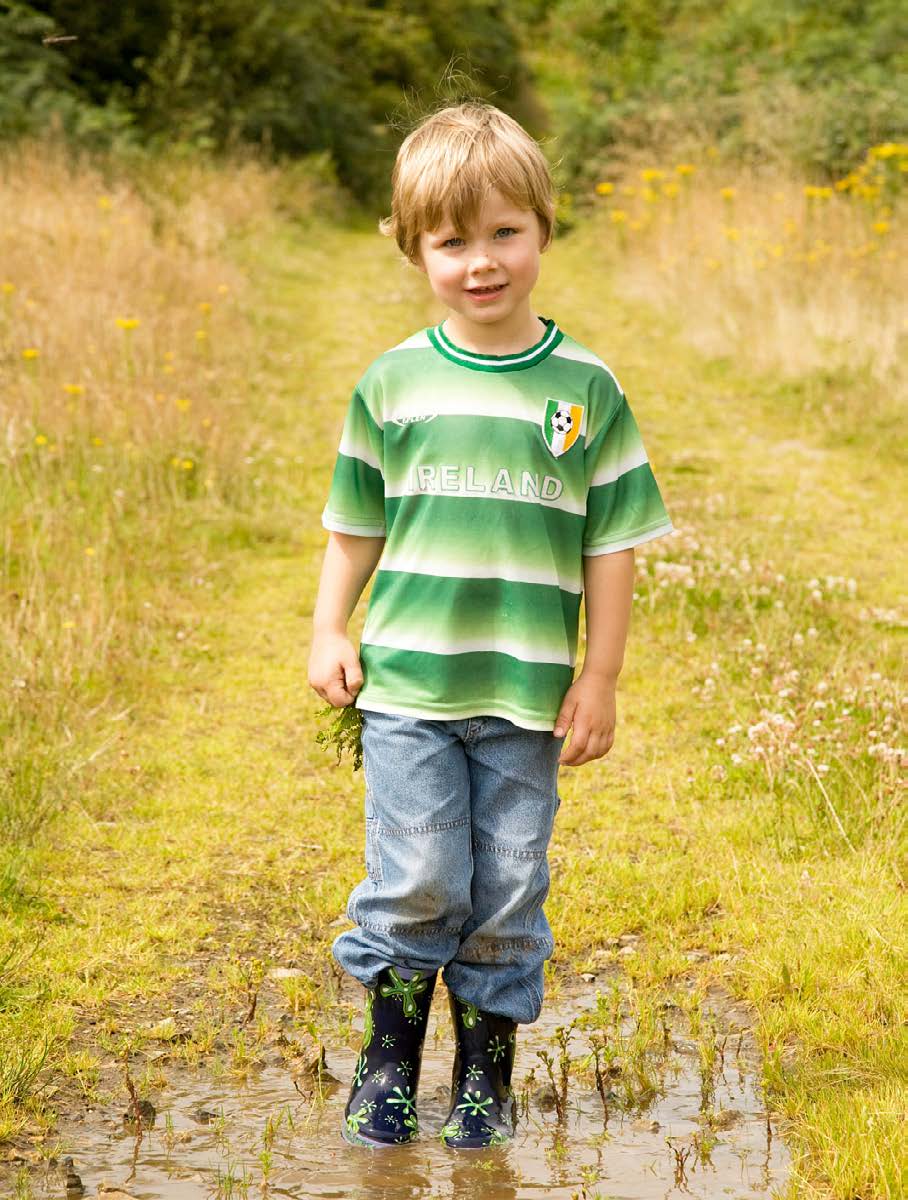
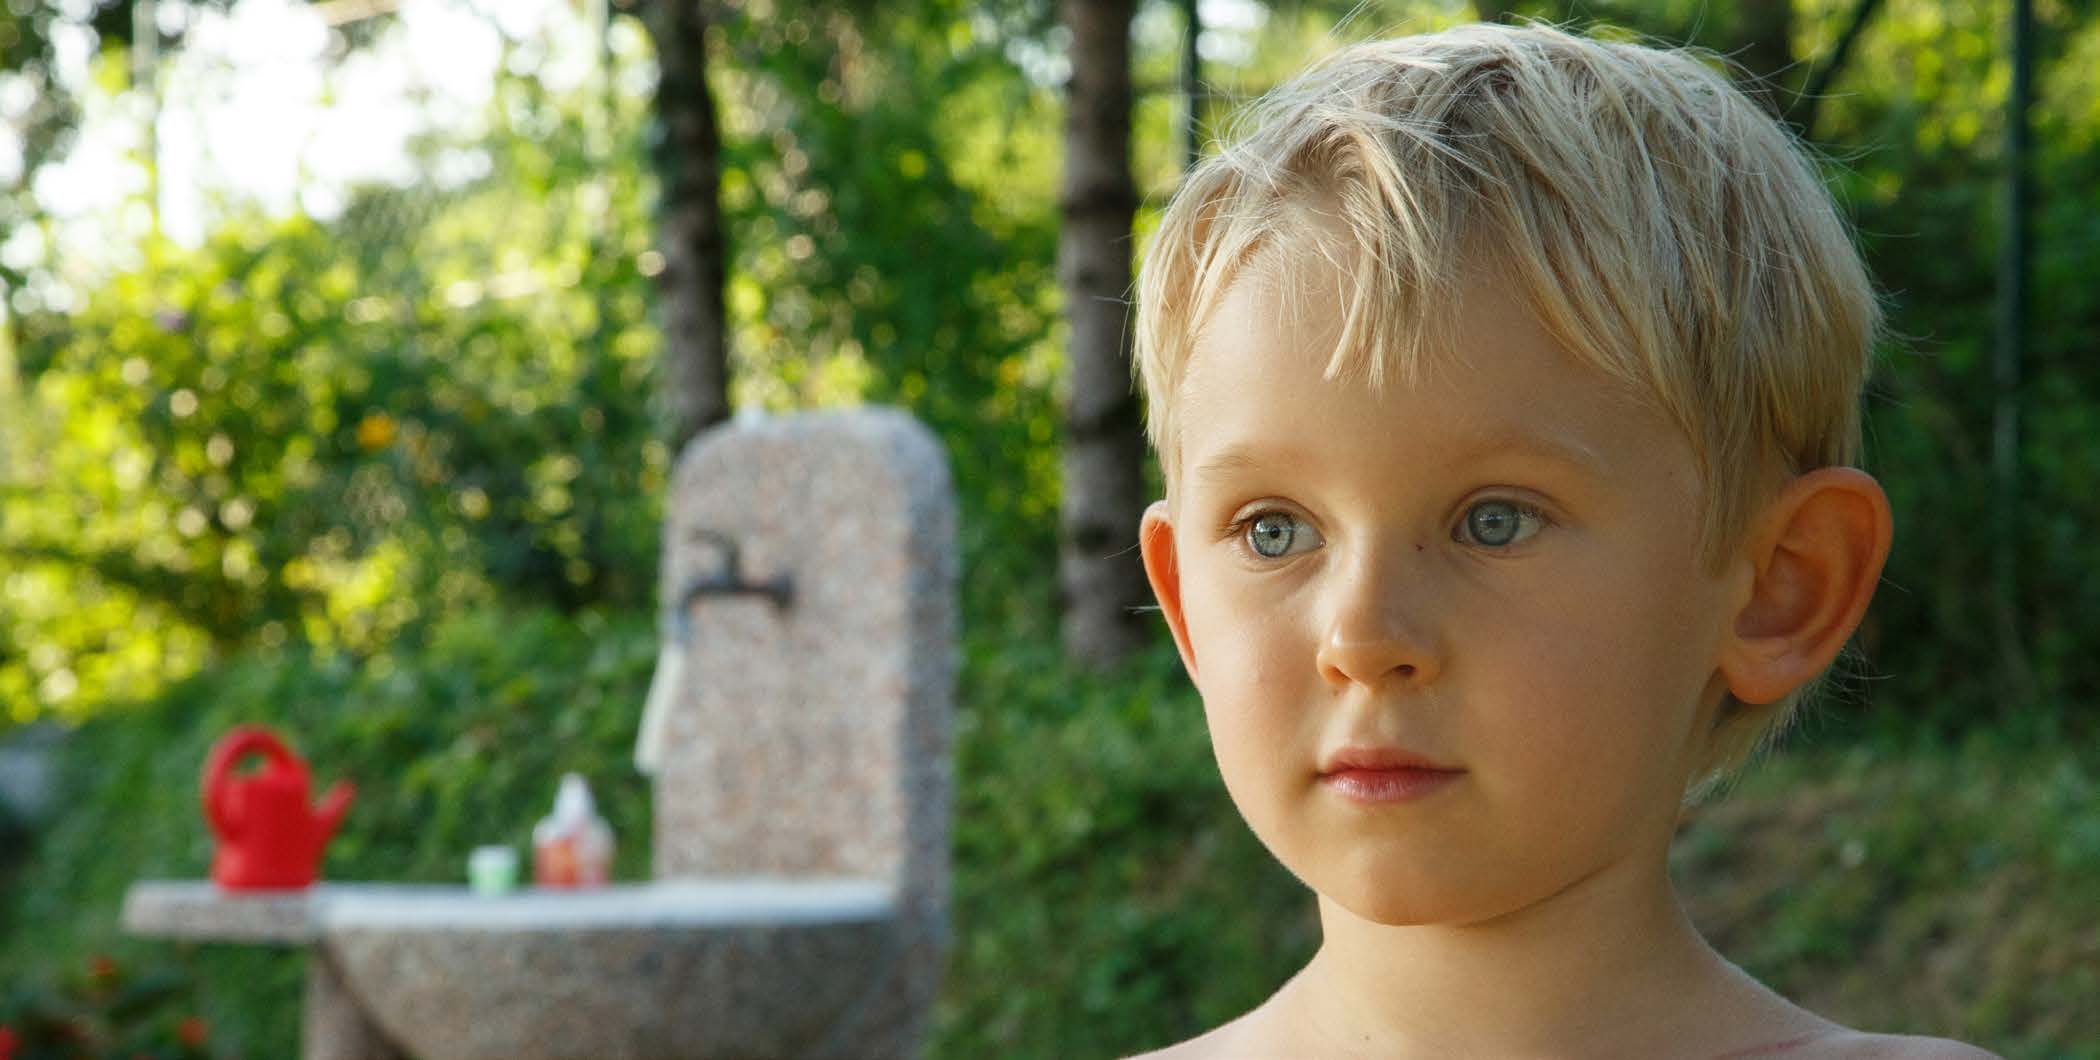
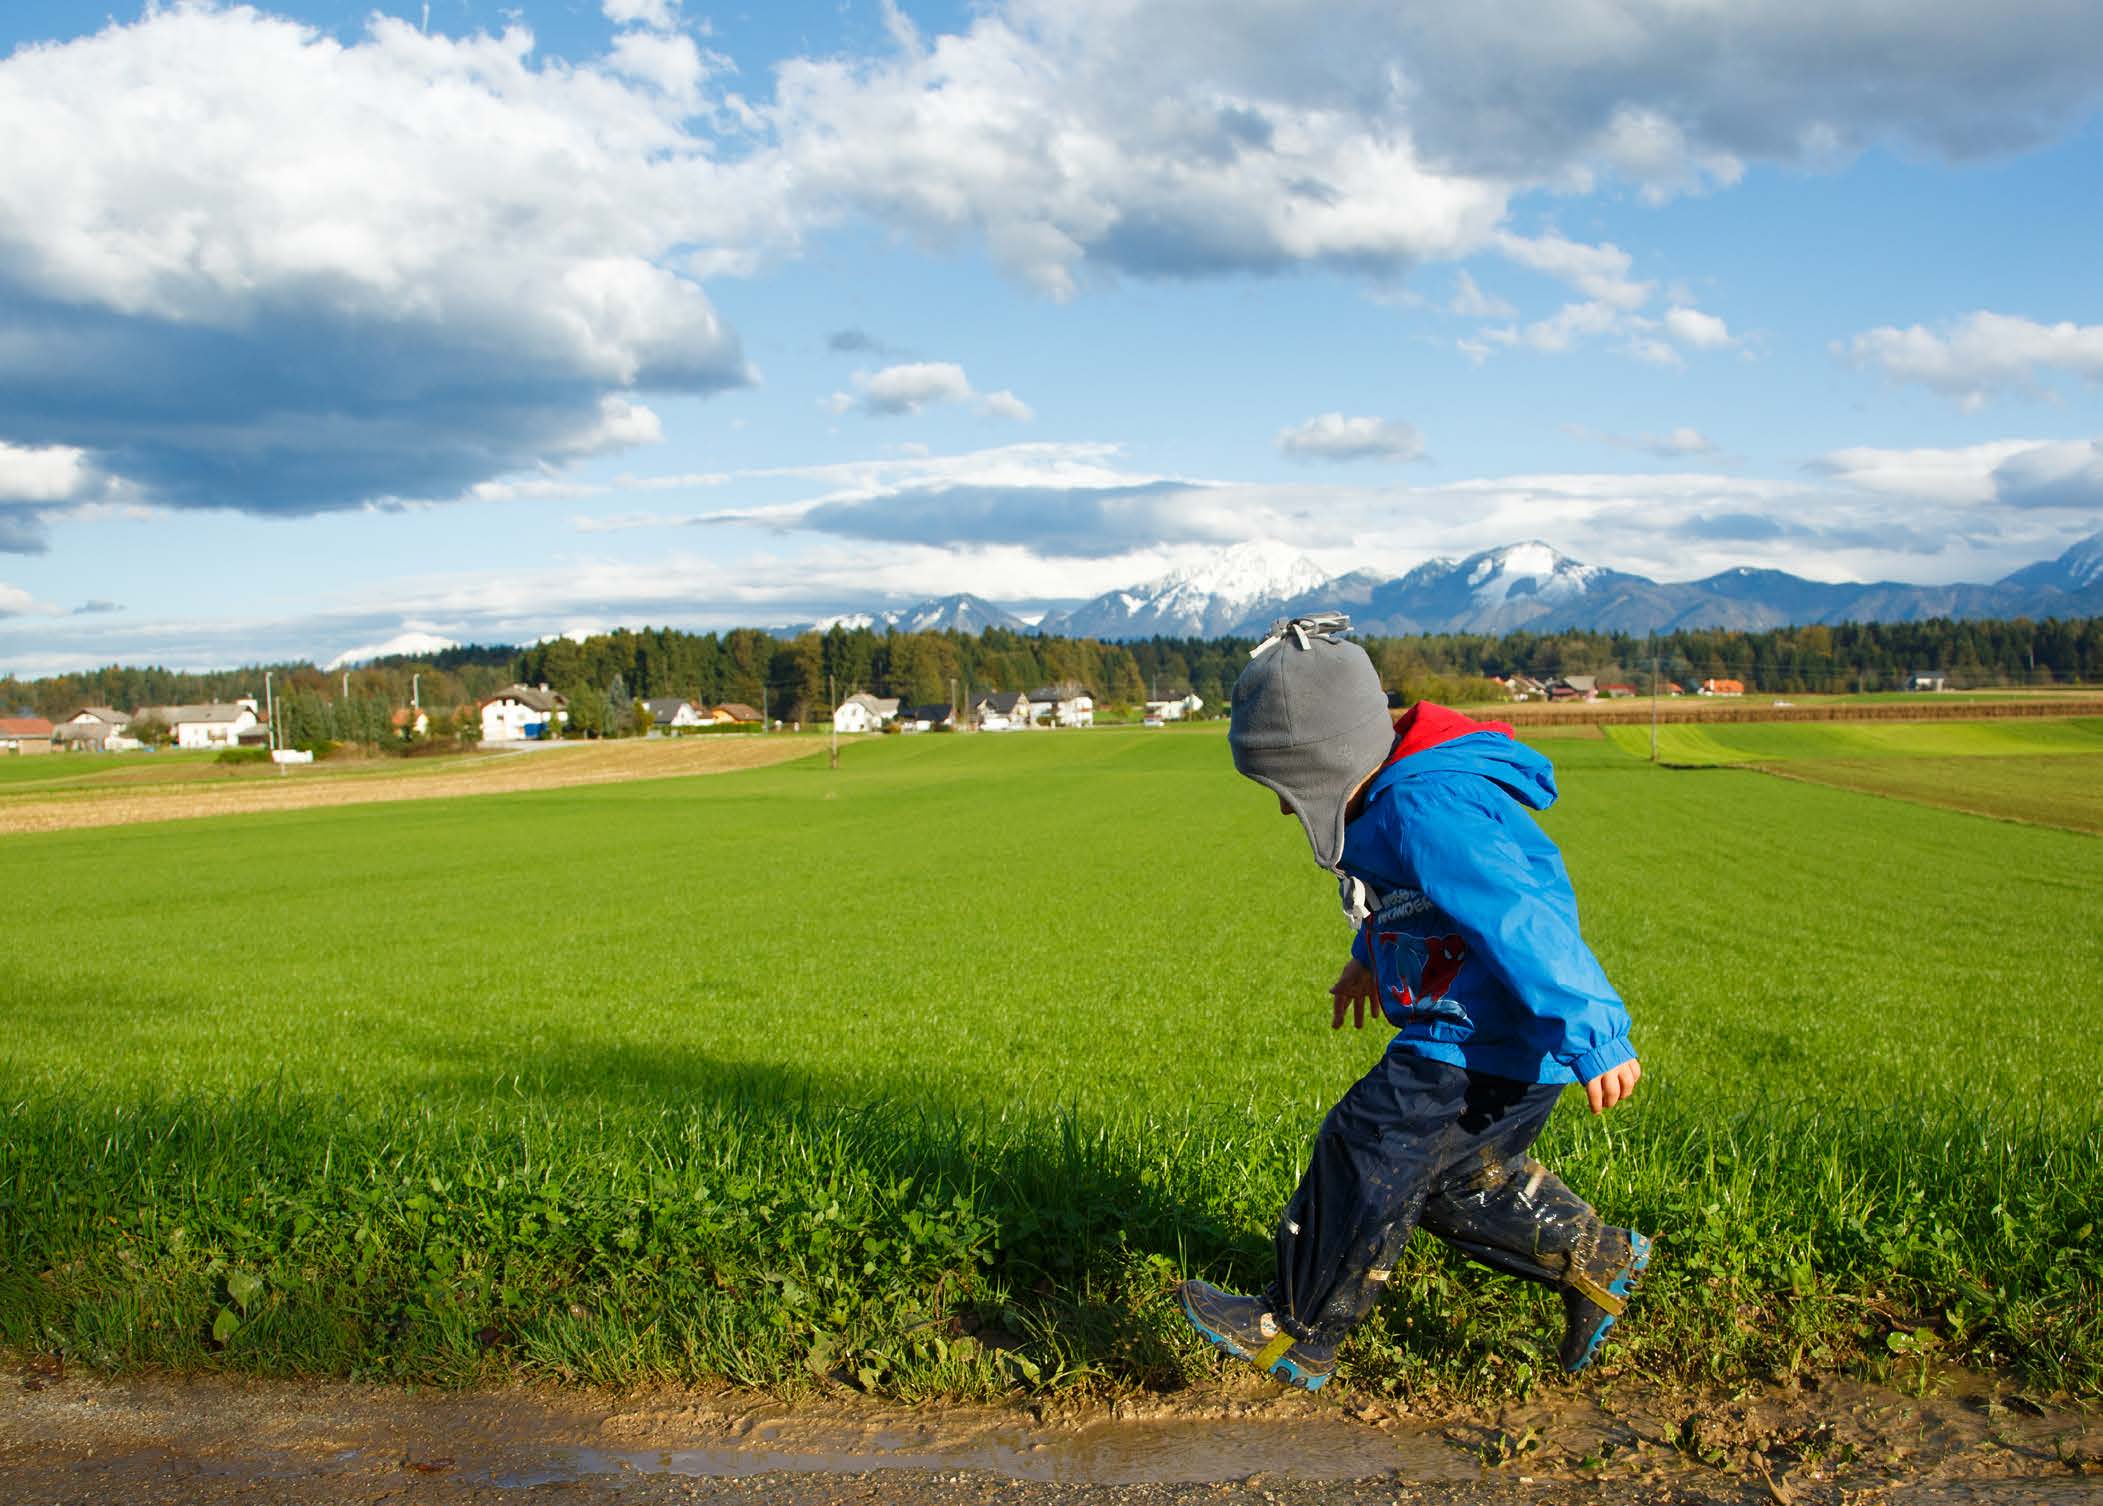
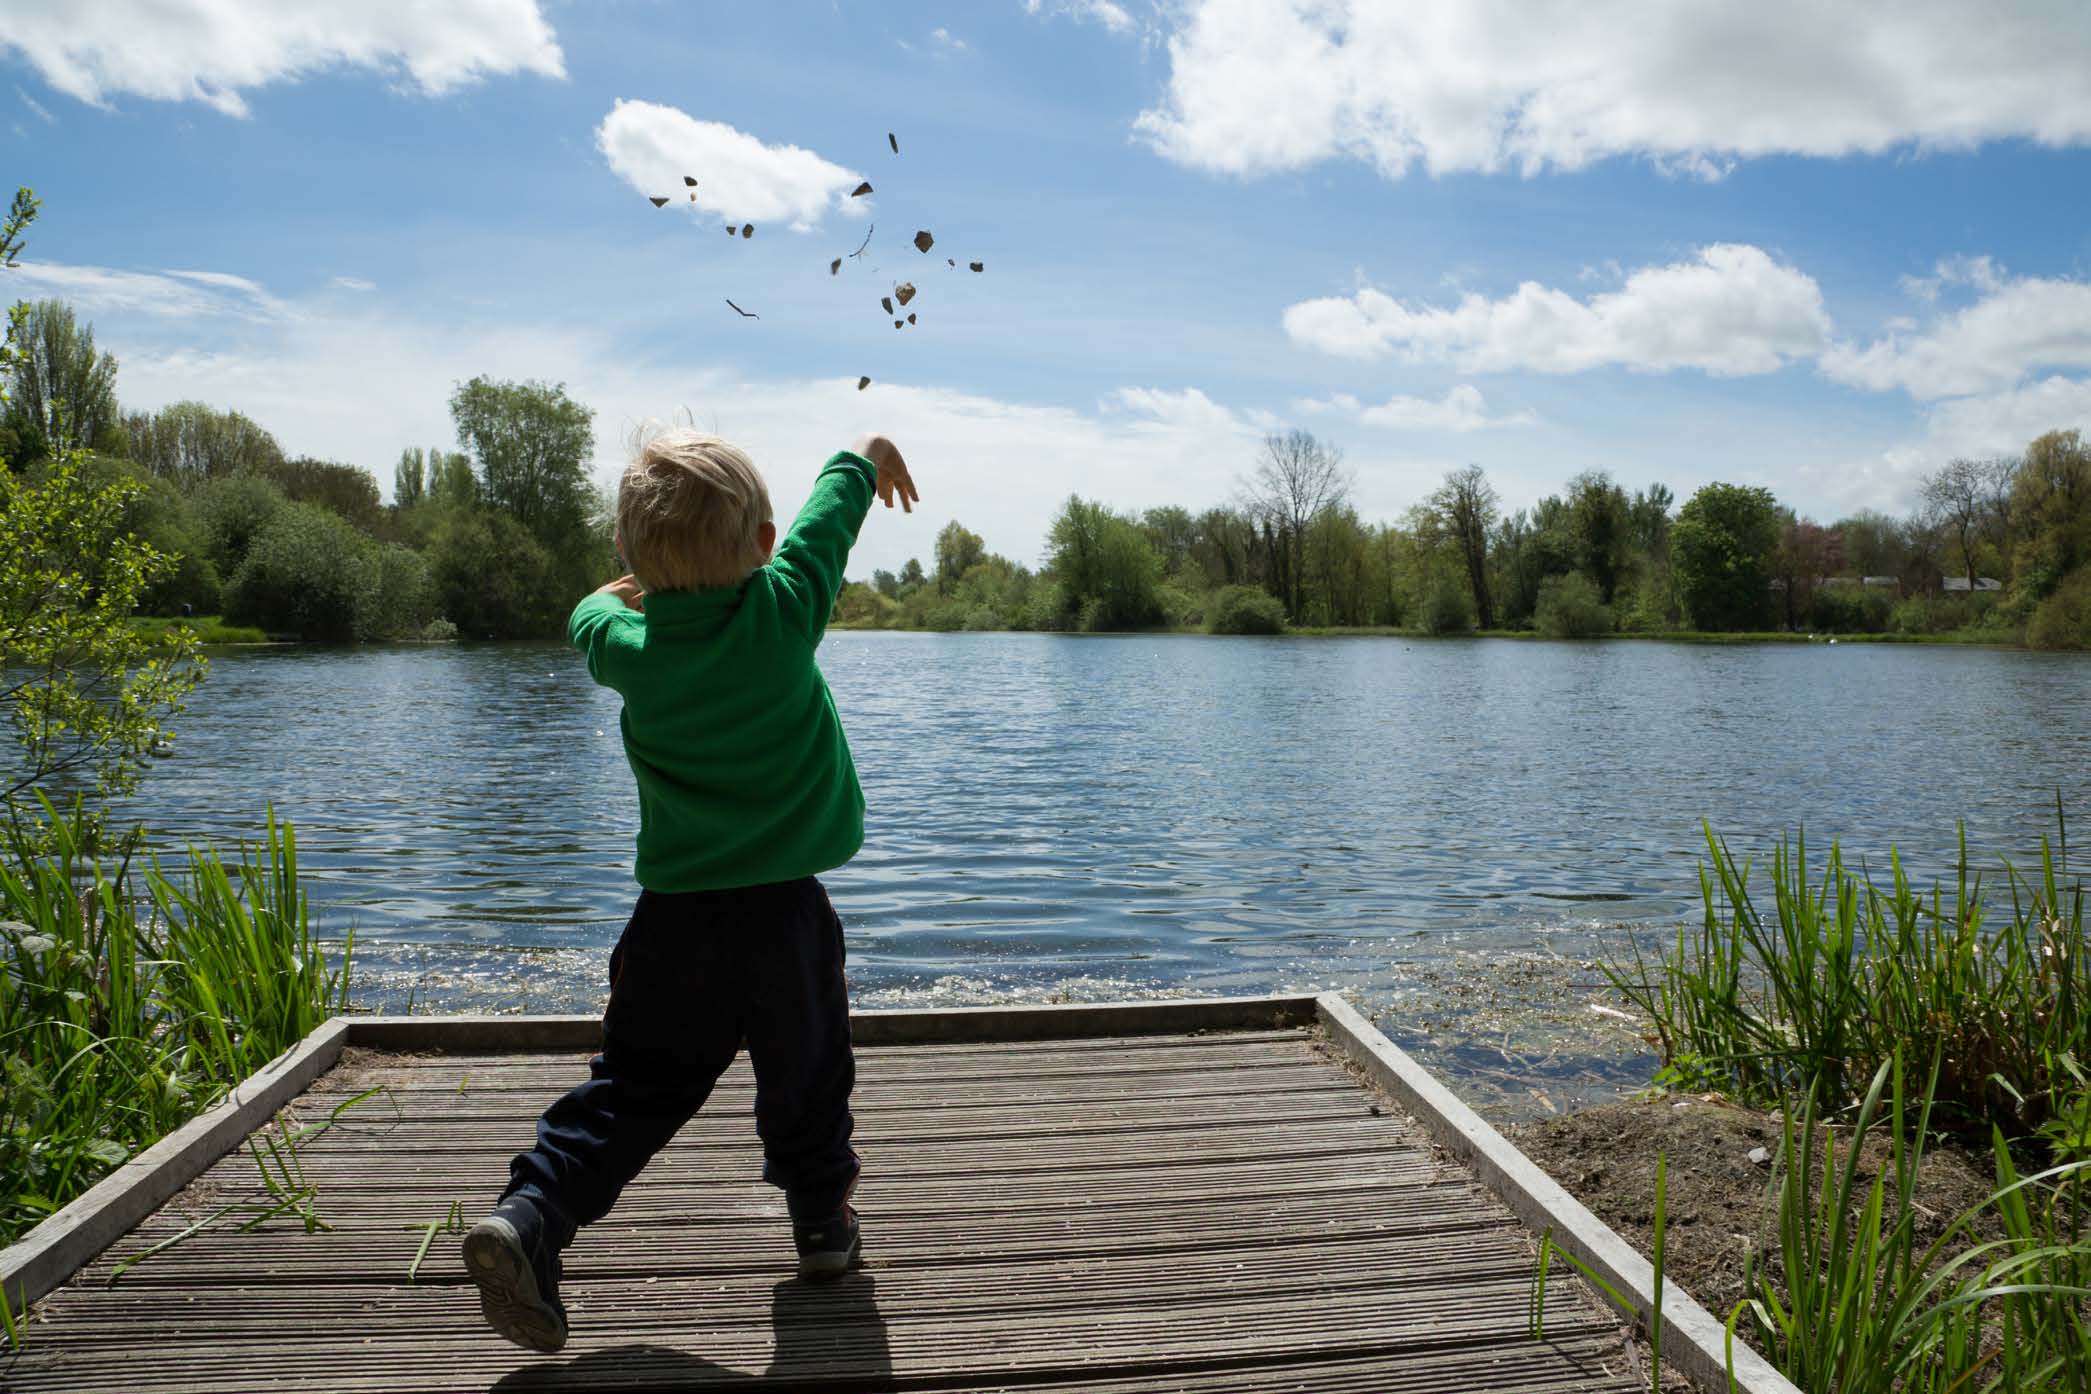
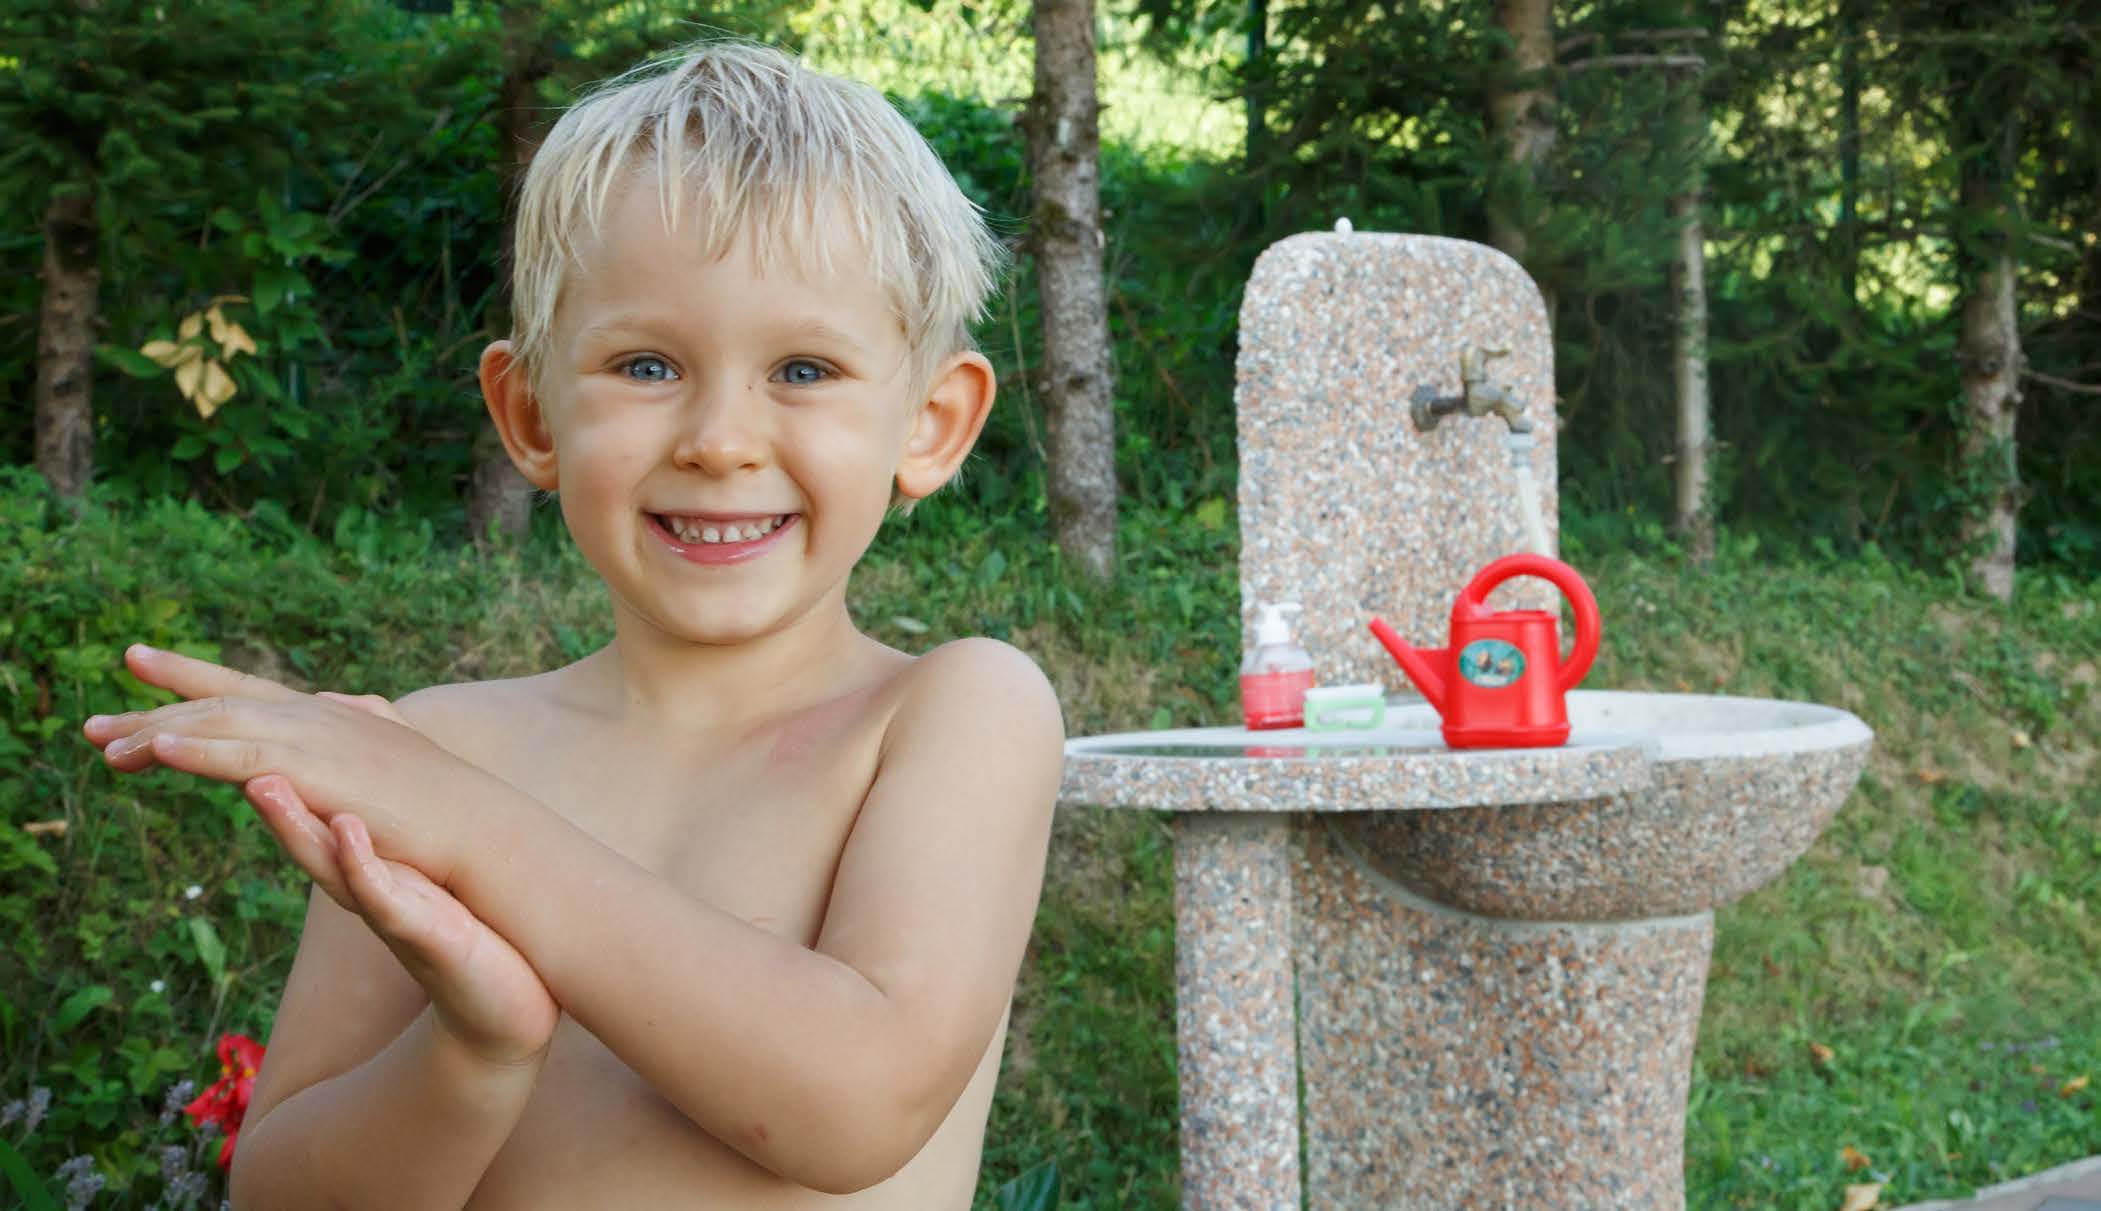
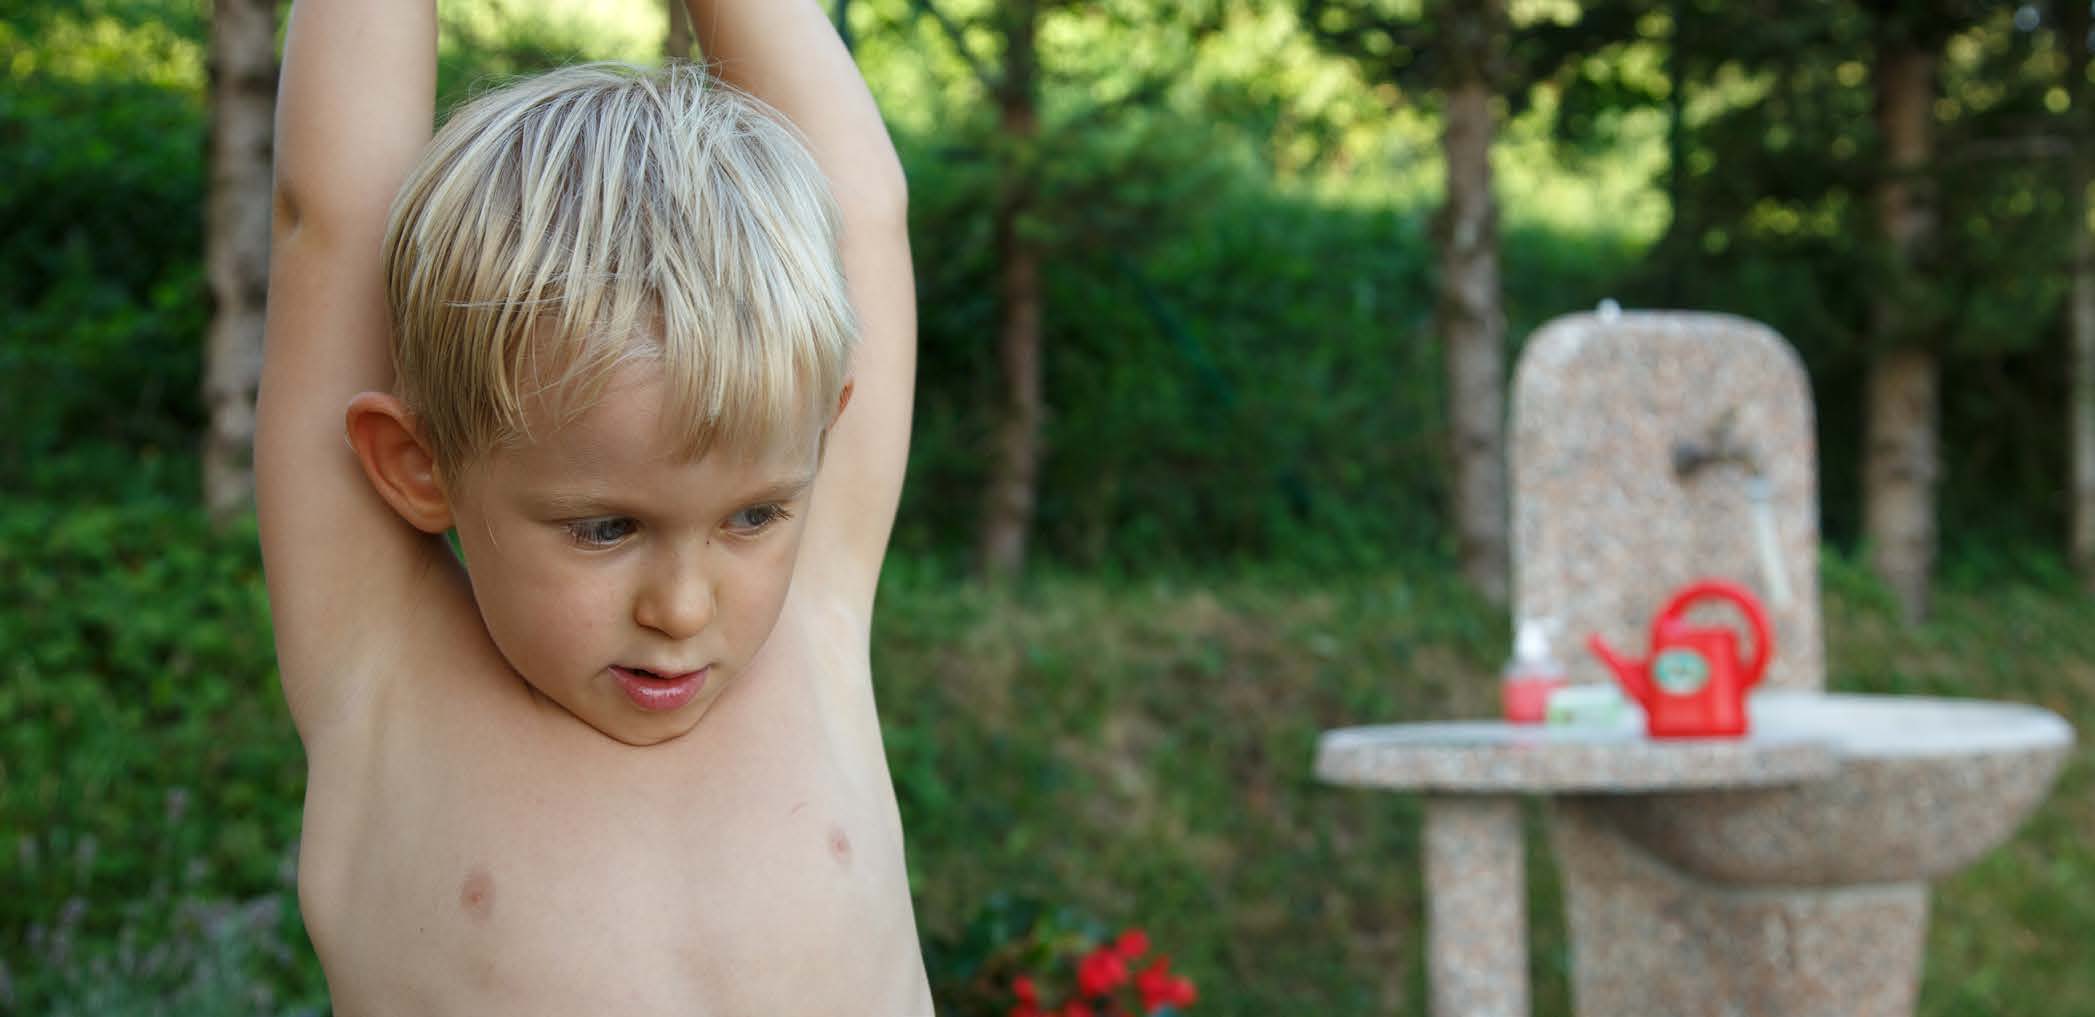
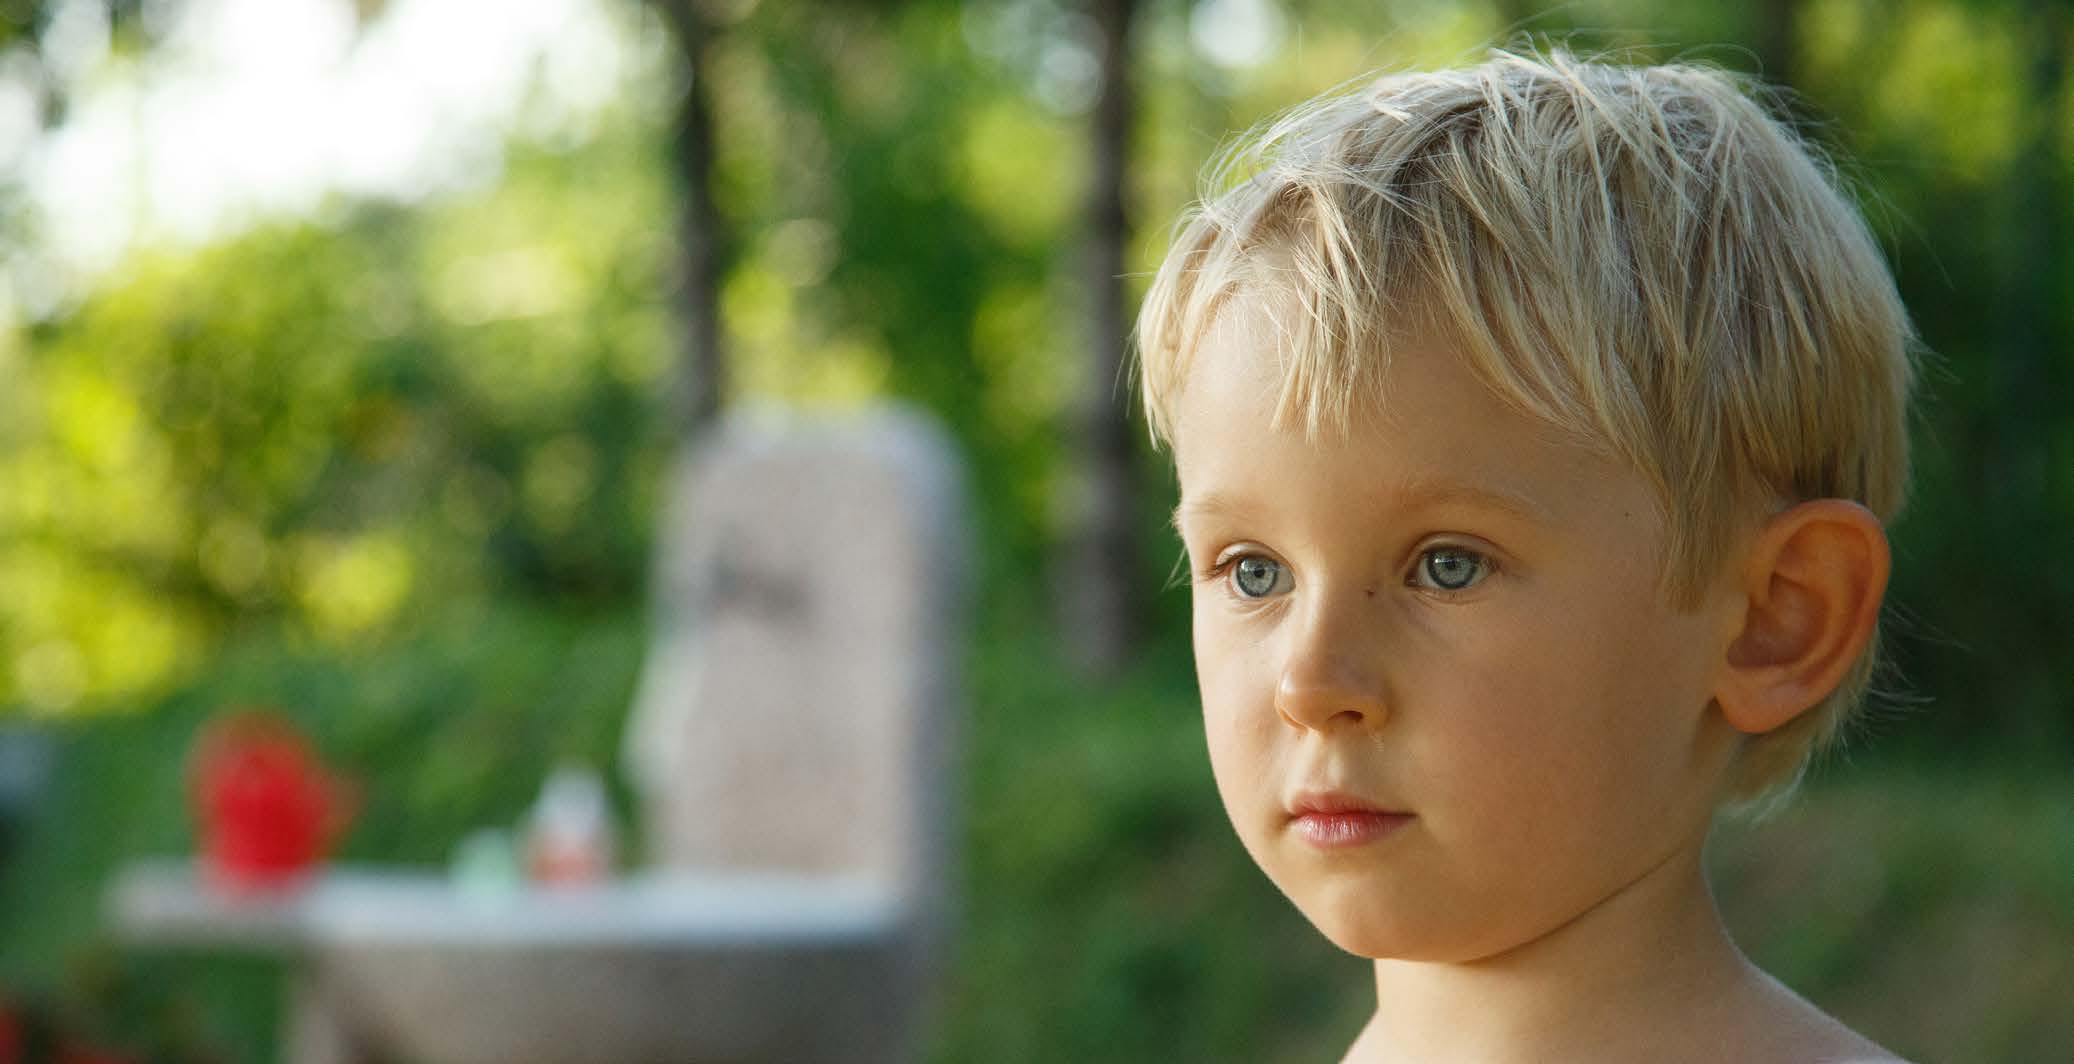
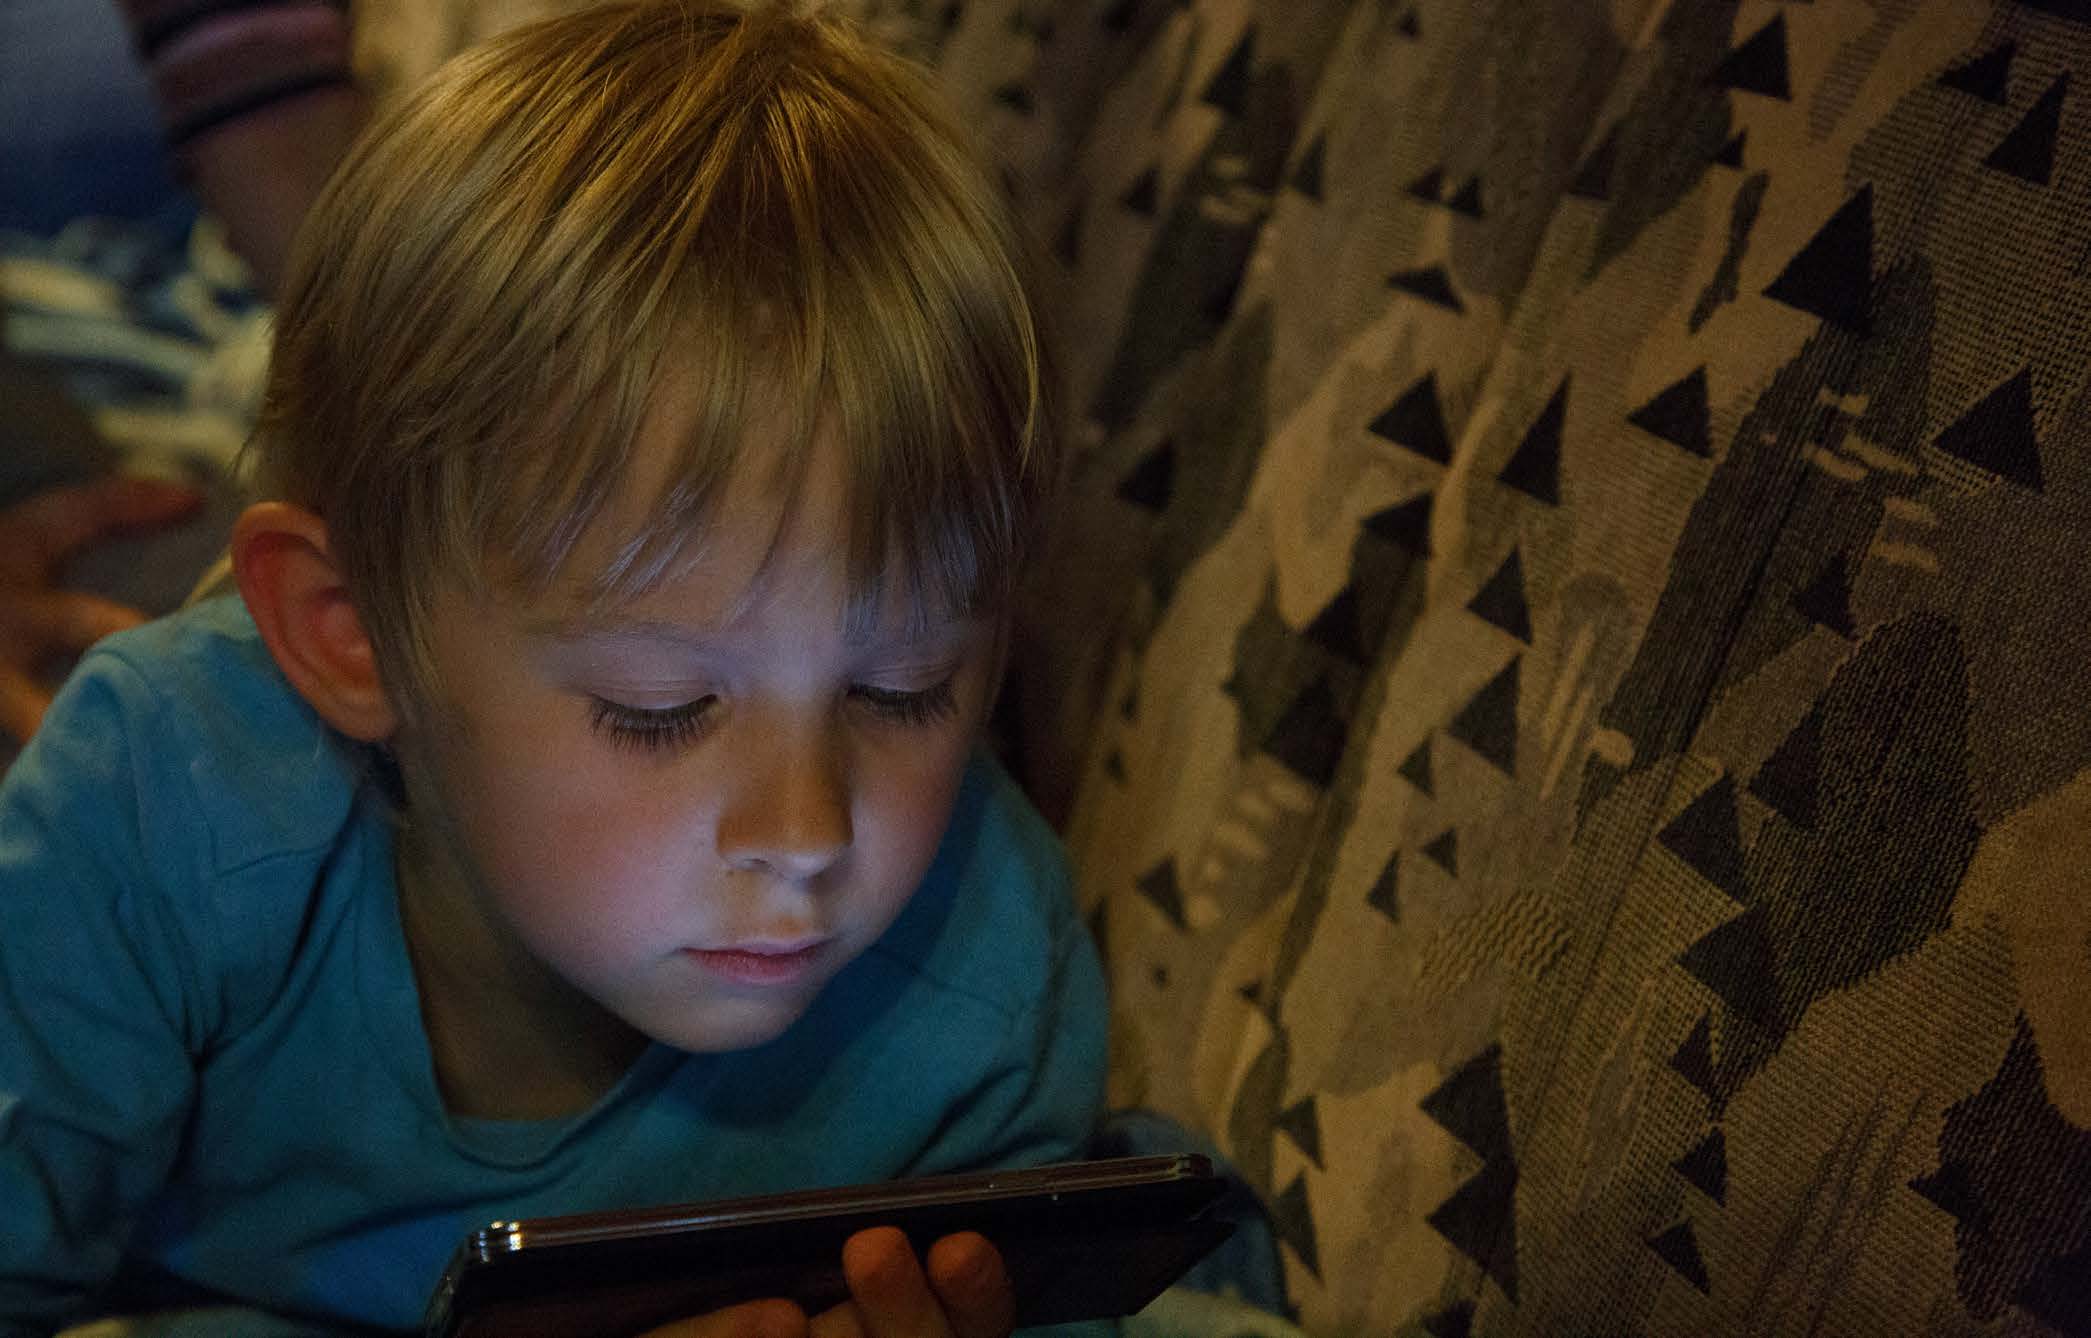
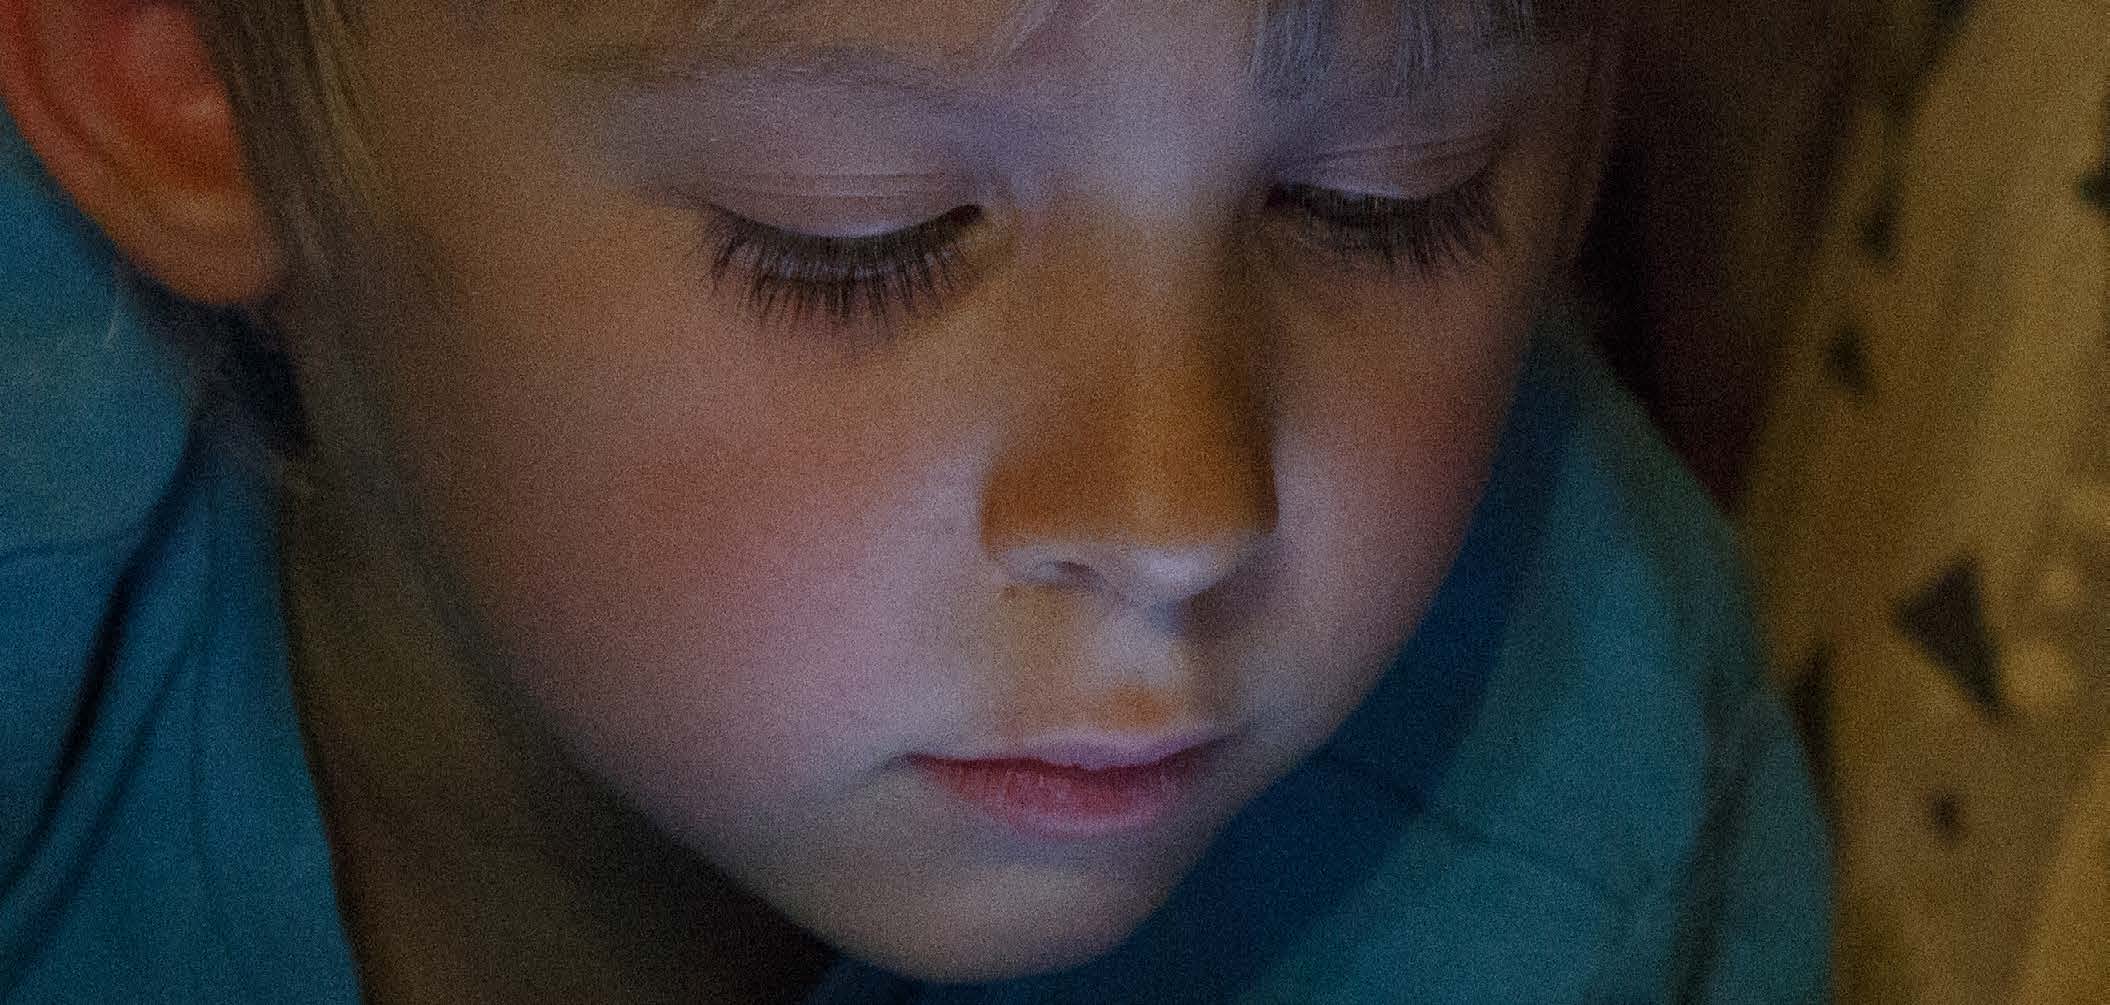
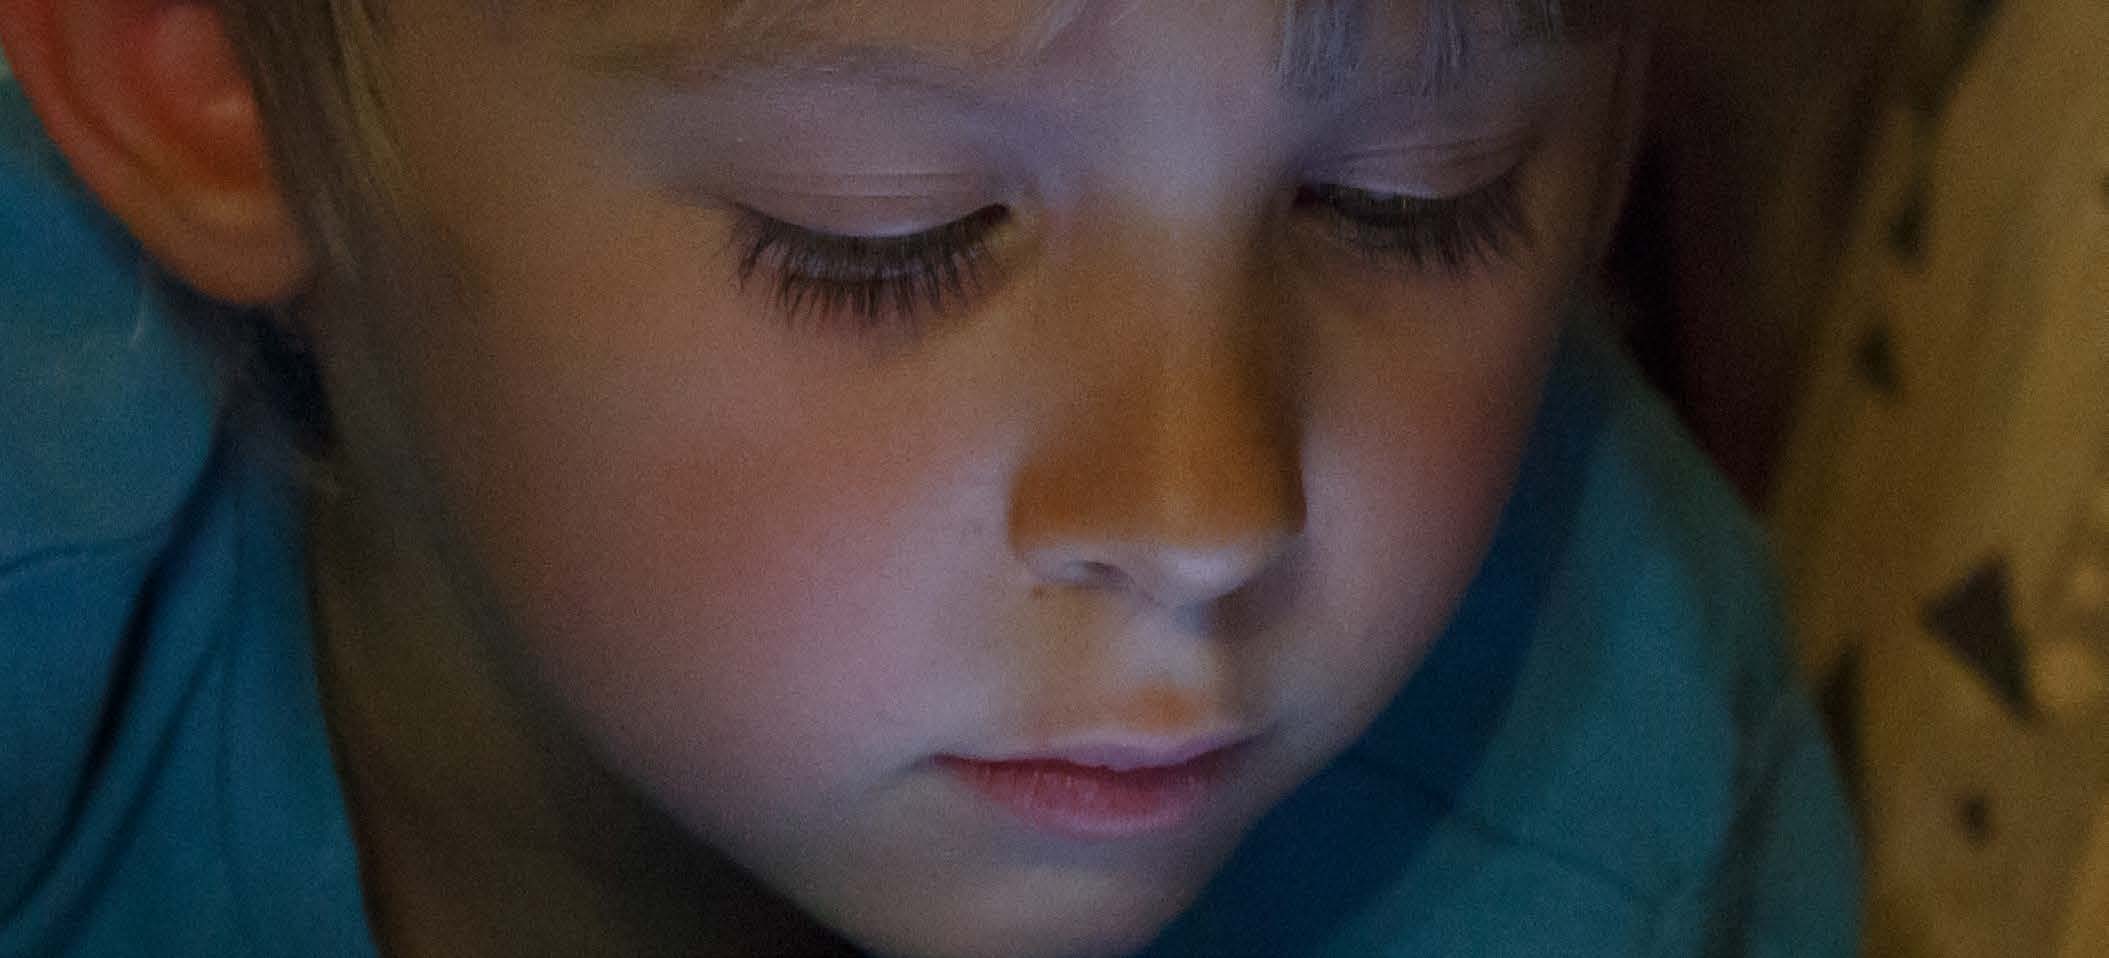
The picture of the boy here was shot on a
is scattered, as you can see in the diagram
lightly overcast day
to the left, and lighting the land evenly,
rather than directly.
20
www.ianmiddletonphotography.com
www.ianmiddletonphotography.com
21
Use the window as a diffuser
Diffused light for landscapes
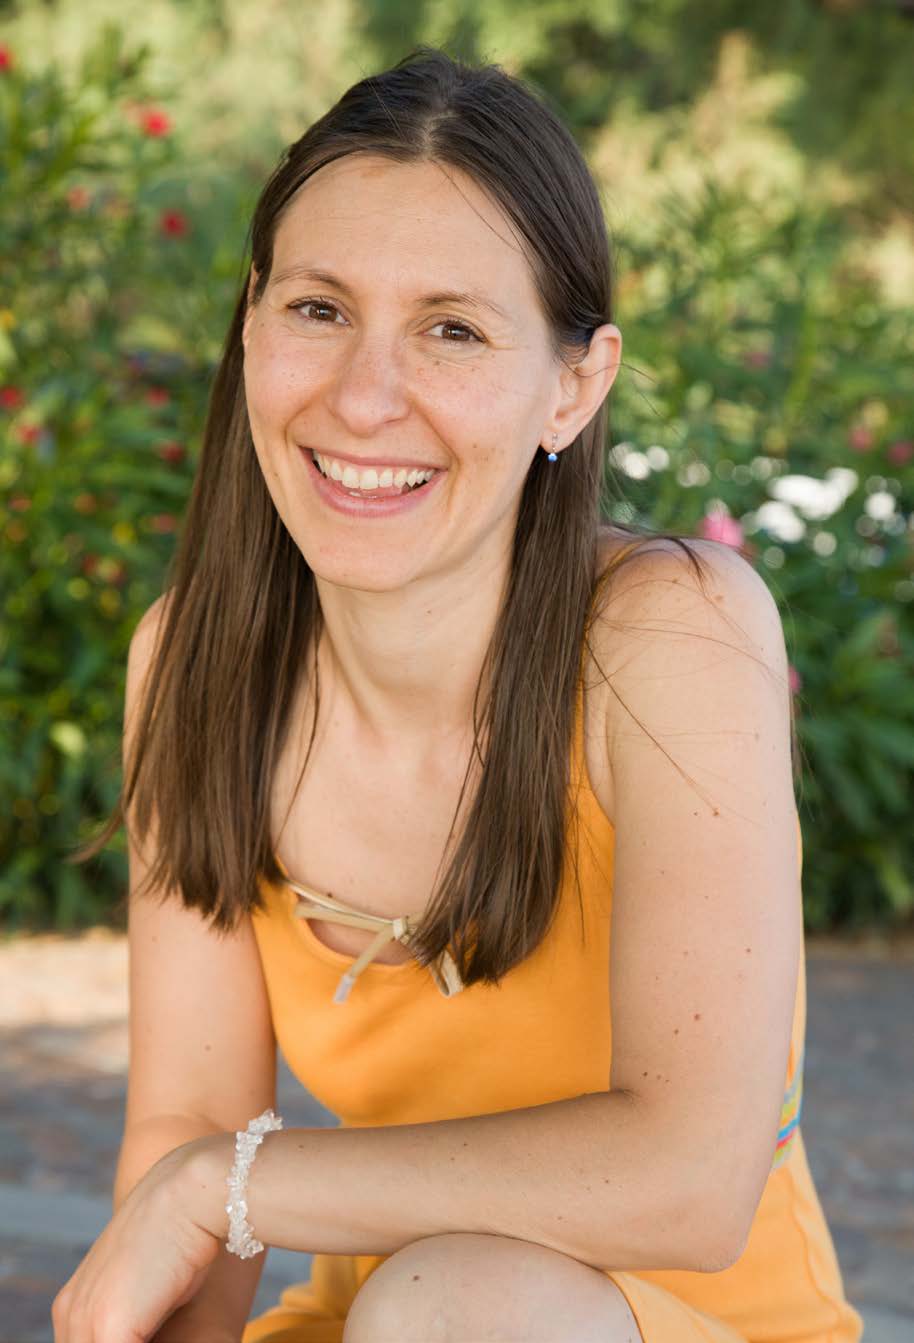
This photo was shot using a large window
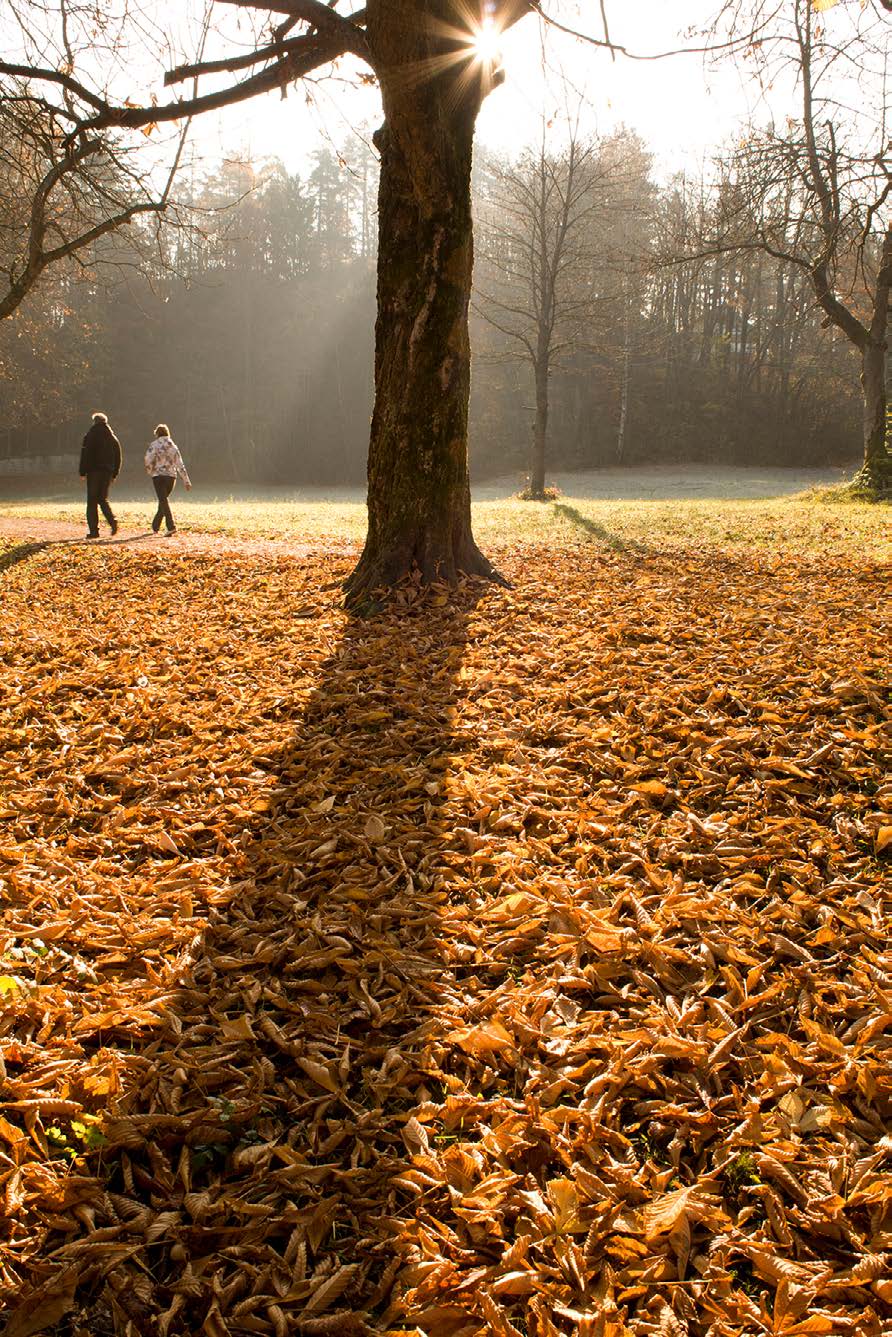
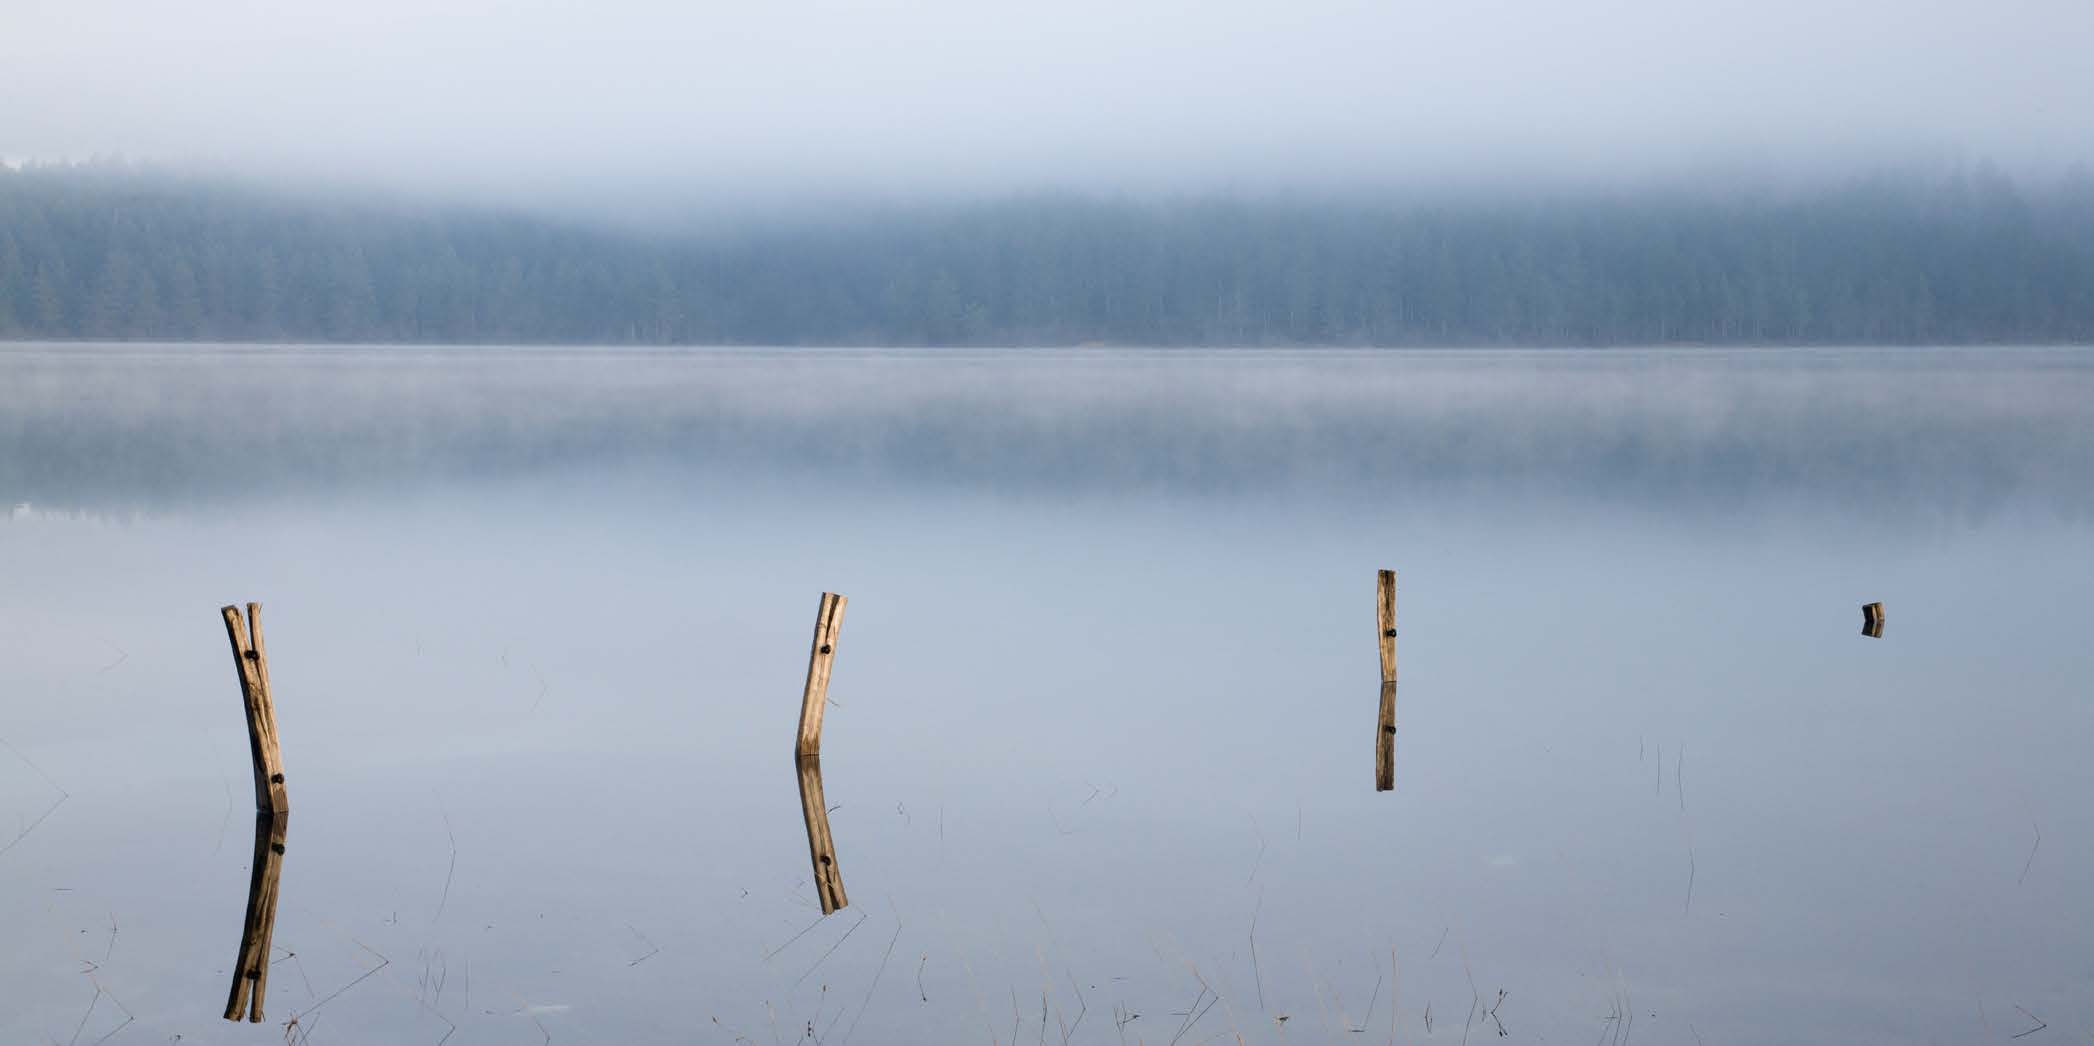
The backlight in the photo on the left has
as a diffuser. By getting them to stand
been used to cast a long shadow from the
directly in front and facing the window,
tree trunk, leading our eyes into the image
I’ve got lovely soft light over both their
and giving it depth. Additional y, the early
faces.
morning mist has diffused the light, so unlike
the previous backlit images that were high
Using a tree
in contrast, this image has lighter shadows,
more subtle colours and an overall softer
On a sunny day the best way to
look to it.
photograph people is to put them in
the shade. In the photo below a tree has
provided bright shade to eliminate any
shadows or harsh light.
Misty mornings: are also great for diffusing
light and give us scenes like below.
Be careful of the background though.
If it’s too bright the difference could be
too big for the camera to handle, and the
background will be overexposed.
22
www.ianmiddletonphotography.com
www.ianmiddletonphotography.com
23

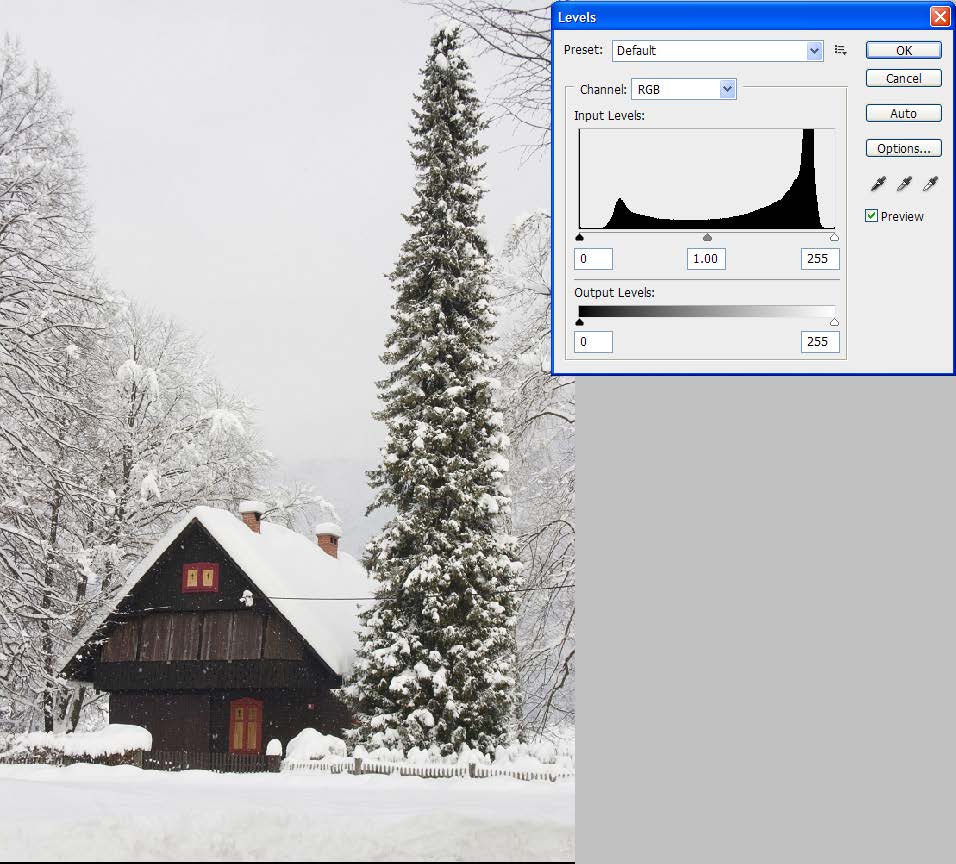
Overcast days for black and white photos
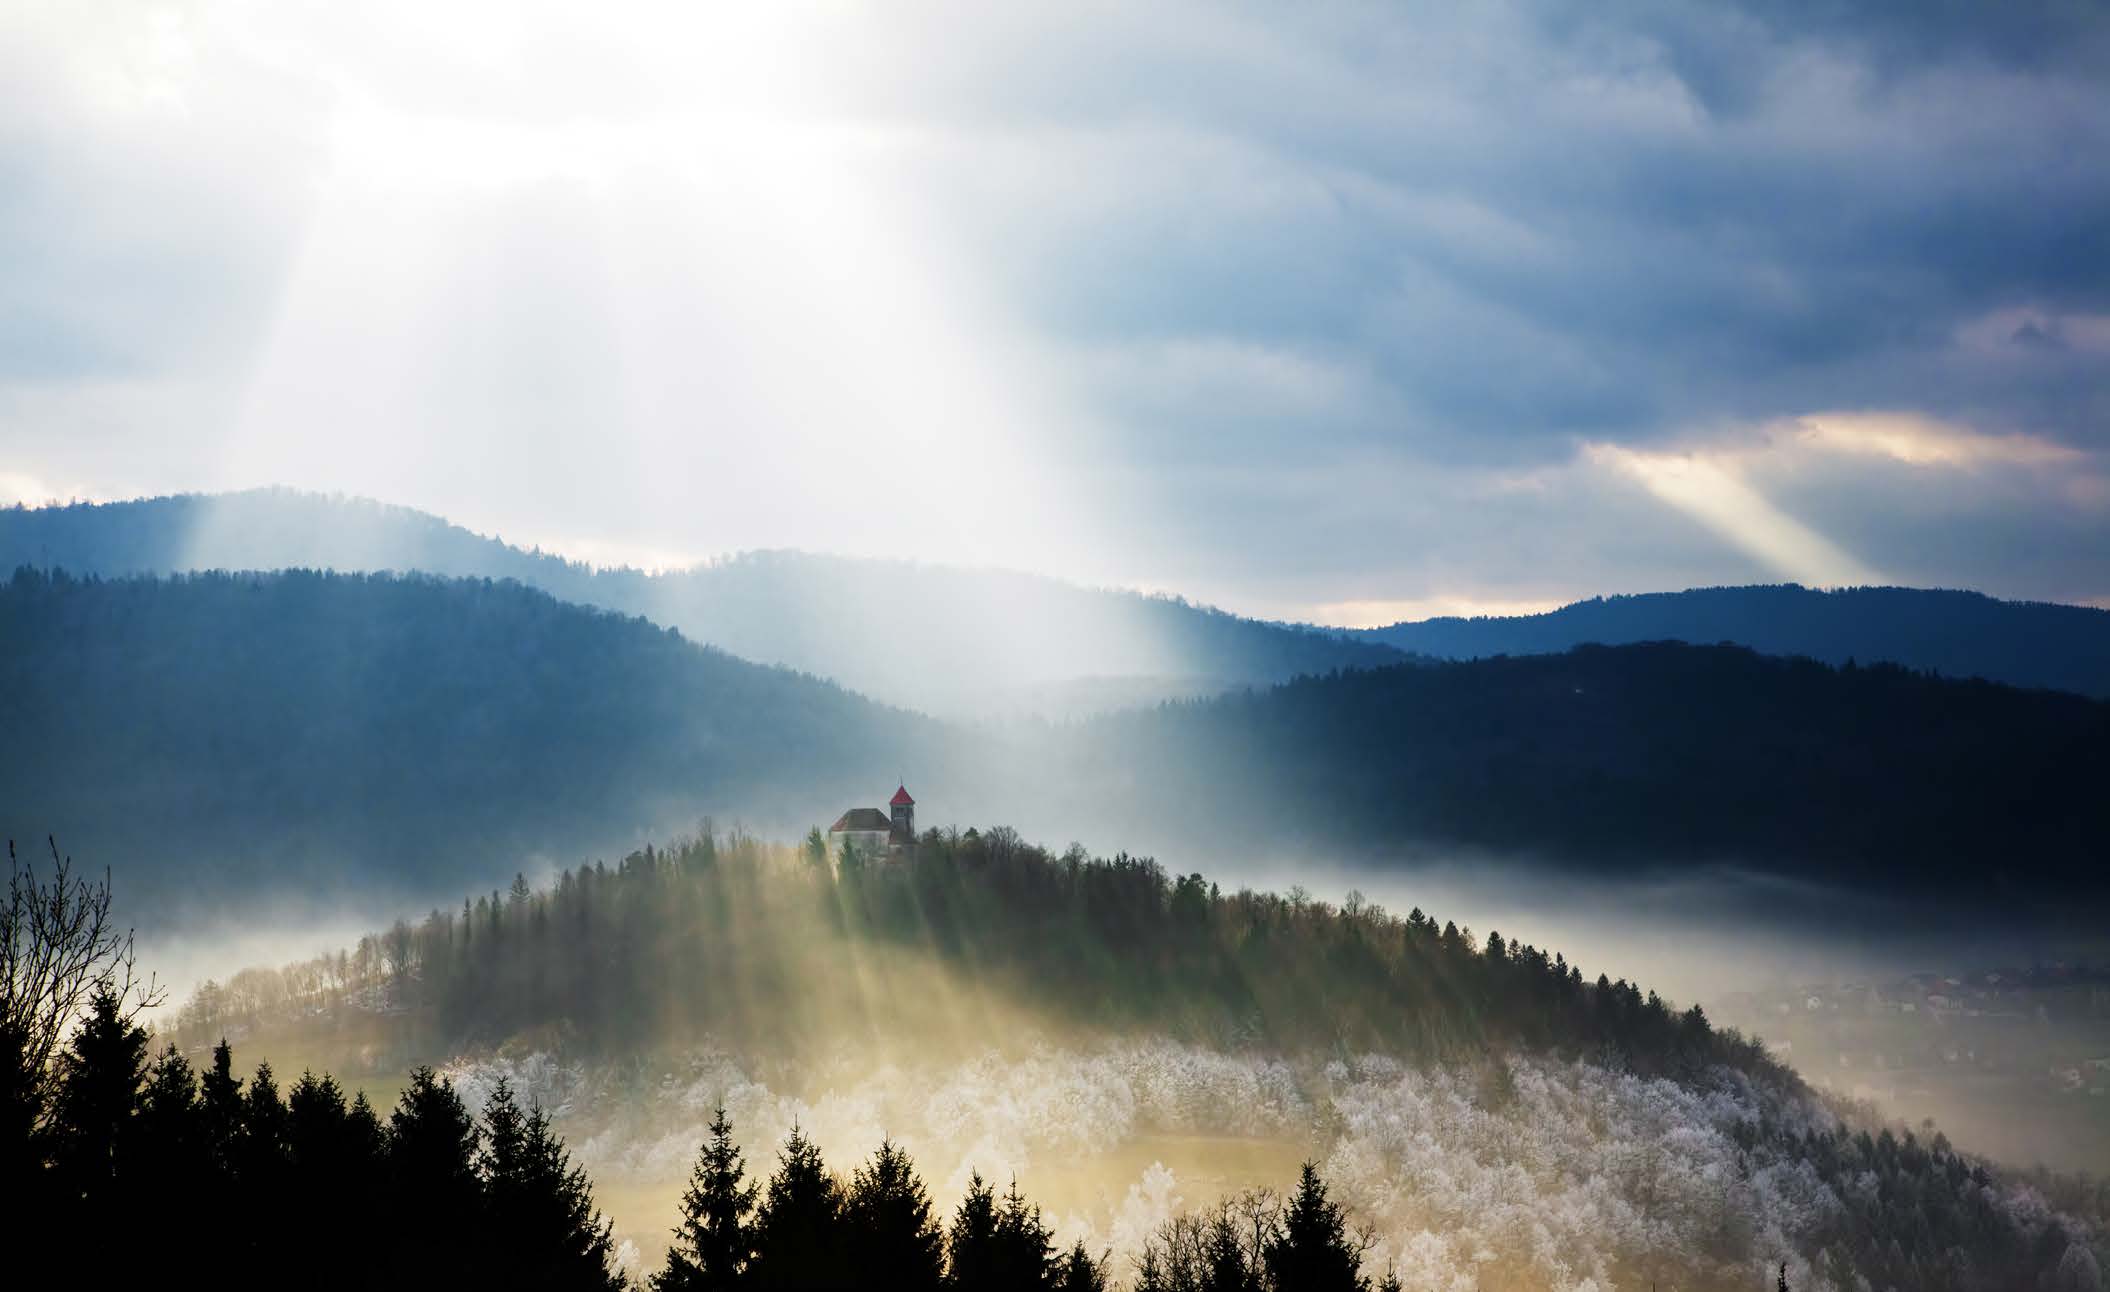
Mixed direct light and diffused light for landscapes
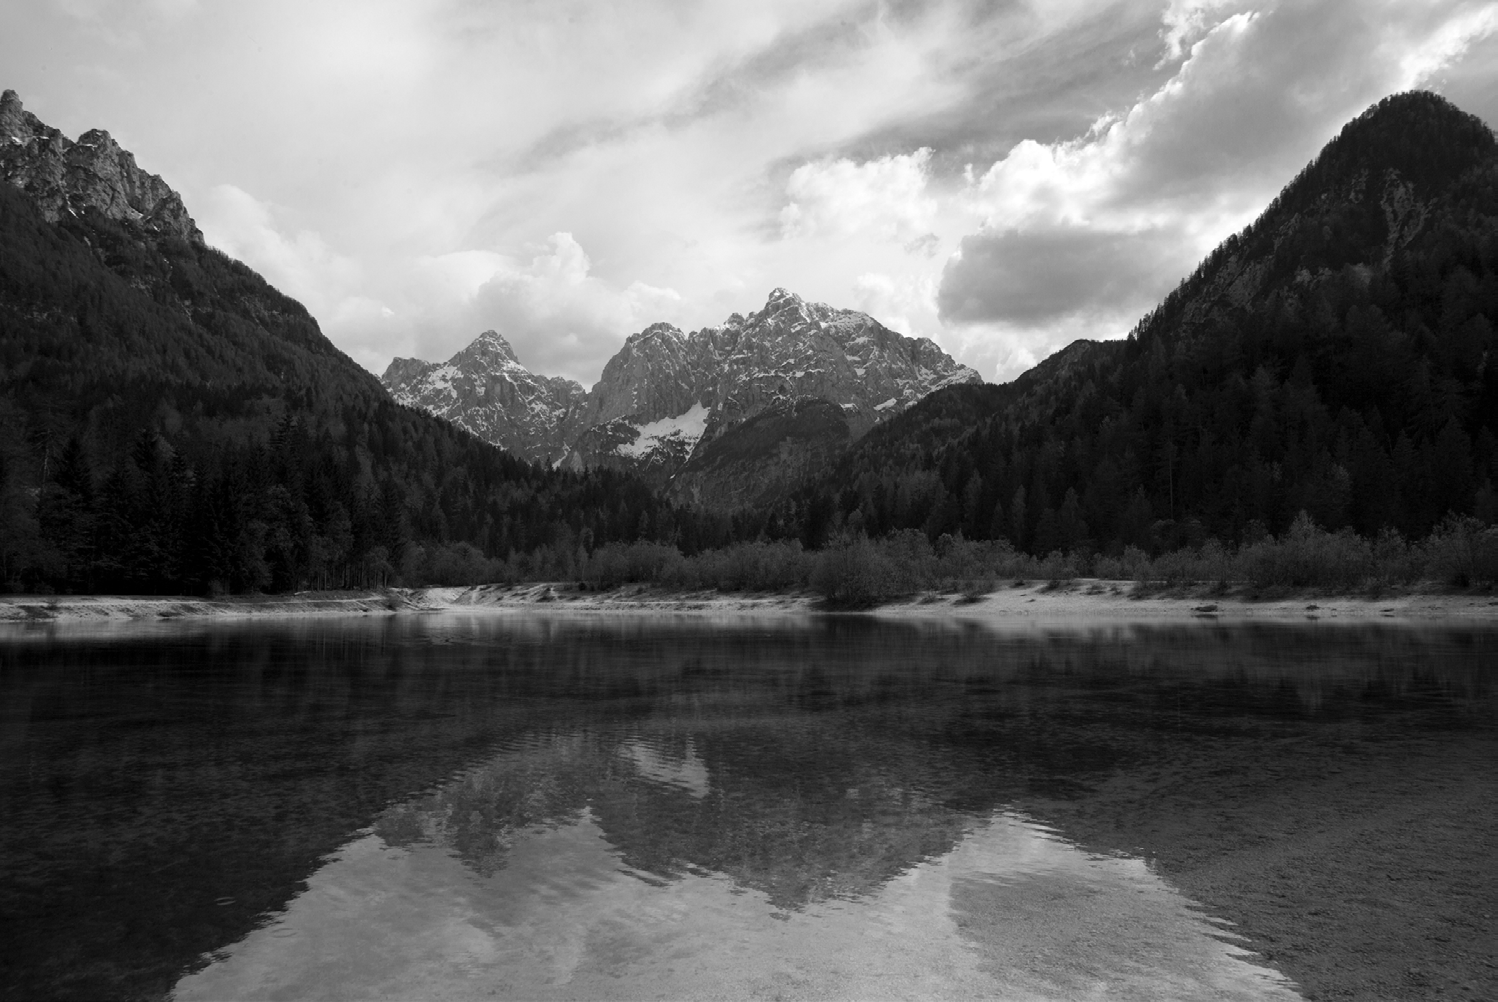
In many cases overcast days are not real y desirable for landscapes. A bland white or grey sky is not particularly photogenic. However, they are not a total washout.
On these days you can often look for good black and white images. The key is to look for contrasting colours and light that will convert to light and dark tones in black and white.
This image doesn’t
look terribly exciting
in colour.
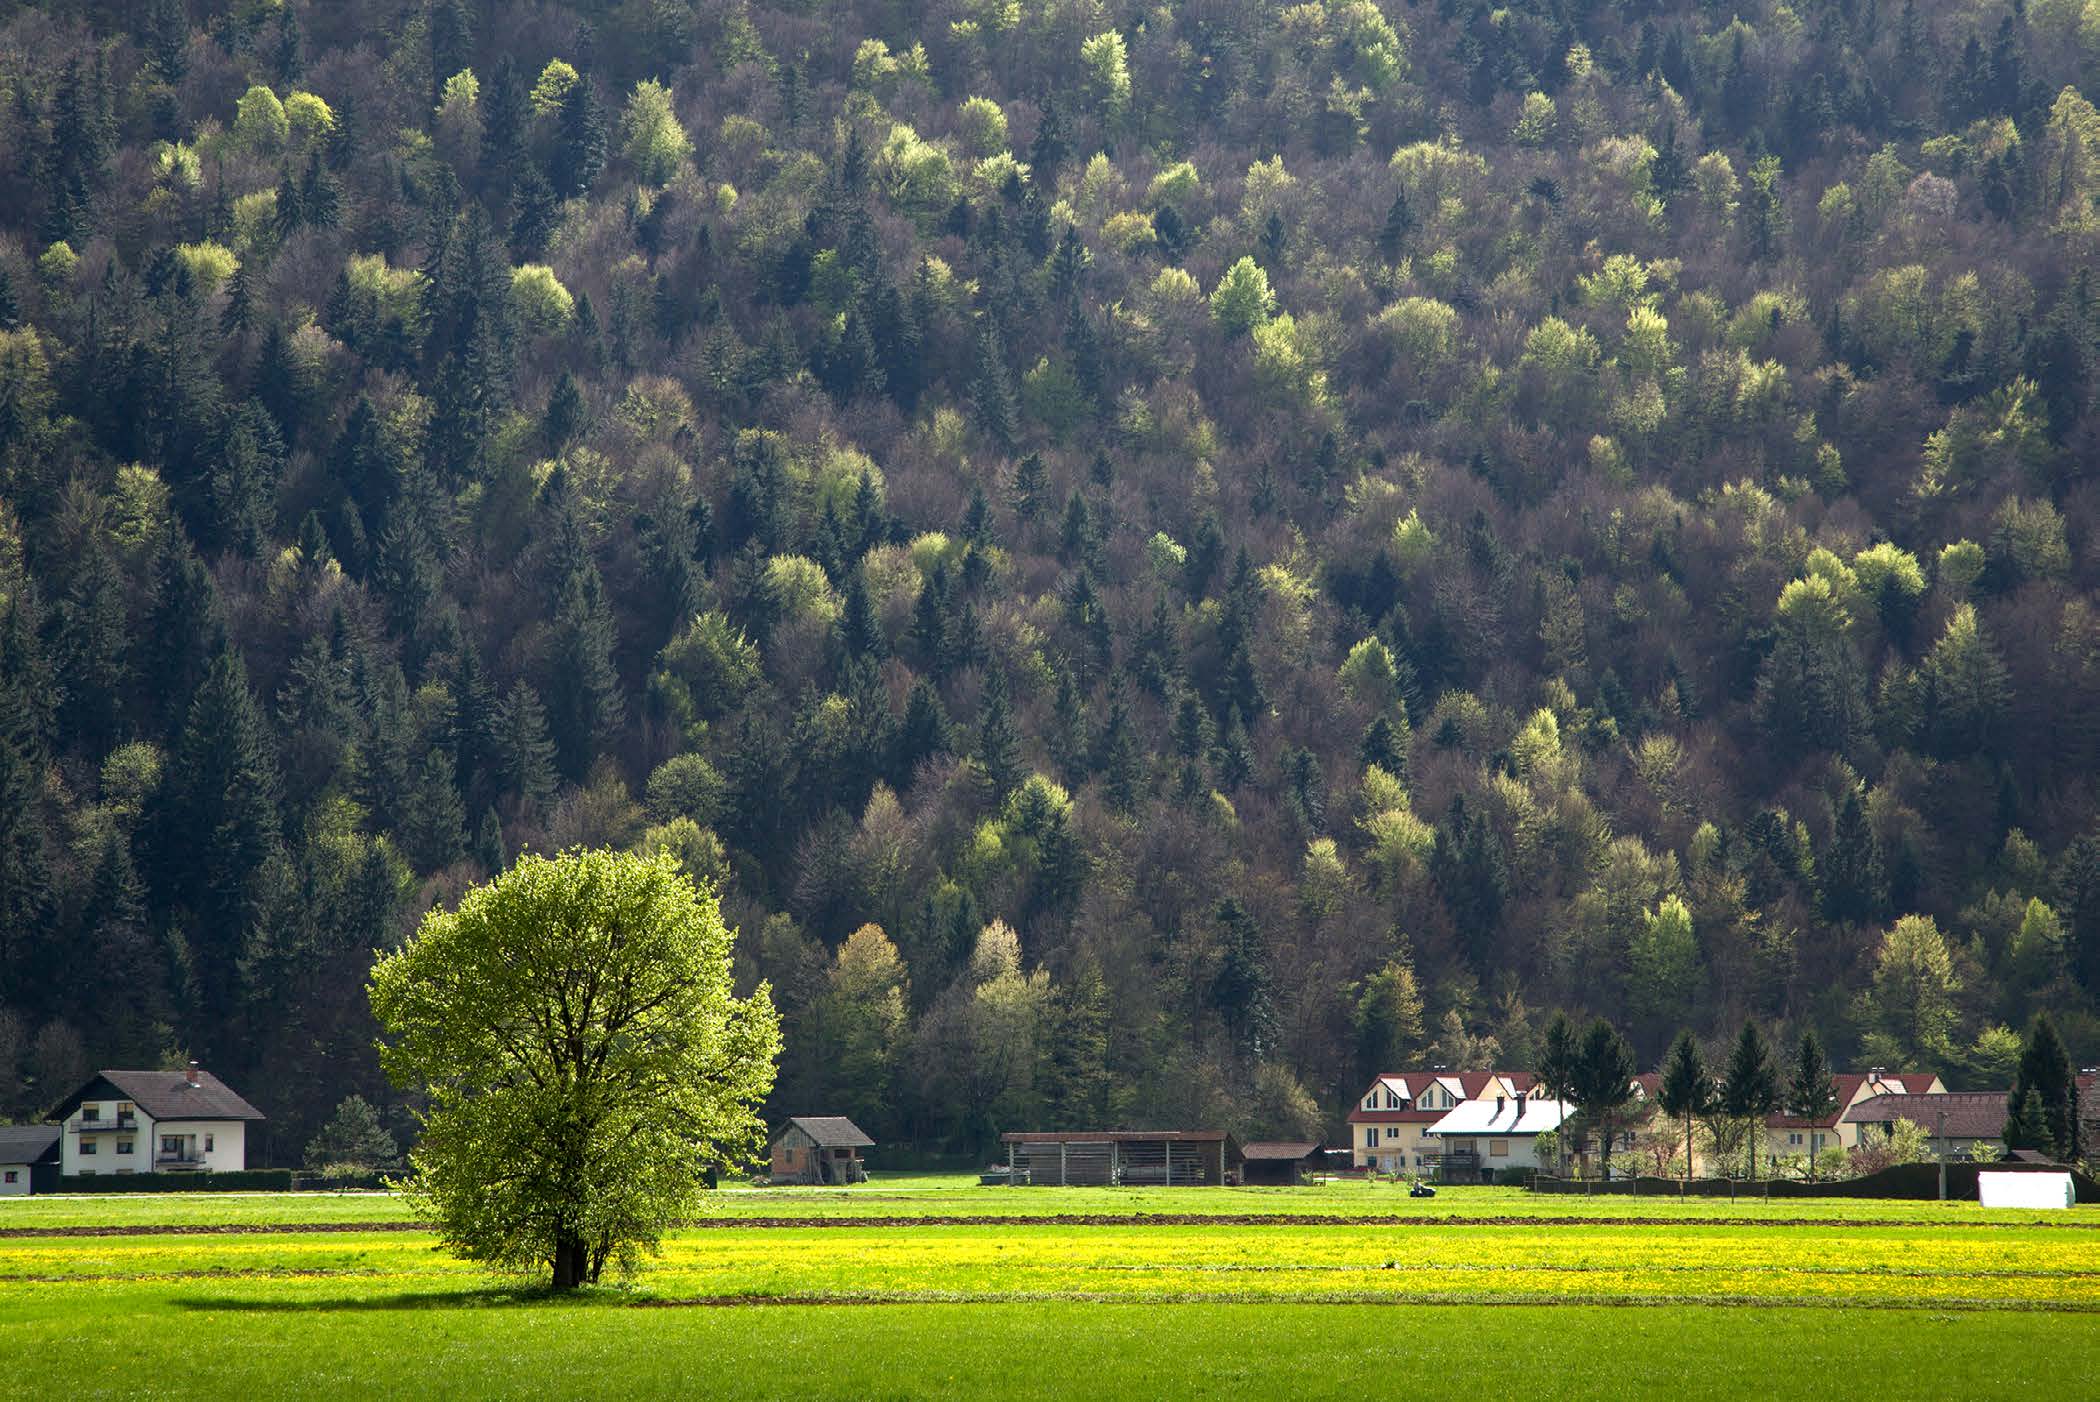
Like many things in life, to get the best results you sometimes have to mix things a bit. So
on cloudy days don’t sit at home cleaning your camera, because you might be missing some
But looks a bit better
of the best moments. When the cloud is scattered or moving fast due to passing storms or
in black and white.
high winds, it can produce a great mix of direct and diffused light; resulting in dramatic
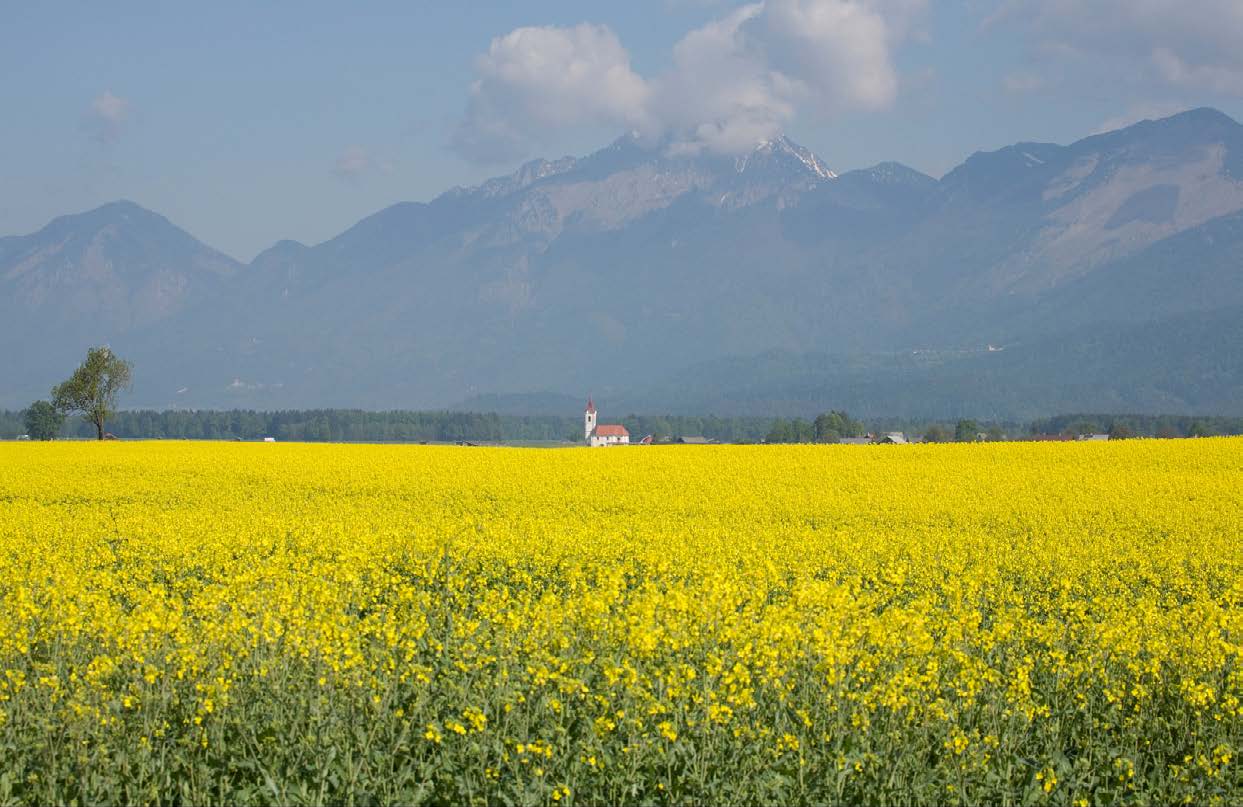
lighting effects. In this photo of the Ljubljana Moors in Slovenia, breaks in the cloud caused
rays of light to burst through and il uminate different parts of the land at different levels of
brightness. Direct light has nicely il uminated the lone tree, grass and vivid yellow of the
dandelions. Notice how the trees in the background are more softly lit with diffused light
and the area behind the lone tree is in shadow, thus making the lone tree stand out more in
the scene. On days such as this always watch the weather and try to anticipate where and
when the breaks will occur. It was raining when I spotted this scene, but I saw that it was
a passing shower, so I set up my camera on the tripod, and under an umbrel a, used the
opportunity to setup my composition and focus on the tree. Then I waited there as passing
drivers gaped at the madman getting wet while holding the umbrel a over his camera. But
when the shower passed and clouds broke, I got this shot.
24
www.ianmiddletonphotography.com
www.ianmiddletonphotography.com
25

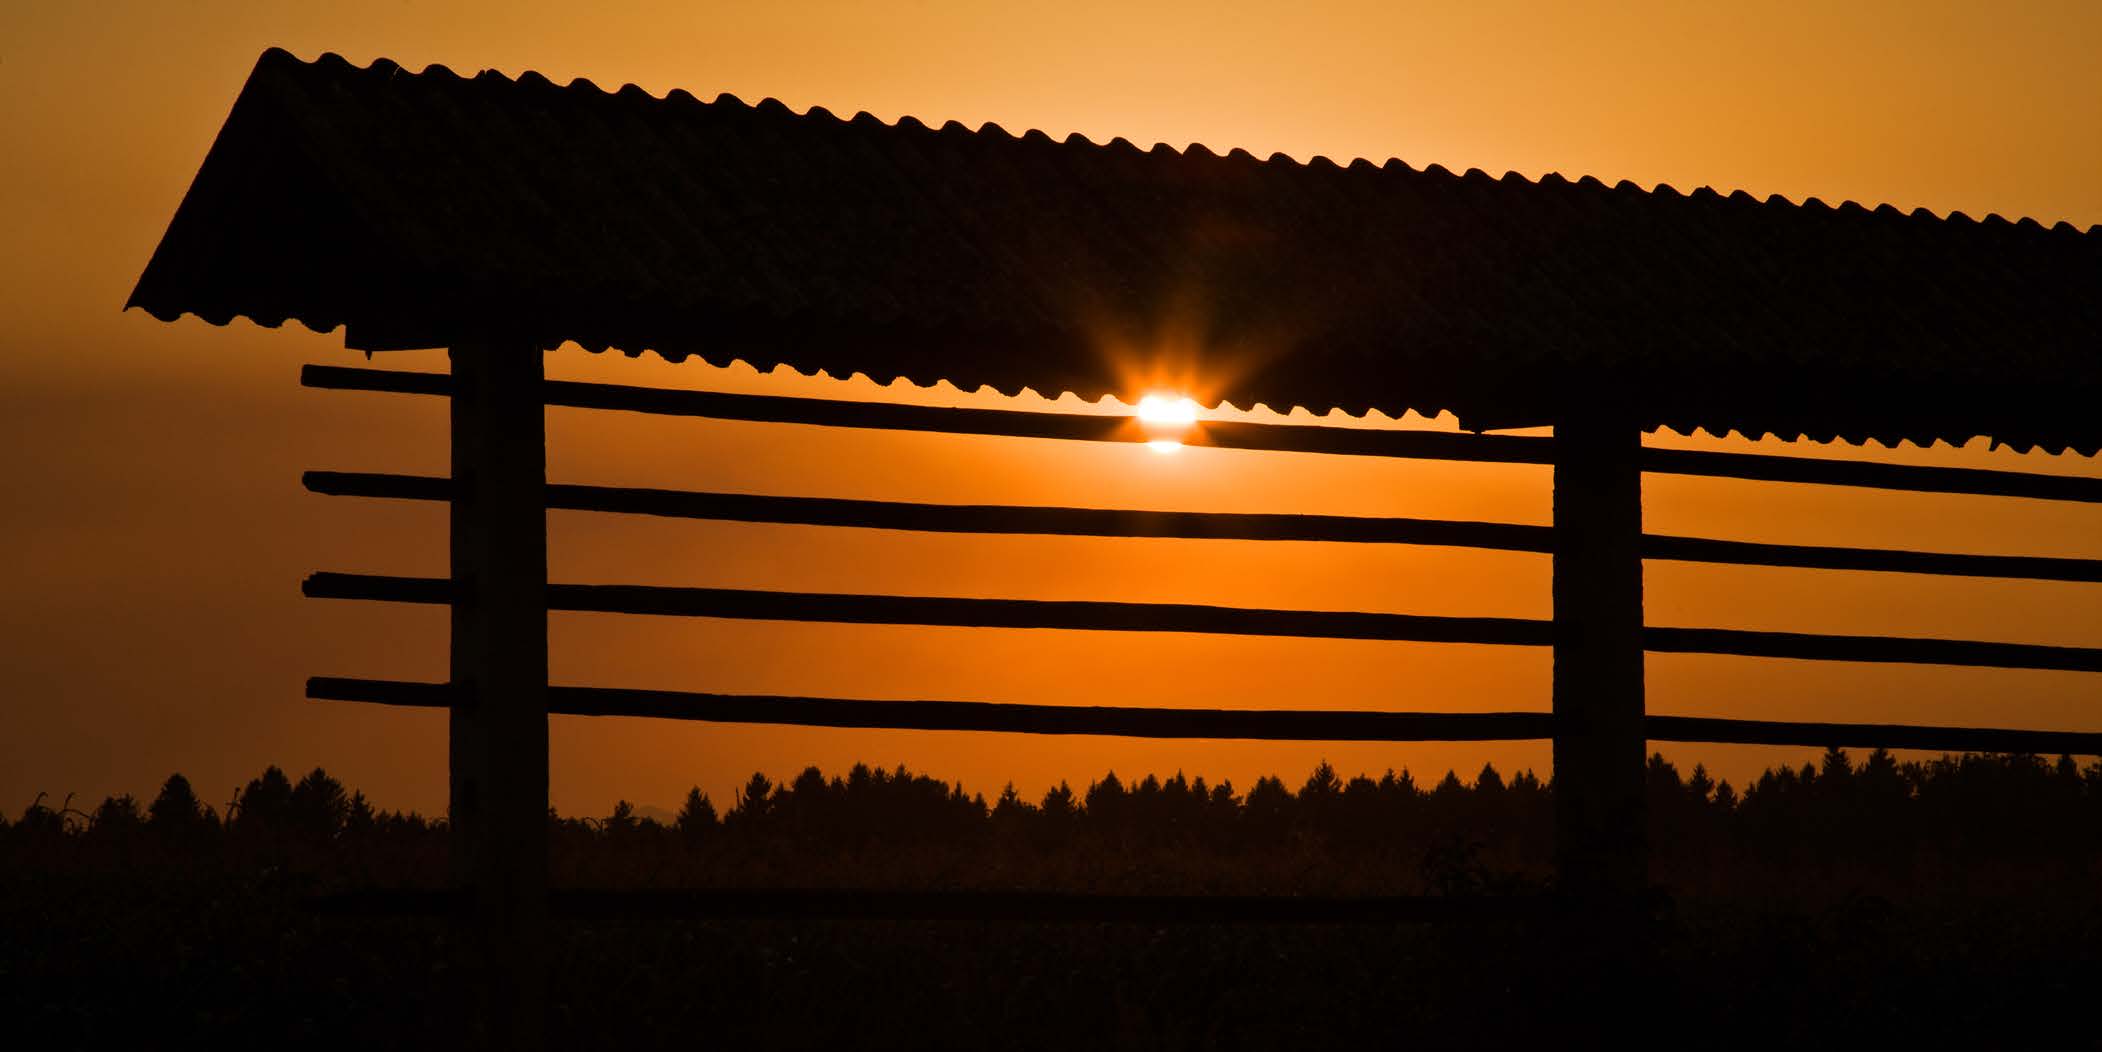
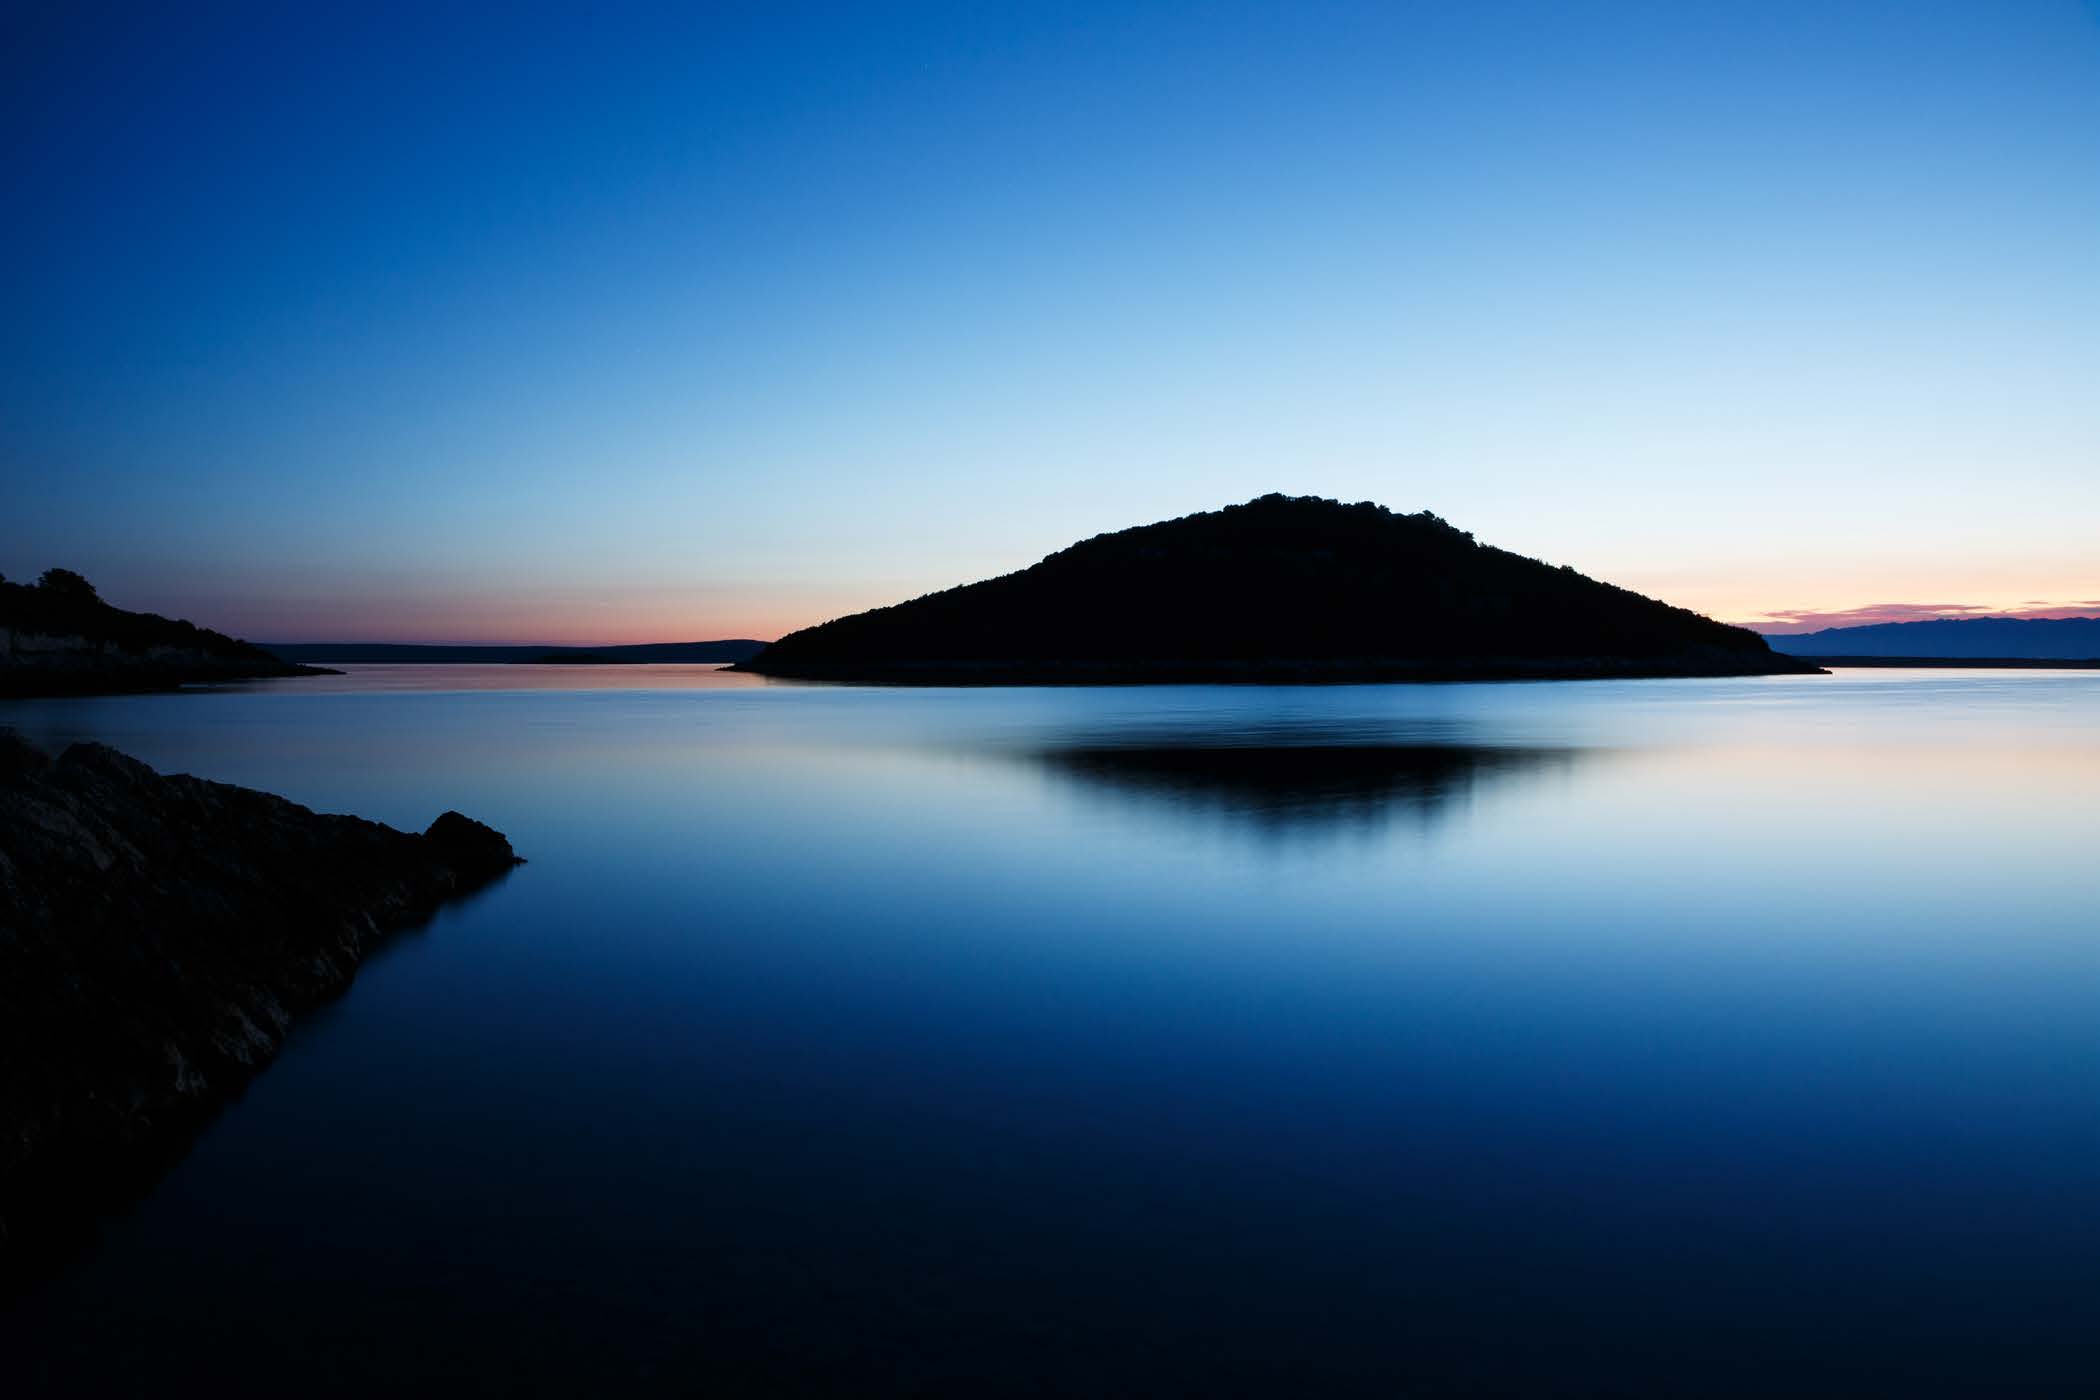
Shooting into the light for creative effect.
Many will tell you to not to shoot into the light. Wel , in most cases this is true.
But shooting into the light, when done correctly, can produce some very creative effects. But what’s important here is that the light is diffused somehow. The less diffused the light, the harder the shadows will be. When the sun is setting its strength is diminished somewhat. But add some light cloud, and its strength is diminished even more. The stronger the light, the higher the contrast and the harder the shadows will be.
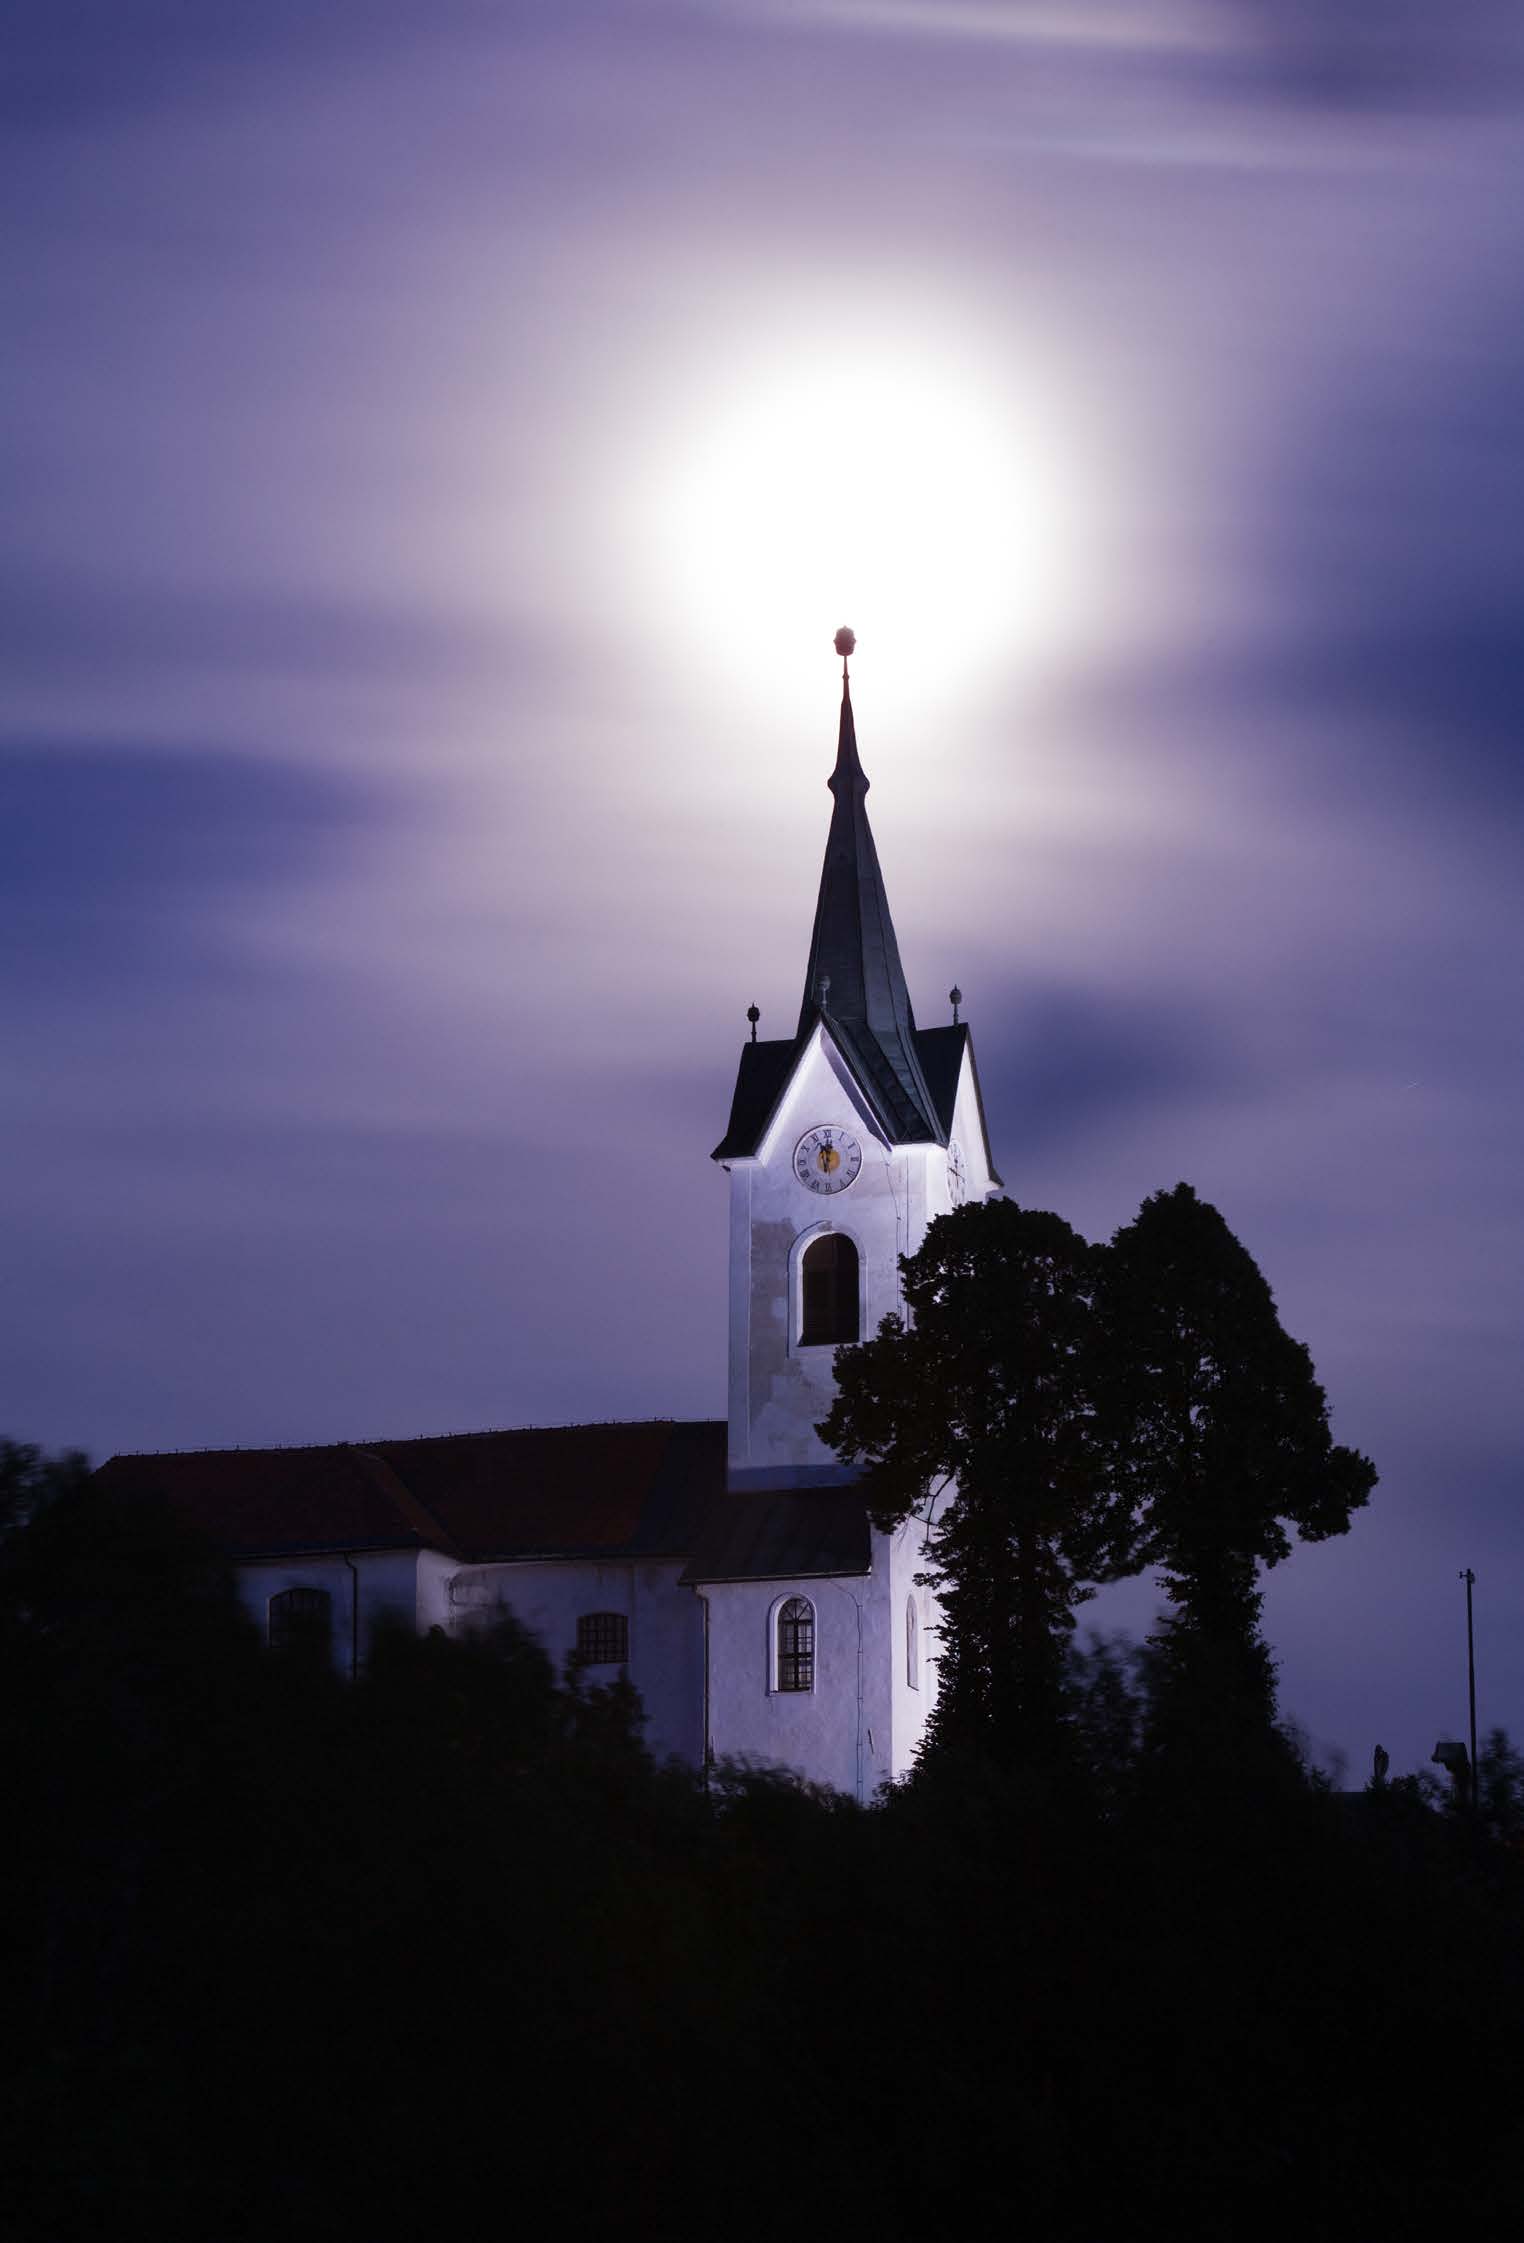
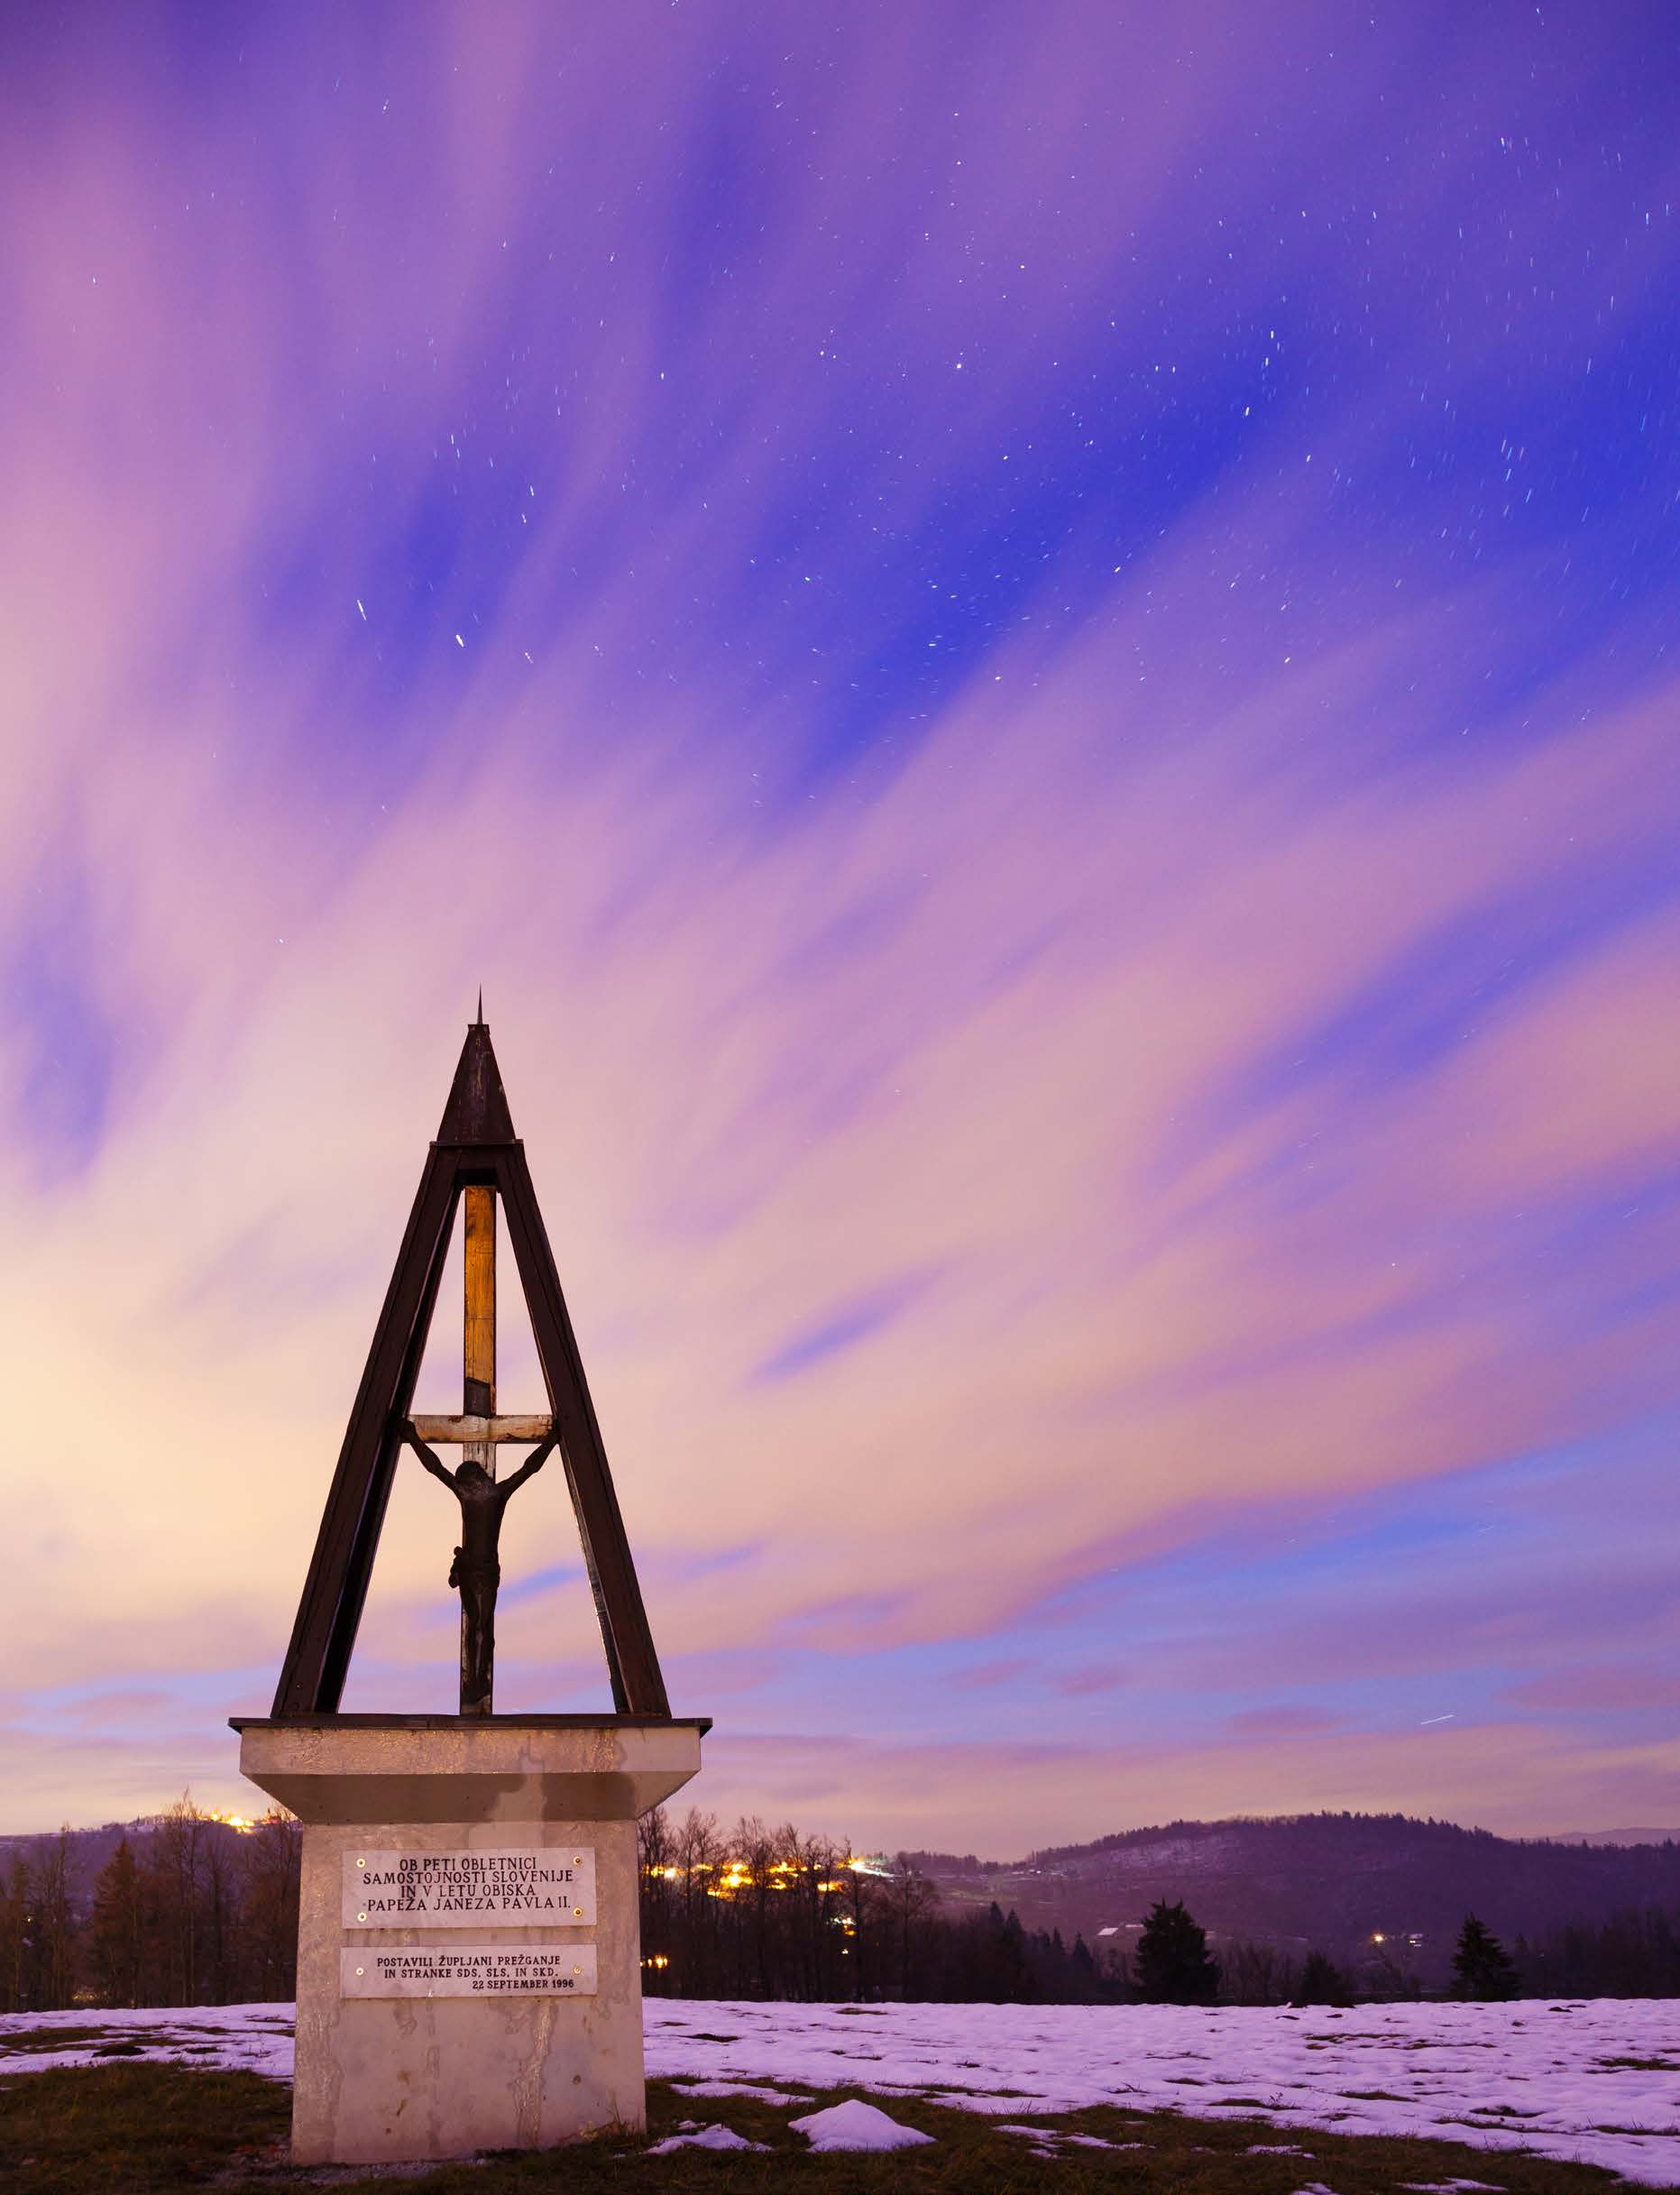
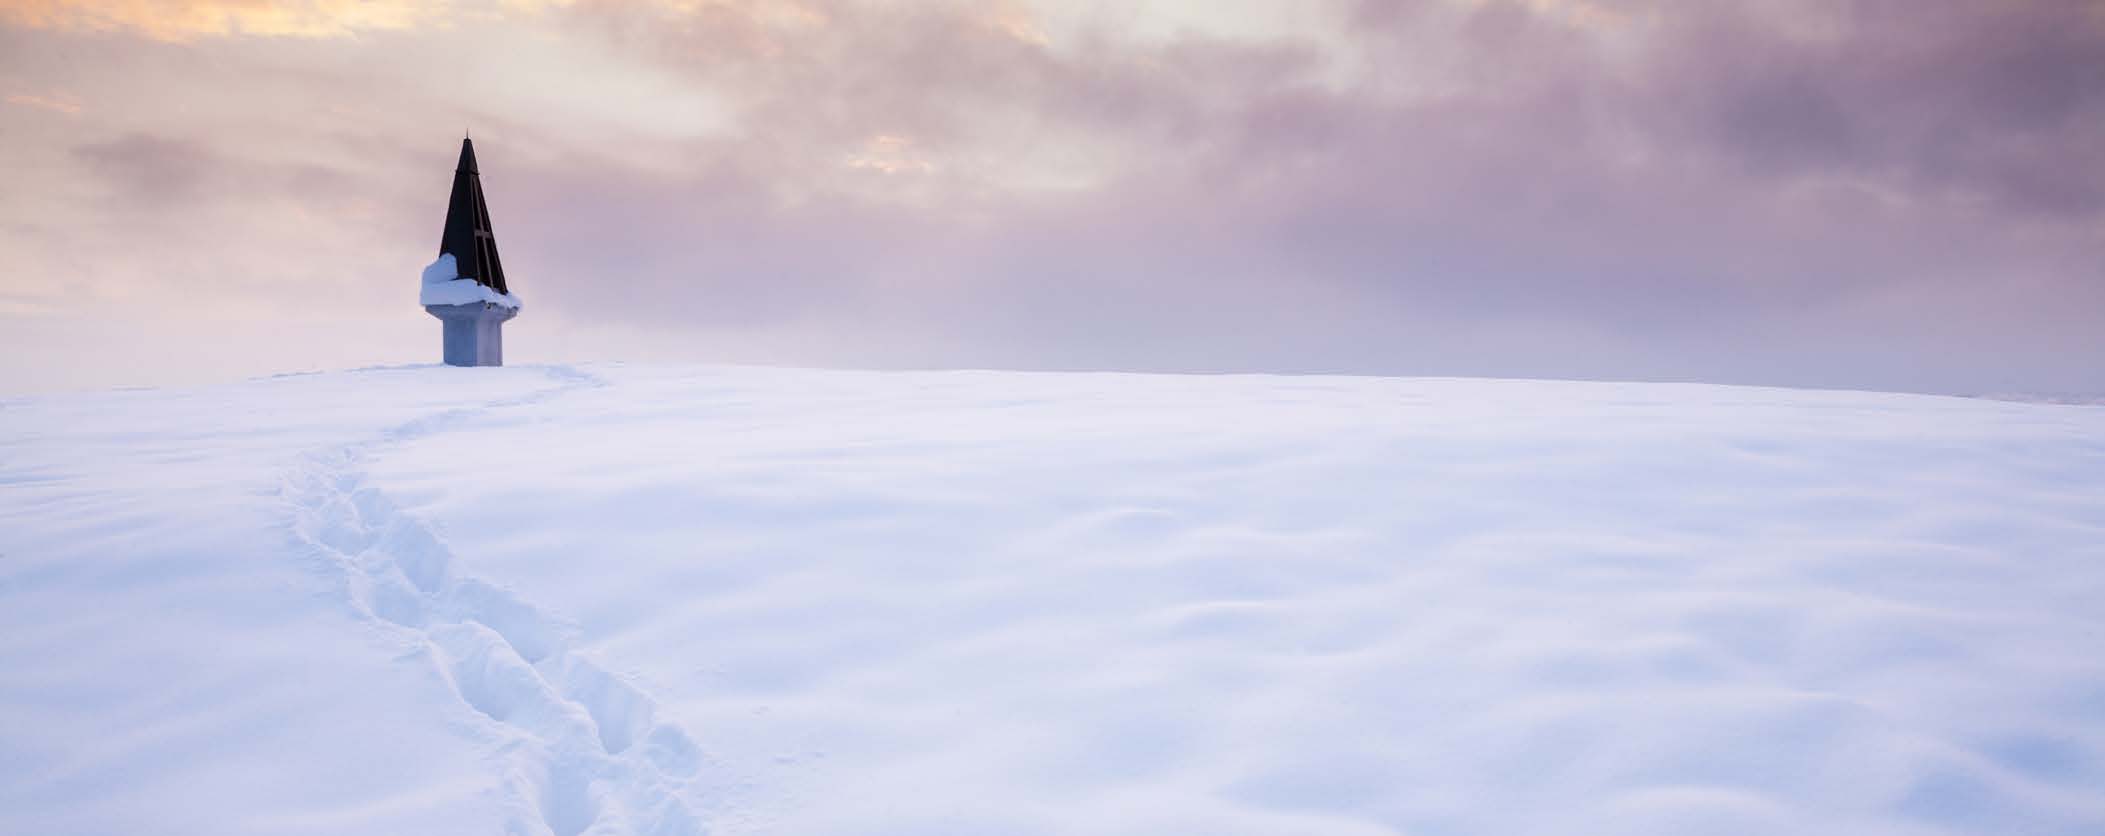
In this photo of Lake Bled in Slovenia, the sun was rising and was already quite high when it reached the church spire. Without the cloud the sun would have been much brighter and this shot virtual y impossible. However, the cloud diffused the sun and therefore I was able to capture this image. The cloud has diffused the light falling across the mountains, and without it the mountains As you can see here the strong light has turned the hayrack and forest into a would have been a completely black silhouette.
completely blacked out silhouette. It’s important here to ensure that your foreground objects can produce a nice, clear shape. A messy foreground produces a messy looking silhouette. Your silhouette must have a clearly defined shape; otherwise it’s just a big black mess.
26
www.ianmiddletonphotography.com
www.ianmiddletonphotography.com
27
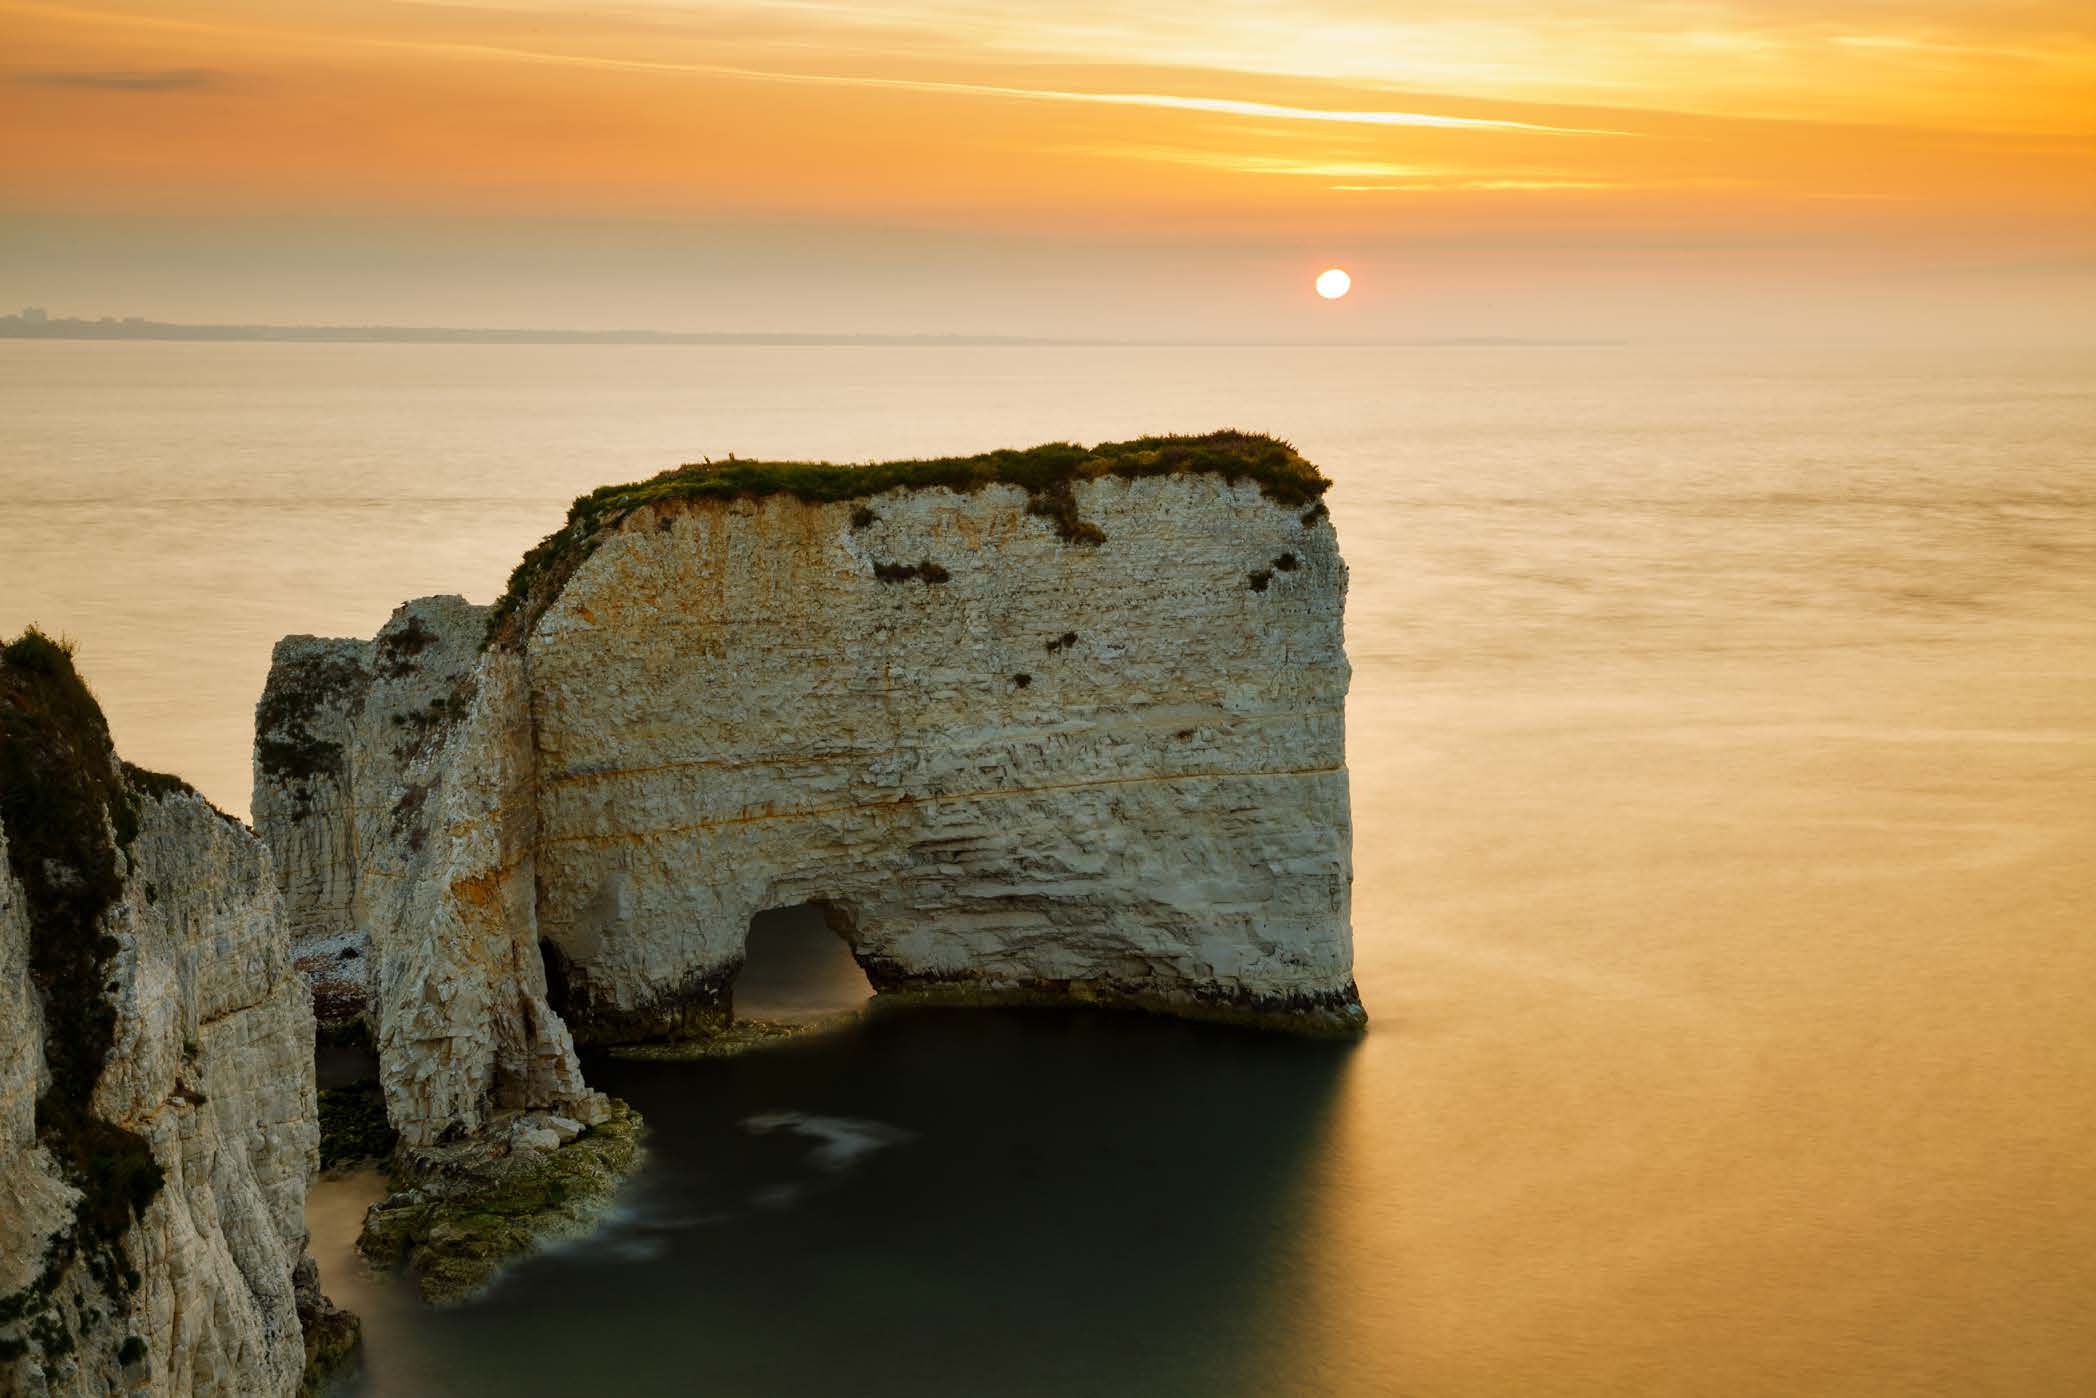
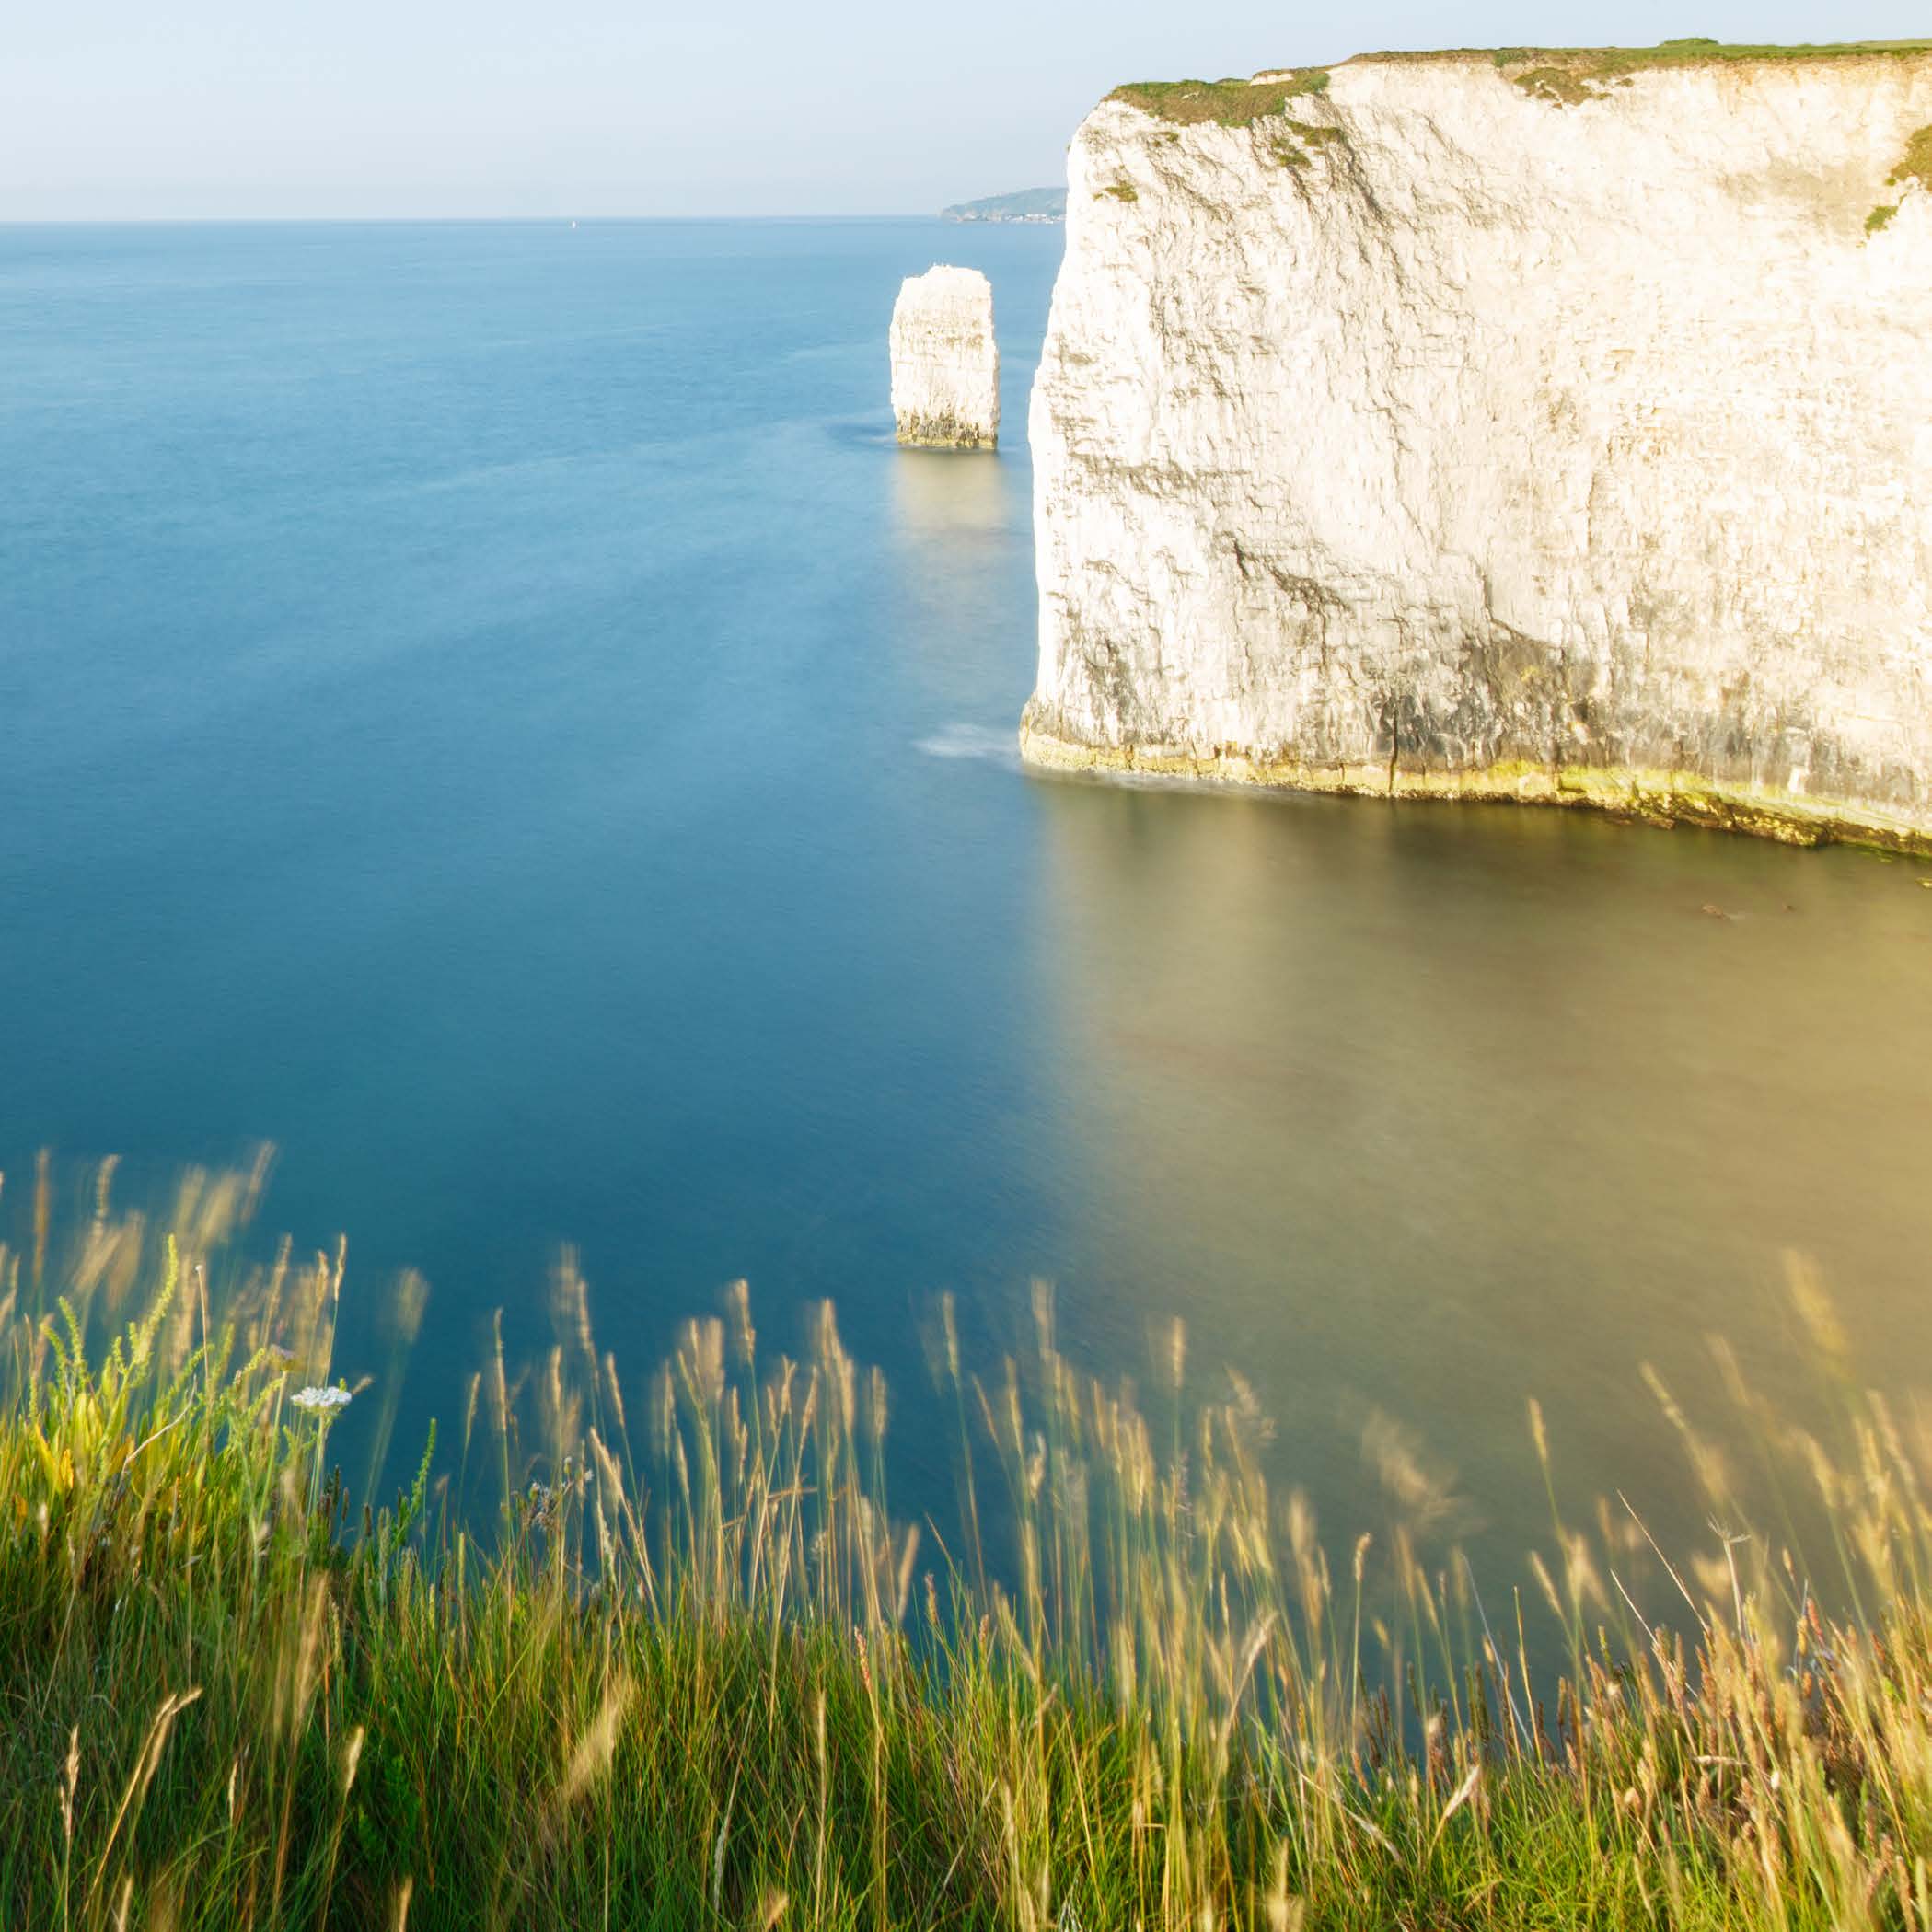
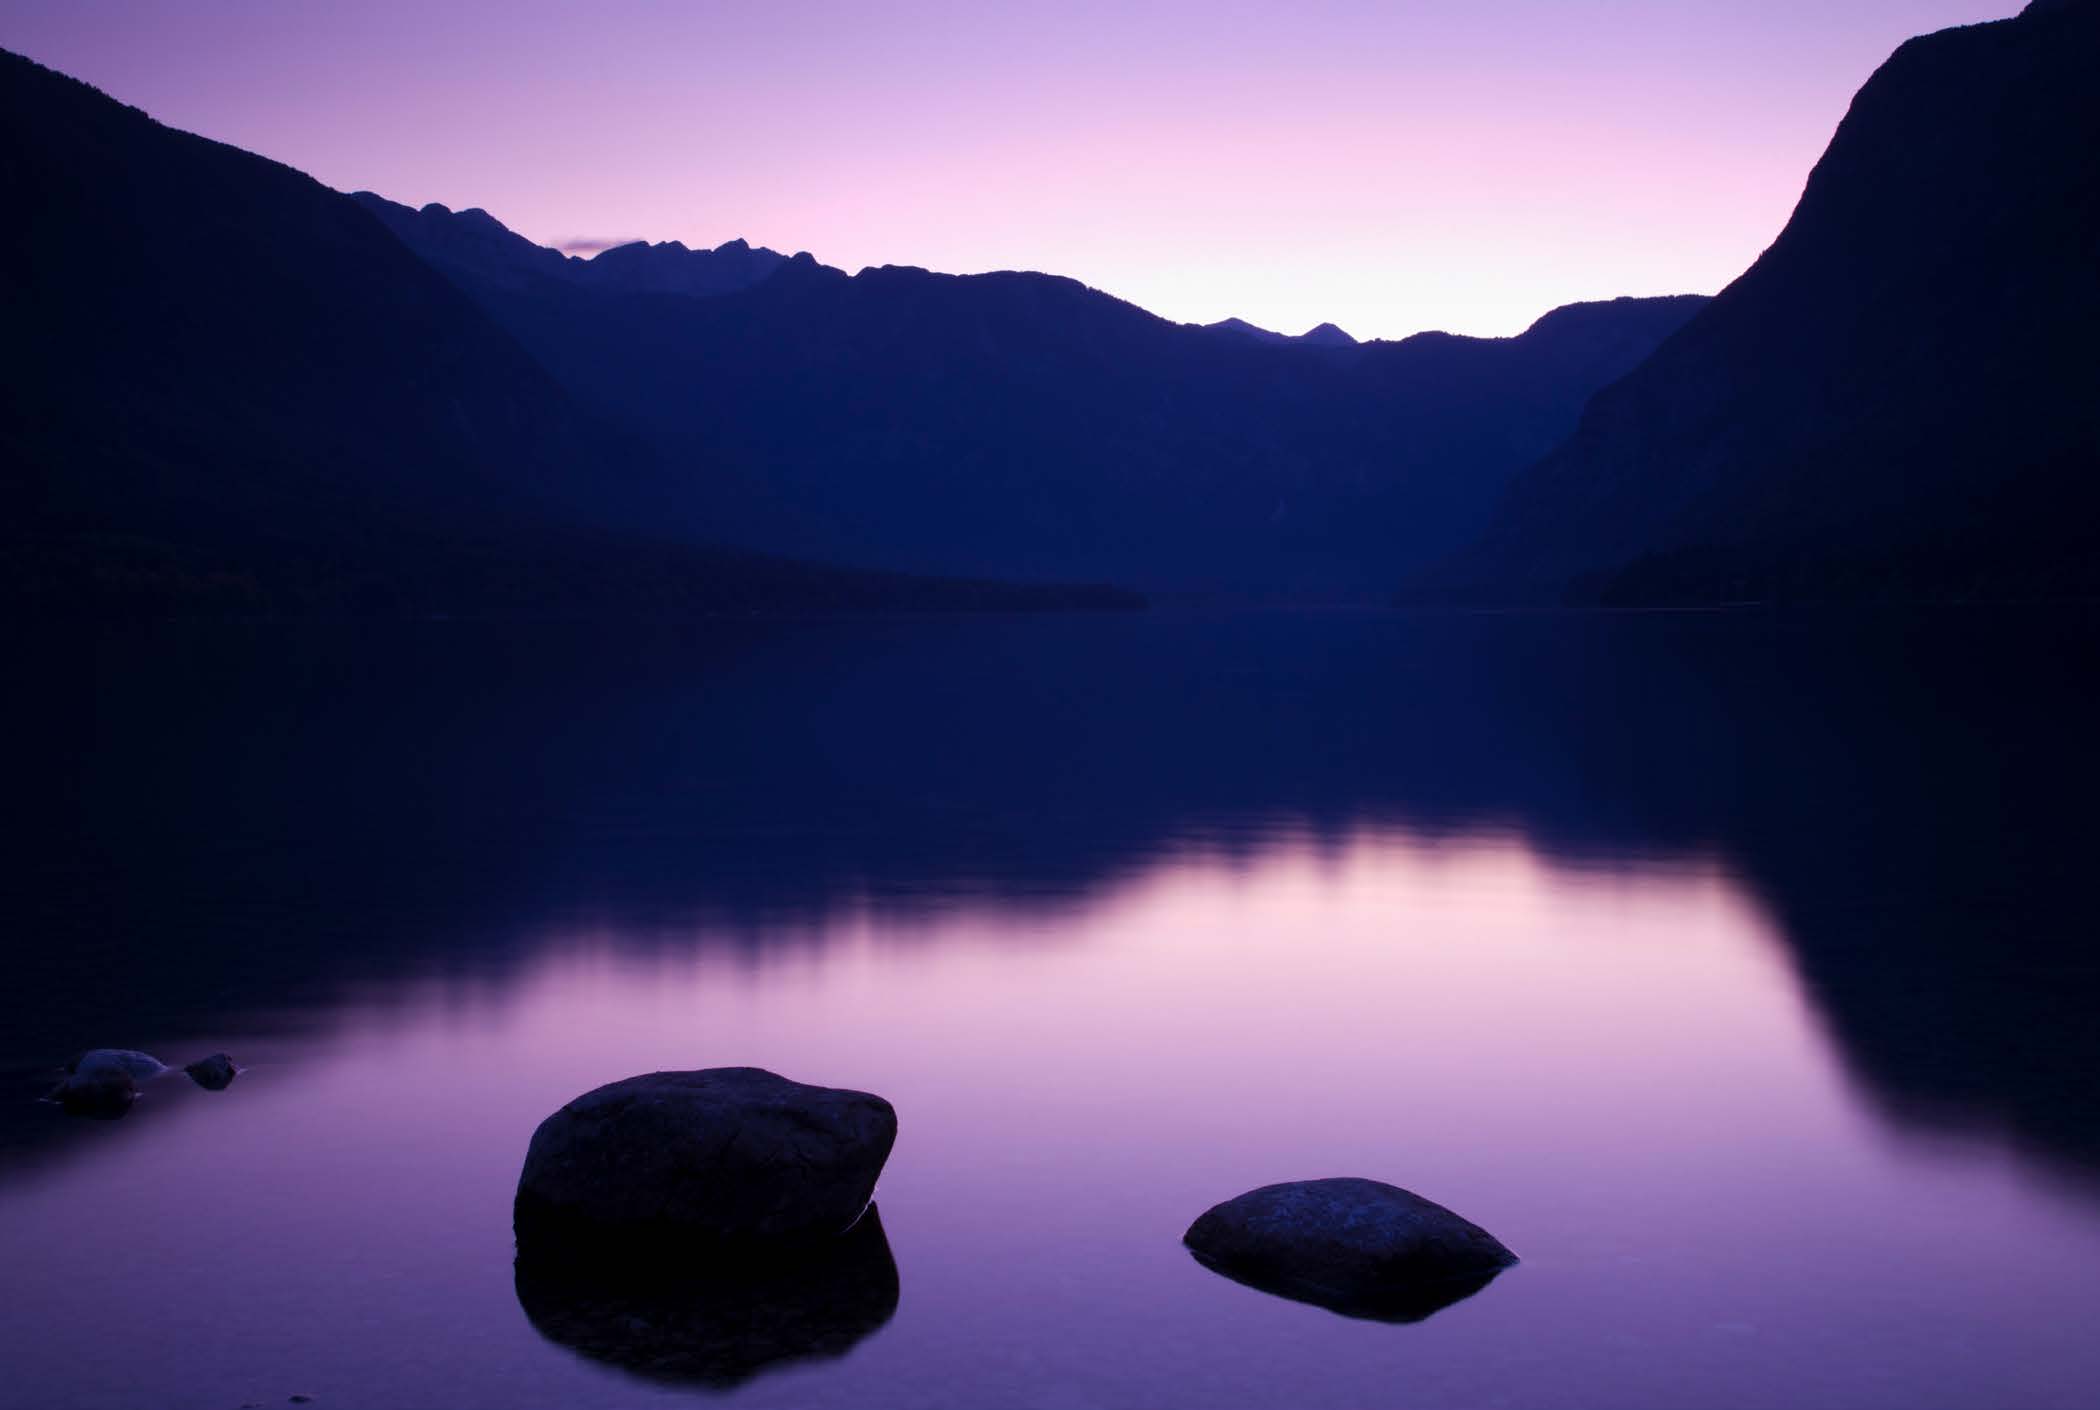
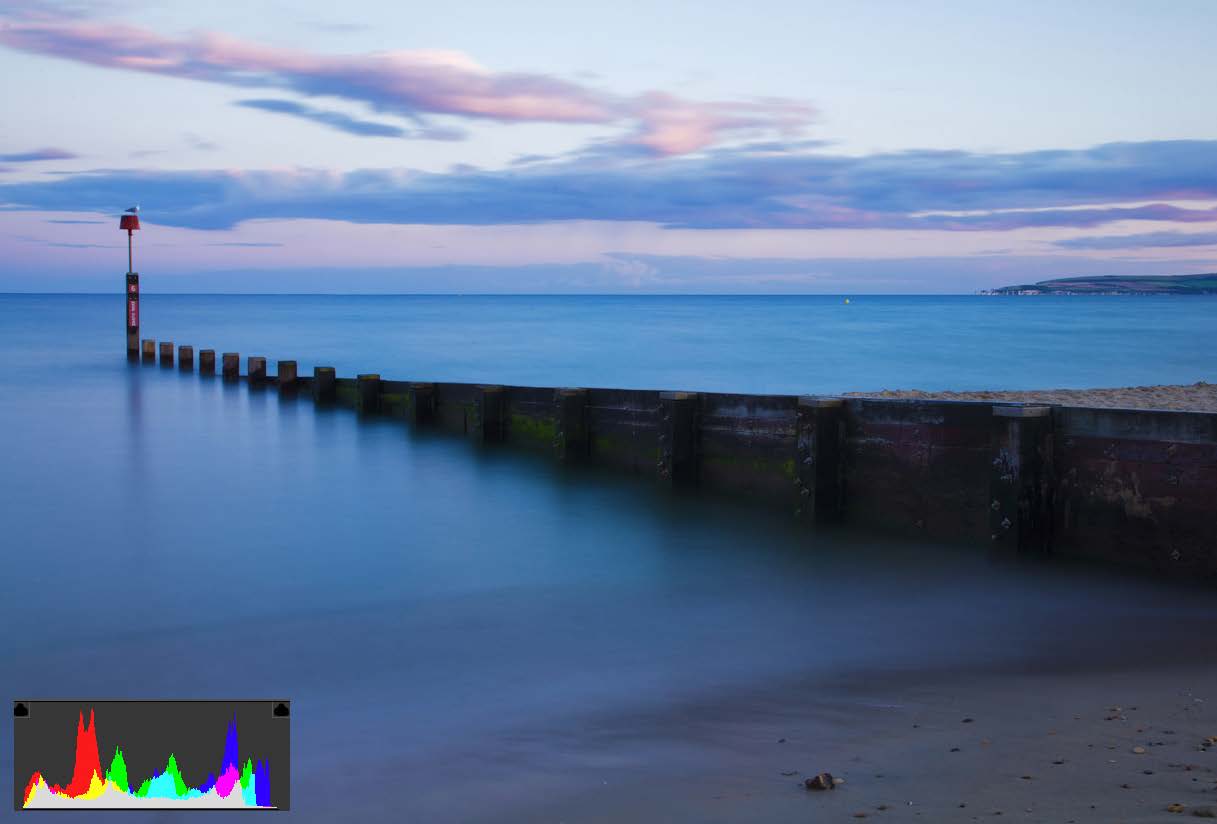
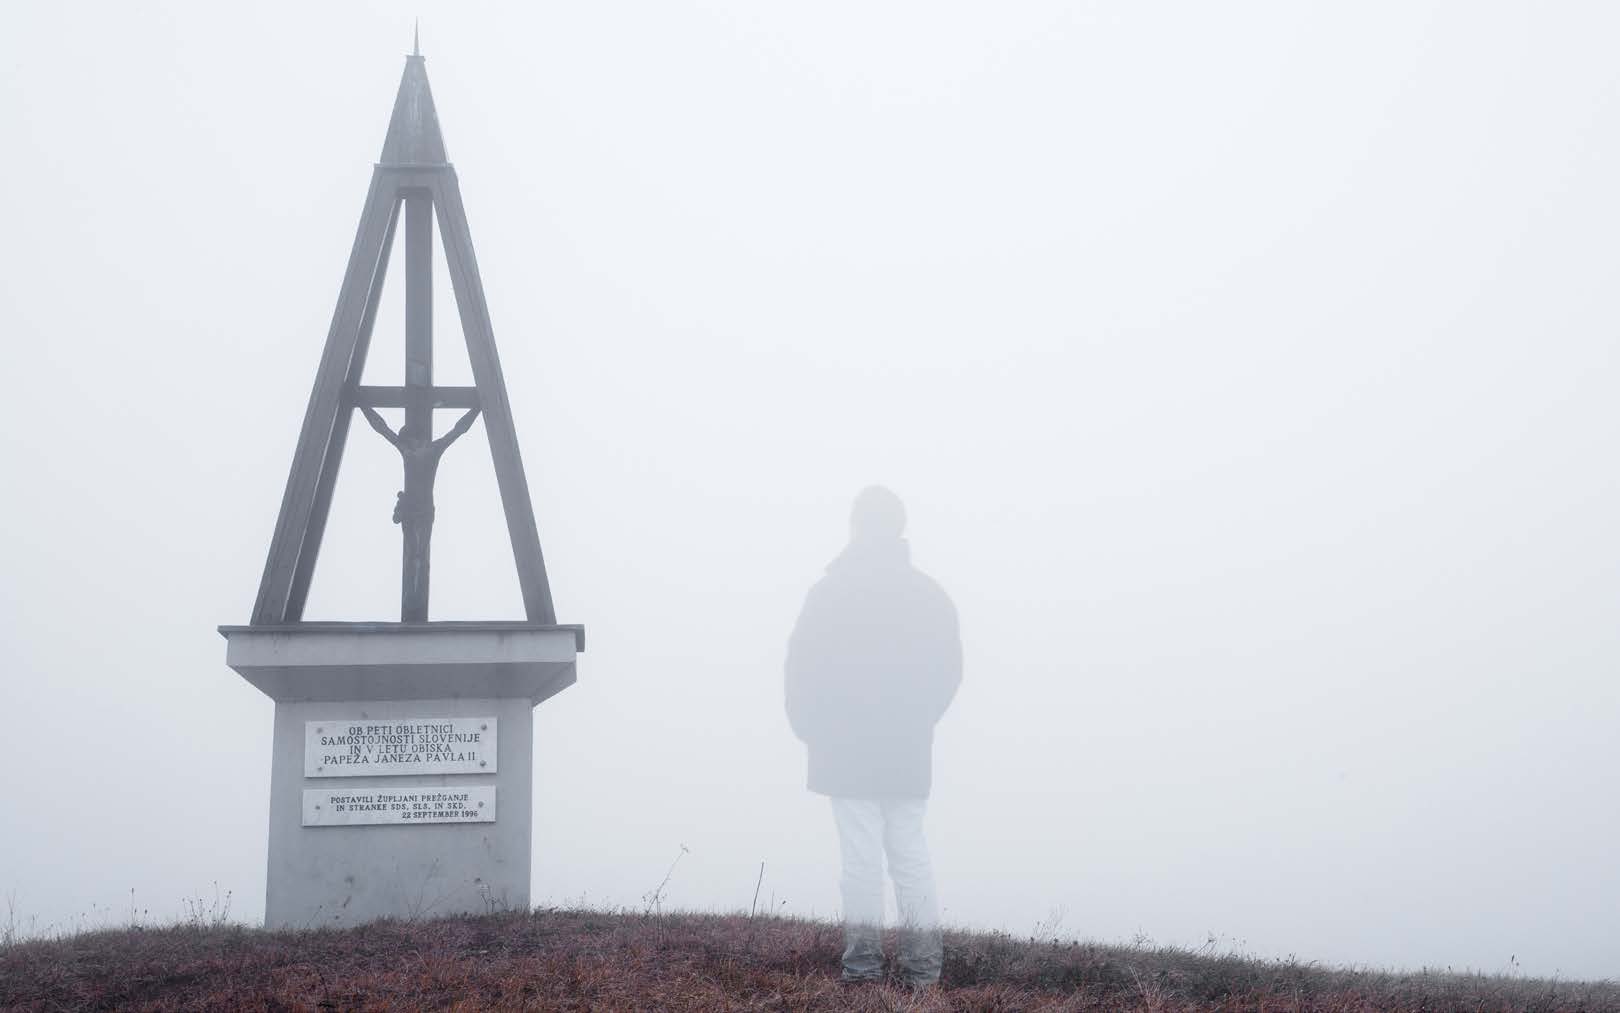
The lower the sun, and the more diffused it is, will also determine how much detail you will get in the foreground. In this photo of Old Harry Rocks in Dorset, England, the thick layer of fog on the horizon and the low angle of the sun has produced very soft morning light and allowed me to capture the detail on the front of the cliff.
Conclusion:
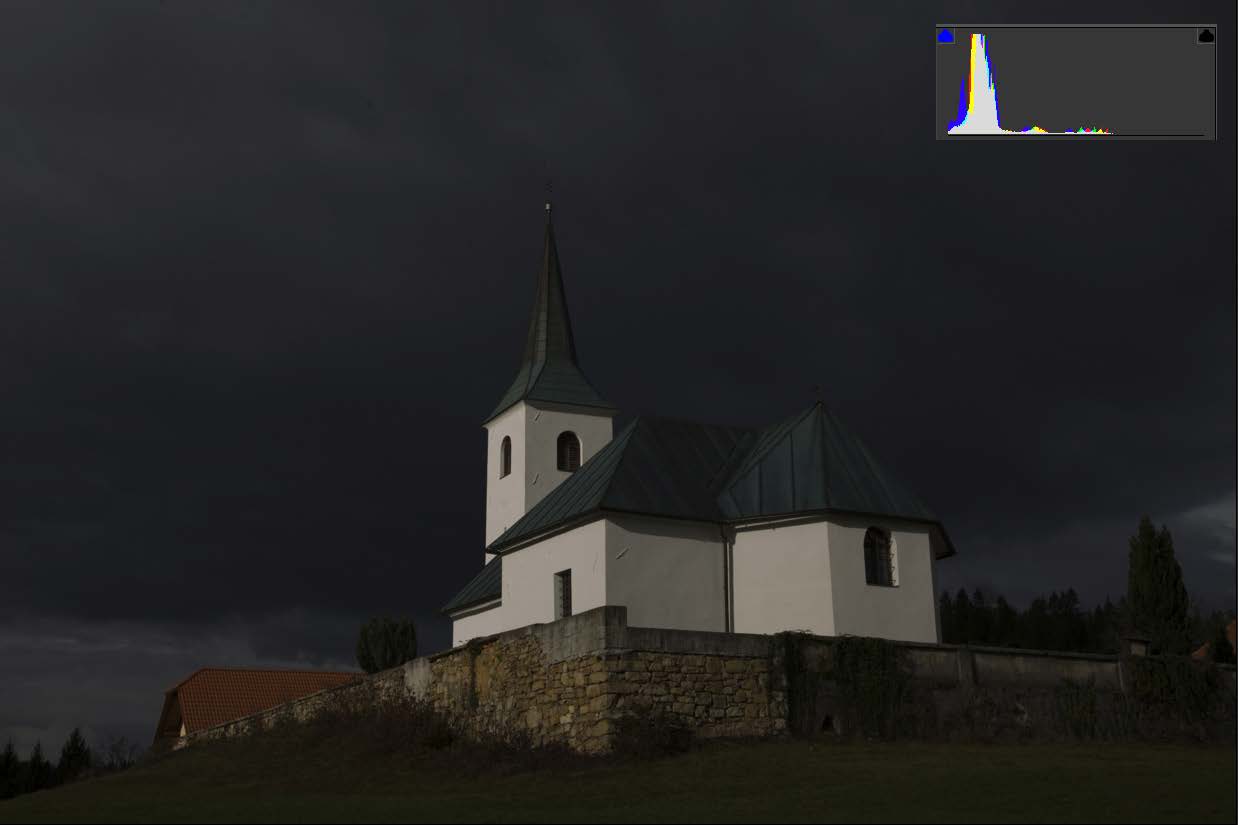
So as we have seen, light has complete control over how we see things. A landscape, or your subject’s appearance, is total y determined by the quality, colour, direction and hardness or softness of the light available. As you take your photographs, take some time to study how the light is il uminating your subject and the effect it has. Go out on sunny and overcast days and see how different This photo of the Supermoon rising over the church was also made possible by everything looks. Look at how shadows shape the landscape. Even when you the passing cloud, which diffused the intensity of the moonlight. It was also shot don’t have your camera, watch and learn as you are going about whatever it is at dusk, so there was still some ambient light in the sky from the setting sun.
that you are doing. Study your favourite photos by other photographers and see how the light has affected each picture.
28
www.ianmiddletonphotography.com
www.ianmiddletonphotography.com
29
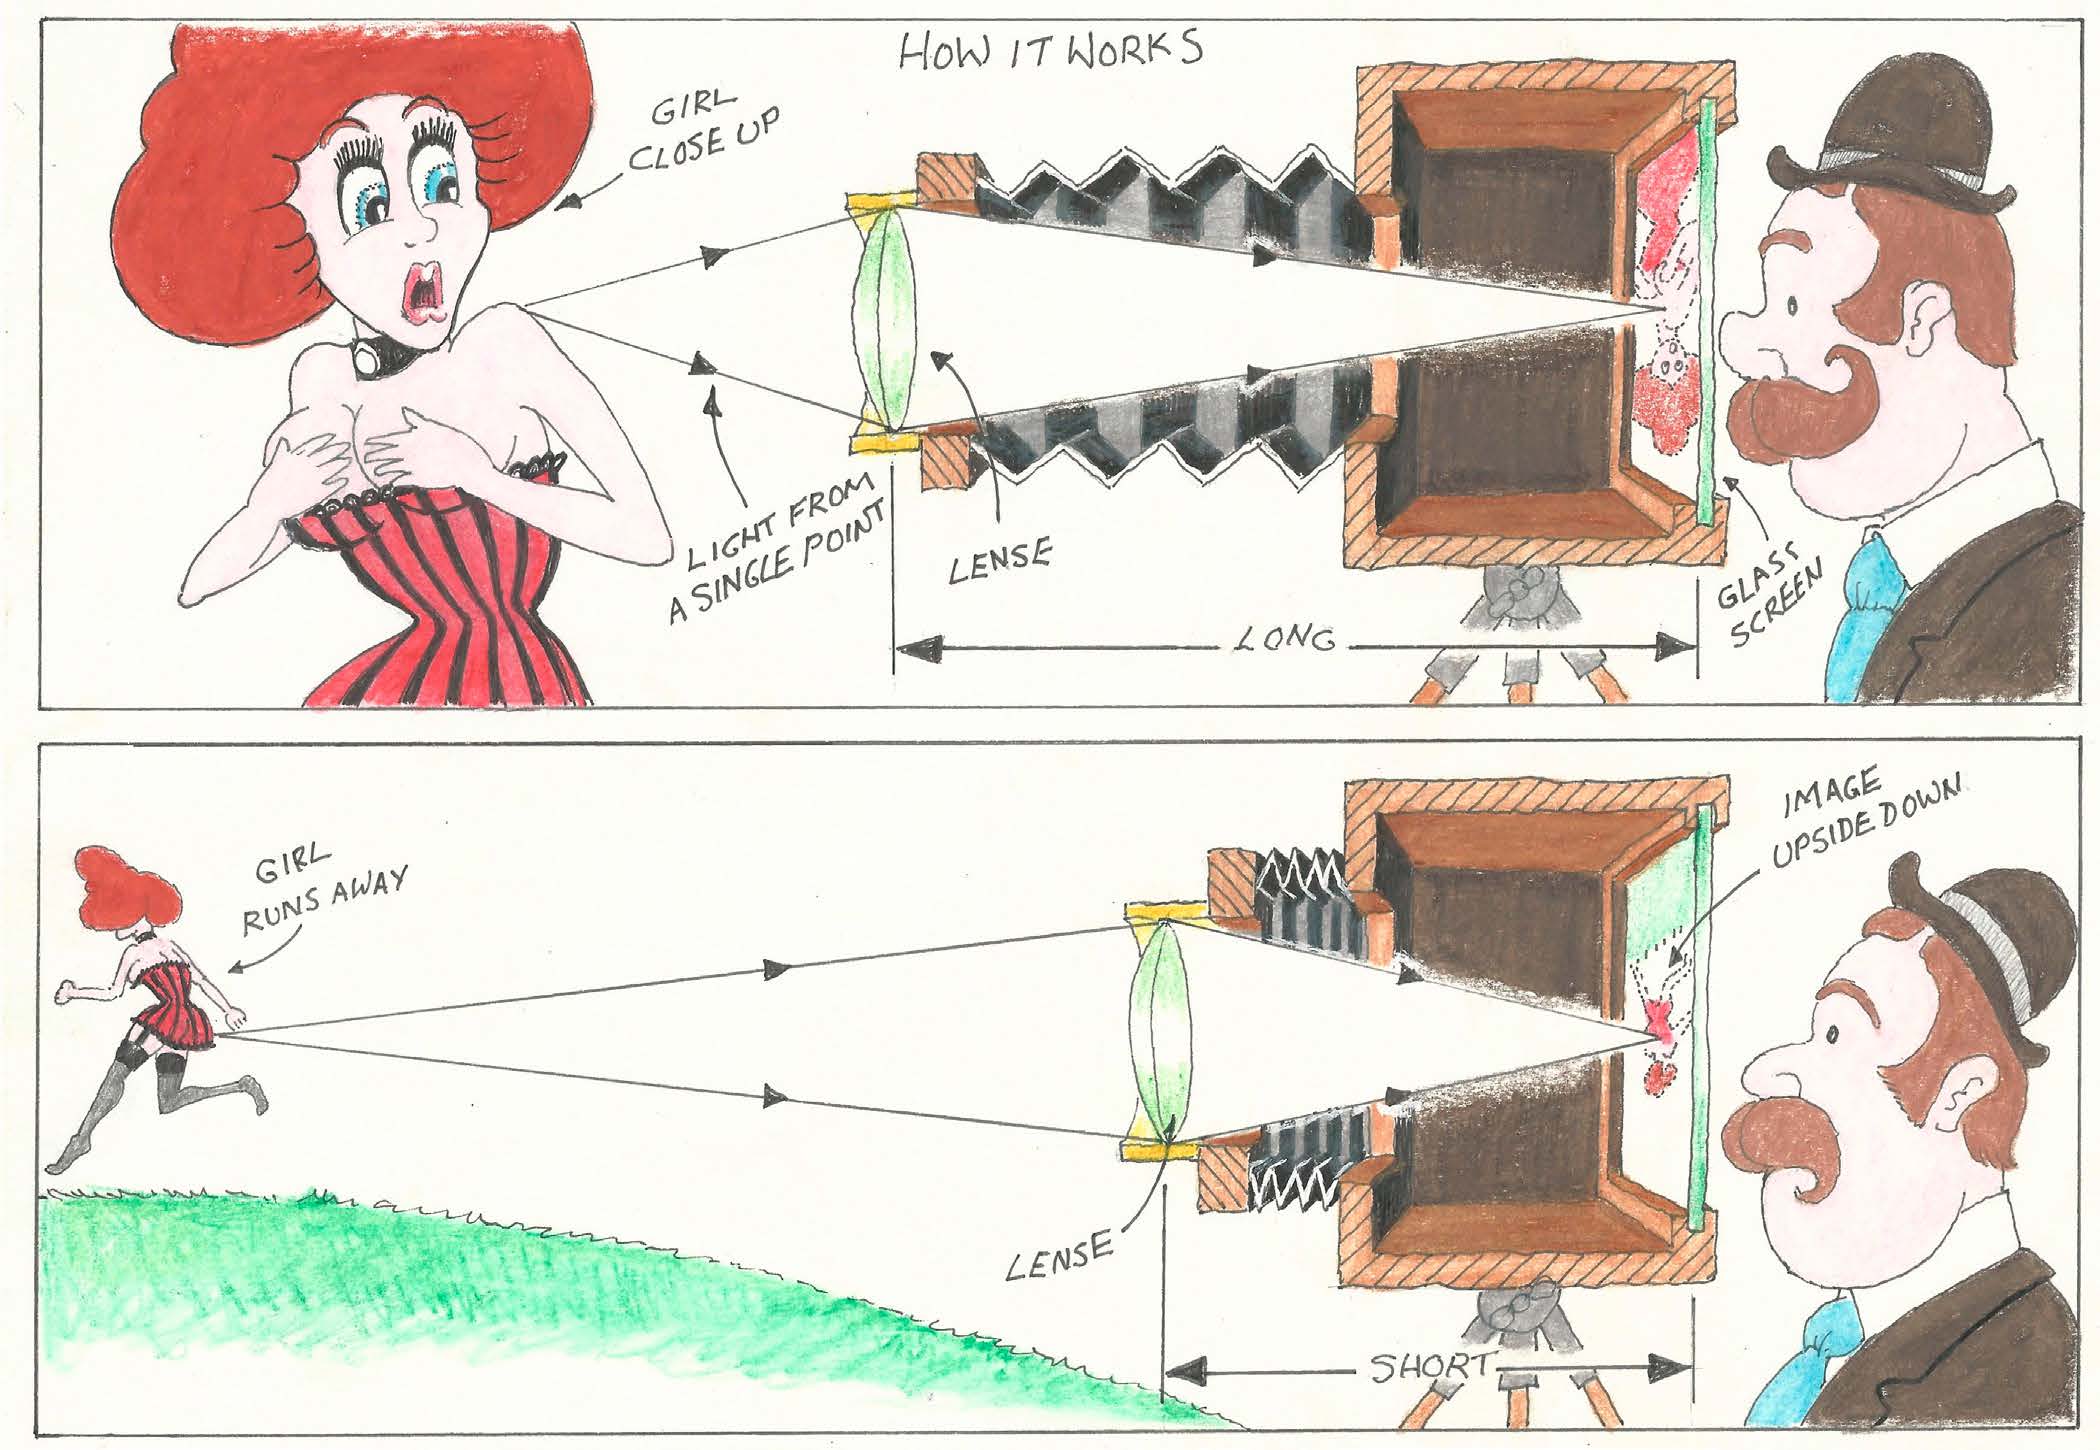
Part 2 - How the camera sees and captures images
How we see images
In order to understand photography, it’s good
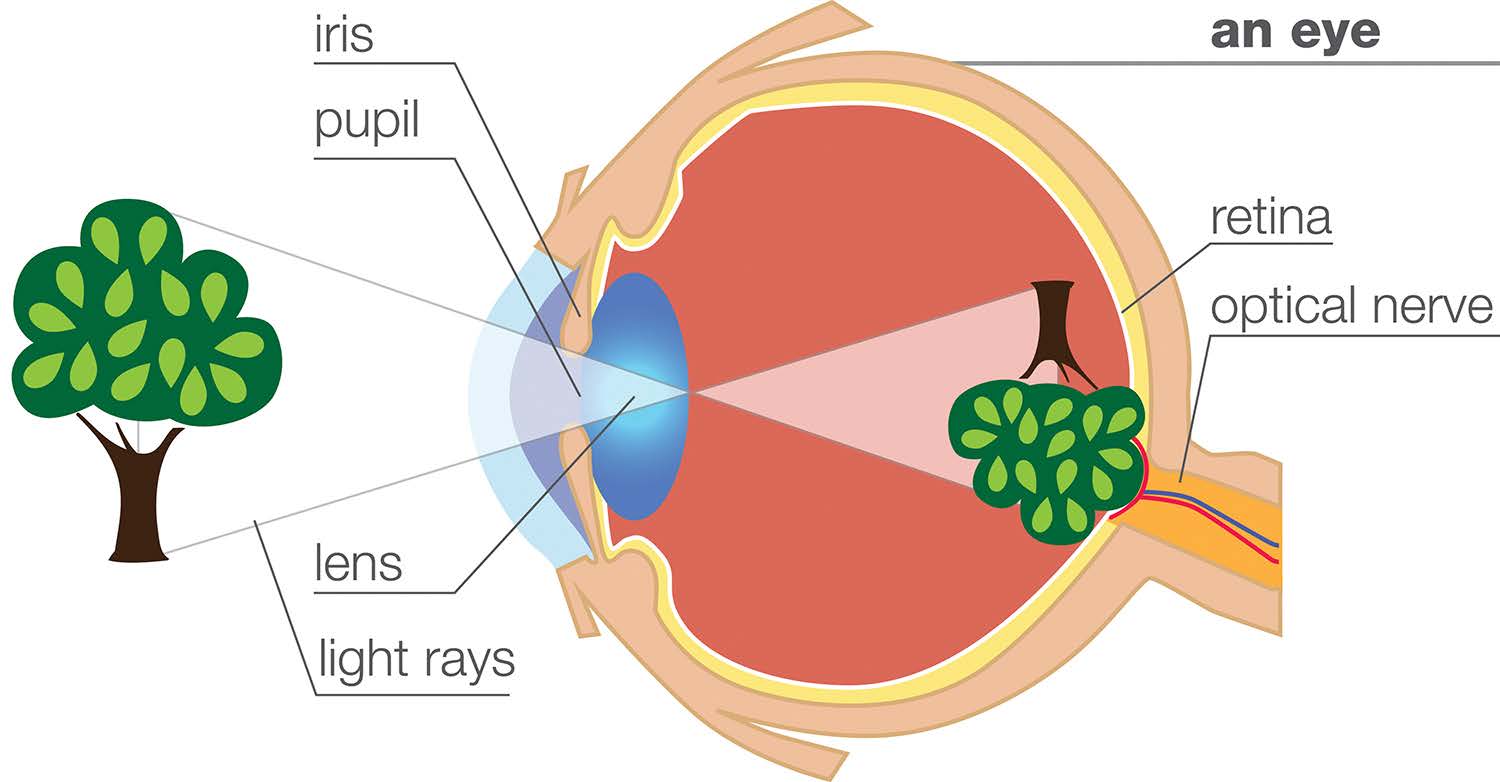
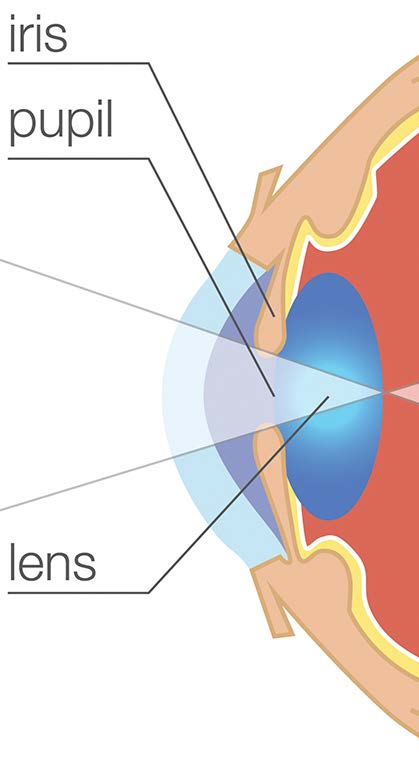
Light passes through the lens after first passing through the pupil, and then to have some basic knowledge about how the
converges at the focal point: the retina, which then sends the image to our brain camera works. So here we go:
via the optical nerve. As you can see the image is upside down, because the light rays are inverted, but our brain flips the image back upright.
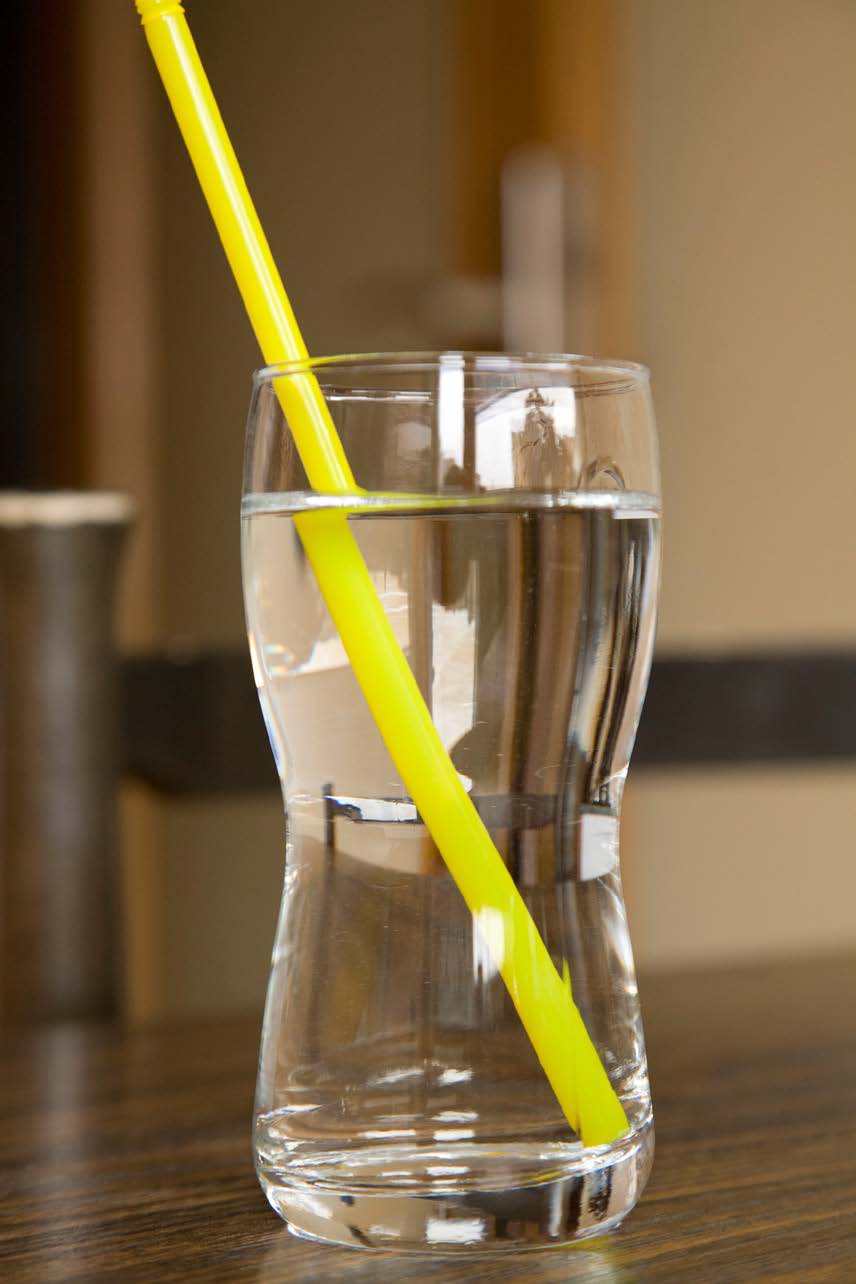
Refraction
When light travels through air its speed is
constant, but when it passes through glass or
water it slows down. This causes the light rays
to be bent, or refracted.
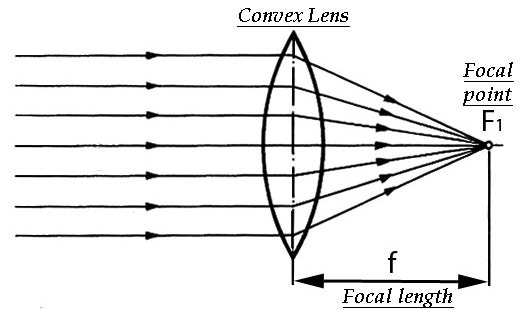
Our eyes and the camera use a convex lens to refract incoming light and direct it to a single focal plane, such as the film or digital sensor. The distance between the lens and focal point is called the focal length.
Our eye is permanently exposed to light, hence we see moving images.
Summary of terms:
Focal point• The refracted rays converge at a single point of focus, known as the focal plane
Focal length
• The distance between the lens and the focal point is known as the focal length
30
www.ianmiddletonphotography.com
www.ianmiddletonphotography.com
31
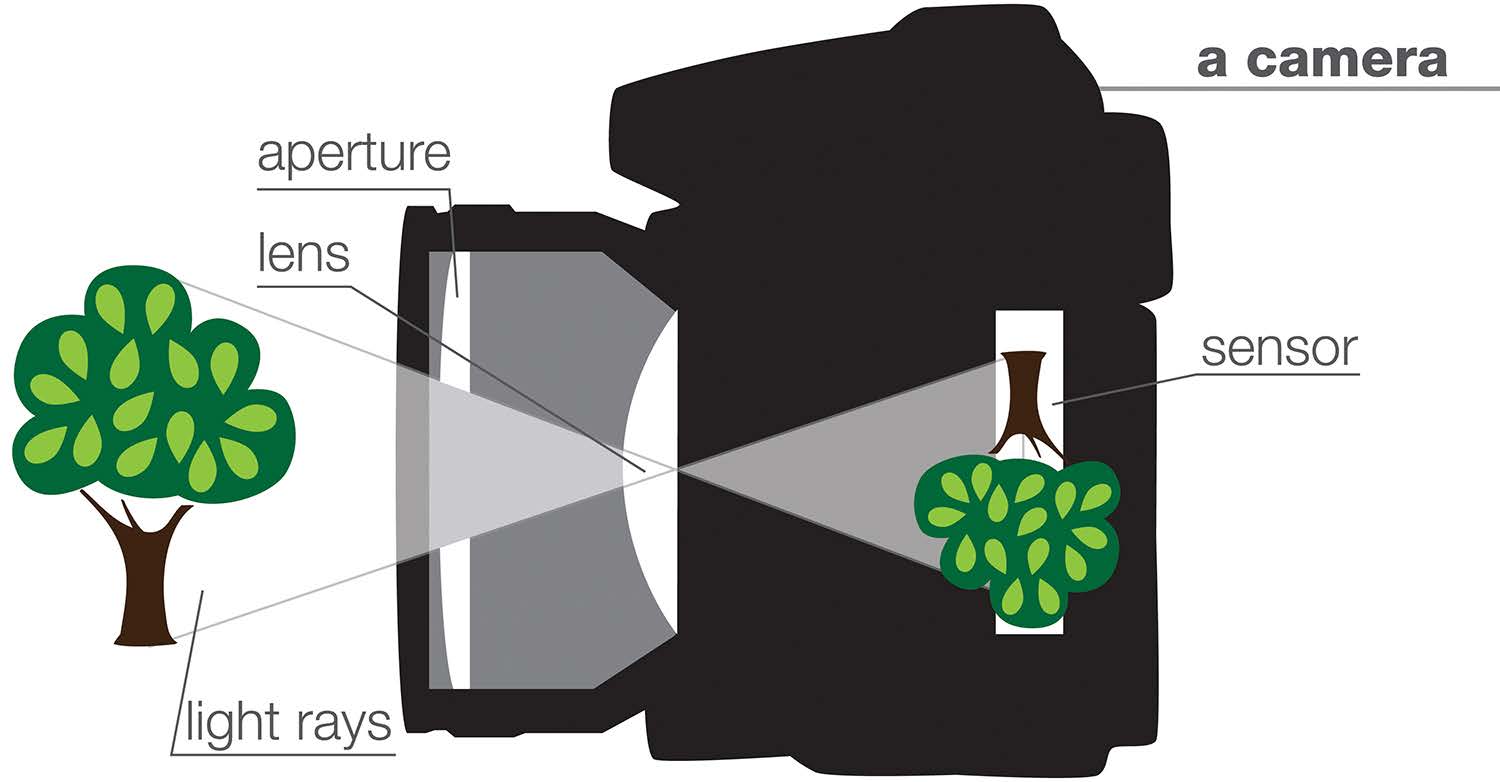
How the camera sees images
Part 3: Lenses and how they work
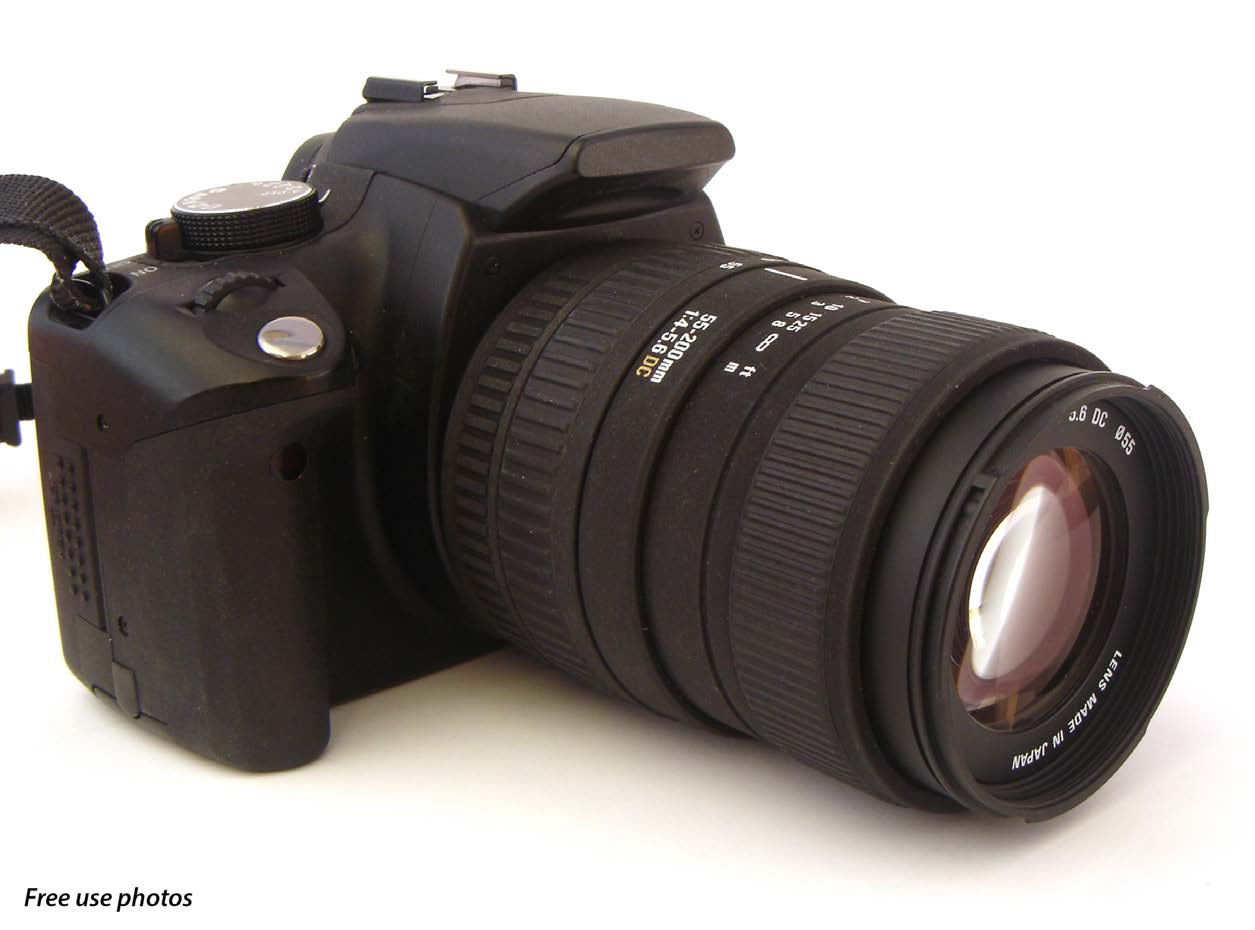
Just like our eye, the camera adopts a similar principle. Only instead of a pupil, The lens
it has an aperture. Light passes through the aperture, then the lens (or a series of lenses in most modern lenses), converges at the focal point: the sensor (digital) This is the first point of entry
or film. The image is then sent to the camera’s brain (microprocessor). Just as and most important part of
with our eye, the image on the sensor or film is flipped back upright by the the camera.
camera’s software.
You can have the best camera
body in the world, but put a
cheap lens on and you may as
well have a budget camera.
Imagine owning a top of
the range BMW, and then
putting a Lada engine inside.
Or having 20/20 vision and
putting on a pair of badly scratched or low quality glasses.
Now I’m not trying to say that any lens other than a top of the range one is rubbish. But the lens is an important factor, and understanding it helps. So look after your lens, keep it clean and free from scratches, even if it’s a phone or compact camera. Also, when upgrading, think of the lens first. If money is an issue, spend it on a better lens rather than a better body. The following theory applies to all lenses on all cameras.
The camera is only exposed to light for a period of time, known as exposure time. Hence it captures a still image.
32
www.ianmiddletonphotography.com
www.ianmiddletonphotography.com
33
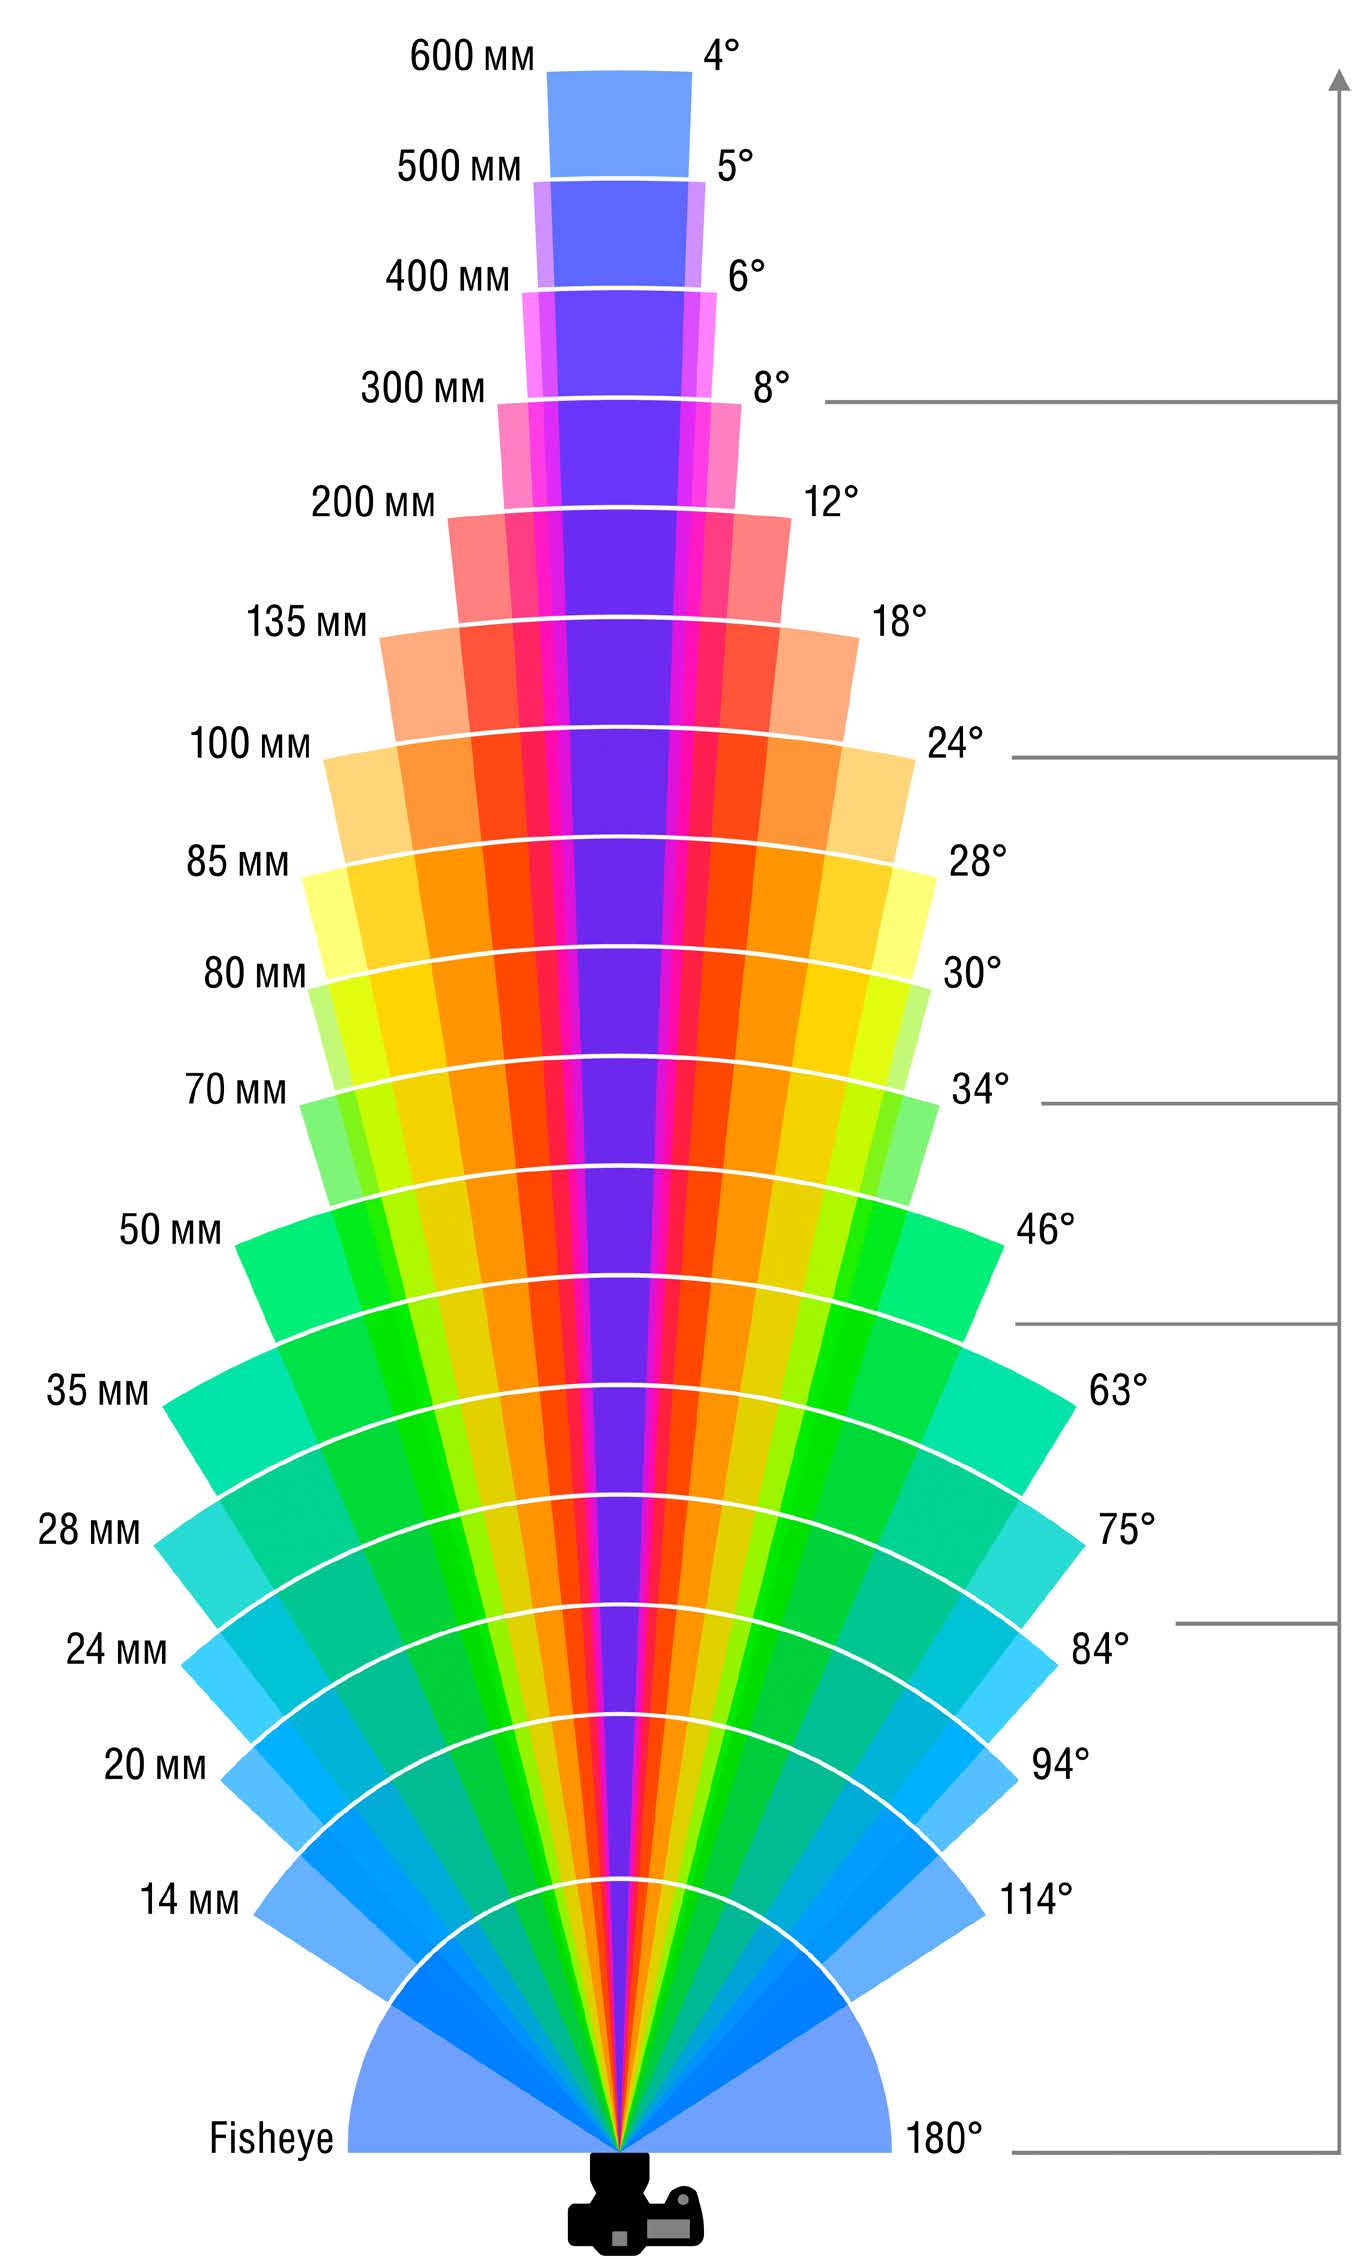
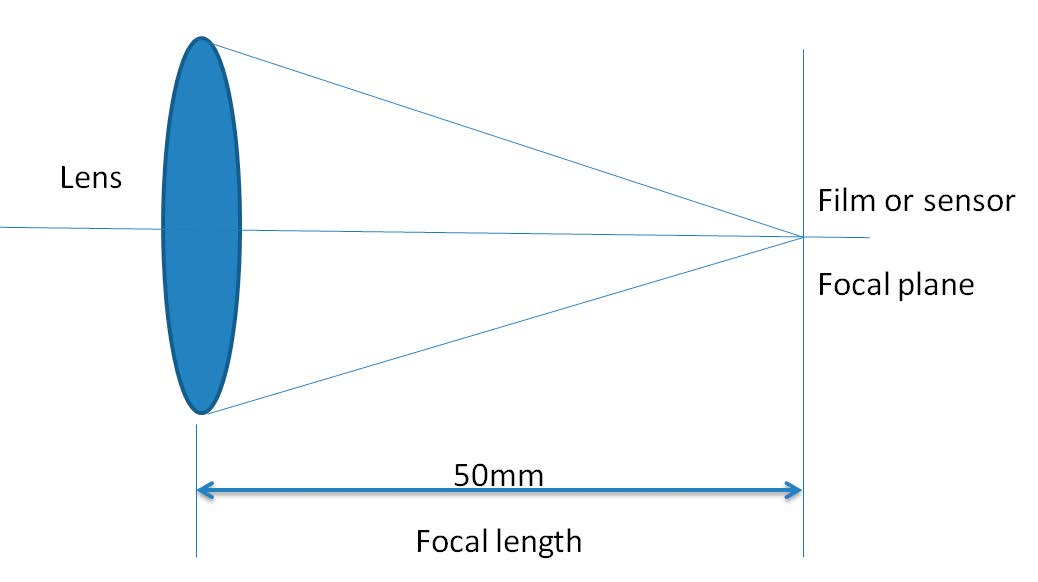
Optical zooms and Focal length
How wide angle and telephoto work
As you saw earlier, light passes
As I explained before, 50mm is the optimal focal length.
through the lens and fal s upon the
focal plane. In an optical zoom the
The diagram to the right
distance between the lens and the
helps to il ustrate this. As
focal plane is known as the focal
you can see, the shortest
length.
focal length (11mm) has
the widest angle of view.
• 50mm – standard field of view
What fal s upon the sensor
equal to what we see with our
is what is seen between
eyes.
those two outer points.
• Below 50mm = wide angle.
Therefore:
• Above 50mm = telephoto.
Increase the focal length:
Some lenses are fixed at a certain focal length (non zoom) and others are the angle of light narrows,
variable (zoom function).
and thus the narrower the
field of view. So essential y
Crop factor
you are compressing the
scene and reducing how
The above is based on using a standard 35mm film or full frame digital sensor.
much of it fal s upon the
Many cameras contain smaller size sensors. Other sensor sizes, on crop sensor sensor, effectively isolating
SLRs, compacts and phone cameras will vary. This is called the crop factor.
a part of it. Think of it as
Canon SLRs, for example, have a crop factor of 1.6. This means that you use cropping part of the photo
the following equation to work out your actual focal length.
away.
• Focal length x crop factor- so a sensor with a crop factor of 1.6 at 50mm, will actual y be
Decrease the focal length:
50 x 1.6 = 80mm.
the angle of light widens,
So the standard field of view of 50mm on a crop sensor will be different. To and thus the wider the
work it out, use the following:
field of view. So you are
• Focal length divided by crop factor (50mm / 1.6 = 31.25mm) 31.25 is increasing how much of
equivalent to 50mm.
the scene fal s upon the
sensor.
© Alhovik | Dreamstime.com
34
www.ianmiddletonphotography.com
www.ianmiddletonphotography.com
35


The photos here il ustrate this.
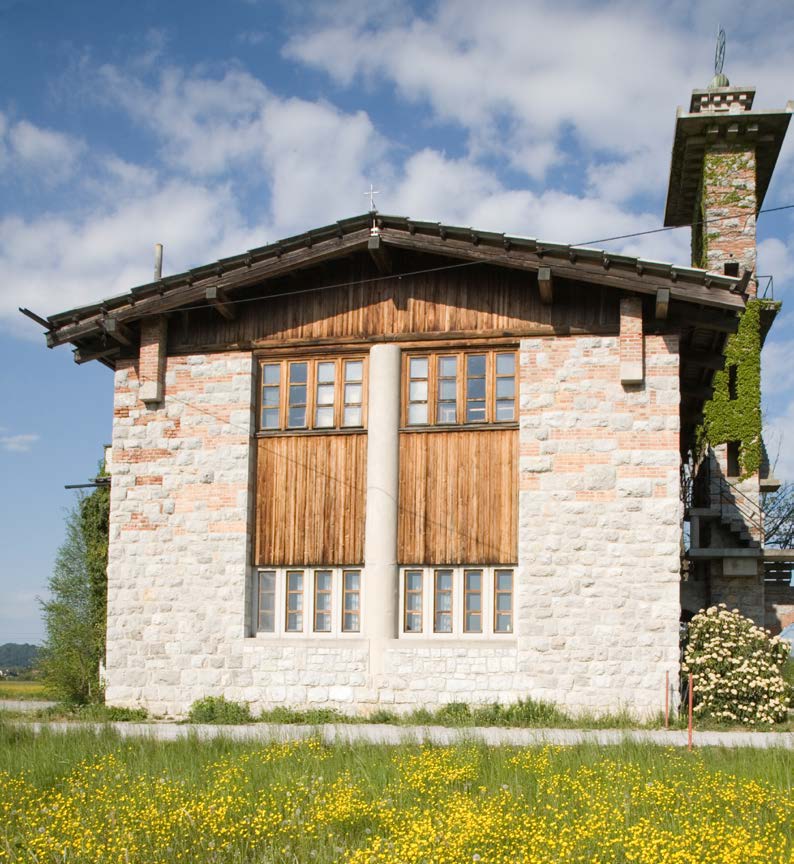
Wide angle lenses and their effect
Photo at wide angle
A wide angle effectively stretches the image and allows a wider view than the normal 50mm will allow. Just like a telephoto allows you to get closer without actual y moving further forward, a wide angle allows you get further away without actual y moving further back. This can be useful when you don’t have room to move back. But again, this comes at a price: distortion The scene is actual y bent or warped. If you look at those roadside mirrors that are placed at sharp bends or awkward junctions to enable you to see round the corners, it’s a bit like that. The wider the angle, the more straight lines in your scene are bent and distorted. How much your lines are distorted very much depends on the angle at which you are viewing your object. This can be corrected When the focal length is
using software, or it can be used for creative effect. Sometimes it is manageable: increased the angle of light
will be reduced and only this
Shoot level and straight: When you do this you will minimise the warping effect on objects much of the scene will fall
in your image with straight lines.
upon the sensor
Get low and shoot upwards: This accentuates the warping and when done properly can add drama to a landscape image.
So the zoomed image will then
look like this on the sensor
Shooting upwards at 24mm
Straight on angle at 24mm
See how the chimney appears to be leaning
Here I stood upright and moved back a bit.
and the building’s sides are converging.
See how the warping here is minimal.
36
www.ianmiddletonphotography.com
www.ianmiddletonphotography.com
37
Creative use of wide angle
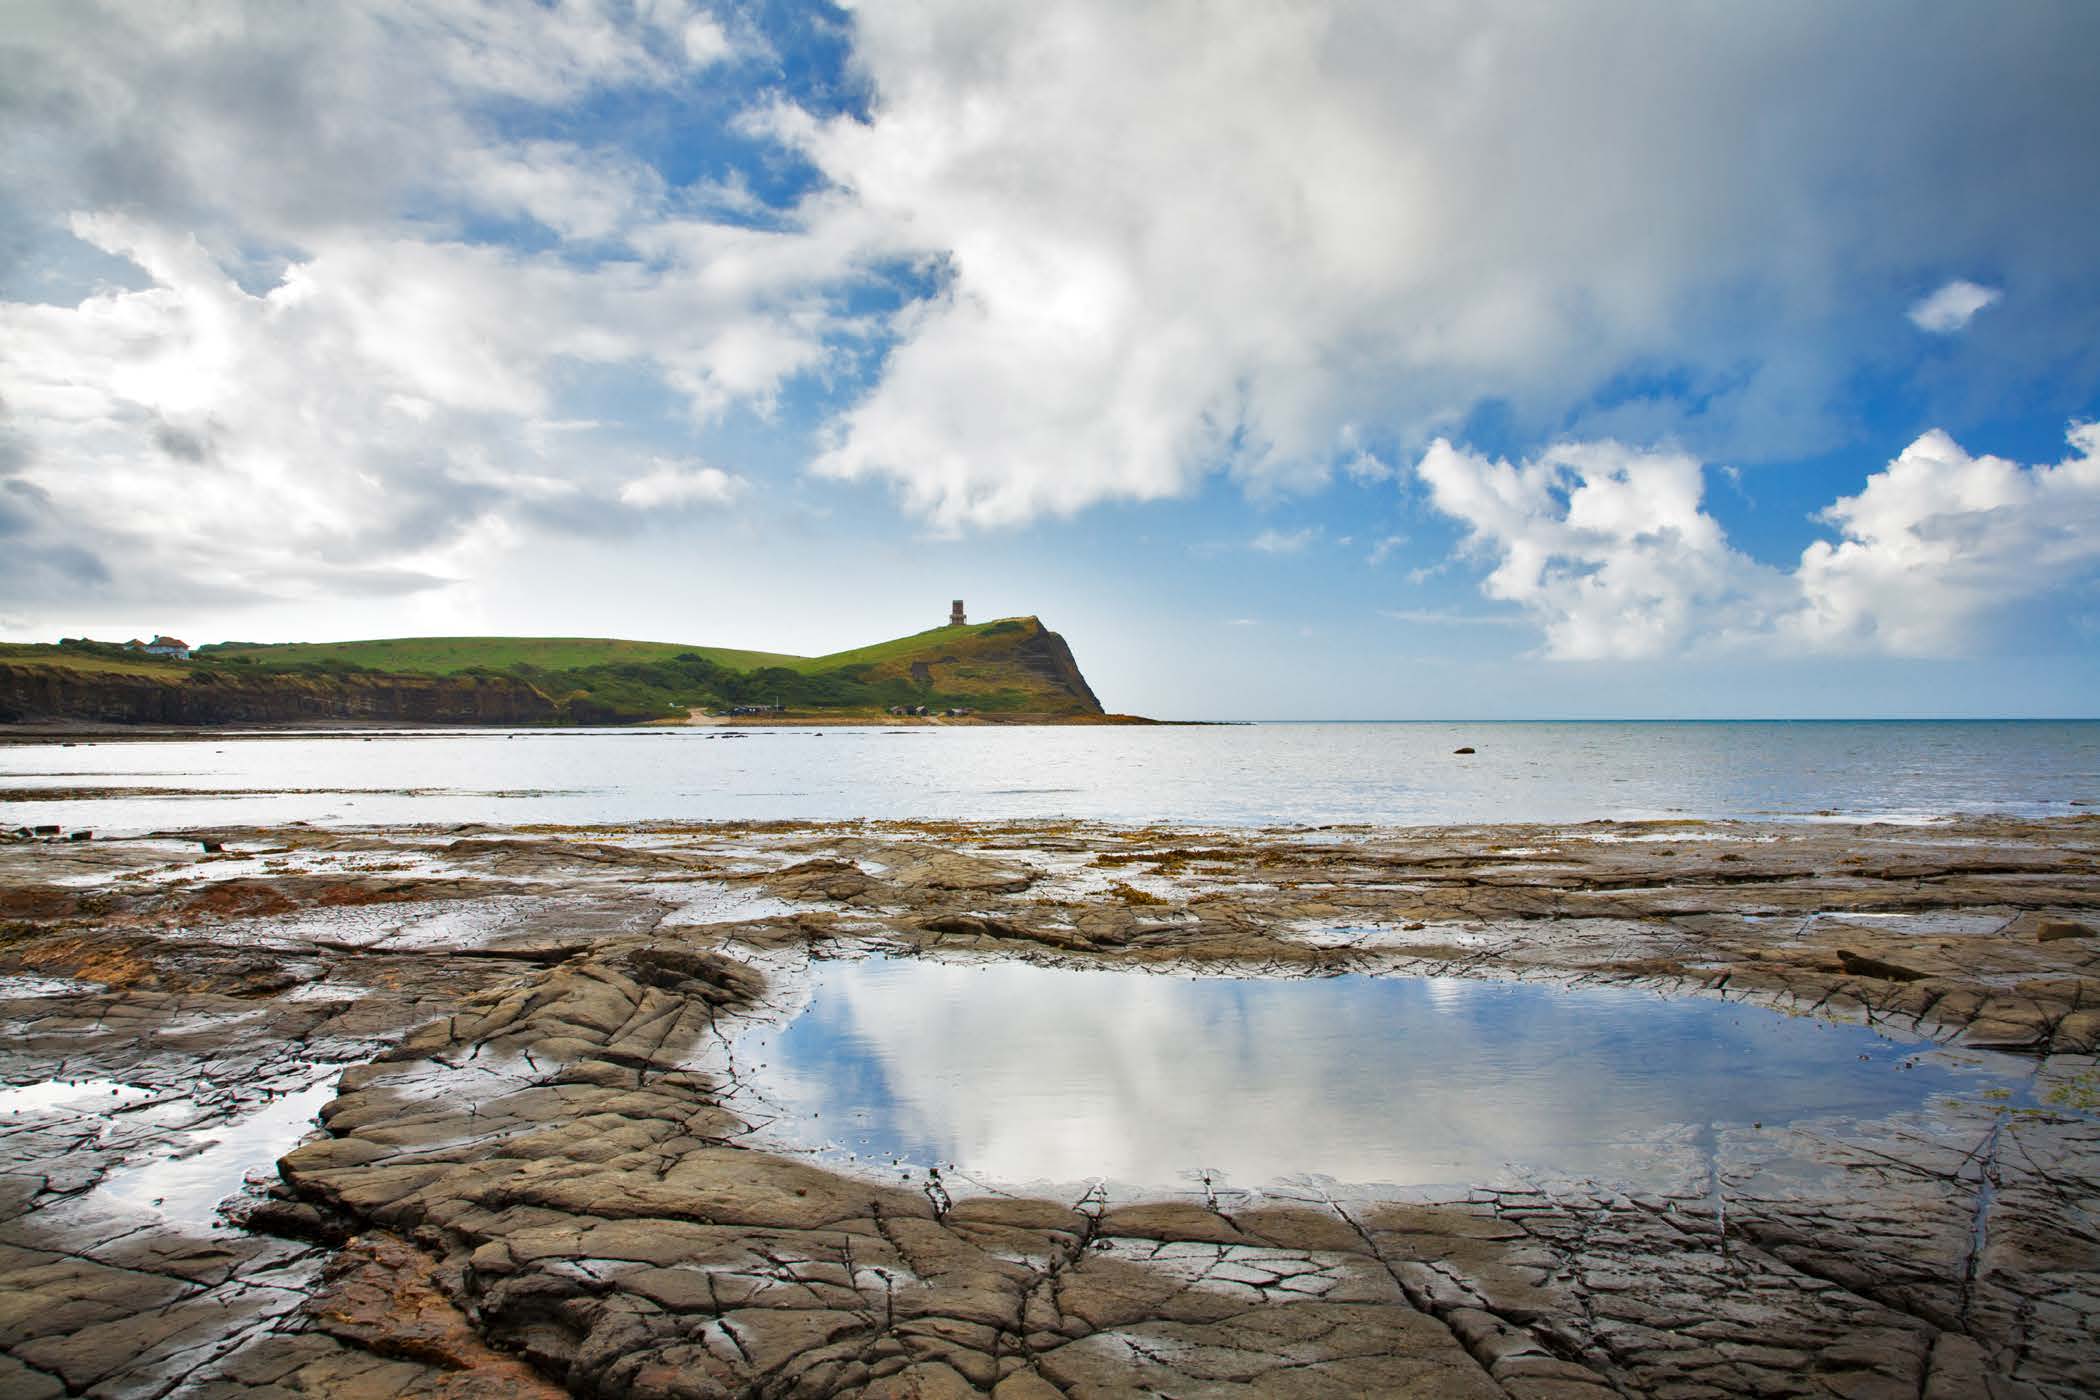
Using wide angle to exaggerate scale
Like most things, we can also put this warping effect to creative use and to add drama to our photos.
When using wide angle, it has the effect of enlarging objects in the forefront of the frame, while making distant objects much smaller.
18mm (28.8mm effective focal length – APS 1.6x sensor) This photo, taken at Kimmeridge Bay in Dorset, was shot at 24mm. As you can In this photo, taken at Lake Bohinj, Slovenia, I moved in low and close using a see, by getting close to the rockpool it appears much larger and has become wide angle. Here the subtle warping has accentuated the curve on the mountains.
a dominant feature of the foreground. The hill and Clavell Tower, have been The close, low angle has also drawn the boat closer to give it a dominant place in shrunk in size to exaggerate the distance. The distortion has also accentuated the the image and made it appear larger in the frame.
clouds, which adds drama to the sky.
38
www.ianmiddletonphotography.com
www.ianmiddletonphotography.com
39
Using wide angle to exaggerate lead in lines
Correcting barrel distortion using computer software The wide angle distortion is not always desirable, and not always avoidable.
However, it’s possible to correct this using computer software such as Adobe Photoshop or Lightroom. You can turn this...........
Into this.....
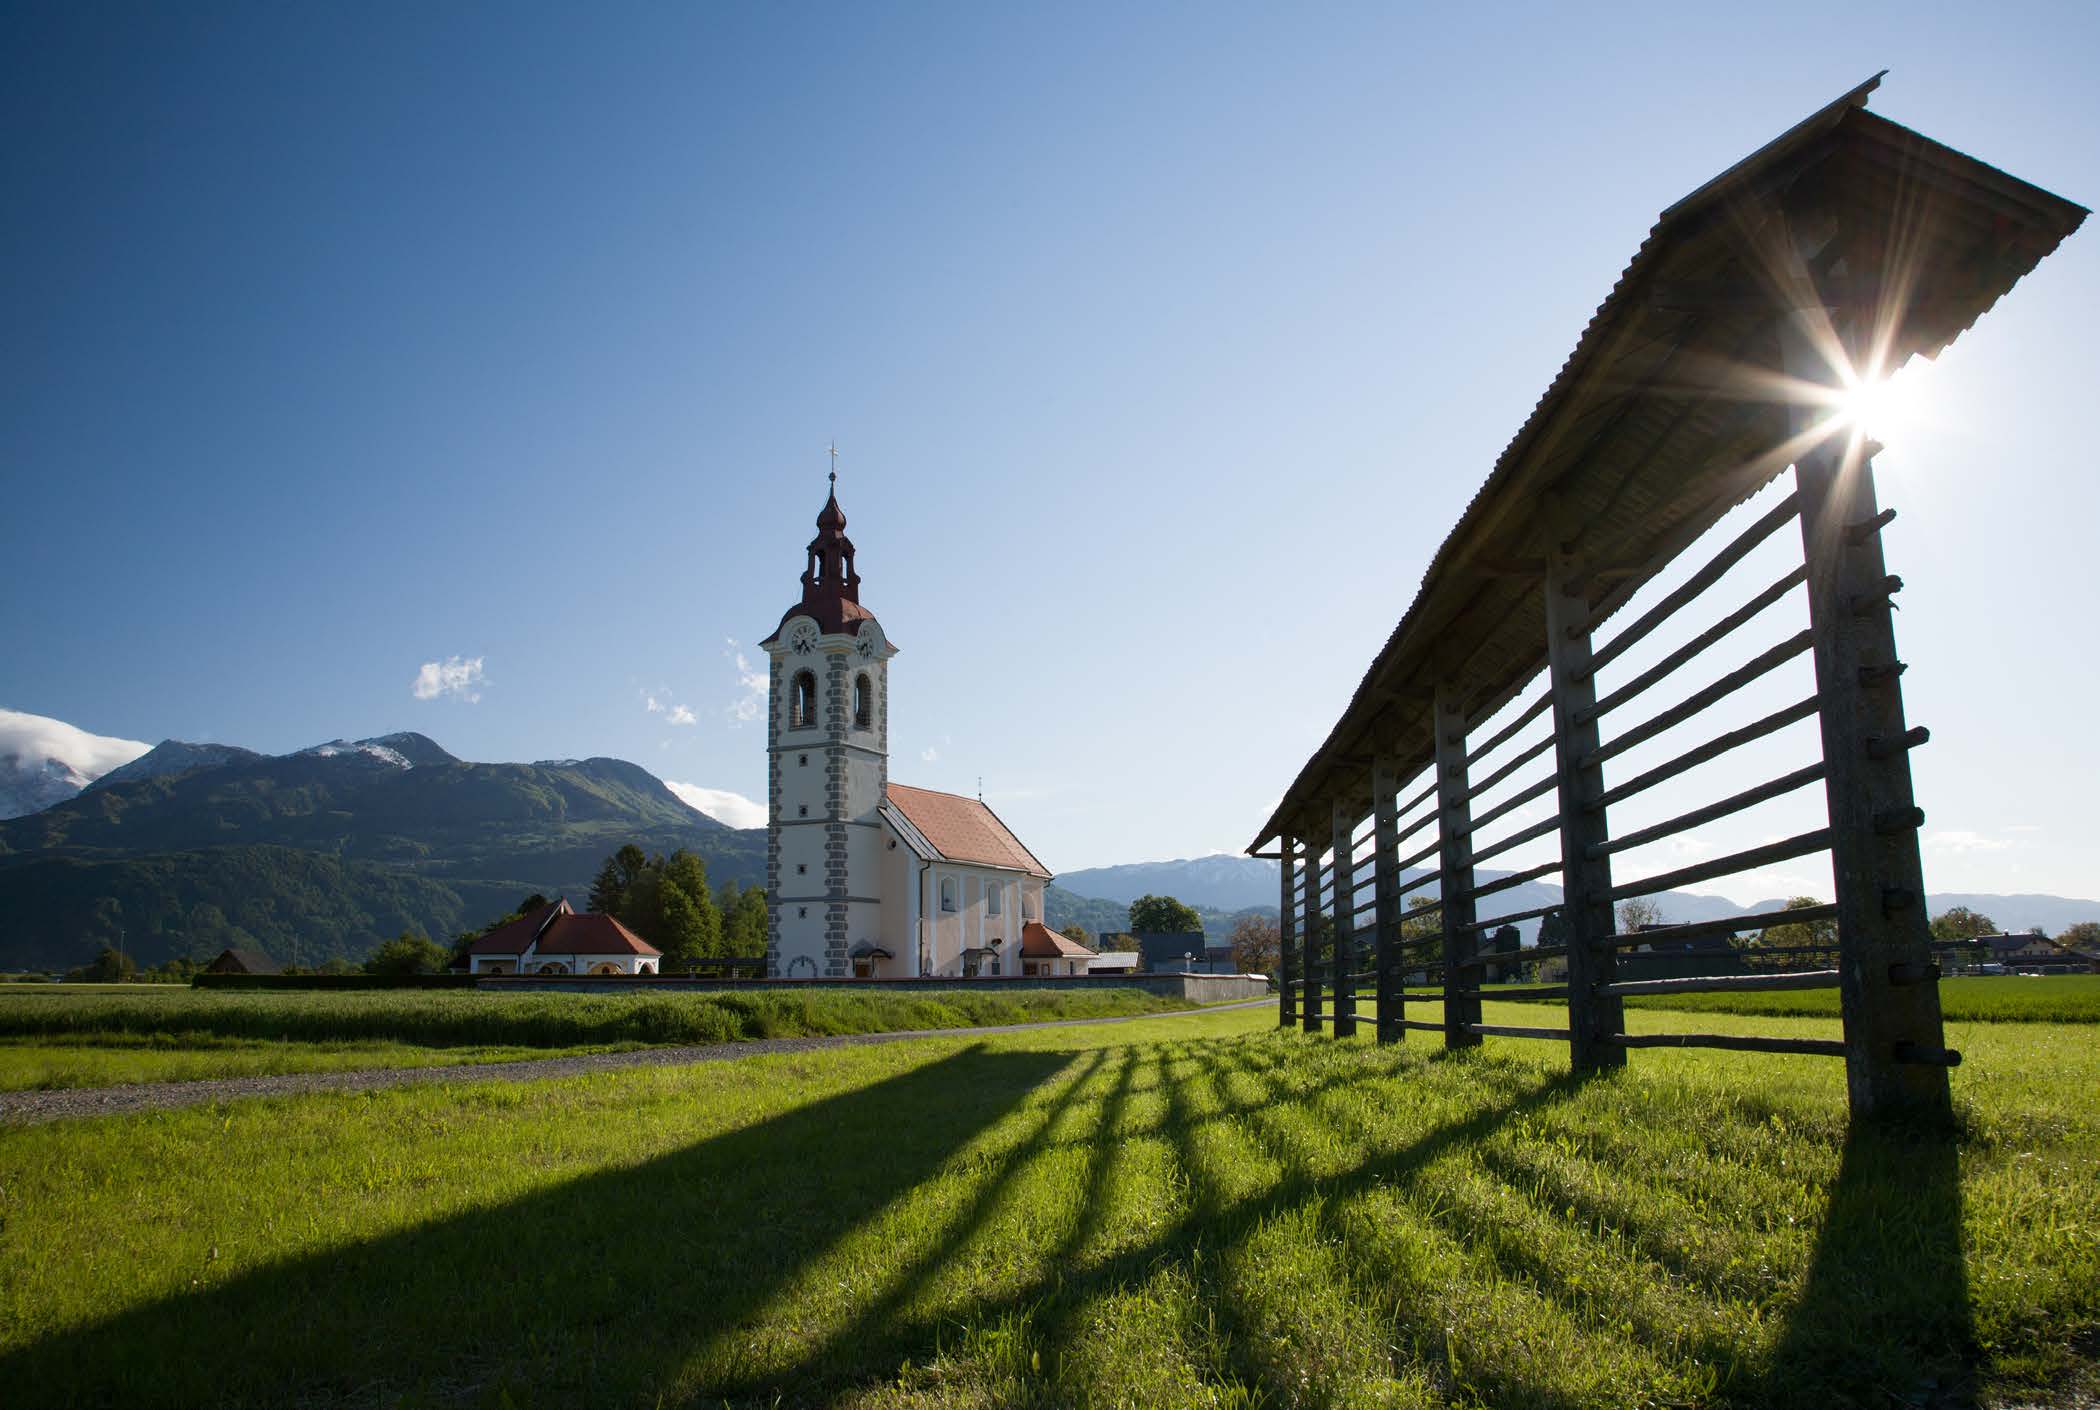
In the photo above, taken at Brnik in Slovenia, the angle at which the photo was taken would natural y have caused the horizontal lines of the hayrack to converge as they move from front to back. But, using a wide angle, getting low and close, and placing it at the edge of the frame, has pulled the front of the hayrack closer and the distortion has made it larger. Conversely, the end of the hayrack now appears smaller in comparison to the front, and so the converging lines have been accentuated. The wide angle has also exaggerated the size of the sunburst.
Click here to watch my video tutorial on how to do it
40
www.ianmiddletonphotography.com
www.ianmiddletonphotography.com
41
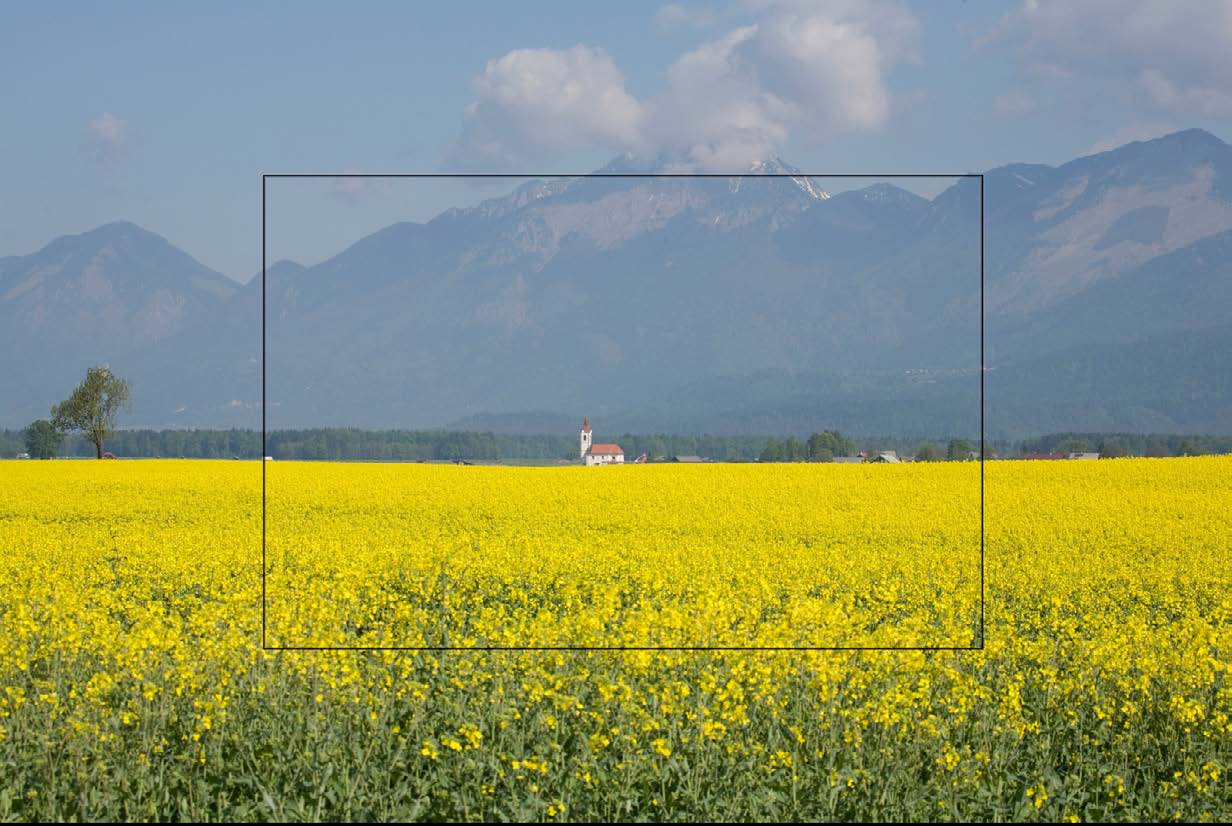
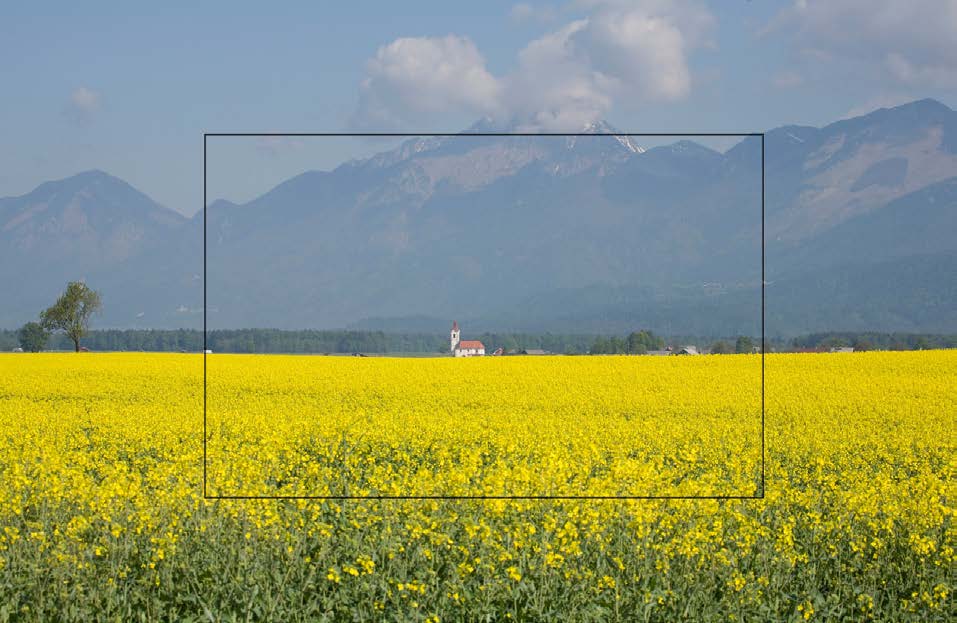
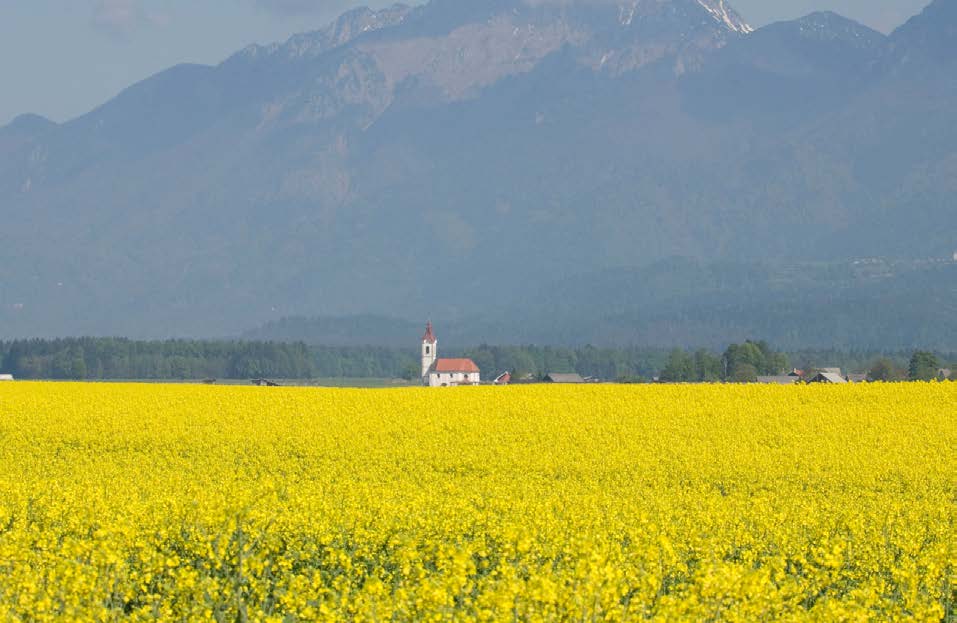
Telephoto effects for landscapes
Never underestimate the power of a telephoto lens for landscapes
While a wide angle makes foreground objects larger and distant objects smaller,
Telephoto lenses play a more predominant role in portrait photography (for
telephoto has almost the opposite effect. When you zoom in you make everything
reasons you will see later in the aperture section) and wildlife photography: the
larger. The photo below, also taken at Brnik, Slovenia, was shot from a distance
latter also for obvious reasons, (You don’t real y want to get close to a grizzly bear,
now do you?). Shorter focal lengths and wide angles are usual y preferred for landscapes. Telephotos are often overlooked as a lens for landscape photography.
However, as we have just seen & will see now, they can play an important role.
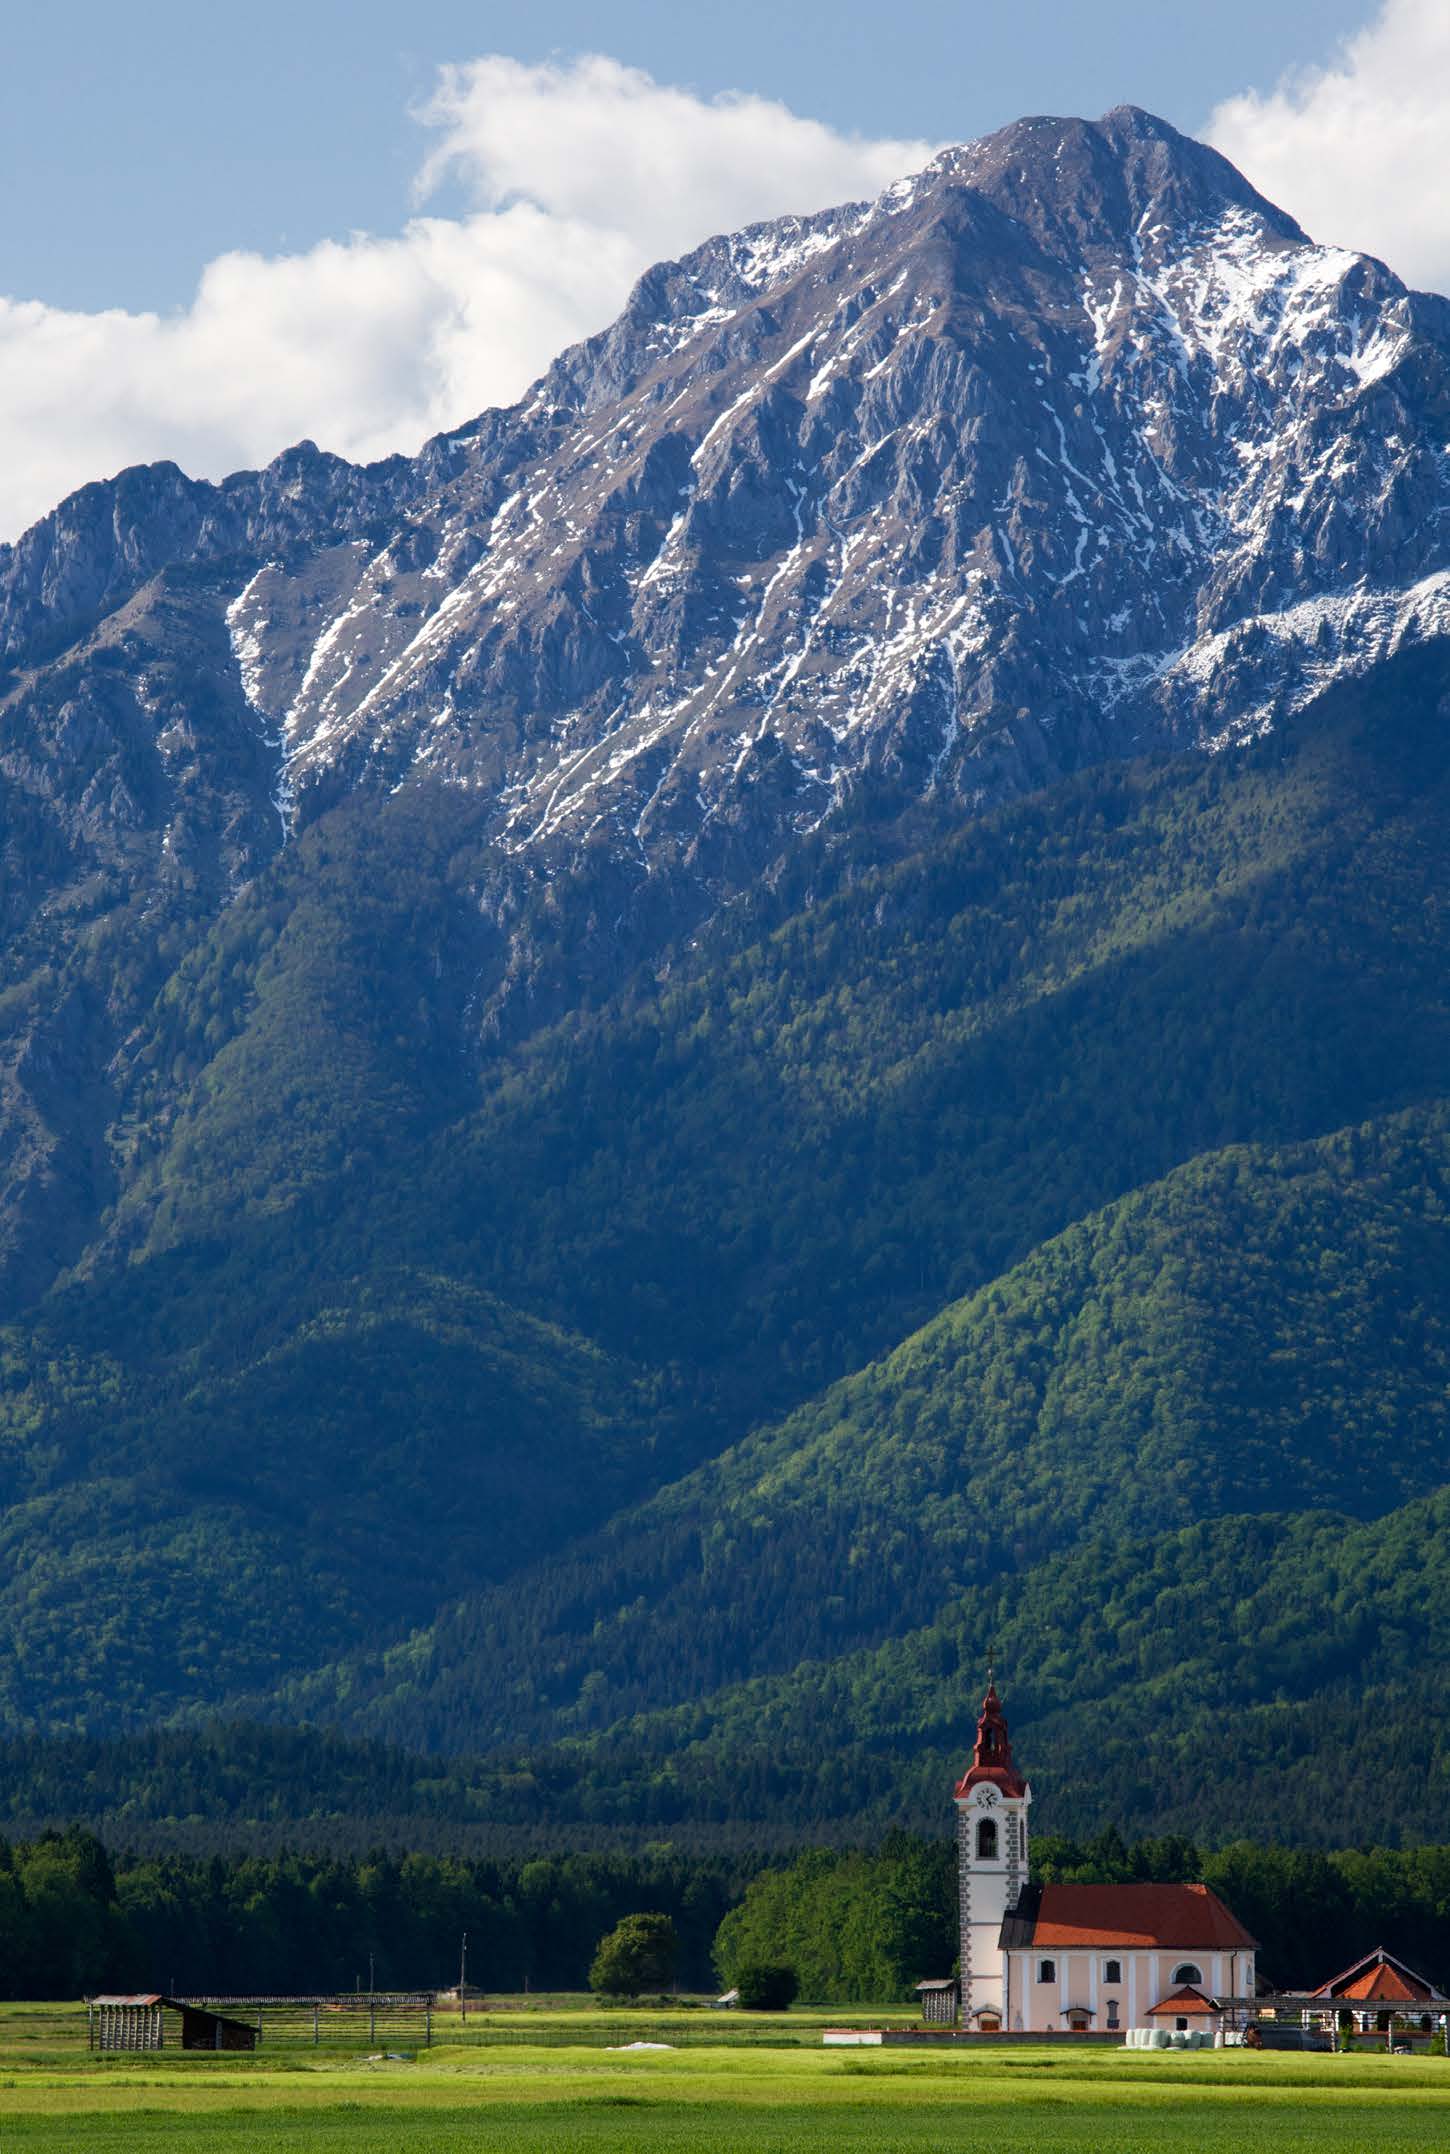
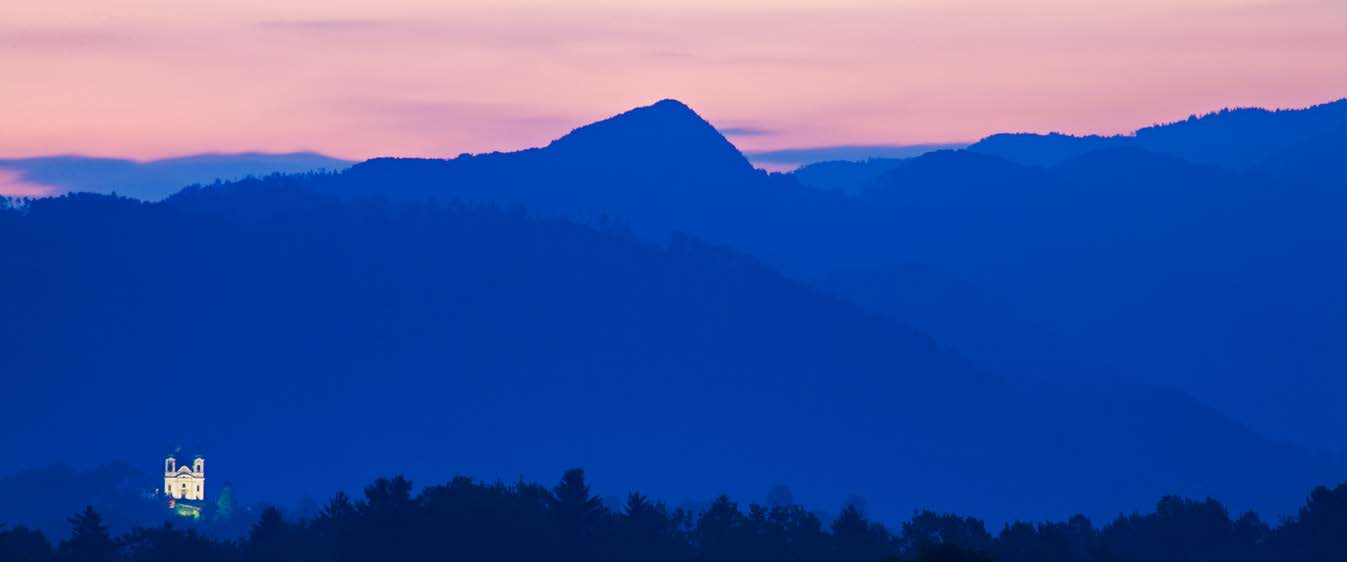
This dramatic sunset over the western mountains in Slovenia was taken from
a church on a hill in the northeast, about 50kms away, using a 400mm focal
length.
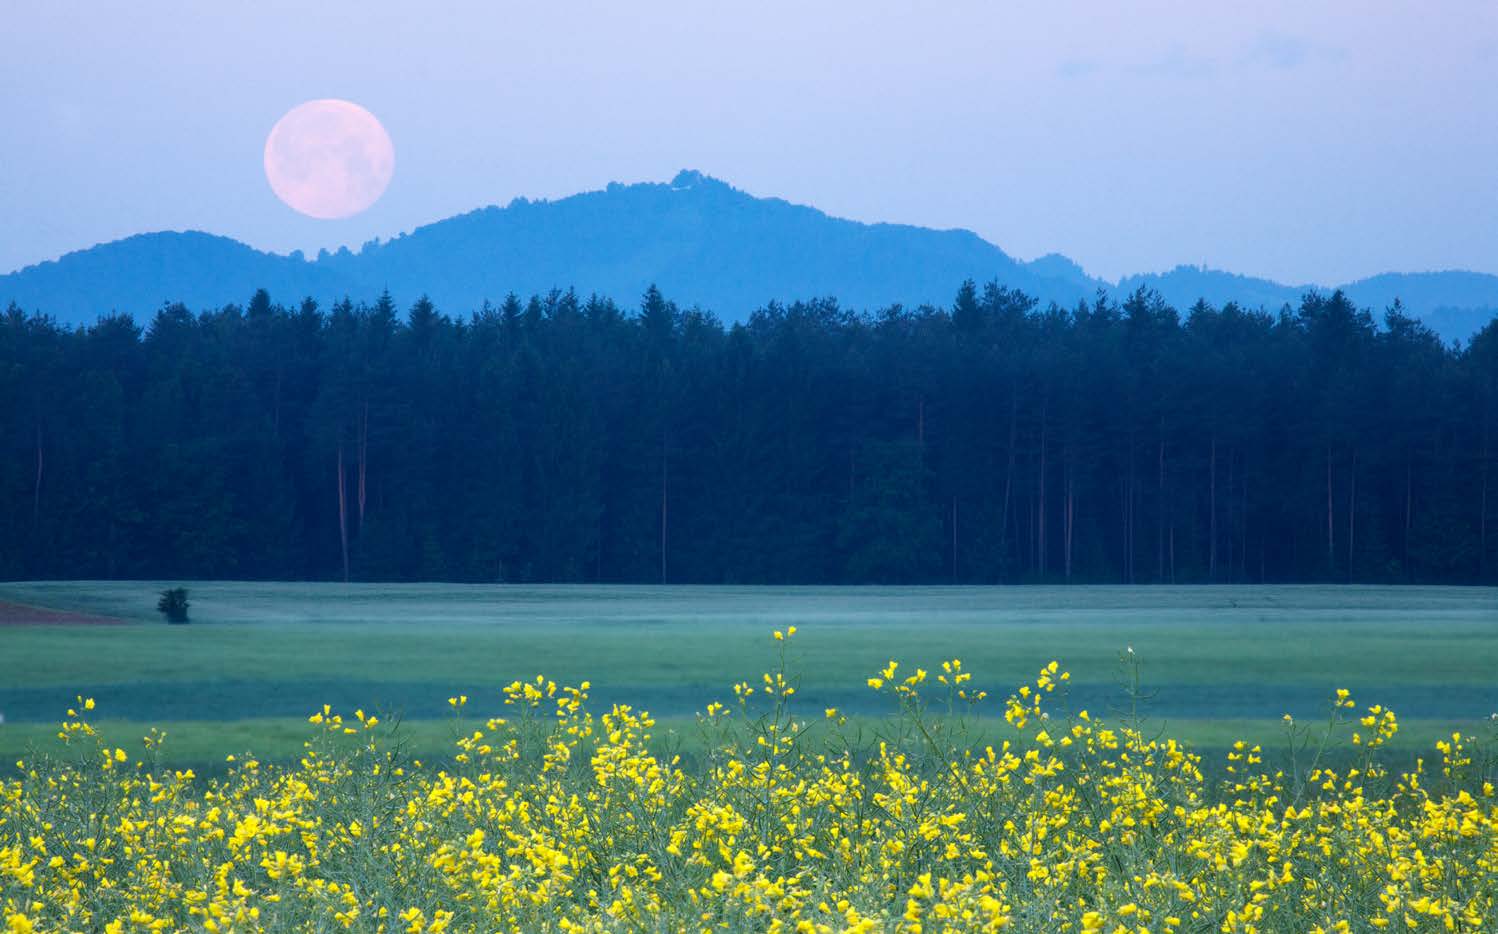
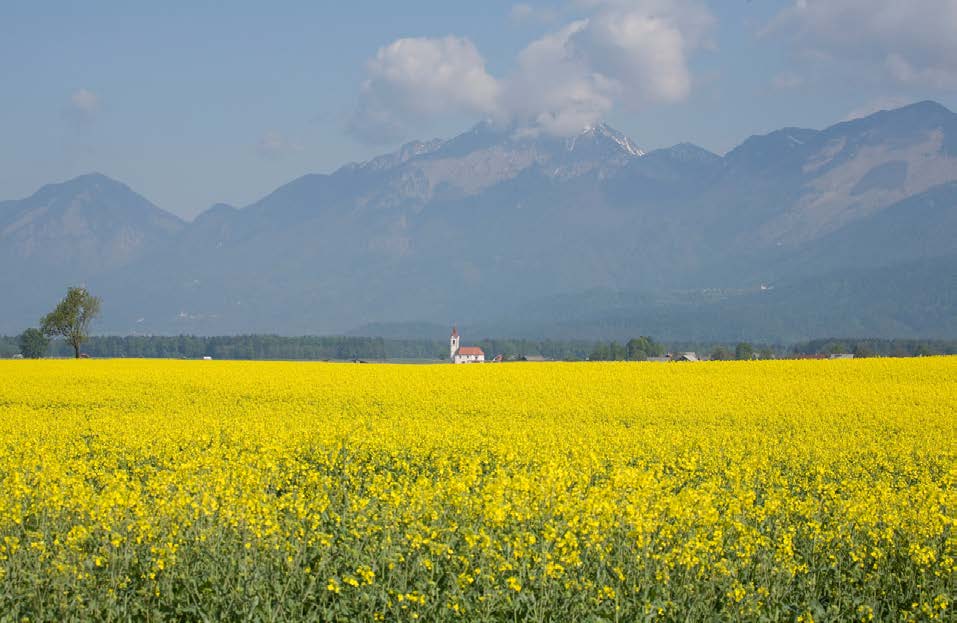
Here I have used a 320mm focal length to exaggerate the size of the setting full
moon. The rapeseed was close to me, so unlike the previous photo, where the
church was further away, the rapeseed appears larger in the frame.
42
www.ianmiddletonphotography.com
www.ianmiddletonphotography.com
43
A telephoto is great for sunsets and sunrises
Digital zooms
A telephoto not only makes the sun much bigger in the frame, but can also isolate A digital zoom works on a similar principle of cropping and enlarging the image, the area around the setting sun which is the most intense part of the sunset; as but at the expense of image quality.
you can see by this photo taken from an apartment balcony in Ljubljana using a 400mm focal length.
If you use your digital zoom compared to your optical zoom, the latter will produce better results. This is because the optical zoom captures the cropped image at full resolution, whereas the digital zoom crops into the full res image and results in a lower resolution photo, which in turn is increased in size by the camera’s software.
The following images il ustrate this:
Original 12mp image
12mp image gets cropped in half
As sunrises go, this was not
exactly the most exciting.
Unlike the optical zoom, there is no change
But by zooming in and
in the angle of light. The focal length is not
isolating a part of the scene
altered and essential y the original image is just
where the sun was rising, I
cropped and re-sized using software within the
have captured the best of
camera. You can achieve the same effect with
the colour, and got a nice
much more control by doing it yourself on the
computer and using better software to obtain a
church in the shot too.
higher quality end image.
Incidental y, this is the
same church from where I took the sunset photo on the previous page. This If you have the capability, it’s best to shoot in
photo was taken about halfway between the church and those mountains.
Image is then re-sized back to 12mp
RAW and then crop your image to get closer.
(with loss of quality)
44
www.ianmiddletonphotography.com
www.ianmiddletonphotography.com
45
Part 4: Focusing (auto and manual)
Camera:
Every photo has a point of focus, and you nearly always choose this yourself; Of course the camera lens is made of glass and cannot be altered in this way; rarely should you let the camera decide for you. The focal point of a scene can therefore the lens itself is moved back and forth instead. By varying the distance be in a variety of places, therefore selection of different focal points is made by between the lens and the focal plane we can change the focal point. Essential y adjusting the lens.
the camera is making small adjustments to the focal length in order to focus on a given subject within the scene. This can be done manual y or automatical y.
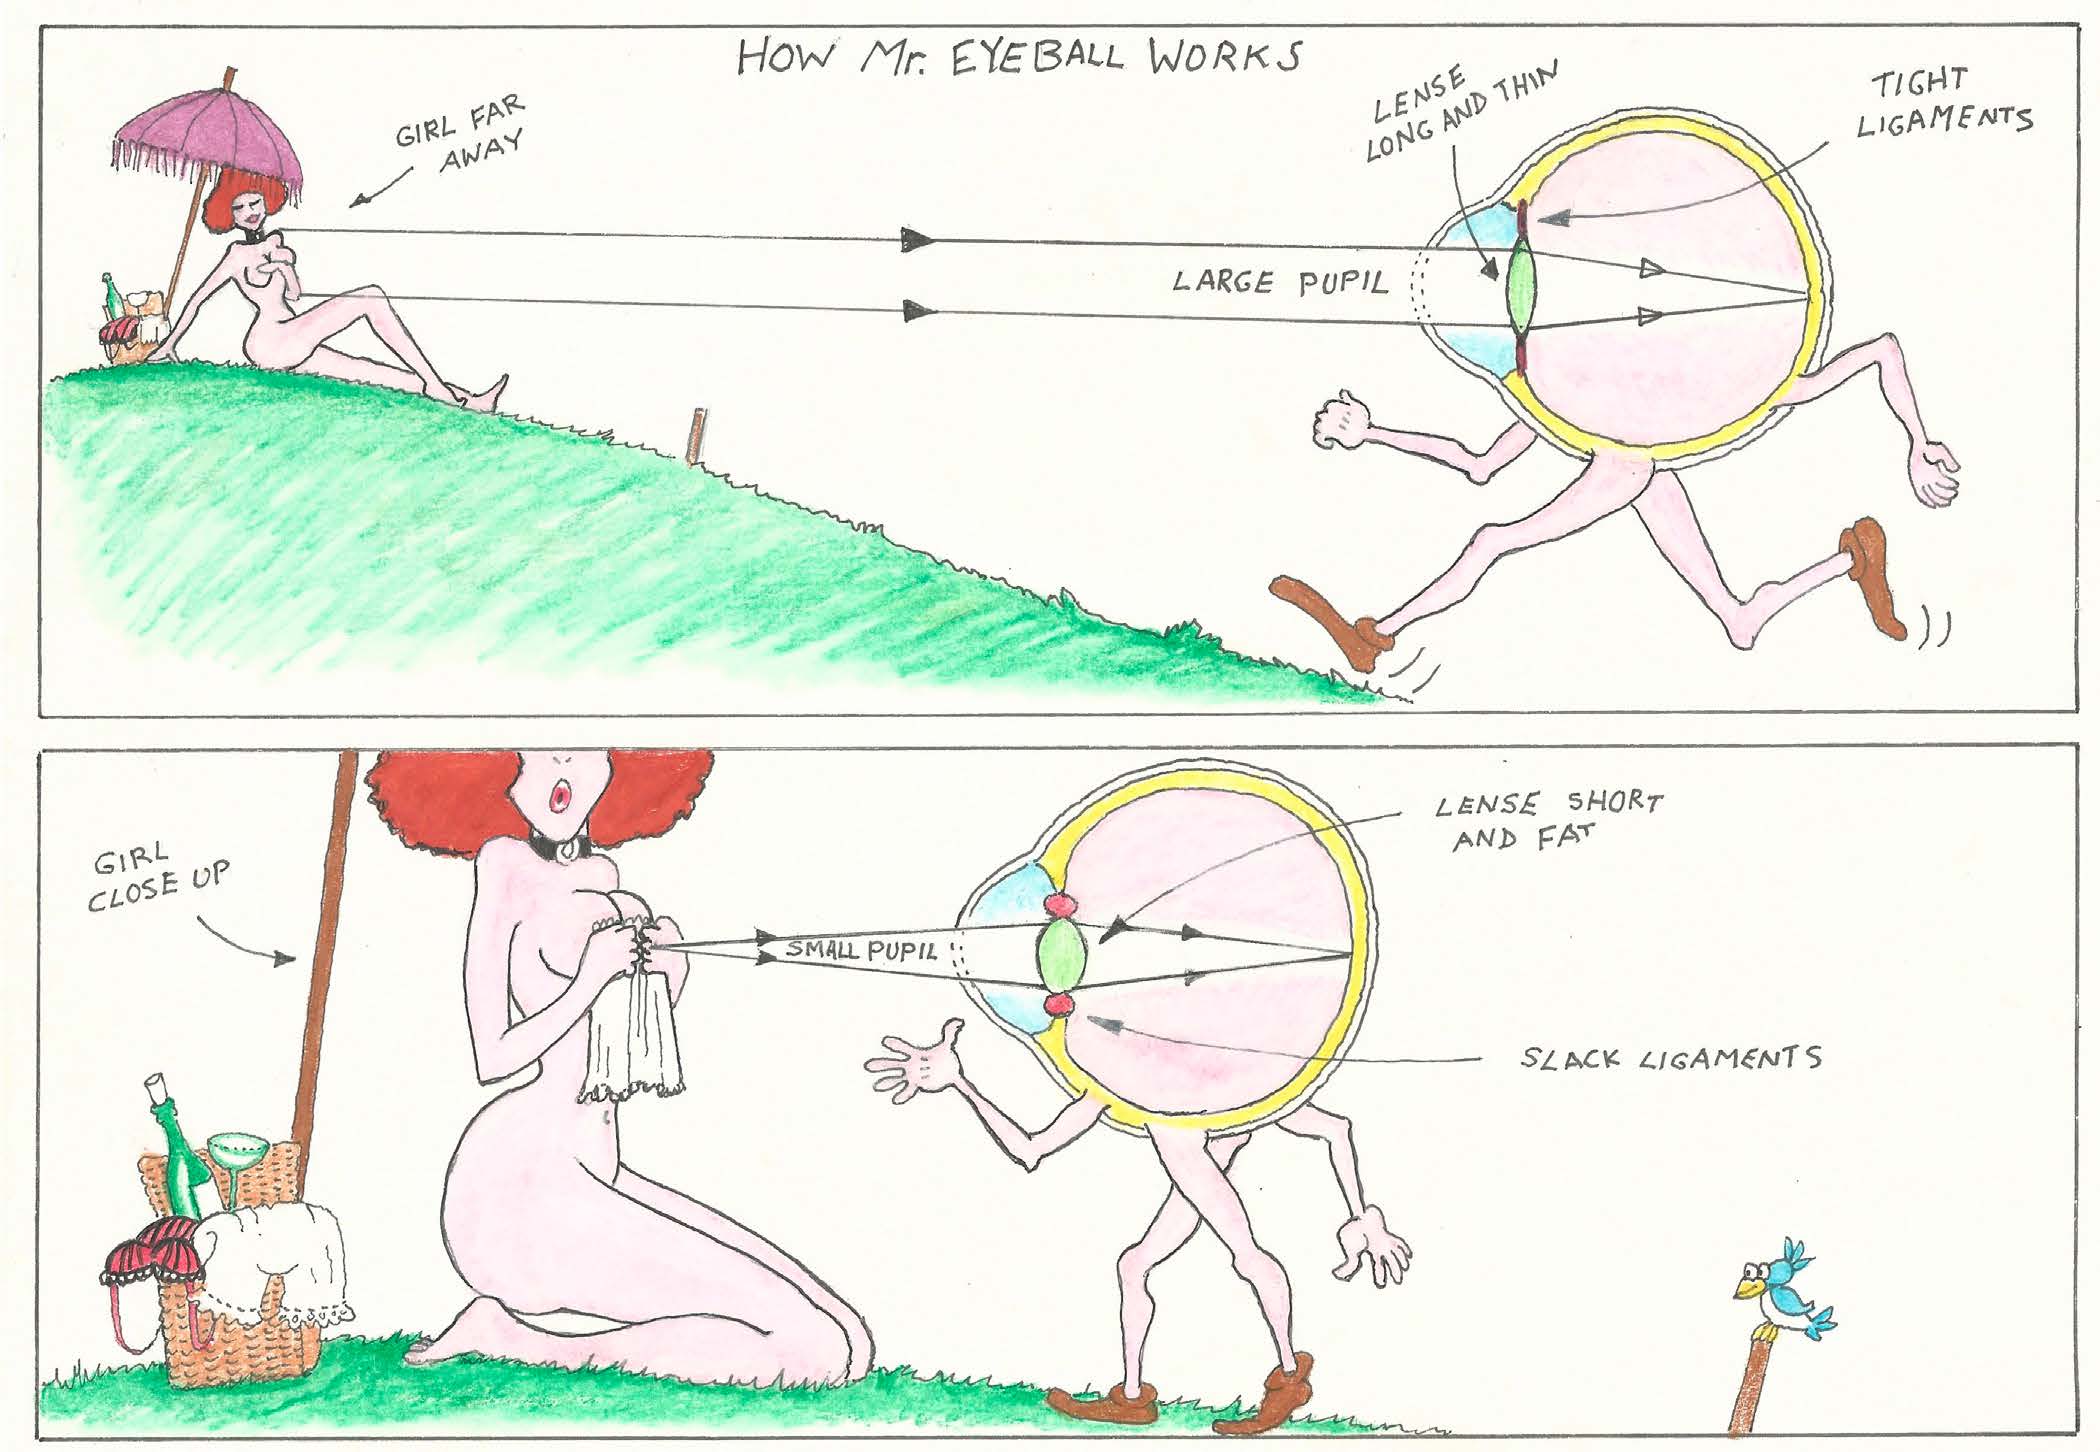
Eyes: Just as our eyes can focus on different objects at different distances, so can the camera. They just do it differently. The eye can change the shape of its lens When the gap measures the lens’s given focal length, ie 50mm, then the focus by using ciliary muscles to squash or relax the lens, which alters the refraction is at infinity. This means that the focal point is far in the distance, such as the of the light.
horizon in a landscape scene. As the focal length increases, the point of focus is closer to the camera. So with an object close to the camera, the focal length is Lens is thin or flat: the eye is focused on distant objects.
slightly more than 50mm.
Lens is fat or squashed: the eye is focused on close objects Illustration by David Selwood
Illustration by David Selwood
46
www.ianmiddletonphotography.com
www.ianmiddletonphotography.com
47

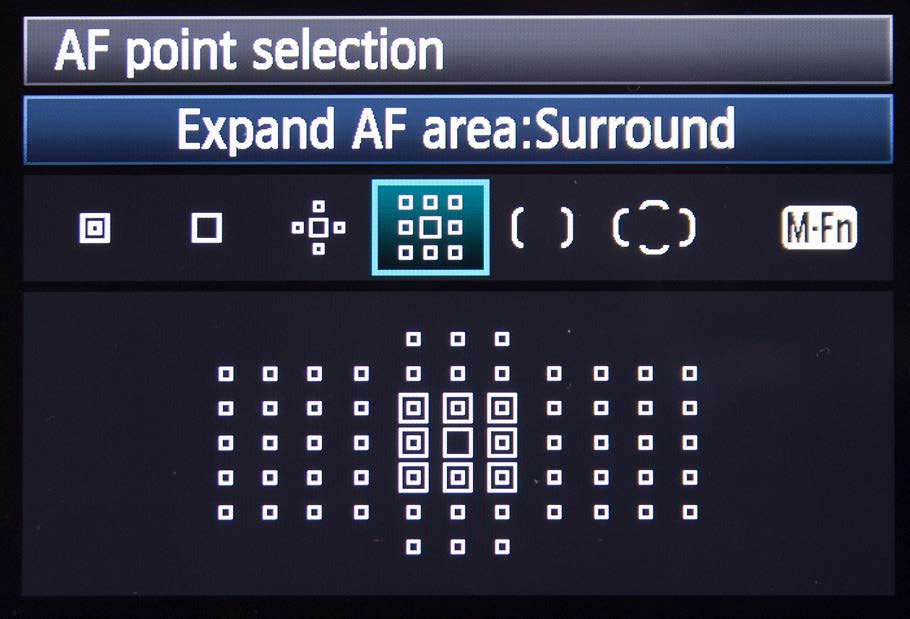
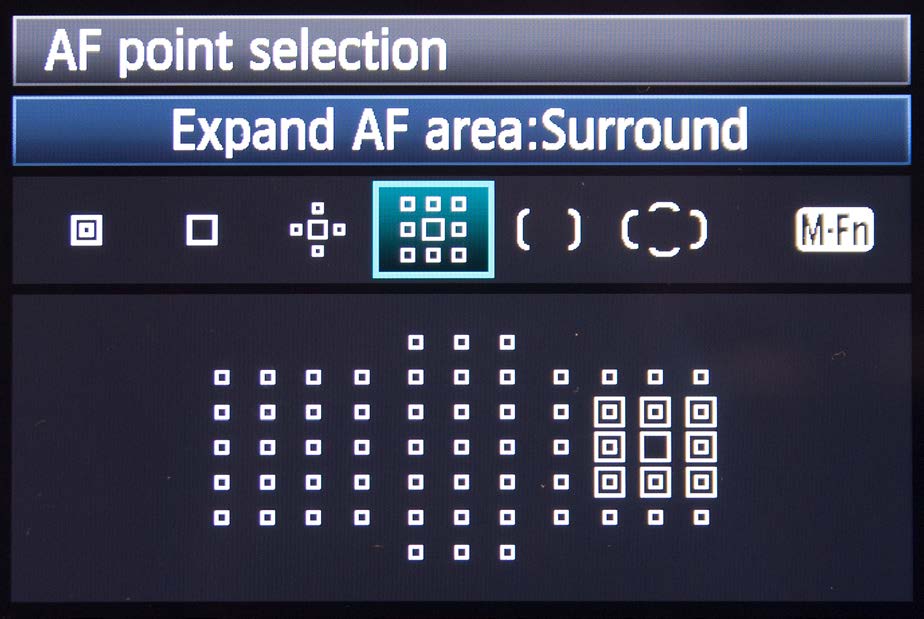

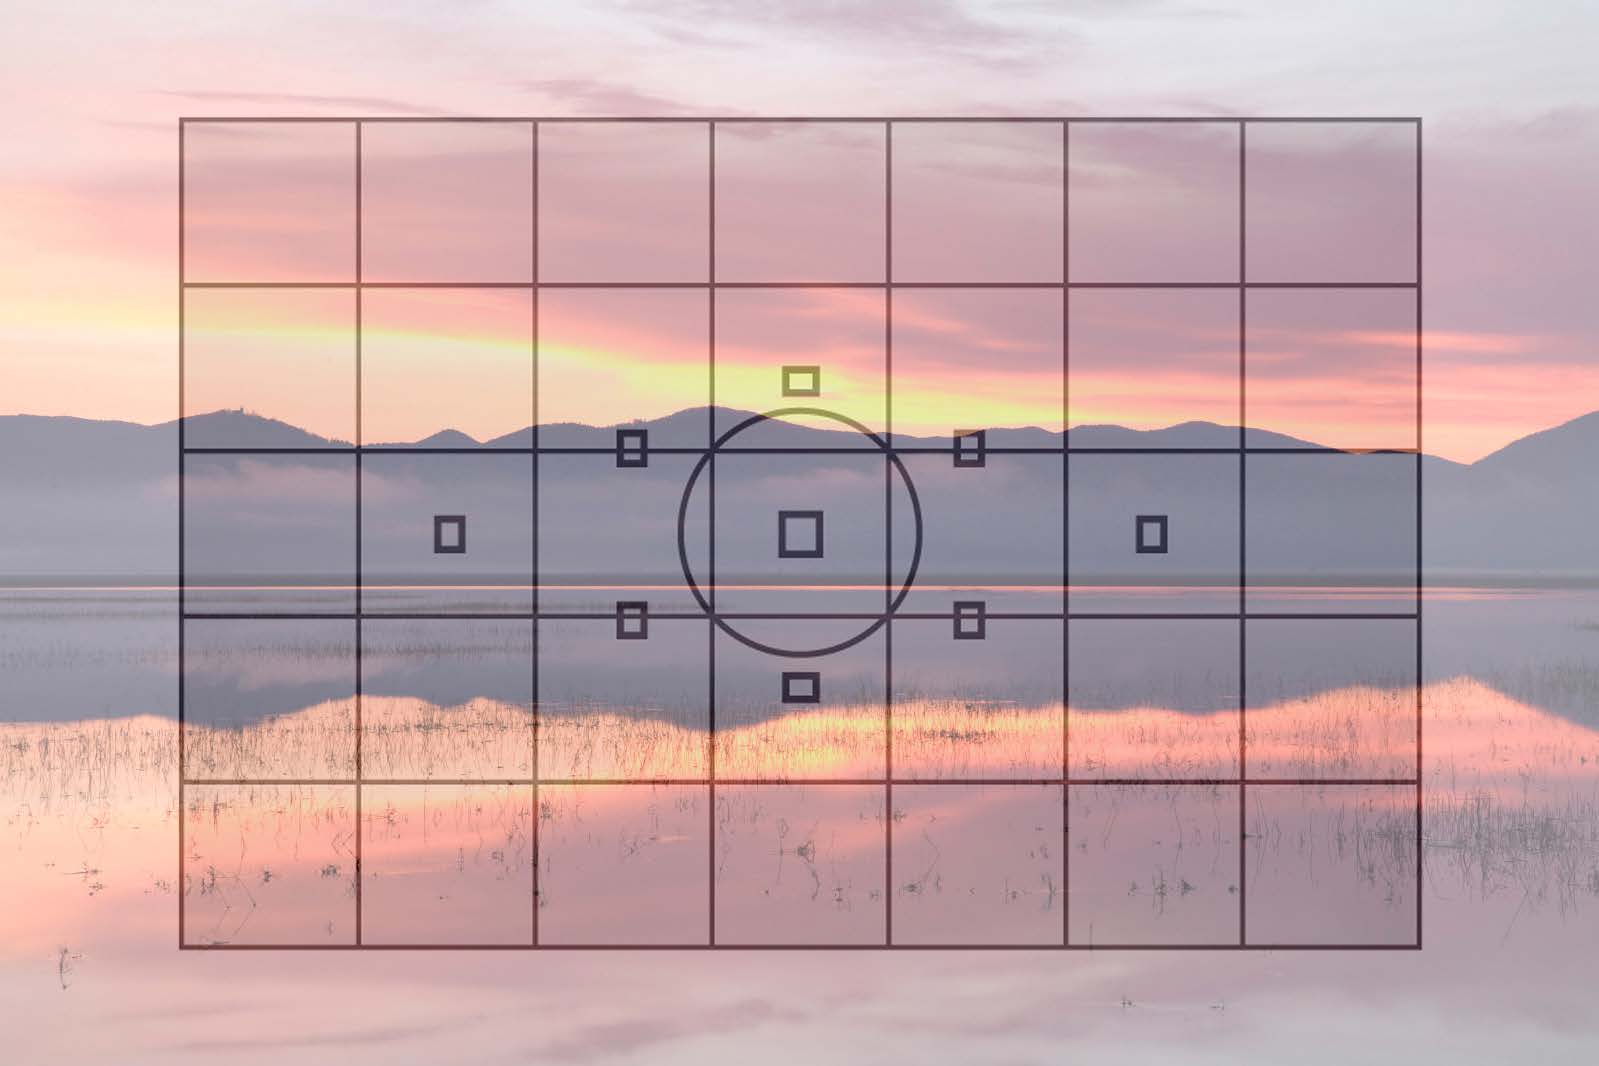
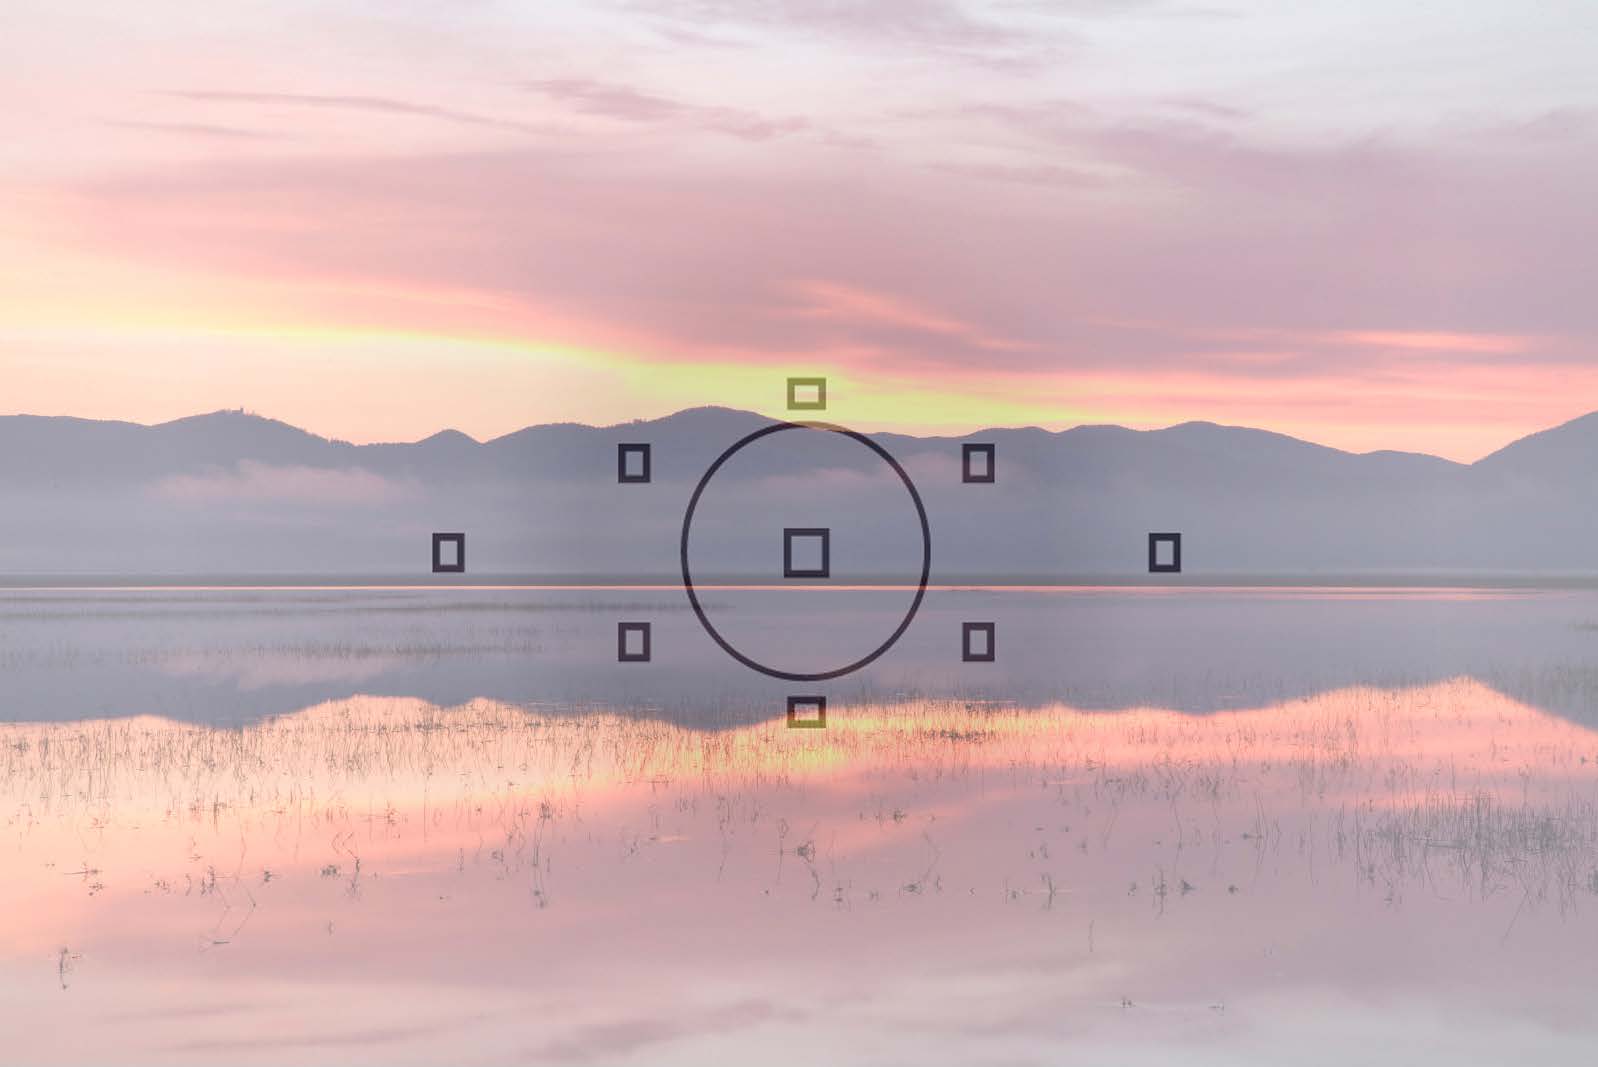
Multi-segment focal points and how we can select our focus point.
Multipoint selection:
Always think about your focal point; your point of focus is rarely in the middle This option selects either all the points or multiple points and the camera will of the frame.
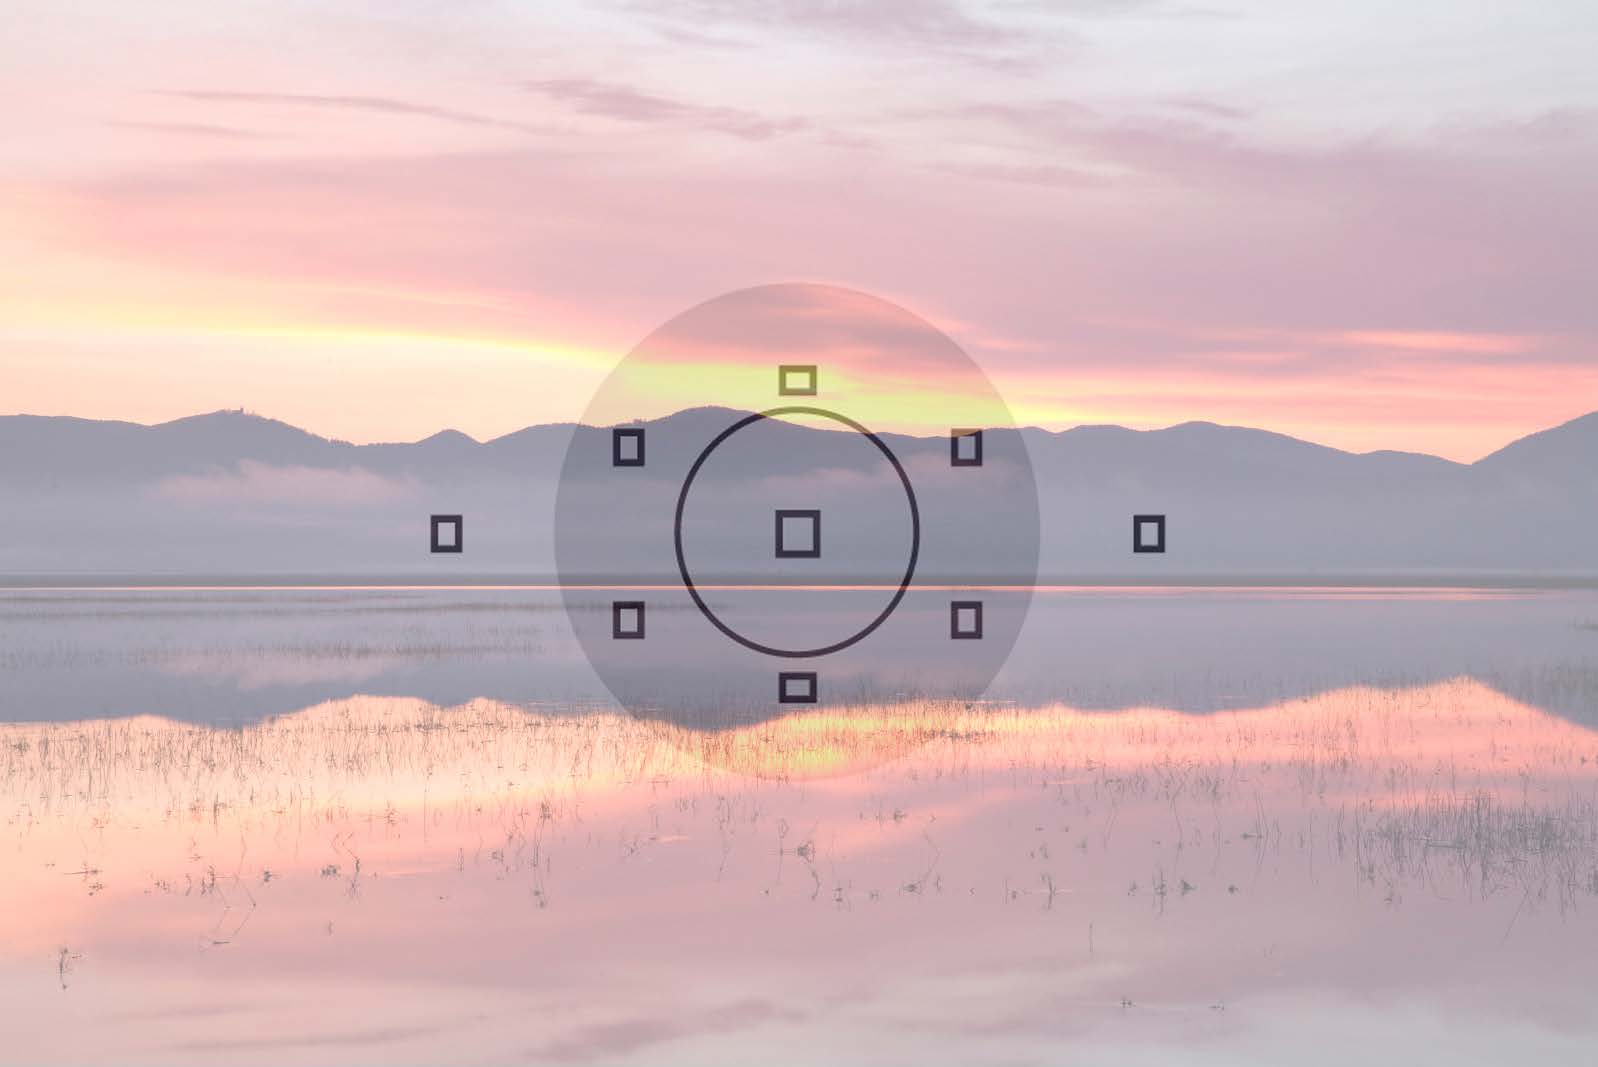
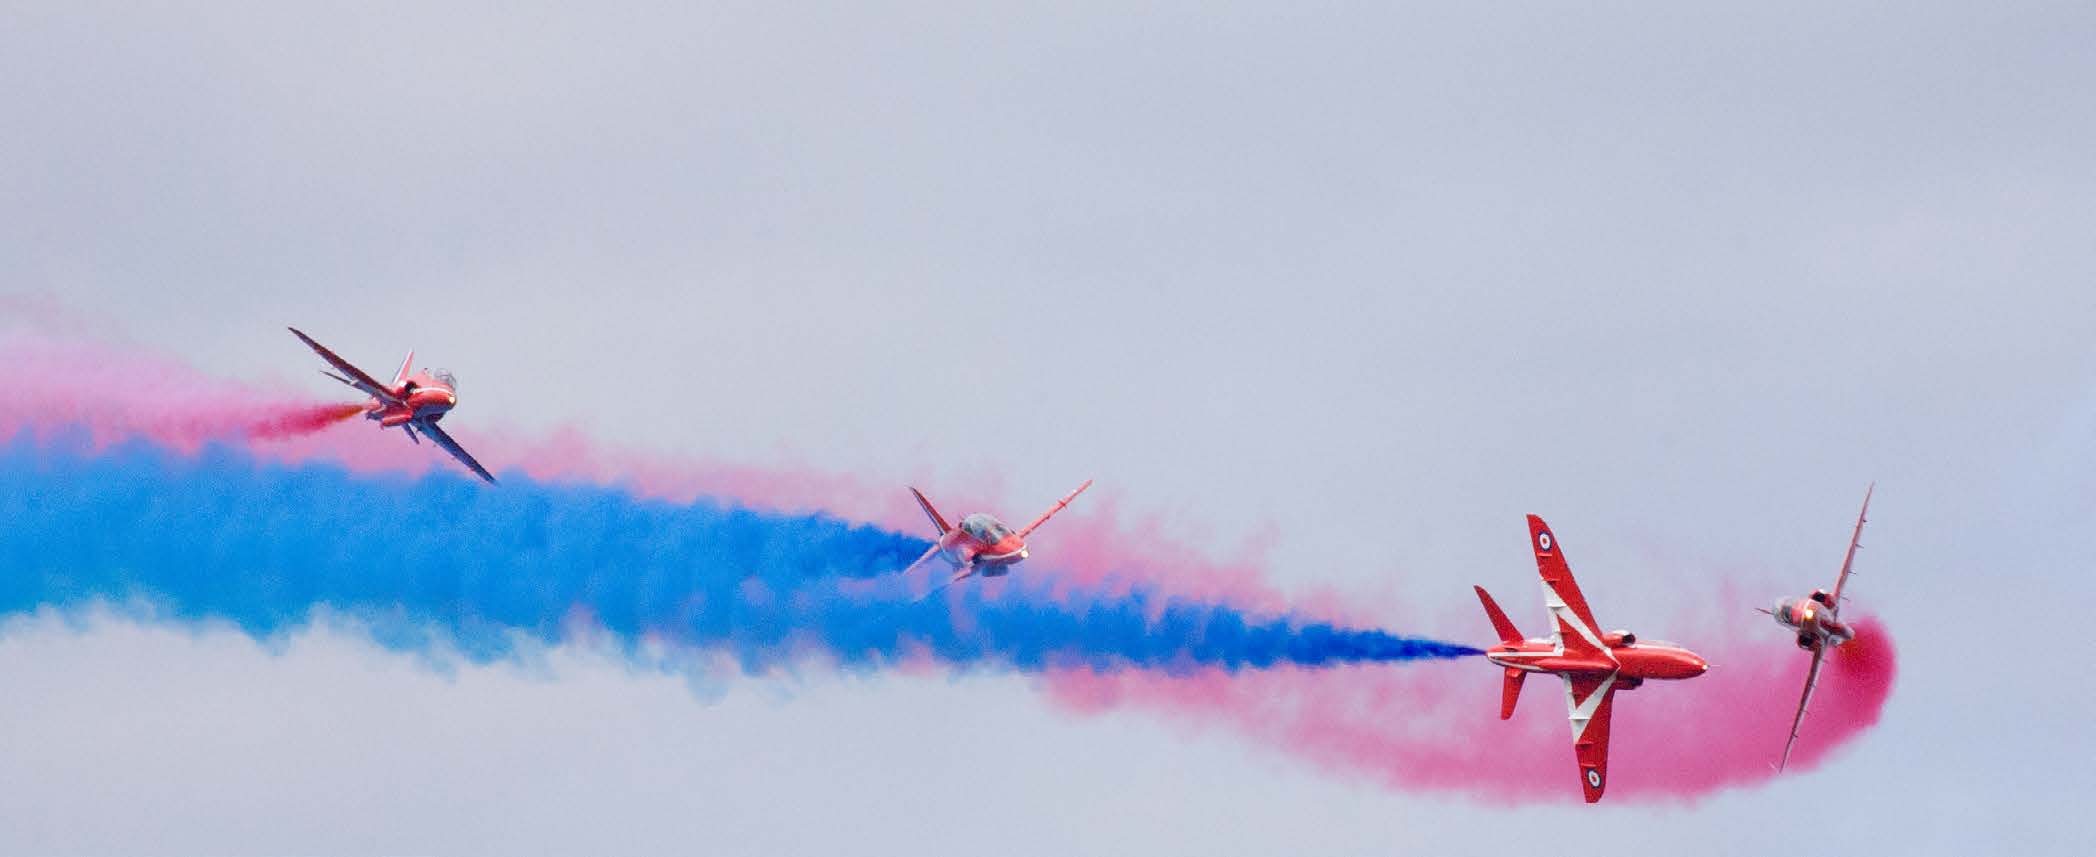
then automatical y select a point, or an average of several points according to the scene it’s seeing. This is useful when your subject is large, for tricky scenes where Automatic focusing (AF)
the light is low and for moving subjects such as people or fireworks.
Focus points selection options:
•
Single point
•
Multipoint
All digital cameras have multi-segment focussing which allows you to use several focus points as well as the main one in the centre. How many they have depends on the camera. It’s important to note that the central focus point will always be the most accurate. That being said, the outer points are still very reliable and should be used when composing and choosing your point of focus.
Tip: The focus is set according to the distance between you and your subject.
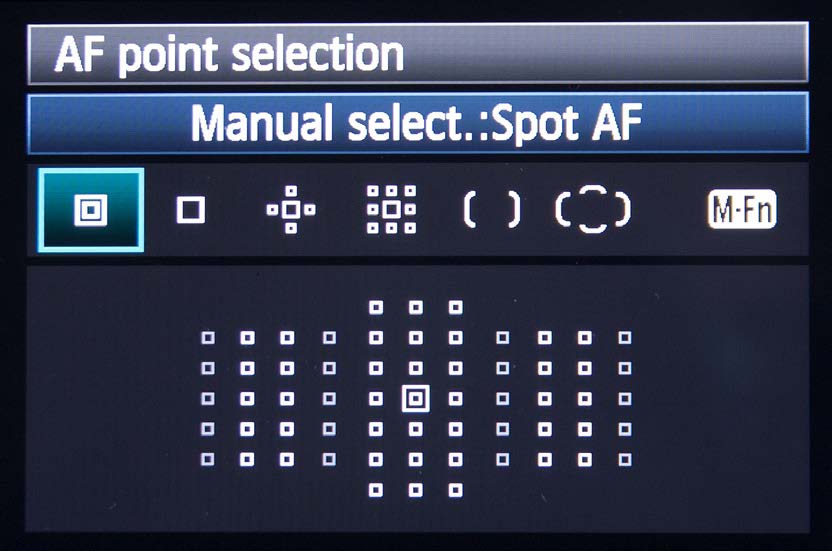
The images above show an expanded AF, where several segments are selected Any movement backwards or forwards, either of you or your subject, after the and you can move them about the scene. This still gives you some control over focus has been locked, will throw your subject out of focus. You will need to the area you wish to focus on, but also makes it a little easier.
refocus
Single point: As the name suggests, this allows you to individual y choose one of the points. This is very precise and can help you to focus more exactly on a very small area of the scene. As you can see here in each pictures, a different focus point has been selected in each case.
In the image above you can see that the whole 61 points have been selected.
This is the full auto mode and the camera will choose the focus point from somewhere within that scene.
48
www.ianmiddletonphotography.com
www.ianmiddletonphotography.com
49
Focusing modes
Most digital SLRs and some advanced compacts allow you to choose from three focusing modes:
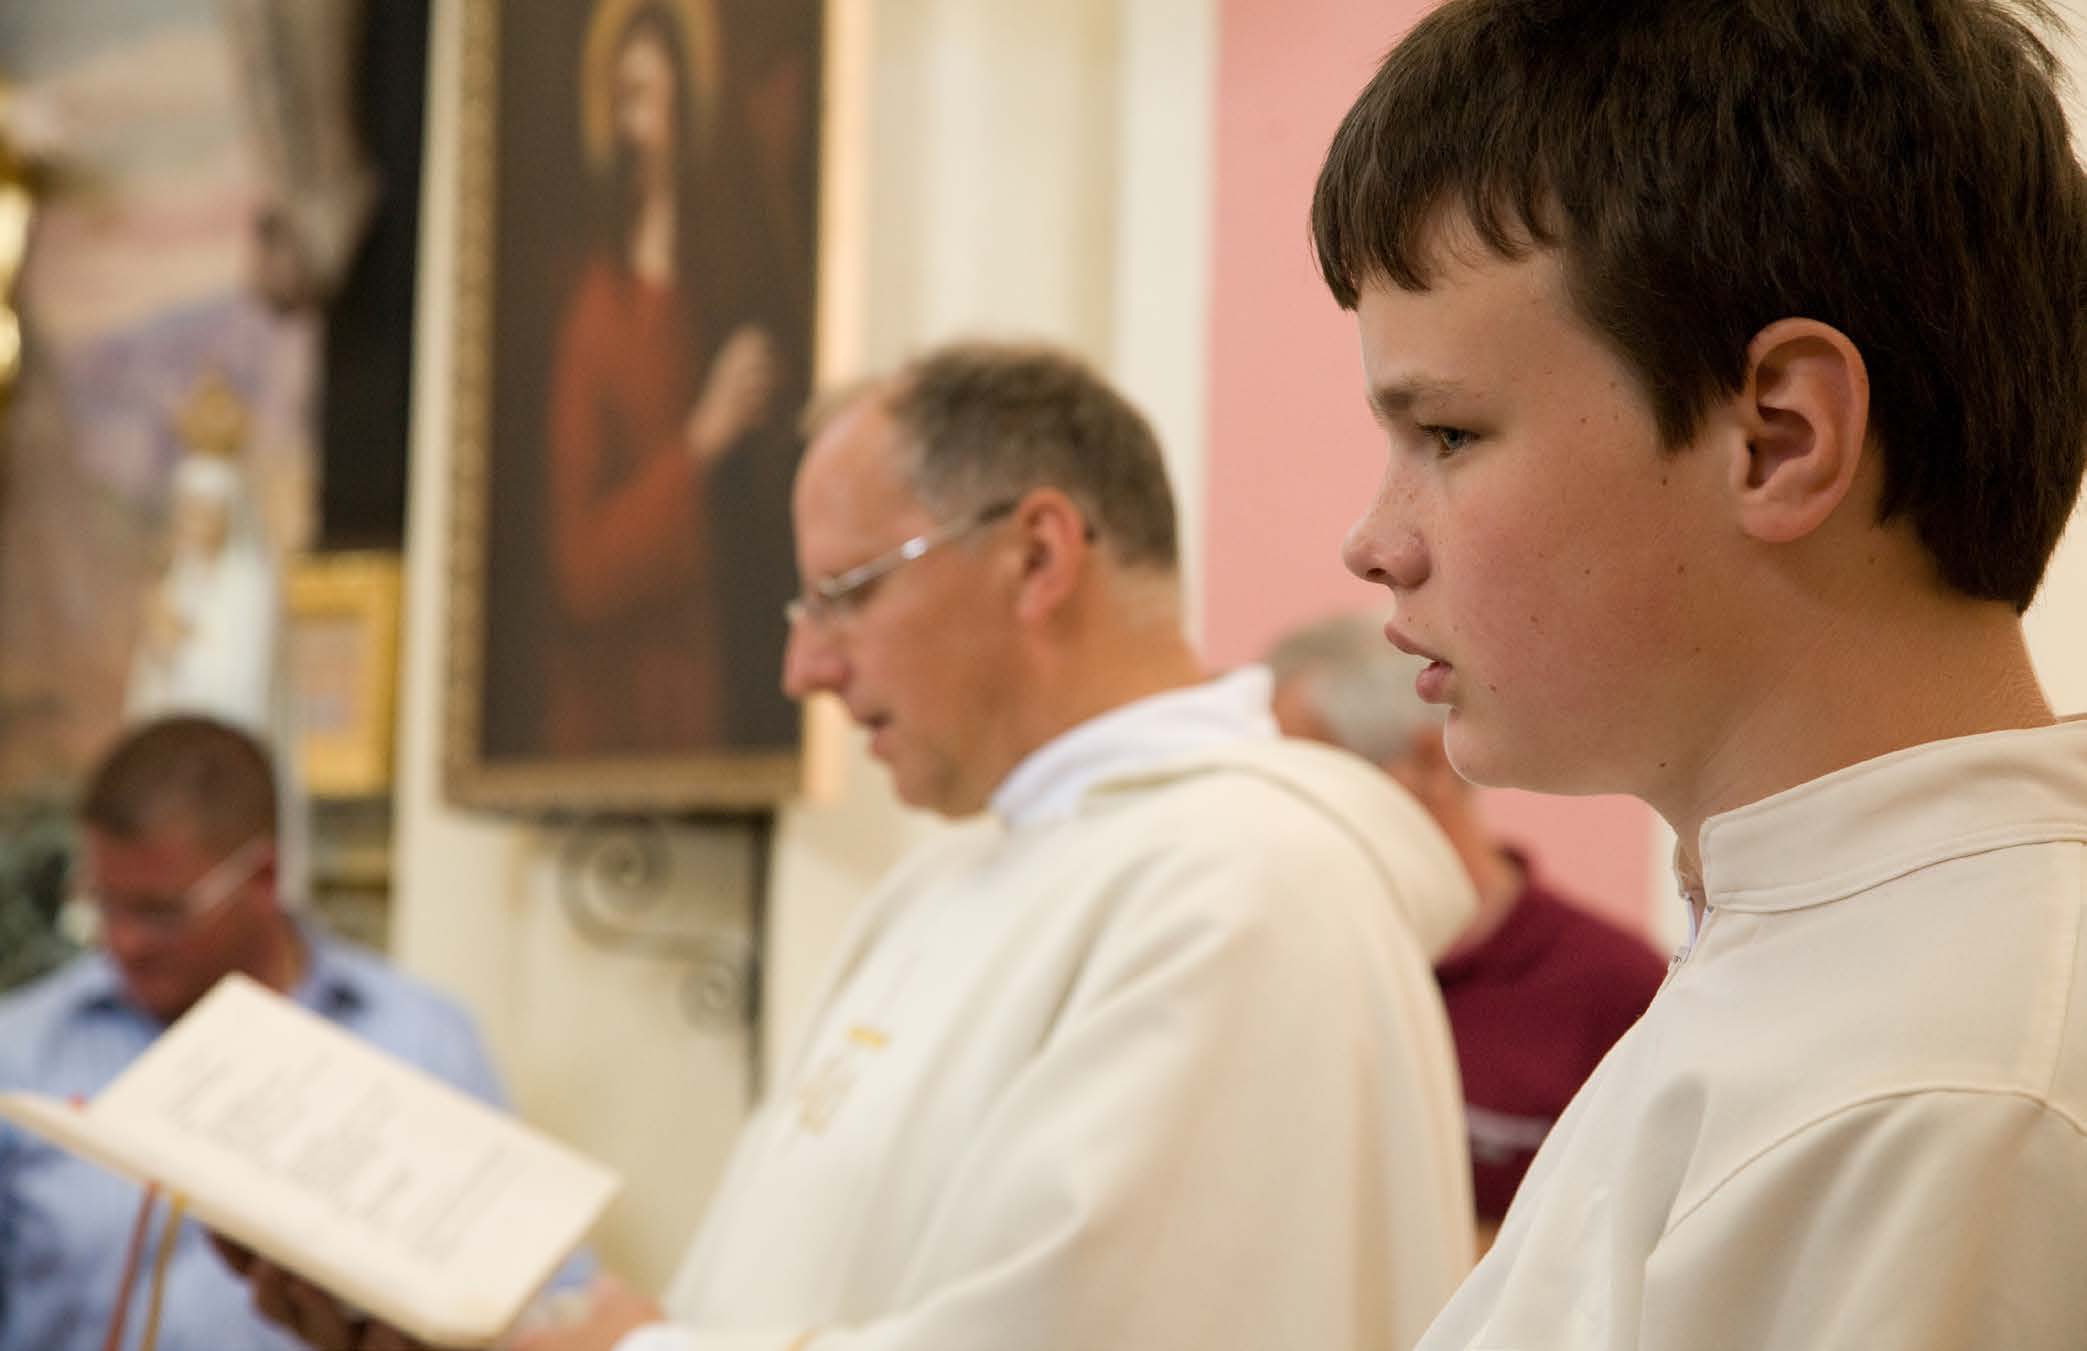
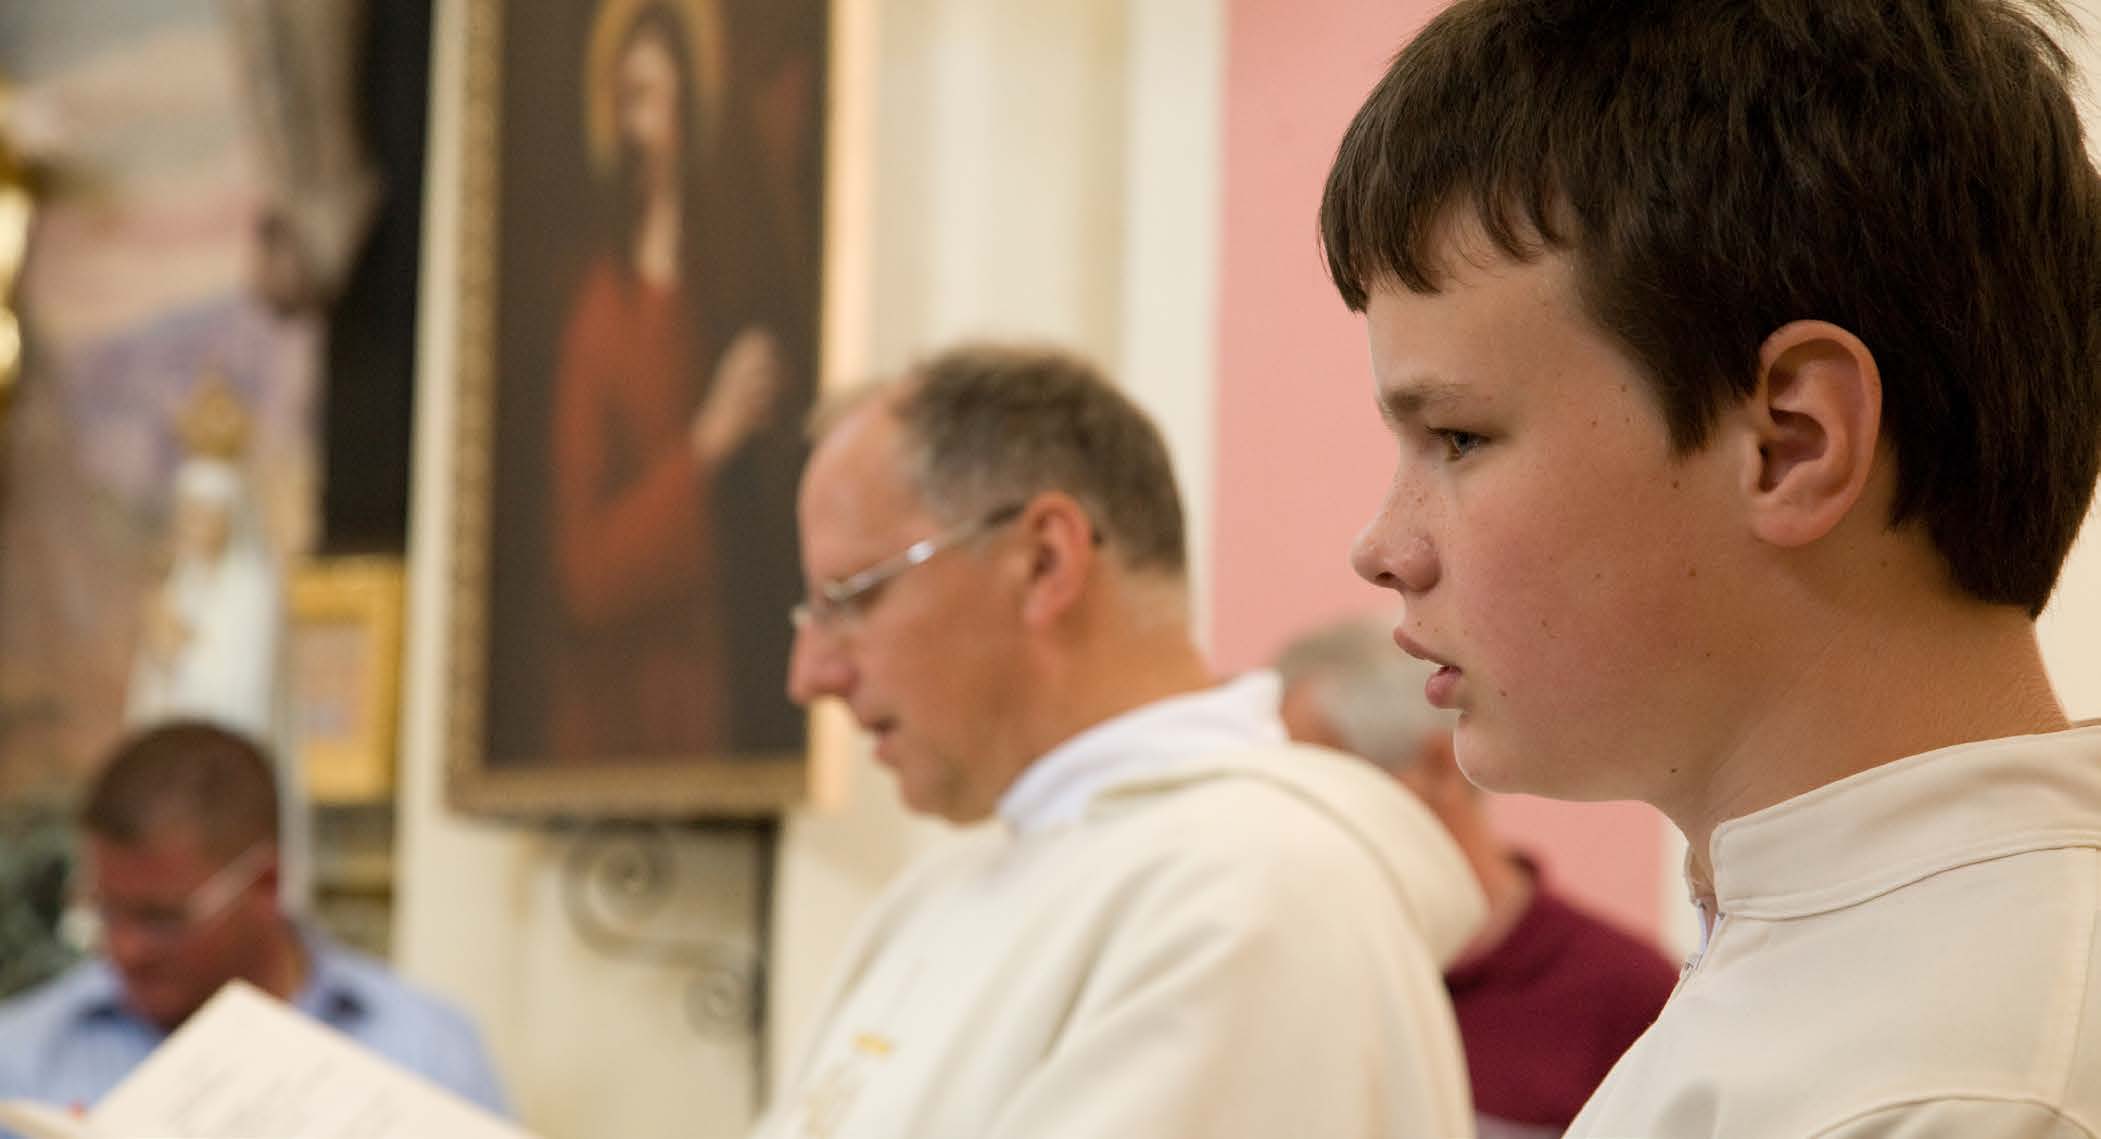
One shot: Different cameras may have different names for this, as seen in the table below, however the principle is the same. When you choose this mode the focus will lock on your subject when you half press the shutter button and remain locked in that position as long as you hold the button half down. You are then free to move your camera without altering the focus position. This is ideal for static subjects that are out of range of the focus points. You can lock the focus and then reframe your shot to place the subject elsewhere within the frame.
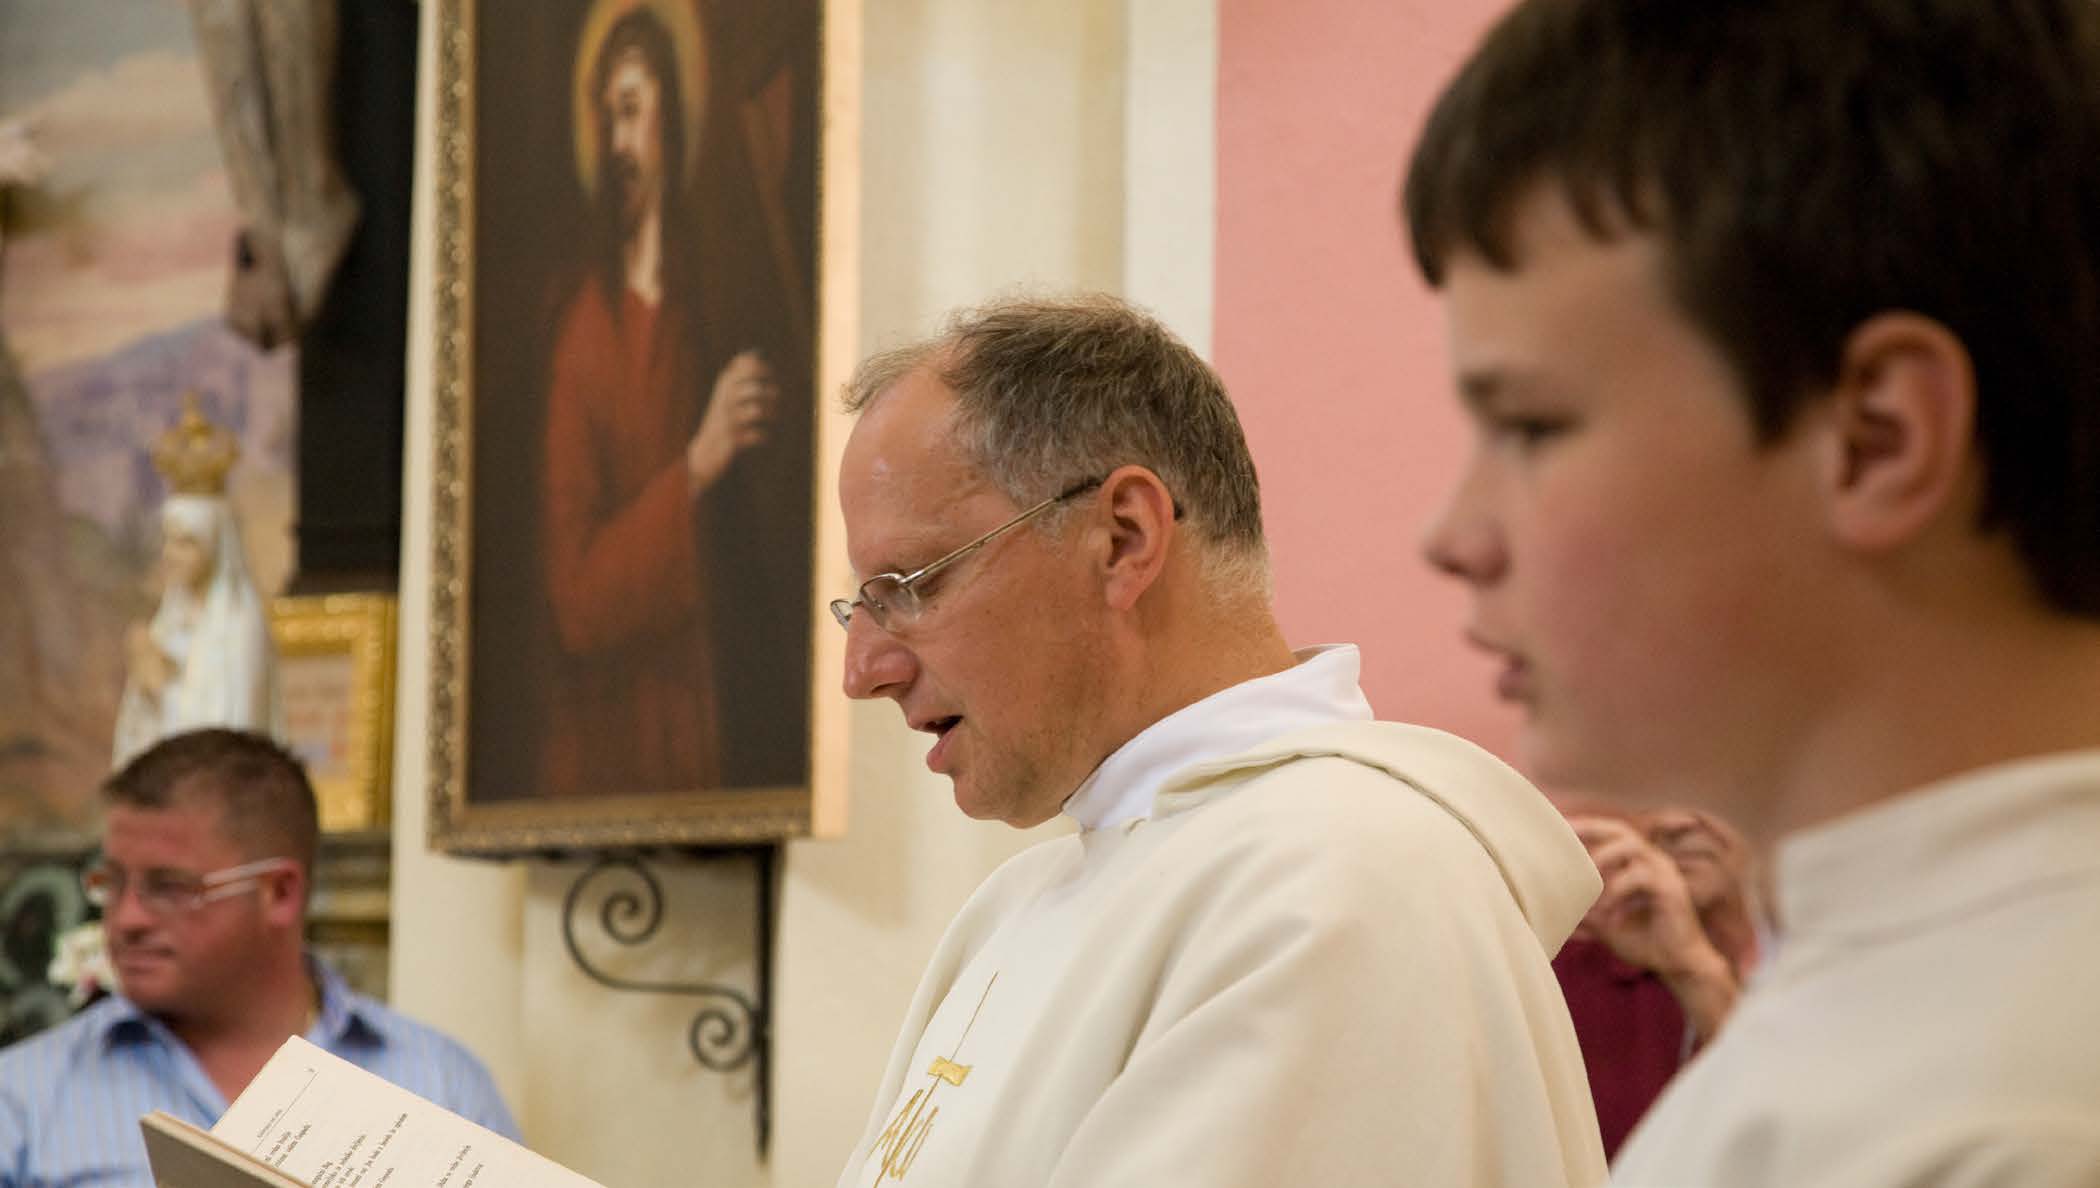
Tip: Be careful not to move the camera back or forth because you will alter the distance between you and the subject, which in turn will render your subject out of focus and you will have to re-focus. When recomposing, ensure Centre focal point selected, focus is on the priest
you only make the side to side movements, and keep them to a minimum.
Continuous shooting: This mode will lock on to your subject and track it while you are holding down the shutter halfway. The AF continues to autofocus until you press the shutter completely. This mode is typical y used on moving subjects so as to ensure that the subject stays in focus.
One shot / continuous: This is an in-between mode, where the camera locks the focus but will re-focus should the subject move any significant amount.
Focus mode
Use
One shot:
Static subjects, landscapes
Canon cameras - One shot
Nikon cameras - (Single servo AF-S)
One shot / continuous:
Static subjects that could move a little
Canon cameras - AI focus
Nikon cameras – Auto servo AF-A)
Continuous:
Moving subjects
Canon cameras - AI servo
Right focal point selected, so focus is now on the altar boy Nikon cameras – Continuous servo AF-C)
50
www.ianmiddletonphotography.com
www.ianmiddletonphotography.com
51

One shot mode
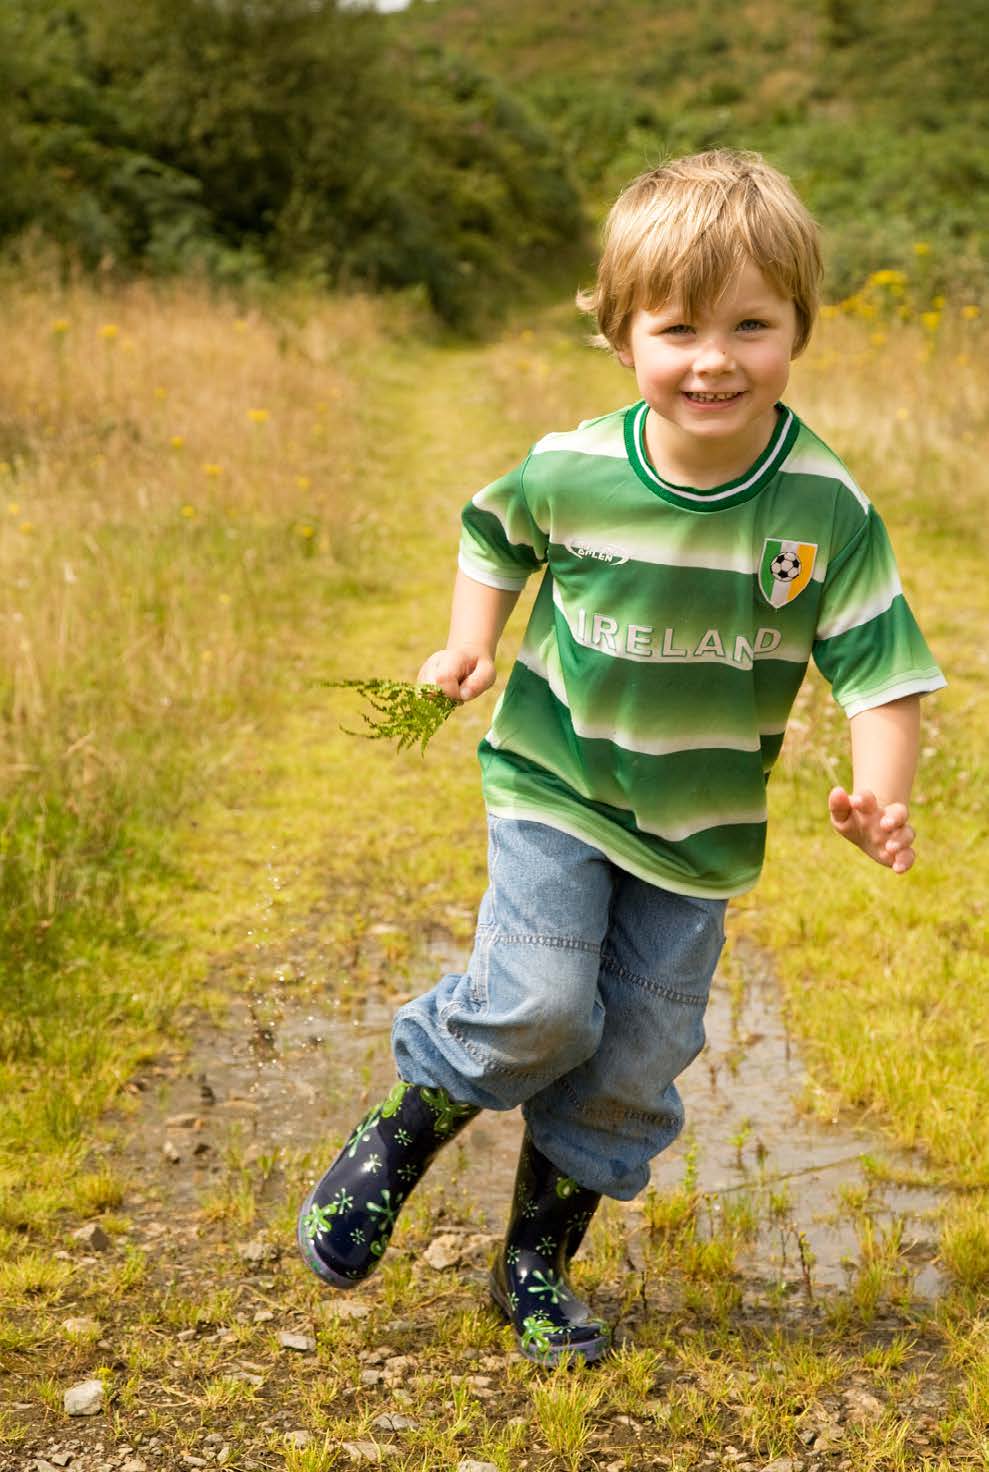
As the boy was standing still here, one shot
mode was all that was needed.
GET A 10% DISCOUNT WITH SQUARESPACE USING MY
CODE IAN10
SIGN UP FOR A FREE 14-DAY TRIAL
Continuous mode
Here the boy was running through the
puddle, and more importantly, running
towards me. That meant the distance
between the camera and him was
changing.
By using the continuous autofocus
mode, I was able to shoot a number of
photos continuously, with the camera
continuously focusing and tracking, so
the boy remained in focus in each photo.
Had I used one shot mode and taken the
photos continuously, without removing
my finger from the shutter button, the
first photo would have been in focus,
but any subsequent photos would have
been out of focus.
52
www.ianmiddletonphotography.com
www.ianmiddletonphotography.com
53

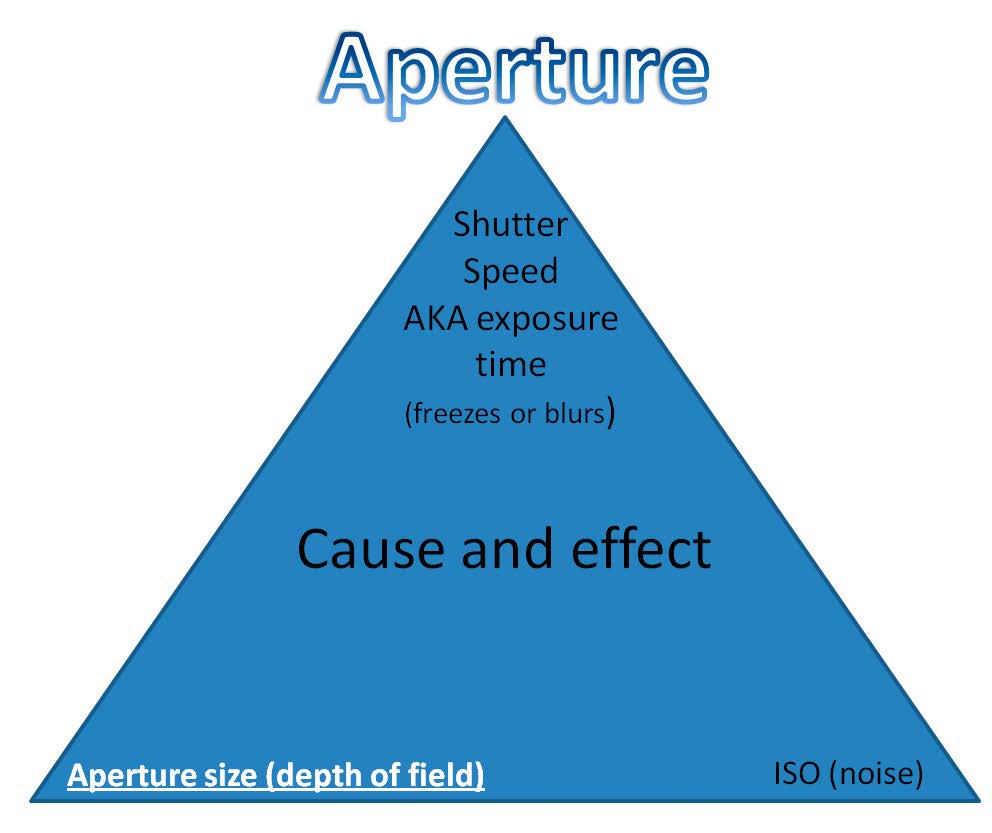
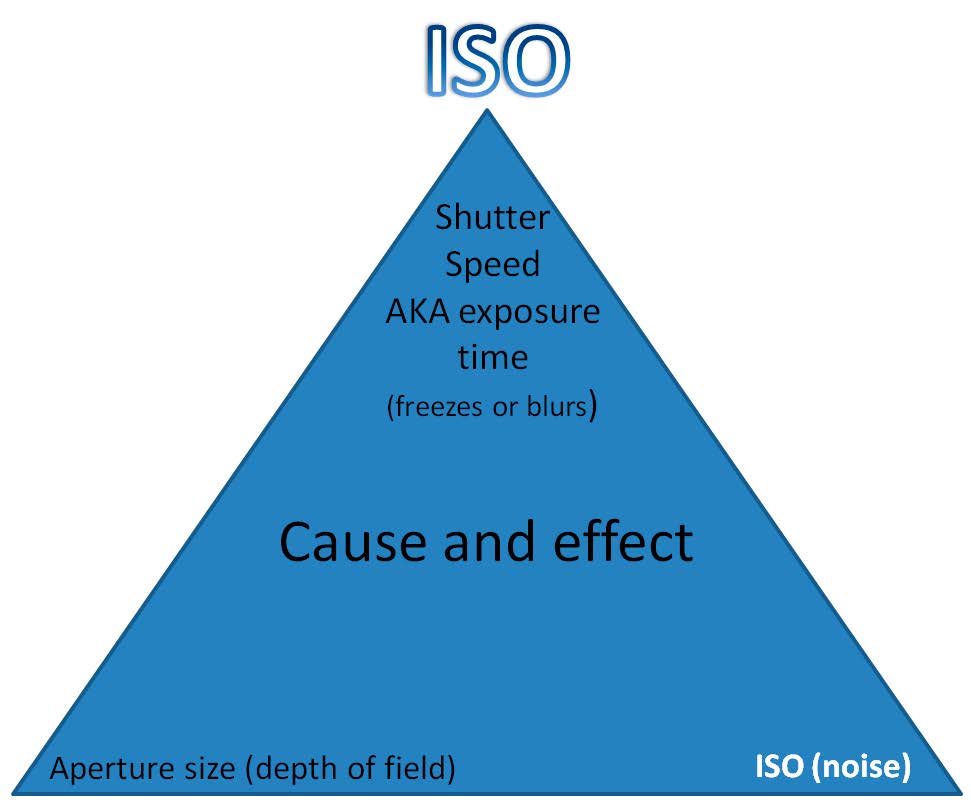
Part 5: The exposure triangle (shutter speed, aperture, ISO) Shutter Speed (AKA - Exposure Time)
The three elements:
Natural y, as our eyes are
seeing constantly moving
In order to capture our
images, our retina is
image onto the sensor or film
permanently exposed to
we must expose it to light.
the light.
This is known as exposure.
There are three elements
However, this is not the
to consider when exposing
case with photography.
for a photo. All three work
In order to capture an
together in a kind of cause
image you must expose
and effect manner. In order
the sensor or film to the
to get the photo right, when
light for a period of time,
you adjust one, you have to
known as exposure time.
adjust another; whether this
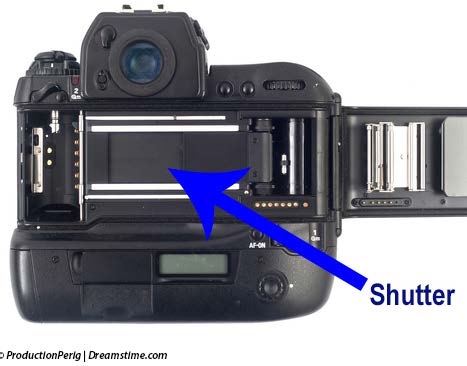
is done automatical y by the camera, or manual y by the photographer. It’s not Inside your camera there is a shutter that acts as a kind of curtain. When the as simple as choosing each setting and firing away. Adjusting each element also shutter button is pressed the curtain is pulled back and light is allowed to fall has an effect on the image itself:
upon the sensor/film. The shutter is then closed and the image is frozen in place.
• Shutter speed (determines how moving objects will appear in your image. A In essence, for the duration that the sensor/film is exposed the image is drawn fast shutter speed will freeze movement, while a slow shutter speed will blur upon it. With film the roll is moved on to another empty frame, and with digital it.)
the image is then transferred to the memory card and saved.
• Aperture (affects “depth of field”, which will determine how much of your background is either sharp or out of focus.)
• ISO (increasing this will also add more noise into your image.) So to understand this, we need to look at each one in turn. As shutter speed is the most obvious (this is the clicking sound you hear when you take a photo) we will start with this.
54
www.ianmiddletonphotography.com
www.ianmiddletonphotography.com
55
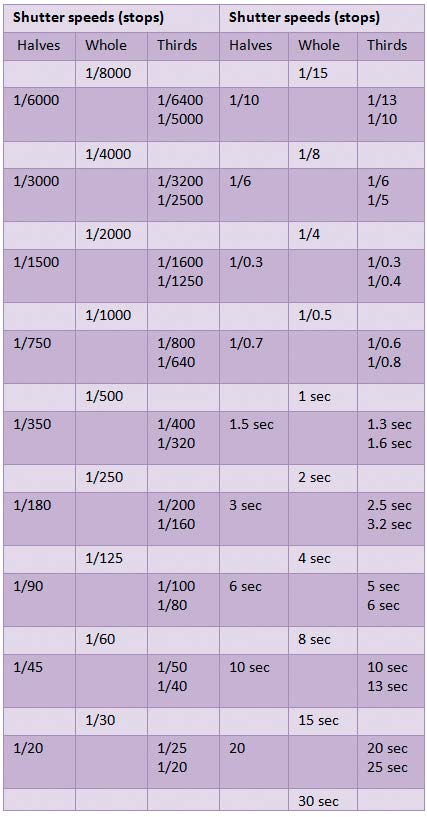
Shutter speed (exposure
Shutter speeds are a classic example of how the light draws the picture. Therefore, time) is measured in the
how long you expose for can make a huge difference to how your image looks.
time that the shutter is
Any moving objects will be drawn according to the length of exposure.
open, usual y in a fraction
of a second such as:
Thus when there is movement in the scene:
1/125 second (125th of a
second).
A slow shutter speed (long exposure) will record this movement into what is called “motion blur”, but onto one image.
Shutter speed
adjustment is measured
A fast shutter speed (short exposure) will freeze the movement.
in stops:
• Full increments
Here are some examples of shutter speeds and their uses: (double or half the
Shutter Speed
Example Use
previous speed)
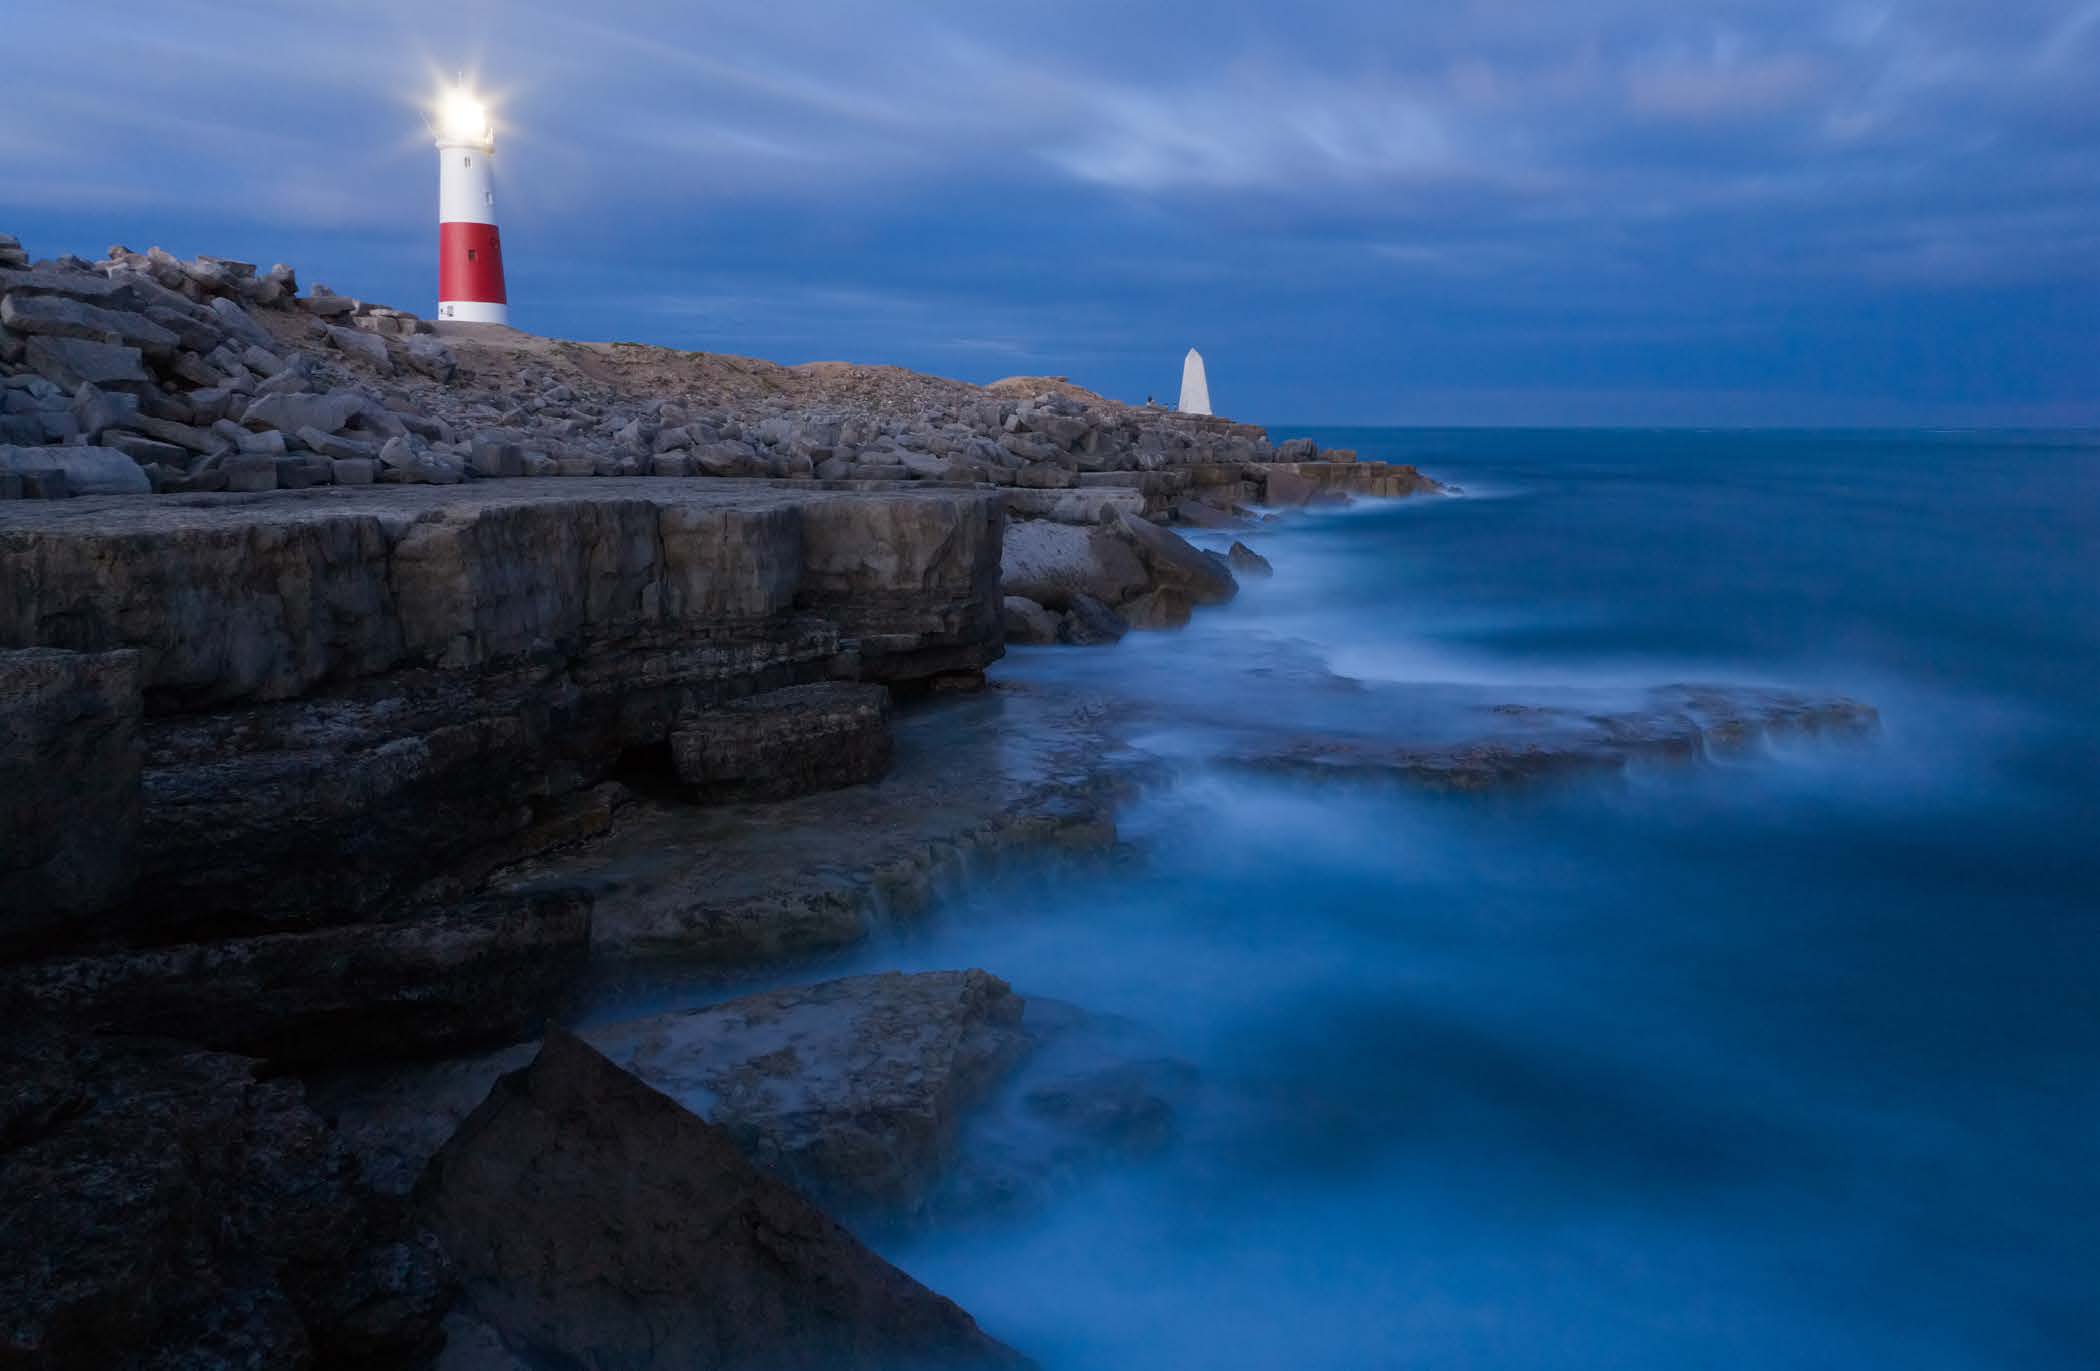
1 - 30+ seconds
Night and low-light photos on a tripod.
• Half (1/2 a stop)
Also used for misty/silky effect on sea or
• Third increments (1/3
other flowing water.
of a stop)
2 - 1/2 second
To add a silky look to fast flowing water.
Landscape photos on a tripod for enhanced
So for a shutter of 1/125,
depth of field.
Shutter
1/2 to 1/30 second
To add motion blur to the background of a
moving subject.
• One stop slower is
Careful y taken handheld photos with im-
1/60
age stabiliser.
• One stop faster is
1/50 - 1/125 second
Typical handheld photos with short fo-
1/250
cal lengths. Rule of thumb for handheld
is minimum speed must equal the focal
The table to the right
length.
shows this.
Eg: 50mm = 1/50sec +
100mm = 1/100 +
1/250 - 1/500 second
To freeze everyday sports / action subject
movement.
Handheld photos with long focal length
(telephoto lens).
1/1000 - 1/4000 second
To freeze extremely fast, up-close subject
motion.
56
www.ianmiddletonphotography.com
www.ianmiddletonphotography.com
57
At a glance - Effects:
Minimum handheld shutter speed = 1/125 sec
Slow speed = blur
This is what I consider to be the best speed to use handheld. But a lot also depends Fast speed = freezes
on your equipment, and the conditions you are working in.
• If it’s cold, you will shiver.
Camera shake: It’s important to note that slow shutter speeds cannot be done
• If your equipment is heavy (big long lens), you will struggle to hold it stil .
handheld because your photo will be blurred due to vibration from camera shake.
• If you are working in an awkward place, or your having to stand tiptoe or No matter how steady you think you are holding your camera, it’s probably not crouch down for your shot, it will be harder to hold the camera steady.
enough.
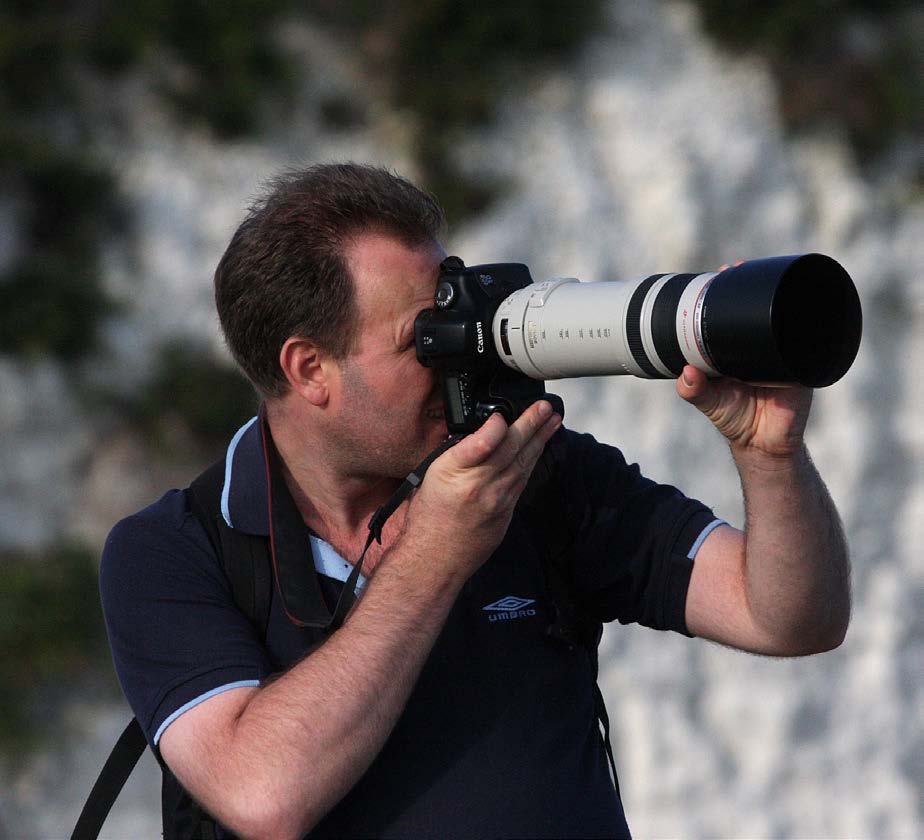
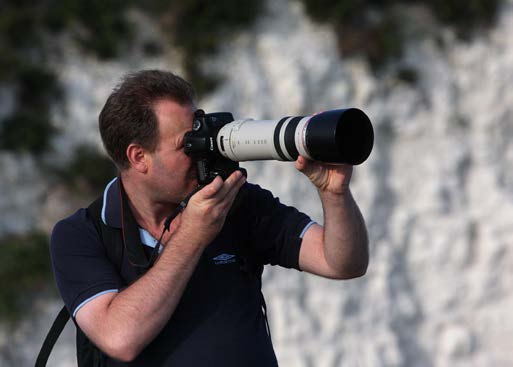
Long lenses
For zoom or telephoto lenses, the rule of thumb is to shoot at a shutter speed equal to or higher than the focal length.
IE: 500mm = 1/500 sec
But of course it also depends on the type of lens. A cheap lightweight zoom will be easier to hold still than an expensive top of the range lens, which is larger and heavier.
The image below was shot handheld at 1/400 at 380mm using the lens in the photo above. It’s a heavy lens, and so is the camera, so I took no chances.
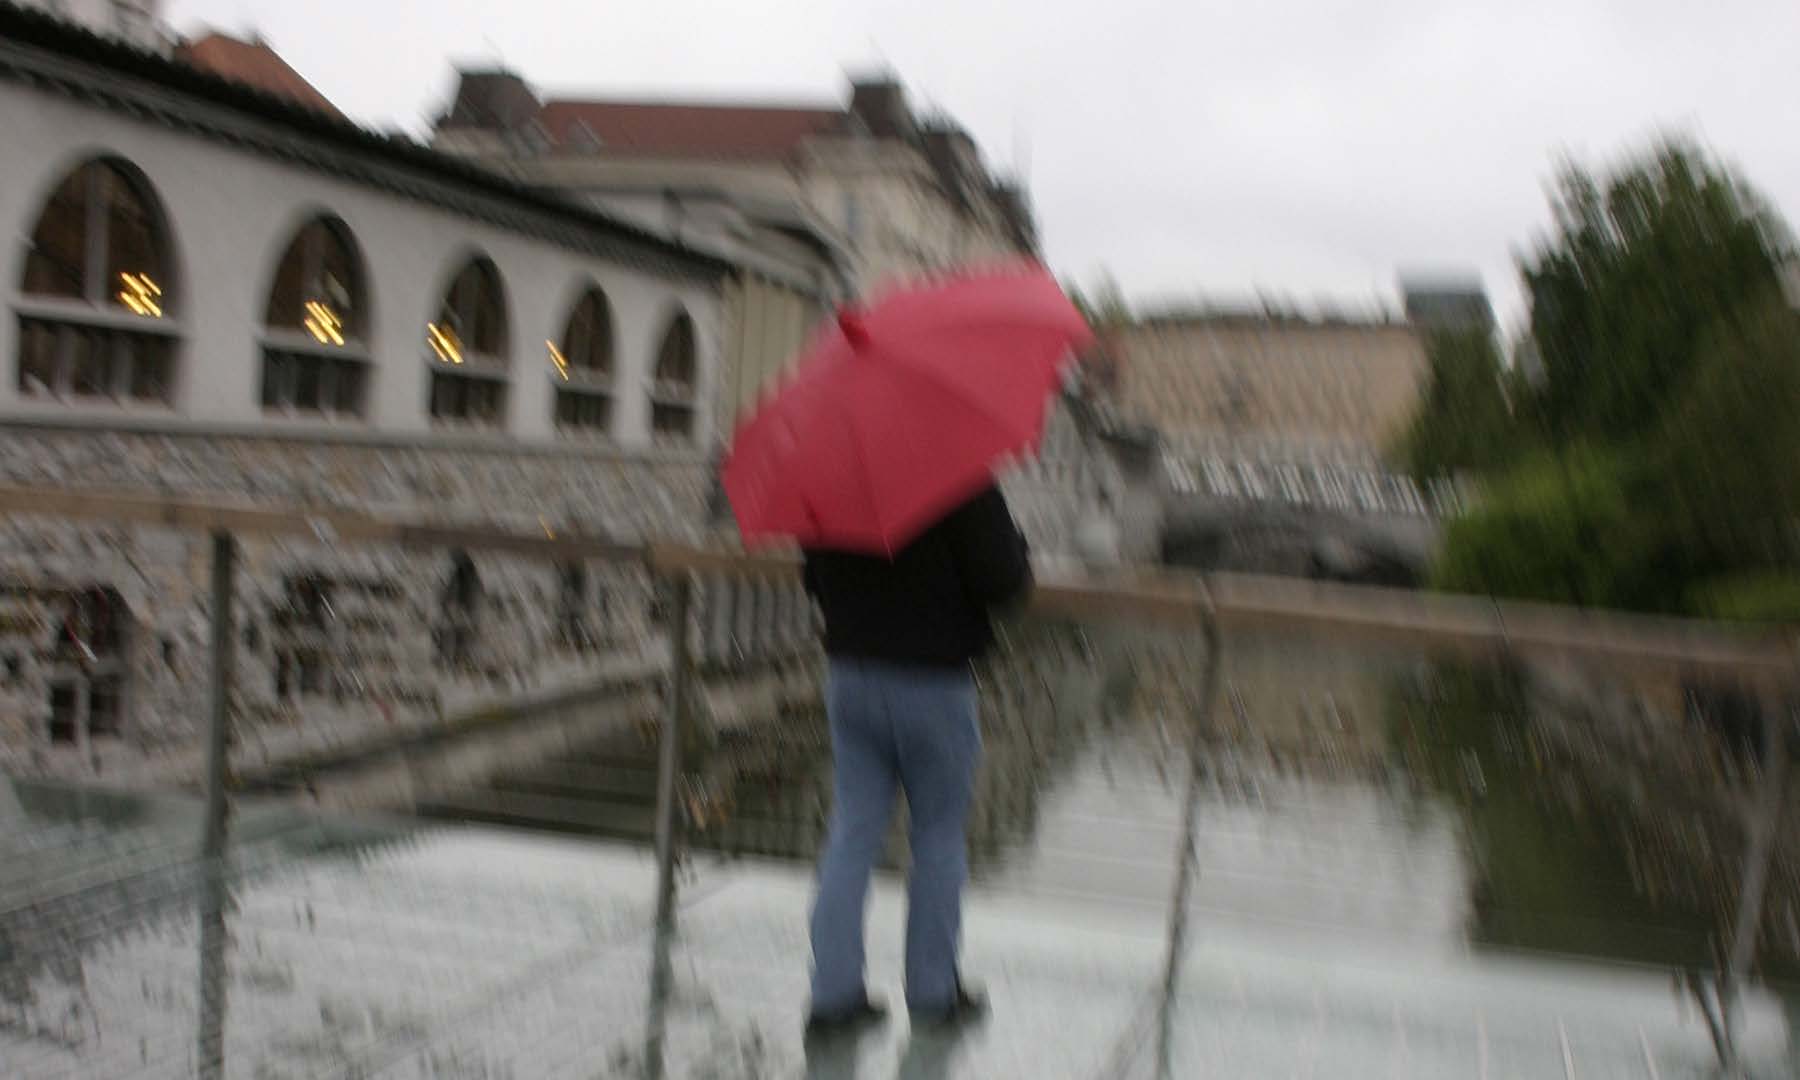
Shutter speed 1/50 sec - This image was shot handheld. See how the slow shutter speed has resulted in a blurred image.
58
www.ianmiddletonphotography.com
www.ianmiddletonphotography.com
59
Image stabilisation/Vibration Reduction
Unwanted Motion Blur
Some more expensive lenses have the above feature which allows you to shoot handheld at slightly lower shutter speeds. However, it usual y only allows about Although setting the right shutter speed avoids camera shake blur, there is also the two stops below normal, and again comes with a compromise: Softens the image.
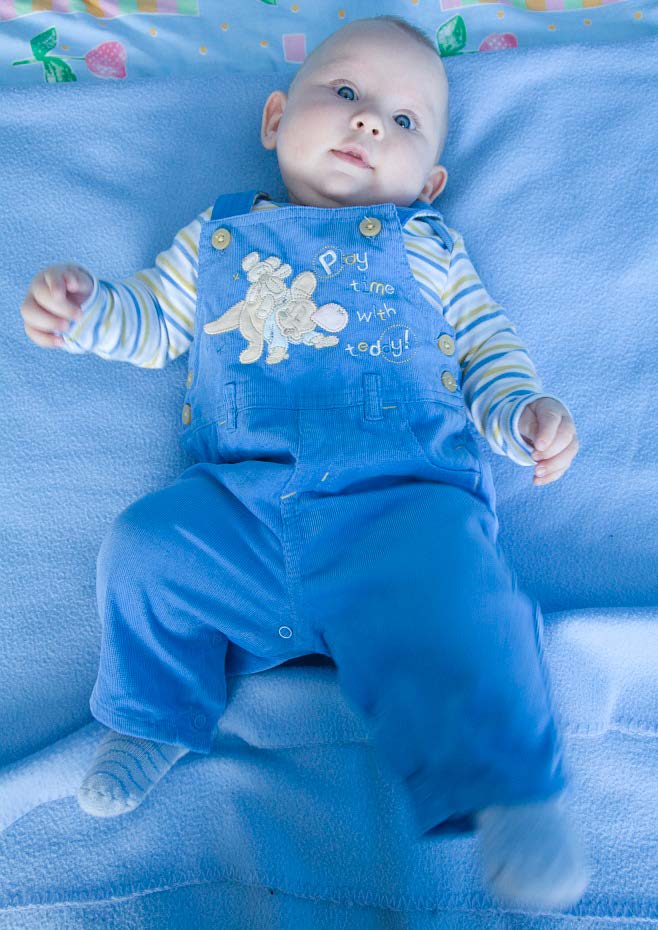
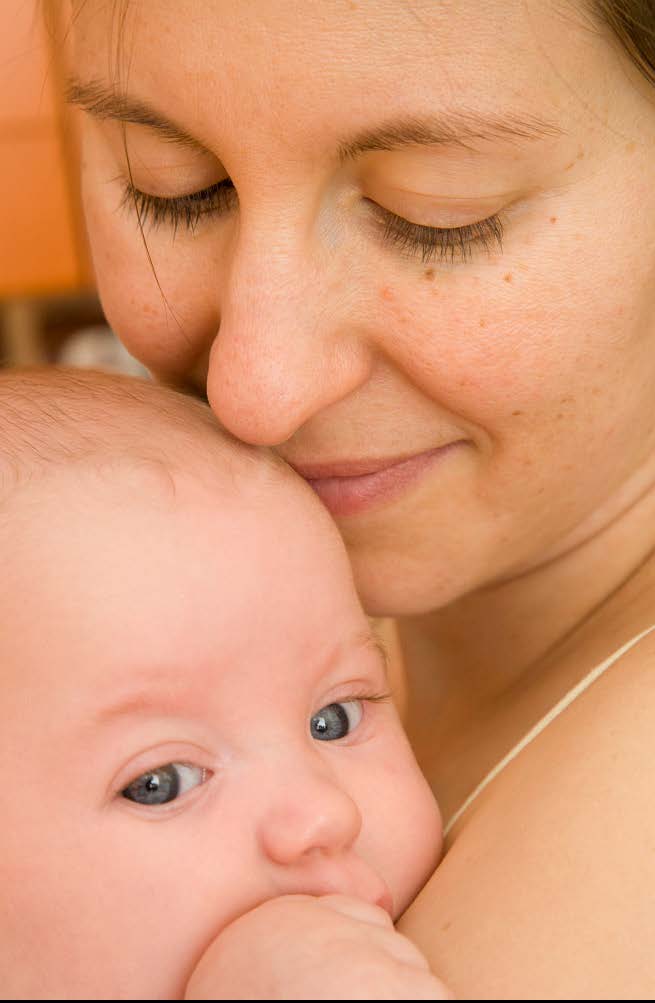
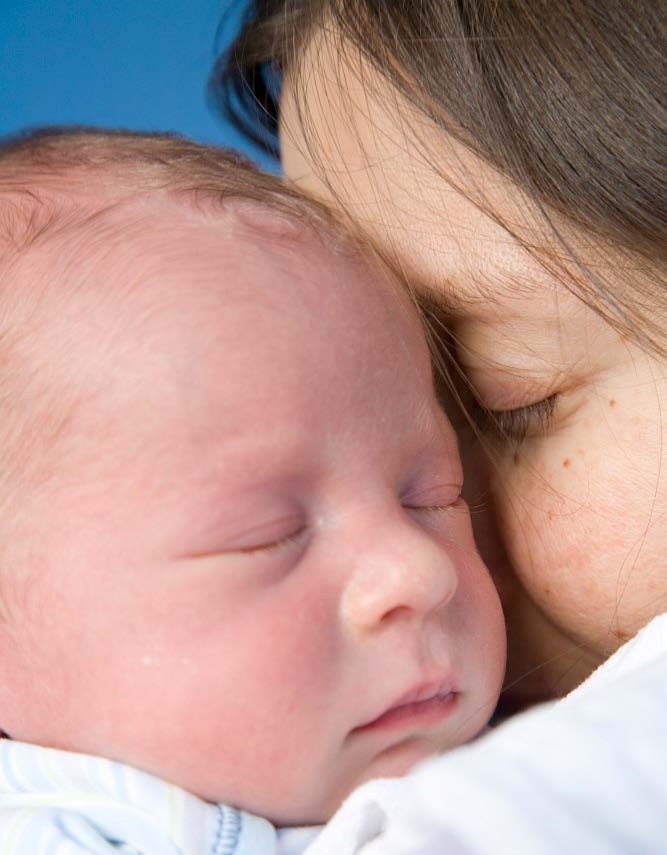
problem of motion blur when it’s not wanted. When people, especial y children This might be acceptable for some portraits, but definitely not for landscapes.
and babies, are moving then you need to consider how fast they are moving and increase the shutter
Tripod or increased shutter speed?
speed accordingly.
Shutter speeds below around 1/125 sec (depending on how steady your hand is or how heavy your camera is) typical y need a tripod, or some other form of support to keep the camera from moving. Even the slightest movement or 1/60 sec (moving
vibration will cause unwanted blurring in your image and a loss of sharpness.
foot and hand are
blurred)
You can also use a beanbag when shooting over wal s, from car windows or on the Although this
floor. When shooting in low light or in conditions that require a long exposure, was shot with
we want to keep the image sharp and free from blurring due to vibration. So the the image stabi-only way to do this is to increase the shutter speed, or use a tripod.
liser switched on
to avoid camera
However, a tripod can only be used if your scene is stil . If people are in your shake, moving
scene then they will be blurred, even if they are standing stil . Like with holding subjects can also
a camera stil , people cannot stand perfectly still no matter how hard they try.
cause blur when
the shutter speed
Also watch out for leaves or grass blowing in the wind, or boats floating on water is too slow.
(unless you want this effect). Study your scene to see if using a tripod will work, or whether you have to increase the shutter speed.
You either need
to increase the
Important note: If you are using a fast shutter speed, a tripod or other support, shutter speed to at
make sure you turn off the image stabilisation function. If you don’t then your least 1/200 sec in a
image will be blurred because the camera assumes there is camera shake when situation like this,
it’s on and tried to compensate regardless. If there is no camera shake, then it or keep the subject
will create it.
still (not so easy
with babies!)
60
www.ianmiddletonphotography.com
www.ianmiddletonphotography.com
61
Avoiding Unwanted Motion Blur
Unavoidable Motion Blur
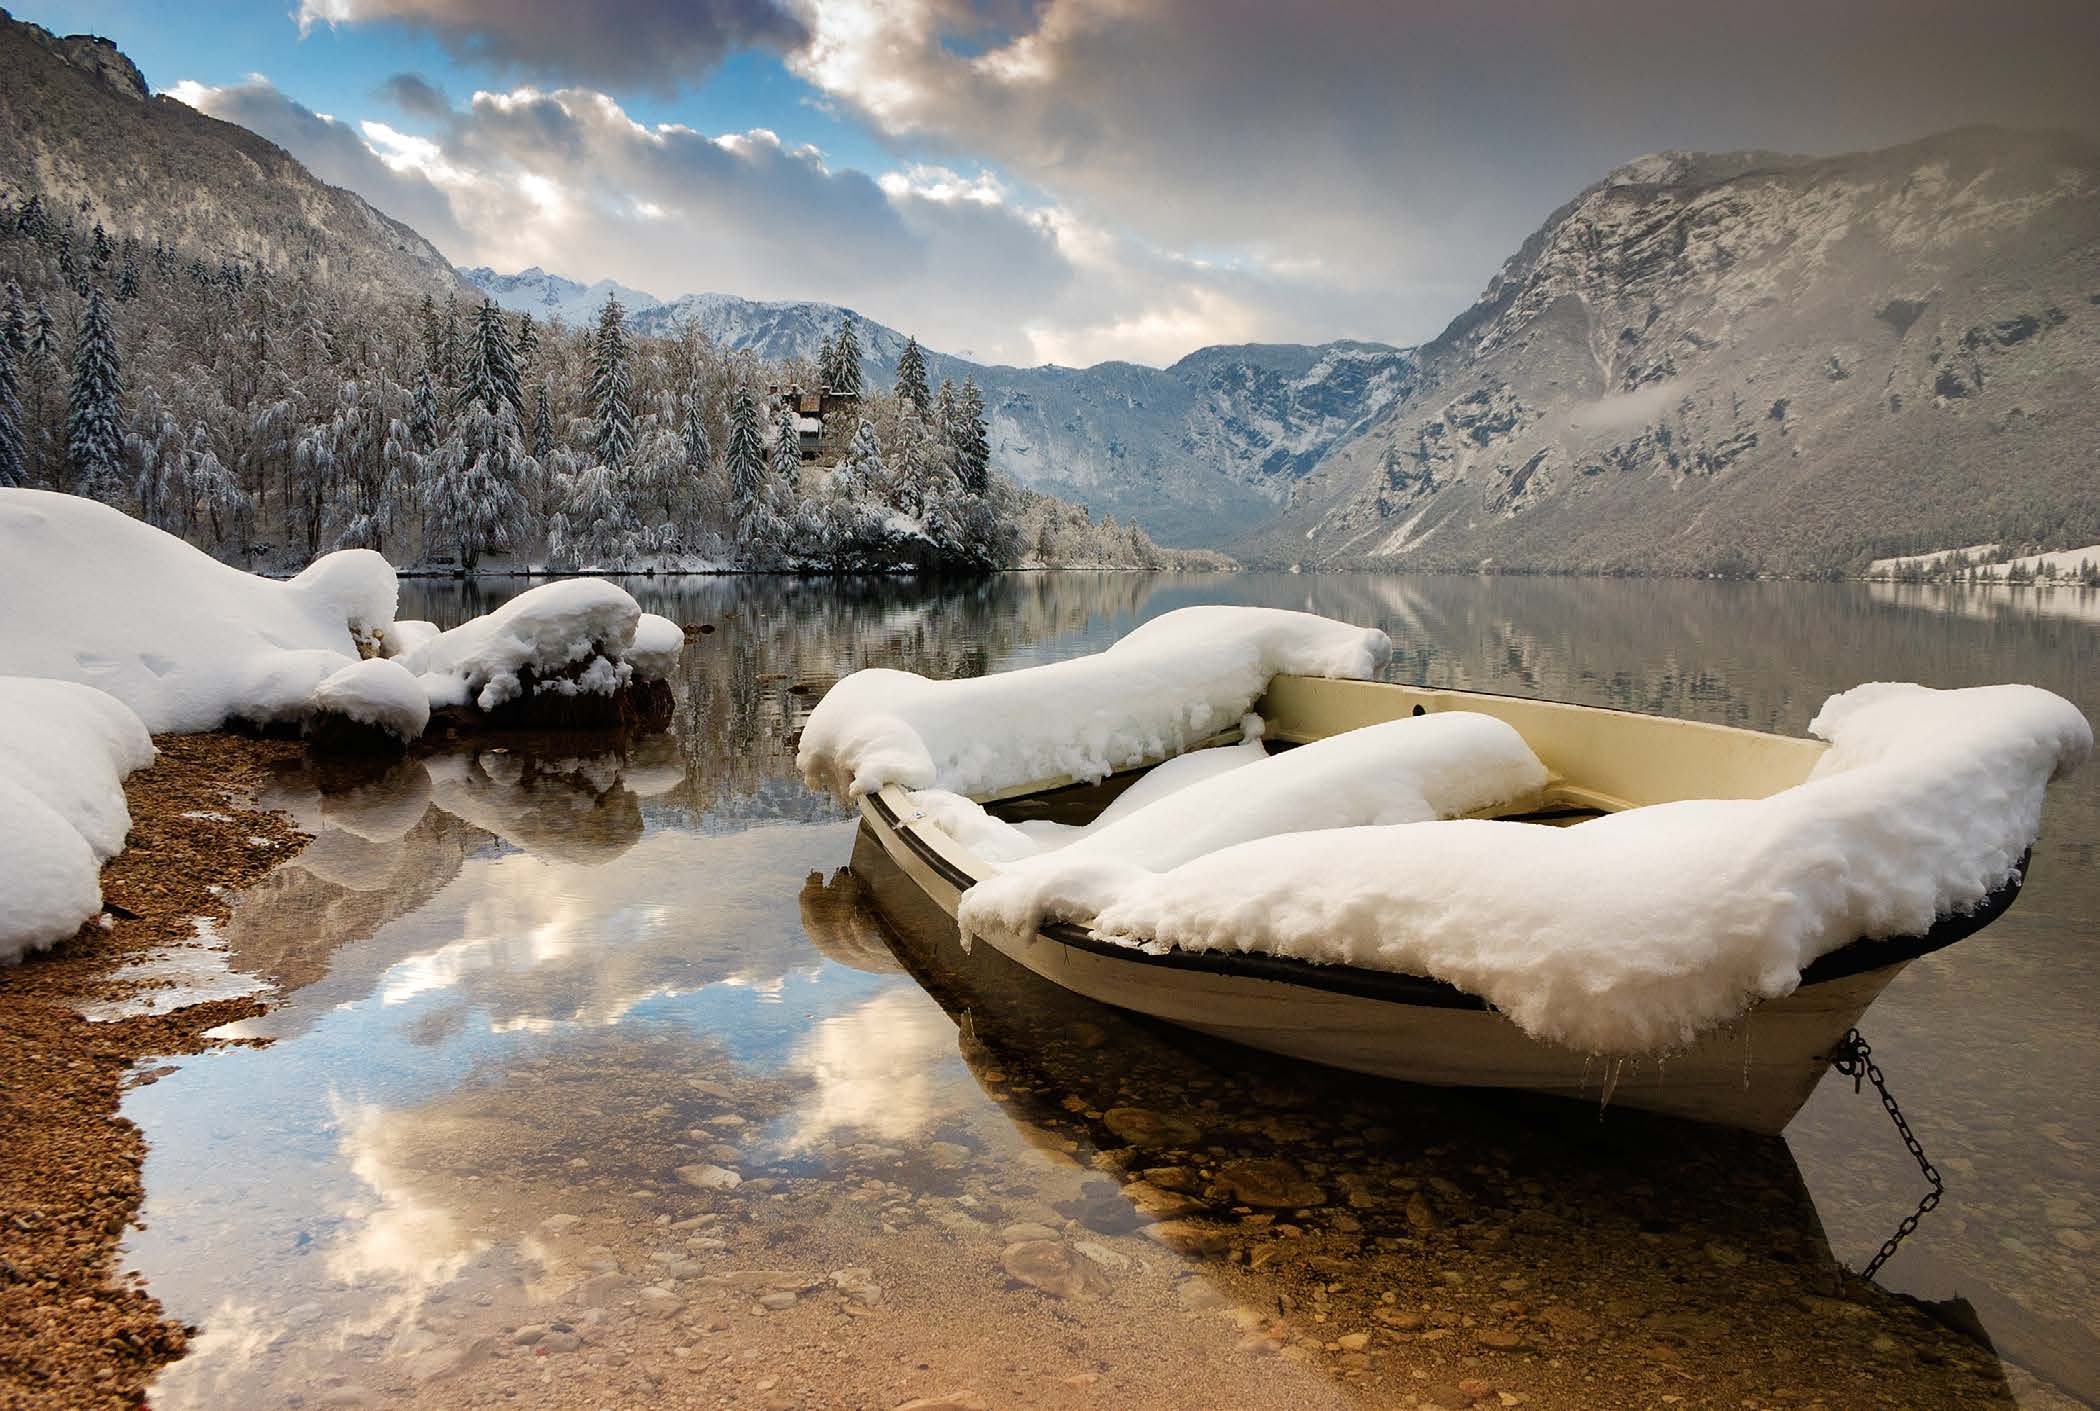
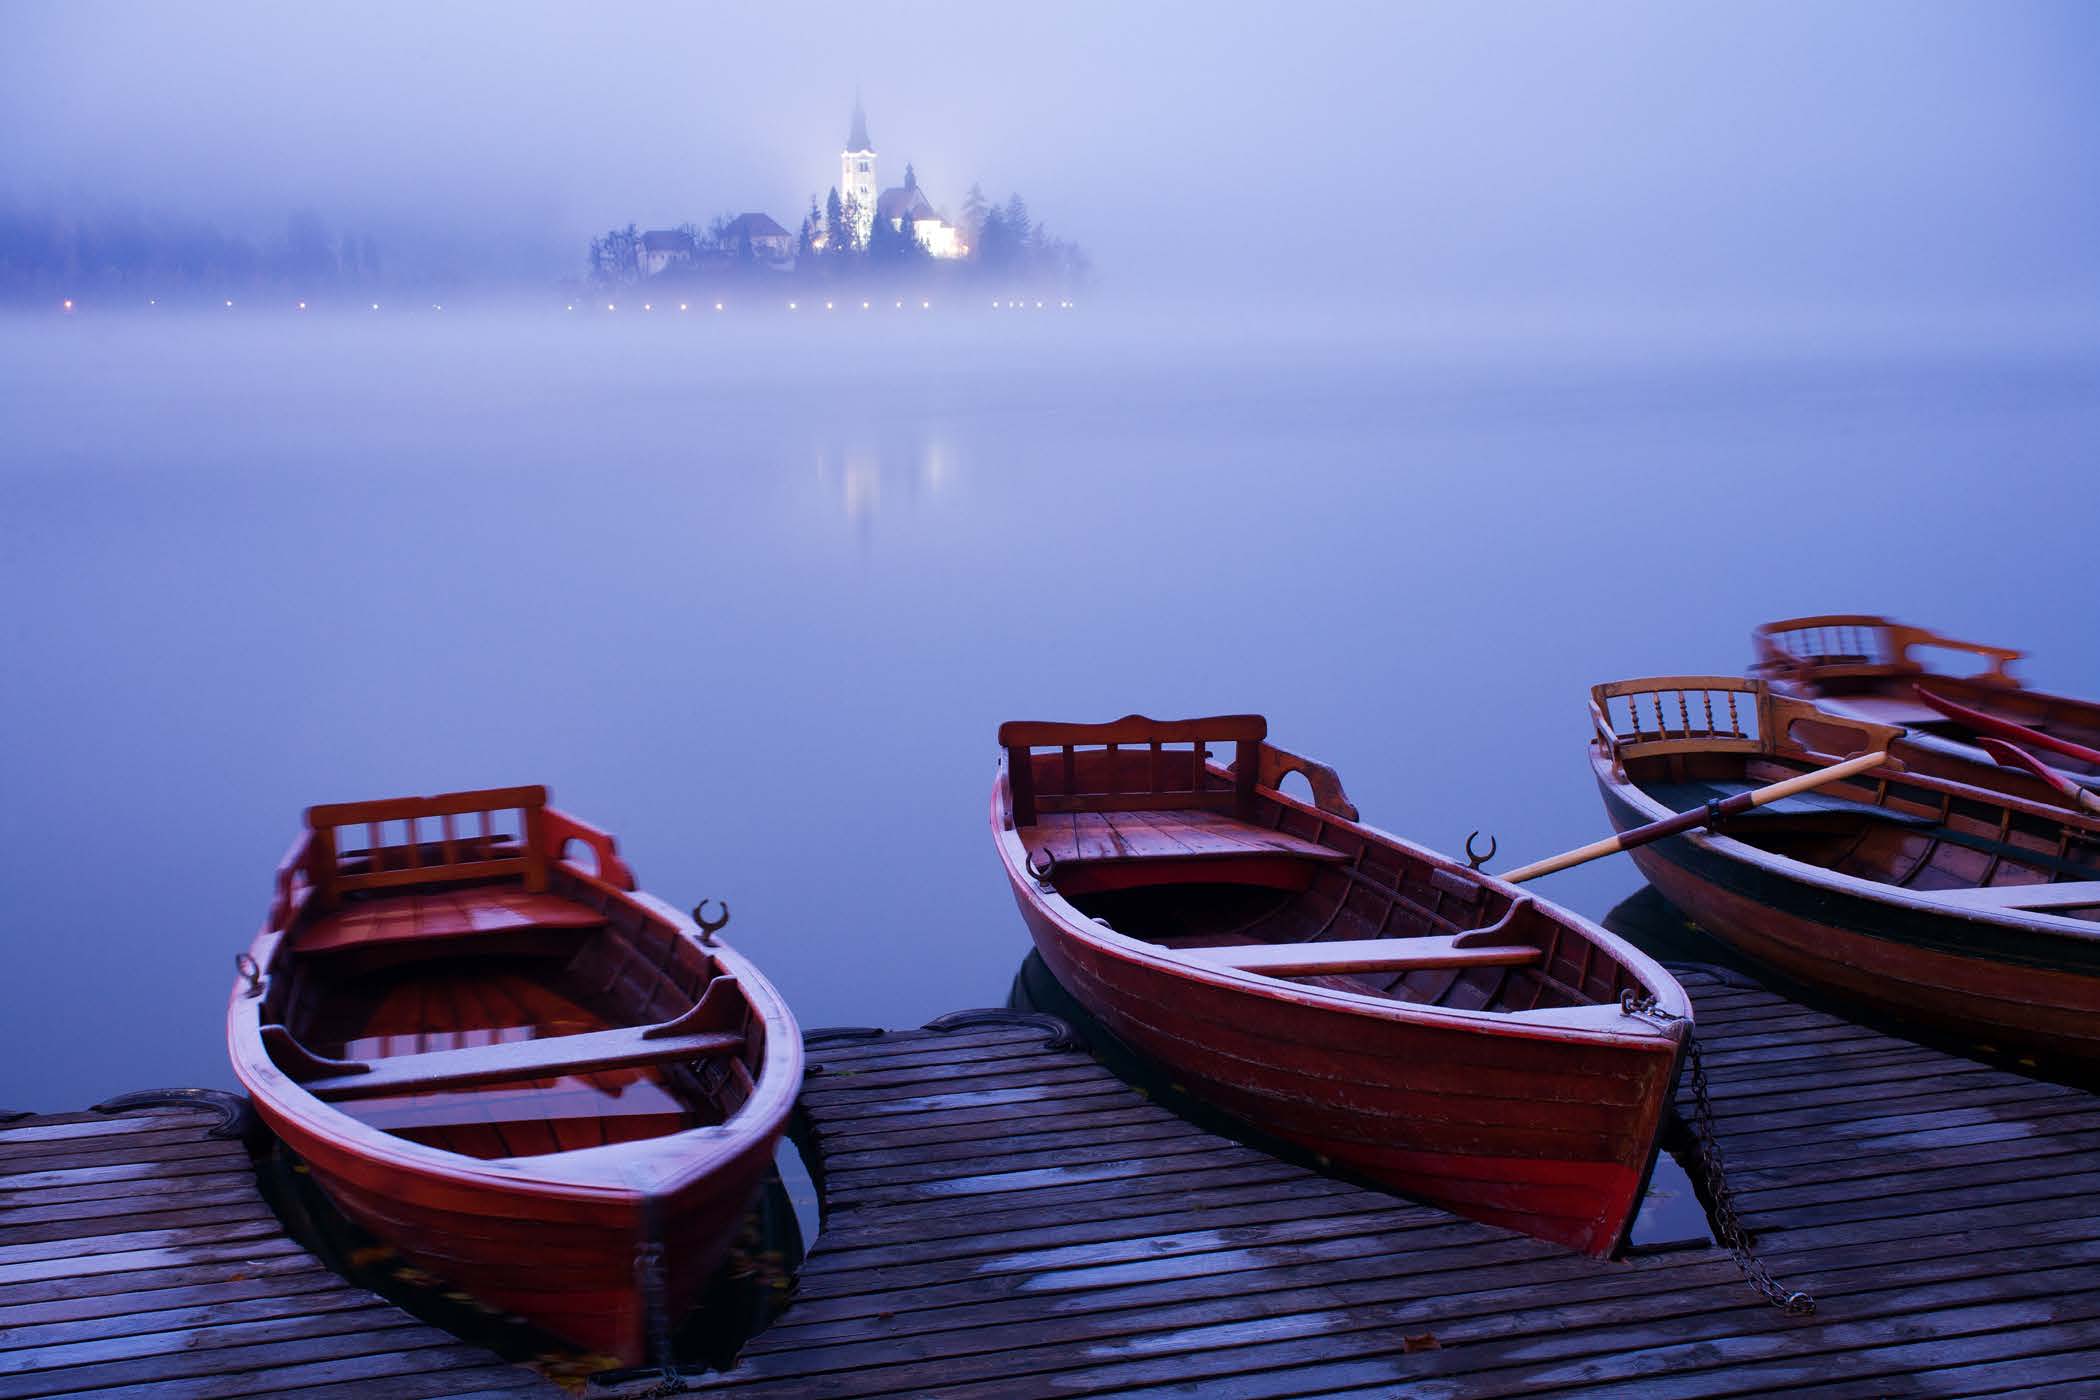
In order to avoid this problem, you either need to increase your shutter speed to Sometimes it’s simply not possible to avoid. On this photo taken during the low freeze the movement, or like I did here, be patient and wait for the movement light of dawn a long exposure was needed. Even though it was morning and the to stop, then be ready to quickly take your shot. Sometimes the situation won’t lake was stil , there was still some slight drifting of the boats. I exposed for 20
allow for a faster
seconds praying for as little movement as possible. Only the boats on the far shutter speed.
left and right moved enough to create some blur. But overall I think the effect worked quite wel .
20 second exposure
62
www.ianmiddletonphotography.com
www.ianmiddletonphotography.com
63
Long exposures (creative blur)
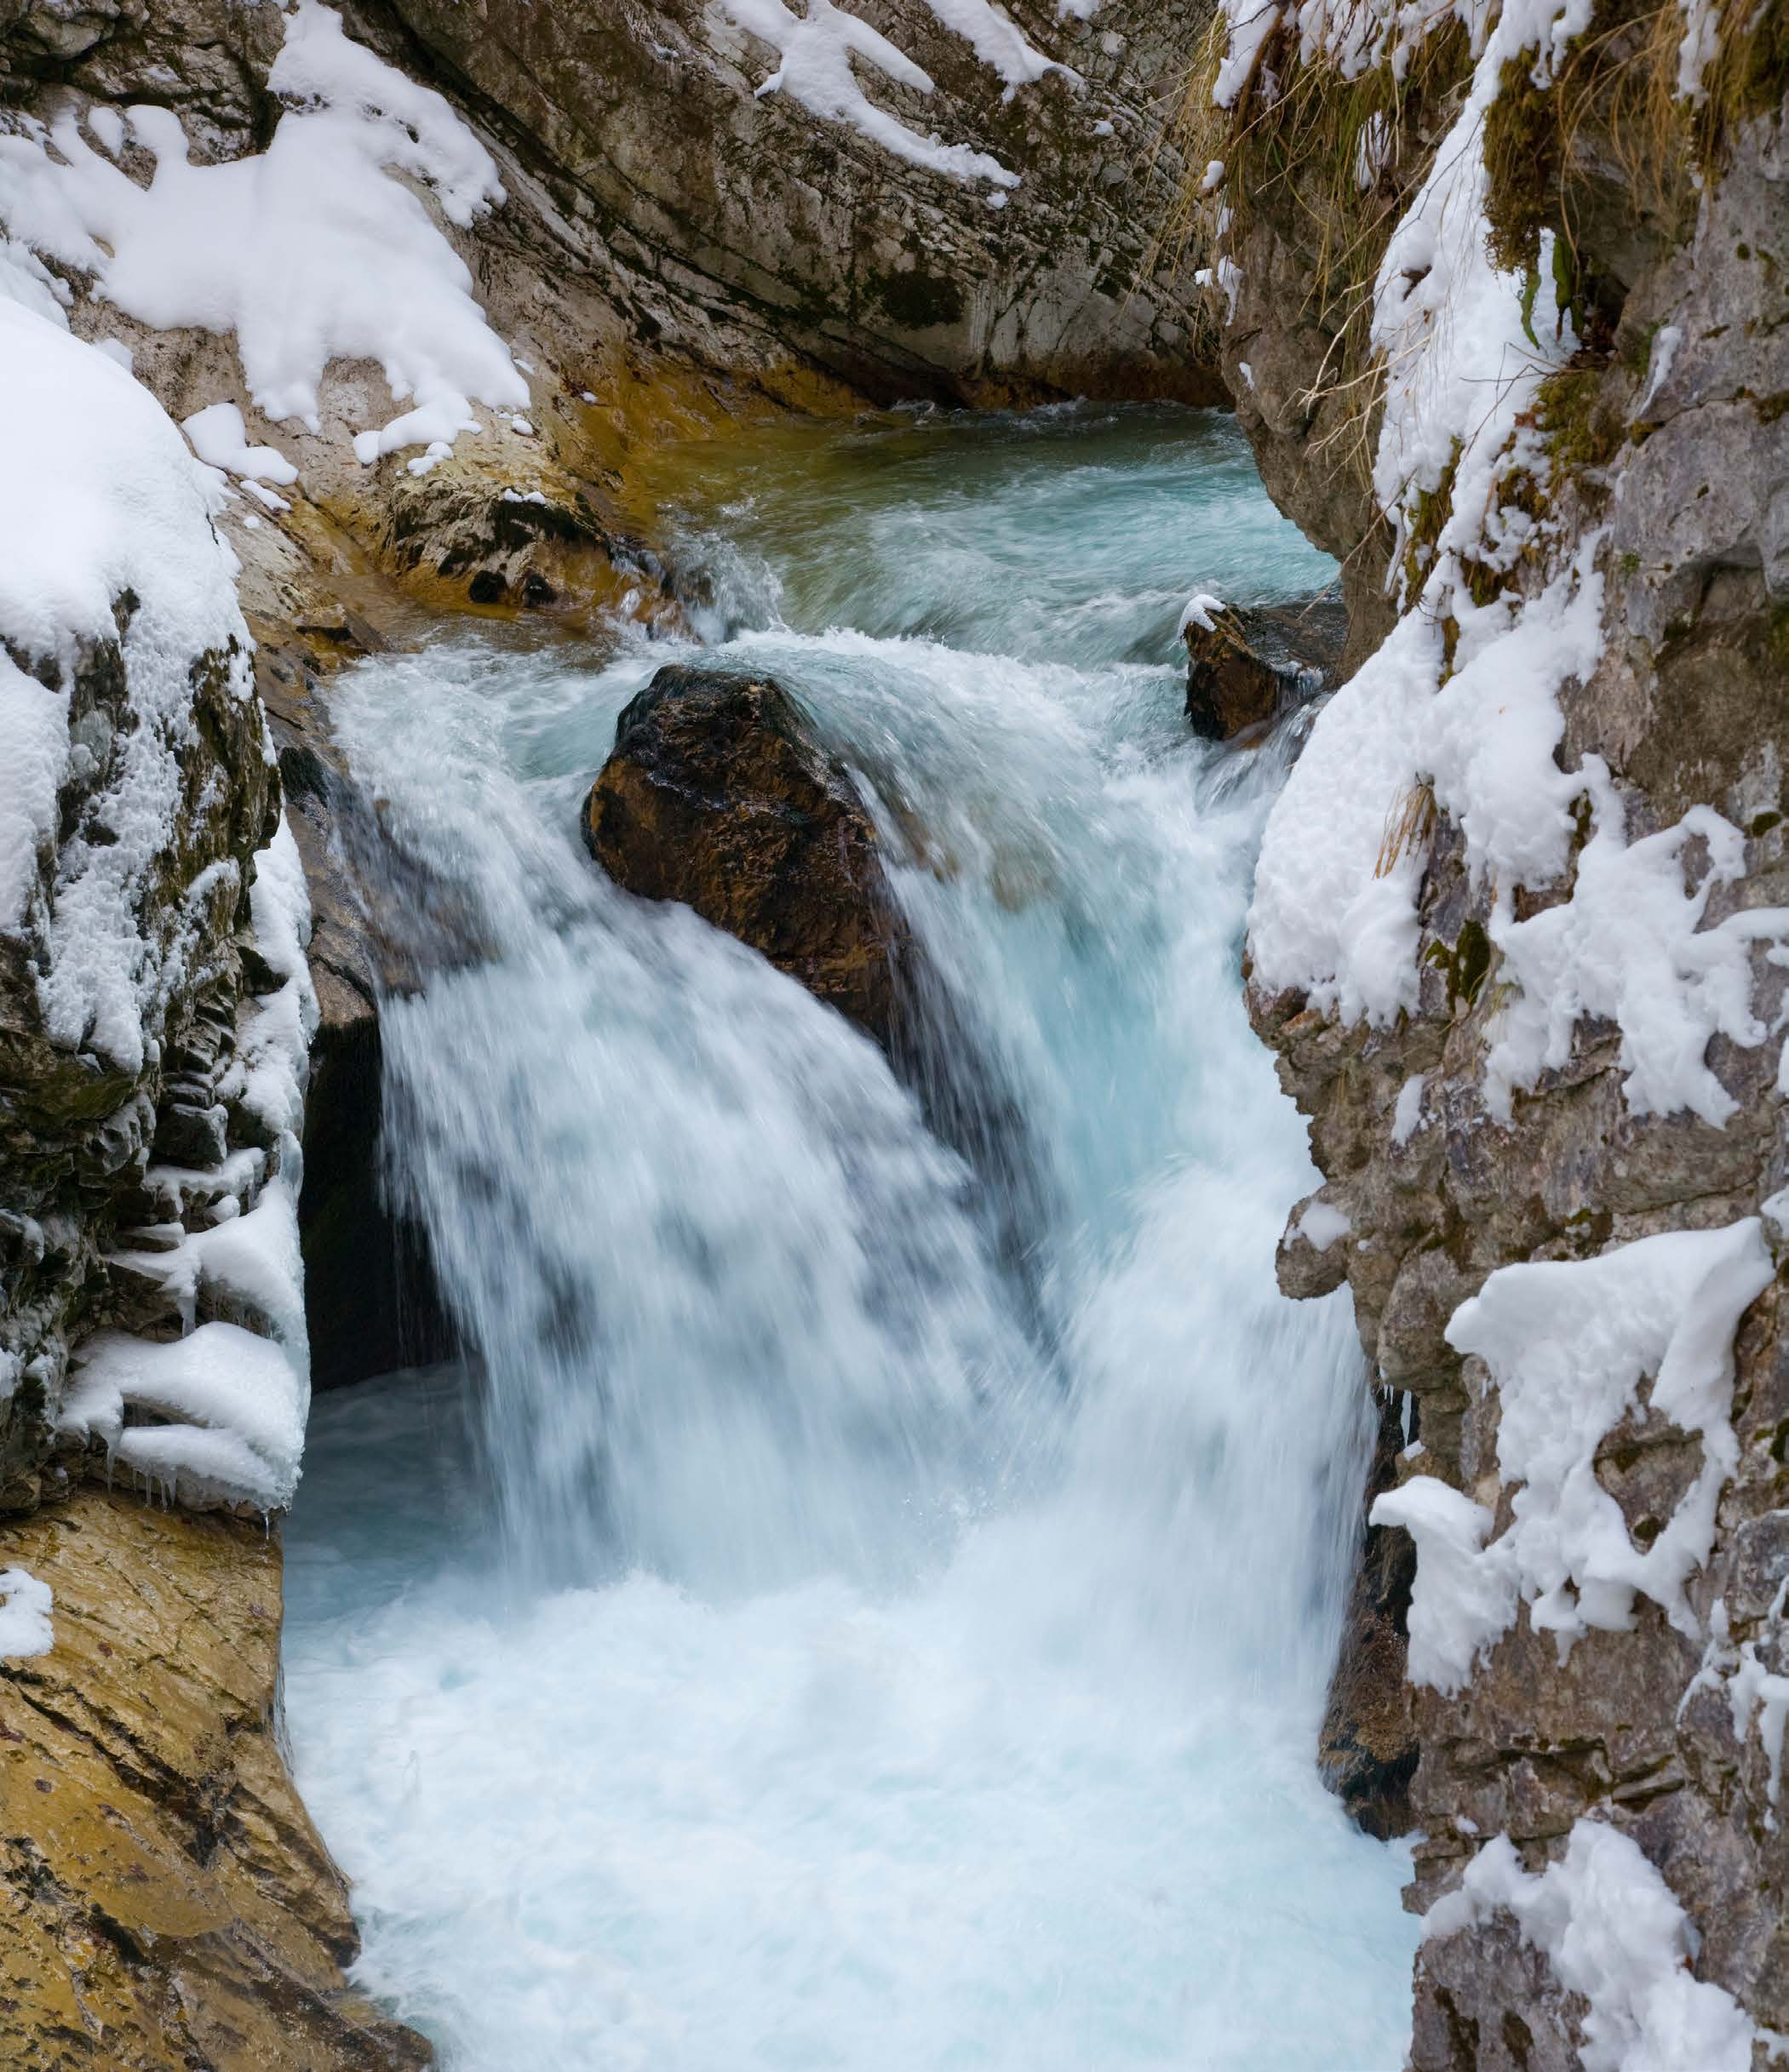
1/30 sec
This shorter exposure has partial y frozen the water but still left some sense of Sometimes we want to use blur in our images to creative effect. This is especial y movement.
true with water, clouds and even people or vehicles. Below are a few examples, again all shot on a tripod.
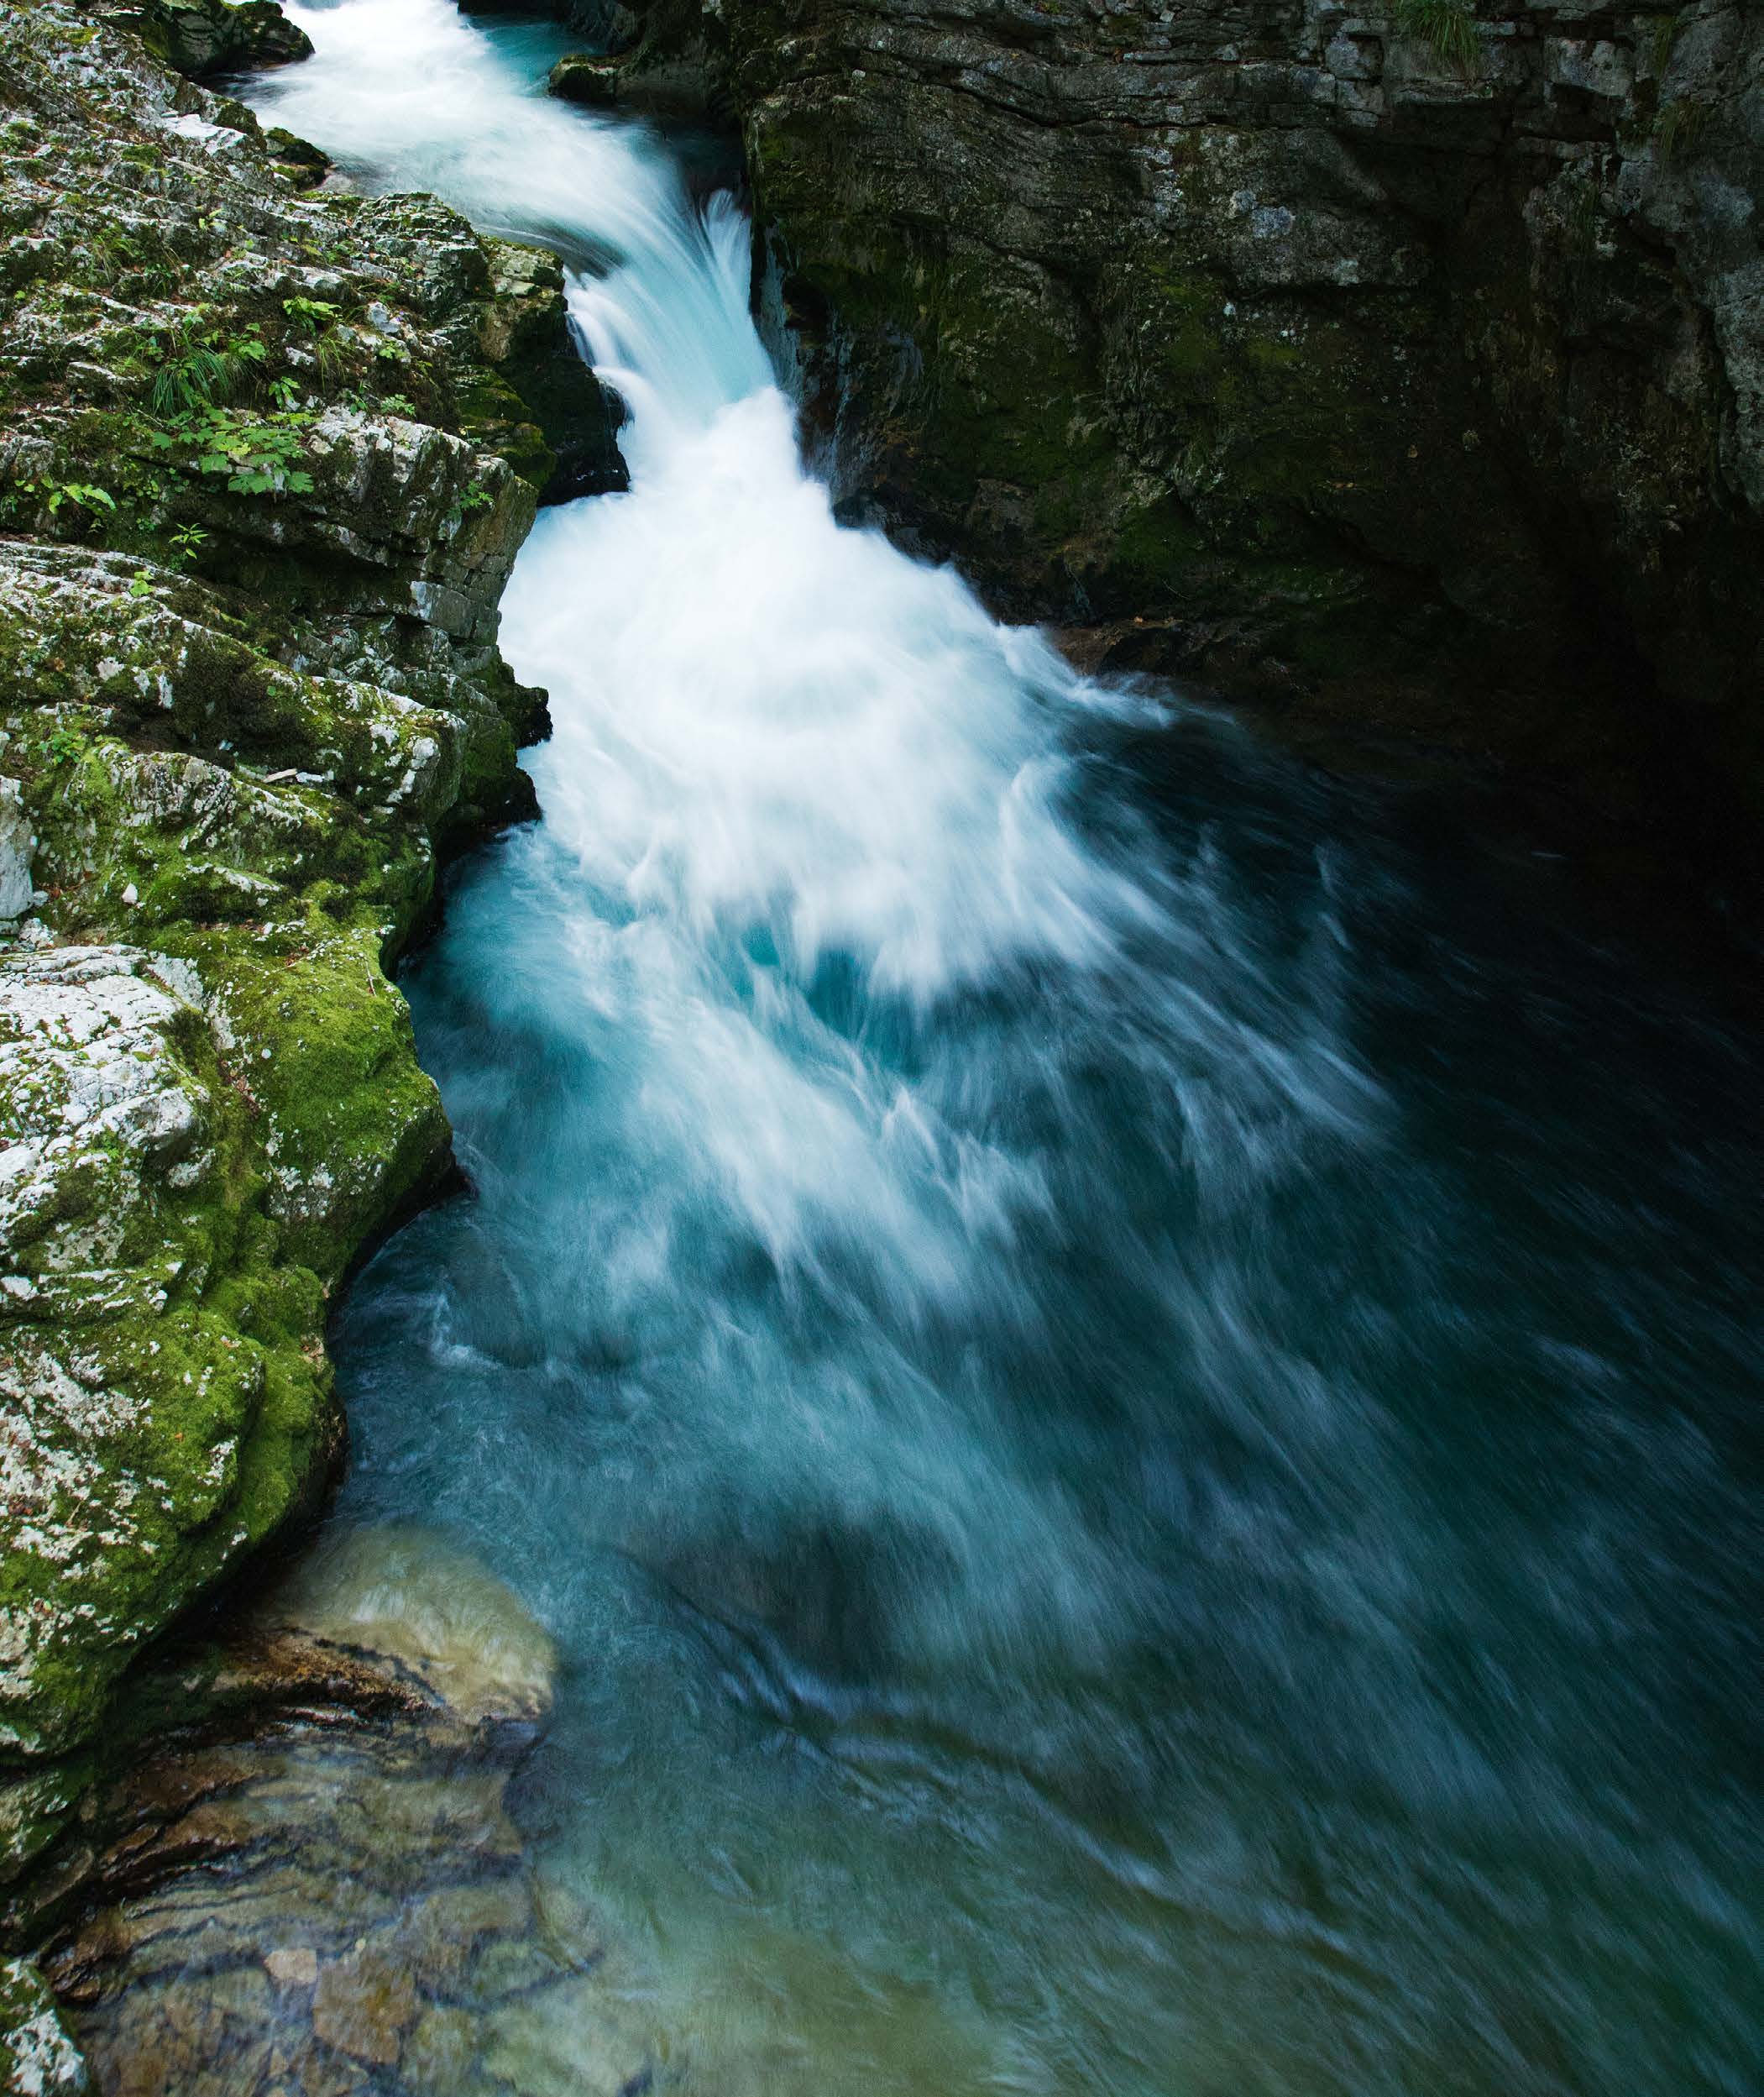
Fast flowing water becomes smooth and silky during long exposures 1/0.3 sec
64
www.ianmiddletonphotography.com
www.ianmiddletonphotography.com
65
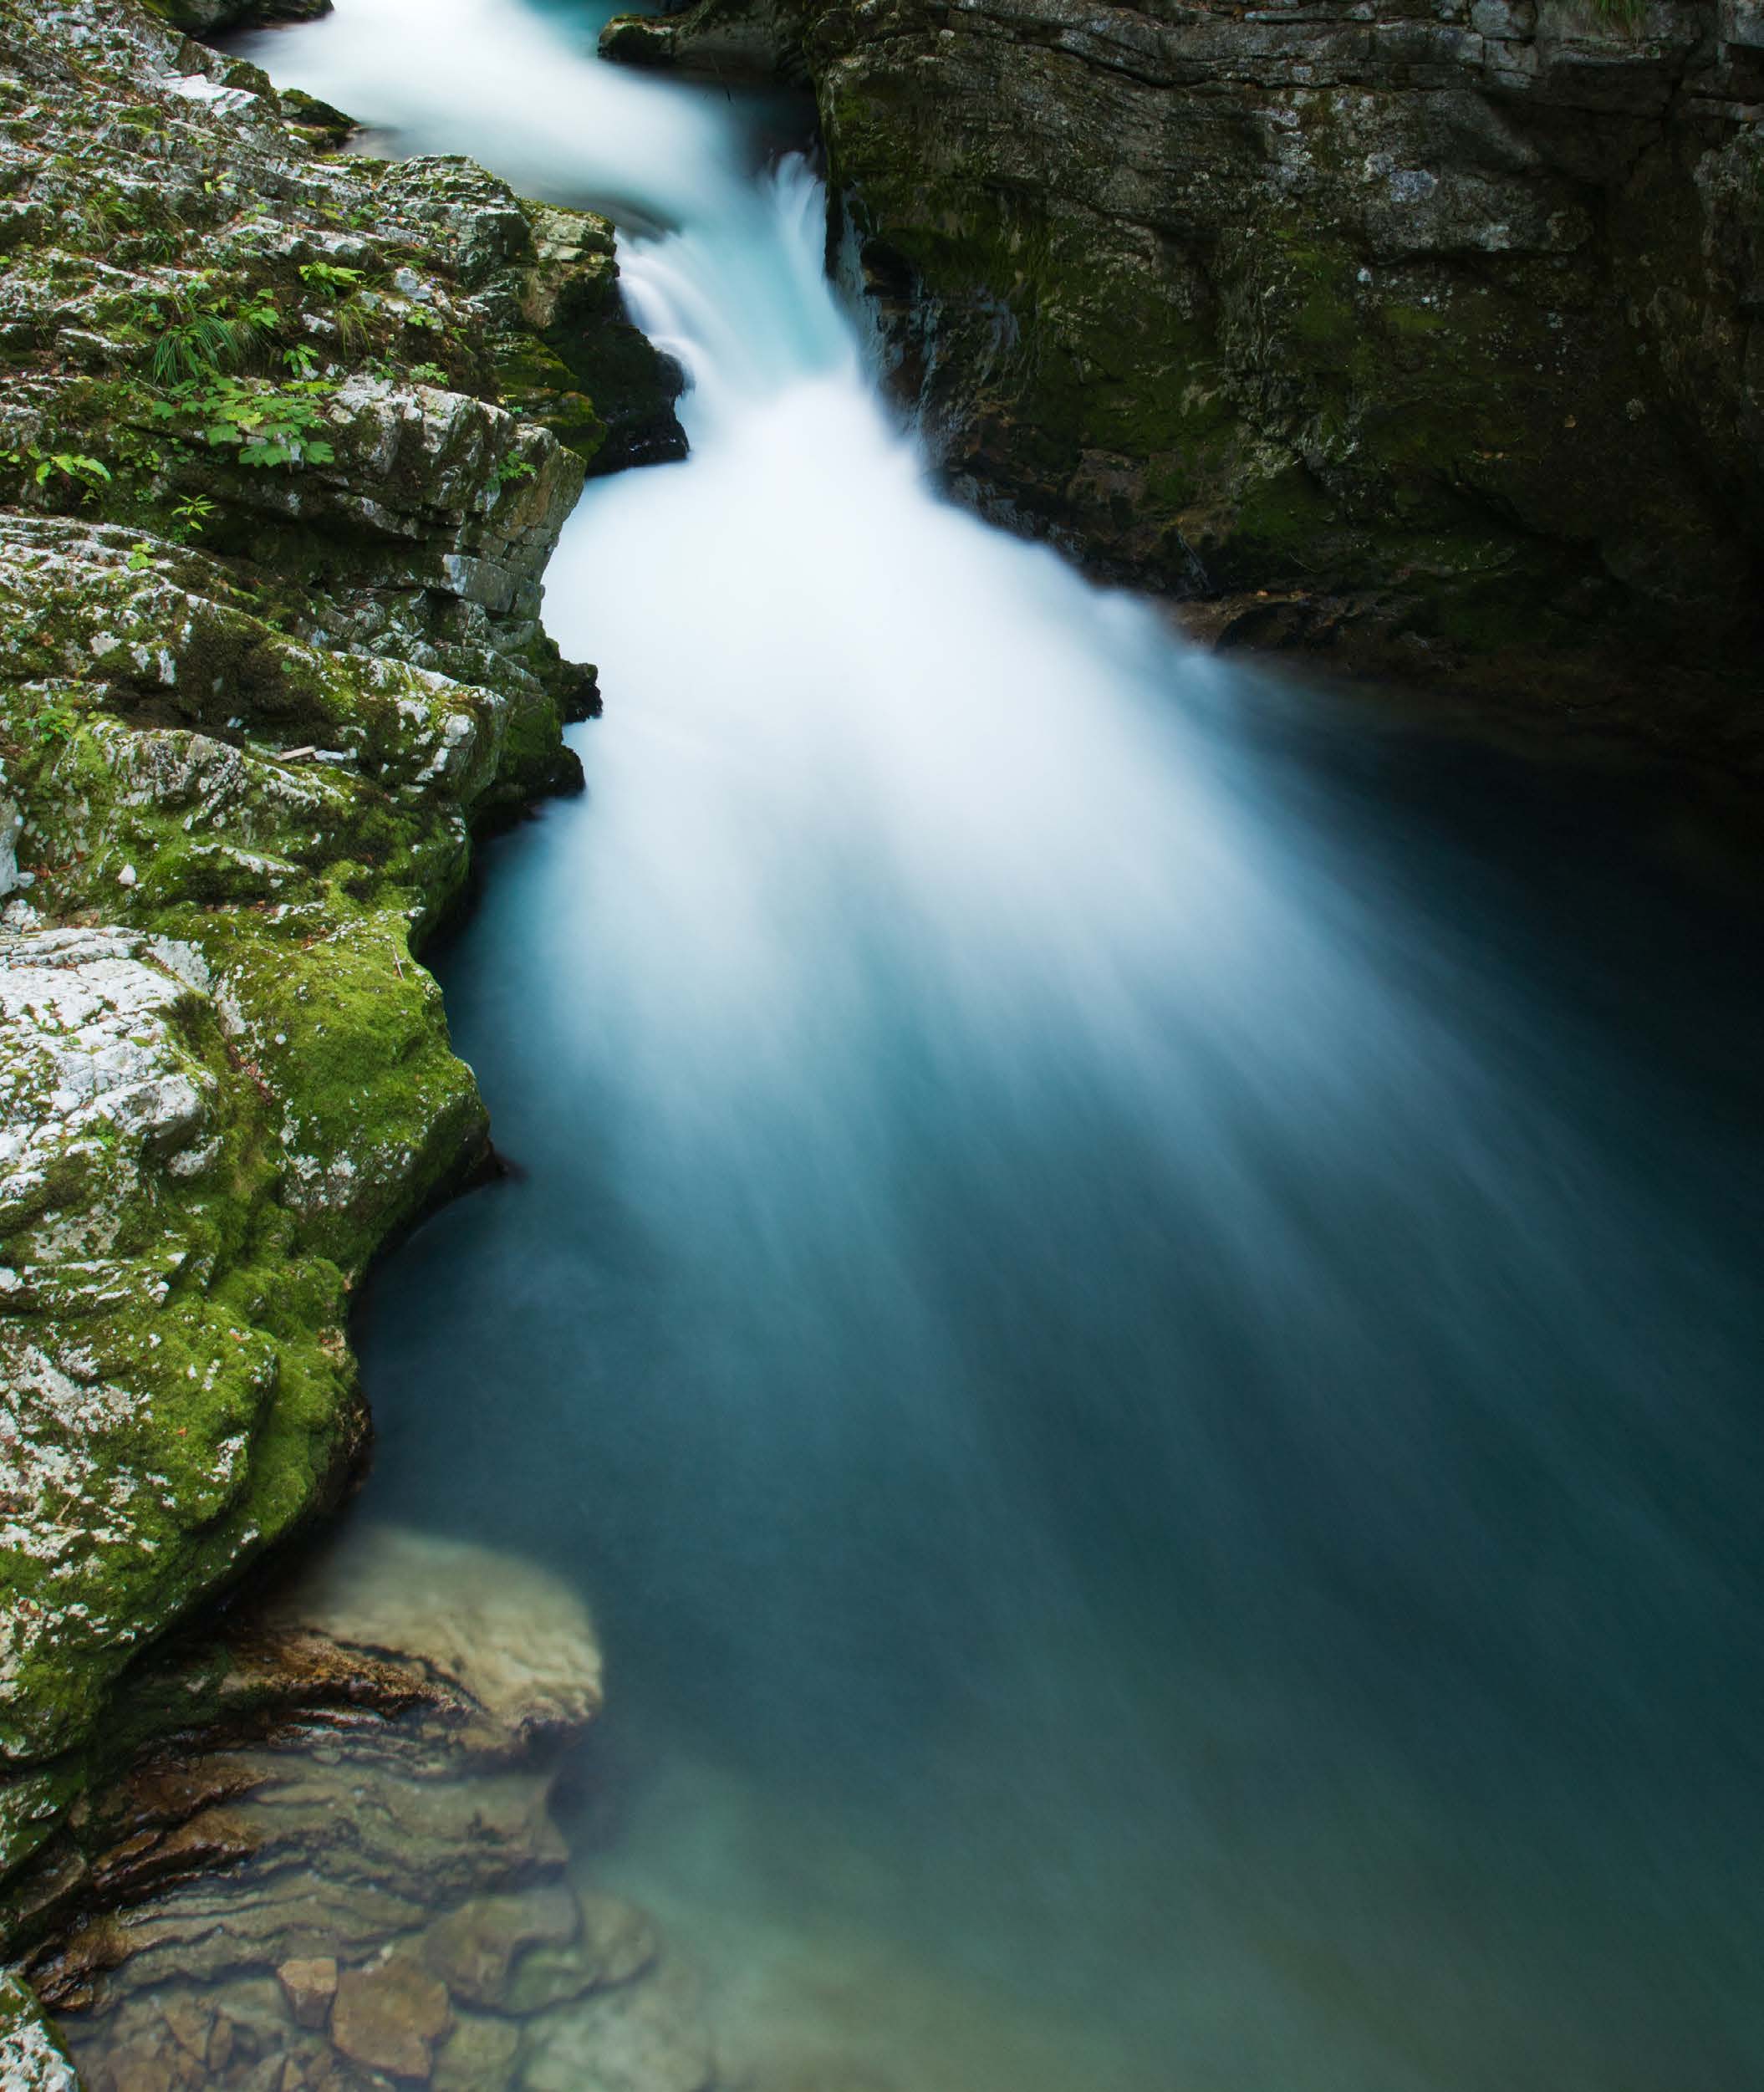
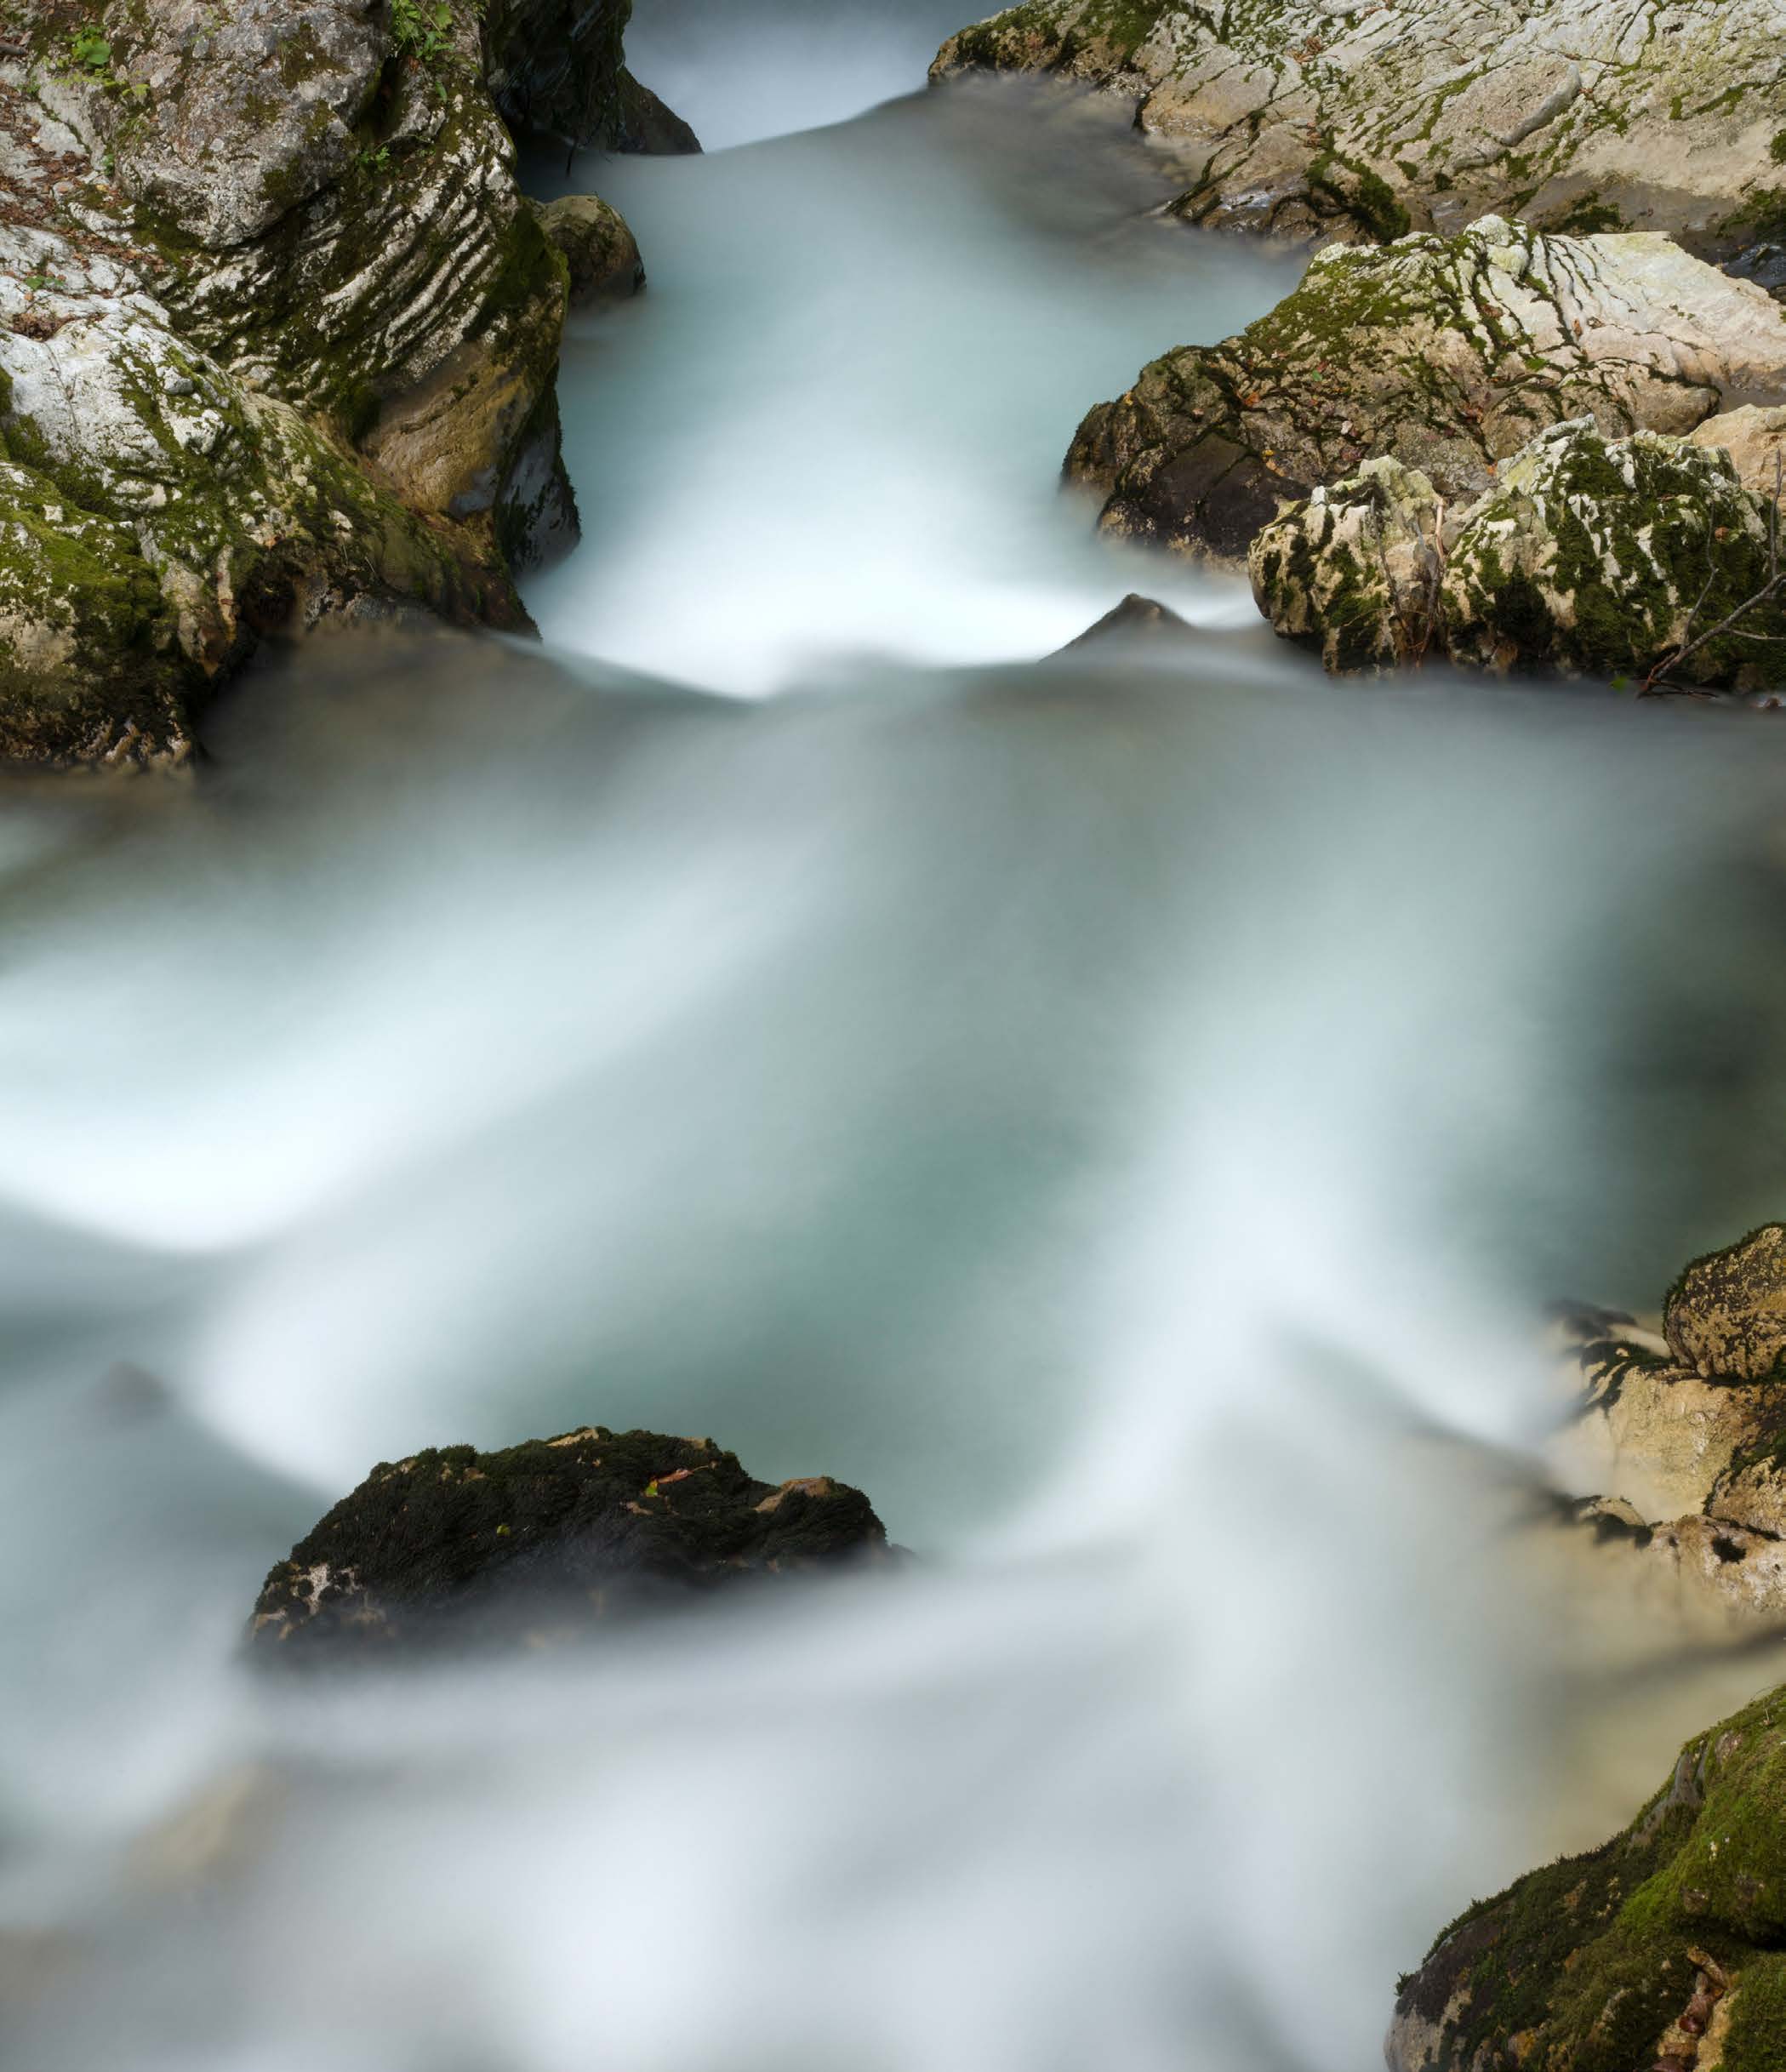
15 sec
10 secs
This much longer exposure has created a dreamy effect on the water.
66
www.ianmiddletonphotography.com
www.ianmiddletonphotography.com
67
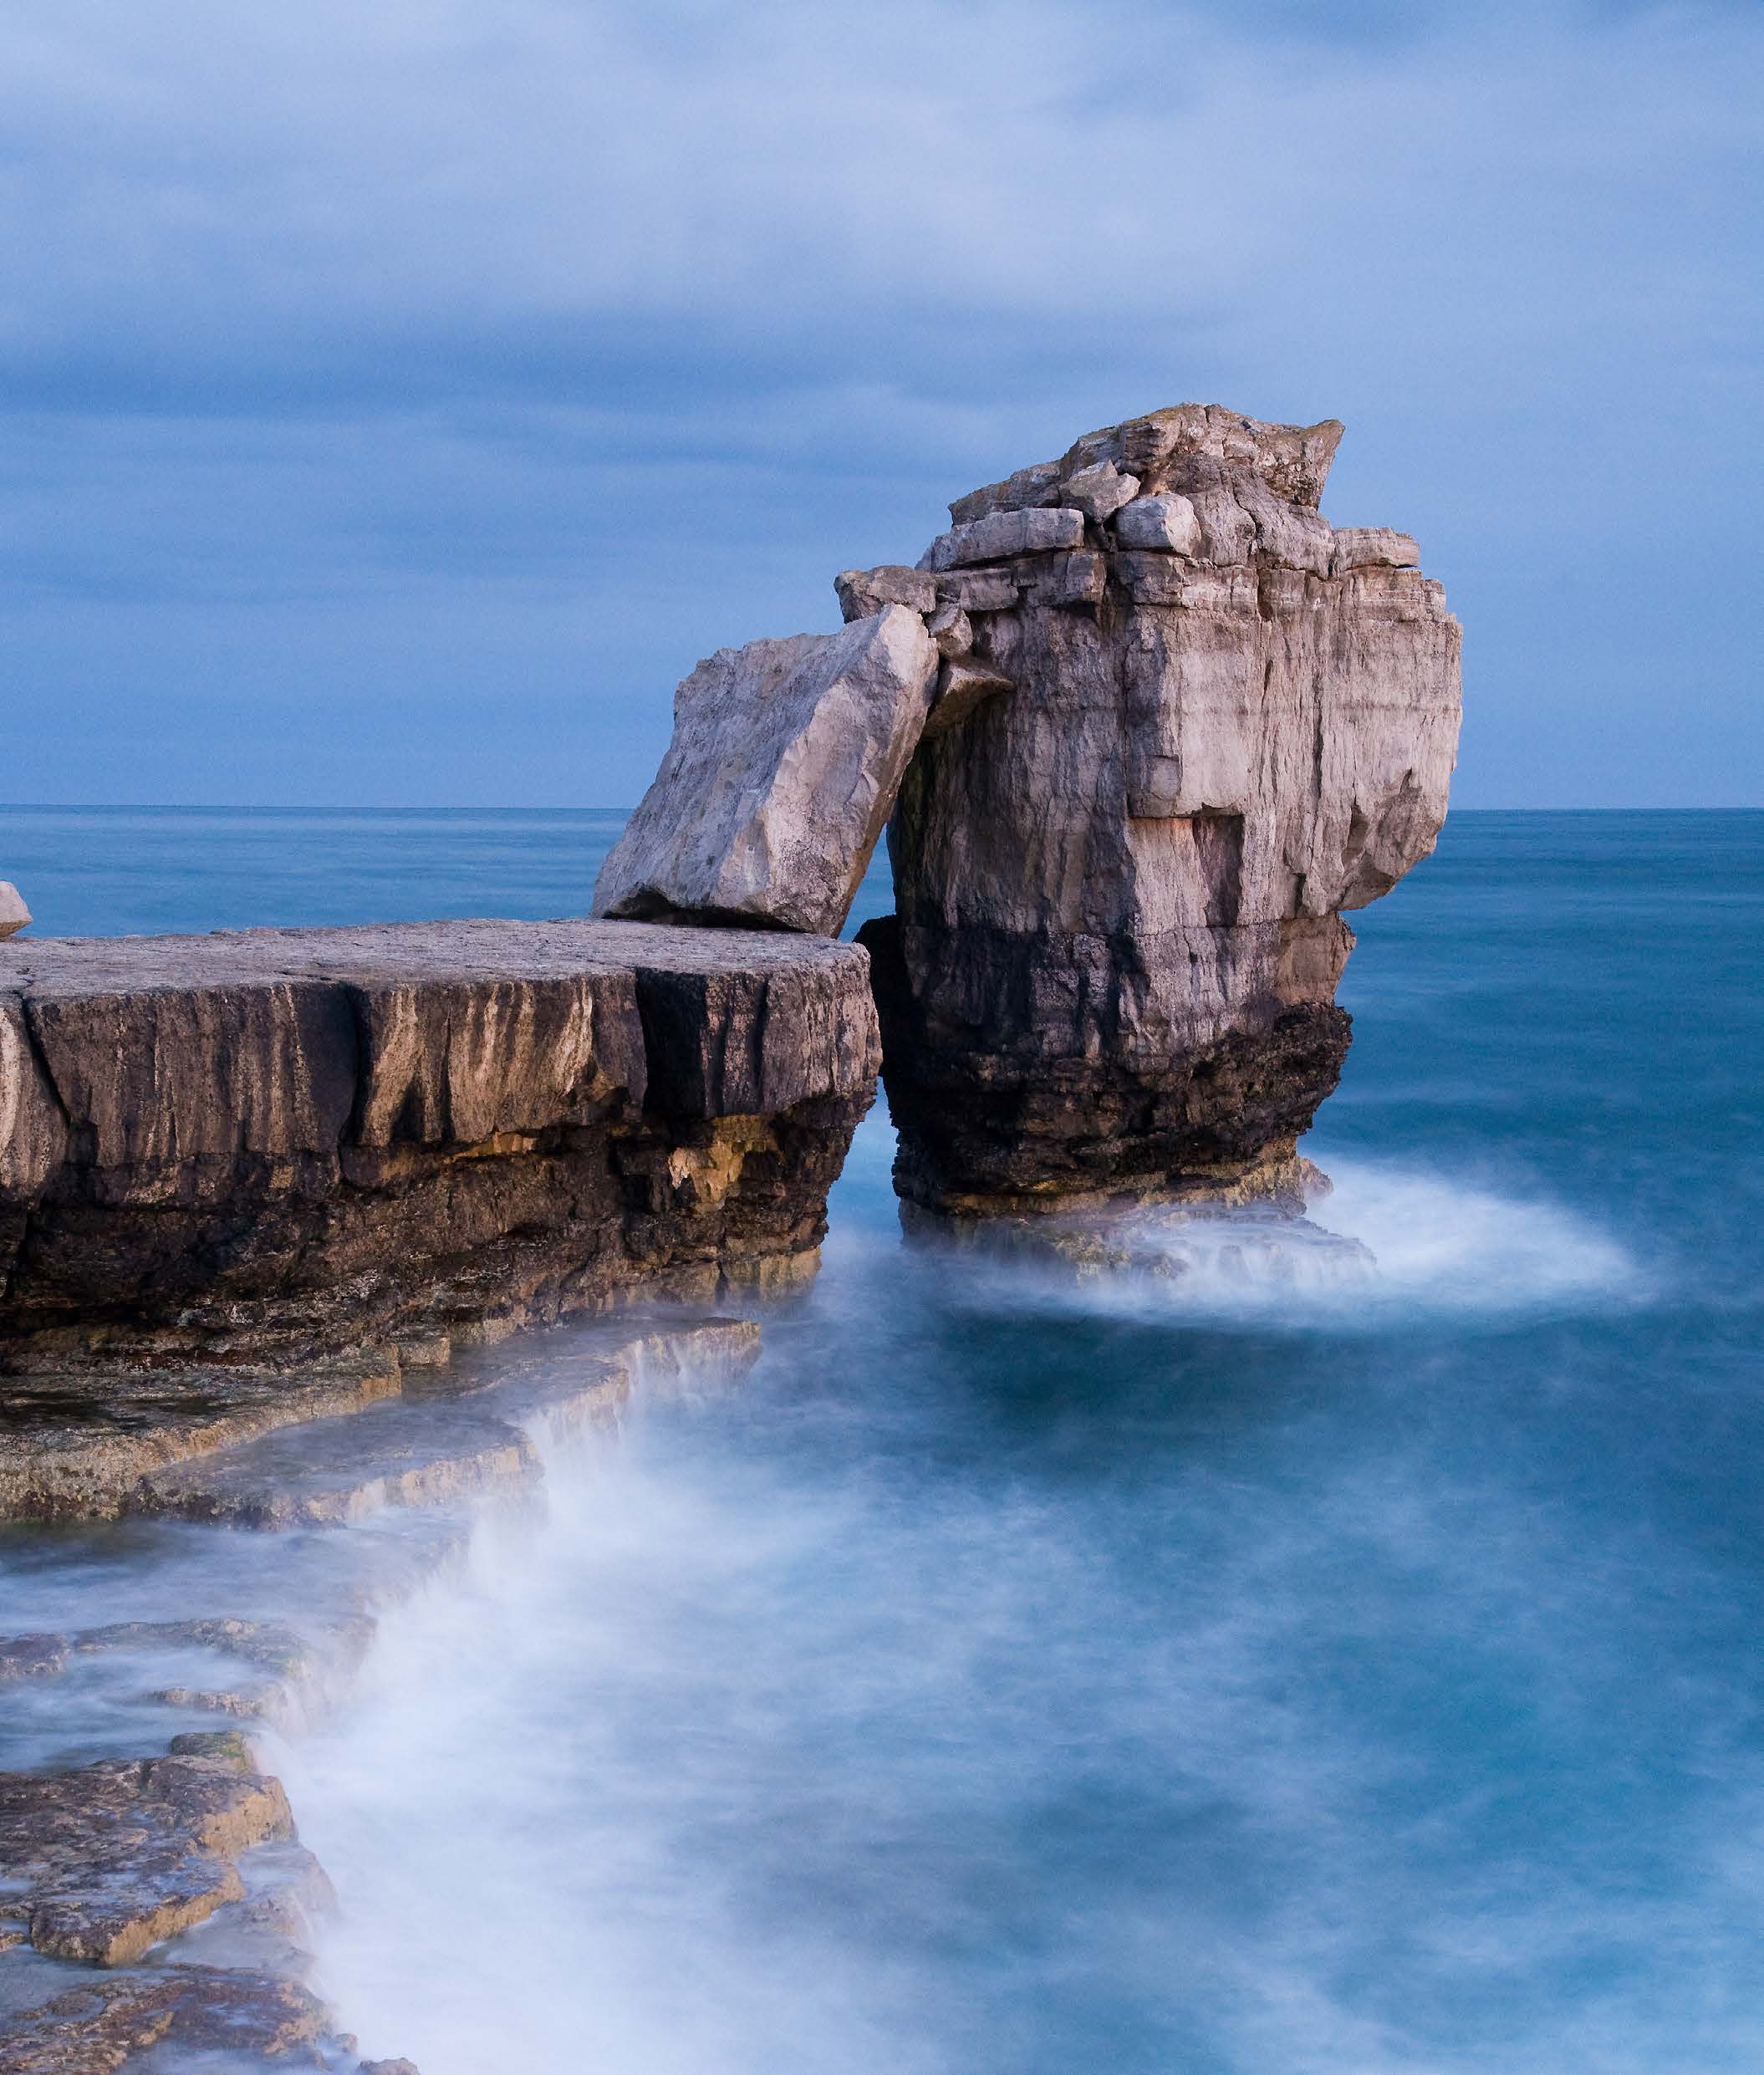
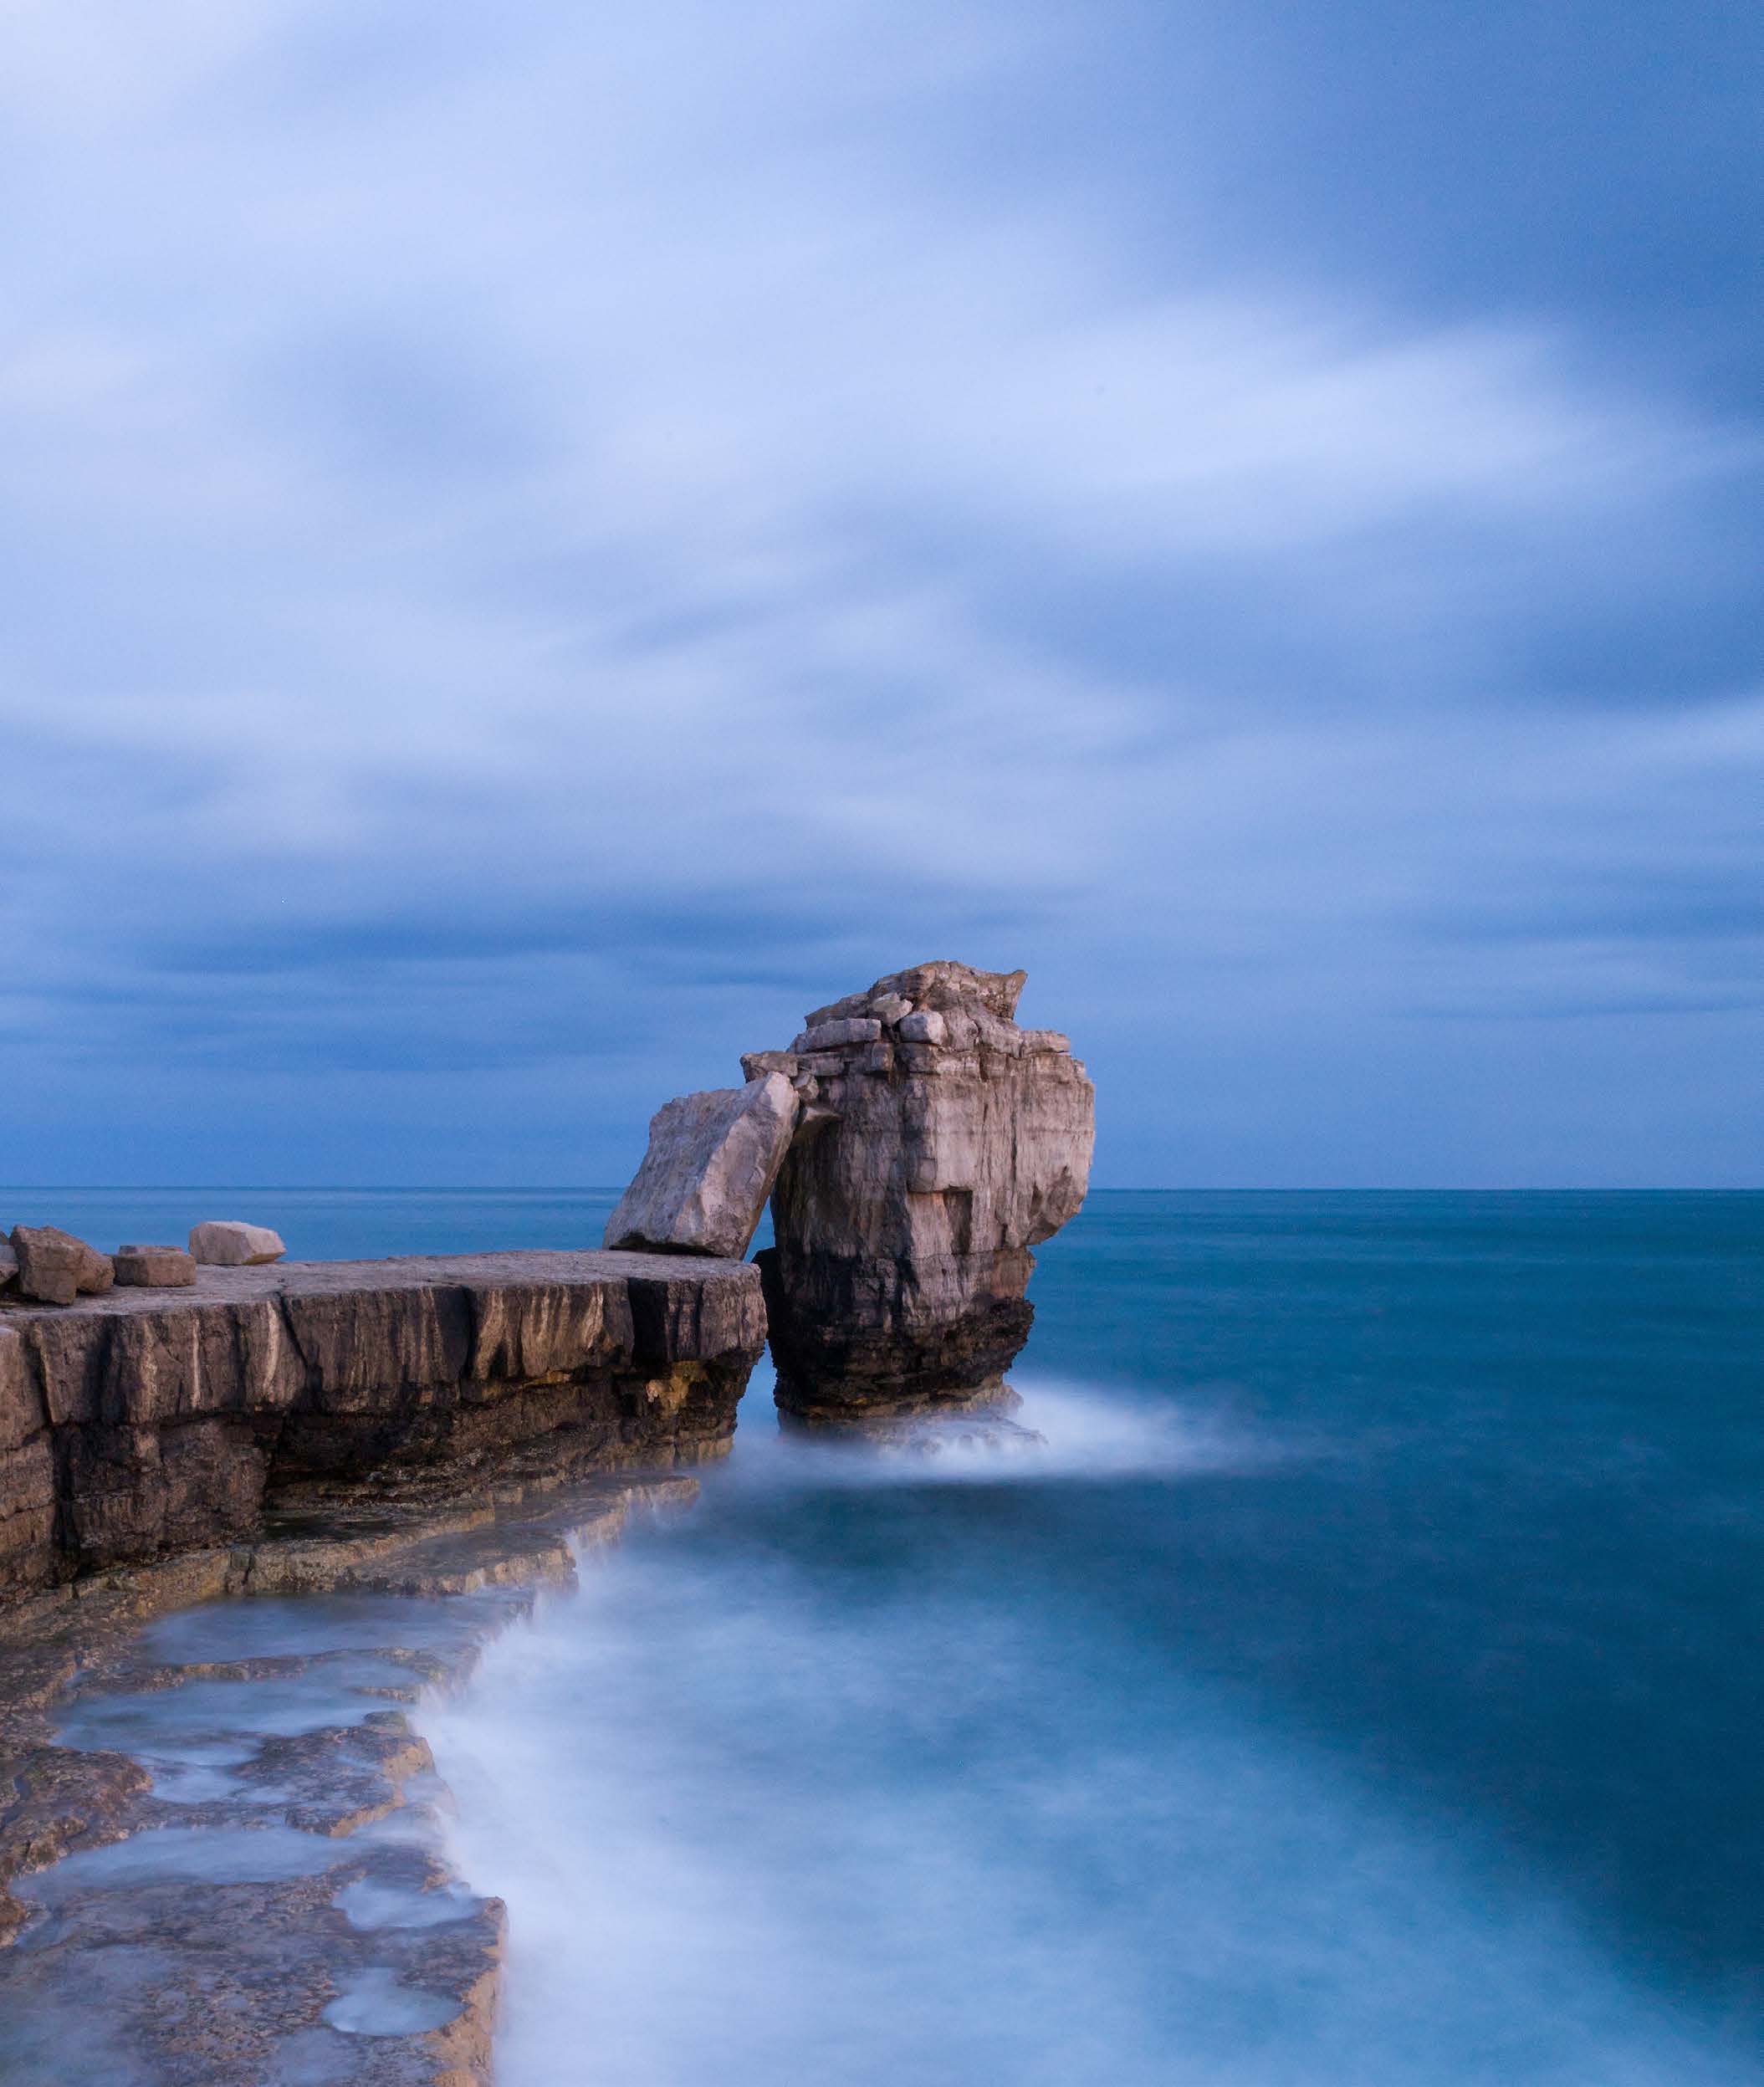
1/4 sec
8 sec
Long exposures create a misty effect from the crashing waves on the sea 68
www.ianmiddletonphotography.com
www.ianmiddletonphotography.com
69
30 sec
324 sec
The longer exposure also added cloud movement
This very long exposure has created super long cloud movement and some star trails
70
www.ianmiddletonphotography.com
www.ianmiddletonphotography.com
71
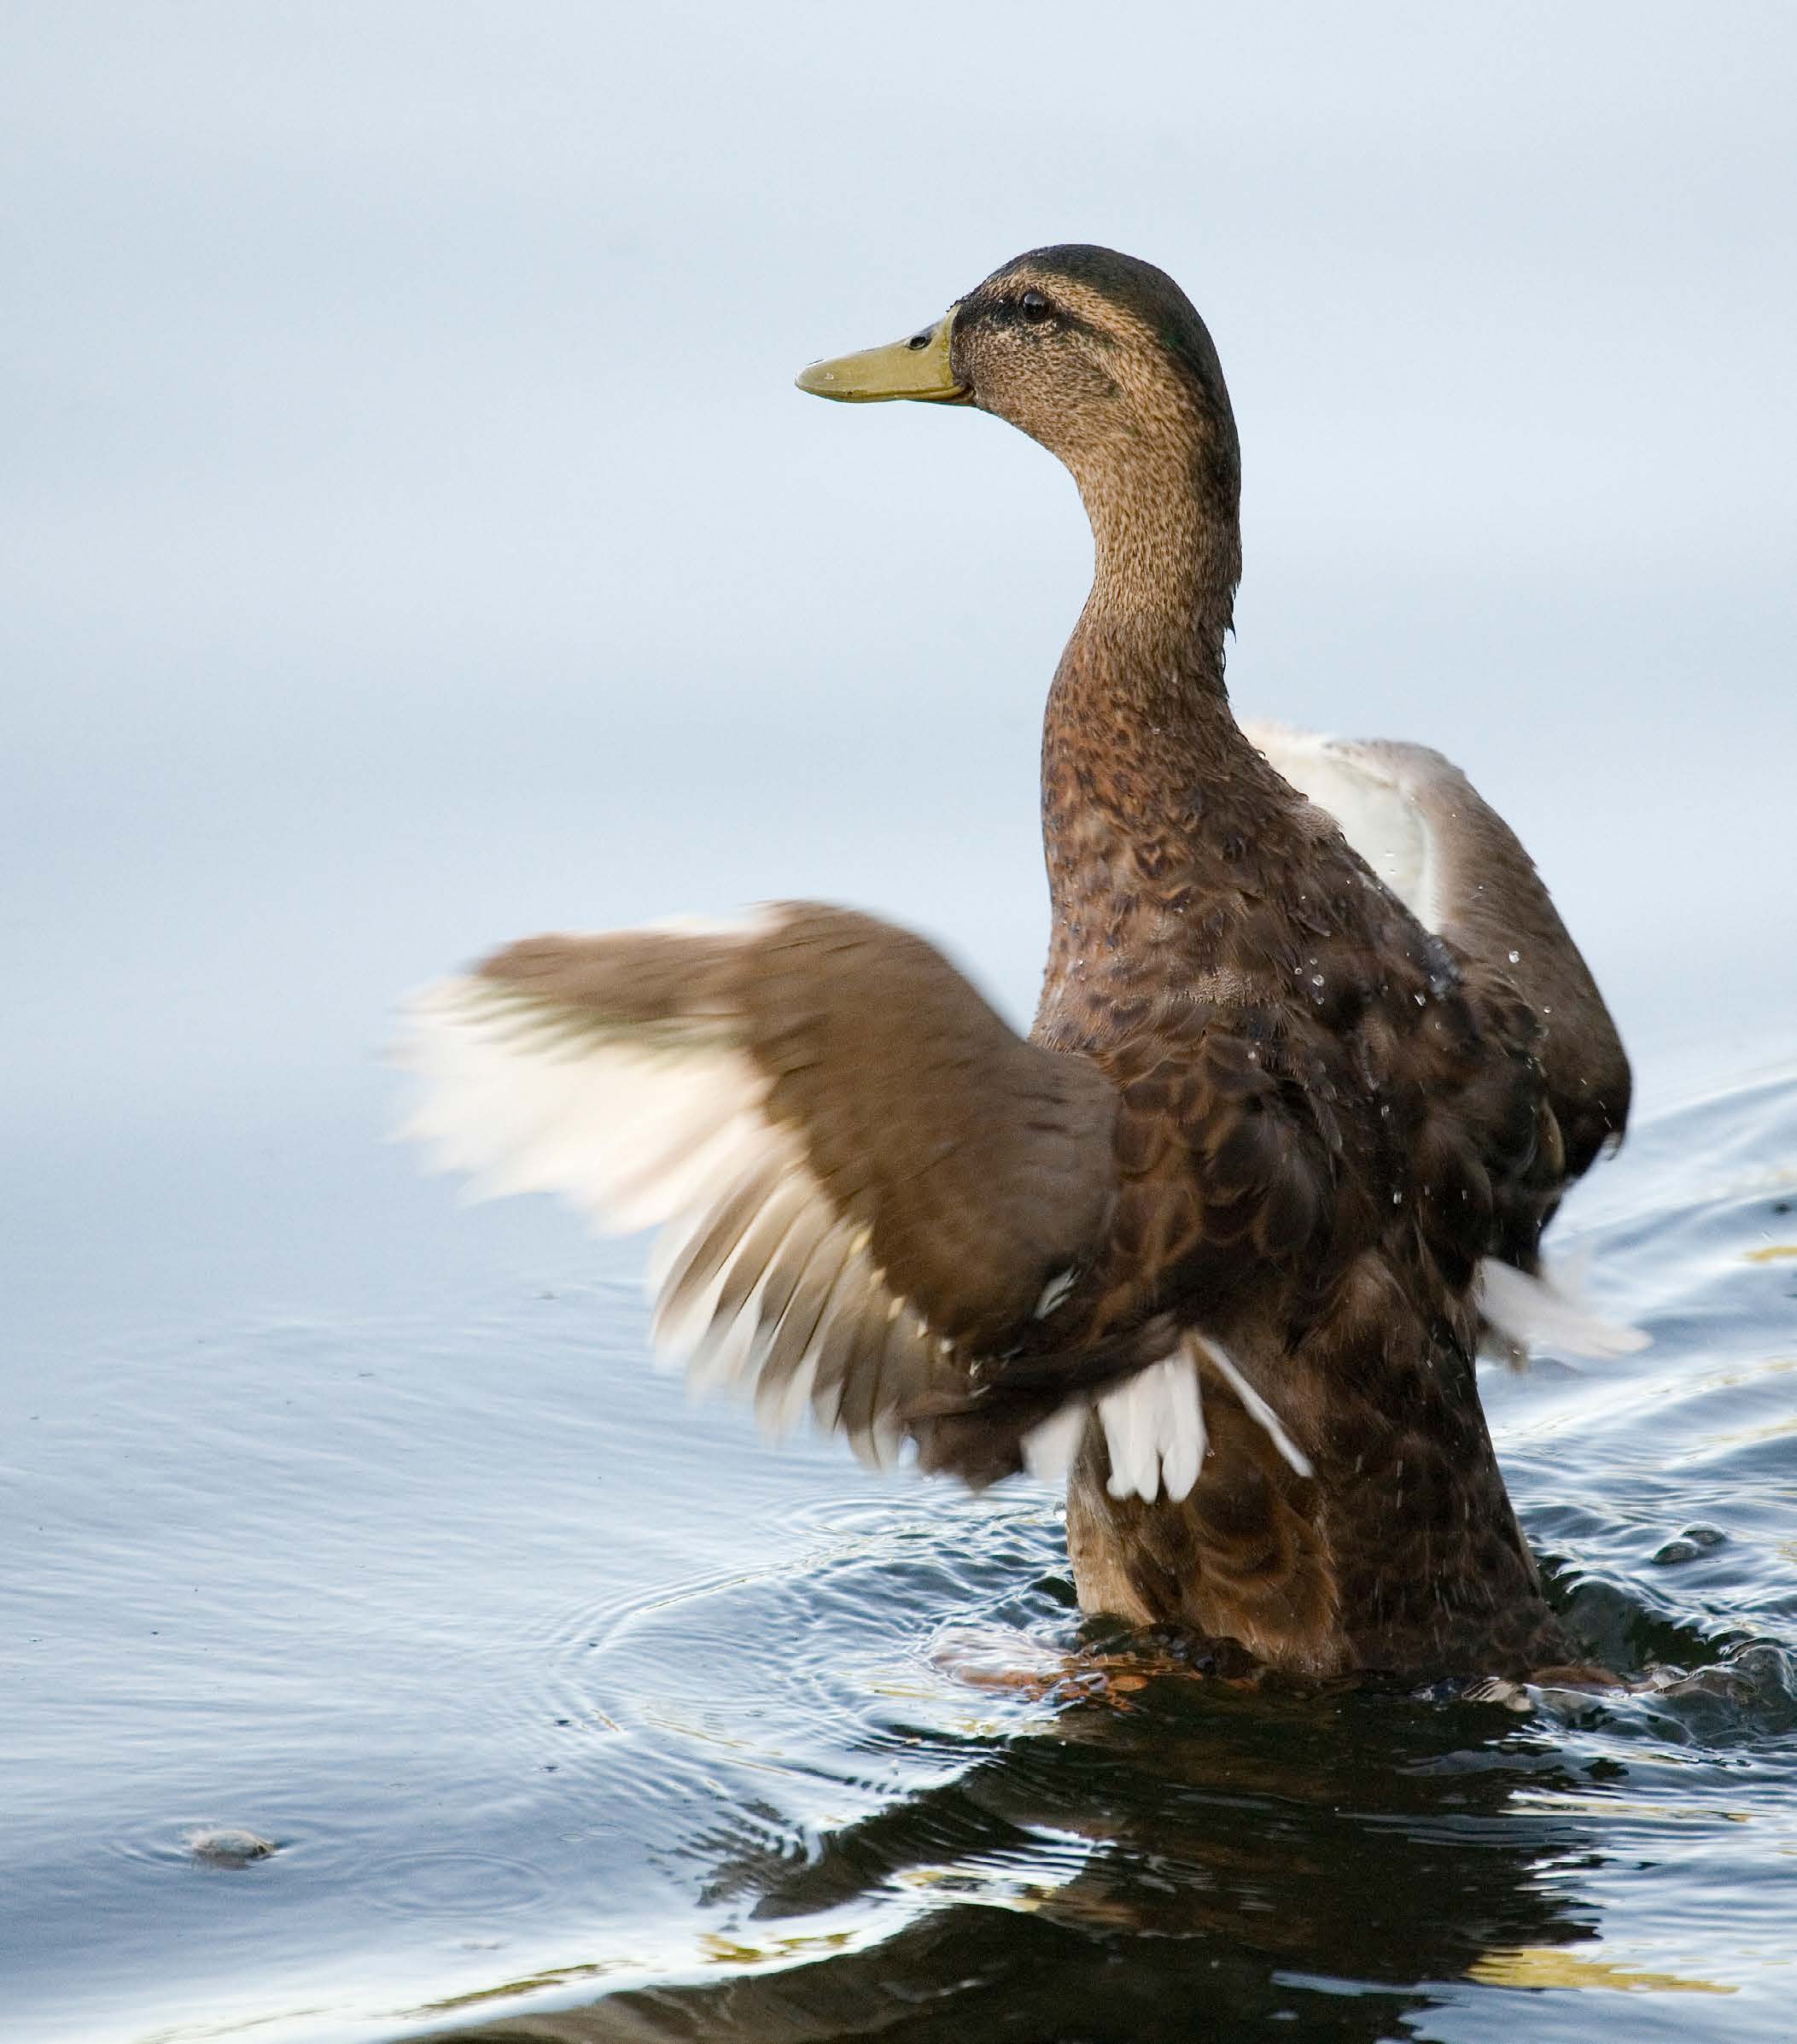
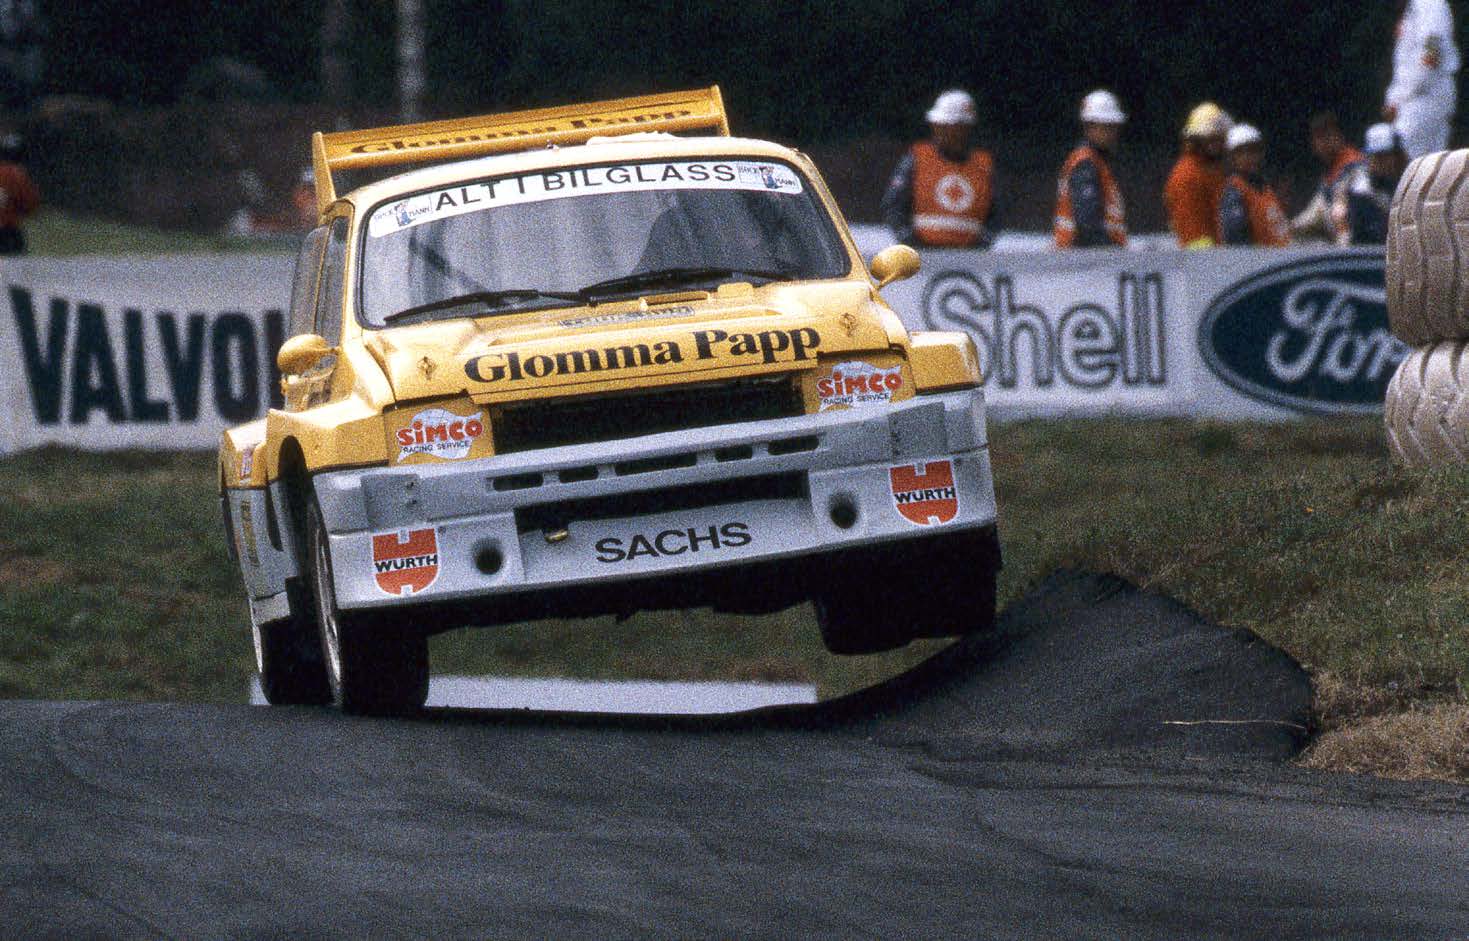
1/400 sec
1/60 sec
Even though this is a fast shutter speed, as the duck’s wings are beating extremely Medium shutter speed along with panning produce dramatic sports/action shots fast this was just the right speed to create a slight motion blur on the wings 72
www.ianmiddletonphotography.com
www.ianmiddletonphotography.com
73
10 secs
A Great example of how light draws our image
The slow shutter speed here has not only been used to smooth out the sea, but Ghost image – During a long exposure when a subject is not in the frame for the also to blur the grass blowing in the wind.
full exposure period then we can get ghosting.
During this 30 sec exposure I stood in the frame for about 25 sec then moved away (very fast). As I was present for most of the exposure the light had started to draw me on the sensor, but because I moved away before the exposure time was up, it started drawing what was behind me. Therefore we ended up with an opaque picture of me in the scene.
However for ghosting or blurring to happen, the subject must be in the frame for enough of the exposure time, otherwise the person or people will be erased or not drawn. For example, if you set up a tripod in a busy train station where people are constantly walking past, and use a very long exposure then the result will be a picture of an empty train station. Also when shooting a street at night and someone walks in front of the camera, they will not appear on the photo if the exposure was long, say several seconds.
Practice effects like ghosting at night or in the evening, using yourself as the subject. Use a tripod and the camera’s timer to start.
74
www.ianmiddletonphotography.com
www.ianmiddletonphotography.com
75
Fast exposures – freezing your subject
1/1000 sec:
Fast shutter speeds will freeze any movement in your photo. How fast a shutter speed is required very much depends on the following things:
• How fast your subject is actual y moving
• How fast it appears to be moving
The latter may sound a bit strange, but it’s all about perspective. Next time you are out get a friend to run, first parallel to you (across the width of the frame, like the boy in the photo), then towards you at the same speed. You’ll see that when the person is coming towards you, it doesn’t seem so fast.
www.ianmiddletonphotography.com
www.ianmiddletonphotography.com
77
Different perspective
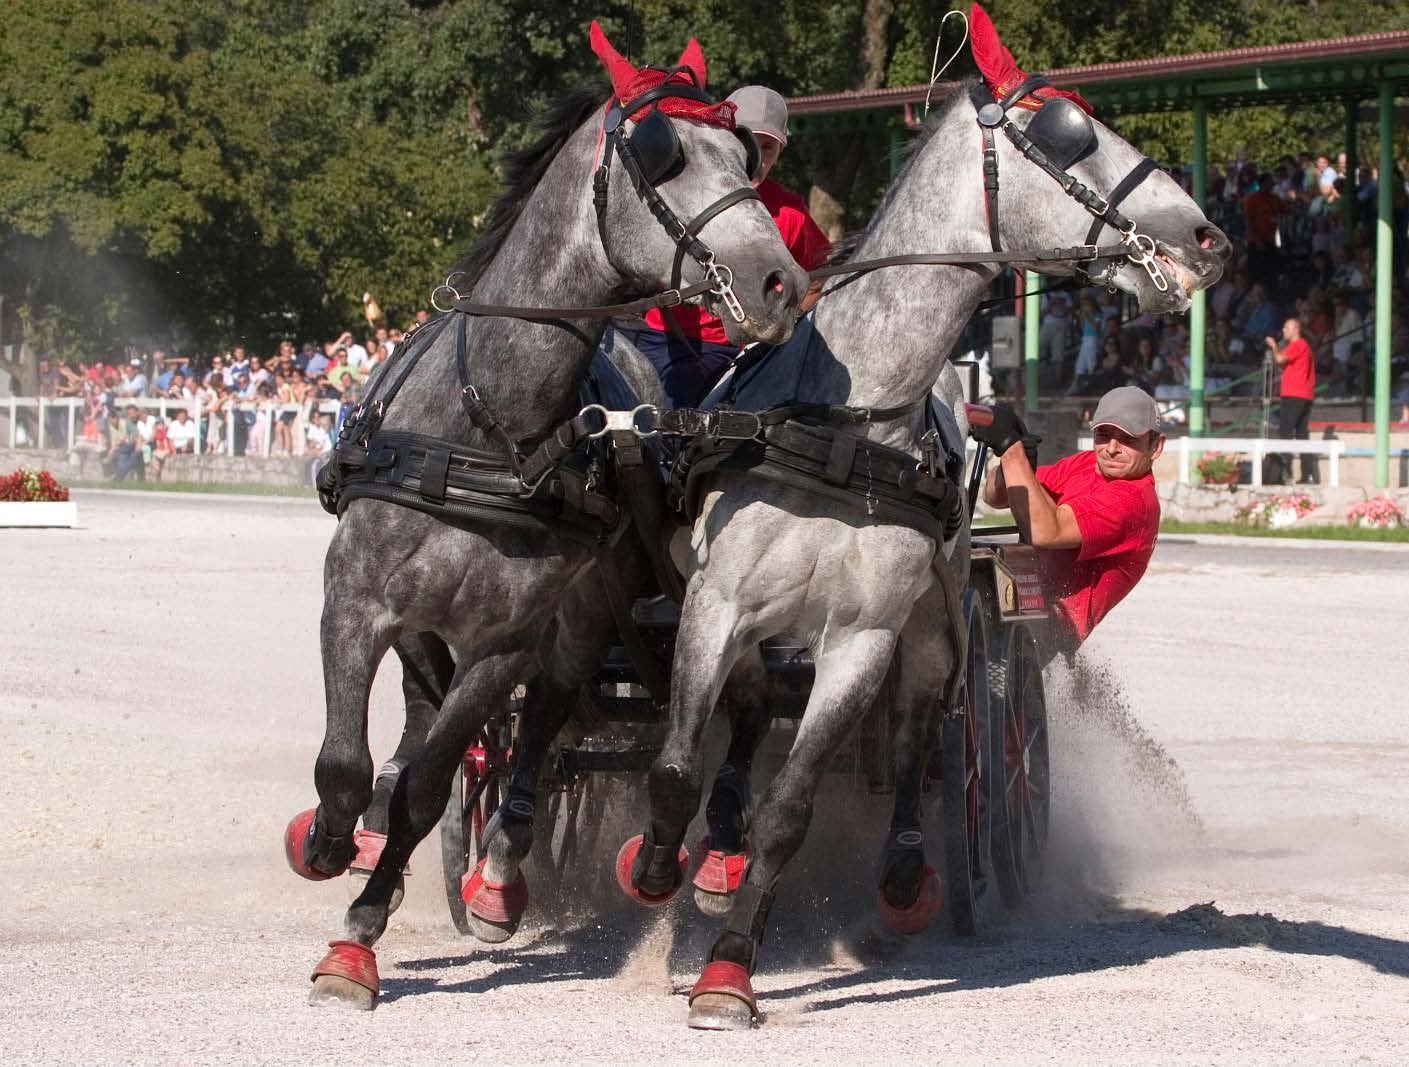
1/500sec
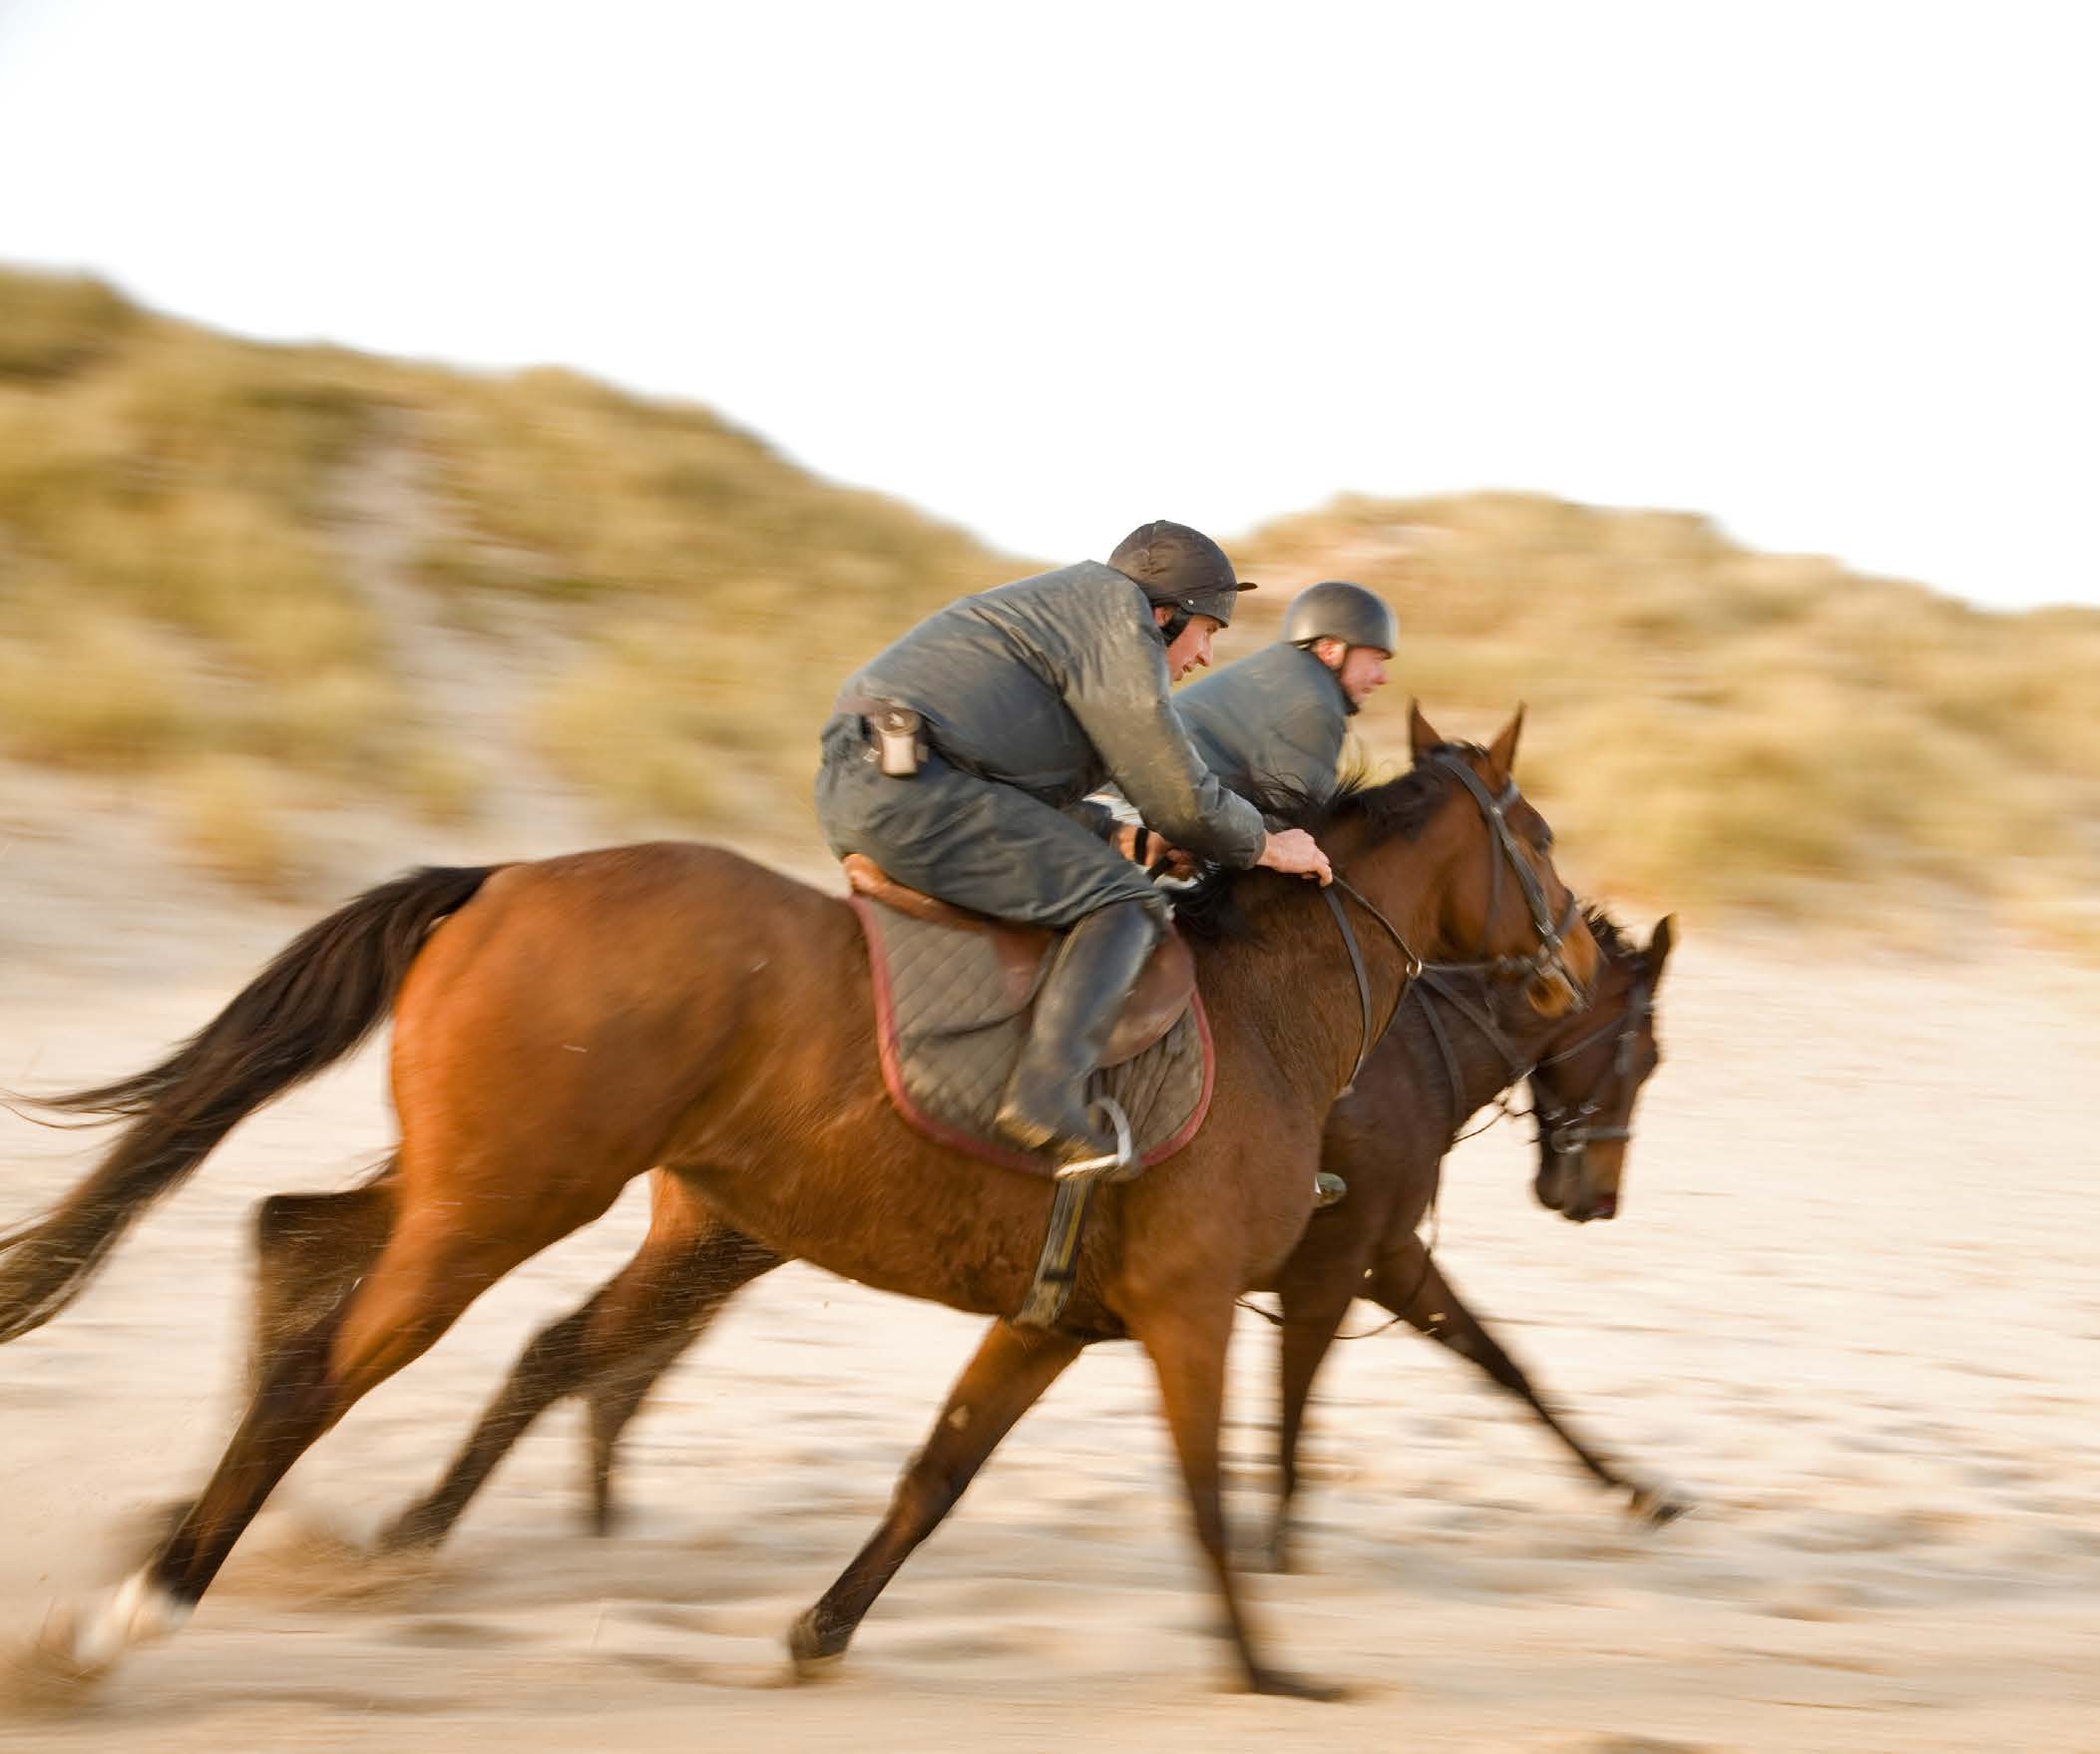
1/800 sec
1/1250
Obviously the horses were running much faster than the boy, but as they were moving in my direction, towards me, 1/800 sec was fast enough to freeze the action.
78
www.ianmiddletonphotography.com
www.ianmiddletonphotography.com
79
Camera settings
Aperture
In order to understand the camera’s aperture, it helps to compare it to the pupil Many cameras have preset modes you can select which do the work for you and in our eye.
usual y comes in the form of subject matter. In the case of shutter speed here are the options available:
Preset Modes
Sports mode: In this case for fast action photos requiring a fast shutter speed, sports mode should be selected.
Creative mode (let’s you take some control)
The other mode is creative mode, where the photographer has some control over the settings. This comes in the form of a priority.
TV (Time Value) or S (Shutter): Shutter priority means that the user chooses the shutter speed and the camera then takes care of the aperture settings. This way you have full control over how much you freeze or blur your subject.
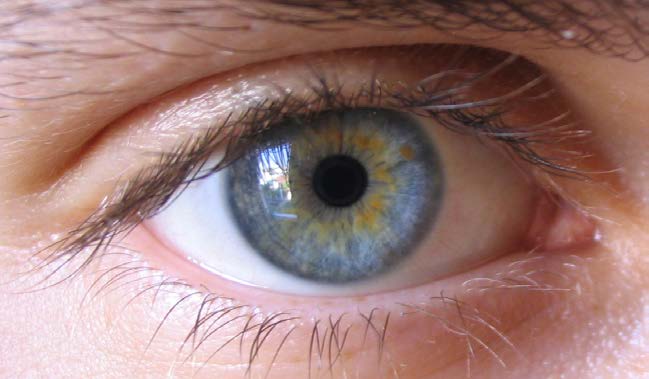
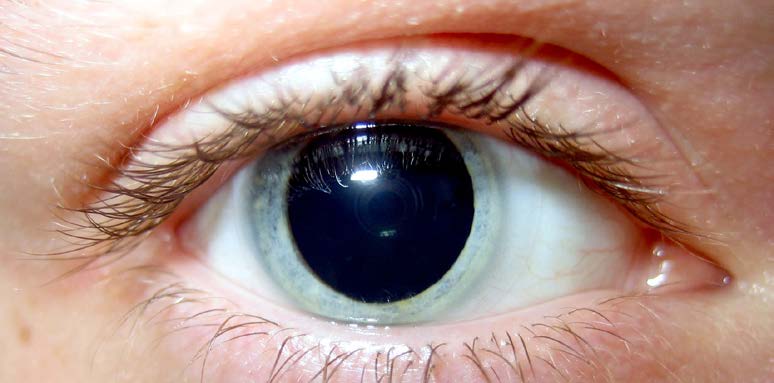
Our eye: - Iris and pupil
In our eye light enters via the pupil. The iris covers our pupil and adjusts its size according to the brightness of the light. In bright light it expands to cover the pupil, thus the pupil is small and restricts the amount of light that enters the eye. In low light the iris retracts, thus the pupil is large and allows more light to enter the eye.
Small pupil in bright light
Large pupil in low light
80
www.ianmiddletonphotography.com
www.ianmiddletonphotography.com
81
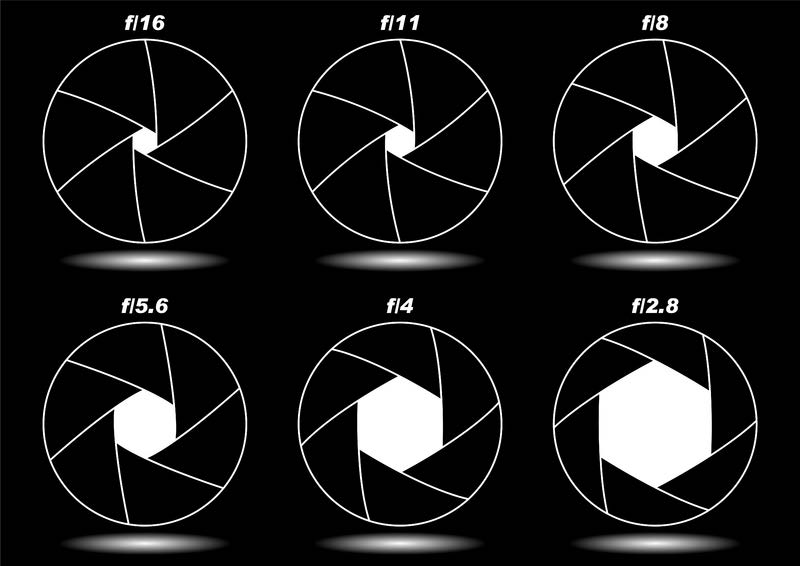
The camera’s aperture:
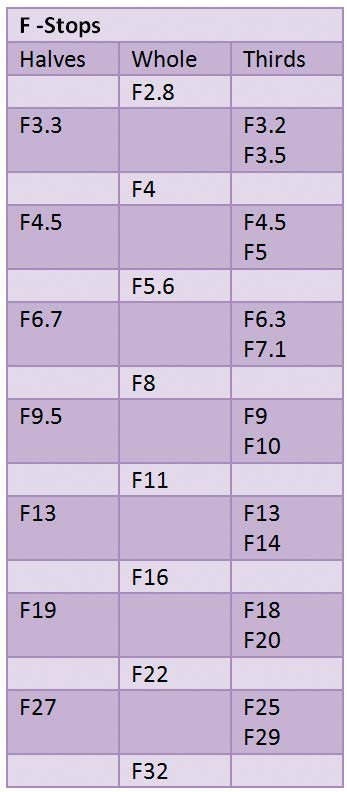
Example apertures and a size chart
Like our eye, the camera also has a method of increasing or restricting the amount of light that passes through its lens. Instead of a pupil, it has an aperture, a hole if you wil . It works in a similar way to our iris and pupil. A mechanical To the left you can see a chart depicting the
iris works to set the size of the aperture hole. When you press the shutter to take range of apertures available. Just like with
your photo, the aperture blades close in to set the aperture just before the shutter the shutter speeds, you can use whole stops,
is opened.
half stops and third stops.
You can see this by pressing the depth of field preview button on your lens (if you have one)
The range of apertures available will very
much depend on the lens you have. In a
Aperture sizes:
DSLR the aperture ring is in the lens, not
the camera. Most lenses start at around
F4.5 - F5.6 and go up to F22. The F2.8 size
is usual y found on much more expensive
lenses. Smaller apertures of F32 upwards
are usual y found on expensive zoom and
telephoto lenses. My Canon L series 100 -
400mm goes up to F40.
Aperture and focal length:
Although apertures come in f numbers,
the actual dimension of the hole depends
upon the focal length. The dimension can
be calculated thus:
Focal length divided by F stop
Therefore the aperture of a 50mm lens at f/8
will be a circle with diameter of
50/8 = 6.25mm
The aperture of a 100mm lens at f/8 will be
Aperture sizes are determined by f + number (also known as an f-stop) a circle with diameter of
The higher the number, the smaller the aperture. See diagram above 100/8 = 12.5mm
82
www.ianmiddletonphotography.com
www.ianmiddletonphotography.com
83
Effect: - Depth of field
Two other things affect depth of field
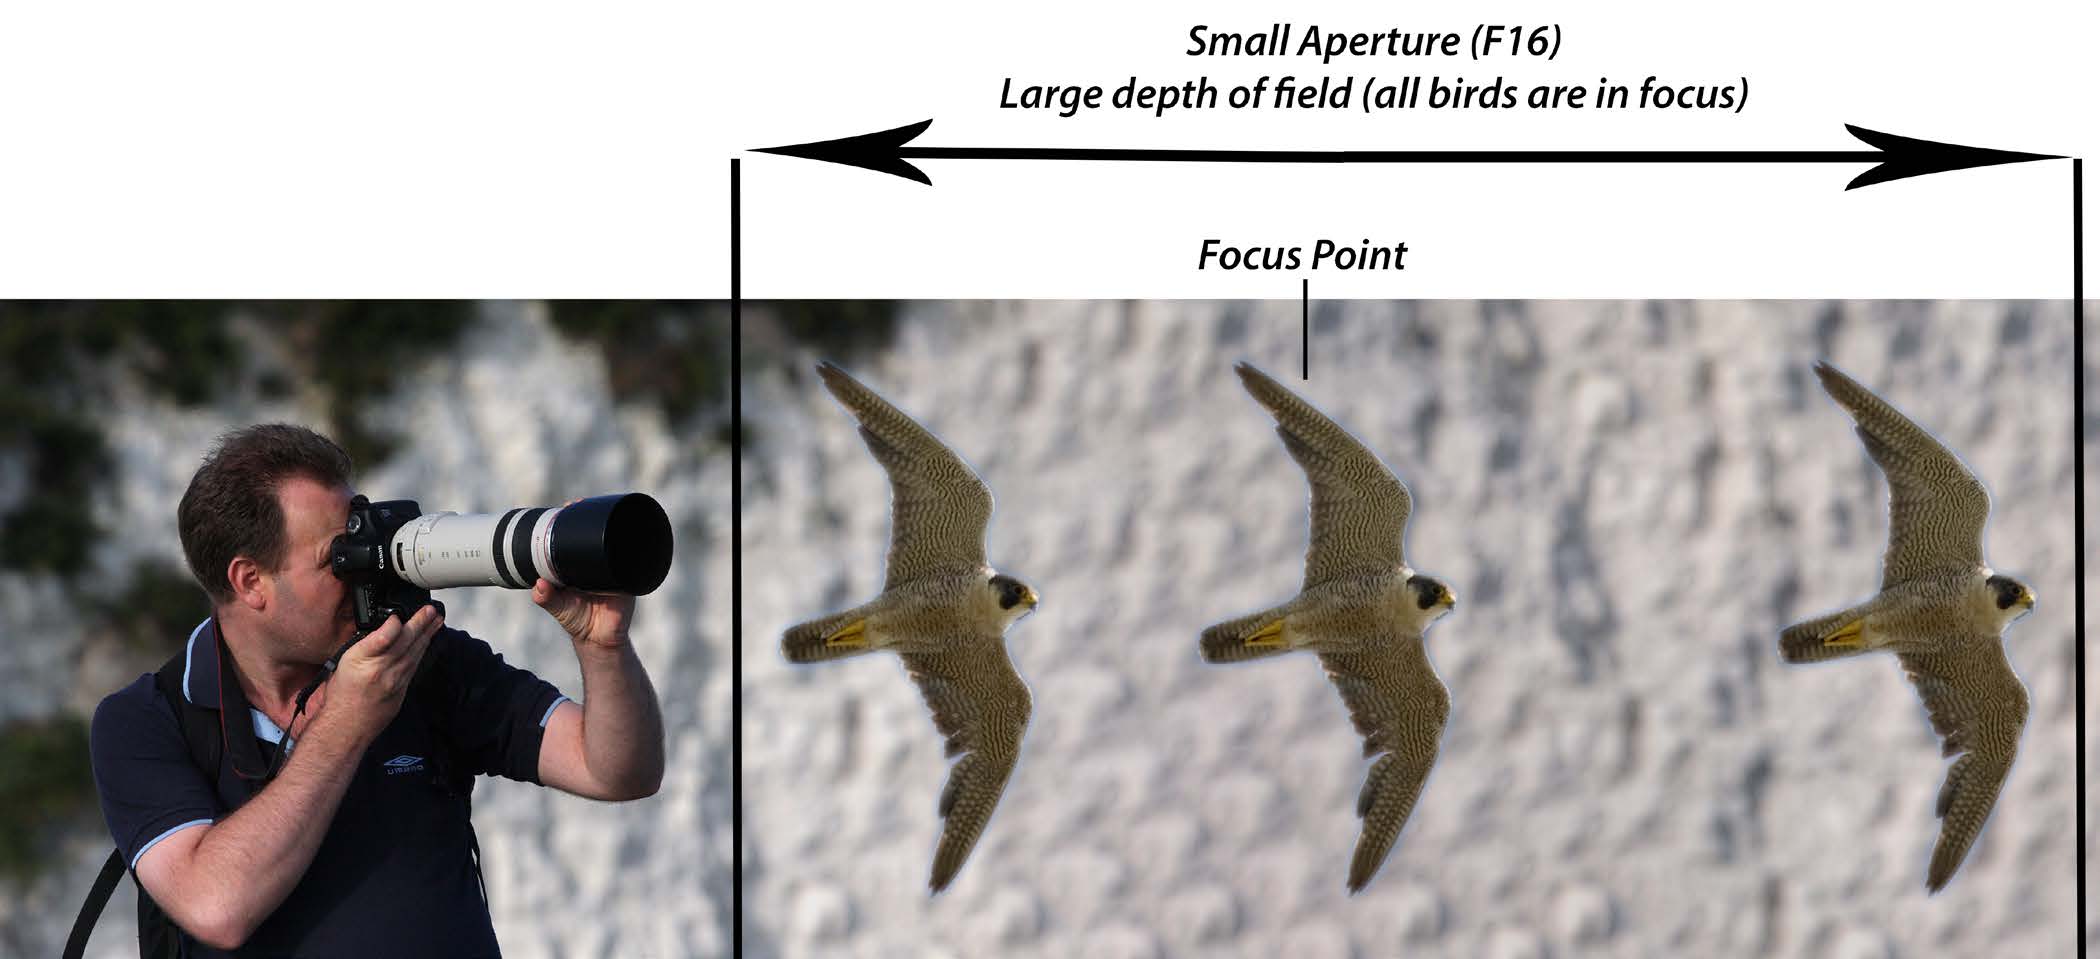
Depth of field is the distance in front of and behind your point of focus that will also be in focus. The aperture setting affects the depth of field as follows: Focal length – the longer focal lengths reduce the depth of field even more because as we saw earlier, the longer the focal length, the larger the hole. So al-A smaller aperture (f16) will result in a larger depth of field, so more of the scene though the F number is the same, the hole is actual y bigger. This means that the will be in focus (great for landscapes)
depth of field you get from an F16 at 50mm, is larger than an F16 at 200mm.
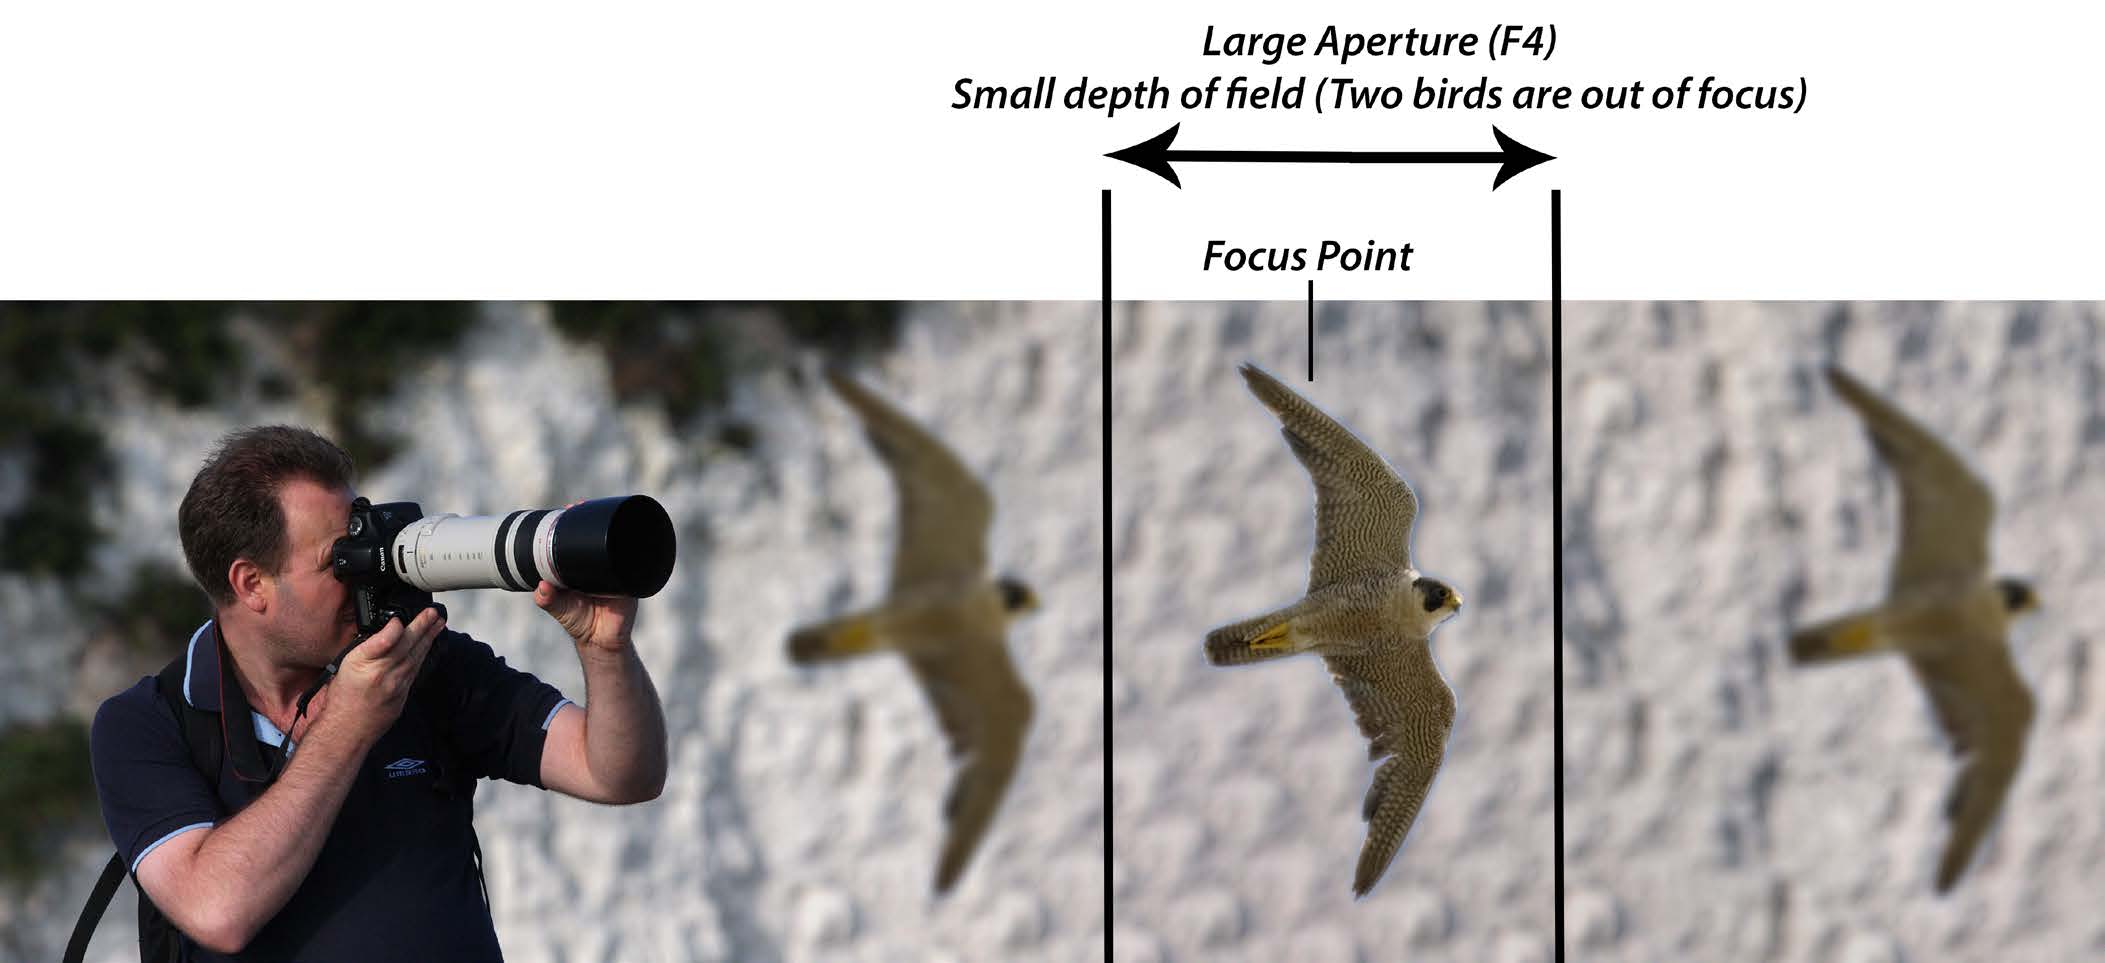
A large aperture (f4 will result in a small depth of field, so less of the scene will Distance from your point of focus – the closer you are to the point of focus, the be in focus. (great for portraits)
more the depth of field is reduced. Conversely, the further away you are from the point of focus, the larger the depth of field.
At a glance – F-stop vs Aperture size
At a glance – F-stop vs Focal length
Large number (F16) = small hole
Short focal length = smaller hole
= large depth of field
= larger depth of field
Ex: at 50mm at F8 - 50/8 = 6.25mm
Small number (F5.6) = large hole
Long focal length = larger hole
= small depth of field
= smaller depth of field
Ex: at 200mm at F8 - 200/8 = 25mm
84
www.ianmiddletonphotography.com
www.ianmiddletonphotography.com
85
Hyperfocal point: (www.dofmaster.com)
The depth of field is not equal on both sides, and is actual y shorter at the front than at the back of your point of focus. Depth of field extends rough 1/3 in front of your point of focus and 2/3 behind. This is important to remember when taking landscape shots where you want to maximise your front to back sharpness. The simple way to do this is to focus about 1/3 of the way into your scene. For even more accuracy you can use a hyperfocal point chart, or special software which you can download for free at: www.dofmaster.com See below for an example:
F16 at 50mm
Large depth of field has kept the object behind acceptably sharp Illustration by David Selwood
F5.6 at 50mm
Narrow depth of field plus the slight increase in distance between the boy and the object has thrown the background more out of focus
86
www.ianmiddletonphotography.com
www.ianmiddletonphotography.com
87
F16 at 105mm
At a small aperture the increased focal length and distance between the boy and the F16 at 24mm
background object still throws everything out of focus Conversely, at shorter focal lengths (wide angle in this case) we can increase the depth of field when background objects are further away. Notice how the background is sharper in this image than in the previous one shot at F16 at 105mm F5.6 at 105mm
A longer focal length and larger aperture increases the background blur even more.
F5 at 25mm
Again, notice how the background is not as blurry as the photo taken at F5.6 - 105mm 88
www.ianmiddletonphotography.com
www.ianmiddletonphotography.com
89
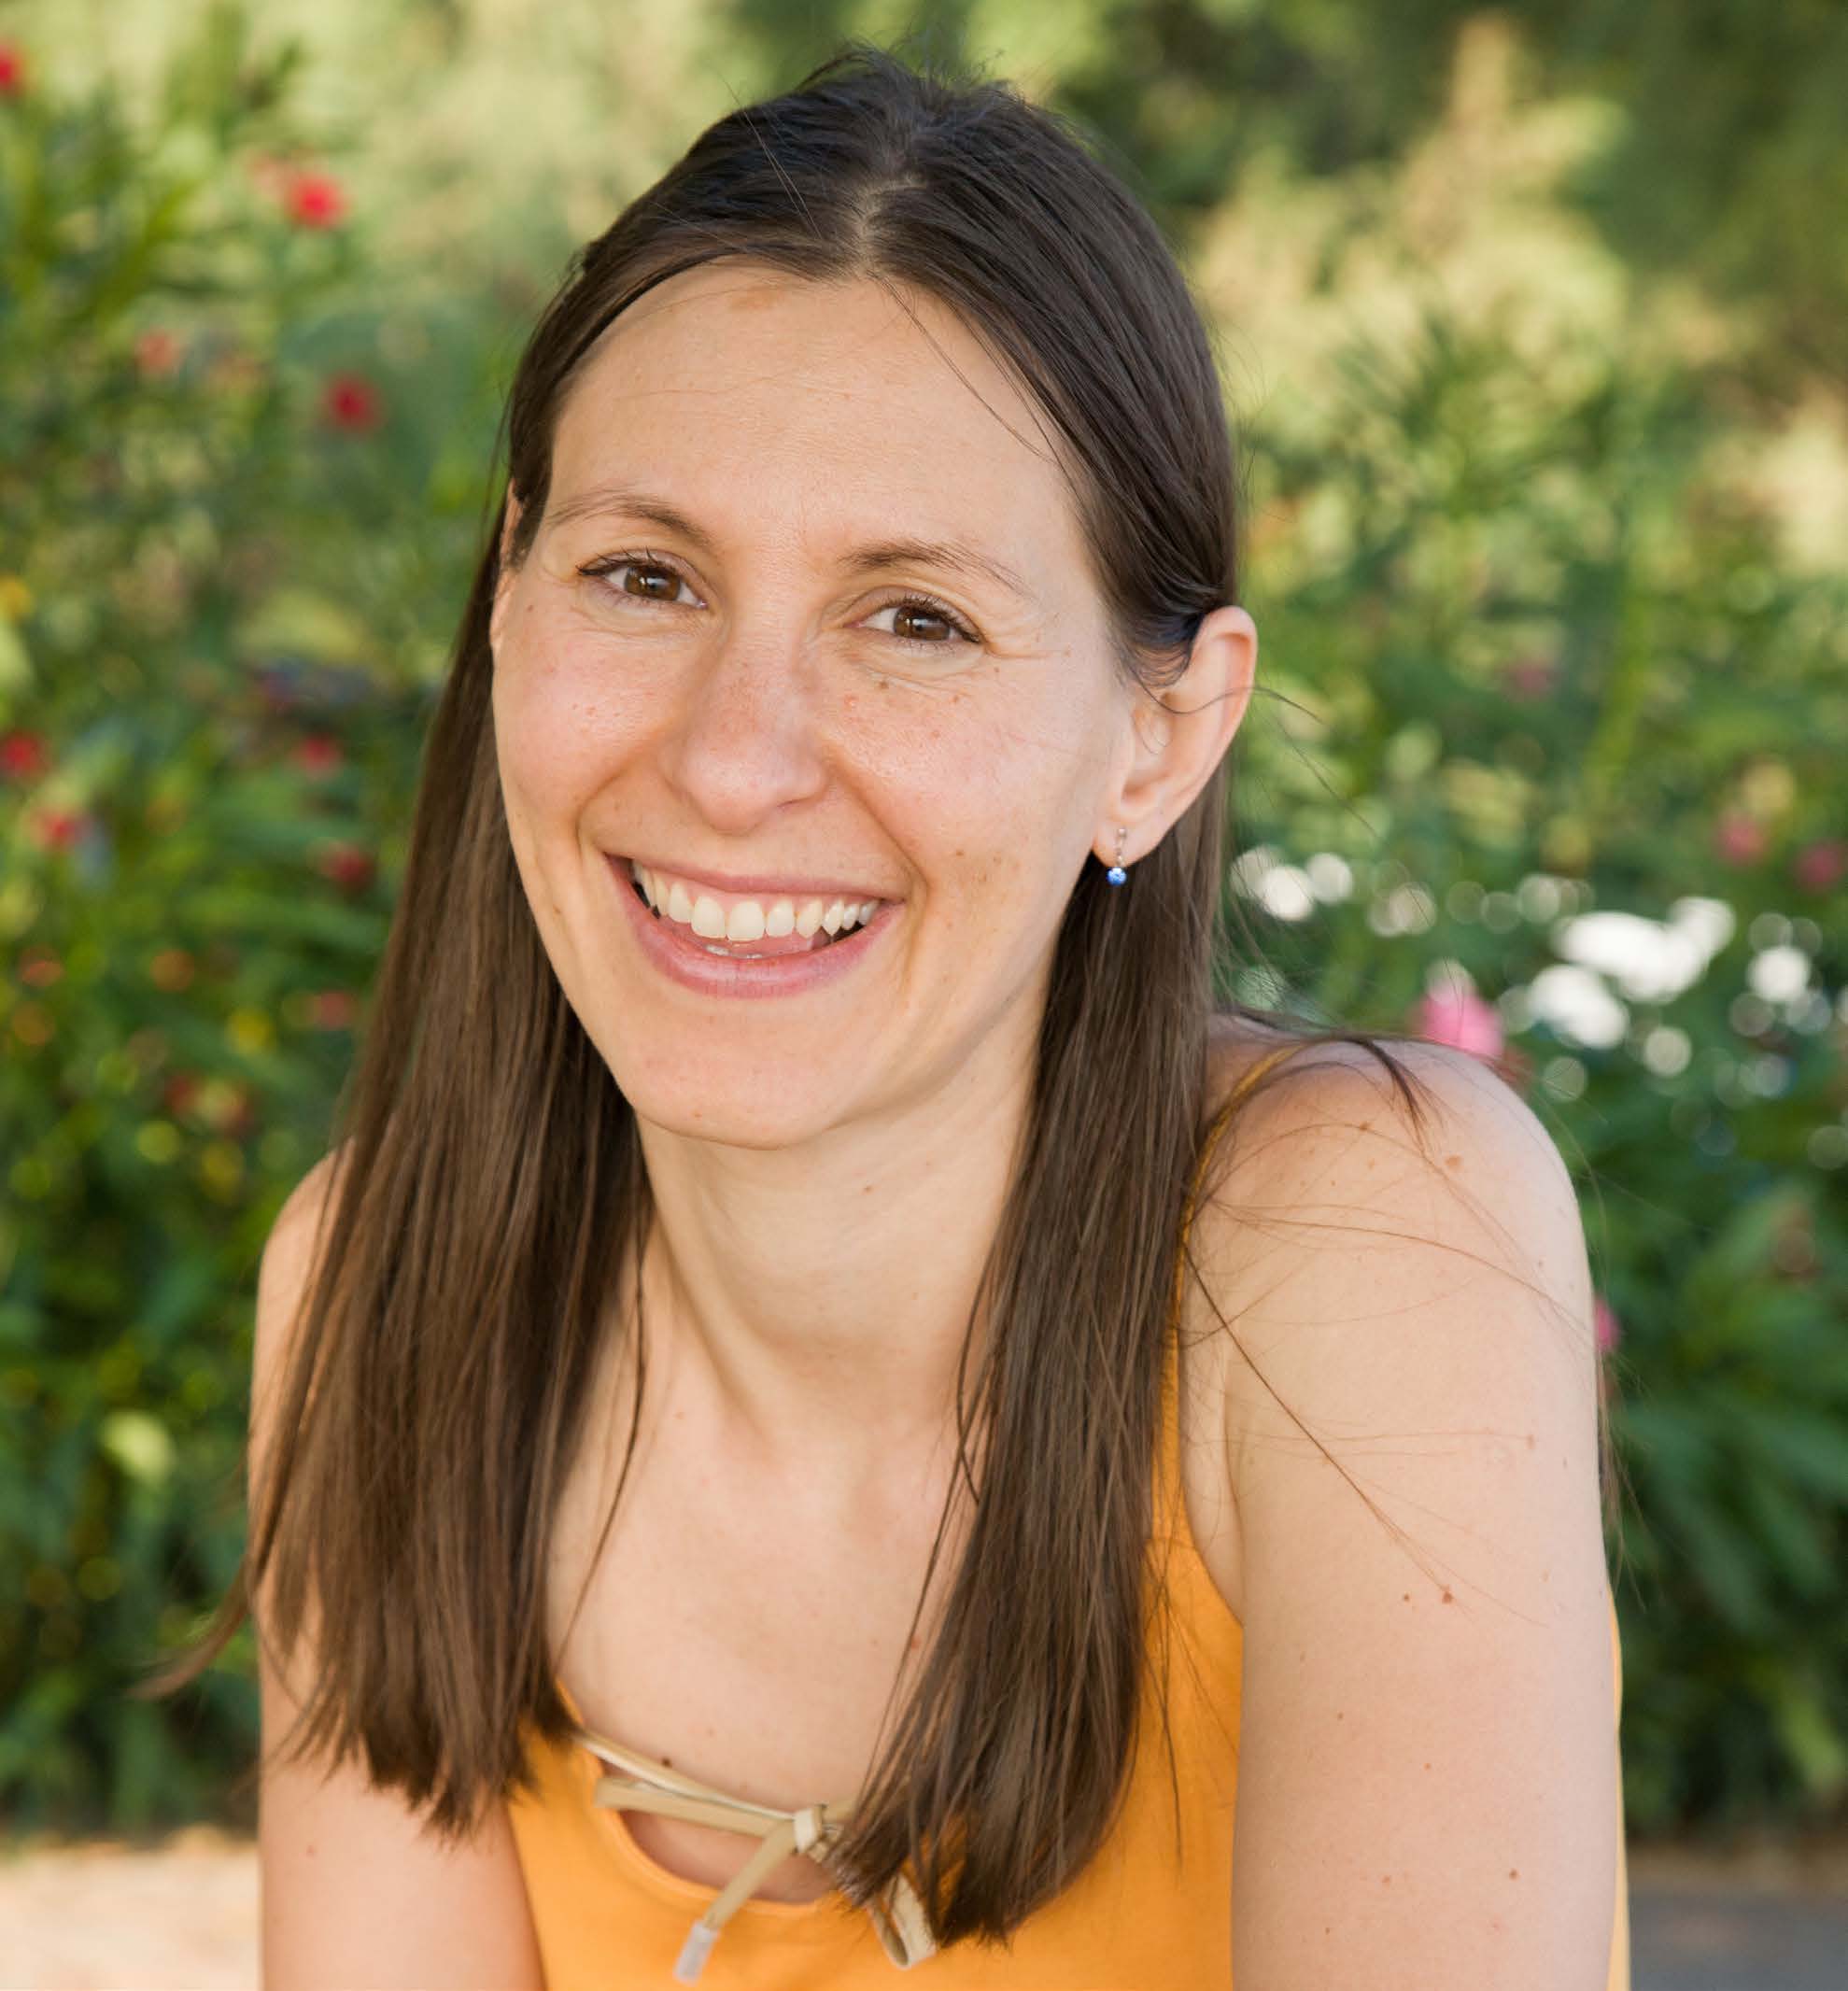
For landscapes we want a large depth of field to get maximum sharpness across the scene Great for portraits
Aperture - f16 Focal length - 24mm
Aperture f7.1 – Focal length 82mm
A narrow depth of field has resulted in:
•
The focal point, the woman, being sharp
Aperture - f20 Focal length - 24mm
•
The rest of the scene is blurry.
•
This effectively isolates our subject from the background and makes it stand out 90
www.ianmiddletonphotography.com
www.ianmiddletonphotography.com
91
Choosing where to focus
Focusing in the middle
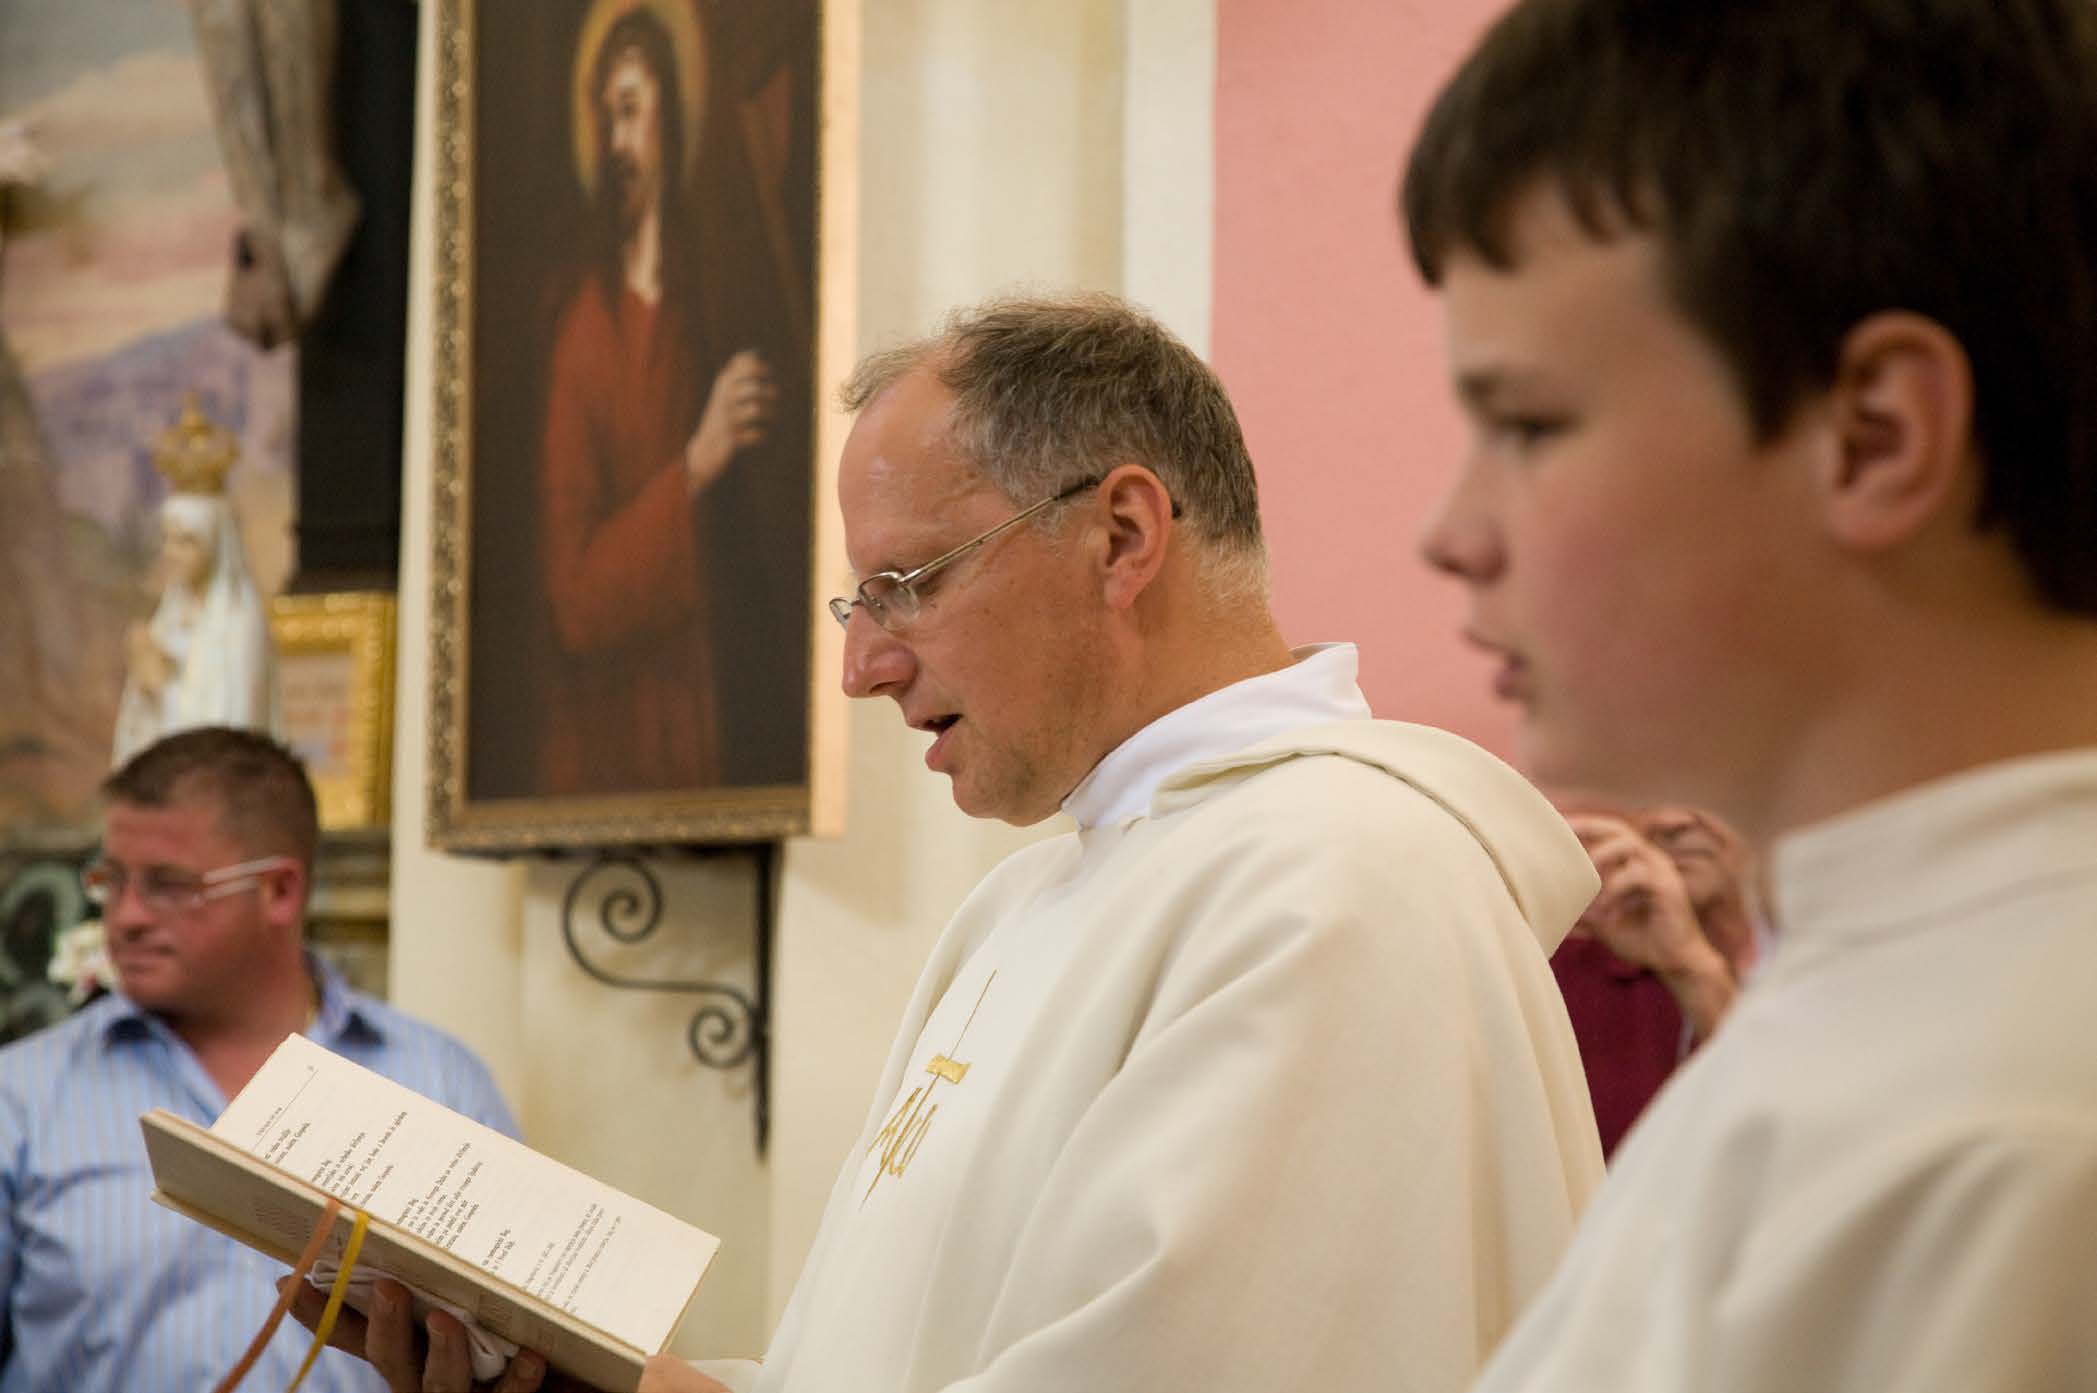
It’s not only where you stand, but where you focus that determines With the focus on the priest, notice how the man in the background how much of the background is in or out of focus
is now less blurred and the boy is now blurred.
Aperture – f5.6 - Focal length - 85mm
Aperture – f5.6 Focal length - 85mm
With the focus on the boy and the large aperture, he now stands out in the photo and the priest and man behind are blurred.
Notice how the blurring increases the further back you go in the picture.
92
www.ianmiddletonphotography.com
www.ianmiddletonphotography.com
93

Getting rid of messy backgrounds
Creative use of depth of field
With an even longer focal length, we are able to further reduce our depth of We can also use this effect in a creative manner. With the Canada goose the field and blur the background even more. This is perfect for messy backgrounds grass behind has been reduced to a pure green background by the long focal which might otherwise distract from our subject. This way we can completely length and large aperture.
isolated our subject from the background, and, in this case, our eye is drawn straight to the kitten and not to the background.
Aperture f5.6 – Focal length 400mm
Aperture f7.1 – Focal length 400mm
94
www.ianmiddletonphotography.com
www.ianmiddletonphotography.com
95

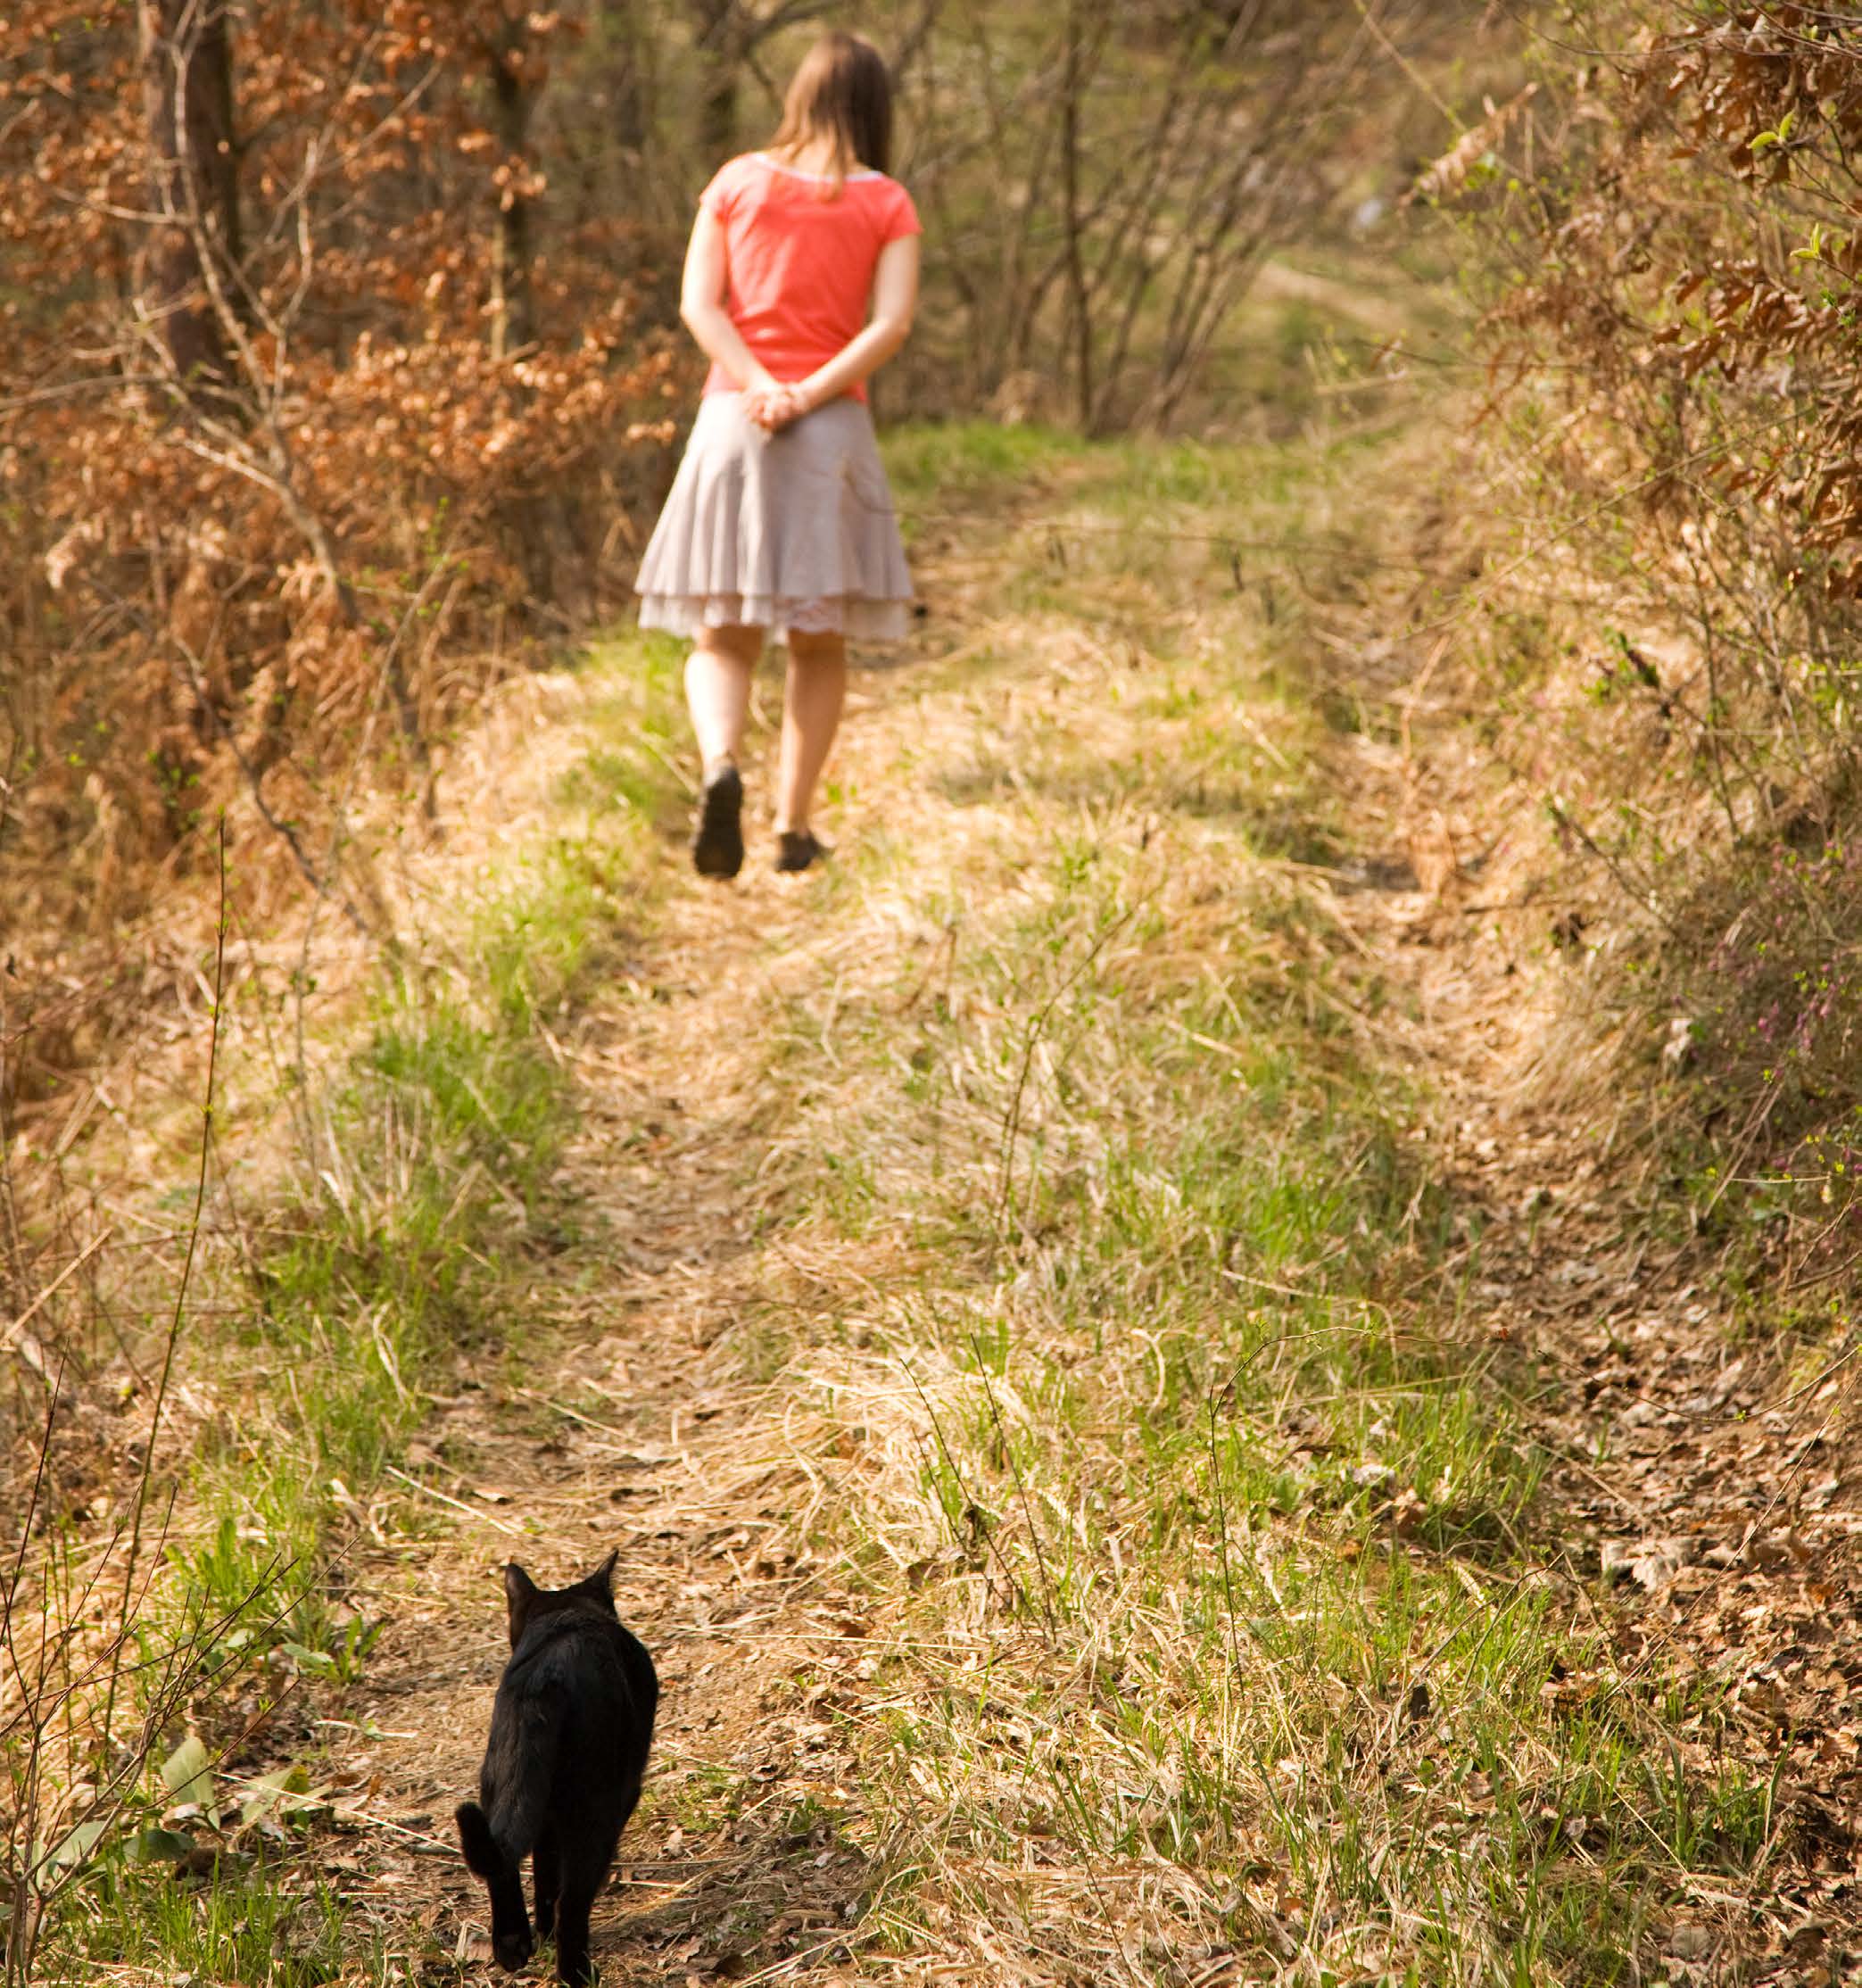
Here I have focused on the cat, and the narrow depth of field has put the girl Mistakes
out of focus. This way our eye is drawn to the cat first, then into the scene and to the girl. The narrow depth of field has also given us a sense of distance and Think about your point of focus.
further enhances the image of the cat following its owner.
Choose your point of focus wisely when shooting with a large aperture, long focal length, and getting very close because your depth of field is greatly reduced.
BAD
Aperture f5.6 – Focal length 105mm
Focal point – right eye
The narrow depth of field has thrown the eye in front out of focus.
Aperture f5.6 – focal length 105mm
96
www.ianmiddletonphotography.com
www.ianmiddletonphotography.com
97
Think about using a smaller aperture
GOOD
Aperture f8 – Focal length 105mm
Aperture f7.1 – Focal length 105mm
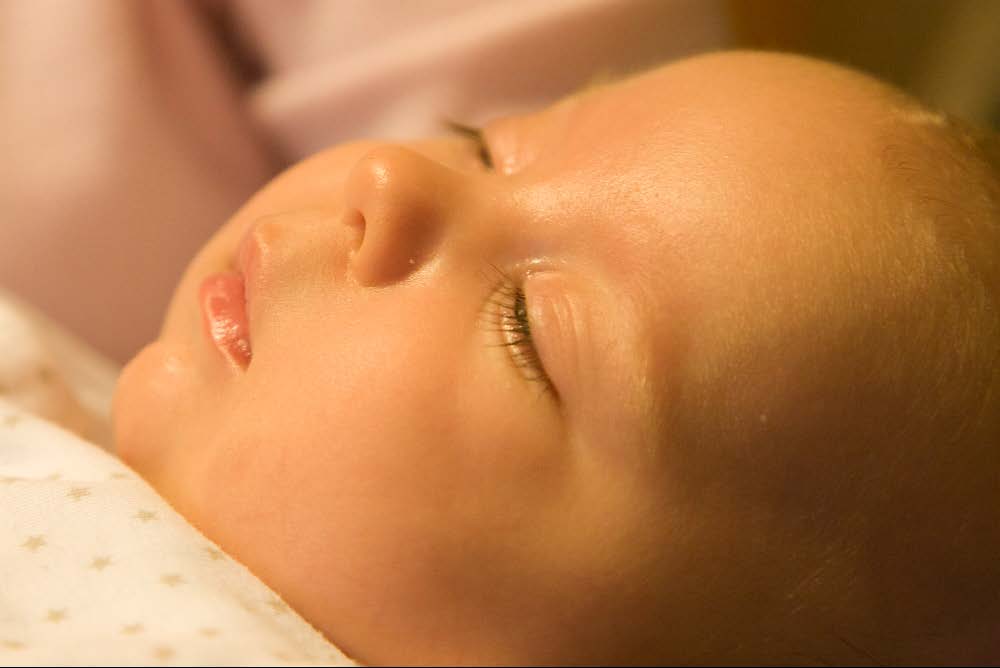
When there are two people in your photo, think about their distance apart, not sideways Focal point – nose
but between you and the camera. Although they are standing next to each other, one The slightly smaller aperture and focus on the nose and now widened the depth of field might be a little closer than the other. Or, as in the photo below, when a mother is hold-and brought the front eye more into focus.
ing her baby, the baby could well be slightly in front of the mother and thus a little closer to the camera. When getting in close and using large apertures, again the depth of field is greatly reduced.
98
www.ianmiddletonphotography.com
www.ianmiddletonphotography.com
99
Camera settings
As I said before, many cameras have preset modes you can select which do the work for you and usual y comes in the form of subject matter. In the case of aperture here are the options available:
Automatic Modes
Portrait Mode: This mode will set the largest aperture possible with the lowest shutter speed possible. This way the background is thrown out of focus and your subject is made to stand out.
Landscape Mode: This mode selects the smallest aperture possible under the conditions at the time to maximise front to back sharpness.
Creative Mode
AV (aperture value) or A (aperture): This comes in the form of aperture priority, meaning that the user chooses the aperture and the camera then takes care of the shutter speed settings. This way you can choose how much front to back sharpness or blur you want.
Aperture f9 – Focal length 105mm
With the focus on the mother’s eyes, that extra one stop on the aperture has put the baby’s face more in focus.
100
www.ianmiddletonphotography.com
www.ianmiddletonphotography.com
101
ISO
Image capture devices
Film
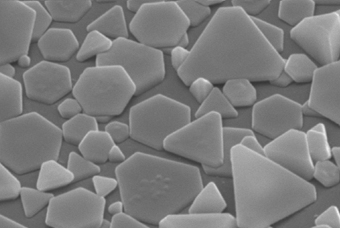
Silver Halide Crystals
Film is coated with tiny
pieces of silver halide
crystals. These crystals
react when exposed to
light and change, de-
pending on the amount
of light that fal s upon
them.
Photo Copyright © 2011 Kodak. Used with permission.
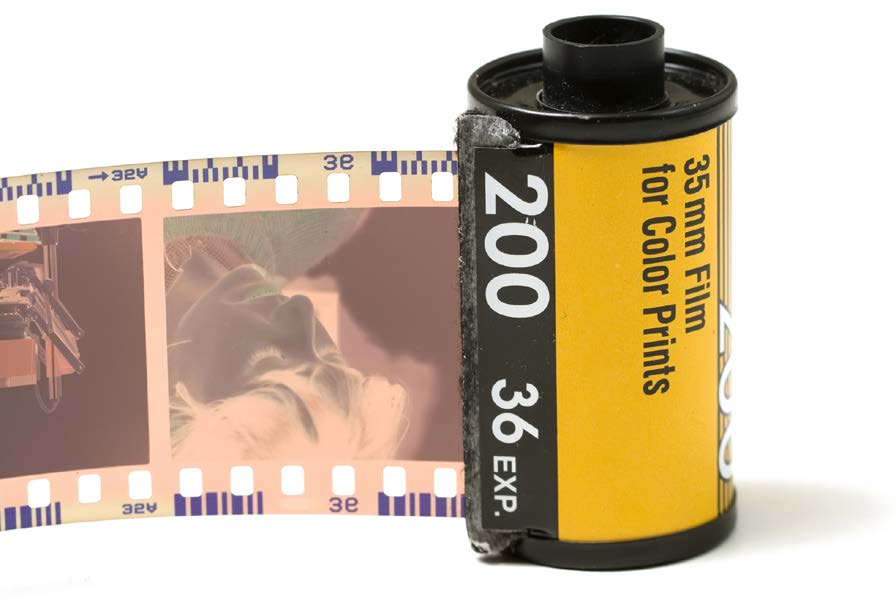
In the days of film, ISO was also known as
Smaller pieces react slower to light and larger pieces react faster to light. The film speed. Anyone who is old enough to
size is denoted in the film’s ISO, which is a measurement of the film speed.
remember shooting only in film might also
Hence:
recall that when they bought film, alongside
ISO 100 is slow film
the number of photos it would also have a
ISO 1600 is fast film
number such as 200, like in the photo here.
This number denotes the film speed. So the
Slow film needs more light to capture a picture, therefore is best used in bright roll of film here has a film speed of ISO 200.
situations. In low light the film must be exposed for longer
© Claudio Fichera | Dreamstime.com Digital camera sensors have been designed Fast film needs less light to capture a picture, therefore is ideal for low light to emulate ISO film speeds to allow photographers the same, and in fact more, situations and won’t need to be exposed for as long as slow film.
benefits that increasing and decreasing the ISO brings. But in order to understand digital ISO, it helps to also understand how ISO works with film.
102
www.ianmiddletonphotography.com
www.ianmiddletonphotography.com
103
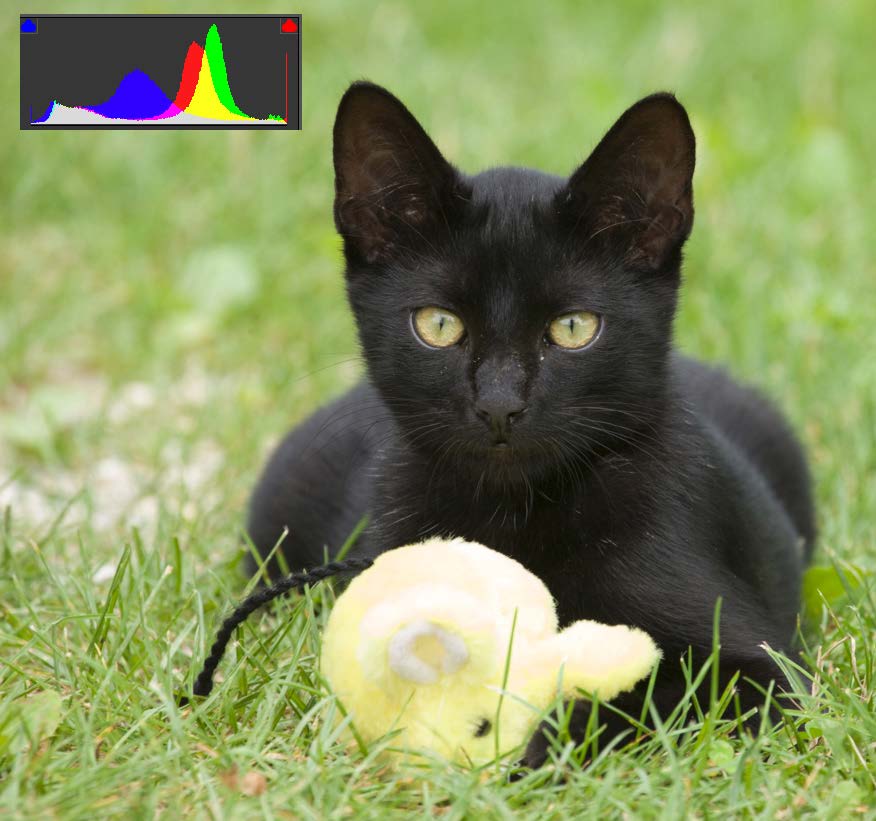
Noise - the cost of using a higher ISO
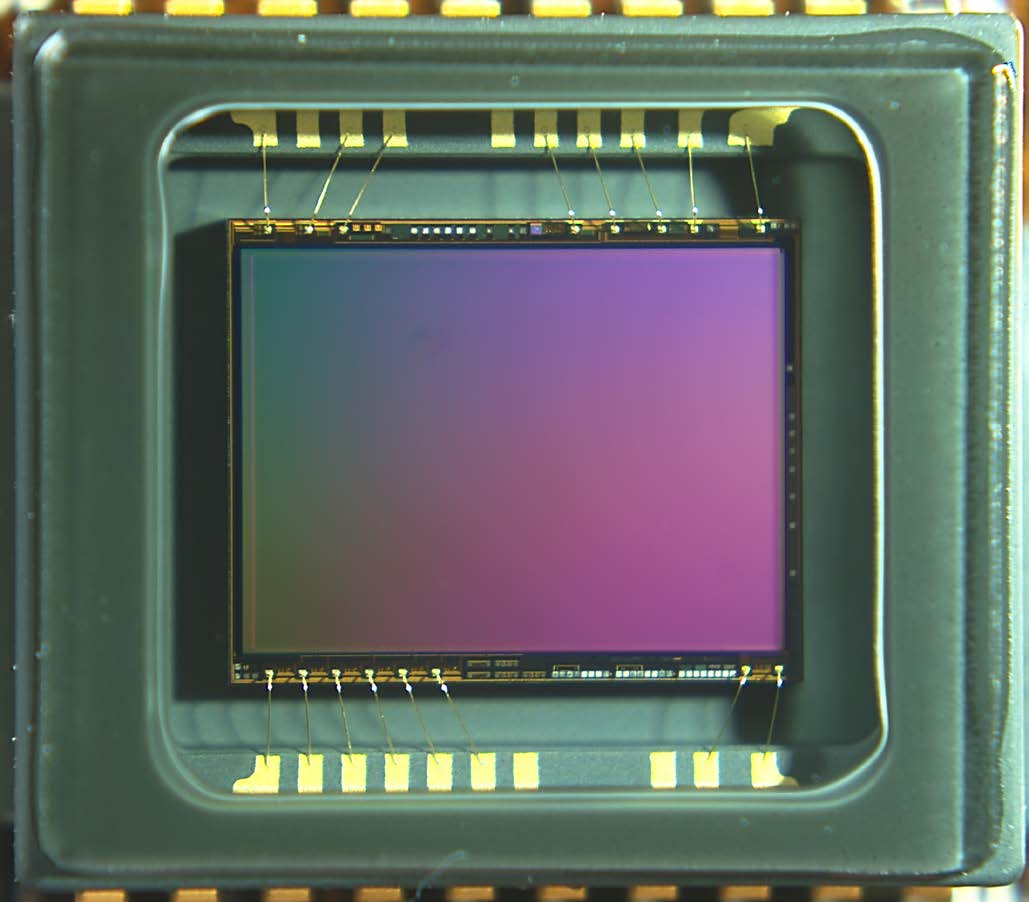
Digital Sensor
Because film with a higher ISO contains larger pieces of silver halide, the larger Digital sensors use tiny photodiodes
pieces show up on the resulting image as grain, and when an image from this is that allow an electrical current to
blown up you will see the grain even more. On the other hand, as low ISO films flow when light is placed upon them.
contain smaller pieces of silver halide, there is less grain and the picture remains Think of it as a switch that is turned
smooth and sharper even when blown up in size.
on when a light is shone upon it.
Think of it as a mosaic with hundreds of tiny pieces making up one big picture.
To make a photodiode react faster to
Now imagine that one mosaic has larger pieces, while another has smaller pieces.
light you must electrical y increase
its sensitivity. So in digital sensors
ISO sensitivity is emulated, and thus
allows us to change the ISO settings
© Dom1 | Dreamstime.com
in the camera. An obvious advantage to
this is that we can do it on a per image basis and not have to change a roll of film.
Just like with camera film though, this advantage comes at a price: noise.
Essential y, the more you increase the sensitivity of the sensor, the more electrical noise you introduce into the signal.
It’s a bit like your old TV having a bad signal. The picture is fuzzy because of noise generated by electrical interference in the atmosphere.
Noise is worse with cheaper sensors, and better on larger and more expensive Image shot on ISO1000 film © Eddi Laumanns (RX-Guru)/Wikipedia ones. The smaller the sensor, and the more pixels it contains, the worse the noise. However, digital camera manufacturers are making huge advances with reducing noise.
There is also a lot of good software out there that can reduce noise in an image, although it does soften the image.
Noise is more noticeable on computer screens and when making large prints (depending on the quality of the noise). It’s also more noticeable in dark images, Blown up the grain becomes more obvious
or black parts of your photo. Cheaper sensors can suffer from colour noise.
104
www.ianmiddletonphotography.com
www.ianmiddletonphotography.com
105
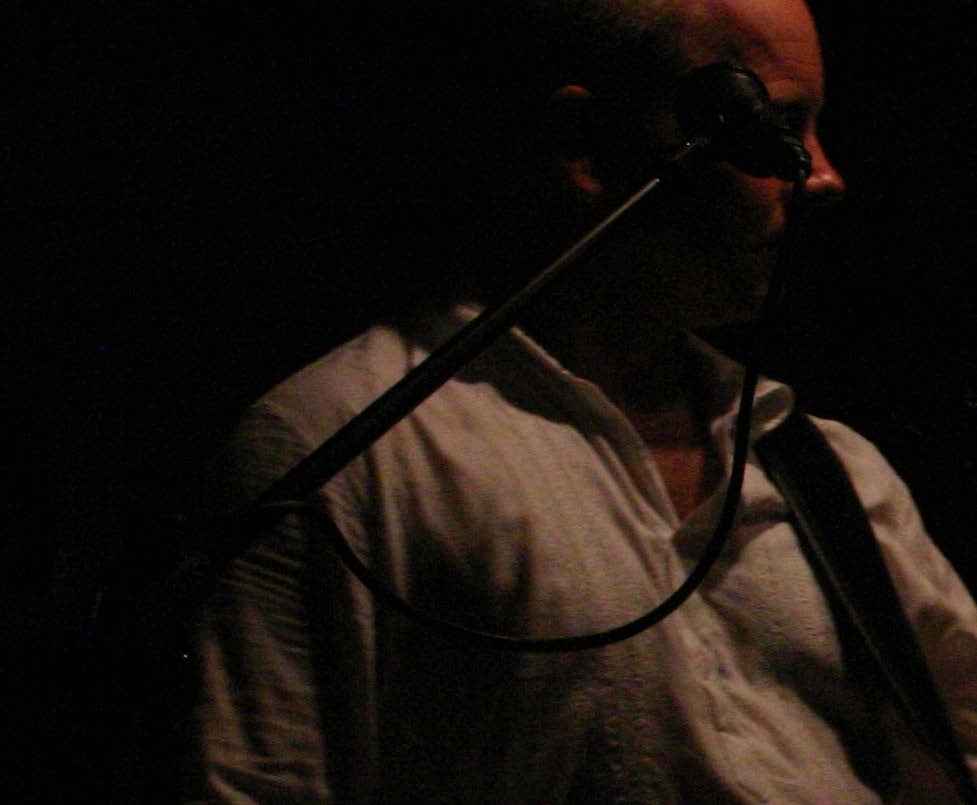
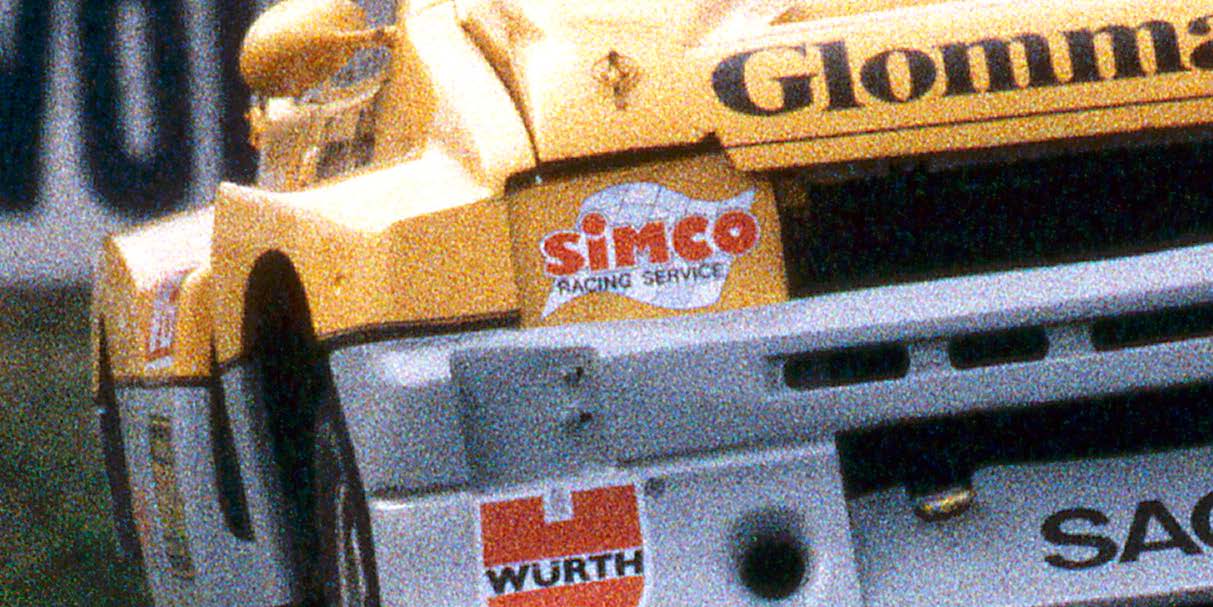
ISO 1600 on Canon EOS 300d (budget SLR)
ISO 128000 on a Canon EOS 5D m3 (Professional SLR)
This camera is old. It’s a smaller sensor with a resolution of 6mp.
This camera not only has a full frame sensor (35mm - same as film) but is also a higher end SLR, so the noise is much less noticeable.
Notice the red colour noise on the white shirt.
106
www.ianmiddletonphotography.com
www.ianmiddletonphotography.com
107
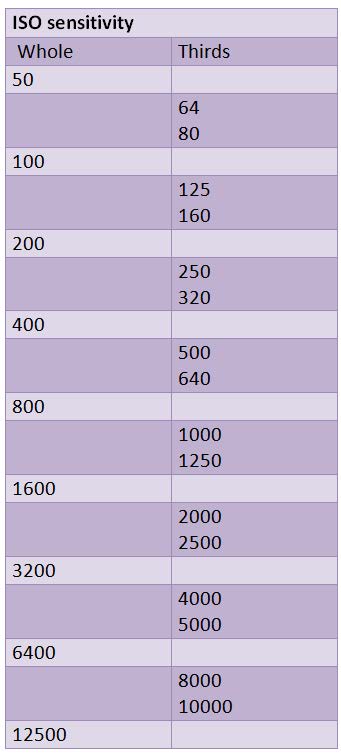
ISO 128000 on a Canon EOS 5D m3 (Professional SLR)
ISO settings are measured in numbers,
By using noise reduction software we can reduce the noise in an image shot at as indicated in the table to the left. As the
a high ISO. Again it comes at a price: softening
number increases, so does the sensitivity.
On portraits this is not such a problem as it smoothes out the skin. But it can be a problem with landscapes as we lose sharpness.
Traditional y the camera film’s ISO was
measured in whole stops, one stop being
double the lower stop, or half the higher
stop. i.e. 50 100 200 etc
However, with digital sensors having more
control over sensitivity they can now offer
1/3 of a stop, offering a much wider range
of sensitivity options.
How high the ISO goes will depend on your
camera. As manufacturers are continual y
improving their sensors, ISO ranges are
ever increasing. Nonetheless, you should
be careful because while your camera may
offer a high ISO such as 6400, you may
find that the noise at this level is awful and
renders the shot unusable. Remember that
noise is also more prevalent in dark or black
areas, so if you are shooting at night or in a
dark place, you might want to think twice
about how high you set the ISO.
Tip: take some sample shots on your camera at each ISO setting to determine at what point the noise becomes too bad. Then you will know how high you can go without compromising on quality.
At a glance
Higher number = shorter exposure time = more noise
Lower number = longer exposure time = less noise
108
www.ianmiddletonphotography.com
www.ianmiddletonphotography.com
109
ISO vs APERTURE (camera set to shutter priority mode): As we are learning with photography, nothing is without consequence. The same applies when setting your shutter speed, aperture or ISO: they all affect Again, we have the same effect with
At a glance
one another and ultimately a compromise is required. Here is a breakdown of aperture. When the camera is set to
ISO effect on aperture:
the effects they have on one another:
shutter priority and you have chosen
•
ISO 200 = F11
•
ISO 400 = F16
your shutter speed, the aperture is
ISO vs SHUTTER SPEED (camera set to aperture priority mode): Increase ISO = Decrease aperture size
automatical y set. But if you increase
As we saw earlier, increasing the ISO
Decrease ISO = Increase aperture size
the ISO, the aperture will decrease
At a glance
increases the film / sensor’s sensitivity
ISO + 1 stop = aperture -1 stop
in size because less light is required.
ISO effect on shutter speed:
ISO -1 stop = aperture +1 stop
•
ISO 200 = 1/60sec
to light. In the case of shutter speed,
Conversely, if you reduce the ISO, the
•
ISO 400 = 1/125 sec
this means that when a higher ISO
size of the aperture will increase.
Increase ISO = Increase shutter speed
is set, it will react faster to light and
Decrease ISO = Decrease shutter speed
thus need less exposure time to create
Advantage: Increase the ISO to get a smaller aperture without having to decrease ISO + 1 stop = shutter speed +1 stop
the photo. So if the camera is set to
the shutter speed or vice versa.
ISO -1 stop = shutter speed -1 stop
aperture priority and you have chosen
your aperture size the shutter speed is
Reason: To increase your depth of field and get more of your scene in focus, or automatical y set. But if you increase the ISO, the shutter speed will be increased vice versa, without having to compromise your shutter speed.
also. Conversely, if you reduce the ISO the shutter speed is also reduced.
Use: There may be times when you want to set the shutter speed in order to
Advantage: Increase the ISO to get a faster shutter speed without increasing the get the precise amount of motion blur or freeze, but your depth of field is too aperture or vice versa.
narrow or too wide. Increasing or decreasing the ISO will allow you to control your depth of field without compromising your exposure time.
Reason: To avoid reducing your depth of field and keep more of the scene in focus or to deliberately reduce your depth of field and throw the background
Examples: Creative sports shots, people, flowing rivers, waterfal s and ocean and other subjects out of focus.
waves.
Use: Freezing fast moving subjects in low light blurring them in good light.
Compromise: More noise in the photo when increasing the ISO.
Increasing or reducing the smoothness of water.
Examples: Sports, people, flowing rivers, waves crashing against rocks or the beach.
Compromise: More noise in the photo when increasing the ISO.
110
www.ianmiddletonphotography.com
www.ianmiddletonphotography.com
111
SHUTTER SPEED vs APERTURE (camera set to shutter priority mode): APERTURE vs SHUTTER SPEED (camera set to aperture priority mode): At a glance
With the camera set to shutter
At a glance
Wel , by now you get the picture.
Shutter effect on aperture:
priority, we choose our shutter speed
Aperture effect on shutter:
•
1/125= F16
and the aperture is set automatical y.
•
F16 = 1/125
•
1/250= F11
But again, if you increase the shutter,
•
F11 = 1/250
Increase shutter = Increase aperture
you also increase the aperture size,
Increase aperture = increase shutter speed
Decrease shutter = Decrease aperture
and vice versa, because a faster shutter
Reduce aperture = reduce shutter speed
Shutter +1 stop = aperture -1 stop
speed needs more light, and therefore
Aperture + 1 stop = shutter + 1 stop
Shutter – 1 stop = aperture – 1 stop
Aperture – 1 stop = shutter – 1 stop
a larger aperture is required to get it.
Advantage: Increase or decrease the shutter speed without having to adjust the
Advantage: Increase or decrease the aperture without having to adjust the ISO.
ISO.
Reason: To keep your depth of field large or small and reduce noise.
Reason: To control how much you freeze or blur your subject.
Use: Maintaining front to back sharpness in a landscape scene or increasing
Use: Freezing moving subjects in low light or deliberately adding motion blur.
depth of field to include multiple subjects and keep them all sharp. Reducing depth of field to deliberately throw the background or other subjects out of focus.
Examples: Sports, people, flowing rivers, waves crashing against rocks or the beach.
Examples: Sports, people, landscapes.
Compromise: A faster shutter speed will increase the aperture and thus result
Compromise: Reduces shutter speed and increases motion blur or vice versa.
in loss of depth of field and front to back sharpness. A slower shutter speed will reduce the aperture and result in an increased depth of field and more of the scene in focus where it may not be wanted.
112
www.ianmiddletonphotography.com
www.ianmiddletonphotography.com
113
Part 6: White Balance
How does it affect my photo?
Light temperature:
Camera film is colour balanced for daylight conditions. If you ever took photos inside with the lights on and without using a flash you probably noticed you As the title indicates, light has a temperature, which is why some light seems got a red colour cast over the entire image. This is because there is a difference warmer (more red) and some colder (more blue). Colour temperature is between the colour temperature of the film and the light source. In the image measured in kelvins (K). The most obvious example of this is candlelight, which below the white balance has been set to daylight, giving the same results.
has a very low colour temperature and appears warm (more red). Tungsten light (household light bulb) also has a low colour temperature. Below is a chart showing the colour temperatures of a variety of light sources.
Color Temperature Light Source
1000-2000 K
Candlelight
2500-3500 K
Tungsten (household light bulb)
3000-4000 K
Sunrise/Sunset
4000-5000 K
Fluorescent light
5000-5500 K
Camera flash
5000-6500 K
Daylight with clear sky (sun high in the sky)
6500-8000 K
Overcast or cloudy sky
9000-10000 K
Shade or heavily overcast sky
At a glance
Colour temperature of light:
•
Low colour temperature, 1500K is redder
•
High colour temperature, 9000K is bluer
Example:
1.
Midday sun has a higher colour temperature and is cooler 2.
Sun at sunset has a lower colour temperature and is therefore redder 114
www.ianmiddletonphotography.com
www.ianmiddletonphotography.com
115
Setting the correct white balance
But why is it red, when we can see it as white with our own eyes?
With film we would have had to buy a special tungsten balanced film to shoot Because our eyes have their own internal auto white balance. We have the ability indoors under artificial light and make your whites white, so to speak. But like to adapt and see most whites as white no matter what the colour temperature.
ISO, we have the advantage of being able to change the white balance per image.
The camera cannot.
For these conditions we need to set it to the tungsten setting. Hence the colour cast is gone, we see more natural looking skin tones, and the whites are white.
The idea of white balance is to match the colour temperature setting of the camera with the temperature of the light source, therefore rendering whites and other colours correctly. Although you can set the actual colour temperature in kelvins using the “K” setting, there are also a bunch of presets that are much easier to use and understand.
The image with the white balance set to daylight has a red cast because the camera’s colour temperature has been set higher than the temperature of the light source.
Camera = 5500k Light source = 2500 – 3500k
When the camera’s setting is higher than the light source you will get a red colour cast. When it is lower, you will get a blue colour cast.
Here is a chart that shows the preset against the colour temperature. Refer to your camera’s manual for the symbols associated with them.
Mode
Colour temperature (approx. K)
Auto
3000 - 7000
Daylight
5200
Shade
7000
Cloudy, Sunset
6000
Tungsten
3200
White fluorescent
4000
Flash
6000
Custom
2000-10000
116
www.ianmiddletonphotography.com
www.ianmiddletonphotography.com
117


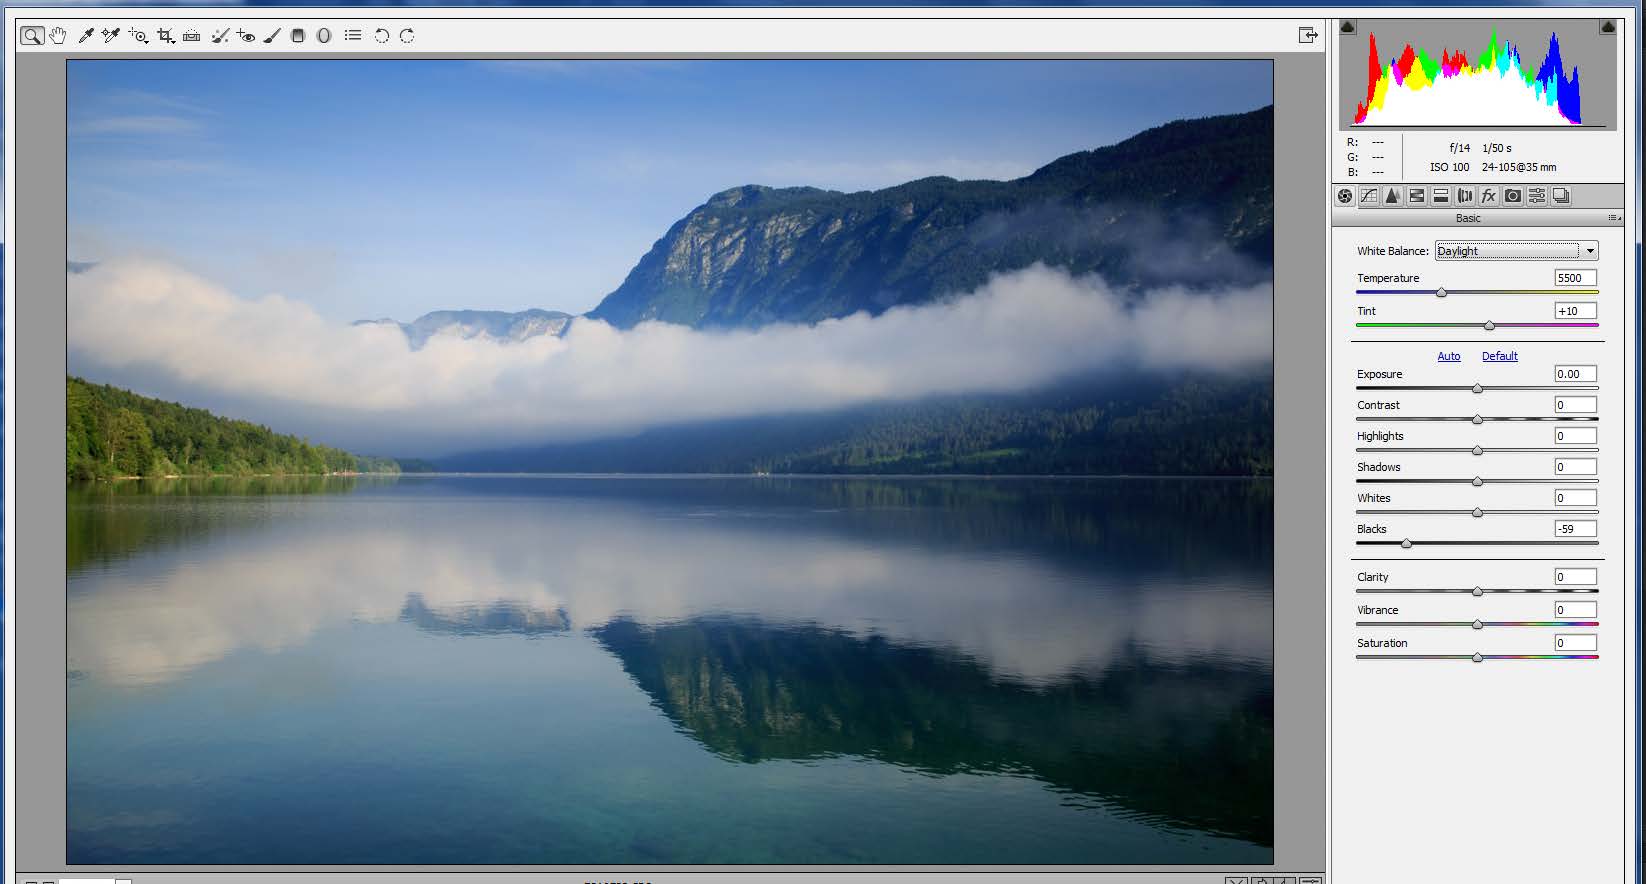
Outdoors on a clear day we can see the tungsten setting has rendered the image with a Here on a clear day the shade setting has rendered the image with a reddish brown tone, blue cast because it’s a lower temperature than the light source.
making the blue sky and the white clouds look dirty brown because the camera setting Camera = 2850k Light = 5500k
was higher than the light source.
Camera = 7500k Light source = 5500k
Daylight setting for outdoors on clear days with sun up high Camera set to daylight
118
www.ianmiddletonphotography.com
www.ianmiddletonphotography.com
119
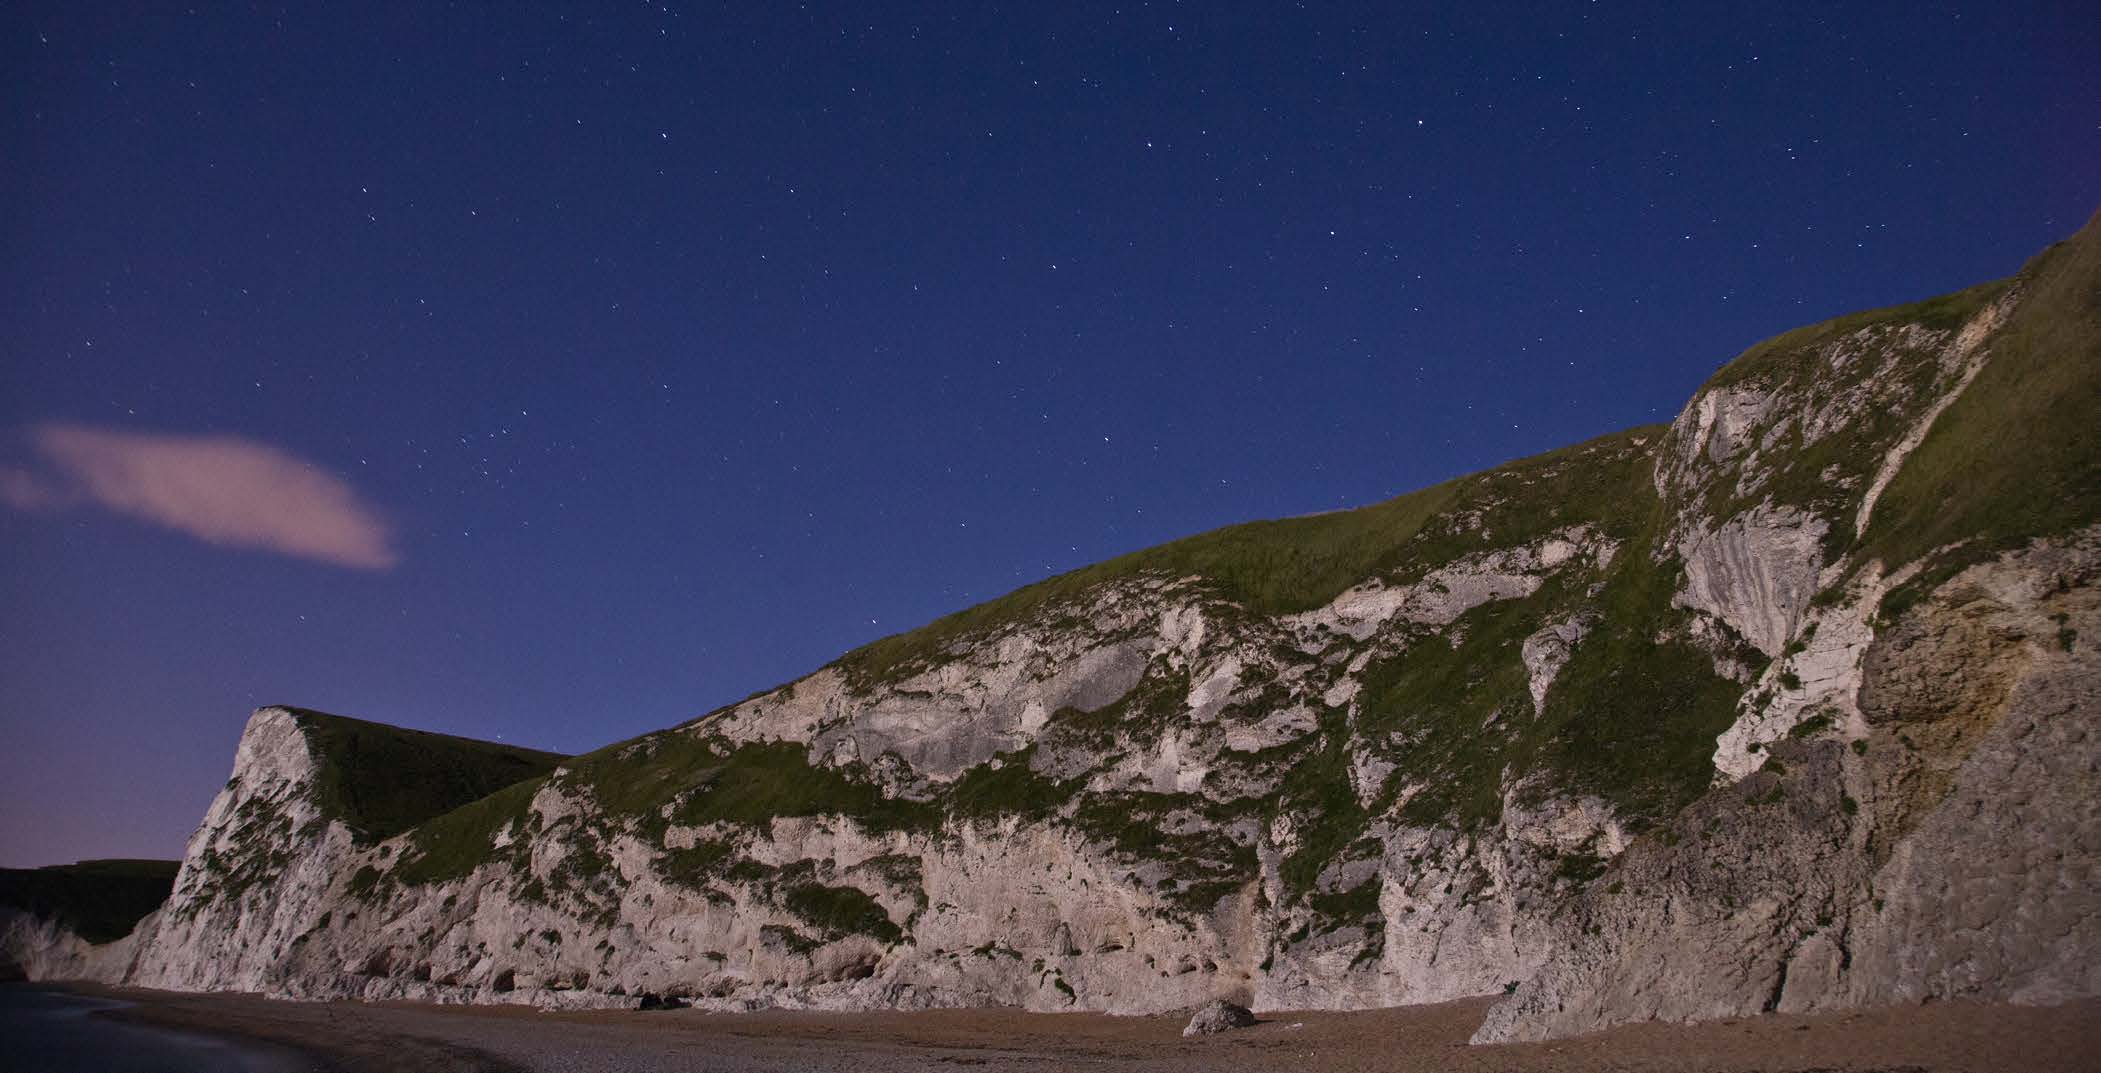
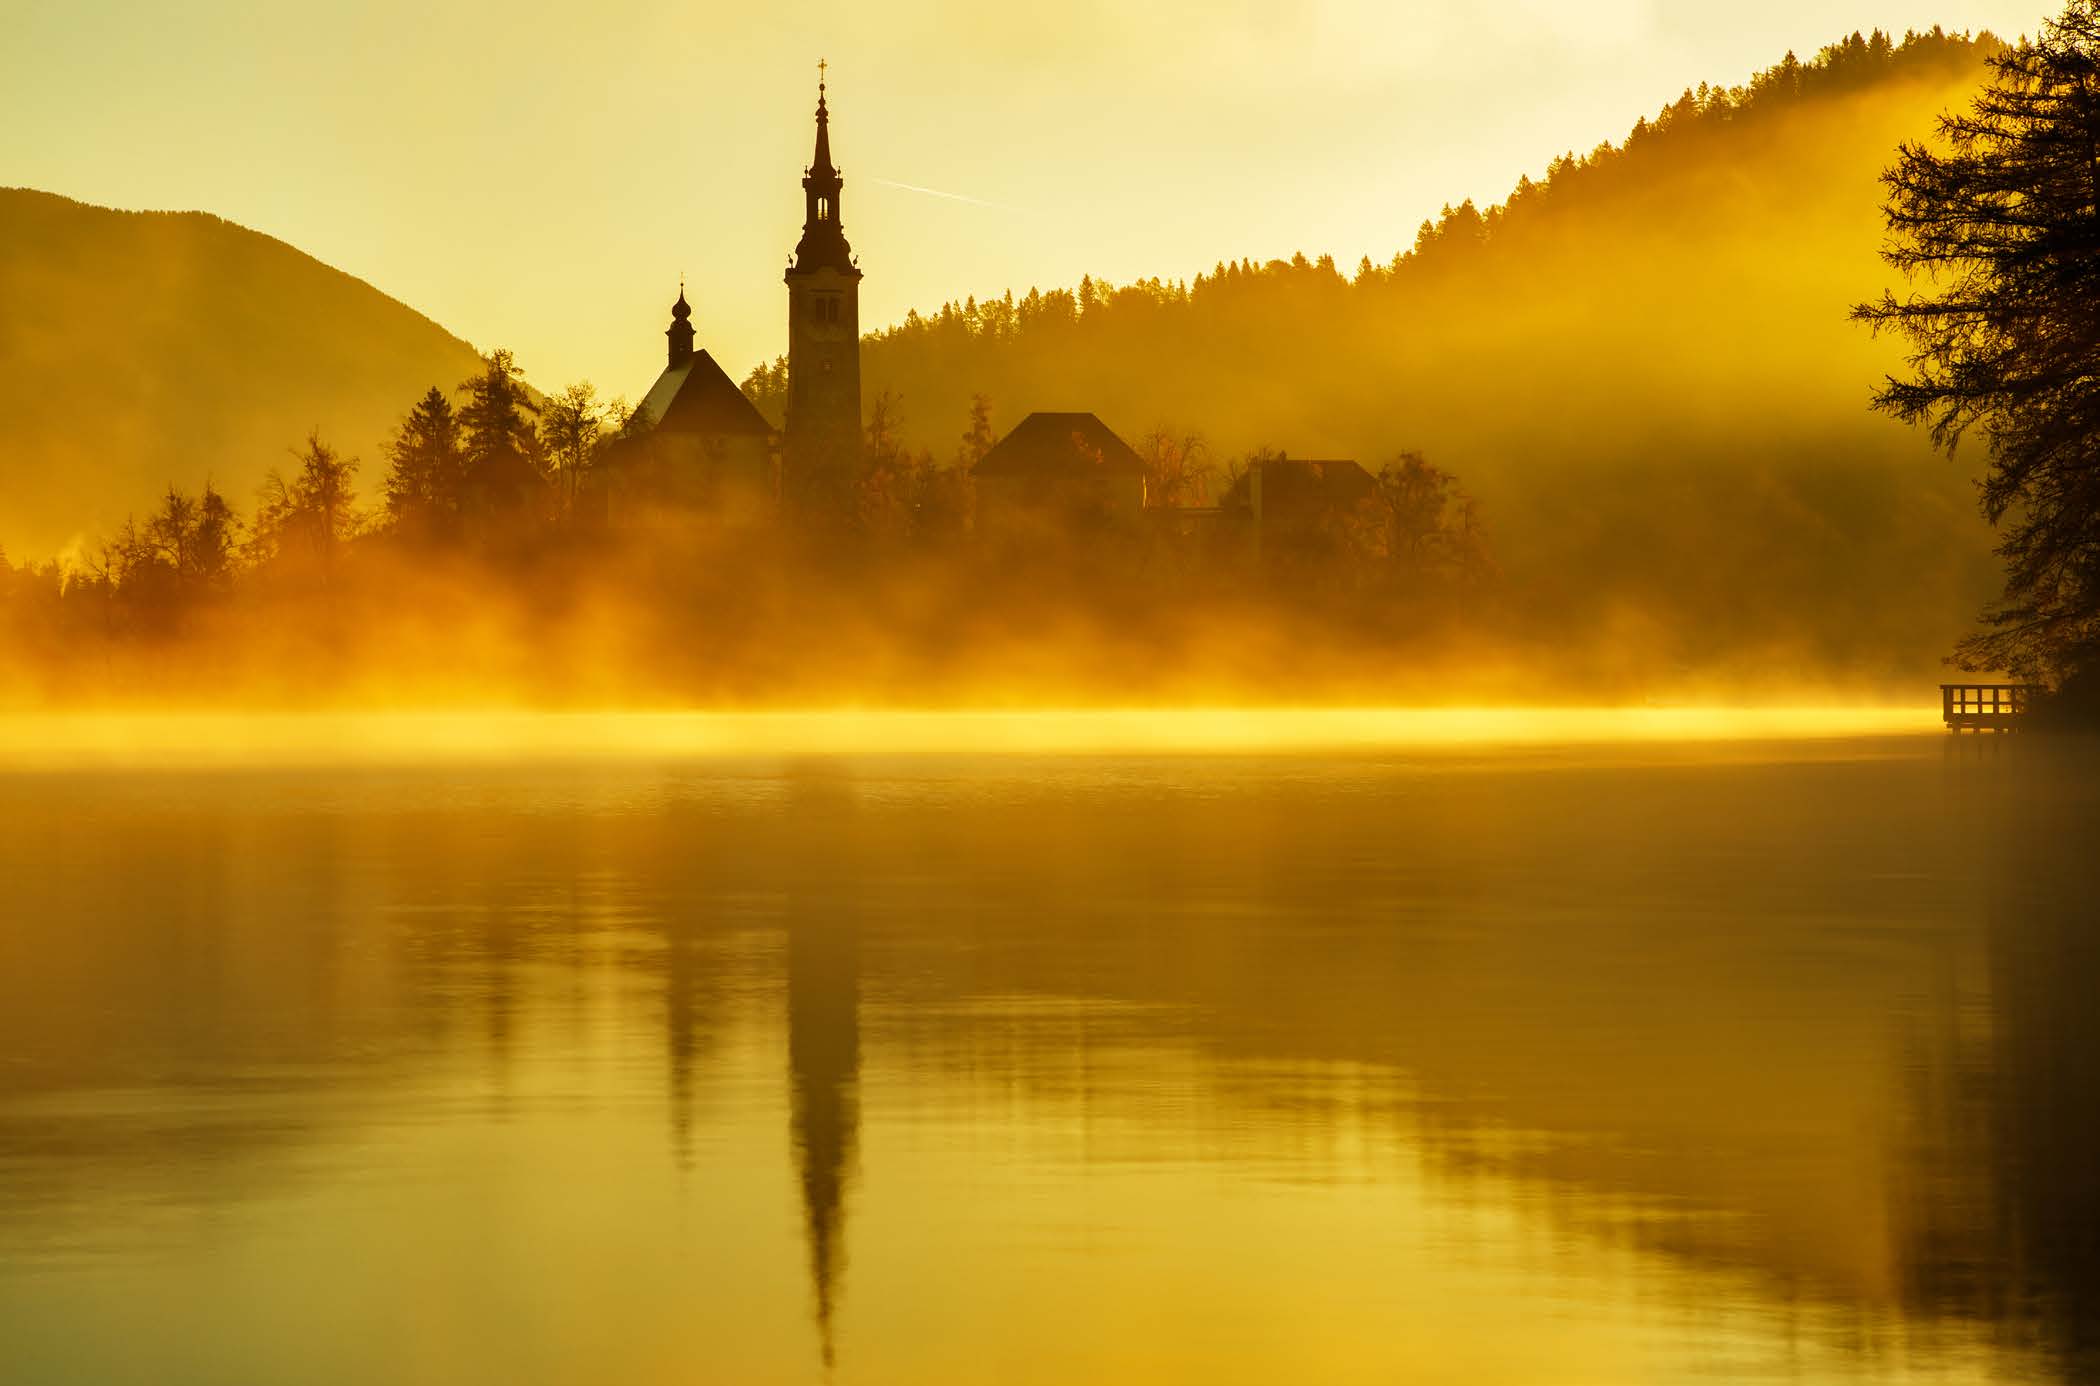
Moonlit nights
Creative use of white balance
We don’t always want to get the white balance correct. Get creative sometimes: As a warm up filter
Film landscape photographers nearly always have a warm up filter on their lenses when shooting at sundown or sunup. This filter is red and is used to enhance the warmth of the scene by adding more red overal . With digital this is no longer necessary because we can do the same with the white balance by increasing the colour temperature setting on the camera.
By setting the white balance to shade (7500k) I have enhanced the colours of this misty sunrise. Be careful though, as this technique doesn’t suit all images. If there is blue sky in your image, it will be rendered dirty brown like in the photo we saw earlier. Remember that this will put a reddish-brown colour cast over the entire image, so it’s only suitable when the scene already contains mostly red or brown, such as sunrises, sunsets and autumn scenes.
Moonlight has a lower colour temperature and as this was set to daylight it’s too warm.
Durdle Door beach, Dorset, UK – Ian Middleton
White balance to fluorescent (3800k)
Misty sunrise at Lake Bled, Slovenia - Ian Middleton
120
www.ianmiddletonphotography.com
www.ianmiddletonphotography.com
121
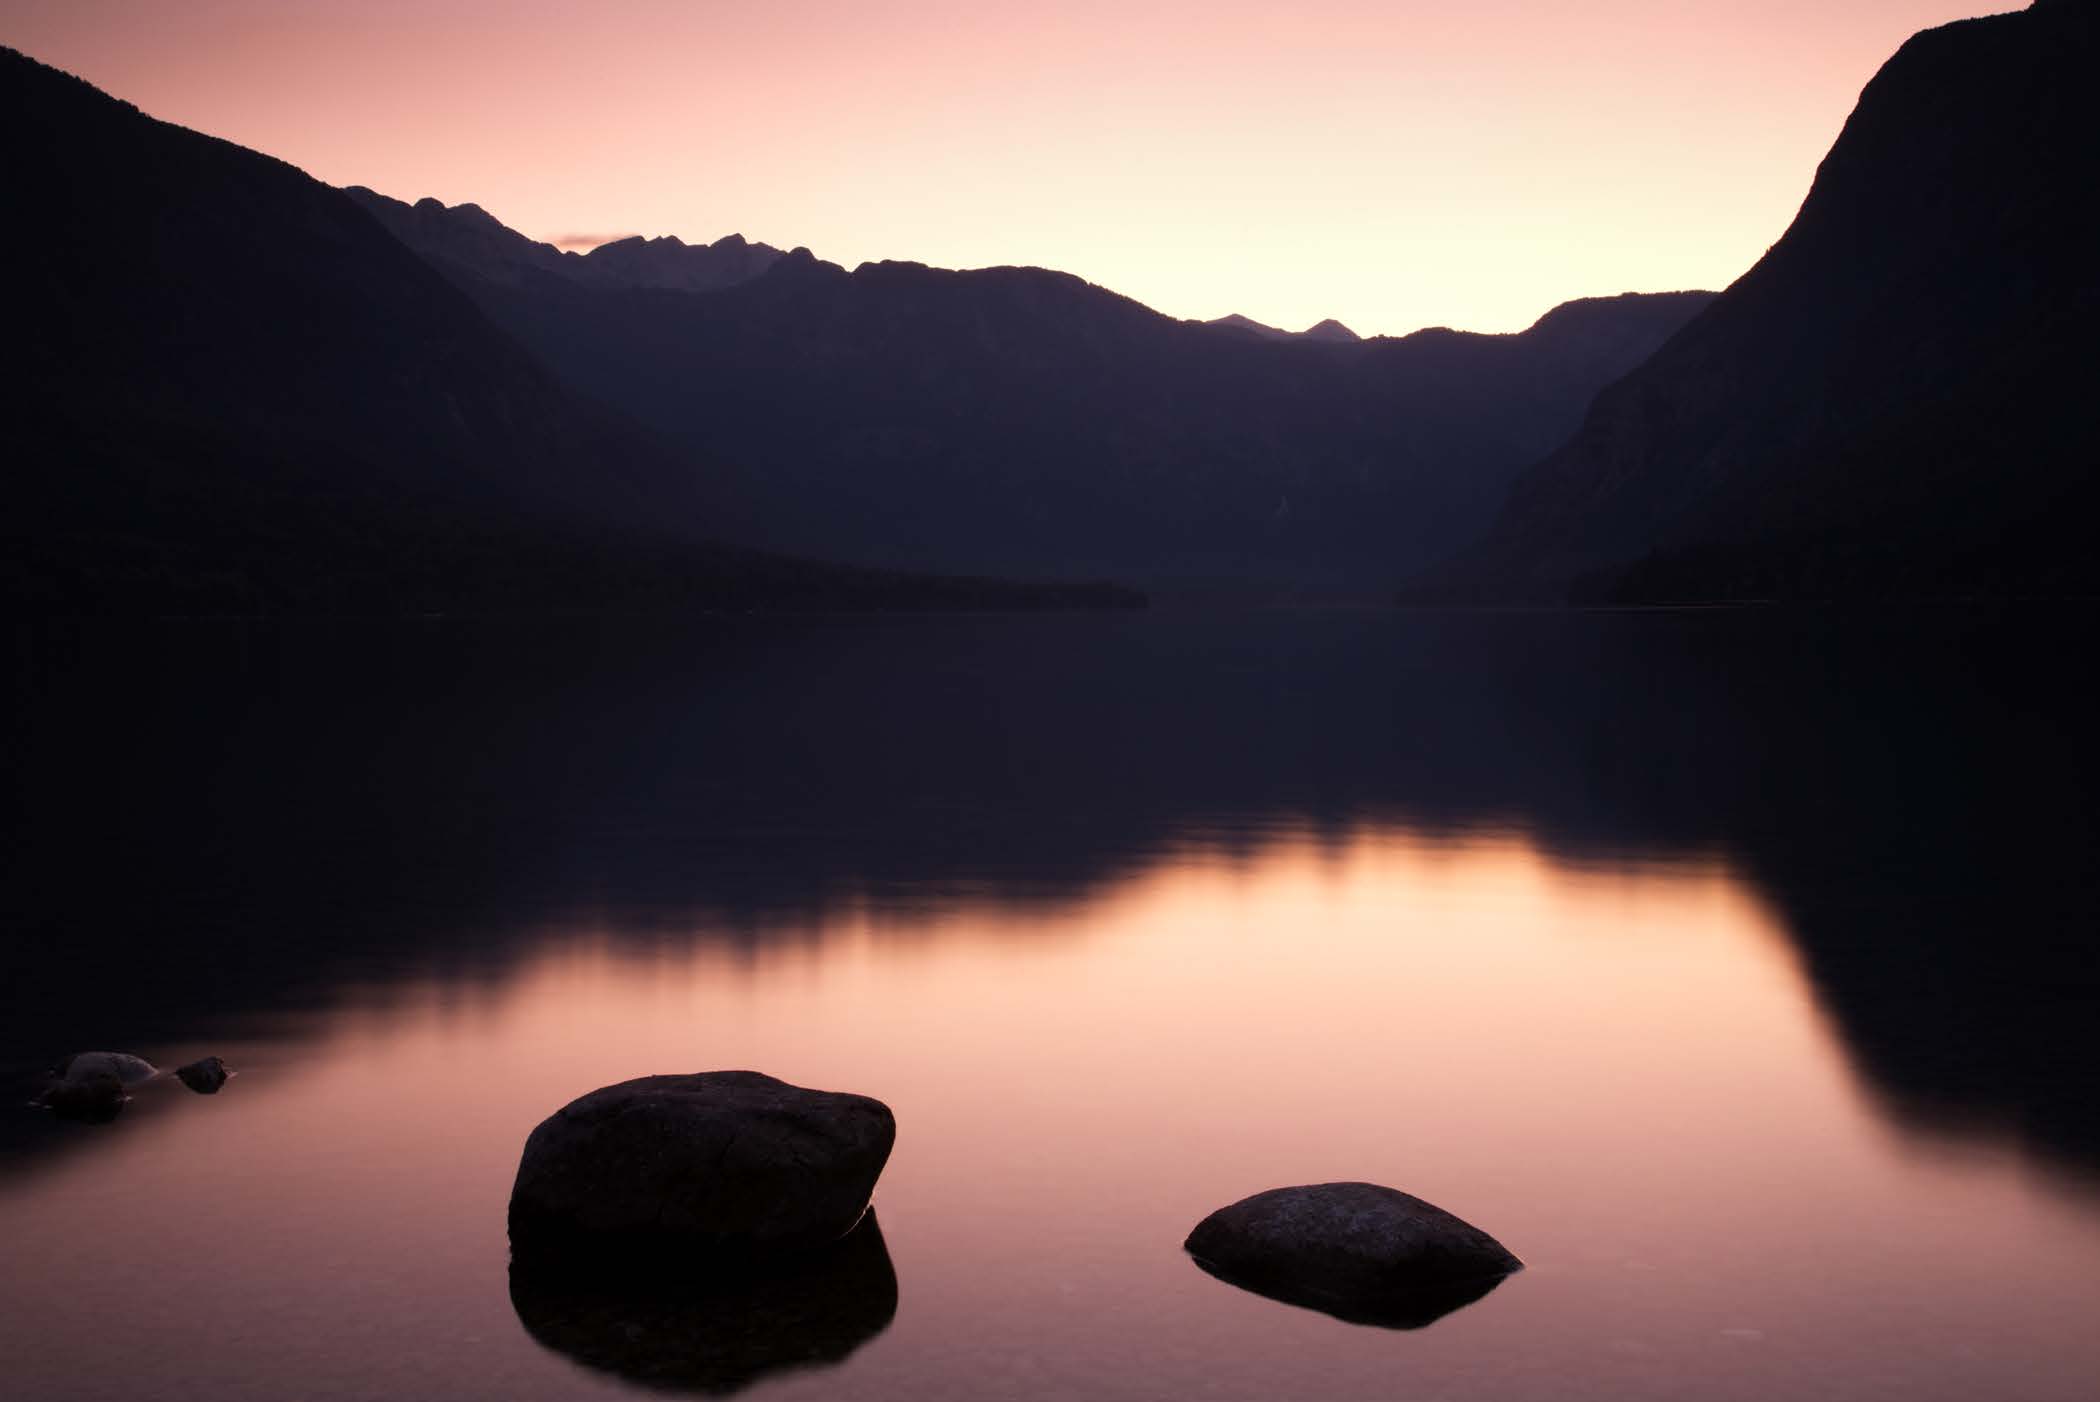
As a cooling filter
Creating other effects using the white balance
Another filter is the cooling filter, which is blue. This is used at dusk or dawn to enhance the blue tones seen at twilight (also known as the blue hour) Although your manual may tell you to set your white balance to cloudy for twilight periods, it’s actual y better to set it to daylight to retain the lovely blue tones you get during the twilight period at dawn or dusk.
For this photo I set the white balance to daylight (5500k)
Dawn at Losinj Island, Croatia – Ian Middleton
Lake Bohinj at sunset, Slovenia - Ian Middleton 122
www.ianmiddletonphotography.com
www.ianmiddletonphotography.com
123

Creating other effects using the white balance
For this version I set the white balance to fluorescent (3800k)
Lake Bohinj at sunset, Slovenia - Ian Middleton 124
www.ianmiddletonphotography.com
www.ianmiddletonphotography.com
Part 7: Measuring the light
Evaluative Mode
Unfortunately it’s not simply a case of choosing your settings and away we go. In The evaluative meter setting reads the light from a wide range of the scene and order to get the right photo, we have to measure the amount of light in the scene.
then calculates the average of that scene. This is suitable for landscape shots with Once this is done, we or the camera can calculate the appropriate settings.
a wide range of bright and dark areas.
In the case of using shutter priority, we choose the shutter we want (having already set our ISO), then measure the light to calculate the aperture needed to get the scene exposed the way you want. If you don’t do this correctly, you will end up with a dark (underexposed image) or bright (over exposed image).
Test:
Manual y set your camera to 1/125, F16 & ISO 200 in a room and take a photo.
You will see that the picture will be underexposed (dark).
Now go outside to somewhere bright and set the camera to 1/30, f5.6 & ISO 800.
You will see that the picture will be overexposed (too bright) How it works
When you half press down the shutter button, not only does the autofocus run, but the camera’s built in light meter is also measuring the light. There are four different metering modes (depending on which camera you use): 1. Evaluative Metering
2. Partial Metering
3. Spot Metering
4. Centre Weighted Average Metering
126
www.ianmiddletonphotography.com
www.ianmiddletonphotography.com
127
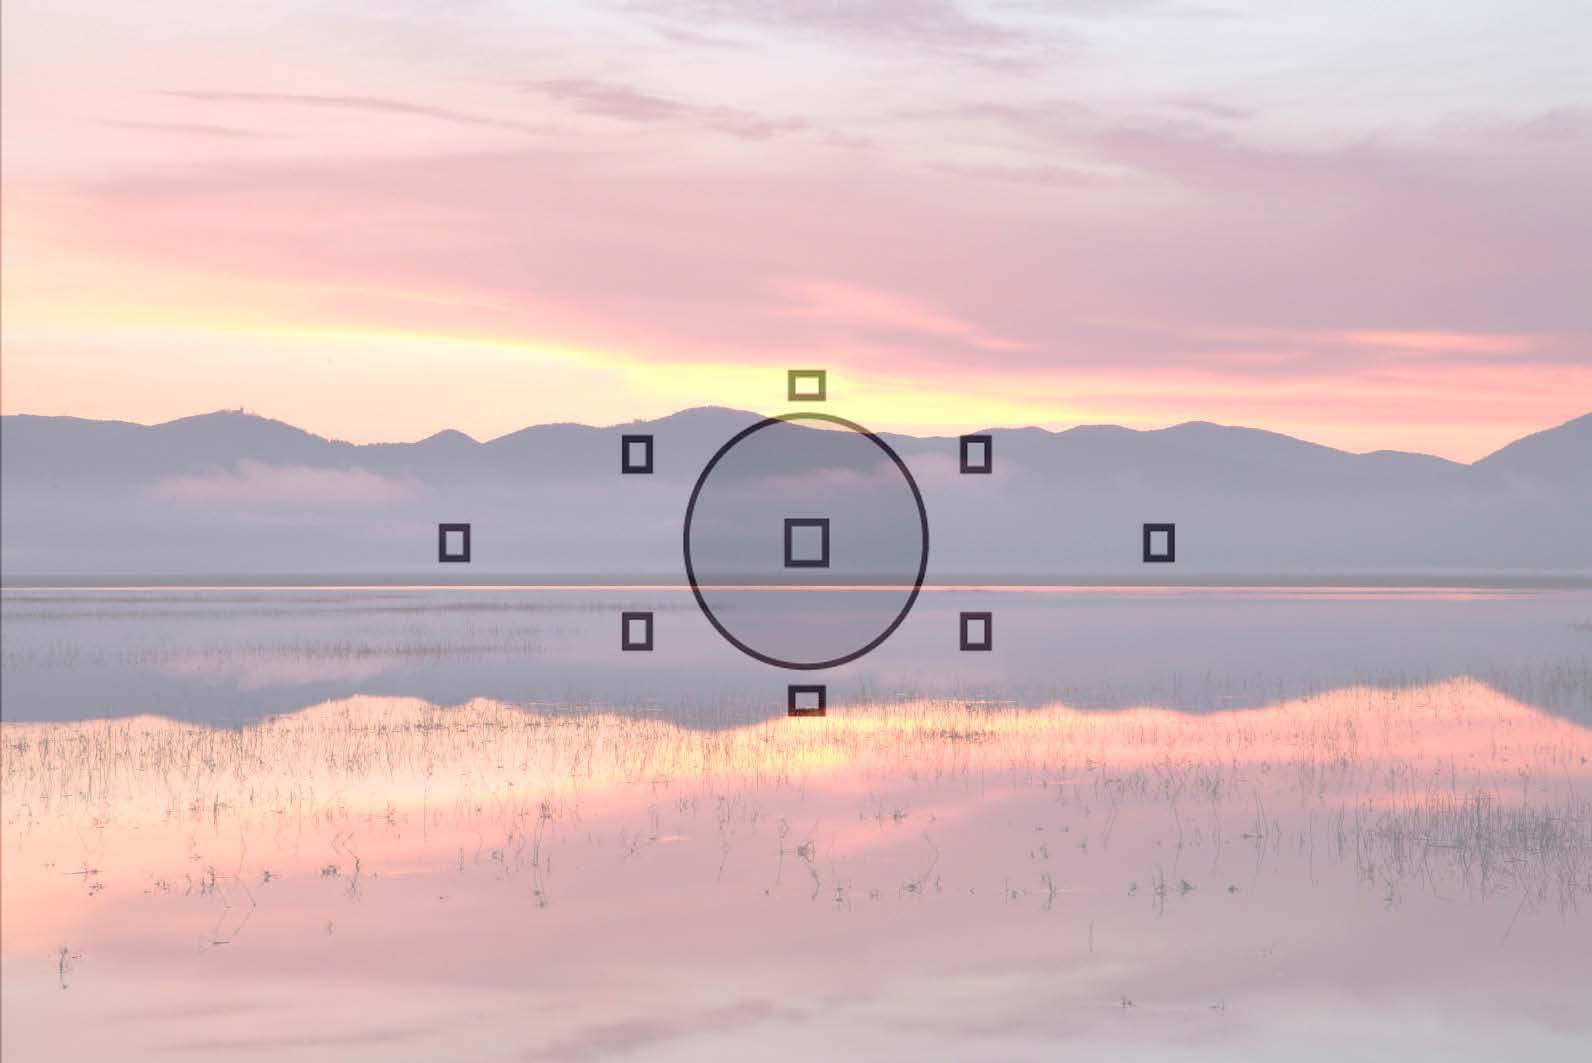
Partial Mode
Spot mode
The partial meter setting reads the light from the circle indicated here and again The spot meter setting takes its reading from the centre focal point. This is best takes an average from within that circle.
for measuring the light at an exact point of the scene, and also for portraits to take a light reading from the subject’s face.
128
www.ianmiddletonphotography.com
www.ianmiddletonphotography.com
129
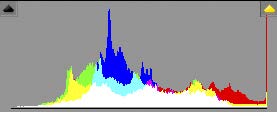
Centre Weighted Mode
The Histogram:
Centre weighted average meter setting is weighted for the centre and then The histogram shows us the tonal
averaged out for the entire scene.
range within the image. It’s shown
in graphical form and is a great
indicator of whether or not we
have exposed our image correctly.
0 255
Shadow Midtones Highlights 1. 0 far left indicates how much shadow detail is present 2. 255 far right indicates how much highlight detail is present 3. Midway point indicates how much midtone details is present You can also think of these as colours:
• Shadows = Black or dark colours
• Midtones = Grey or muted colours
• Highlights = White or bright colours
Anything beyond 255 is completely white with no detail present.
Anything below 0 is completely black with no detail present.
The height of each line represents the amount of pixels in your image that contain that tone. So for example, the blue peak show there are lot of pixels around the midtone range.
Clipping:
Notice that on the far right there is a spike. This means that the image to which this histogram belongs has some areas which are completely white with no details. This is known as clipping.
130
www.ianmiddletonphotography.com
www.ianmiddletonphotography.com
131
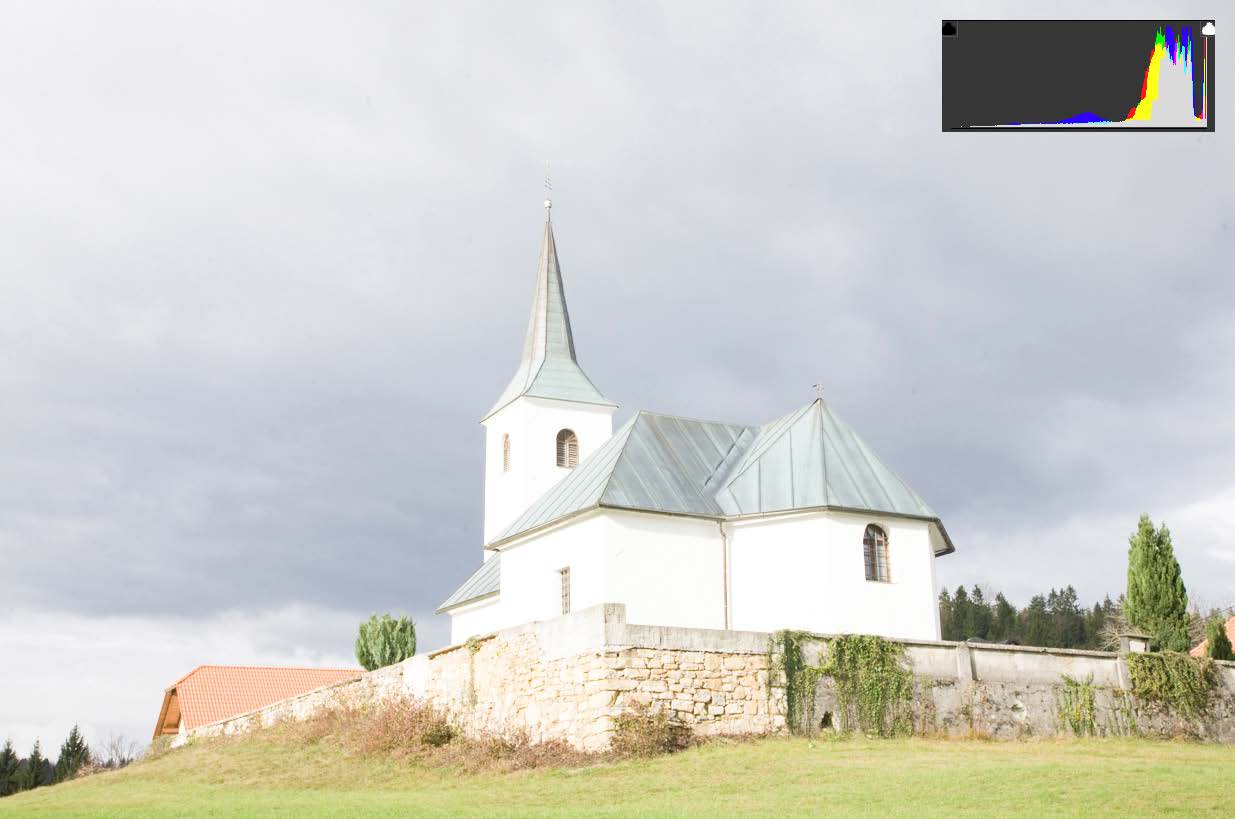
What you see is what you get?................................... NO
Overexposure (too bright):
The tonal range (or range of luminosity) of a photo is much lower than our eyes.
When an image is too bright it is considered to be overexposed. This means that We can see more detail in a wider tonal range than this histogram.
the film or sensor received too much light, a result of the exposure time being too long.
So in a high contrast scene, where the difference between the darkest point and brightest point is very big, we will be able to see the detail in the darkest part and the brightest part, but the camera will not.
This photo is a good
example of this. While the
sky and the water were very
bright, the mountains were
quite dark in comparison.
This photo was metered
for the church and the
mountains. These are nicely
exposed, showing lots
of detail. But because of
the extreme difference in
brightness, the sky is now
too bright and overexposed.
Notice on the histogram
how the far right side is
Notice how on the histogram that everything is pushed to the right. This is clipped. Also notice how
usual y an indication of overexposure.
the sky is lacking detail. The
pure white parts are off the
scale and contain no detail.
With my eyes I could see
more detail in the sky.
132
www.ianmiddletonphotography.com
www.ianmiddletonphotography.com
133

Underexposure (too dark)
Well exposed
When an image is too dark it is considered to be underexposed. This means that A well exposed photograph, like the one below, will usual y have a good spread the film or sensor didn’t receive enough light, a result of the exposure time being of details across the histogram and not be too bright or too dark.
too short.
Notice how on the histogram that everything is pushed to the left. This is usual y an indication of underexposure.
134
www.ianmiddletonphotography.com
www.ianmiddletonphotography.com
135
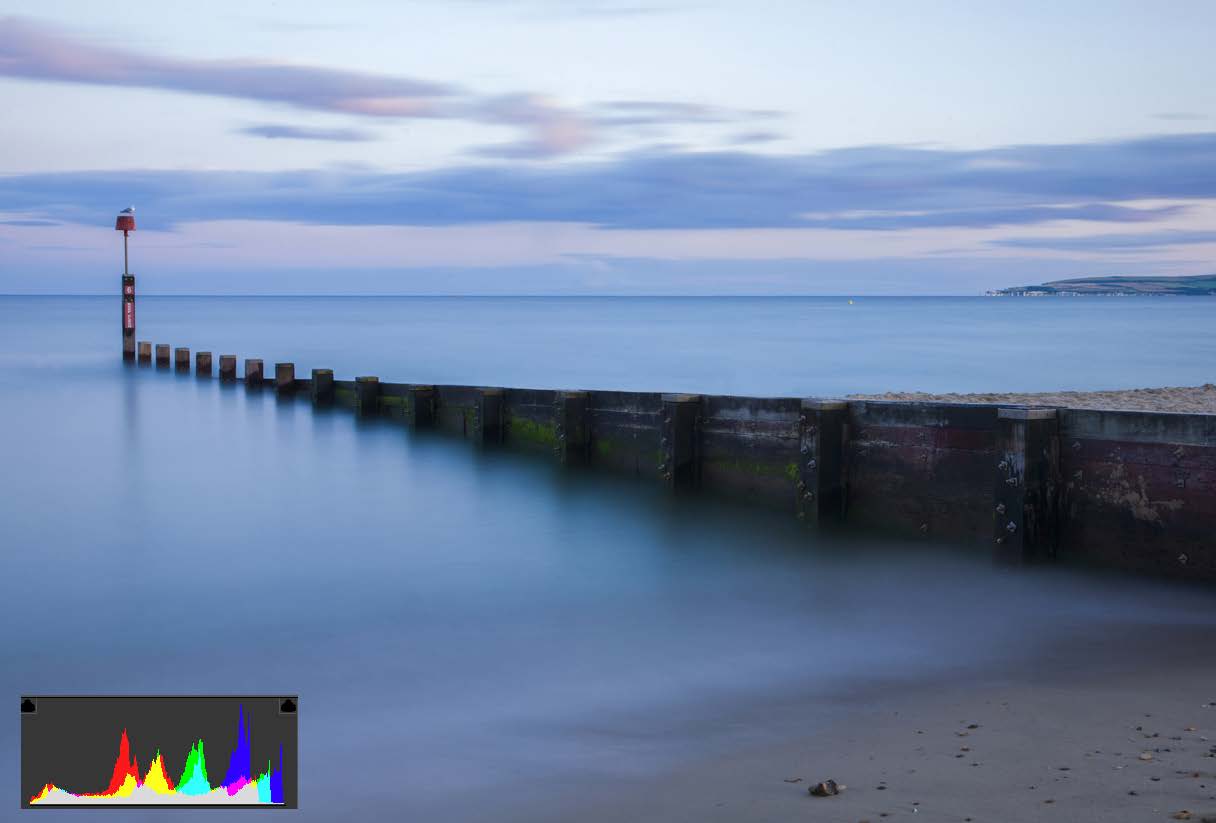
Correct exposure, is there such a thing?
A Brighter Exposure
Not real y. While there are many cases where the exposure is incorrect, there In this photo I measured the light more towards the midtones. It was shot isn’t a definitive correct exposure because it is all down to what the photographer seconds after at 77secs, F16 ISO 50. Here I’ve created a lighter, high key version wants to achieve.
with softer, more subtle colours.
A photographer doesn’t photograph a scene, a photographer makes a photo of a So, your exposure will very much depend on how you want your picture to look.
scene. How you choose to make that photo depends on many things, not least of Expose for the highlights to create a slightly darker image with more colour all how you choose to expose for the scene.
depth, contrast and details. Expose more towards the midtones or shadows to create a lighter image with softer colours and a more milky, etheral feel.
In the photo above I measured the light more towards the highlights. It was shot at 30 secs, F16 ISO 50. The intention here was to make it slightly darker to capture the depth of colour in the sunset, the mood of the sea and create an overall darker image with deeper, bolder colours and more contrast.
136
www.ianmiddletonphotography.com
www.ianmiddletonphotography.com
137
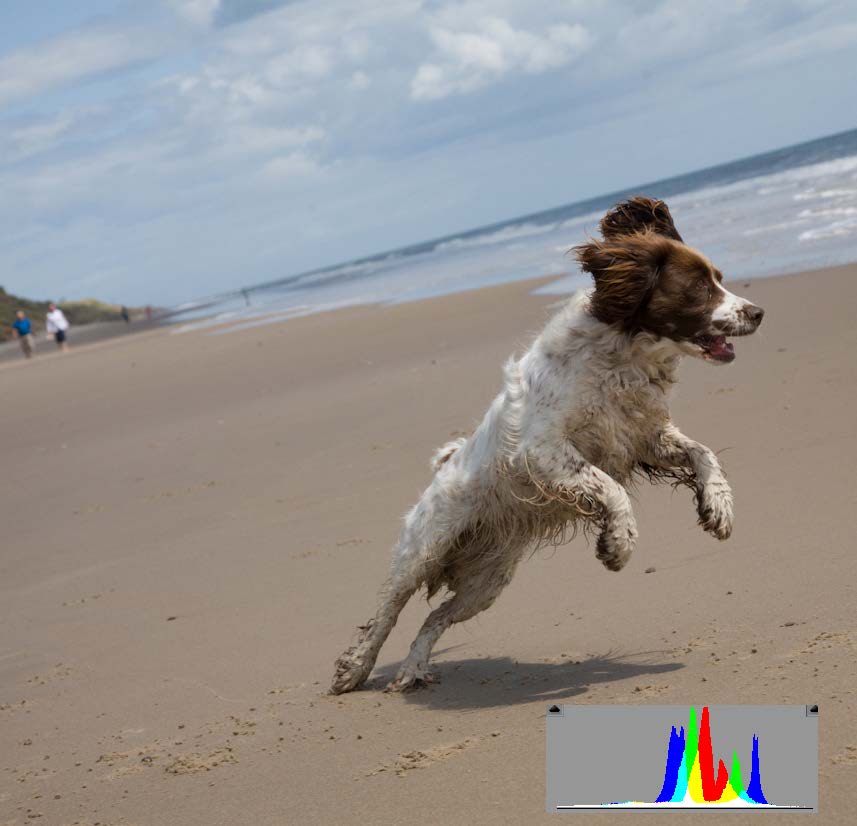
High key scenes:
High key scenes: (underexposed)
Some scenes are predominantly bright (known as high key scenes) Although the histogram is more centralised in this exposure, and the detail Here, on a good exposure, the histogram is pushed more towards the right to more evenly spread across the range, this image is underexposed (too dark). As indicate the predominantly bright scene.
we know this is a high key scene we also know it’s too far to the left.
A high key scene should be exposed so that all the detail is pushed more to the right.
The histogram shows how much of the detail is between the midtone and the highlight area.
Notice how there is nothing in the shadow area to the right, and also that there are no dark colours or shadows in the scene. There is also very little midtone colours, except for the brown on the dog.
138
www.ianmiddletonphotography.com
www.ianmiddletonphotography.com
139
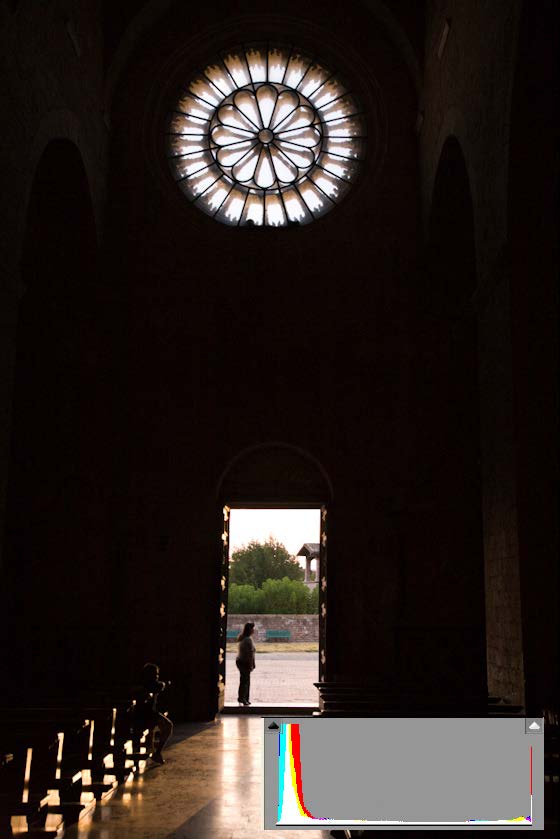
High key scenes: (overexposed)
Low key scenes:
This image is overexposed (too bright). The histogram here is pushed too far to Some scenes are predominantly dark (known as low key scenes) the right. So the trick is to expose to the right just enough, but not too much.
Here the histogram is pushed more towards the left to indicate the predominantly dark scene with lots of shadows and dark colours.
The histogram here
shows how much of the
detail is on the left side .
Notice how there is
very little detail in the
midtone and highlight
area.
The spike on the far
right is a blown area
which is from the bright
light coming through
the window.
140
www.ianmiddletonphotography.com
www.ianmiddletonphotography.com
141
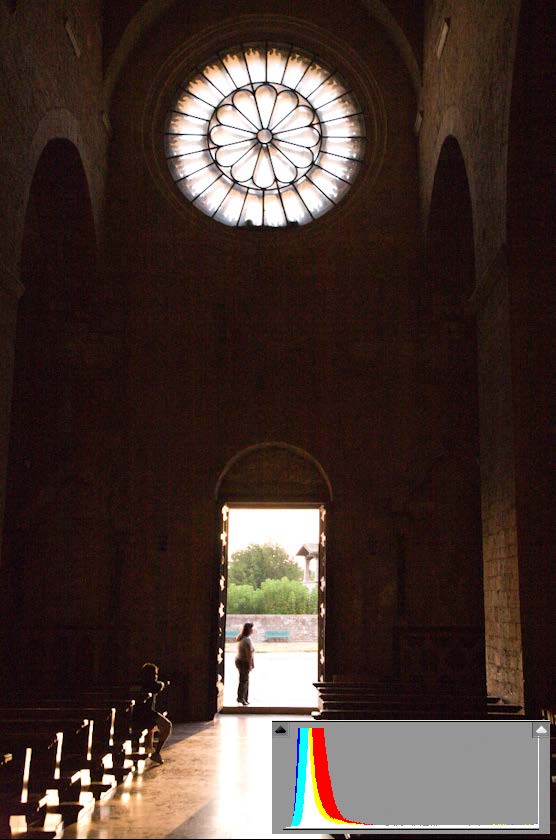
Low key scenes: (underexposed)
Low key scenes: (overexposed)
In this exposure the scene is too dark and the histogram pushed too far to the In this exposure the scene is too bright and the histogram pushed too far to the left.
right and the scene lacks the deep shadows it requires to make it a low key image.
As we know this is a low key image we want to expose to the left, but not too far.
142
www.ianmiddletonphotography.com
www.ianmiddletonphotography.com
143

Part 8: Exposure compensation
Underexposed
Flaws with Camera light meters:
Camera meter’s exposure 1/125 F16 ISO200
Unfortunately the camera’s built in light meter is not perfect, and it sees colours Snow is classic example of how the camera’s meter will underexpose. The brighter as being bright or dark. Camera manufacturers have designed their meters to the light falling on the snow, the more the meter will read the white colour as measure midtone colours, therefore:
brighter than it is. The photo below is underexposed.
1. Bright colours such as white, red etc. can make the camera think the scene is brighter than it is and will therefore underexpose.
2. Dark colours such as blacks can make the camera think the scene is darker than it is, and will therefore overexpose.
You can override the camera’s reading and settings by using a feature called exposure compensation. Essential y what you are doing is forcing the camera to take a brighter or darker exposure than the internal meter wants.
Increased exposure (+) (Brighter)
Here you choose to increase the
exposure. You can add in increments
of 1/3 stops up to 2 or more stops to
make the photo brighter.
Decreased exposure (-) (Darker)
Here you choose to decrease the
exposure. Again you can reduce by 1/3
stops up to 2 or more stops to make
the photo darker.
At a glance
+1 = brighter image
-1 = darker image
For bright colours -whites, reds etc. = increase exposure For dark colours - blacks = decrease exposure
144
www.ianmiddletonphotography.com
www.ianmiddletonphotography.com
145
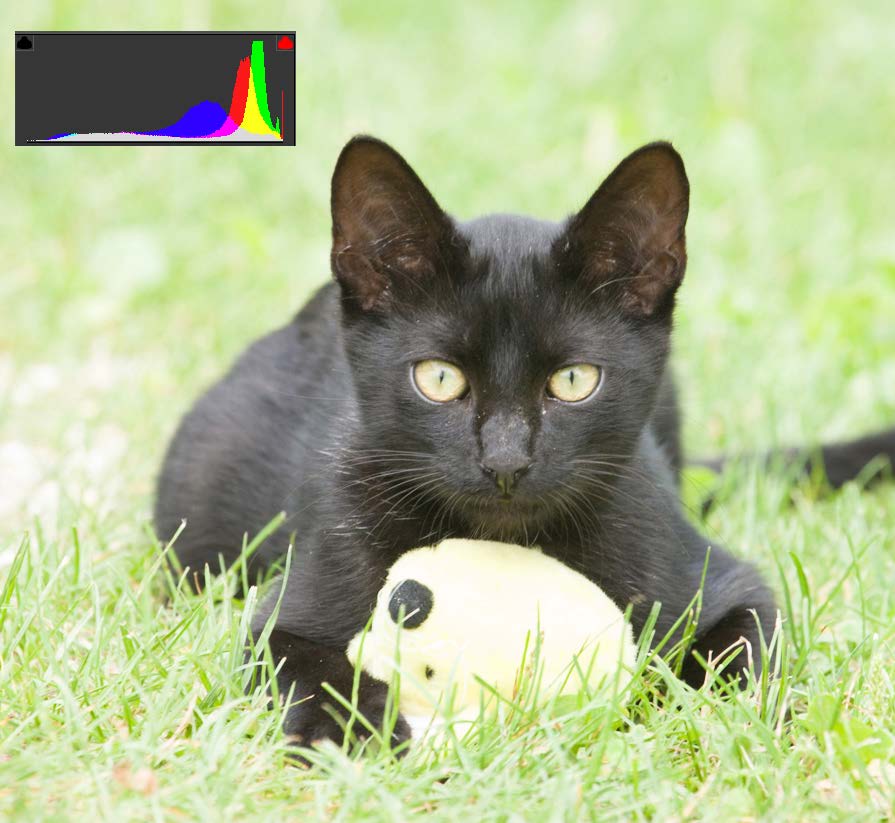
Exposure compensation used
Overexposed
Correct exposure with exposure compensation set to +1
This photo is overexposed because I took the meter reading off the cat. The black colour of the cat has fooled the meter into thinking there is less light than there 1/60 F16 ISO200
actual y is so it has set a longer exposure in error.
By dialing up +1 I have increased the exposure time and corrected the photo.
Camera meter’s exposure 1/60, F11, ISO800
146
www.ianmiddletonphotography.com
www.ianmiddletonphotography.com
147
Exposure compensation used
Part 9: Image file formats – RAW, TIFF & JPEG
Correct exposure with exposure compensation set to -1
With traditional film the image is captured on the frame and held there, as long as it isn’t exposed to any more light, until it is processed. Chemicals are used to 1/125, F11, ISO800
alter the properties of the silver halide pieces to make them permanent. With your image on film, a print is then produced. Even with film the final look of By dialing down one stop (-1) I have decreased the exposure time and corrected the picture very much depends on the processing technique, and professional the photo.
photographers can spend hours in the darkroom perfecting an image. Different types and makes of film are designed to give different results, so photographers choose their film accordingly. For example, landscape photographers use slide (positive) film that produces an image with vivid colours.
Digital photography is different to film in the way that it captures an image.
Essential y, the electronic sensor is designed to capture as much data from the scene as possible. Once it does this, the camera’s computer processes the data and produces a photo from it, which it then saves to the memory card. The final image very much depends on the camera setting or profile used. If you have set the camera to shoot landscapes, then the computer will work to produce a final image with bright colours and sharp detail. Should you set the camera to shoot portraits, then it will work to produce natural looking skin tones, and soften facial features.
So whatever you are shooting, any digital image requires some or more post processing to produce the desired effect the photographer is looking for.
JPEG: is the most popular file format due to the small file size taking up less space on your hard drive or memory card. JPEG is a compressed format, so once your image is produced by the camera then all other data is deleted and only the data for the image is saved. While this is an advantage for people wanting to get as many photos on a card as possible, if you want to do any extra post processing or editing of the image, then this will result in a loss of quality. Also, each time you re-save a JPEG you will lose data. For this reason it’s known as a lossy format.
148
www.ianmiddletonphotography.com
www.ianmiddletonphotography.com
149

RAW: If your camera has it, then you should always shoot in this format. When you shoot in RAW then every single byte of data the sensor captures is saved, and therefore the file contains a wider dynamic range with much more detail, tonal range, contrast and colour. Saving in RAW not only allows you complete control over how the image is processed (rather than letting the camera do it), but it gives you more flexibility when it comes to processing and editing without losing quality. A RAW file editor program will allow you to adjust white balance, exposure and retrieve lost detail in overexposed areas (within reason).
This can be essential when applying effects such as blending different exposures, or compensating for the extremes of light and contrast that the camera cannot otherwise handle. RAW is also a great format when learning, because it allows you correct mistakes you make in exposure. If an image is over or underexposed, you can adjust it either way.
TIFF: is a lossless file and therefore there is no data loss or compression. You can also save images in 16-bit format, which will contain more colour detail. Like the RAW, the TIFF file is very tolerant to editing, so you can do much more to it to it without losing quality. This is also the best format to save in if you want to make your images bigger by upsizing.
What I do is shoot in RAW then process and save as TIFF, add final touches such as cleaning away dust spots, then save a JPEG version. If I need to make changes, I edit the TIFF file and then re-save the JPEG.
TIP: While learning, set your camera to save both RAW and JPEG, if possible.
That way you have the best of both worlds.
150
www.ianmiddletonphotography.com
www.ianmiddletonphotography.com
151

Useful info:
Other useful websites
1. https://photoephemeris.com/ A great piece of software for showing you where the sun and moon rise and set at any place and any time of the year 2. https://www.dofmaster.com (Contains tables and software for calculating the hyperfocal distance)
3. https://www.photohound.co/ (A website for finding photography spots) 4. For ways to sell your photos, read my article here:
I often work very late nights to produce these ebooks and all the free articles and tutorials on my websites. They will always be free, but I do need coffee to keep me awake at night. So I’d be grateful to anyone who wishes to buy me a coffee. You can do so via the link above. Thanks in advance.
More articles on my blog
https://blog.ianmiddletonphotography.com
LEARN PHOTOGRAPHY WITH ME
OUT NOW IN PAPERBACK
https://ianmiddletonphotography.co.uk/photography-workshops-tours/
Available at:
152
www.ianmiddletonphotography.com
www.ianmiddletonphotography.com
153