You don’t need to set up a web server in order to automate the delivery of your information products. This section is for people who don’t want to pay a cent for hosting their downloadable information products and web sites. Hosting your own web pages gives you much more hard drive space and easier control of your HTML documents. This section will also go over typical issues when setting up a web server and a solution for each issue.
Here is a little information on most Internet Service Providers (ISP’s). If you’re on a basic ADSL or Cable package, then chances are you have some restrictions on your Internet account. Common limitations are certain port blockages, and IP address assignment process. First, let’s look at ports.
Ports are used for communication on the Internet. There are a lot of them, and knowing what they all do is not important for this document. What is important is that your ISP may be blocking you from accepting requests on port 80, which is the HTTP (Hypertext Transfer Protocol) port. HTTP allows you to surf the Internet. If you look at the address bar on your browser, you will always see “HTTP”. This means that you can access the Internet on an outgoing basis, but you can’t accept incoming HTTP connections. Why? Think of your ISP as doing you a favor. By blocking port 80, they are eliminating the chance of your computer from ACCEPTING viruses, spyware, and all sorts of other malicious activity. The problem is, this also blocks your ability of accepting other HTTP (port 80) requests, therefore preventing you from being a web server. To find out if your port 80 is blocked, you will either have to go to your ISP’s web site and find your license agreement, or call their technical support line and ask. Either way, this problem is easily solved in the next few pages. We will now move on to the next issue, IP Address Assignment.
An IP (Internet Protocol) address is a unique identifier that gives your computer a “home” on the World Wide Web. Most basic Internet packages, including all dial-up connections, work on a dynamic IP address assignment process. The problem this causes is that if your IP address is always changing, how is anyone supposed to find your “home”? It would be like you lived in your house for 5 hours, and then left. Even your trusty mailman would get confused! One solution is to call your ISP and get your Internet package upgraded to a business plan, which will change your IP from dynamic to static, but at an extra cost. The other is to use a great free tool that we will explain in the next section.
To find out your IP address, click “Start”, then Run, type “Command”, click “OK”. When the black window, known as the “Command” window opens, type “ipconfig /all”. This will yield your current IP configuration. If you see a line that says “Lease Expires”, and it’s soon, then you definitely have a dynamic IP. Don’t worry if it expires soon, you’ll get a new one as soon as it does. You will also notice a 4-octet number, seperated by 3 periods next to its appropriate description, “IP Address”. This is your IP address.
Before we get into it, lets define what a domain name is. A domain name is a alphanumeric representation of your IP address. In other words, any “www” name you enter into your address bar actually reflects an IP address. If you open up your command window again and type “ping www.ebookautomate.com”, you will notice there is an IP address in square brackets next to my domain name in the results.
Now, let’s move on.First, No-IP will give you a web name and you don’t even have to pay for it! That means you don’t have to purchase a domain name. Any “www” address you see in your address bar is a domain name. When you use No-IP.com, you will receive a domain name that looks like www.yourname.no-ip.com. Notice the “no-IP” part. Since No-IP.com is a free service, they add that to your “www” name. This is fine because the purpose of your site is to serve your ebooks to your customers through your eBay and Paypal “Instant Purchase” sales, although you can also serve web pages. Your domain name also remains easy to remember.
Second, your dynamic IP address issue simply disappears. No-IP.com has developed a free piece of software that you download from them and install on your PC. What it does is monitor your IP address, and when your IP changes, it tells the NoIP.com server, which updates your “www” name to reflect your new IP address.
www.ebookautomate.com/no-ip
Once you have fully registered, you will receive a confirmation email. Follow the directions on the email. Next, log into your No-IP.com account, and click on the “Add” link under the “Hosts/Redirects” header.
The “Hostname” textbox is where you will enter your “www” name, and the dropdown is the No-IP.com extension of your choice.If your ISP does not block port 80 then you don’t need to do any port redirecting. Just click the “Create Host” button at the bottom of the page.
If your ISP does block port 80 then click on the “Port 80 Redirect”. A new page will load, but will look almost the same. For the “Port”, enter 8000. Click the “Create Port Redirect” at the bottom of the page.
Registration is complete – on to the software!Click on the “Downloads” tab at the top and then click “Windows” on the left column. Click on the No-IP DUC v x.x.x link. (x.x.x because the version is always changing)
Follow the wizard to install the program. Once installation is complete, you will be prompted for the email address and password you entered during registration. After entering this, the console will open. Turn to the next page to see what your console will look like.

You are done setting up your No-IP client. Notice the smiley face. That means the No-IP.com server has been updated with your current IP address.
Now that you have your domain name set up, you have to start hosting your pages! The next section will introduce you to an excellent program called Abyss Web Server by Aprelium.
Simply put, Abyss is a free personal web server for Windows, MacOS X, Linux, and FreeBSD. Abyss is just a web server, and does not allow for any FTP protocol. You can access your console remotely to update directory and user settings, but you can’t upload any files unless you are at the computer running the web server.
www.ebookautomate.com\abyss
Find the “Download” link under the “Software Resources” header near the bottom of the page. Click on the “Download Abyss Web Server X1 for Windows” link and install the software.
Once the installation is complete, you will be asked for a username and a password. This identifier will then be your login to your web server. You will also see the Abyss icon in your system tray. After entering your login info, you will be prompted again for a username and password. You will always be prompted for your login information with this screen whenever you start your console.
You should get a console that looks something like this:
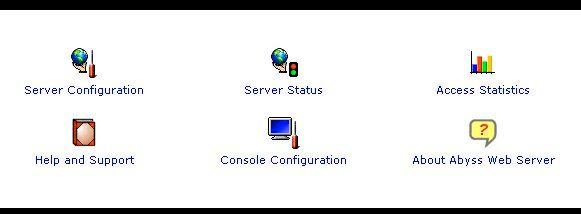 The first thing you want to do is click on “Server Configuration”. Do not change the “Server Root”. This is where your web server runs.
Change your “Documents Path” to the path you wish to host your pages from. For this book, I will use “c:\ebook”.
If your “Port” isn’t already set to 8000, do that now.
Any changes that you make will require a server restart, which is nothing more than clicking a button when you are prompted.
If you ever need to access your console again, right click on the Abyss icon in the system tray, and select “Show Console”. Please take into consideration that we have only skimmed the surface with Abyss Web Server and that there is much more to learn about it, such as setting up directory and user permissions, and your access statistics.
We will now move on to a “suggested” method of setting up your web server directory.Before you start creating HTML and putting your ebook online, you may want to look at how you want your web server’s file system to be set up. I have found that it is easier to maintain when you have the following setup:
 For this example, I have set my “Documents Path” to c:\ebook. To create a directory, read “Directory Creation”.
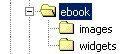
Take a look at the image below:

You will notice that we are in the ebook directory, and there is an index.htm file. This file will be your website’s home page. Next, you will see an images folder and a widgets folder. You will store all of your website’s images in the image folder. The widgets folder will contain another “index.html” file, which will contain the download link to your ebook.
1. Right-Click the “Start” menu.
2. Click on “Explore”.
3. Navigate through the tree until you find “C:” and click on it.
4. In the right window pane, right-click on some white-space, and select “New”, then “Folder”.
5. Name your folder “ebook”.
Next, test your server. Run the “ipconfig” command, and write down your IP address. Open a new web browser and in the address bar type: http://yo.ur.ip.addy:8000/ If you get the Paypal button you created and tested earlier, you have correctly installed Abyss. Notice the “8000”. This directs the website to your port 8000. If you decide to run your server on a different port, you will need to change this figure to be the same.
Now try your No-IP domain name “http://yourname.no-ip.com”. Notice that your address bar changes to your IP address?If you don’t want the address to change to your IP, then you will have to log into your No-IP account and edit your Host settings from “Port 80 Redirect” to “DNS Host,” but the difference will be that your domain will look like www.yourname.noip.com:8000.
TroubleshootingIf you experience problems, such as “error 404 - Page cannot be found”, then try some of these suggestions:
1. Make sure there is an “index.html” file in your “c:\ebook” directory.
2. Make sure your “Documents Path” is set to “c:\ebook”
3. Make sure you see the following icons in your system tray (bottom right):
If all none of these suggesstions work, the following link: www.ebookautomate.com/serverhelp