Chapter 10 – IPv6 Projects
There are a number of possible projects you can do for free, given the information in this book and various open source components (or evaluation versions of Microsoft products) readily available on the Internet.
It is possible to do the open source implementations based on FreeBSD, NetBSD, OpenBSD or various Linux flavors. Use the platform you are most familiar with. The BSD variants have a powerful dual stack packet filtering component called pf. This can be used to add a host-based firewall to any project (to block access via anything but the desired protocols), or even to build a multi-NIC router or firewall with complex rules. In Linux, the equivalent component is called NetFilter / IP Tables. The BSD and Linux packet filtering components have roughly the same functionality, but totally different deployment and configuration schemes. Both have one part that lives in the Kernel Space, and one part that lives in User Space. The configuration of the TCP/IPv4 and TCP/IPv6 stacks is done in different ways, but the functionality is almost the same. Both the BSD and Linux IPv6 implementations have passed IPv6 Ready Gold testing (at least one release, possibly not the most recent). For the most part, other open source components (Apache, Postfix, Dovecot, etc.) are pretty much the same regardless of what underlying platform is used.
Microsoft Windows Vista, Windows 7, Windows Server 2008 SP1 and Exchange 2007each has excellent support for IPv6 and dual-stack operation. You can put together a viable testbed network with just Microsoft products if you like (except for the gateway router/firewall), or all with just open source, or mix and match. It all depends on your expertise and job requirements.
Some open source components (e.g. SMTP MTA, POP3/IMAP mail retrieval agents) are available in a variety of popular implementations (Postfix, QMail, EXIM, Dovecot, Cyrus IMAP, etc.). Pretty much all of these have support for IPv6, but in some cases, finding the specifics to actually deploy these in dual stack mode may be difficult to locate. I will recommend components that I have actually deployed and verified dual-stack operation, but if you happen to prefer a different component, chances are the necessary configuration information is available online somewhere.
If you are not looking for an educational experience, but just want to deploy working servers, you will be able to purchase “kits” from our website that have detailed instructions for deployment of the various servers listed in this projects chapter, using one possible set of open source components, along with configuration and testing procedures. This should help organizations (like universities) that are short on funds, but long on open source and network expertise to get started with IPv6 test bed networks. These are not recommended for mission critical production deployments in commercial organizations that require 24x7 support, high availability, simple GUI management, etc. There are good commercial products available from reputable companies that have all of these features and more. Even for such organizations, these kits may be enough (together with this book) to start climbing your own IPv6 learning curve and get some hands-on experience actually running real services dual stack.
Each project has a basic level of functionality described, and various extensions that can add more functionality (e.g. a basic router can be enhanced by adding packet filtering and/or proxies).
10.1 – Project 1: A Standalone Dual Stack Node in an IPv4 Network, using Tunneled Service
This is the simplest lab, and does not require a working dual-stack network. Each standalone node will be creating its own tunnel and the only IPv6 access to or from that node will be to or from the Second Internet via the tunnel. Local access will still be IPv4-only.
Freenet6 Tunneled Service using TSP
TSP tunnels (e.g. from Freenet6) will work even behind NAT, using NAT traversal with UDP encapsulation. If you do have a real IPv4 address (not behind any NAT), it will negotiate simple 6in4 tunneling. In either case, TSP requires client authentication (you must sign up at their site for credentials). For details, see www.gogo6.com and click on Freenet6. You can download their TSP client for a variety of platforms, including Windows, FreeBSD, Linux, etc. Follow their directions to download the appropriate TPC client, then install and configure it. This will typically even work from hotels. Some networks force your browser to use a web proxy, which usually is IPv4-only. In this case, web access will not work, but other protocols will typically work. If you can ping IPv6 addresses, but not surf to IPv6 websites, probably something is forcing your browser to use an IPv4-only web proxy. One good use for a standalone node is to test access to publically accessible servers in your testbed network from “outside”.
As of this writing, Freenet6 includes their gogoclient in binary for Windows 32 bit, Windows 64 bit, and in source code for Linux, UNIX, Mac OS or BSD. Download the gogoclient User Guide and follow the directions.
Freenet6 has recently added DS-Lite virtual ISP service, plus a DS-Lite client, for Windows 32-bit and Windows 64-bit.
By default, with Freenet6 you get a single IPv6 address (“/128”), but you can request a “/64” or even a “/56” if your node can act as a gateway and route traffic to one or more subnets with multiple internal nodes.
Hurricane Electric 6in4 Tunneled Service
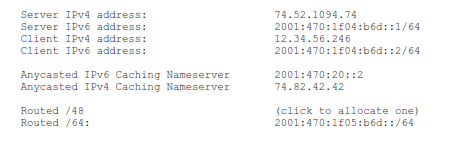
For Hurricane Electric, apply for an account at www.he.net (tunnel broker link). You will need a real IPv4 address (which accepts ping). This address cannot be behind NAT (even 1 to 1). Enter your IPv4 address as requested (e.g. xxx.52.125.246). The tunnel broker will create a tunnel and show you the details, for example:
With 6in4 tunneling, there is no client to download and install, the functionality is already in all supported platforms. All you need to do is configure it (as described below in labs 3 to 7 for various platforms).
By default, Hurricane Electric gives you a “/64” block but you can request a “/48” block if you have more than one subnet. Hurricane Electric’s tunneling can be used to get IPv6 service for a single node, but more typically this would be used in a gateway node (router or firewall) to provide IPv6 service for one or more internal subnets.
Once the Tunnel is Set Up
Both of these virtual ISPs provide caching dual stack DNS service for client resolution, but you cannot add your own domain name or resource records into their DNS server. Hurricane Electric has recently added Free hosted dual-stack DNS service in addition to their caching DNS service for exactly this. In a later lab we will make use of this service.
Once the client is installed and configured, try pinging some IPv6 addresses (e.g. ipv6.google.com or www.ipv6.org – on FreeBSD or Linux remember to use ping6, not ping). If this works, try surfing to www.ipv6.org and see if it reports your IPv6 address. If surfing reports an IPv4 address, but pinging the IPv6 address works, likely your browser is being forced to use an outgoing IPv4-only proxy. This often happens in hotels.
On the BSD variants, the tunnel will appear as a pseudo interface named gifx (where x is a digit like 0). You can use ifconfig or other commands on pseudo interfaces just like real ones (such as bge0).
If you get a real IPv6 address on www.ipv6.org, welcome to the future! Start exploring the Second Internet.
10.1.1 – Standalone Node Lab 1: Freenet6 on Windows
Apply for an account at www.gogo6.com (Freenet6 tab), then download and install the TSP client for Windows 32-bit or Windows 64-bit (depending on your version of Windows). Download the gogoclient User Guide and follow directions.
10.1.2 – Standalone Node Lab 2: Freenet6 Using BSD or Linux
Apply for an account at www.gogo6.com (Freenet6 tab), then download the source code for the Linux, UNIX, Mac OS or BSD platforms, then build and install it (download and read the gogoclient User Guide for details).
10.1.3 – Standalone Node Lab 3: Hurricane Electric on Windows
Given the tunnel creation above, in Windows Vista, Windows 7 or Windows Server 2008, you would need to issue the following commands (substitute the addresses for your network and tunnel):
netsh interface teredo set state disabled
netsh interface ipv6 add v6v4tunnel IP6Tunnel 12.34.56.246 72.52.104.74
netsh interface ipv6 add address IP6Tunnel 2001:470:1f04:b6d::2
netsh interface ipv6 add route ::/0 IP6Tunnel 2001:470:1f04:b6d::1
10.1.4 – Standalone Node Lab 4: Hurricane Electric Using FreeBSD (since v4.4)
Given the tunnel creation above, you would need to issue the following commands (substitute the addresses for your network and tunnel):
ifconfig gif0 create
ifconfig gif0 tunnel 12.34.56.246 72.52.104.74
ifconfig gif0 inet6 2001:470:1f04:b6d::2 2001:470:1f04:b6d::1 prefixlen 128 r
oute -n add -inet6 default 2001:470:1f04:b6d::1
ifconfig gif0 up
10.1.5 – Standalone Node Lab 5: Hurricane Electric on OpenBSD
Given the tunnel creation above, you would need to issue the following commands (substitute the addresses for your network and tunnel):
ifconfig gif0 tunnel 12.34.56.246 72.52.104.74
ifconfig gif0 inet6 alias 2001:470:1f04:b6d::2 2001:470:1f04:b6d::1 prefixlen 128
route -n add -inet6 default 2001:470:1f04:b6d::1
10.1.6 – Standalone Node Lab 6: Hurricane Electric on NetBSD / MacOS
Given the tunnel creation above, you would need to issue the following commands (substitute the addresses for your network and tunnel):
ifconfig gif0 create
ifconfig gif0 tunnel 12.34.56.246 72.52.104.74
ifconfig gif0 inet6 2001:470:1f04:b6d::2 2001:470:1f04:b6d::1 prefixlen 128
route -n add -inet6 default 2001:470:1f04:b6d::1
10.1.7 – Standalone Node Lab 7: Hurricane Electric Using Linux net-tools
Given the tunnel creation above, you would need to issue the following commands (substitute the addresses for your network and tunnel):
ifconfig sit0 up
ifconfig sit0 inet6 tunnel ::72.52.104.74
ifconfig sit1 up
ifconfig sit1 inet6 add 2001:470:1f04:b6d::2/64
route -A inet6 add ::/0 dev sit1
10.2 – Project 2: Dual Stack Router with Router Advertisement Daemon
This project is an ideal starting point for a test bed network. Any network with IPv6 clients requires a source of Router Advertisement messages, and either direct (or more likely, tunneled) IPv6 service. There are several sources of free tunneled IPv6 service today, including a large block of IPv6 addresses. There are tunnel clients available for each source of free tunneled service. You may wish to try more than one of the free services to see which works best for you, depending on where in the world you are deploying your test bed network.
It is possible to build a router starting with vanilla FreeBSD, OpenBSD or Linux. Each has built-in packet forwarding for both IPv4 and IPv6, and support for multiple NICs. Install the NICs before starting the operating system install, and tell it to make the system a gateway. This should enable the necessary packet forwarding, but you can always specifically enable it later. Details of doing this vary from one OS to another, search for “enable packet forwarding” together with your operating system name (e.g. “FreeBSD”) in Google. All OSes also support creating static routes, default gateways, etc. The BSD variants have a powerful packet filtering component called pf that will allow you to turn your router into a firewall. Linux has similar components, called Netfilter and IPTables. The packet filtering components from both Operating Systems support IPv6. Creating a router (and even better a firewall) like this is highly educational (primarily about FreeBSD or Linux), and would make a great class project. However, if you are more interested in the end result than in the education, while still learning quite a bit about IPv6, there are several good alternatives.
One simple alternative is to buy a D-Link DIR-615 wireless router. It has support for dual stack, bringing in tunneled service, and IPv6 routing. It does not have any support for IPv6 packet filtering. There will be more and more such products hitting the market over the next two years. You may need to update the DIR-615 firmware to the latest version, as there is a lot of older stock in the channel that has pre-IPv6 firmware. The DIR-615 has supports both wireless clients and wired clients (there is a 4 port 10/100 switch included for wired clients, which you can chain out to a larger switch if needed).
Another alternative, somewhat more difficult, is to obtain one of various commercial SOHO routers or wireless routers for which open source replacement firmware is available. An example of this is the Linksys WRT-54G wireless router. Search google for “DD-WRT” for details. There are actually quite a few variants of the firmware for these devices, many of which support IPv6. Be very careful to research the exact hardware versions supported, as there are quite a few distinct devices sold under names like WRT– 54G. This requires you to update the supplied vendor firmware with a completely different version, and the vendor will no longer provide support for your device. These units are typically available in the USD 50 to USD 100 price range, so this is an inexpensive way to get a dual stack gateway. There is quite a bit of information and support in online forums, but it is assumed that you have more technical knowledge and capability than a typical home user. Any of these units with replacement firmware will probably suffice, but may be somewhat limited in terms of tunnel and firewall rule support.
The third alternative is to create either a fairly complete dual stack firewall using m0n0wall. This is based on FreeBSD 6.2, but you download a bootable ISO image which installs everything, including a stripped down FreeBSD OS, all routing and packet filtering components, a web server, and a fairly sophisticated management GUI. This is what I recommend, as the result has quite good features and performance, but it can still be created at very low cost. Their website is at m0n0wall.ch (note those are zeroes not oh’s). There is quite a bit of information on their site on various options for hardware, and on configuration.
There are several competitors to m0n0wall, such as pfsense (also based on FreeBSD), and IPcop (based on Linux) but most do not currently include support for IPv6. Once you install one of these, you will not typically be interacting with the OS anyway (just using a point and client GUI), so it doesn’t really matter which OS it is based on. m0n0wall uses the older FreeBSD packet filter (ipfw), while pfsense uses the newer packet filter (pf). Otherwise they are similar (except that pfsense does not currently support IPv6).
There are some fairly inexpensive “embedded” hardware platforms that can be used to deploy m0n0wall, such as ones from Soekris Engineering (www.soekris.com). m0n0wall even has downloadable images ready to put on a hard disk or even a Compact Flash card for various models of the Soekris box. This makes a highly portable, lightweight unit that is great for teaching, demos, etc. Since it includes various tunneling mechanisms, you can typically set it up to bring in IPv6 anywhere IPv4 service is available (hopefully including at least one “real” globally routable IPv4 address). Versions with anywhere from 3 to 7 NICs are available. If you don’t want to hassle with a Soekris box, virtually any generic PC will work just fine, so long as it has at least two NICs. If performance is an issue, it is highly recommended that you use Intel Gigabit NICs, which are readily available. For typical Internet speeds, even an old decommissioned 486 or Pentium I/II/III box and 10/100 NICs will work just fine. If you are linking two or more gigabit networks with this gateway, use Intel gigabit NICs. There is also support for various wireless NICs, if you want to also support wireless dual-stack clients.
If this project is too complicated for you, you may wish to purchase a commercial dual stack router or firewall (such as InfoWeapons’ SolidWall) and move on to the other projects. If you try to use a Cisco or Juniper router, be aware you may have to pay quite a bit extra for IPv6 support (in Cisco’s case, you would need “Advanced IP Services” for IOS, which costs almost as much as the router). In a class situation, the instructor or lab assistants may wish to install and deploy this component for the students.
When you complete the labs in section 10.2, you will have made a great start on your complete Dual- Stack testbed network. We will add to that network in the following labs. Note that you will not be installing anything else on your router/firewall. You will need an additional internal node running FreeBSD for the remaining labs, configured for Dual-Stack operation.
10.2.1 – Router Lab 1: IPv4-only m0n0wall Installation and Configuration
This first lab creates a firewall that supports an IPv4-only LAN behind a single globally routable IPv4 address, with RFC 1918 private IPv4 addresses for internal nodes. We will add in support for bringing in tunneled IPv6 service in a later lab, making the network behind the firewall Dual-Stack.
Obtain a generic PC, possibly installing additional NICs (see comments above). You will need at least two NICs, although you can support as many as you have room for (for DMZ, etc). m0n0wall only uses a very small amount of hard disk (<50MB), but it cannot partition the drive for multiple operating systems, so don’t waste most of a nice 500GB drive on this. You should use a good quality drive, as the failure of an old (well used) drive will bring down your firewall. You can go to some extra trouble and put the firewall image in a Compact Flash card, but it will need something (floppy, USB thumb drive, etc) to save its configuration files onto. Using a CF card will make your firewall very reliable. The m0n0wall code will actually load into RAM and run there, to avoid burning out any bits in the CF card. Your PC should have a CDROM/DVD drive, but this can be provided using an external drive via USB (assuming your PC can boot from this). You will also need a video interface, a video display and a keyboard, but only during installation. Once m0n0wall is installed, these can be removed and your PC will operate as a “headless” node (no monitor, keyboard or mouse). All interaction with it is done via the network interface.
Step 1 – Get the m0n0wall installation media.
Download the “generic PC” ISO image (e.g. file cdrom-1.32.iso) from the m0n0wall.ch website, and burn it onto a writeable CDROM.
Step 2 – Setup your PC for installing m0n0wall.
Configure the ROM BIOS in your PC to not use ACPI, to work with an OS that does not support Plug and Play, and to boot from CD/DVD before booting from hard disk.
Step 3 – Boot from the m0n0wall install CDROM. When it finishes loading, you will see a menu:
LAN IP address: 192.168.1.1
Port configuration: LAN -> sis0
WAN -> sis1
m0n0wall console setup
**********************
1) Interfaces: assign network ports
2) Set up LAN IP address
3) Reset webGUI password
4) Reset to factory defaults
5) Reboot system
6) Ping host
7) Install on Hard Drive
Choose option 7, Install on Hard Drive. It will list all available hard drives, and let you choose which one to use. For example:
Valid disks are:
ad0 MAXTOR STM 3320620A 3.AAD 298.09 GB
Enter the device name you wish to install onto: ad0
It will warn you that this will overwrite the current contents of that drive.
Warning: ...
The firewall will reboot after installation. Do you want to proceed? (y/n) y
When you type “y” (followed by Enter), it will write the firmware to the selected hard disk. When it is done, remove the install CDROM and allow the PC to reboot.
Step 4 –Install m0n0wall.
Connect a network cable from a powered-on switch to the m0n0wall NIC you want to use for LAN, so you can identify it in the next step (as being in the “up” state). It will display the console setup menu again (now minus option 7). For example:
LAN -> sis0
WAN -> sis1
m0n0wall console setup
**********************
1) Interfaces: assign network ports
2) Set up LAN IP address
3) Reset webGUI password
4) Reset to factory defaults
5) Reboot system
6) Ping host
Select option 1, Interfaces: assign network ports. It will list the available interfaces. In my case, the first NIC (vr0) was a D-Link PCI 10/100 PCI NIC I installed. The second NIC (vr1) was on the motherboard. The one named vr0 above is in the UP state, so that is the one to specify for “LAN”. Note: your interface names may differ from mine (the name depends on the FreeBSD driver used, which is determined by the NIC type). Do not install VLANs now.
Valid interfaces are:
vr0 00:15:e9:80:b3:b1 (up) VIA VT6105 Rhine III 10/100baseTX
vr1 00:15:82:2e:b4:a5 VIA VT6102 Rhine II 10/100baseTX
Do you want to set up VLANs now? (y/n) n
Enter the LAN interface name or „a‟ for auto-detection: vr0
Enter the WAN interface name or „a‟ for auto-detection: vr1
Enter the Optional-1 interface name or „a‟ for auto-detection:
The interfaces will be assigned as follows:
LAN -> vr0
WAN -> vr1
The firewall will reboot after saving changes
Do you want to proceed? (y/n) y
The firewall is rebooting now.
After it reboots, it will present the console setup menu again (now with your port assignments):
LAN IP address: 192.168.1.1
Port configuration:
LAN -> vr0
WAN -> vr1
m0n0wall console setup
**********************
1) Interfaces: assign network ports
2) Set up LAN IP address
3) Reset webGUI password
4) Reset to factory defaults
5) Reboot system
6) Ping host
Choose option 2: Set up LAN IP address. Follow the interaction below, replacing 192.168.1.1 with your preferred LAN IPv4 address, and the number of bits in the subnet mask (e.g. 24 for 255.255.255.0). Enable the DHCPv4 server, and provide it with a reasonable range of available IP addresses, in the same subnet as the LAN IP address. The remainder of the steps assume you used the default LAN IP address. For example:
Enter the new LAN IP address: 192.168.1.1
Enter the new LAN subnet bit count: 24
Do you want to enable the DHCP server on LAN (y/n) y
Enter start address of client address range: 192.168.1.101
Enter end address of client address range: 192.168.1.200
The LAN IP address has been set to 192.168.1.1/24
You can now access the webGUI by opening the following URL in your browser
http://192.168.1.1
Press ENTER to continue.
Step 5 – Connect remaining cables and configure client PC.
You are done with the installing m0n0wall, and will not need the video display and keyboard again. Remaining configuration is done from a browser on your client PC. Connect one network cable from the m0n0wall WAN port to your cable/DSL modem, and connect a second network cable from your client PC to the switch. Ideally your cable/DSL modem should be configured in the bridge mode (or be routing one or more real Ipv4 addresses inside), so that you won’t have multiple layers of NAT. Configure your client PC to obtain an IPv4 address automatically (with DHCPv4). Your client PC should acquire an IPv4 address somewhere in the range you specified for the DHCPv4 server. Try to ping the m0n0wall LAN interface from your client PC:
ping 192.168.1.1
Step 7 – Connect to m0n0wall with browser.
Assuming this worked, use the browser on your client PC to surf to http://192.168.1.1. You should see the m0n0wall login screen.
Log in with the default username (admin) and password (mono). You should now see the m0n0wall main screen.
Click on the System / General Setup link in the left column of that screen. Enter appropriate values for hostname (e.g. m0n0wall), domain (e.g. hughesnet.local), select a valid timezone (e.g. Asia / Hong Kong), and enter IPv4 addresses of your ISP’s DNS servers (e.g. 4.2.2.2, 4.2.2.3).
Click the Save button at the bottom of the screen. Step 8 – Configure WAN interface.
Click on the Interfaces / WAN link. Configure your WAN interface as appropriate for your ISP. In my case, I use a static globally routable IPv4 address of 12.34.56.120 with subnet mask length 26, my gateway is 12.34.56.129. (Note: the 12.34.56 is to hide my IP address). On the web form I entered:
Type: Static
IP address: 12.34.56.120 / 26
Gateway: 12.34.56.129
Now click on the Save button at the bottom of the screen. Step 9 – Verify interface status.
Click on the Status / Interfaces link. Both LAN and WAN interfaces should be up, and have the correct configuration. At this point there should not be any global unicast IPv6 addresses listed (if IPv6 is enabled on your client PC there may be some link local IPv6 addresses, which start with fe80::).
Step 10 – Test firewall.
Your client PC should have normal access to the IPv4 Internet at this point. Ping some internal addresses (e.g. 192.168.1.1). Ping some external addresses (e.g. 4.2.2.2). Ping some external nodes using symbolic names (e.g. www.ipv6.org). Finally, surf to an external node (e.g. www.whatismyip.com). You may wish to explore some of the IPv4 capabilities of m0n0wall at this point. By default, all outgoing IPv4 connections are allowed, and with hide mode NAT, there are no incoming IPv4 connections. The IPv6 menu options are not visible until you enable IPv6 in the next lab. You may want to connect some additional client nodes on the LAN side of the firewall. With the chosen private IP address range (192.168.1.0/24) and DHCPv4 configuration, you could connect another 100 or so nodes.
You could add some servers behind the firewall that accept connections from the outside world by using BINAT (also called 1:1 NAT), and an additional globally routable IPv4 address for each server. In future labs, we will configure this to allow incoming connections for Web and E-mail servers over both IPv4 and IPv6 for. You will discover that it is much easier to allow incoming connections over IPv6 than it is over IPv4.
10.2.2 – Router Lab 2: Adding IPv6 service using 6in4 Tunneling from Hurricane Electric
It is possible to also do this lab with 6to4 tunneling (which is also supported with m0n0wall), but I had less than satisfactory experience with it (especially with respect to Dual-Stack DNS), so I recommend that you use 6in4 tunneling to bring IPv6 service into your testbed network. The only other real candidate for tunneling is TSP, with service from gogo6. This will even work from behind a NAT gateway (no need for a routable IPv4 address). Unfortunately m0n0wall currently does not include support for TSP tunneling. You can build your own router/firewall from FreeBSD and use that if you like, but m0n0wall is much easier to work with.
There are actually quite a few sites that provide free 6in4 tunneled service that will work with m0n0wall (check out the list at SixXS) but this lab uses Hurricane Electric. We will request a “/64” block of addresses and use those to make the entire LAN behind m0n0wall Dual-Stack. We will also have m0n0wall provide Router Ad
Describe what you're looking for in as much detail as you'd like.
Our AI reads your request and finds the best matching books for you.
Popular searches:
Join 2.9 million readers and get unlimited free ebooks