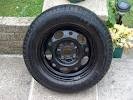
Once a suitable place has been found, it is time to make the car safe. Apply the hand brake and place a chock underneath the wheel. If you are working on the rear then chock the front, vise versa if you intend to work on the front like we are then chock both rear wheels. Look in the Ford owner’s handbook for the best place to jack up the car. In this case, apply the hand brake.
Once you have removed the driver’s side front wheel and the inner wheel arch covers, it is now time to turn your attention to the upper engine compartment.
You need to decide if you intend to re-use the cooling fluid. If so then choose a suitable receptacle capable of holding five to six liters of water and antifreeze.
Please remember if you have been topping up the coolant level for a while due to a leaking water pump then the cooling fluid will require more antifreeze.
Check your Ford owners hand book or manual for the correct amount.
As I have to remove the engine mount, I have devised a bar to stride the engine bay and use nylon webbing as a tunicate so I can adjust the height of the engine accordingly. The other alternative is to either purchase one or check out your local hire shops.
Once this is in place it is time to loosen and remove the fan belt, check the condition, as it is advisable to change any worn parts now. It will save time and money in the end. Replace any parts with genuine Ford replacement parts as they fit better, are made from high quality products thus lasting longer. My Ford car has only genuine parts fitted from new and listening to some of my mates at work, they are forever replacing parts far more frequently than me.
I am now able to see the timing marks that my Ford manual have shown me.
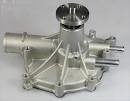
Once they are aligned it is time for me to loosen the retaining bolts of my defective water pump. My water pump is also the timing belt tensioner so I intend to change the belt at the same time. It is due to be changed in the next service in three thousand miles so no point going to all this trouble now without changing it.
Once the water pump is loose I am able to remove the belt from the top part of the engine, I now need to turn my attention to the lower part and remove the bottom crankshaft pulley. This is held on by one large nut. One quick tip is if you place a spanner on the nut prior to removing any parts and just turn your ignition key for a second the nut will undo. This is only my quick tip but you may wish to follow the Ford manual.
The whole timing belt is now able to be removed. Take out all the water pump bolts, I use cardboard and draw a picture of the water pump. Place the bolts through the card this way you know where each bolt goes this is important, as they are all different lengths.
You need to ensure the flat edge of the engine block is totally clean from old gasket and oil. Use a scraper to dislodge any unwanted bits. I like to use a small amount of grease on the new gasket as it will help keep it in place and help create a watertight seal.
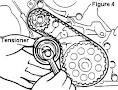
Once the new water pump is in place (and left loose). Replace the timing belt in reverse. Once the water pump is used to tighten up the timing belt, tighten all the bolts to the recommended settings in your Ford handbook or manual.
It is now time to replace all the parts you removed in the reverse sequence.
Ensure all bolts, screws and clips are tight. If you have any parts left over you must find where they go unless you have replaced them with new genuine Ford parts in which case they should be disposed of appropriately.
Once the car is back together and the fluid reservoir is full, start the engine and run for a while until the engine temperature is showing its normal operational temperature. Keep an eye out for leaks. Once the engine is warm, I like to run the internal heater on hot, full speed. Once the engine is hot and running ok, top up the reservoir to the max level and replace the top. Check again when the car has been out for a run.
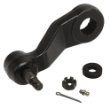
My bottom ball joint has been showing some signs of ware and tare, such as my near side front tire has a lot less tread on the inner edge, when I go over a bump there is a loud knocking noise and the steering has gone stiff. I attribute the need to replace this part due to the terrible condition of the road surface leading up to my new house. I did detect some free play in this part during the last service so I now intend to change it and the tire at the same time to keep within the law.
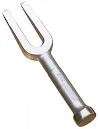
The bottom ball joint is a simple quick inexpensive job. Looking at both, the Ford owner’s handbook and manual I will need basic tools and one ball joint splitter. I purchased this at my local DIY store for less than twenty quid.
The first step is to find a suitable safe area to carry out the repair. It should be level and away from moving traffic. You may wish to cone off the area or use signage to warn people about the repair you are doing.
DO NOT LEAVE THE KEYS IN THE IGNITION AS THIS COULD
RESULT IN SOMEONE TRYING TO MOVE THE CAR AND CAUSE
Describe what you're looking for in as much detail as you'd like.
Our AI reads your request and finds the best matching books for you.
Popular searches:
Join 2.9 million readers and get unlimited free ebooks