Once a suitable place has been found, it is time to make the car safe. Apply the hand brake and place a chock underneath the wheel. If you are working on the rear then chock the front, vise versa if you intend to work on the front, like we are, then chock both rear wheels. Look in the Ford owner’s handbook for the best place to jack up the car.
Once the jack is in place, you need to loosen the wheel nuts. If you have steel wheels and they are covered with plastic wheel trims remove them and then undo the wheel nuts. If you have alloys then the wheel nuts will be visible to the eye. Only loosen them at this point. Once they are slightly loose, jack up the car until the tire is away from the hard standing.
Remove all the wheel nuts and place them in a safe place. It is time to lift off the wheel and tire. I always like to place the wheel under the chassis leg as an extra safety measure.
If the car was to fall, it will go no further than the wheel rim. If you have axel stands then you may wish to use them. One further tip is to do one side at a time. You will have the other side as a reference if you forget where a particular clip or spring my go.
Depending on what year your Ford car was produced, the break caliper will be held on by either Allen keys or thirteen-millimeter nuts. Once again, check your Ford owner’s manual to check which one is particular to your model.
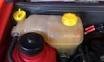
Use a flat bar or screwdriver and force back the piston that pushes the brake pads on to the disc. Remember to unscrew the break fluid reservoir cap. This will allow any trapped air to escape.

Once the piston is pushed back, it is time to undo the break clapper retaining bolts. Put them somewhere safe. Remove the caliper and then dislodge the old worn out pads.
I like to smear on copper grease on the side of the pad that comes into contact with the metal parts of the breaking system. Ensure you do not allow the copper grease to go on the breaking part of the pads.
Replace the pads like for like and ensure all the parts are fitted in the correct order and are secure. If you are in any doubt, always refer to the Ford owner’s handbook.
The brake pedal should be pumped until it becomes hard to depress. Once this is done move to the next side and repeat the sequence.
The brake pads are an easy repair and one that most Ford owners can carry out with limited mechanical knowledge and a simple toolbox. Remember always check the Ford manual or owner’s handbook.
My second do it yourself job on my Ford Fiesta was the water pump. This job has some hidden benefits and complications. It is very important to check the Ford handbook and Ford manual to ensure you know what is entailed and that you have the right tools and skills for the job.
In the Ford hand book there will be a list of any specific tools needed to carry out this job. I have taken the time to ensure I have them all and for some very specialist tools, I am able to make use of some other instruments I have at my disposal.
The water pump is one of those jobs that will involve removing different mechanical pieces to enable you to remove the water pump. In my case, I have to remove the driver’s side wheel and wheel arch liner; I will have to remove the engine mounting and the timing belt.
The first step is to find a suitable safe area to carry out the repair. It should be level and away from moving traffic. You may wish to cone off the area or use signage to warn people about the repair you are doing.
DO NOT LEAVE THE KEYS IN THE IGNITION AS THIS COULD
RESULT IN SOMEONE TRYING TO MOVE THE CAR AND CAUSE
Describe what you're looking for in as much detail as you'd like.
Our AI reads your request and finds the best matching books for you.
Popular searches:
Join 2.9 million readers and get unlimited free ebooks