If your hosting service provided you with a specific FTP path to the folder
where Blogger must put the files which make up your blog, copy that path
into that field. Most people can leave it blank because most hosting services
use the most common path.
Copyright © 2008 All rights reserved
- 22 -
" Quick and Easy Blogs " by John Williams
Page 23 of 100
The Blog Filename field is for the front page of your blog.
The Blog URL is the address on the Internet where people and search
engines can find your blog.
If your blog is the main part of your site, the address could be
http://www.example.com/ and the Blog Filename would be index.html If your blog is not the main part of your site and you want it installed in a
subfolder called blog on your web site, the Blog URL would be
http://www.example.com/blog/. The Blog Filename would still be index.html.
The sub-folder (blog in my example) must be created on your web site before
you come to blogger.com to set up your blog.
As soon as you complete the set-up steps on these pages, Blogger will create
the necessary files and then try to transfer them to the sub-folder on your
web site. If there I anything wrong with the FTP information which you
provided or if the sub-folder does not exist (or the name is even slightly
different), the process will fail and you will have to correct the errors and try
the process again.
If you see that everything is correct, you just need to type in the characters
to match those of the Word Verification showing on the page and left-click
on the “Continue” button.
Copyright © 2008 All rights reserved
- 23 -
" Quick and Easy Blogs " by John Williams
Page 24 of 100
Select the Design for Your Blogger Blog
The next step is very enjoyable - you choose one of Blogger’s professionally
prepared designs to use for your new blog. Blogger adds new templates from
time to time. The quality is good and the variety of styles make it almost
certain that you will find something suitable for your blog.
The best part is that it will cost you nothing to use so long as you keep using
the blogger system to maintain your blog.
Now, you can select one of Blogger’s templates to use for your blog. Check
any template which you think might be appropriate by left-clicking on the
“Preview this Template” box under your chosen template. The preview will
open in a new window in your web browser.
Select your template by clicking on the thumbnail preview picture for that
particular template.
When you have the blog on your own web site, you should consider whether
the color scheme and general design of that particular template will fit in with
the other pages on your web site.
Apart from that fundamental point, you do not need to waste too much time
making your selection from the available templates because you can change
to any of the other templates simply and quickly at any time.
Now, left-click on the last space "Continue" button and Blogger will prepare your new blog for you.
When it is ready in just a few seconds, you will see a link which you can click
on and then start to type the first message (called a "post") into your new blog!
The last step before your new blog is created by Blogger and transferred to
your web site requires you to left-click on the link Blogger provides for you to
create your first post.
When you publish that post, Blogger will transfer the files for your blog to the
address on your web site which you specified.
Copyright © 2008 All rights reserved
- 24 -
" Quick and Easy Blogs " by John Williams
Page 25 of 100
Blogger will need your username and password to be able to put the files into
your site.
You can let Blogger remember your FTP Transfer settings or leave that option
unchecked. The security risk with a reputable site like blogger.com is slight
but the choice is yours.
If you choose not to let Blogger keep those settings, you will be prompted to
enter them each time you create or edit any part of your blog in Blogger and
publish the changes and additions to your web site.
Blogger will allow you to move your blog to your own web site if you want to
do that after you have set it up to be hosted on blogspot.com. You just need
to login to your Blogger account and change the options from Hosting on
blogspot.com to FTP.
Then, you just fill in the information as I explained in the earlier section.
You Save your Settings and then you must republish your blog with the new
settings.
Now, you can open a fresh browser window and type in the address of your
blog in its new home on your own web site. If everything shows up as you
can confidently expect, fine.
If not, go back to the browser window showing your Blogger account and
carefully recheck the information which you entered.
Copyright © 2008 All rights reserved
- 25 -
" Quick and Easy Blogs " by John Williams
Page 26 of 100
Posting to Your Blogger Blog
Whether you let Blogger host your blog or put it on your own web site, you
need to go to your Blogger Account and manage your Blog.
Most Blogger users also do that to creating new posts on their blog, but
Blogger has already added new features which let you post to your Blogger
blog from your mobile phone or by email.
Using the editor in your Blogger account is probably easier and gives you
more flexibility, but having these extra options makes everything a bit more
interesting and convenient.
Login to your Blogger Account and select the correct blog if you have set up
more than one.
Just click the NEW POST button. When the “Create New Post” window
opens, you can put a Title for your Post and then enter the main text in the
larger box.
You don’t have to give every Post a Title but it’s worthwhile to do so. Visitors
to your blog will often just skim the titles to see if any of your topics have
particular interest for them, just as most people skim the headlines in the
newspaper and only read those stories with a headline that attracts their
interest.
Left-click the Preview button and carefully check what you wrote. You may
not worry about spelling errors too much, but you must make sure that
readers will understand what you mean.
Sending Posts to Your Blogger Blog by Email
How do I post via email?
You can set up the option to post to your Blog through your email account.
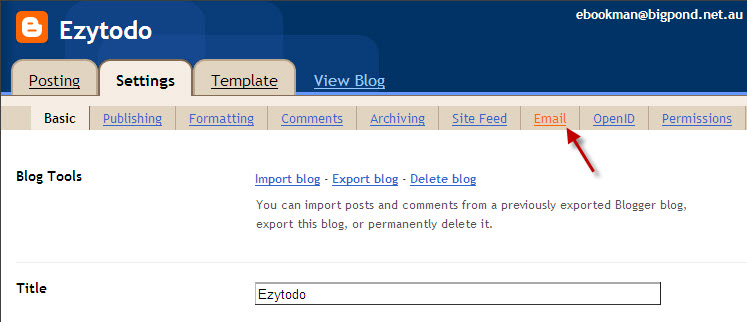
Login to your Blogger account.
Select the Settings tab.
Copyright © 2008 All rights reserved
- 26 -
" Quick and Easy Blogs " by John Williams
Page 27 of 100
Now, left-click on the Email Tab.
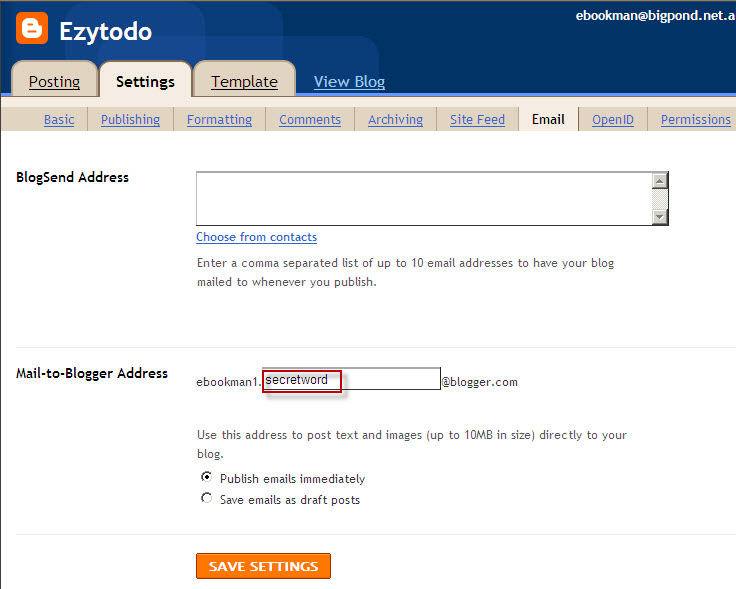
Type a word (it can be a real word or a made-up one) which is relevant to
your blog into the box where I’ve put secretword.
Copyright © 2008 All rights reserved
- 27 -
" Quick and Easy Blogs " by John Williams
Page 28 of 100
Make it something which is hard to guess because this becomes part of the
email address which you use to email your posts to your Blog. Anyone that
finds out that address could send posts to your blog!
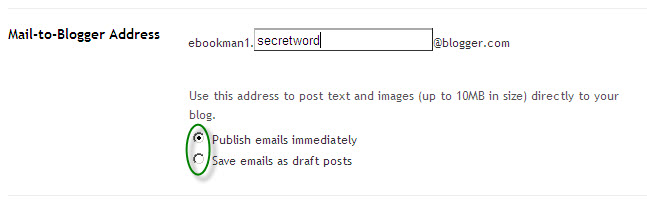
Now, you select whether the posts which you email are to be published
immediately they get to your Blogger account or to be saved as Drafts.
If you just send them as Drafts, you must login to your Blogger account and
review them, then Publish them while you are logged in.
Save your new Settings.
Now, you are set up to email posts to your blog.
Blogger will use the email’s subject as the title for your Post.
The text in the email will become the main text of your Post.
Put #end at the end of the text you want published to prevent any other
material, including advertising messages that some email service providers
add to their client’s emails, being published as part of your Post on your Blog.
If you want a picture to be part of the post, just attach it to the email. You
should check your blog to ensure that the picture is properly set up within
the post. You may need to login to Blogger and make adjustments.
If you know how to use HTML to add bolding and color to your post, you
can use the HTML option, if it is available with your email program, to set
that up for your post.
Otherwise, your post will just have the text of your email exactly as you
wrote it. But, you can login to your Blogger account and edit your post later.
Copyright © 2008 All rights reserved
- 28 -
" Quick and Easy Blogs " by John Williams
Page 29 of 100
Set up Your Blogger Mobile Blog
Another innovative, free service from Blogger lets you set up a blog which
you feed posts, including pictures to, from any device that you own which
has a capability to send text messages and for which you have a text
messaging plan through your service provider.
Blogger’s service is free but your carrier will charge you their usual rate for
usage of the service including receiving and sending pictures and text.
To start setting up your new mobile blog, just send a message to
go@blogger.com.
Blogger will set up the blog and publish the message to it. Then, they will
send a message to your device.
That message will have:
9 The address of your new Blog so you can review it, and
9 A token which you need to claim your blog and be able to add it to
your Blogger account.
You can login to go.blogger.com and use the token Blogger sent to you to
claim it.
Then, you can make changes to the settings of your new mobile blog.
You can also set it up so that your future posts from your device will be
added to your current Blogger blog. If your blog is not hosted at
blogspot.com, the post(s) you’ve already made to your mobile blog are not
moved automatically when you make this adjustment.
You can post Mobile Messaging Service messages and emails from that
device to your blog. But, email messages from your phone or other system
which go through a webmail service will not work with Blogger Mobile.
Blogger have a set limit of 250Kilobytes for photos and anything larger will
be bounced. You will get a bounce message so you can send a smaller
picture if you want to.
Copyright © 2008 All rights reserved
- 29 -
" Quick and Easy Blogs " by John Williams
Page 30 of 100
Your mobile service provider will probably charge you for everything you
send (including any bounced pictures) and they will also have their own limits
on the size of pictures which you can send.
Copyright © 2008 All rights reserved
- 30 -
" Quick and Easy Blogs " by John Williams
Page 31 of 100
Enhancing Your Blog Posts
I suggest that you make a couple of posts which are just text before you
start using these options to add more “eye-candy” to your posts. That will
ensure that you have the basic steps right.
You can always edit those early posts and add more design features when
you are more confident about the basic process of posting new material to
your blog.
Add a Picture to Your Post
It is simple to put a picture into your post.
Blogger lets you select the picture from your computer or from a web site.
But, you should make sure that you only ever use a picture which you have
permission from the copyright holder to use. It could be an embarrassing and
expensive mistake to use a picture which you do not have permission for.
I know a couple of people who have had to pay up to $1,000 to avoid the
possibility of ending up in court because they used a picture which they did
not have permission from the actual rights holder to use. The copyright
owner had an invisible mark inserted into their pictures on the Internet which
they used to locate misuse of their pictures and prove their ownership.
Each of those people had bought a collection of pictures from someone else
who told them they had the right to use them on their web sites!
To transfer your picture, just left-click on the Image Icon in the Post Editor
Toolbar.
When the new window appears, just navigate (browse) to your picture file on
your computer, or enter the URL of your picture on the Internet.
Then, you can arrange how you want your picture to be displayed in your
post.
Adjust its position in relation to your words, using the 'Left', 'Center', and
'Right' options.
Use the 'Image size' option to set the size of the picture in your post.
Copyright © 2008 All rights reserved
- 31 -
" Quick and Easy Blogs " by John Williams
Page 32 of 100
Then, left-click on the UPLOAD IMAGES button to transfer a copy of your
picture to your blog.
Then, just click DONE after you see the message that your image has been
added.
Blogger will reopen the post editor where your image is showing and can be
published to your blog.
Other options for adding pictures on your blog include using your a mobile
device, Google's Picasa (free photo-editing software) or a third-party service like flickr.
Adding a Video to Your Blog Post
It’s almost as easy to put your video in to your blog post.
Just left-click the film-strip icon that you see in the toolbar above the box
where you write your blog text.
When the “Add a video to your blog post” window opens, just click on
Browse.
Then, navigate to where the video is stored on your computer.
You can put video files in AVI, MPEG, QuickTime, Real or Windows Media
format that are up to 100MB in size.
Put a title into the “Video Title” box and click that you agree to the Terms
and Conditions before you start to transfer your video.
Then, just left-click the box to transfer a copy of your video to your blog.
Accepting the Terms and Conditions for using this option will mean that
acceptance applies to any other video uploads which you make with this
account. So, you won’t have to click to accept the terms each time that you
transfer more videos but you will still be bound by them.
While your video uploads, Blogger shows a marker (placeholder) showing
where your video will appear in the post.
Copyright © 2008 All rights reserved
- 32 -
" Quick and Easy Blogs " by John Williams
Page 33 of 100
Blogger also shows a message about the progress of the transfer just below
the post editor.
The time your video transfer will take depends on the size of your video and
the connection speed of your Internet connection.
You will see your video in the editor window when it has been transferred
successfully.
Personalizing Your Blog’s Layout
You are now going to learn the biggest secret of Web Page Design. If you
don’t need real fancy features, it can be fairly simple to do. This section won’t
make you an expert but may inspire you to try making your own web site
sometime if you don’t already have one.
You chose a template from those offered by Blogger for your use with your
Blogger blog.
That’s just the start.
Blogger will give you a very simple way to customize the template you are
using if you have the blog hosted on blogspot.com or have the domain you
registered for your blog pointed to your blog on blogspot.com.
They provide their “intuitive drag-and-drop interface”. This is usually called a
WYSIWYG (What You See Is What You Get) web editor.
If your blog is on your own web site, you cannot (currently) use that tool.
But, you can edit the template using the HTML box. This is more risky if you
do not know much about editing web pages.
But, it gives experienced HTML users very good control.
You can also add slideshows, user polls, or even AdSense ads or easily alter
the fonts and colors on your blog.
Using the LayOut Editor on Your Blogspot Hosted Blog
Copyright © 2008 All rights reserved
- 33 -
" Quick and Easy Blogs " by John Williams
Page 34 of 100
Using the Blogger Layout editor to edit your blog, when it is hosted on
Blogspot, is about as easy as it gets.
Just left-click on the Layout option in your dashboard below the blog you
want to edit.
Left-click “Edit” in the “Page Elements” section to change gadgets you are
already using.
The “Add a Gadget” button is for adding more of them to your Blog. You just
have to left-click the + sign beside the Gadget you want to use. Browse
Gadgets by category or use the search option in the pop-up window to find
exactly what you want.
Copyright © 2008 All rights reserved
- 34 -
" Quick and Easy Blogs " by John Williams
Page 35 of 100
Make Your Blog a Community
RSS Feed
You can also offer an RSS Feed through which readers can subscribe to get
additions to your blog sent to the Feed Reader program.
Feedburner was bought up by Google, so it must be pretty good.
The Feed Service at Feedburner has a free version for blogs created with Blogger.
Get the Site Feed URL (location) for your blog by logging into your Blogger
account.
Click Settings/Site Feed. Check or set Allow Blog Feed to either Full or short.
Go to the feedburner.com website and check their current instructions for setting up your Feedburner account and feeder. It’s now owned by Google,
who own Blogger, so you can expect good results!
Comments
When you enable Blogger’s Comments feature, visitors to your Blog can
comment about your post which they have just read.
You have ways to control these comments before they appear which I’ll
explain further along.
Their comments will be published under your post
Let Visitors Comment about Your Blog
Login to your Blogger account and left-click on the Settings tab in your
dashboard.
Then, choose the Comments tab.
Click the Show button and then click Save Settings.
Now, you must set up these other settings.
Copyright © 2008 All rights reserved
- 35 -
" Quick and Easy Blogs " by John Williams
Page 36 of 100
Who Can Comment? There are three options in this setting.
1) Only Registered Users: Visitors will need to have a Blogger account
or set a new one up before they can post a comment.
2) Anyone: This is open slather – anyone can post a comment. Of
course, the comments will still need to be moderated by you before
they appear if you have already set up a Moderation option.
3) Only Members of this Blog: This is for a Blog where you have a
Team of contributors. Only they can leave comments.
Default for Posts If you want comments which are a good way to increase
interest and traffic for your blog, you should choose New Posts Have
Comments:
If you select New Posts Do Not Have Comments: only those Posts where
you specifically enable them will let visitors make comments.
Comments Timestamp Format: You can choose the way that the date and
time the comments were made (not moderated) will be shown.
Show Comments in a Popup Window? I suggest that you click No for this
option because a lot of web surfers use software which will block pop-ups.
They do not like them.
The No: option will have the comments and a form for the visitor to put in
their own comment to appear in their current browser window.
Show Profile Images on Comments? The Yes: option will display a
Blogger user’s public profile image (if they have one) in the posting form.
They won’t show in the actual blog.
The No: option will not allow the display of a Blogger user’s public profile
image.
Comment Notification Address: You can put your email address here to
have all new comments emailed to you.
Now, you just have to check that all the settings are the way you want them
and then left-click on Save Settings.
Copyright © 2008 All rights reserved
- 36 -
" Quick and Easy Blogs " by John Williams
Page 37 of 100
You must now republish your blog to have the new settings activate.
Blogger’s templates have the correct template tags for comments but some
other templates may not work properly.
All comments appear in the order that they were posted by the visitors.
Older posts that were published before you enabled Comments will not have
Describe what you're looking for in as much detail as you'd like.
Our AI reads your request and finds the best matching books for you.
Popular searches:
Join 2.9 million readers and get unlimited free ebooks