In this section, we’ll deal with the various components of the kitchen and how to arrange them on your plan then in Section 2 I’ll show you exactly how to set-up MS Word to create detailed, accurate drawings to work from.
Most of us consider the kitchen to be the ‘heart of the home’. The room where you’ll spend a lot of your time and where everyone usually ends up at parties! More importantly though, the kitchen is often one of the biggest selling points of a house if you ever decide to sell it.
A well thought out kitchen plan is essential then if it is to be functional, effective and most of all – safe.This quick and easy guide will help you to ensure that your plan makes maximum use of the space available and best suits your circumstances. A little time spent at this stage will save you from making potentially expensive mistakes later.
Kitchen design is relatively straightforward in most cases and really just relies on accurate measuring and knowing what cabinets & appliances are available to fit in the space you have.
In any kitchen there are 3 main ‘zones’ which professional planners try to tie together to create a working triangle.1. Food storage & preparation – fridge and worktop area
2. Cooking – oven, hob, microwave
3. Washing up – sink and dishwasher
Things to consider:
• What’s your budget?
• What’s your timescale?
• Who’s going to install it – you, or professional fitters?
• Do you have alternative means of cooking - microwave, take-away?
• Do you want to retain the same basic layout or completely change it?
• If you’re changing layout, can the services be moved easily (is there access under the floor for example?)
Your circumstances will affect not only the style of the kitchen but the type of units you use, the appliances you specify and the kind of accessories you want to incorporate. So…
Who’s going to use it? – are you:
• a single person living on your own,
• a couple,
• or a family with one or more children
What are you going to use it for:–
• will you just cook in it,
• do you have a utility room where you do your laundry,
• will you entertain in it,
• will your kids watch TV in it

Tip : if you live in a relatively modern home, before you decide to completely change everything around, remember that at some point a highly qualified architect has used his experience to design an efficient and effective layout for the space you have available. In this situation, I would recommend sticking with this basic layout unless you plan to enlarge your kitchen with an extension or by knocking-through into another room.
Straight Line – if you have a very narrow room, you may be limited to just a single run of worktop. Although you can’t really achieve a ‘working triangle’ as such, it’s still possible to group your appliances together to make the best use of the space available. In this case, most of your storage will probably be in wall units.
Fridge
Washing Machine 3-Drawer Base Unit
In this example, notice the washing machine and dishwasher are either side of the sink for ease of plumbing. In most properties you will tend to find the sink beneath the window if there is one. There’s also adequate space between the hob and sink
- which needs to be at least 600mm for current building regulations.
Galley – if you have a square or rectangular shaped room with a door at each end then a galley layout is probably the most effective for you. To use this layout your room will need to be at least 2.4m wide to allow a 600mm worktop on either side and a 1200mm gap between them for walking space when cupboard doors and drawers are opened.
Washing Dishwasher MachineFridge Kitchen measurements are usually expressed in millimetres (mm): 1000mm = 1metre and 100mm = 10centimetes (cm).
L-Shaped – this kitchen shape is ideal if you only have two useable walls to build out from. This configuration tends to leave a nice open space in the centre of the room – handy if you want to use a table and chairs or if you simply want a light and airy kitchen (just because you have available wall and floor space, it doesn’t mean you have to fill it with units).
Dishwasher
Washing Machine
Tip: Avoid locating your fridge or freezer right next to your oven if you can, otherwise it’s going to have to work much harder than normal to keep cool. U-Shaped – if you only have one door leading into or out of your kitchen and you have three useable walls, then a U-shaped configuration might be perfect for you. With this layout you’ll get maximum space for units and appliances. The only thing to remember, as before, is that you need at least 1200mm between opposing rows of base units to allow you to open doors and still walk past.
Washing MachineIsland – if you’re lucky enough to have a large kitchen then you might want to consider an island layout. In the right setting they can look fantastic and be a real feature of the house. Normally you would create an L or U-shaped layout as above but with the addition of a central ‘island’. This can be used simply for storage or, for the more adventurous, it’s possible to have your hob located here with an island extractor above it. Obviously this depends on being able to run services to the island under the floor.
The other appeal of this kind of design is that, if large enough, the island can double as a breakfast bar. Although you could use 665mm breakfast bar worktop if space is tight, it’s better to use 900mm wide worktop if you can so that you can place bar stools underneath it. The same regulations apply as before in that you will need to have at least 1200mm between the island and adjacent worktops/units to allow for easy passage when doors/drawers are opened.
Dishwasher
Washing Machine
Before we get into how to layout the units and appliances, we need to quickly go over some safety issues so that your design is in keeping with current UK Building Regulations. This list is not exhaustive and if you are in any doubt about any aspect of your design and installation, please seek professional advice.
You will see that most recommendations concern the siting of the hob which makes sense given that it is potentially one of the more dangerous pieces of equipment in your kitchen.
Hob Do’s & Don’t’s:Do
• Leave a minimum distance between the hob and the sink of 600mm (24”) if they are on the same run of worktop.
• Leave at least 200mm on either side of a hob to ensure that surrounding walls or tall units aren’t damaged by the heat and to allow easier pan handle movement.
Don’t –
• Position your hob and oven behind a door, in case the door is opened while you are at the hob or putting something in the oven.
• Locate the hob underneath a window. Draughts from an open window can blow out the flames of a gas hob and leaning across a lit hob to close a window is obviously dangerous.
General GuidelinesWorktops must be supported by a base unit or with a worktop support panel every 600mm (e.g. between two appliances).
Try to avoid short runs of worktop less than 1000mm in length.
As I’ve already mentioned above, you need to leave a gap of at least 1200mm between two parallel rows of units e.g. on an L or U shaped layout.
Although this guide is all about showing you how to design your kitchen using MS Word, initially you’ll still need a pen and paper to make a rough sketch of your kitchen. This only needs to be a simple line drawing to mark your dimensions on.
Tip: Because very few houses actually have perfectly straight and square walls, measure the length and breadth of the room at floor level first, then again at a height of 900mm (approximate worktop height). Use the smaller of the two measurements for your plan.
Make a note of the location of doors, windows, central heating boilers and any other fixed features which you will have to work around. When measuring the position of doors and windows, measure from the edge of the wall to the outer edge of the door or window frame (i.e. to the edge of the decorative facing), to get the overall size. For windows, measure the height from the floor to the bottom of the sill too.
If you have a staircase above part of your kitchen and have a sloped section of ceiling, then you’ll also need to make a note of this as it will be a factor when it comes to hanging your wall units. Even though these measurements are being noted down on a rough sketch, they still need to be accurate.
At this stage, also jot down on your drawing the location of the services. All kitchens will have at least water and electricity supplies and in most cases these days, gas too. The position of these services must be taken into account in your kitchen plan. If your kitchen has a concrete floor or limited under-floor access then it may not be practical to move the location of gas and water supplies, so keep this in mind before completely changing your layout! Thankfully, adding extra electrical sockets and switches should be quite straightforward, as your electrician can often just extend the existing circuit.
Now that you have the measurements of the room, it’s time to give some thought to the design. By now you’ve hopefully decided on the basic layout – galley, UShaped etc. Starting at floor level, decide which appliances you would like and where these will need to be located with regard to what we’ve learned so far. Decide on the location of the sink at this stage too.
Tip: Try to keep the sink in its existing position if this where the water main enters the house from under the floor – moving it will be time-consuming and costly.
Tip: Keep dishwashers and washing machines positioned close to the sink to simplify plumbing. If you plan on having a cooker hood, these should ideally be located on an external wall so they can be vented to the outside. To do this you will need to cut a 4” hole through the brickwork which will require a specialist tool (ask for a ‘core cutter’ at your local tool hire shop). If your hob isn’t located against an external wall, then one alternative is to run the extractor ducting through the ceiling void to the outside - but this is only possible if the upstairs floor joists run in that direction. The other alternative is to use a re-circulating type hood which uses filters to clean and de-odorise the air.
Once you’ve decided on the location of your sink and appliances it’s just a case of filling in the spaces on the floor with the most appropriate cabinets. I’ll go through the different kinds of units available in the next section, but basically you can divide these up into:
• Base units
• Wall units
• Tall units (e.g. larder units)
• Midi size units (mid size between a base unit and a tall unit)
• Corner units (base & wall types)
Construction : kitchen carcasses are usually made from MFC (Melamine Finished Chipboard) in 15 or 18mm thicknesses (some are actually made from just 12mm board, but these are best avoided).
15mm carcasses are ideal if:
• You are on a tight budget
• You’ve bought a “doer-upper” and just want to sell the property on
• Buy-to-Lets
• Student accommodation
• Kitchens that only see light / infrequent use
• Solid backboard (normally 8mm MDF/MFC, instead of hardboard)
• Stronger / more rigid construction
Tip: check whether the units you buy have a ‘services’ gap between the backboard of the cabinet and the wall. These are essential for running cables behind e.g. for under unit lighting.
Base Units – are usually a total of 870mm in height (720mm cabinet, plus 150mm legs) and 570mm in depth. As they’re designed to sit under a worktop, these units come without a top panel so, if you need to know the overall height, this will depend on the thickness of the worktop used (normally 30 or 40mm). In terms of width, they increase in multiples of 100mm i.e. 300mm, 400mm, 500mm, 600mm, 800mm, 1000mm - the latter two sizes will come as a double-doored unit.
You will often see base units described as ‘Highline’ or ‘Drawerline’ - this simply refers to whether the cabinet has a drawer or not (in the case of an 800mm or 1000mm unit, it would obviously have 2 drawers). In situations where it’s not practical to have a drawer but you would still like the appearance of one (e.g. underneath a sink), then a ‘dummy’ drawer is created by joining the door and drawer fascias together with metal plates.
Some people have a preference for all highline or all drawerline units depending on the look they are trying to achieve. All drawerline tends to lend itself to a traditional country kitchen look whereas it’s fashionable at the moment for many of the modern, high gloss kitchens to be all highline. If you do go for this look though it’s wise to include at least one drawered unit e.g. a 3-pan cabinet, which will give you a cutlery drawer and 2 larger drawers beneath it.
It’s also perfectly okay to use a combination of both highline and drawerline units in your design but, where possible, try to locate drawer units next to each other.When it comes to installing your units don’t worry if your floor is a little uneven as all base units come with adjustable legs (this includes tall and midi-size too).
 Highline Base Unit
 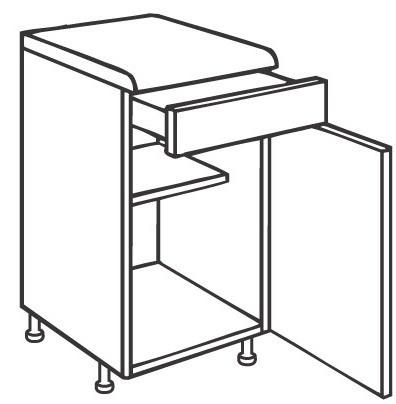 Drawerline Base Unit
 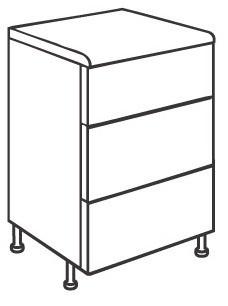 3-Pan Drawer Base Unit
 Wall Units – Although only half the depth (normally 300-330mm ), wall units come in the same variety of widths as base units. Because of this, it’s worth planning your kitchen in such a way that the doors of the wall units appear above those of the base units below– this creates a structured, linear look and is more professional (see photo).
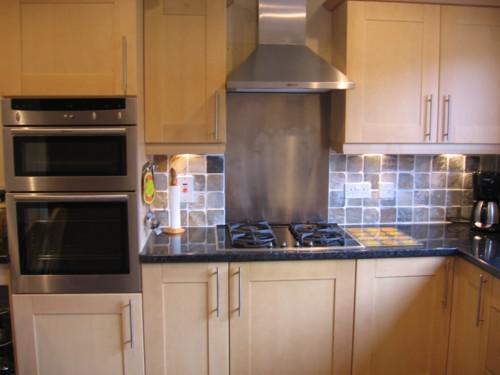
Wall units come in various heights; the smaller ones - sometimes known as ‘Bridging’ units - can be used above a hob where a normal wall unit would not be suitable (remember you need a gap of 760mm above a hob). Standard wall units are approximately 715-720mm high, but extra tall wall units are available for rooms with particularly high ceilings. Keep in mind though that the maximum practical cupboard shelf height above a worktop is 1060mm (3’6”).
 Standard Height Wall Unit
 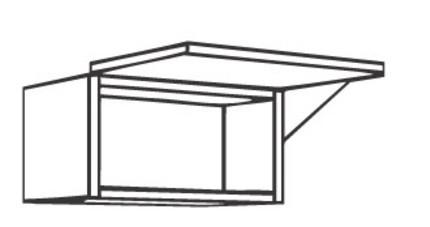 Bridging Wall Unit
When installing your kitchen, aim to hang the wall units at least 450mm (18”) above the worksurface.
Tip: if you plan to tile the splashback area between the worktop and wall units, make this gap 460mm to allow for 3 rows of 150mm (6”) tiles, plus grout spacers – (if you’re using this size of tile of course).
It’s also possible to create a ‘peninsular’ with wall units that juts out from the wall at 90Ú and is supported by legs that attach to the worktop below. You will have to use a base unit end panel, or similar, to blank off the back as this would normally not be seen. Some wall units are actually specially designed for this purpose and tend to be display type cabinets with glazed doors on both sides.
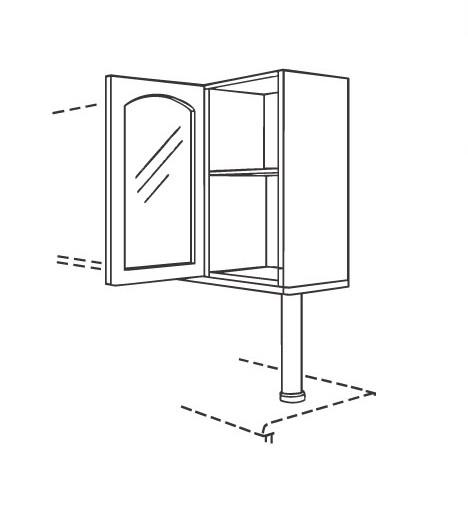 Peninsular Unit
Talking of display units, you can also get conventional glazed wall units, open end wall units and ‘Dresser’ units which sit on top of the worktop.
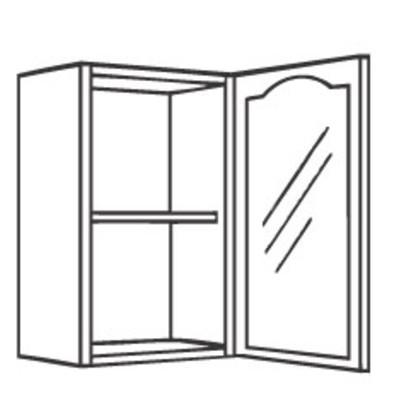 Glazed Wall Unit
 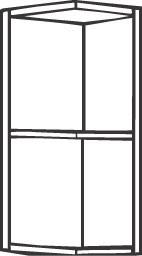 Open End Wall Unit
 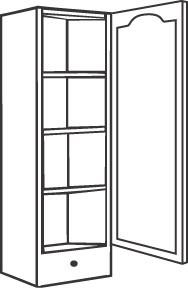 Dresser Unit
Tip: if you are installing a Dresser unit, or indeed a tall larder-type unit, then these will dictate the height of the rest of your wall units.Use cornice and pelmet to finish off a row of wall units and create the illusion of a single piece of furniture.
Tall Units/Larder Units – tall units can be purchased as integrated appliance housings with specific door sizes to suit, or as regular storage units. Normally about 2170mm high (2020mm + 150mm adjustable legs), they are the same depth as base units at 570mm. Most manufacturers will offer 300mm and 600mm widths and can often supply special pull-out wire baskets to make them easier to use.
Midi-Size Units – are a half-way size between regular base units and tall larder units. They’re mainly designed for housing integrated appliances and are useful if you want to incorporate a ‘built-in’ double oven in your kitchen but don’t want to use a tall unit. Unlike tall units, it’s common practice to finish off the top of a midi-size unit with a piece of worktop providing a useful raised area to put things on.
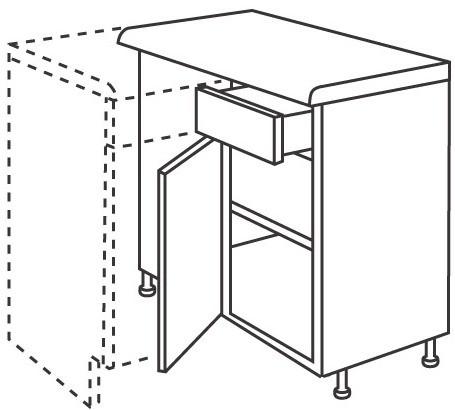
Corner Units (Base & Wall) – the simplest base corner units are just regular straight units with only one door. They’re designed to have another unit butt up against the remaining ‘opening’ at 90Úto form an L-shape. These can come in sizes varying from 800mm – 1200mm and will have a door size ranging from 300mm to 600mm. It’s easier to explain this with a drawing, so please see below:
Incidentally, wall units are available in the same format, but tend to be available in 600mm sizes only with a 300mm door.

800mm Corner
Base Unit with
300mm Door
800mm Corner
Base Unit with
400mm Door
600mm Base Unit 600mm Base Unit
1000mm Corner
Base Unit with
500mm Door
1000mm Corner
Base Unit with
600mm Door
800mm Base Unit 800mm Base Unit
 Drawerline Corner Base Unit
 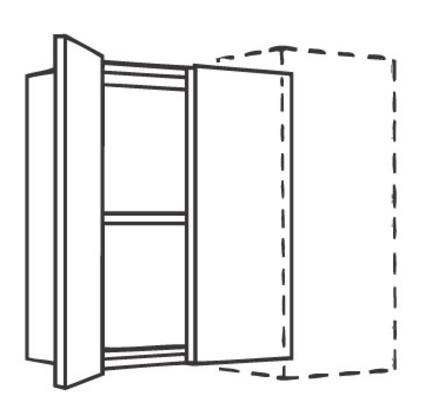 Corner Wall Unit ‘True’ corner units can be in an L-Shaped format or with a diagonal front. For base units, these are normally 900mm-950mm in size and 650mm for wall units.
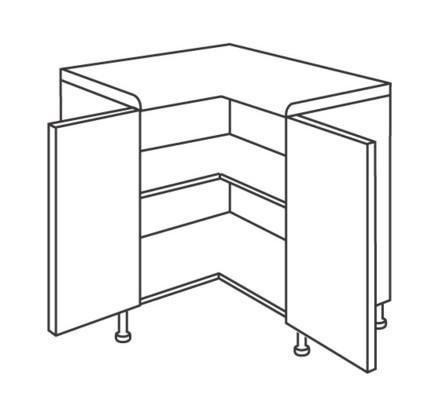 L-Shaped 950mm Highline Corner Base Unit
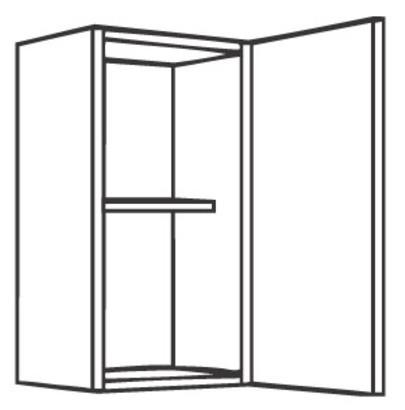
  L-Shaped 650mm Corner Wall Unit
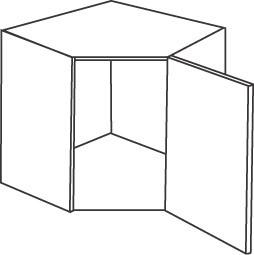 650mm Diagonal Corner Wall Unit
 Cornice, Pelmet & Plinth – all three of these items are purely decorative and are used to visually ‘tie’ the units together. When fitted, they give your kitchen the appearance of being a single, continuous piece of furniture.
Cornice - is installed on the top of the wall (and larder) units and the pelmet attaches underneath.Pelmet - or ‘lighting pelmet’ as it’s sometimes known, also helps to conceal underwall unit l
Describe what you're looking for in as much detail as you'd like.
Our AI reads your request and finds the best matching books for you.
Popular searches:
Join 2.9 million readers and get unlimited free ebooks