If you have a Positive Mental Attitude book, or how-to craft book, send that. I can read those on the days I can not get out of bed.
Don’t send religious stuff.One of these days I will find a cheap, used laptop and have money at the same time. Then I will be able to use it on the bad days.
Send to “gailkenton@yahoo.com” by Paypal Type it in, the link usually does not work.
Most plants need a moist atmosphere to attain healthy development. This presents a problem in most dwellings, as the heating and cooling is designed to create a dry atmosphere. Humans need a dry atmosphere to prevent mildew and other fungus. A good compromise for most plants is to spray the leaves once a day. DO NOT Spray African Violets or any fuzzy leafed plants.
You can have zone humidity by using a plastic or aluminum tray and filling with coarse pebbles to a depth of about two inches. Place the pots on top of this gravel. Any over watering will be caught by the tray and evaporate upward to the plants. If the plants are potted in a real clay pot (not the fake look-alikes) it will absorb some moisture from the rocks and pass it through to the soil.
As you read the following, keep in mind that over watering will rot roots:An amplesupply of water should be furnished the plant at the roots. Plants growing in the dry conditions of the home lose water through the leaves. They lose more water than the ones growing outdoors because of the low humidity. This must be replaced by the roots. The water in the soil serves two functions. The first is to supply water to the plant tissues. The second is to dissolve the nutrients from the soil so that the plant may take them into the root system and use them.
Lack of water causes the plant to wilt. The internal water pressure is what holds the new growth upright. After wilting, the plant begins to starve from lack of food. Too much water will cause the plant to suffocate. The plant must have oxygen to the roots. When a plant is continually over watered, the oxygen is driven from the soil and no air cavities are left to hold any oxygen. The oxygen contained in the water will be used up quickly. Decay of the roots and the death of the plant will follow.
The ideal condition for the majority of plants is the soil condition shortly after watering. The excess water has drained away and pulled air into the soil as it drained. The soil will be damp and have plenty of oxygen. If that is the case, why not water twice a day? Hydroponics culture does just that. However in soil culture, over watering and lack of oxygen will result as the soil will hold more and more of the water.
There is no one rule for watering plants. Water a plant when it needs it. Water well and let it dry before watering again seems to work most of the time, but not all. Frequent small waterings do not seem to work as well. More contradictions: Plants in small containers usually need watering more often. Flowers in clay pots will need watering more than flowers in plastic pots. The clay allows moisture to evaporate while plastic does not. More plants die from over watering when grown in plastic pots. Those plants in boxes will not need to be watered as often. The size of the plant in relation to the container will also determine how quickly the plant runs out of water. All of this brings us back to “Water when they need it.”
MORE WATERING ‘RULES’Note the texture of the plant stems and leaves. The harder the foliage, the less water needed. I killed a nice rubber plant from over watering. I watered it each time I watered some other plants. This does not work. Plants like African Violets must be watered more often, as they have softer leaves.
Slower growing plants need less water than fast growing plants. Plants such as the hydrangeas need the extra water in order to grow rapidly. Slower growing plants such asprimroses, will need less water. They can be damaged by over watering.
Leaf area is another factor in water usage. A broad, soft leafed plant will use more water.The native habitat of the plant is another indicator of water needed. The desert area plants, such as the cacti and succulents require less water. This is especially true during winter.
The humidity of the room will have a large effect on the frequency of watering. The lower the humidity, the faster the plant will dry out.
In the resting stage, plants need very little moisture. This is true of the palms and other tropical plants which grow very slowly during their winter resting stage. Plants with broad, leathery leaves need a moist atmosphere, but must have a well drained soil. Ferns require lots of water, they are mostly water, but must have a well drained soil. Some plants will thrive under too much water - if they get oxygen in the water. The elephant ear and umbrella plant are two that fit this description.
When the top of the soil is dry, water thoroughly. Water enough that the water goes through the soil and flows out the drainage holes in the bottom. The extra water will wet the soil and dry out the trapped air which has been depleted of oxygen. The weight of the water acts as a suction and brings fresh air into the soil around roots of the plants.
The shortcut of setting plants in water and letting the water be drawn to the surface through the pot is not advised.
Automatic watering pots are available at the plant stores. They are not as good as the ‘soak and dry’ method for most plants. They work quite well for starting seeds and for plants such as African violets. They also work better than forgetting the plant and letting it die. They consist of a wick which hangs in a container of water. Make sure the wick is of glass or some of the plastic wicks. Cotton will rot. The wick draws the water from the container into the soil.
Foliage plants have a tendency to grow too rapidly if given the optimum amount of water. To avoid this, keep the soil just wet enough for health leaves that are not wilted. In many cases, this means watering only once a week.
TEMPERATUREMost foliage plants grow well in the home as the temperature is about the same as that preferred in the natural setting. Tropical flowering plants also do well in warm rooms. This may be the reason that African Violets are so popular. Since temperatures in the home are at 70 degrees or above, many of the cool plants do not do well. Plants such as hydrangeas, cinerarias, cyclamens, and primroses will not do well. They prefer temperatures of 65-70 in the day and 55-60 at night. During the winter, you can make the plants last longer by moving them to a cooler room at night. The flowers on most plants will last longer if you place them in a cooler location at night.
On cold nights, do not leave plants near windows.. If you must do so, put a curtain or layers of paper between the plants and the window. Heat will radiate from the leaves to the cold glass. African Violets are very sensitive to this effect.
Plants will not do well if you place them near radiators, heaters or hot air vents. The extra heat causes drying of the leaves.
Fumes from coal burning or manufactured gas will injure plants. Fumes from natural gas does not harm most plants.
SOILIf everything else is ideal and the soil is poor, plants will not grow. If the ph is close to what a plant needs, the plants can adapt to many different soils. The soils must contain the raw materials and water for the plants to manufacture the food they need. They field of hydroponics does not use soil at all. The food is supplied with the water.
For house plants, a good mixture is one-half garden loam, one-fourth sharp sand, and one fourth peat. The loam contains some humus and clay. The sand is to provide drainage and keep the soil from packing or caking and cracking. Peat supplies some food value and water holding. The easiest way to get good soil is to go to a reputable garden center. Buy soil that is labeled sterile (most will be).
Add one-half teaspoon of a complete plant food to a six inch pot when potting a plant. A complete plant food is one which contains the three main growing elements. They are nitrogen, phosphorous, and potassium in a 1:1:1 ratio. Many companies add trace elements. One vitamin tablet to a gallon of water will supply all the trace elements needed.
Every brand of plant food will say they are the best. Forget brands and purchase by the total units of fertilizer. If the bag says 10:10:10 and cost $1.20, this is .40 per unit. Divide total units (30) into price (1.20). Buy the plant food with the lowest unit cost. To paraphrase: phosphorous is phosphorous is phosphorous.
If you buy plants from a reputable dealer, the soil mixture they are in will supply food for awhile. When it is depleted, buy plant food and apply according to directions. Never apply fertilizer to a dry plant. Always make sure the soil is moist before feeding.
POTTINGPotting will be needed for one of three reasons. Potting newly rooted cuttings or seedlings. Potting plants brought in from outdoors. This can get to be a big operation in the fall.
Transferring plants from one pot to another. This is done if you are doing root divisions or if you have plants that are ‘root bound’.
When potting seedlings, rooted cuttings, or slips (such as yams), use a rich soil to which fertilizer has not been added. Strong fertilizer will injure the fresh, tender roots. This is what a grower means when he says the fertilizer ‘burned’ the roots.
Start with a two and one-half inch pot. Prepare the pot by placing a broken pot over the bottom hole. Place this with the curved side up to form a dome. This is for drainage. I can never find a broken pot when I need it. I use coarse stone. I put the larger pieces (preferably broken) stacked around and over the hole. Make sure one does not seal the hole. Then I use smaller pieces to make a smooth layer. Broken clay bricks work well also. Place a little sand over this. Then place a layer of the potting soil. Put the seedling in the center and gently put soil around the plant and the roots. Fill to within one-half inch of the top. Firm gently. Soak completely. Add soil if needed. Place in a shady spot until the roots become established. This usually takes one week. Then give them sunlight. Mist the leaves the first few days.
Put plants gathered from the garden in a pot large enough for the root ball and soil lifted with the plant. The rest is the same as for seedlings.
When repotting from one to another, it is common practice to go one size larger. If you go too much larger, the plant will not do as well. Over potting usually results in leaf yellowing and the plants do not develop. This is because the pot holds too much water that is not used by the plant. The excess water drives out the air.

Let the
the hand
stem of
a n d
handed
do what
upside
hand as
on a
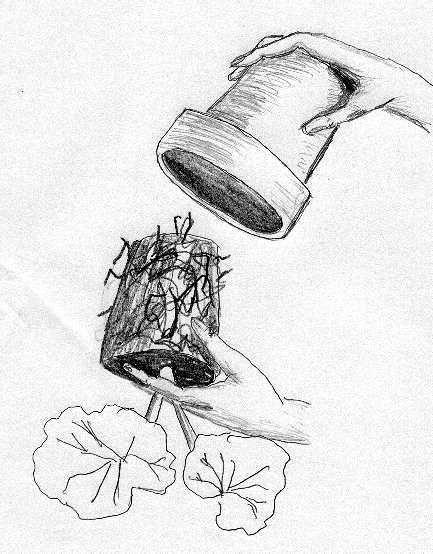
p l an t
hand holding the plant. plant dry out some. Place over the soil with the main the plant between the index middle finger. I am rightso I use the left hand. You is comfortable. Turn the pot down and use the other a guide. Tap the pot sharply bench or fence post. The should slide out into the
Re-pot when the plant becomes ‘root bound’. When the roots are coming out the drain hole or when they are an entwined mass after taking out of the pot, they are ‘root bound’.
Prepare the pot as described earlier. If you have some, put crushed charcoal in the bottom. This keeps the soil ‘sweet’. Break off the top edge to round the dirt ball. Scrape off the very top layer of dirt on the old plant. Gently immerse the root ball in water for about a minute. This will make sure that the roots are truly wet when transplanted. Finish re-potting as described for seedlings. Glazed or painted clay pots, ceramic pots or plastic pots are attractive, but special care must be given when watering. Since there is almost no evaporation, the drainage must be excellent. Stir the soil surface for better aeration.
Old pots should be soaked in a bleach water to kill fungus and other plant diseases. Rinse thoroughly before using. Treat like a painted pot as older pots lose their porosity.
Metal containers are pretty, but never pot directly in a metal container. If you must have a plant in that beautiful brass container from Aunt Mildred (The one with all the money and no heirs), pot the plant in a clay pot. Insert the clay pot in the brass container. Support the pot from the bottom with two or three inches of charcoal. Be very careful when watering.
DOUBLE POTTING - Plants in a clay pot are put into a larger water tight container. The clay pot is supported by two inches of peat moss and surrounded by a layer of peat moss. Water is applied only to the peat moss. If the peat moss is kept wet but not soaked, the clay pot and the soil there-in will absorb the water from the peat moss. This idea is the forerunner of the wick system mentioned earlier.
PRUNING AND PINCHINGWhen a plant, or even one branch of a plant, starts to become long and spindly, the cure is pruning or pinching back. To many people. ‘Pruning’ means cutting a woody outdoor plant with knives, shears, etc. while ‘pinching back’ refers to pinching off new growth with the fingers. The result is the same. The reason for either is to have a bushy, stocky, healthy plant. When transplanting plants in the fall, it is a good idea to cut back the top growth to a few joints from the bottom.
If a plant does not get enough light, it tells you by becoming spindly and growing toward the light it is getting. Plants such as this need to be pinched back. If practical, change the lighting conditions.
Most vines will benefit from ‘pinching back ’ when young. This will result in more growth from the base and healthier plants. Grape ivy, Pothos, wandering jew and others will make better plants if kept trimmed.
SUMMER CAREMany gardeners put the house plants back into the garden during the summer. They will get added strength if this is done.
Since outdoor gardening is not the subject of this book, we will not cover this issue. Just remember that the sun gets hotter as summer progresses and plant put in sunlit windows can be severely damaged. You may want to move them or shade them.
PROPAGATIONPlants may be propagated by seeds, leaf cuttings, stem cuttings(slips), root divisions, portions of leaves, eyes (potatoes), air layering, and runners.
Seed planting is the method for the majority of plants grown. This is not always true of house plants. The seeds should not be too old. Light is usually detrimental to germination. One Christmas, a five year old was explaining this. She had seen a TV program. She had memorized all of the program. I wish more kids watched this kid of program and less of the other kinds. The seed should be planted to the depth called for on the seed package. If no package is handy, try twice the thickness of the seed. Very fine seed such as begonia or cockscomb should not be covered. Water them in with a fine spray. The soil should be damp - not wet.
The best results I had was using the thin, disposable, ‘rose boxes’ from a florist supply. One hundred was very inexpensive at the time. After the seeds were planted and watered, the box was closed and the moisture was trapped in. I did not need to water again. The trays were covered with black garbage bags to block light. By lifting the bags, I could easily see the progress of the seeds. It worked great. I used industrial mixing sand with a small amount of fertilizer in the water. When they sprouted, the plastic box became a miniature greenhouse.
After sowing, mist the soil with a fine spray. If you can not get the rose boxes, cover with glass, plastic or even paper. You want to keep the moisture on the seeds and avoid watering again. Remove the covering after the seeds sprout.
Most instructions say to transplant to other soil as soon as the first two true leaves appear. I prefer to wait until four or six appear. With the plastic box method, this works well. When you do transplant, space one to two inches apart. Use a soil with 60% sand and 40% potting soil. You will need to move them again and a heavier soil will damage the roots. You will have very good results if you use a plastic knife from a fast food place to lift the plants. Simply insert the knife under the small plant and lift. Place in new soil and gently slide off the knife by using a second knife. Pull the new soil around the plant and mist until very moist. Place in a shady place for about three days. After they grow several more leaves, transplant into individual pots.
This section would not be complete if I did not mention Jiffy Pots. This is a neat commercial product which is great for a few seeds. The Jiffy Pot Number Seven comes 25 to the pack. Decide how many seeds you are planting. Figure about three to the pot. They may not all sprout. Soak the number of pots you will need. They expand forever. They form a cavity in the top. Put seeds in cavity with some sand (some people use soil). Place the pots in a plastic or aluminum tray. I use styrofoam plates or the styro trays in which food is sold. Keep pots damp by putting water in tray - not on pots. After the seeds sprout, wait until roots come through the Jiffy Pot. Transplant.
CUTTINGS
In colonial times, a visit among neighbors often meant a gift of a begonia or patience plant cutting. They had their tea and the recipient would lovingly tend the stem or leaf until it flowered. Stem cuttings are usually rooted in sharp and that is kept moist. Many will root and become complete plants if inserted in a container of water. Geraniums, wax begonias, coleus, ivy and yams (sweet potatoes) are a few of the plants that will. A great project for school children is the sweet potato. Buy a small yam at the store. Put the pointed end down in a narrow container. Fille with water until only about three-fourths of the yam is not covered. Set in a warm, well shaded place. It will sprout in about a week. The plants grow rapidly. When they are about nine inches long they are what we called ‘slips’. If you continue watering, the vines can reach over six foot long. This is covered again in this book with a picture.
An aside here - George Washington Carver is remembered for the many uses he discovered for the peanut. Not many people realize that he also found over 260 uses for the yam. He was a very smart man.
STEM CUTTINGS: Many plants from begonia to Azalea will root and grow from stem cuttings. Begonias and softer plants will root if you simply cut the end of a stem and place the cut in in wet sand. Keep out of direct sunlight. Wait about a week and check to see if roots have formed. Gently tug on the plant. If it resist, roots have formed. Wait another week and transplant. If it pulls out, stick it back in the soil and wait until the roots do form.
Sections of plants such as dumbcane, ti, and dracaena will root if laid in damp sand. Cut sections several inches long. Make sure the have bumps or undeveloped leaf buds. Cover about 90% of the stem with damp sand. New plants and roots will form in several weeks. Each new plant can be severed from the stem and planted separately.
Plants such as Azalea work best if a fork is cut. Leave a few leaves on the smaller limb. Dip the fresh cut bottom end in a rooting medium. The fork is then placed in potting soil mixed with sand. Put deep enough so that the joint of the two limbs is covered. Keep the medium damp until new leaves appear.
LEAF CUTTINGS - African Violets can be rooted from the leaves. Each leaf must have at least one-half inch of leaf stem attached. Insert the leaf stem in damp sand. Roots will form in about four weeks. Small plantlets will start to form at the base of the leaf. This sometimes takes as long as two months. Cut each new plant from the ‘starting leaf’ and plant separately.
Another method is to cover a glass filled with water with plastic wrap or wax paper. Hold the wrap or paper on with a rubber band. Punch a hole for each leaf. Insert the leaf stem through the hole into the water. Keep in bright light. After the roots and plantlets form, plant and cut off the ‘starter leaf’.
Try Snake-plant. Lay out a large leaf. Cut at two inch intervals. Mark the former top end of each piece. Insert the bottom end in damp sand. Each piece will form a new plant.
A rex Begonia leaf will root if placed flat on damp sand and soil mixture. Use 60% sand 40% potting soil. Have the sand damp and keep out of direct sun. Use hairpins over some small veins to hold it down. Make a few cuts at the main vein. This is where it will root and new plants form.
Each leaf rosette of echeveria will root if twisted from the main stem and placed in the rooting medium.The ice plant propagates very easily. Simply trim off the excess and chop into very small pieces. Scatter over the soil and cover with more soil. Keep damp and each piece will root.
In order to avoid watering often, cover the rooting medium with a plastic cover or use plastic trays and covers or pick up an old aquarium at a garage sale. Cover the aquarium with a piece of window glass. Dampen soil. Do not soak.
RUNNERS-
Flame violet, spider plant, strawberry geranium and others put out runners. Small plantlets form at the tip of these runners. These are easy to root. Pin them to the soil until they develop roots. Cut the runner and pot the new plant.
ROOT DIVISIONS This applies to plants that are usually called “bulb” plants.
TRUE BULBS - A true bulb is like a daffodil or onion. It has a short underground stem surrounded by fleshy leaves. This is the bulb. The fleshy leaves store the food and protect the unseen plant.
BULBLETS - These are sometimes called offshoots. They are formed by the lateral bud on the basal plate. Formed from true bulbs only.
BULBILS - These are small bulbs produced in axils of leaves (like lilies), flower clusters or on stems.CORMS AND CORMELS - Plants such as the Gladiolus are planted with corms and form new corms and many cormels at root level. These cormels should be gathered in the fall. Place in refrigerator for at least 30 days before replanting. It will usually be two years before they will bloom.
RHIZOMES - These are creeping underground stems as in the Iris and Calla. Because of food storage, they are sometimes very thick. Foliage leaves and the flower stalks arise from buds on the top side. Roots project below. Cut sections so that each section has a growth bud. Pot for a new plant.
TUBEROUS RHIZOME - This is a slender underground stem. It is basically a rhizome that is thickened at the end into a tuber like section for storing food. The term rootstock is often used for a tuberous rhizome. Cut the same as for rhizome for propagating.
TUBER - The short enlarged stem is for food storage. It may be flattened (tuberous begonia), rounded (potato) or irregular (ranunculus). Tubers do not creep like a rhizome. Tubers have growth buds called eyes. Divide into sections having at least one “eye”. Let pieces dry until a ‘scab’ forms then pot.
TUBEROUS ROOTS - Yams are an example. These are real roots (not stems) with thickened food storage structures. They have no growth buds in the ‘tuber’. Growth buds are at one end as part of the old stem base. Can be divided as long as each piece has a growth bud. Other examples are Dahlias and the Gloriosa Lily.
AIR LAYERING - This is a great way to multiply woody plants. Cut a downward slice through the bark and into the stem. Hold the cut open with a toothpick. Wrap with well dampened sphagnum moss. Wrap with a clear plastic. Tie the plastic tightly above and below the moss. When healthy roots have protruded through the moss, cut off stem below the moss. Remove plastic and most of the moss. Replant.
PESTS“Damping-off”fungus attacks seedlings, but if proper care is taken, it will not be a problem in the home. The biggest factor is to have sterilized starting medium. Next - Do not over water.
Due to the dry conditions in the average house, stem rot and leaf spots do not secure a foothold. Should any of the foregoing be a problem, talk to your local plant supplier. He will have the very latest fungicide to cure the problem.
Insects cause more trouble with house plants. Insects fall into chewing and sucking insects.
CHEWING INSECTS bite out parts of plants. When this occurs, sprays or dusts are available to easily eradicate them.
SUCKING INSECTS are a large and varied group. You have aphids, mites, red spiders, white fly, mealy bugs and scales as a sample. No one treatment will control all of them. Malathion will control most of them. See the local nursery and ask if something better is available and hopefully it is also environmentally friendly.
The aphid is a small green or brown insect. Powered tobacco dust is sometimes used for control. Whatever you use, it must get on the aphid. Several application will ne necessary.
Mite damage causes the curling of leaves and curling of buds.Red Spider feed on the underside of leaves. This produces a speckled appearance on the leaves. Both insects will eventually kill the plant. Whatever spray you buy, verify that it is safe for the home. One pest control ‘expert’ in this area sprayed cotton poison in a children’s nursery. The children are still being monitored and the building was ordered torn down.
WHITE FLY is a serious pest. It flies on approach so it is difficult to spray. It attacks many plants but especially salvia, cineraria. Ageratum, fuchsia, and some geraniums.
MEALY BUGS are soft, slow moving insects. They are found on ferns, crotons, coleus and many other plants. The bugs cluster around the joints of stems and leaves. They have fuzzy covered bodies and most sprays do not work. They can be removed with a soft paint brush dipped in a nicotine solution. Your nursery may have some new sprays.
SCALE insects look like very small brown spots. They attack fern, palms and crotons. Do not confuse SCALE with the brown spore cases on ferns. You can try scraping them off. Then go buy the best spray available.
EARTHWORMS will not be a problem if you use sterile soil from the start. Their burrowing creates air pockets which dry the roots. Kill them, root lice and maggots with Chlordane dust.
Begonias are attractive plants. Some have beautiful foliage and almost no flowers. Others have beauty in both. Peat or humus soil seems to work best. The temperature can be cool with no direct sunlight required for most varieties. The heavier foliage varieties do better with reduced light.
The normal propagation method is by stem or leaf cuttings. Wax Begonias use seed. Few insects or diseases bother these hardy plants.
AFRICAN VIOLET is a native of tropical Africa. It thrives best at a temperature of 65 to 70 degrees. About the same as most American homes. It requires little light so it does well in most apartments. If not over watered, it will bloom for a long time.
Proper watering is the key to success. The original home for the plants was under giant trees in a tropical damp area. Keep this in mind. Keep the soil moist - not soaked. Do not wet the leaves. Cool water will spot the leaves. Never wet the crown.
Direct sunlight will injure the plant. An East or North window is best. West and South windows may be used with proper shading.
Skip the saucer watering system. Skip glazed pots unless you are very careful not to over water. With African Violets, it is how much water as well as how you water that makes the difference.
A good soil is mandatory for success. A good mixture is equal parts of organic matter (peat or leaf mold) and soil. Add sand if the soil has much clay. Two parts sand to eight parts clay soil. Mix one teaspoon of a 10-10-10 fertilizer to one-half gallon of potting mix. Do not repot a mature plant more than once a year.
African Violets propagate by leaf cuttings. See the section on cuttings. TIP: Large leaves with long stems can be used more than once to start plants. When the first plants take hold, cut the stem and start again.
Some problems:Flower buds forming, but flowers dropping off - Probably carbon monoxide from a faulty heater or stove. Check especially if anyone has had headaches.
Plant leaves wilting and dying - due to over watering.White cottony masses on the leaves - Mealy bug infestation. Remove with alcohol on a cotton swab or a s

Reads:
25
Pages:
24
Published:
Jan 2024
Step into a world of tranquility with 'The Journey to Calm: Mastering Adult Coloring for Relaxation.' This Book is your guide to unwinding and expressing crea...
Formats: PDF, Epub, Kindle, TXT

Reads:
79
Published:
Oct 2022
How to easily develop a beautiful singers voice with effortless vocal agilityBy following this streamlined professional singing system, you’ll condition your ...
Formats: PDF, Epub, Kindle, TXT
Reads:
290
Pages:
123
Published:
Nov 2021
This book takes the reader through the concept of container gardening. The author believes that even with limited space (this is true more especially for city...
Formats: PDF, Epub, Kindle, TXT

Reads:
170
Pages:
23
Published:
Sep 2021
Get All The Support And Guidance You Need To Be A Success At Fixing Things!Is the fact that you would like to know how to fix things but just don't know how m...
Formats: PDF, Epub, Kindle, TXT